DIY Loudspeakers: HOME INDEX UPDATES RESPONSE WHAT'S NEW
AudioTechnology 3-Way
Classic
Copyright 2015-22 © Troels Gravesen
Go to on this page:
DRIVERS CROSSOVER CABINET MEASUREMENTS SPEAKER-KIT CROSSOVER-LAYOUT SOUND Be-dome version
2021: R3004/602010 version discontinued due to no requests. All kits sold are with the Be dome version, D3004/604010.


Click images to view large
The bass driver is the foundation of any speaker system and defines the
overall sensitivity we can achieve. We have to take room-gain into account
when voicing the speaker, but I still have to design a speaker
specifically made for book-shelf or corner placement. When placing a
speaker on a book-shelf we may well have an increase in the bass
response by 3-5 dB below ~150 Hz, thus, from this point we would have to
shelve the tuning up some 2-3 dB from what is lower-midrange (starting
around 160 Hz). If we did so, we would still not overcome the loss of
3-dimensionality in the soundstage due to early reflections from the
wall behind the speaker. Corner placement is even worse as we easily get
6-9 dB increase in the bass response, something that cannot be overcome
in the crossover design. In that case we would have to use an extremely
low-Qt driver with an intrinsically shelving response.
The speaker presented here is not designed for such application, rather
meant to be placed on ~60 cm stands some 70-90 cm from the rear wall,
providing optimal soundstage with regard to spatial information and an
overall balanced sound of basic notes and overtones, but I have to admit
that due to the character of the midrange, the speakers can be placed
surprisingly close to the front wall.
Last year I very much enjoyed doing two classic 3-ways, the
Discovery 3WC and
SEAS
3WC mkII and they have been well received as was the
SEAS 3WC mkI
version.
The thing is that we can get an awful lot of good sound from a modest
investment, cabinet work is as easy as can be, and crossovers are fairly
simple too. All this mainly because making a good 3-4" driver really isn't
that difficult, and fairly cheap too. The classic "6+1" is a
compromise; adding a 2-4" driver handling upper mid and lower treble
simply is better, but yes, adds cost and complexity to the overall
construction.
The ambition here is to present a statement in modest
sized 3-way classics, no less. I've had the opportunity to work with
both 4 and 10 Ohms version of the 23I52 bass driver from
AudioTechnology, and I've been
impressed every time; in particular when the voice coil is made from
aluminum reinforced kapton, improving transient response (high Qm).
Forget about old time sloppy polyprop bass drivers. They were dull and
lifeless due to the aluminum voice coil formers and sometimes also
high-loss rubber surrounds, not due to cone material.
This speaker is not cheap, and it wasn't meant to be! The AT drivers
alone are 1385 EUR incl. VAT and the tweeters are 238 EUR incl. VAT, a
total of 1623 EUR incl. VAT. Non-EU builders you get away with
1298 EUR not paying VAT. On top of this comes crossover kit and cabinet
material. For the money you get a seriously powerful speaker in a modest
packing and you get a quite a sensitive speaker too, that can be driven
from smaller amps, even tube amps.
Basics:
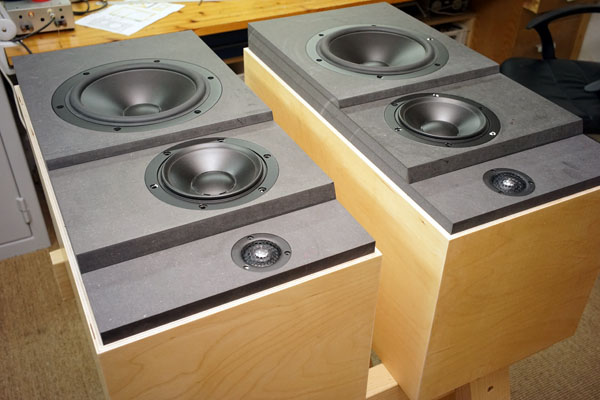
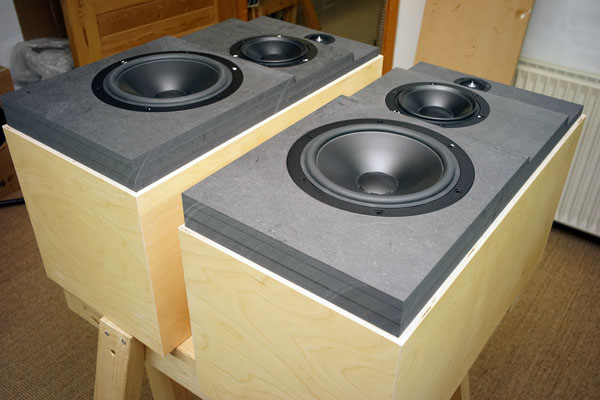
3-way speaker from 8" bass driver, 5" midrange driver and 1"
ring-radiator
tweeter, all drivers time-aligned.
Bass reflex for bass and aperiodic tuning for midrange driver.
Points of crossover; 400 and 2600 Hz, 2nd order LR.
Impedance: 4-8 Ohms, minimum 3 Ohms above 5 kHz.
Sensitivity: 90 dB/2.8 volts, 1 meter.
Amplifier requirement: Minimum 20 watts.
Power handling: A lot! Read
here.
Useful links (Please read before writing!):
http://www.troelsgravesen.dk/tips.htm
http://www.troelsgravesen.dk/crossovers.htm
http://www.troelsgravesen.dk/LCR-RC.htm
FAQ (Please read before writing!):
You cannot change cabinet front panel dimensions and drivers' placement
without needing a new crossover - and I cannot help.
You cannot use any other drivers with the crossover shown here.
Please read these files before e-maling:
http://www.troelsgravesen.dk/crossovers.htm
http://www.troelsgravesen.dk/choices.htm

Click images to view large
Download specs/data: D3004/604010
Using ScanSpeak D3004/604010 requires no changes to the crossover, only a little tweeter attenuation. R1011 can be either 1R0 or 1R8 for the 602010 tweeter depending on your preferred tweeter level, where the D3004/604010 requires 2R7 - to my ears. 1R8 makes a rather flat tuning but does emphasise treble on certain recordings. If you want to use the Be dome, ask Jantzen Audio to substitute the 602010 ring-radiators with the D3004/604010 Be domes - and ask for 2 x 2.7 Ohm resistors as well.
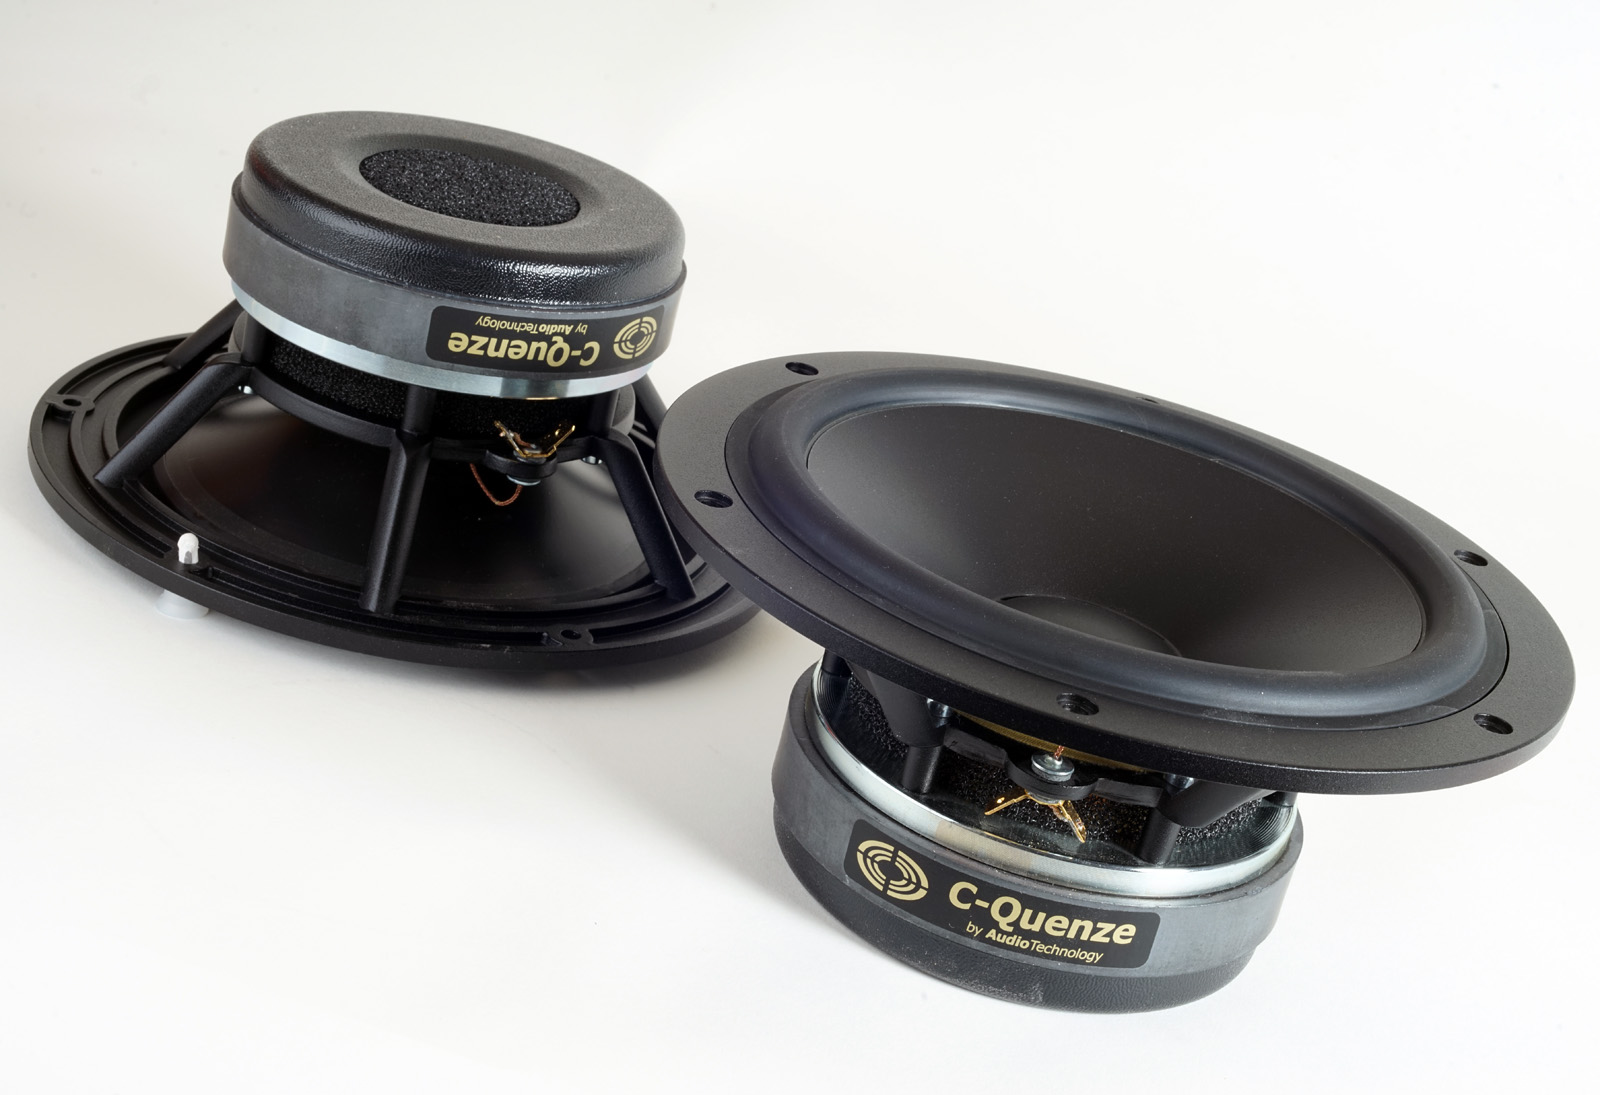
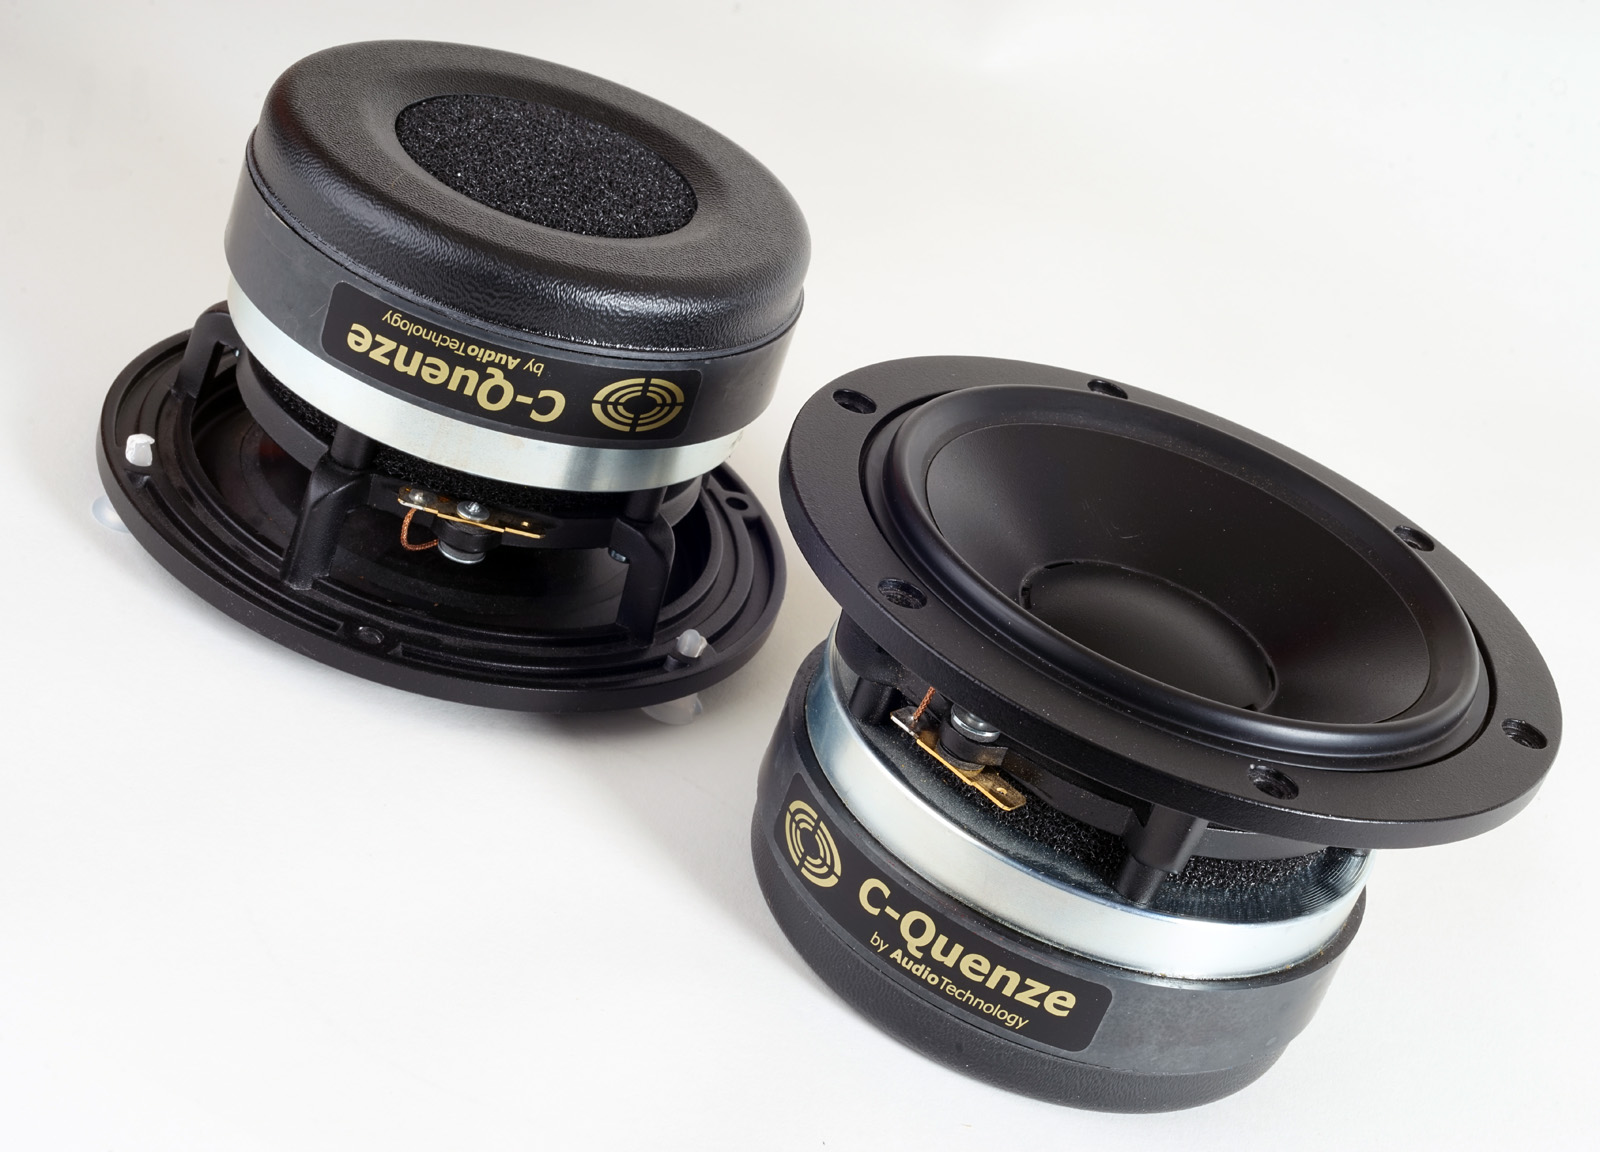
23I52-2006-SDKA 15H52-0613-SDKAM TS data:
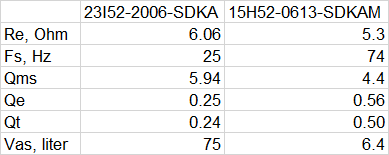
There are few things from the
AudioTechnology drivers I could want better except for a perfectly flat
frequency response, but no such driver exist to my experience, and what
comes from the bass and mid here is easy to correct and leaves an almost
as simple as possible crossover.
Highly ventilated magnet system, symmetric drive, kapton voice coil
former reinforced with alu from the windings up to the spider, optimised
cone geometry, low-loss suspensions, high mechanical Q, middriver with
underhung voice coil and special rubber surround optimised for midrange
drivers - and we could go on.
Now, cone material is a never ending story because the perfect cone
material doesn't exist. Mineral filled polypropylene has been around for
decades and I don't think the basic foil has been changed at all since
we heard the first Dynaudio drivers back in the Seventies.
The thing about mineral filled PP is - besides its low cost - the
ear-friendly break-up nodes. With all the things that have been added
since then, the mineral filled PP can deliver an astonishing level of
transparency and not least a dynamic headroom that beats most.
This is not trivial, because we may experience cone materials that
deliver a tad more transparency, but may display problems when pressed
really hard - and in many cases require steep crossovers. The 18H52 used in my ATS-4 is to my ears the best 6" driver
I've ever had with regard to dynamic headroom. You have to misuse it
before it starts sounding bad.
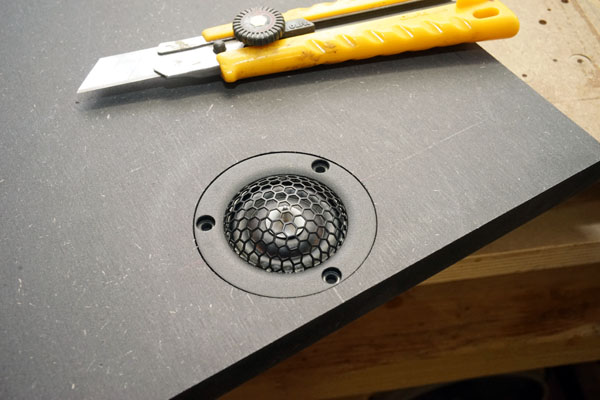
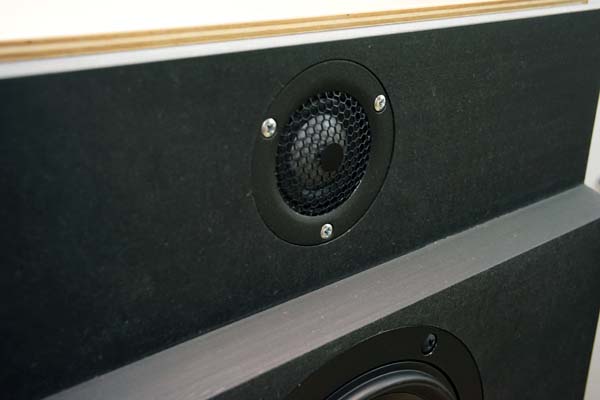
I've become really fond of the small Illuminator tweeters from ScanSpeak.
They feature the same domes as their more expensive siblings with the
traditional face-plate. I like the protective grille and I like being
able to getting it closer to the midrange driver reducing
crossover lobing.
And I like them being some 100 € cheaper!
What strikes the most is the amount of detail from the 15H52 midrange. It's .... whauuu! The power handling, the dynamic headroom, its dispersion, its presence quality, etc. In one way it's a demanding midrange, in another it's not. No matter what you do to it, it sounds great. The problem is in the voicing of the speaker. It's one of those speakers where you can go on and on adjusting midrange and treble level, because it always sounds great, but the trick is to get it sounding natural, to give the drivers the best possible balance, providing the correct timbre. It took a lot of records of all sorts of music to find the best balance - and the best compromise, because it's always a compromise. And it took a long time before I ordered the final crossover components from Jantzen Audio.
I had to get used to the speaker not delivering the bass of the ATS-4 and Illuminator-5 - because it can't. In that way it's no different from Discovery 3WC and SEAS 3WC mkII although its dynamic headroom is significantly bigger than any of said speakers. One 8" driver will not deliver the same bass as 10 inch + 8 inch. The bass is tight and firm and I was torn between a quite low port tuning of 30 Hz and 38 Hz, the former delivering a very tight bass. Eventually I ended up with 38 Hz delivering a bit more warmth to the low end. From its 30 litre volume we have a -3 dB @ 40 Hz. If you want the sound of a truly full-bodied system, add a subwoofer to get the lower octave.
Yes, you can place this speaker up against the wall (I never thought I'd write this...), even fairly close to corners, but do not have the same distance to front wall and side wall. I've been playing the speakers with some 15 cm from the back side to the front wall and some 75 cm from the side walls. The speakers will, like all speakers, suffer lack of midrange depth from such placement, but the 15H52 midrange has an unusual presence and level of detail that will still project the soundstage into the room.
It's my desert island 3-way classic! (There will be quite a few speakers following me to that island, but this is for sure one of them).
What you get here from a serious investment compared to the three other classic 3-ways is a certain smoothness of sound, ease if listening, a refinement in overall presentation and not least, an unprecedented dynamic headroom. The large voice coils, the thorough symmetric drive, the proper ventilated magnet systems, etc., all make this speaker deliver more from its size than any other similar equipped system.
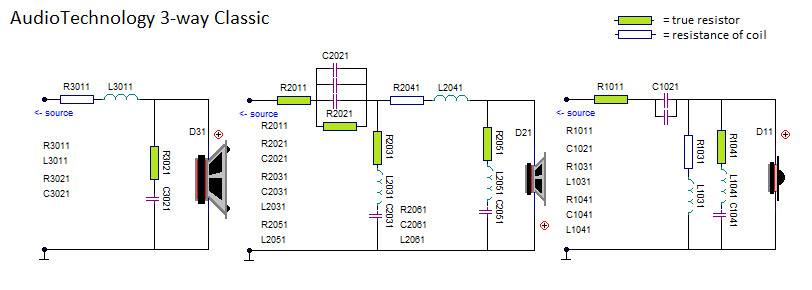
Values come with the Kit Instruction
The crossover is a straight forward LR2 filter with inverted midrange
polarity. RCL-2051 shapes the middriver upper roll-off and takes
care of a minor peak at 5 kHz. The LCR 2031 shapes the middriver's lower
roll-off together with the driver's intrinsic roll-off by smoothing the
impedance peak at around 110 Hz.
Tweeter RCL-1041 helps shaping the
roll-off towards lower frequences. It doesn't get much simpler. C1021 is
made from two identical capacitors to make target value.

Click image to view large
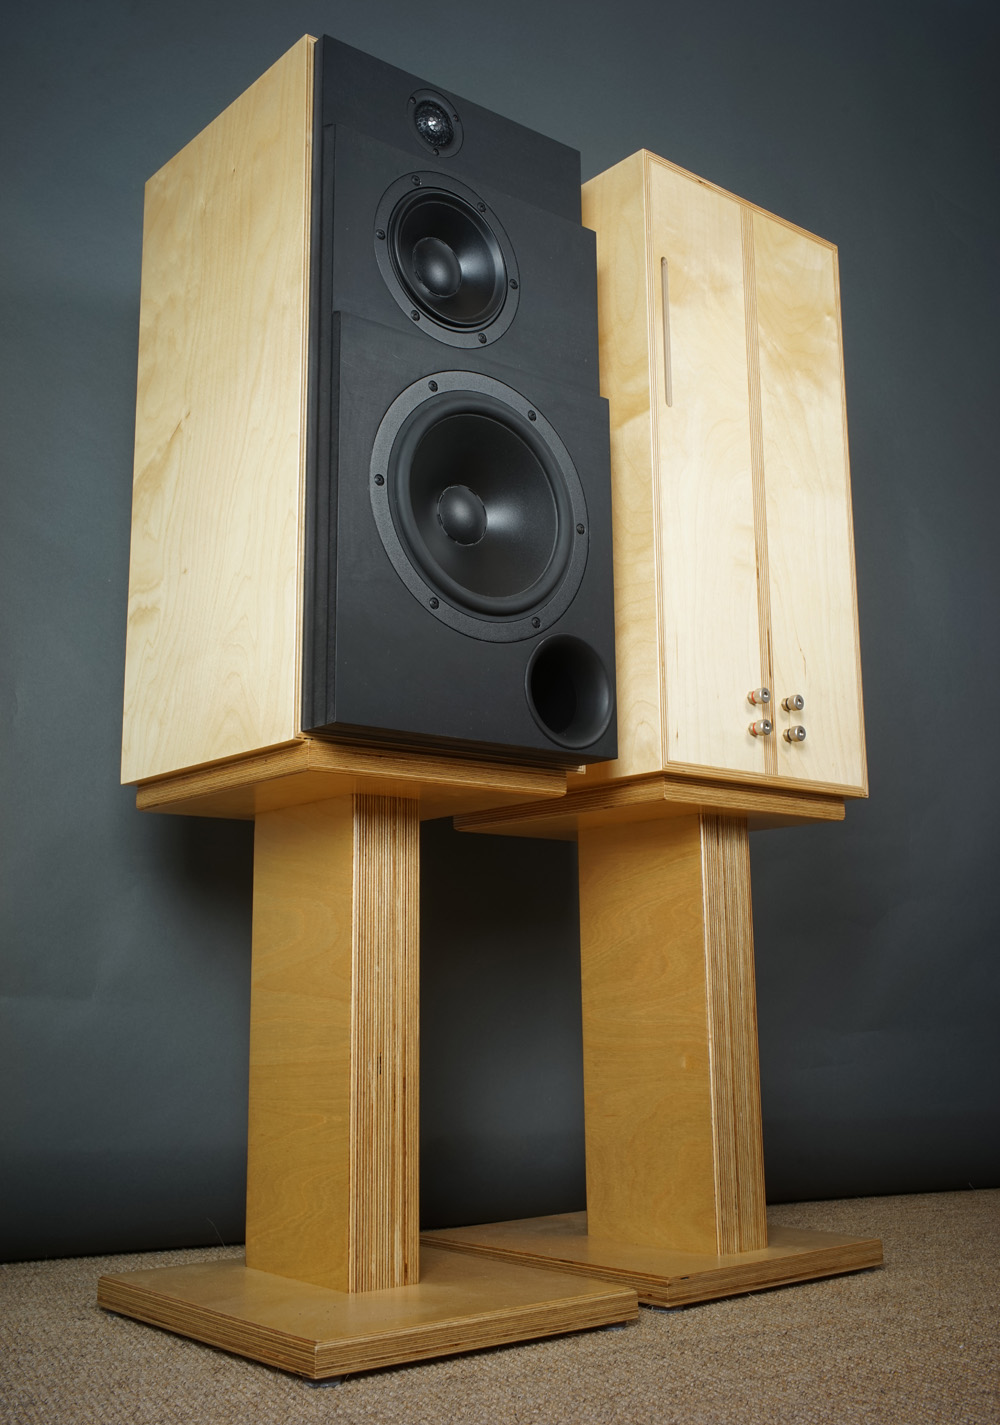
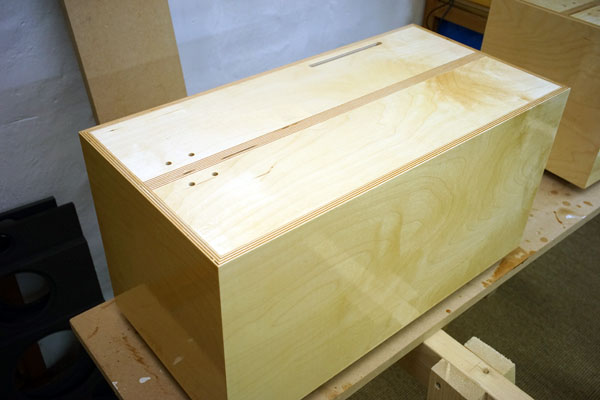
The cabs are 30 x 30 x 60 cm, some 2 cubic feet for you over there. From
20 mm Baltic birch this makes a net volume of 40.8 litre. From this we
deduct bracing, fillets, port, driver, crossover and mid cab and end up
with some 30 litre, and this is what we want for the 23I52 driver. Cut
the port length to 15 cm to get a Fb tuning of around 35 Hz.
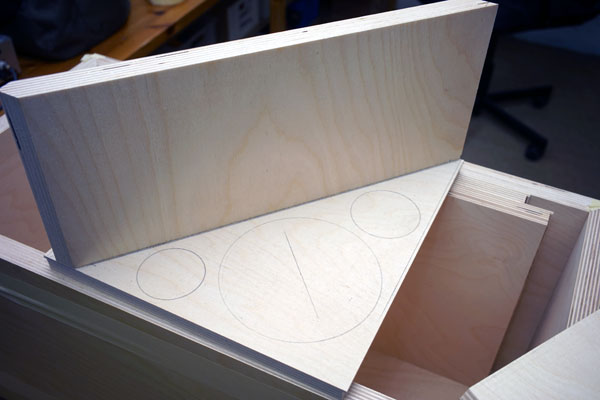
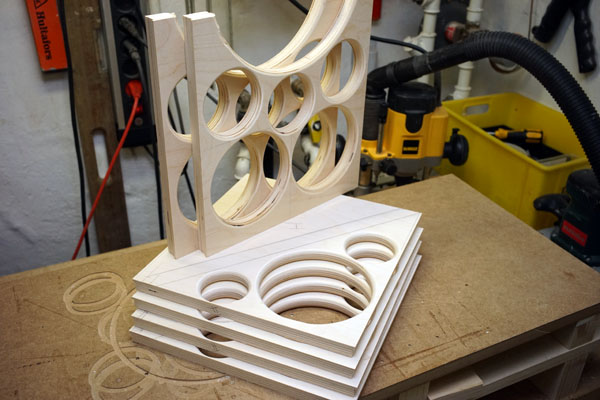
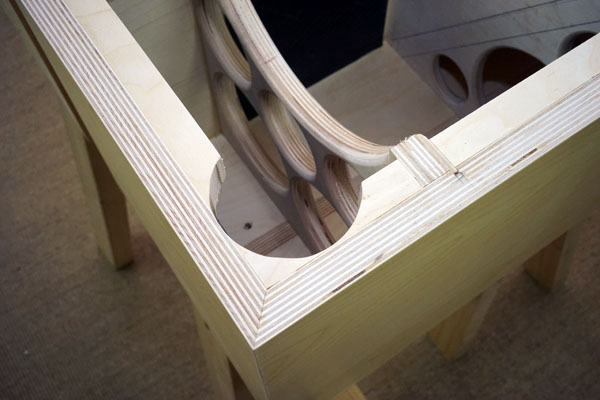
The fillets holding the front panel is 20 x 20 mm cuts from BB. Bracings
are made from 15 mm BB and the lower one has 4 holes of ~115 mm diameter,
the upper two braces being part of the mid-cab have 3 holes of 128, 60
and 50 mm.
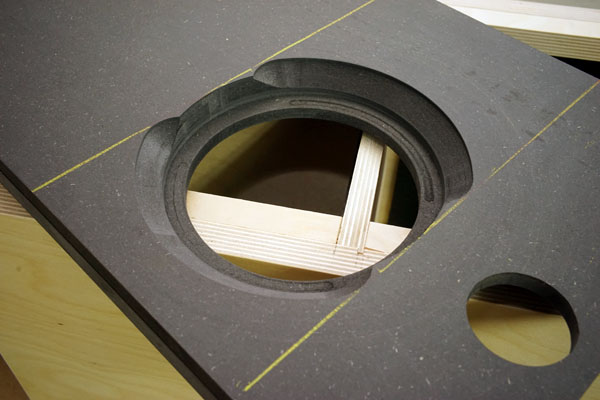
The mid brutto volume is ~6.9 litre, net volume 4.9 liter. The mid-cab
has a damped slot to the rear to make an aperiodic tuning. This is
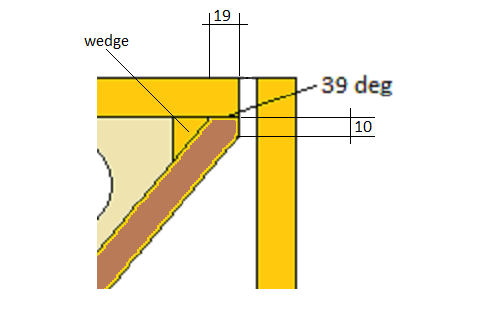
optional and you can leave it closed if you want to. The slot is 10 mm
wide and 158 mm in height, the internal height of the mid-cab. See
damping instruction below.
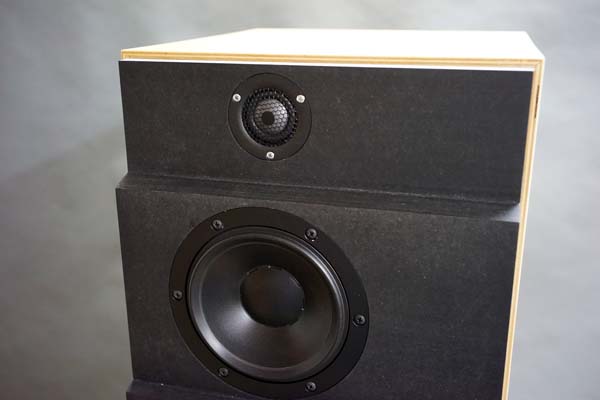
The stepped baffle between mid and tweeter is mandatory, the stepped
baffle between bass and mid is optional. The bass and mid have an
acoustic depth almost identical, but as the speaker most likely will end
up on stands, the bass will be a little further away from point of
listening, hence the 12 mm extra baffle for the bass driver. Ideally the
bass driver should be on a slightly tilted baffle, some 3-4°, but
it's not an easy thing to do, so I left it out.
Place is rather limited on the front panel, so before routing for
drivers, cut all panels +2 mm and mark drivers and port and see if it
all fit in. In particular the space for the port is limited, so find its
position with equal distances to edges and bass driver before marking
the center for routing.
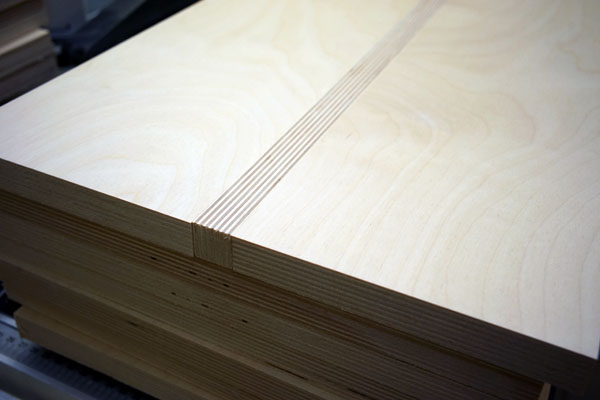
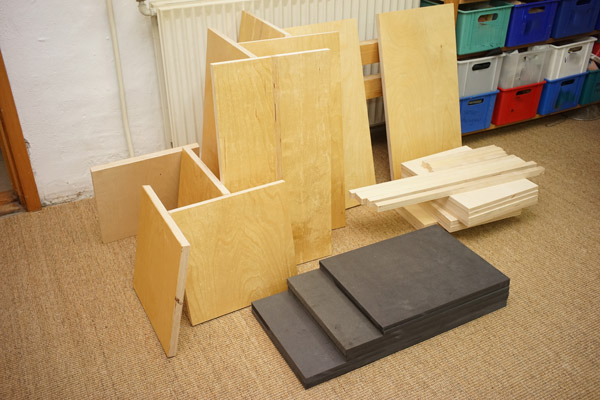
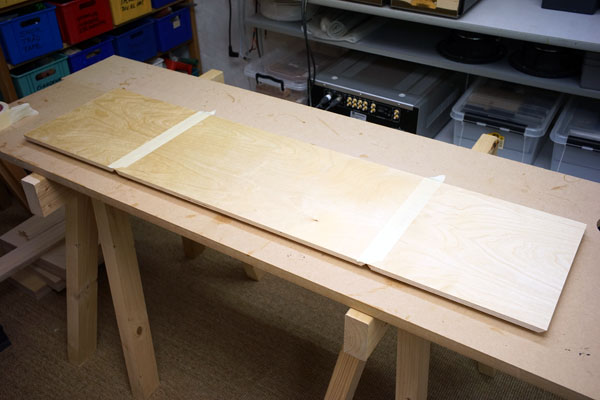
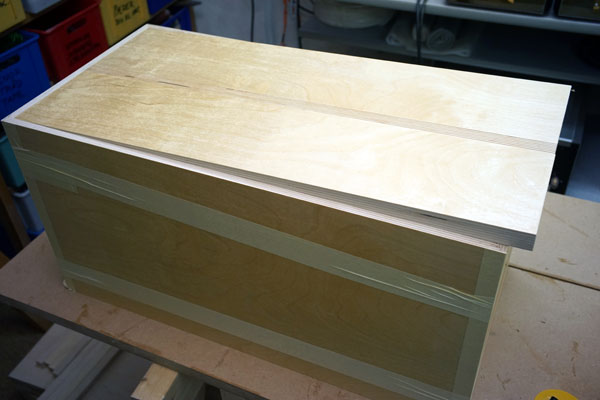
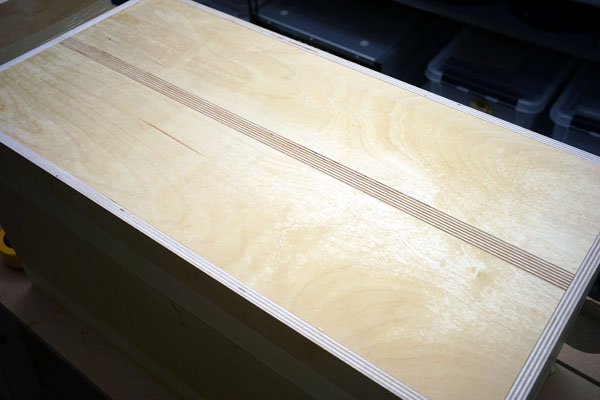
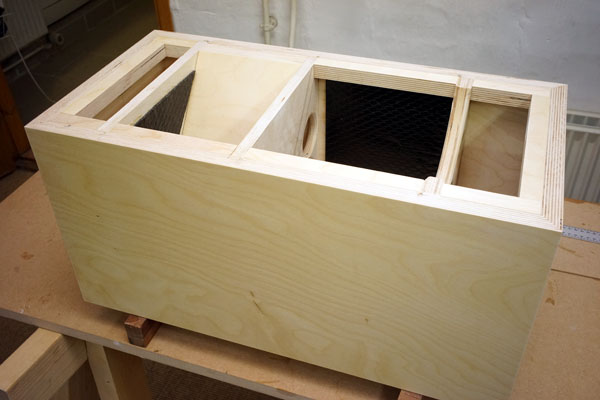
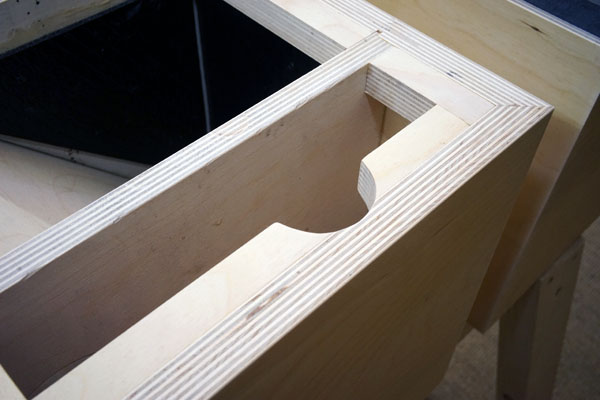
Left: All Baltic birch (BB) panels. Right: I hate seeing good BB going to waste
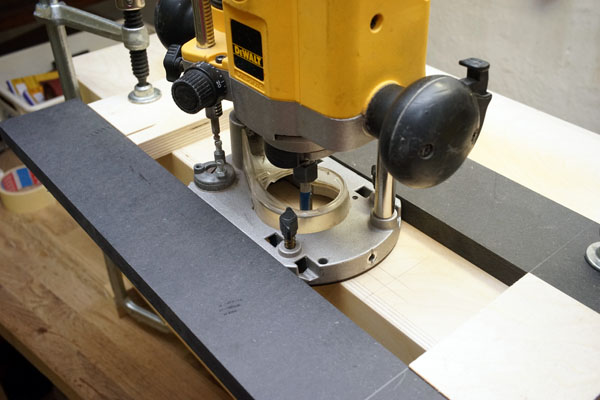
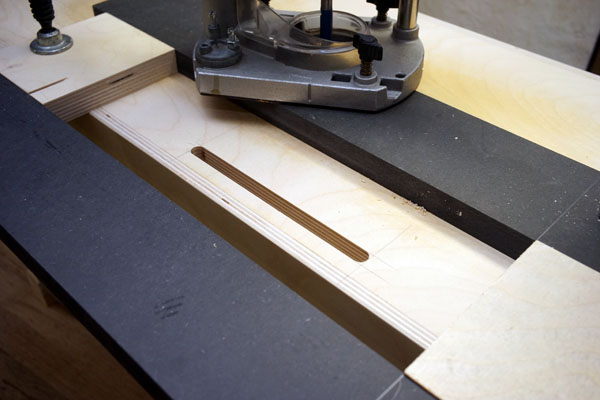
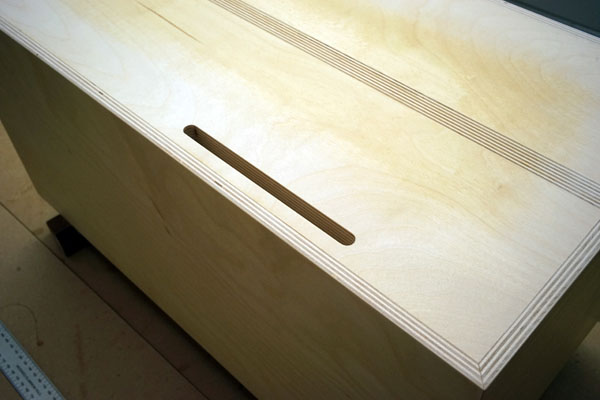
and having 4 pcs 15x61 cm leftovers, rear panels were made from gluing
together two panels with a fillet turned 90 deg for decorative purpose.
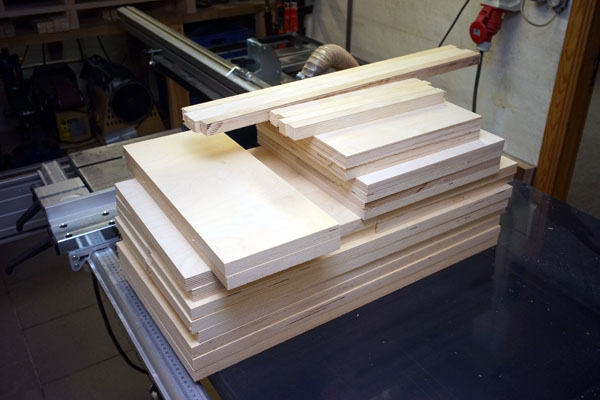
Cutting all Baltic birch panels in the raw:
4 pcs 310 x 610 mm, 20 mm BB, side panels
4 pcs 310 x 310 mm, 20 mm BB, top and bottom panels
2 pcs 290 x 600 mm, 20 mm BB, rear panels
6 pcs 270 x 290 mm, 15 mm BB, for bracings
2 pcs 170 x 400 mm, 20 mm BB, for mid cabinet
4 meters of 20 x 20 mm BB for fillets supporting the front panels.
Before starting cutting the panels to exact size, I added one coat of
lacquer, which helps preventing edge ripping.
Front panels, raw:
2 pcs 300 x 600, 15 mm black MDF, inner panel (tweeter level)
2 pcs 300 x 510, 20 mm black MDF, middle panel (midrange level)
2 pcs 300 x 350, 10 mm black MDF, outer panel (bass driver level) This
layer is really optional and you can mount mid and bass on the same
level.
Left:
Panels with lacquer drying before final cutting. The first coating
always takes 48 hours before fully dry.
Right: Sides and top/bottom cut 45 deg + rebate for rear panel. Take one
side + top/bottom and join with painter's tape.
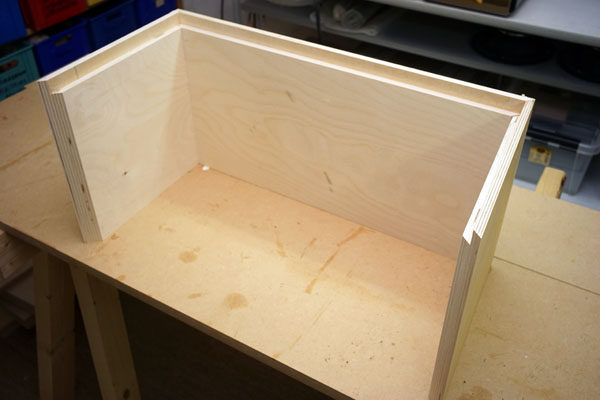
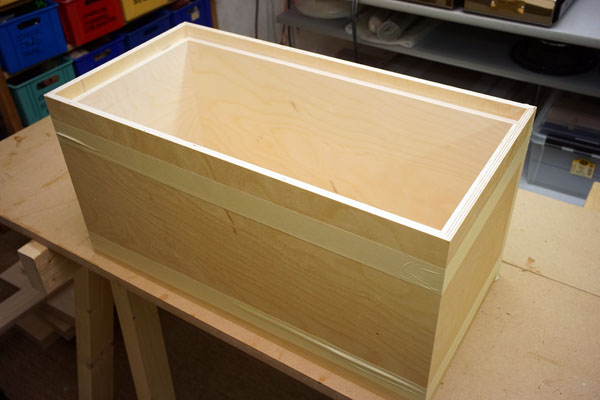
Start folding cabinet and add the other side panel.
Left: Cutting rear panel to exact width. Right: Cut rear panel to exact
height.
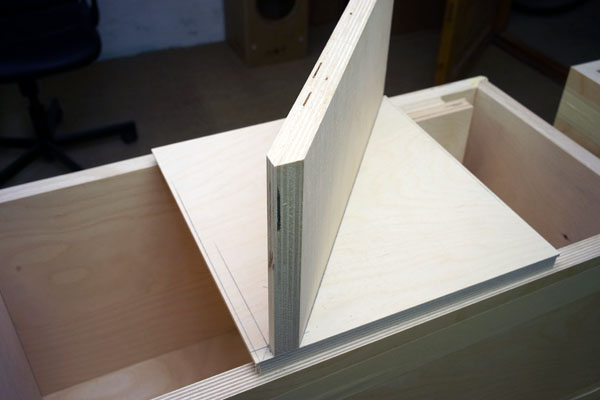
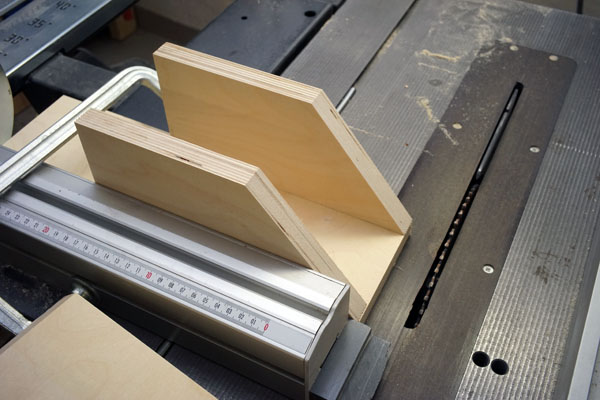
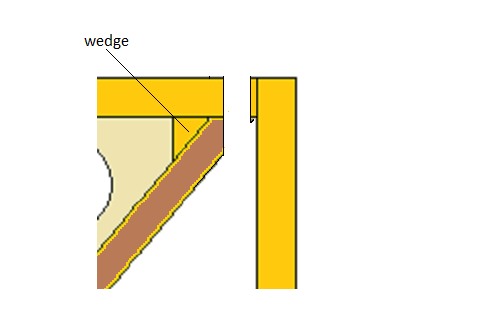
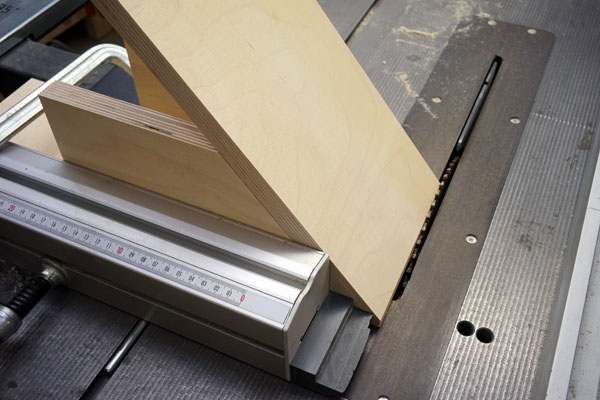
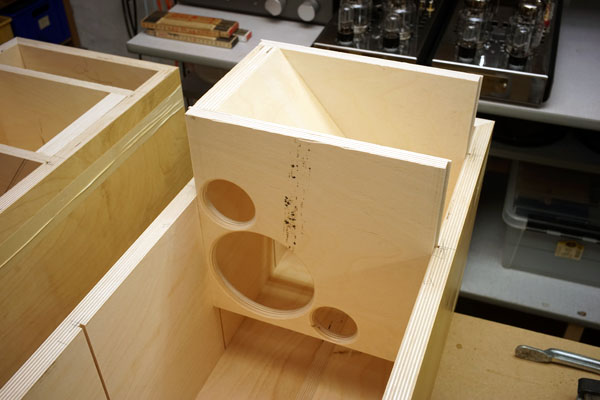
Making the traverse rear panel of the mid cabinet. Cutting odd
angles sometimes requires a minor rig to get the right angle.
The 39 deg cut needs to be cut 90 deg to fit the slot.
If you don't care to the elaborate solution above, just let the
mid panel go to the bottom and drill some holes having the same area as
the slot, ~15 cm^2.
A third option is to leave the mid cab closed. Aperiodic tuning is not
the holy grail when we're talking point of crossover @ 400 Hz.
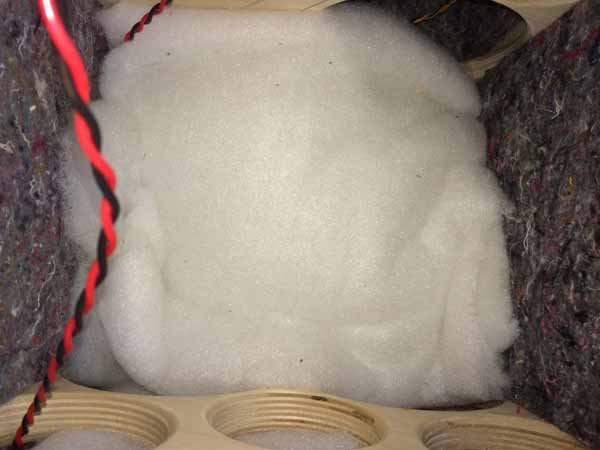
Add felt to all internal panels of mid cab and press it firmly towards
the slot.
Make sure the slot is fully covered by felt and seal with some filler.
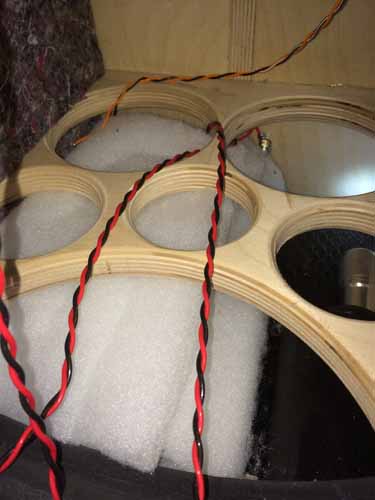
Place a piece of 16 x 30 cm acoustilux towards the rear of the mid cab.
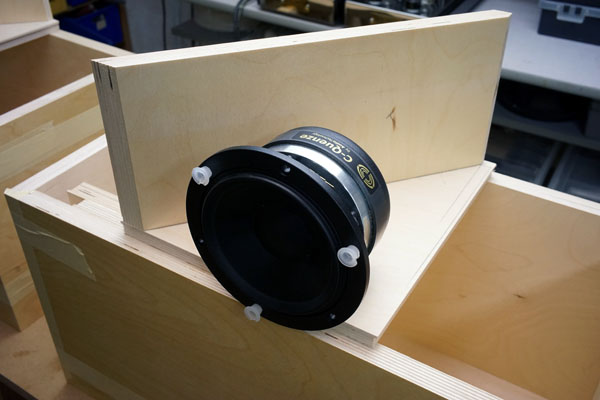
Plenty of room for the middriver magnet.
Right: The lower brace standing up here has been changed in the drawing
as we don't need such large cut-out for bass driver.
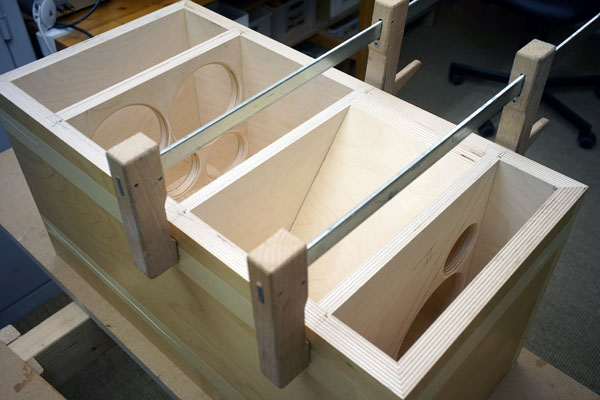

Test assembly of all parts.

Start gluing the traverse mid-cab panel. This helps a lot when gluing the
cabinets giving a rigid structure.
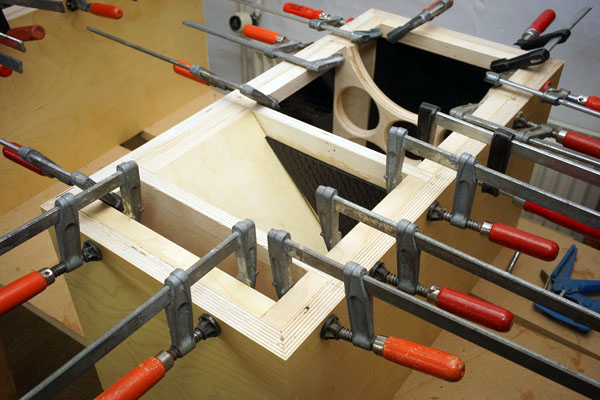
Left: Gluing fillets for baffle support. Right: Cabs almost finished.
Routing the slot for the middriver, 10 x 150 mm.
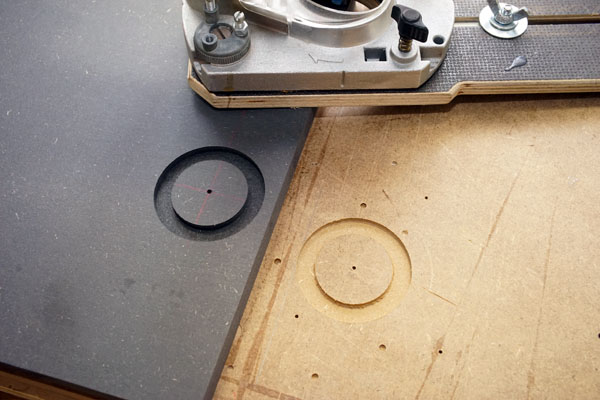
Right: Always make test routing for drivers. Here the small tweeter.
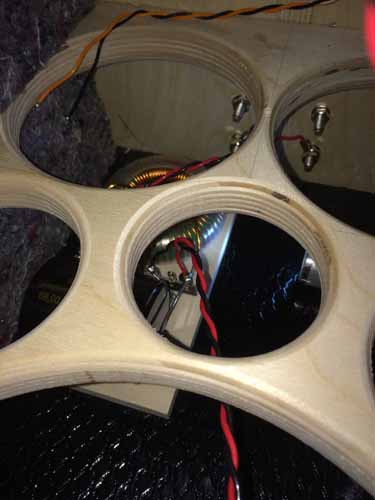
Right: Mark braces not to chamfer outside mid-cab enclosure. Make sure
you have lots of ventilation for the middriver.
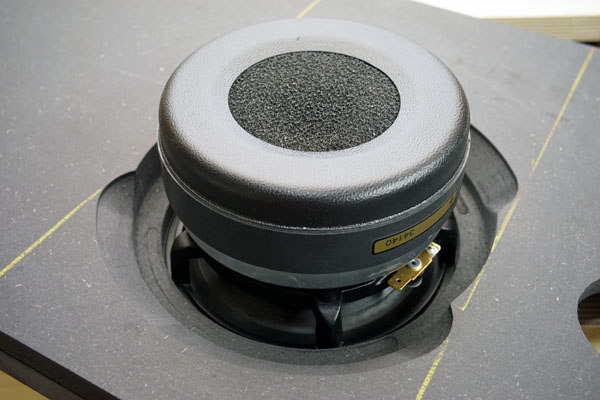
Left: Mid-driver seen from behind. Free air-flow is secured. Right:
Testing all drivers.
Left: Can't get enough of first full appearance. Right. Tweeter cut-out.
Left: Port cut-out. Right: 2nd coat of lacquor.
"Everything that can be counted does not necessarily count; everything that counts cannot necessarily be counted". Albert Einstein.
A few comments on MEASUREMENTS before you start interpreting all the
readings below.
First of all, if we think measurements will tell us how a speaker
sounds, we're wrong. The perception of sound is way too subjective to be
reflected in any measurements we can perform. A loudspeaker system is
meant to give us a satisfying idea of an acoustic event and for some
people a pair of 5 USD ear-plugs are enough, others spend 200 kUSD on a
truly full-range pair of speakers - and the latter may not be happier
than the former.
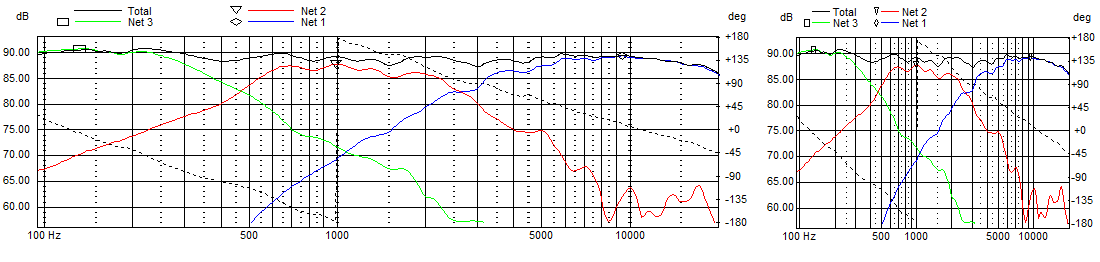
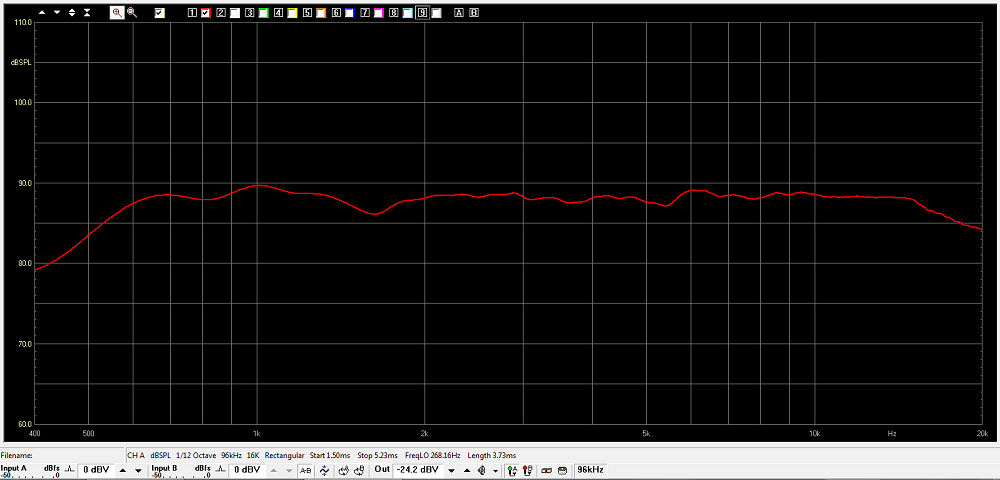
Above you see the same graph presented in different width. Now, we may think the graph to the right looks rather rugged, but if we stretch out the presentation (left) it suddenly look rather smooth. The left presentation is often used by Chinese manufacturers to make their frequency response graphs look better. No smoothing was used on the above measurements, but if we apply e.g. 1/6 or 1/3 octave smoothing things look even better. Just this to display how easily measurements can be manipulated to look nice.
Measurements may give us an idea of tonal balance of a system, i.e. too
much or too little energy in certain areas. Measurements may tell us
about bass extension if far-field measurements are merged with
near-field measurements. In addition to this, ports may contribute to
bass extension. Most of us diy'ers do not have access to an anechoic
room for full-range measurements from 20-20000 Hz, nor do manufacturers
for that matter.
What cannot be seen is what kind of bass performance we get in a given
room. Bass performance is highly dependent on in-room placement of your
speaker and the same speaker can be boomy in one place and lean in
another.
Actual SPL level at 1 meter distance and 2.8V input is useful
for en estimate of system sensitivity and combined with the impedance
profile may give an idea of how powerful an amplifier is needed to drive
the speaker to adequate levels.
What measurements do not tell is the very sound of the speaker unless
displaying serious linear distortion. The level of transparency, the
ability to resolve micro-details, the "speed" of the bass, etc., cannot
be derived from these data. Distortion measurements rarely tell much
unless seriously bad, and most modern drivers display low distortion
within their specified operating range.
Many people put way too much into these graphs and my comments here are
only meant as warning against over-interpretation. There are more to
good sound than what can be extracted from a few graphs. Every graph
needs interpretation in terms of what it means sonically and how it
impacts our choice of mating drivers, cabinet and crossover design.
What measurements certainly do not tell is the sonic signature of the
drivers, because cones made from polyprop, alu, Kevlar, paper, glass
fiber, carbon fiber, magnesium, ceramics or even diamonds all have their
way of colouring the sound.
The choice of crossover topology has a huge impact on the sound
we get. We may produce the same frequency response from 1st, 2nd or 4th
order filters and they may be Butterworth, Linkwitz-Riley, Bessel and
others and they all sound different, very different indeed, so take
care!
AT-3WC measurements:
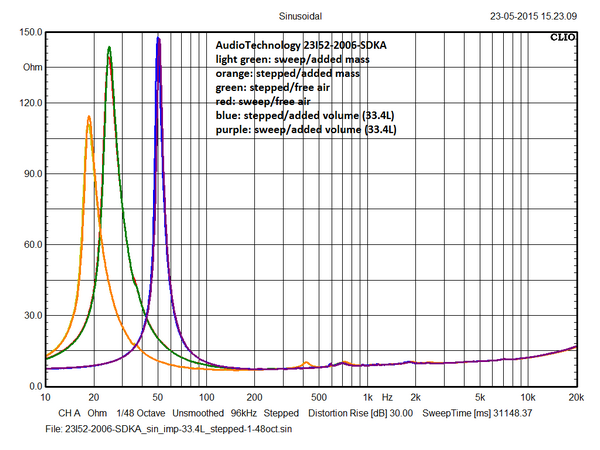
Left:Impedance measurements of the 23I52 driver during TS data determination from stepped and sweep sinusoidal measurements . Both added mass and added volume were used. As can be seen we have an Fs around 25 Hz (green/red) and the huge peak indicates high mechanical Q - and so it is. Right: 15H52 impedance in cabinet.
A few comments on tweeters. You may think these tiny tweeters cannot be
as good as their larger siblings with their bigger (?) rear chamber and
large face-plates. I have found no reason to believe so. Above to the
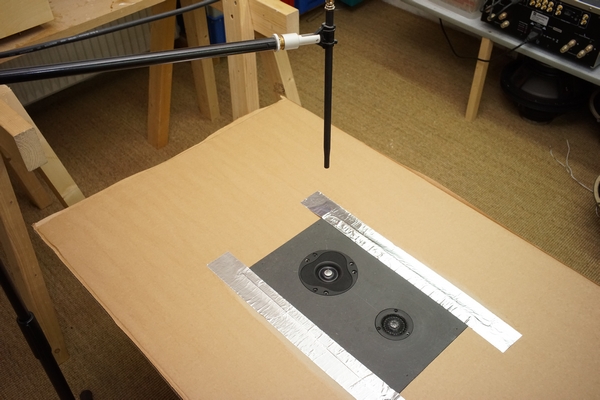
left a set-up for measuring distortion. To the right the R3004/602010
impedance plot showing an unusual low point of resonance. This is as
good as any of the standard tweeters. Below distortion tests:
Above distortion measurements done at 2.8 V input, hence the high SPL
from measuring at 0.25 meter distance.
Green is 2nd harmonics, blue is 3rd.
To the left the R3004/602010, to the right the R3004/662000. The 662000
has slightly higher sensitivity, but otherwise these tweeters have
nothing to tell one another.
Left: The most interesting initial measurement is frequency response on the intended baffle and with the intended driver placement. Here frequency response merged with near-field response at 200 Hz on actual baffle. Nice flat response up to 1 kHz. This will make crossover work easy. Right: Midrange frequency response.
Left: Tweeter response on actual baffle, smooth and easy. Right: Bass driver response w/wo crossover.
Left: Response of B and MT driven from crossover plus summed response. Right: Tweeter roll-off included.
Here's a screen shot of the mid-tweeter section with R1011 = 1R0. Quite
a flat response.
I prefer R1011 = 1R5-1R8, minus 1-1½ dB.
Left: Mid-tweeter response and summed response driven from x-over. Point
of crossover ~2600 Hz.
Right: Final system impdance.
Again: Please read intro to measurements. These graphs tell nothing about how the speakers sounds!
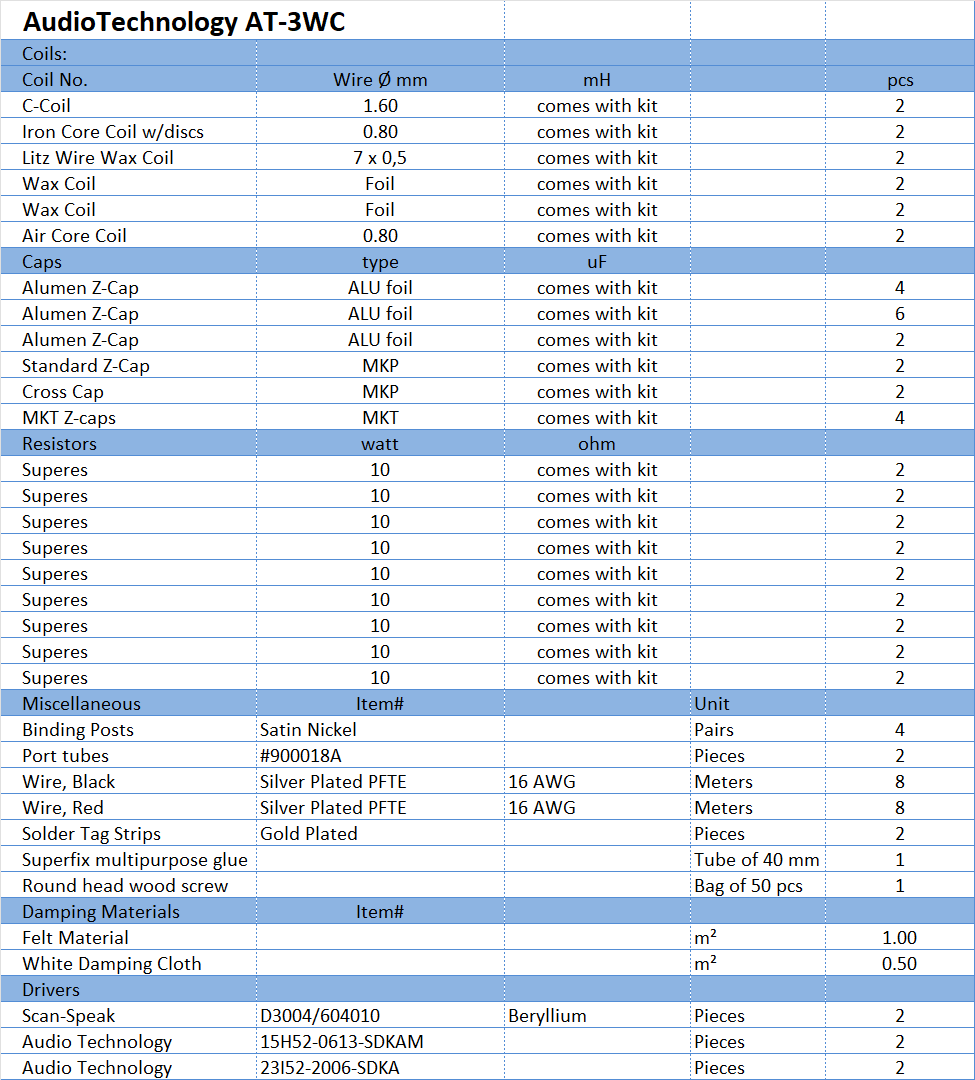
Crossover components' values to come with the kit.
All questions regarding purchase of kits, please mail Jantzen Audio at contact@jantzen-audio.com
All kit and component prices may be subject to change and are always to be confirmed by Jantzen Audio Denmark.
Download Sales Presentations here:
![]()
Kit will be available from Jantzen Audio including all drivers to save shipping costs.
All technical questions to troels.gravesen@hotmail.com
CROSSOVER-LAYOUT
BACK TO INDEX
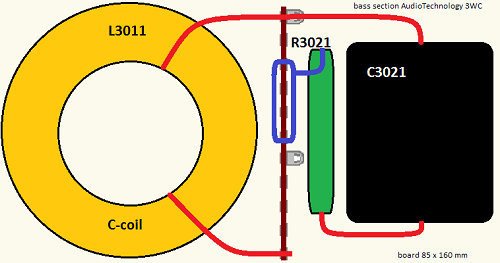
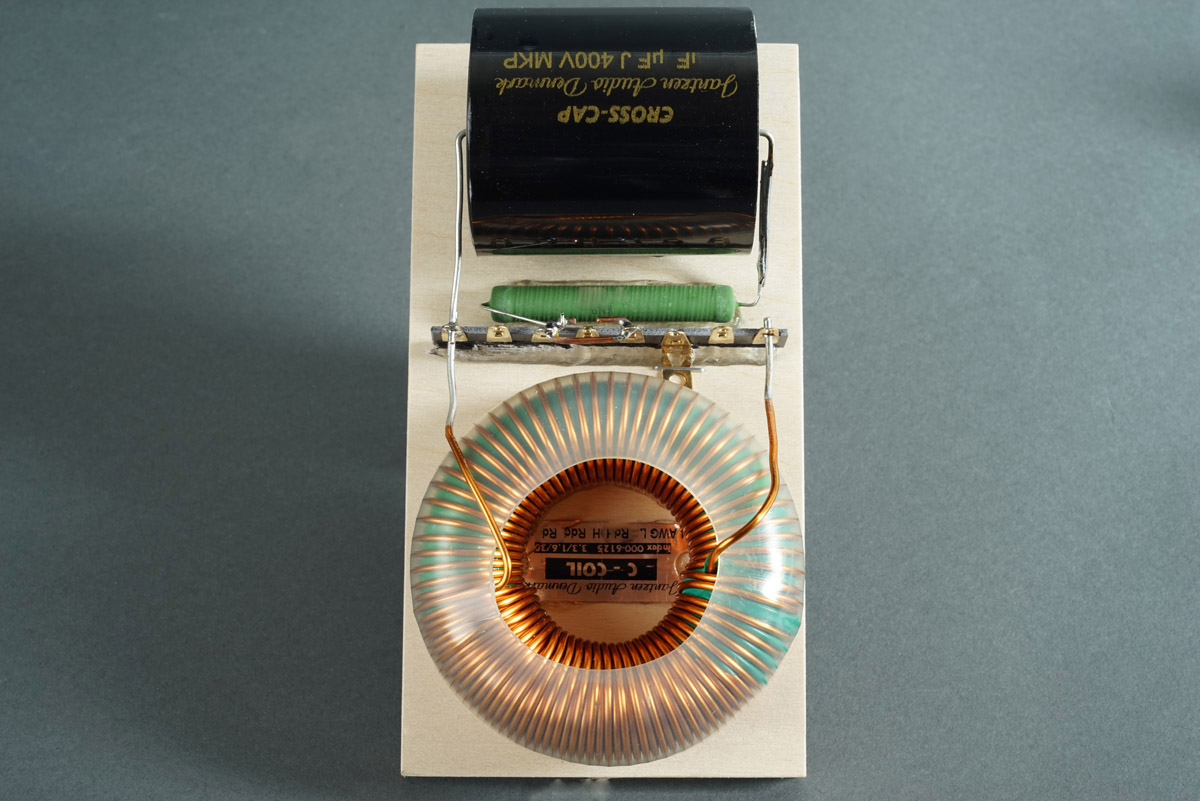
Bass section:
Mid-tweeter section:
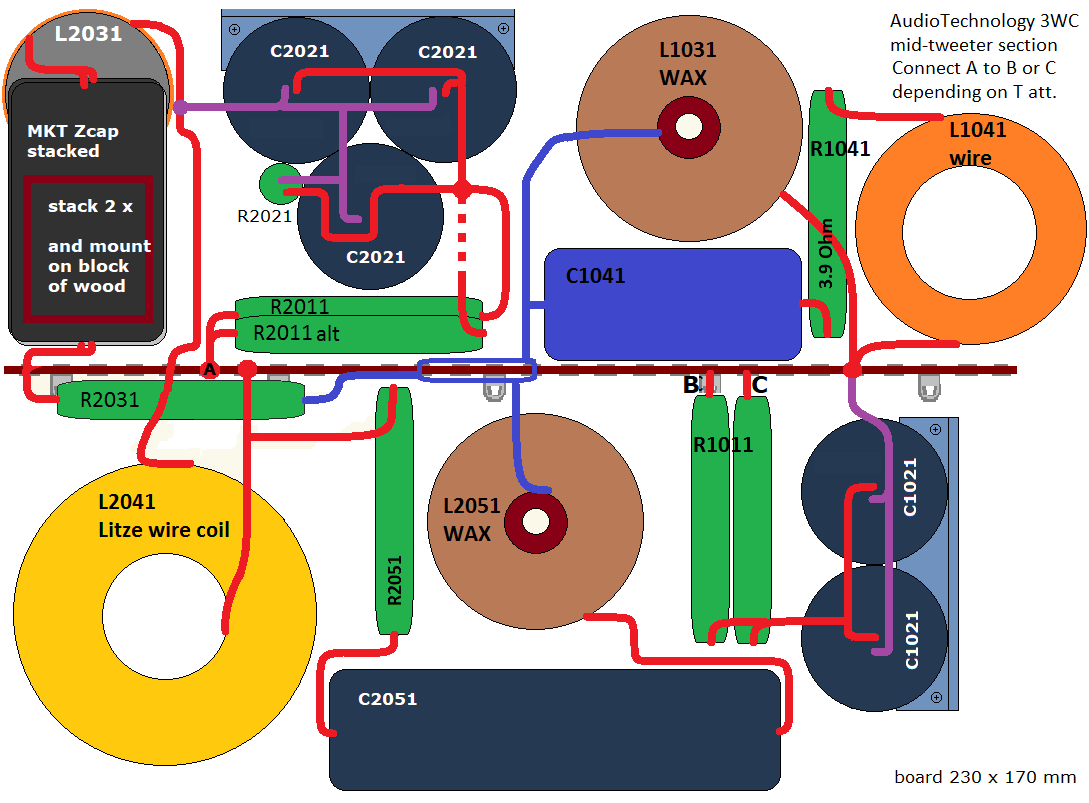
Crossover layout for midrange and tweeter.
This has changed a little due to the introduction of MKT Z-caps, and due
to size, these must be stacked and placed on a block of wood next to
L2031.
To make room for it all, you have to make two aluminum brackets for
mounting the Alumen-Z caps vertically.
These brackets do not follow the kit.
Wiring:
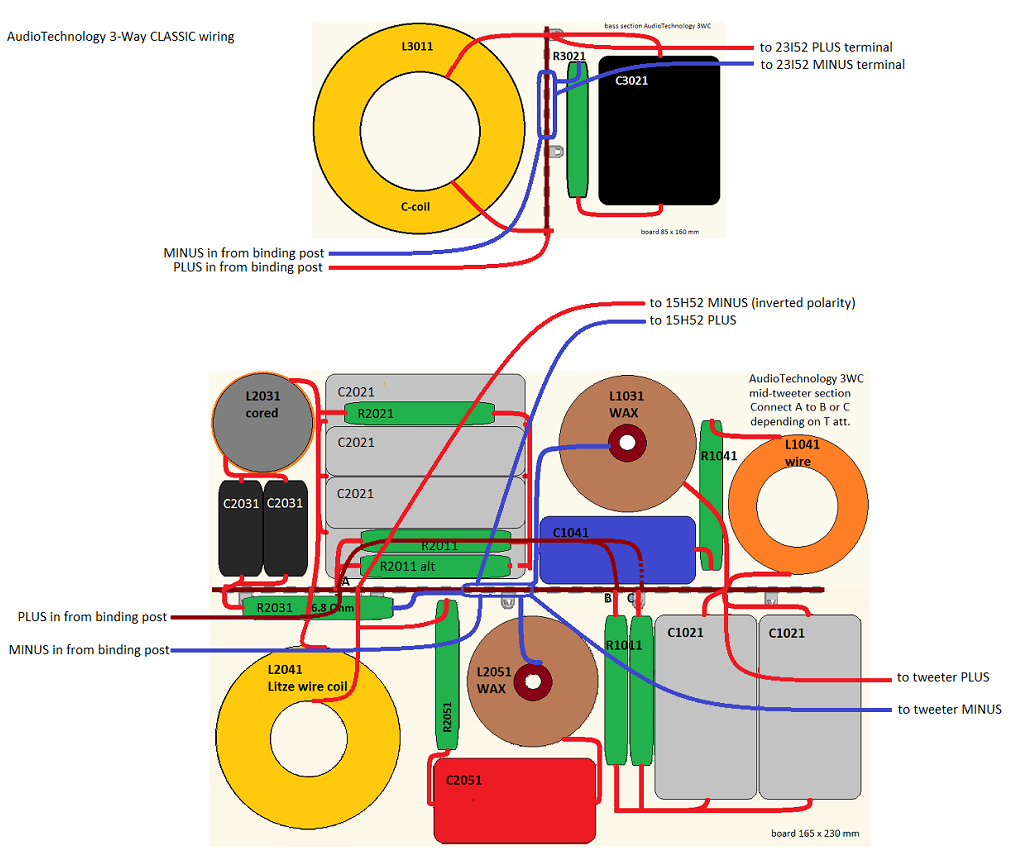
Do not forget the wire from A to B or C!

Above former level-2 crossover, which is discontinued as nobody buys it.
Follow layout drawing.
Mounting crossovers
Mount the bass crossover next to the port and
connect to binding posts and driver. Cover x-over with 3 layers of
acoustilux.
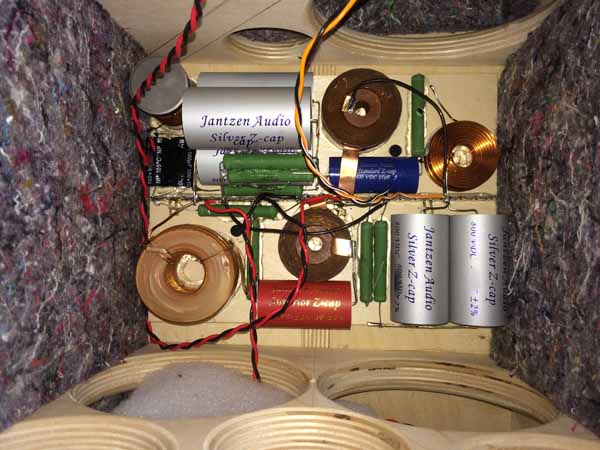
Mount the mid-tweeter section on rear panel
and connect to binding posts and drivers. Cover with two layers of
acoustilux.
Make sure the mid-driver is connected with inverted polarity!
Using ScanSpeak D3004/604010 Be-dome
Using ScanSpeak D3004/604010 requires no changes to the crossover, only a little tweeter attenuation. R1011 can be either 1R0 or 1R8 for the 602010 tweeter depending on your preferred tweeter level, where the D3004/604010 requires 2R7 - to my ears. 1R8 makes a rather flat tuning but does emphasise treble on certain recordings. If you want to use the Be dome, ask Jantzen Audio to substitute the 602010 ring-radiators with the D3004/604010 Be domes - and ask for 2 x 2.7 Ohm resistors as well.