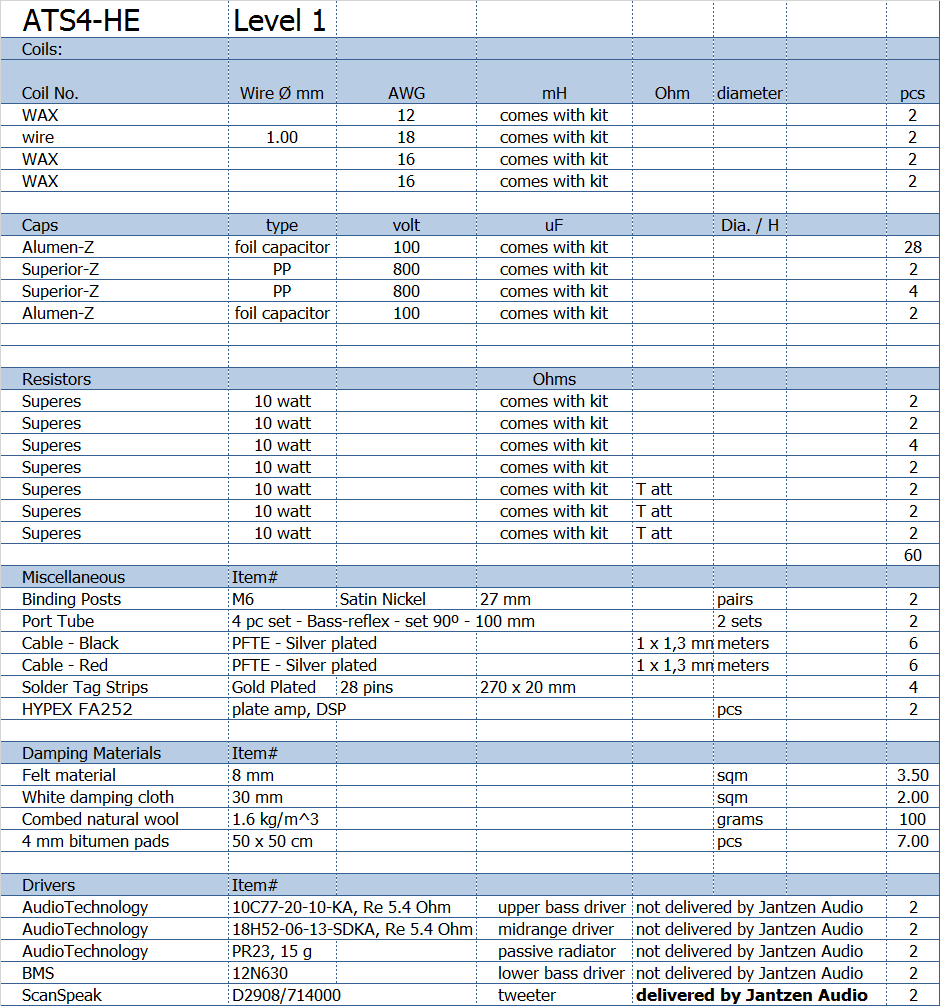
AudioTechnology
ATS4-HE
Copyright 2022 © Troels Gravesen
Go to on this page:
DRIVERS
CROSSOVER
CABINET
HYPEX
MEASUREMENTS
SPEAKER-KIT
CROSSOVER LAYOUT
SOUND
It's been well over three years since I finished my
ATS-4
speakers. I've made quite a few speakers since
then, but the ATS-4 are still my reference speakers to measure any new
construction against. The Ill-4/-5 and SBA-10 come pretty close and the
Ill-5 can even play a few tricks the ATS-4 cannot due to the small
magnificent 4" midrange driver between the 7" mid-bass and tweeter.
Still, the ATS-4 is my number one. Habit is a
strong partner. We get used to a certain sound and we like it, and this
is the way we want our system to sound. One thing always stood out in
all tests against the ATS-4, efficiency! The ATS-4 is significantly more
efficient than any other similar system I have built, approx. 2 dB. The
Ill-4/-5 and SBA-10 do slightly deeper bass compared to the ATS-4 - at the expense of
efficiency. For the same box volume we must decide how efficiency and
low-end extension should be balanced. Some people will argue that
efficiency is not that important, because watts are cheap.
True, but
good watts are not I can tell. I heard some seriously good amps
at the Munich High-End Show this year and last year, but prices were out of this world. I recently
upgraded my GlowMaster KT88 with better - and insanely expensive - caps,
and I think it can compete with the best you can find. Only limitation
is power. It's rated at 65 watts, not bad at all, but not suited for
driving heavy 10-12" bass drivers. Fortunately we can bi-amp as I've
done for the ATS-4 having a Hypex running the two bass drivers. Works
excellent!
High-efficient speakers will always bring out something from good sounding
amps and source material in a way low-efficiency speakers do not, even if power is
adequate for average listening levels. High efficiency drivers have
better energy transfer compared to low-efficiency drivers and has been
my hobbyhorse since 2008, where this was put together:
http://www.troelsgravesen.dk/HES.htm
Now, I won't dig into horn constructions because I would need a new
house and a dedicated hifi room. Not an option. I like where I live and
intend to stay here with my 24 sqm living room. And horns have their own
problems, which I won't dig into here.
There are a few tricks left to further increase efficiency of a
speaker similar in size to the ATS-4, because this is the size that
allow my wife and I to use our living room for relaxing, social
activity, TV watching, etc.
I've been using
bi-amping since I built the ATS-4 and this brings me to a topic I
have been wondering about for long. Why do not more high-end speaker
manufacturers (large speakers, that is) use a plate amp for the bass
drivers?* To me it's crazy not doing so. Vandersteen does
it and plugs in a plate-amp with 11 dials on the rear to adjust bass response
to real world living rooms. Brilliant! Last Munich exhibition, May 2016,
displayed some high-powered amps sounding really, really good. ~200 wpc
amps that could run low-efficiency speaker to realistic levels. The only
problem was price. We're talking 15-30+ kEUR for a pair of mono-blocks
and preamp that could match the sonic quality of low-powered amps,
typically much easier to construct - and less costly. Below 200 Hz it
doesn't matter what an amp sounds like as long as it can deliver
amperes! Lots of them. And this is both easy and cheap these days.
There may be another more subtle reason for so few high-end speaker
systems utilising plate amps for the woofers. Maybe this is not how
customers perceive their stereo system. No digi/plate stuff for my bass drivers!
A high-end system comprises a pair of integrated speakers with passive
crossovers and a pair of impressive mono-blocks running all of
it! Speakers, amps, pre-amp. That's it. Or a 300 EUR digi amp apparently
doesn't go with a pair of Kondo mono-blocks! The way we visualise our
system may be a strong determining factor for the commercial success of
a speaker system. Heck, have a plate amp made on a 10 mm slant of
aluminum! And add some copper sockets, etc. If it has to look like a
million.
*: I think I did se more plate amps used at this year
(2017) Munich show.
Some 25-50 good watts are mostly all we need to run a midrange-tweeter combo on top of our bass system. Even from speaker systems down to 85-87 dB efficiency. 25-50 really good watts are within reach of most hifi aficionados. Many tube amps can do this and a few solid state like the First Watt J2 from Nelson Pass despite its low gain. I tried the J2 recently and it has qualities I could live with was it not for my current GlowMaster. Maybe another habit. I love my GlowMaster.
Now, let's get to the issue here. We need at some +3 dB from the ATS-4 bass
section to
further enhance efficiency and get more dynamics. Rather than a 10" bass
driver we need a 12". And we need some electronics help to bring the overall
system sensitivity up to around 92 dB/2.8V/1 meter. These are the
targets: +3 dB sensitivity, deeper bass, almost same cabinet volume.
The 12" driver is BMS 12N630. This is an unusual driver from a
PA driver perspective. Fs = 29 Hz, Qt = 0.33, Vas = 86 litres,
sensitivity = 96 dB. 60 litres makes -3dB @ 32 Hz. Too good to be true?
Well, it depends on where at the SPL data we look. The excellent EXCEL
sheet from ScanSpeak suggests some 91 dB on an infinite baffle and on a
narrow baffle much less, but this time we take serious advantage of room gain
and place the driver some 10 cm above the floor with 70 cm to the front
wall, and we get some +6dB room gain @ 40 Hz. So, we loose 6 dB
due to narrow baffle and we get ~6 dB from room-gain. Last, but not
least, we ask the plate-amp to boost response some 2-3 dB with below 50
Hz. Voila, we have something in the area of 92 dB down to around 30 Hz. I'd say
92 dB down to 35 Hz is excellent.
To make 100 dB @ 30 Hz takes Xmax 8.5 mm, just what the BMS can manage
and I think we're safe for some serious SPL if needed.
The BMS 12N630 is favourably priced at 260 EUR from e.g.
Thomann (DE) and 217 £ from
LEAN in the UK. I've had very good experiences from both suppliers.
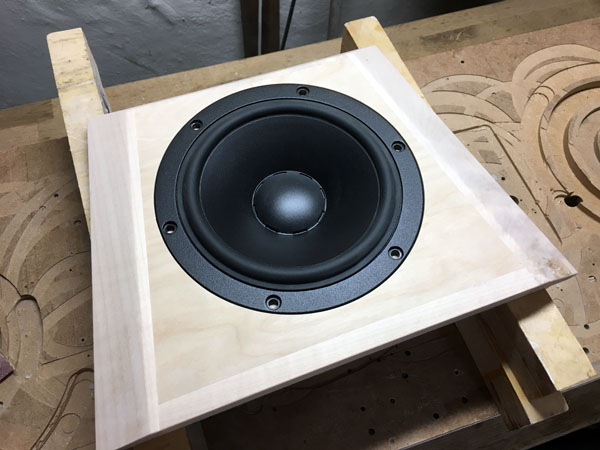
Next we need a 10" upper bass driver and after some discussion with Per Skaaning at AudioTechnology we decided on making a 10" Flex Unit with the needed sensitivity and with a standard voice coil DCR delivering a whopping 94 dB on an infinite baffle. The cone material is PP to match the sonic signature of the midrange. We're using shallow sloped crossovers here! This 10" driver is something, I can tell. Phenomenal!
For mid and tweeter we can use the same drivers as for the ATS-4. This time no series resistors to the midrange driver! By using shallow LR2 filters we have a lift of the midrange from upper bass and tweeter and we can tune it to some ~90-91 dB sensitivity, just what we need to get a balanced voicing of a 92 dB bass section. No need for lower DCR voice coil or more uF to the midrange. What came in later was the addition of a 8" passive radiator to help the 18H52 at the low end just to get a little more level in its band-pass area. The benefit from this is arguable, but it did something to the sound of the midrange, and I liked it. The SS Be dome has no trouble following the target here. Obviously the crossover is completely re-designed compared to ATS-4.
You may ask if all this for 3 dB really matters? Only thing I can say
is that every 3 dB matters! More responsiveness, better dynamics, more
live feeling, closer to the real thing. And our amplifiers have to do
less! Plus 3 dB means half power for the same SPL level. It matters.
You may ask why not aim higher. Why not 95 dB? The answer is size. 92 dB
is achievable from a foot-print not much bigger than the ATS-4. It's all
a matter of balancing size, efficiency and low-end extension. We can
have it all if size is not a constraint - but here it is.
The overall cost here for level 1 is likely to set you back some 6500 EUR + cabinets materials. Not cheap - and wasn't mean to be, sorry.
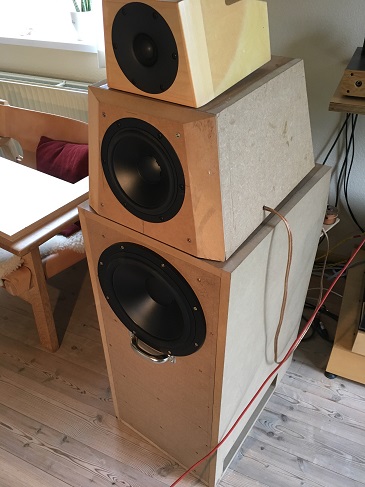
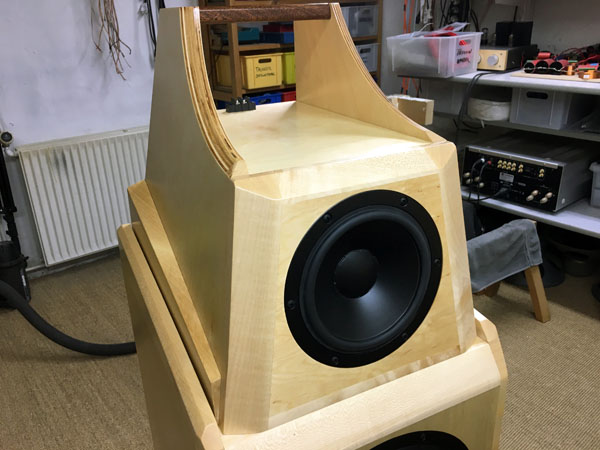
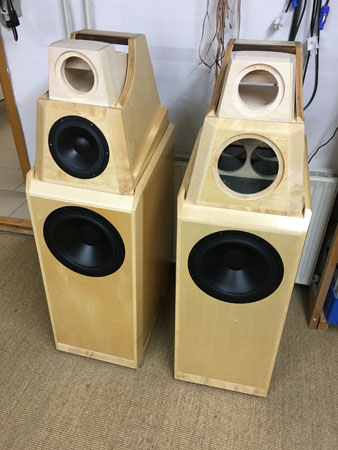
Sept 17: After several months of service, I can still go to my system in the morning and say: This is it! The sound is as vibrant, as dynamic, as transparent as I had wanted for. I have no idea how to make a better speaker for my 25 sqm living room. The Colibri cartridge, the EAR-912 phono-line-stage, the modded GlowMaster, the Hypex bass modules, all makes the best sound I've ever had. And the cabinets are starting getting the patina I like too. Takes a year or two to get the final glow.
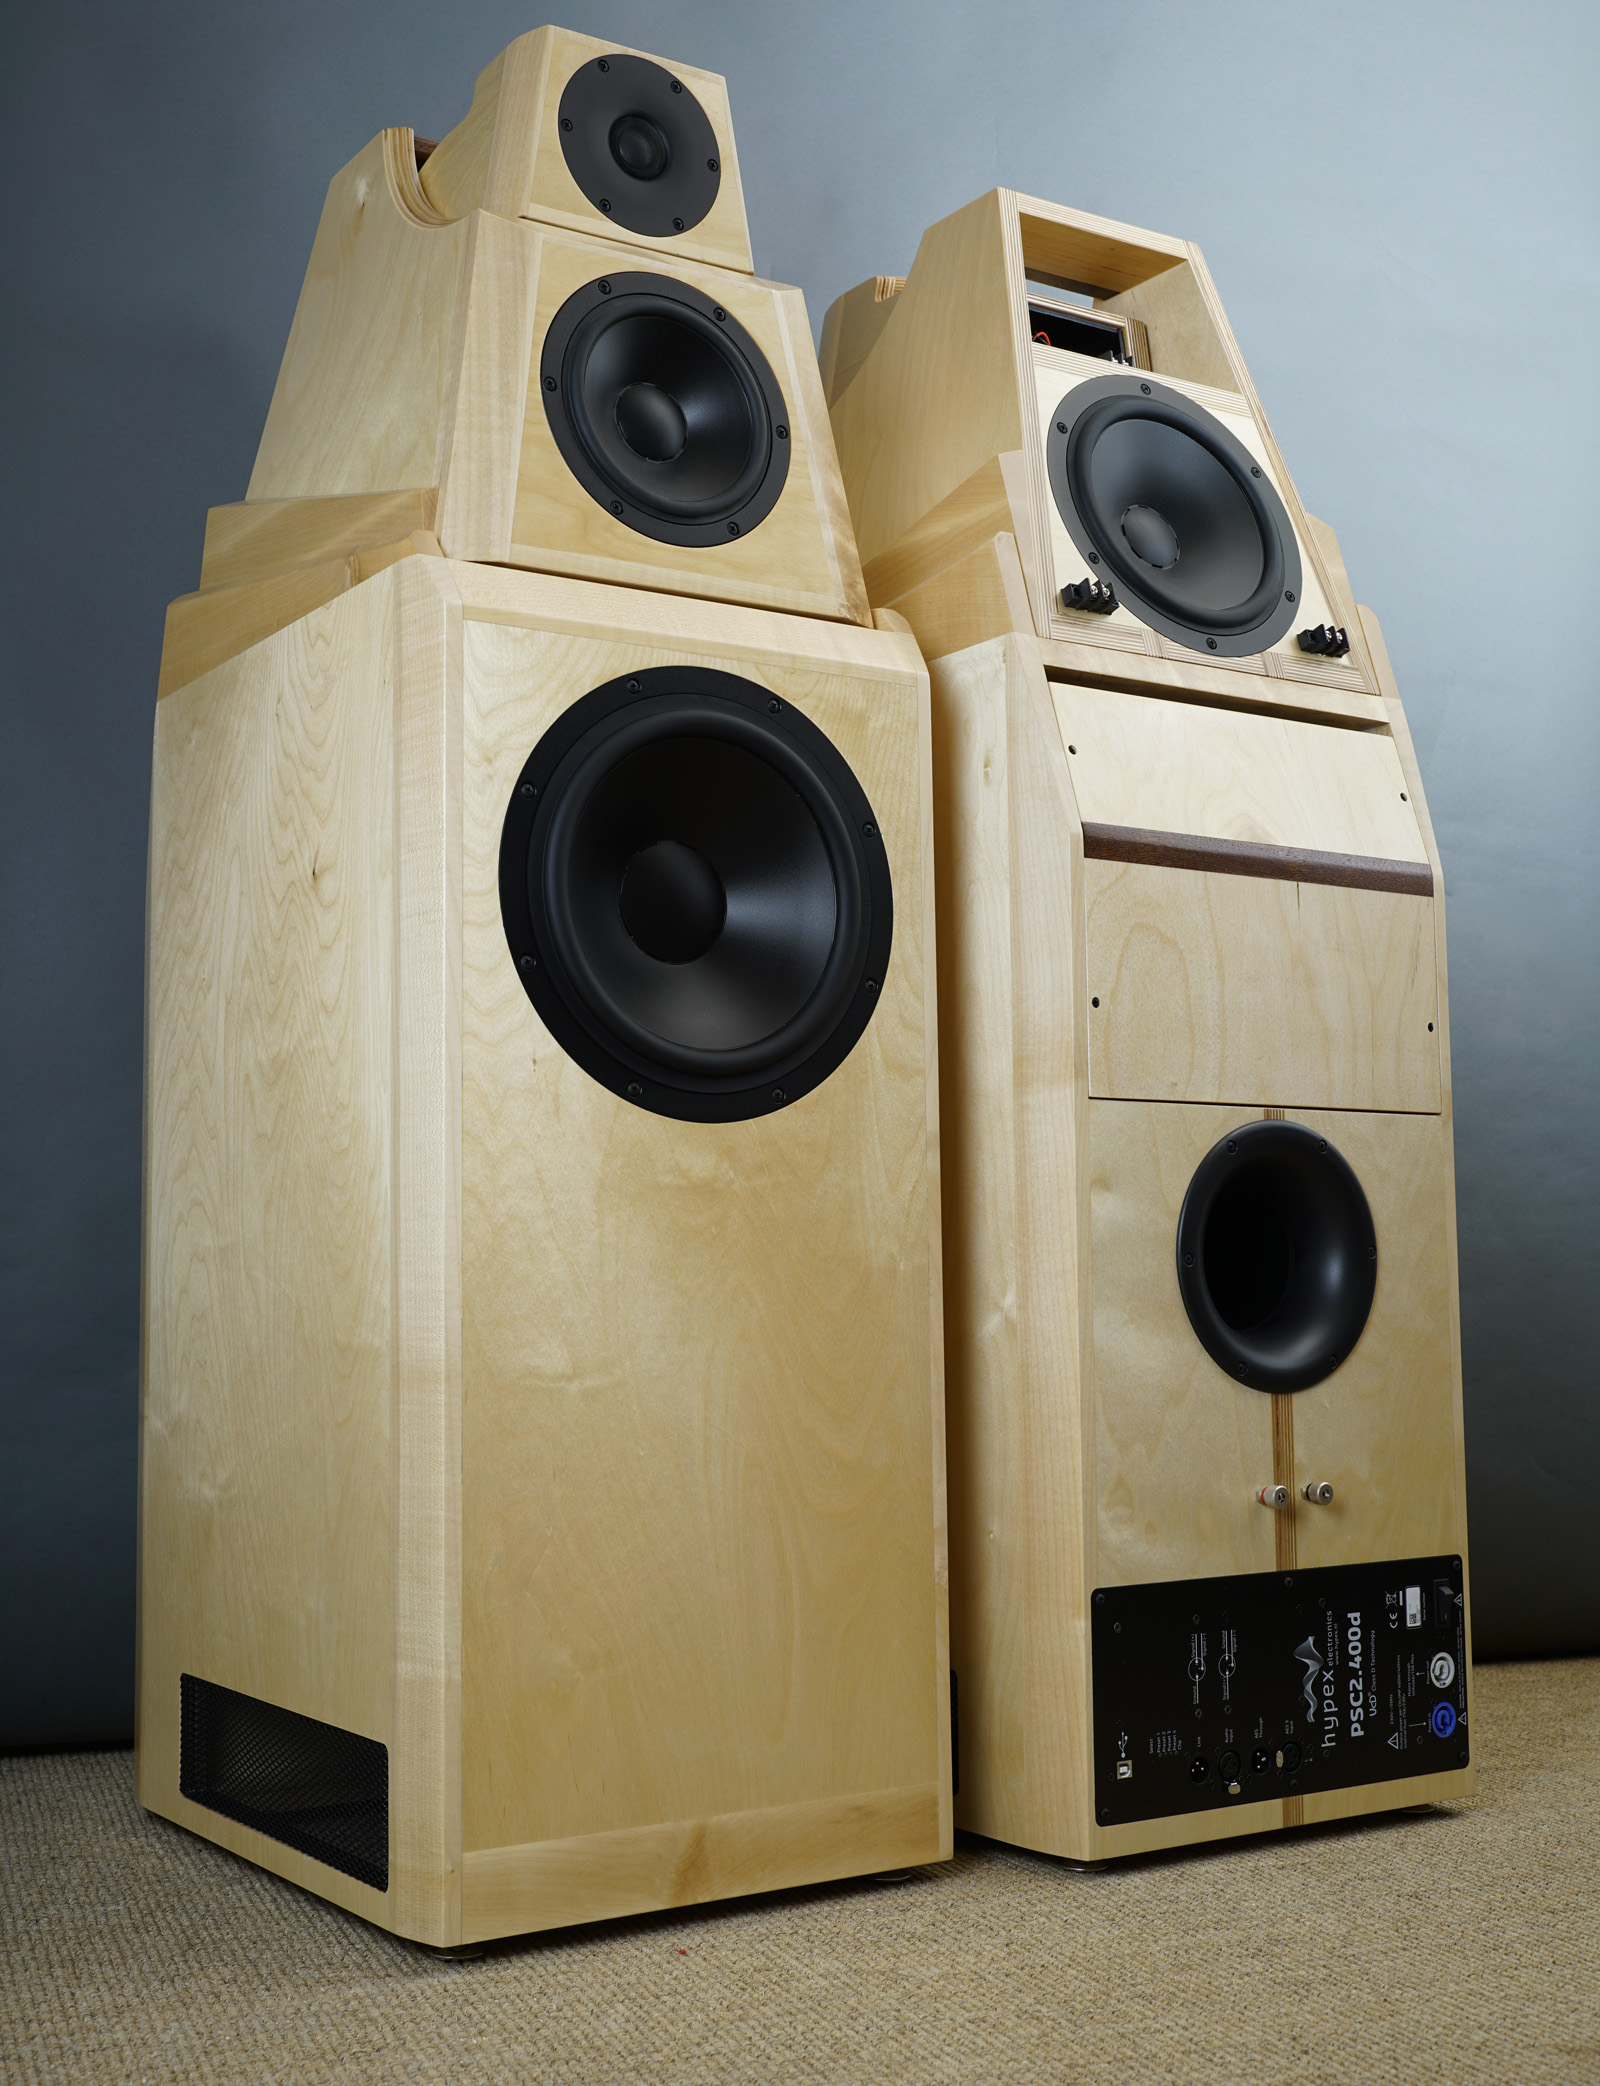
The finished speakers in their pale fresh coating. In a couple of years
they'll get the deeper glow of my current ATS4.
Click images to view large.
Basics:
4-way speaker system.
System sensitivity: 92 dB/2.8V, 1 meter.
Impedance: 8 Ohm, 4.4 Ohm minimum at 325 Hz for the MT section. See measurements below.
Points of crossover: Low-order LR2 filter, 100 Hz, 200 Hz, 2300 Hz.
Power requirement: 25+ wpc for the MT section.
Bass amps: Hypex FA252.
Power handling: A lot, but please
read this:
http://www.troelsgravesen.dk/power-handling.htm,
and remember any burned driver is a misused driver.
As always: Any change to front panel design and drivers'
placement and you need and new crossover and I can't help.
Useful links (Please
follow all links before e-mailing!):
http://www.troelsgravesen.dk/tips.htm
http://www.troelsgravesen.dk/tips.htm#CONSTRUCTION_OF_CROSSOVERS
http://www.troelsgravesen.dk/crossovers.htm
http://www.troelsgravesen.dk/LCR-RC.htm
http://www.troelsgravesen.dk/Inverted-Polarity.htm
http://www.troelsgravesen.dk/choices.htm
http://www.troelsgravesen.dk/power-handling.htm
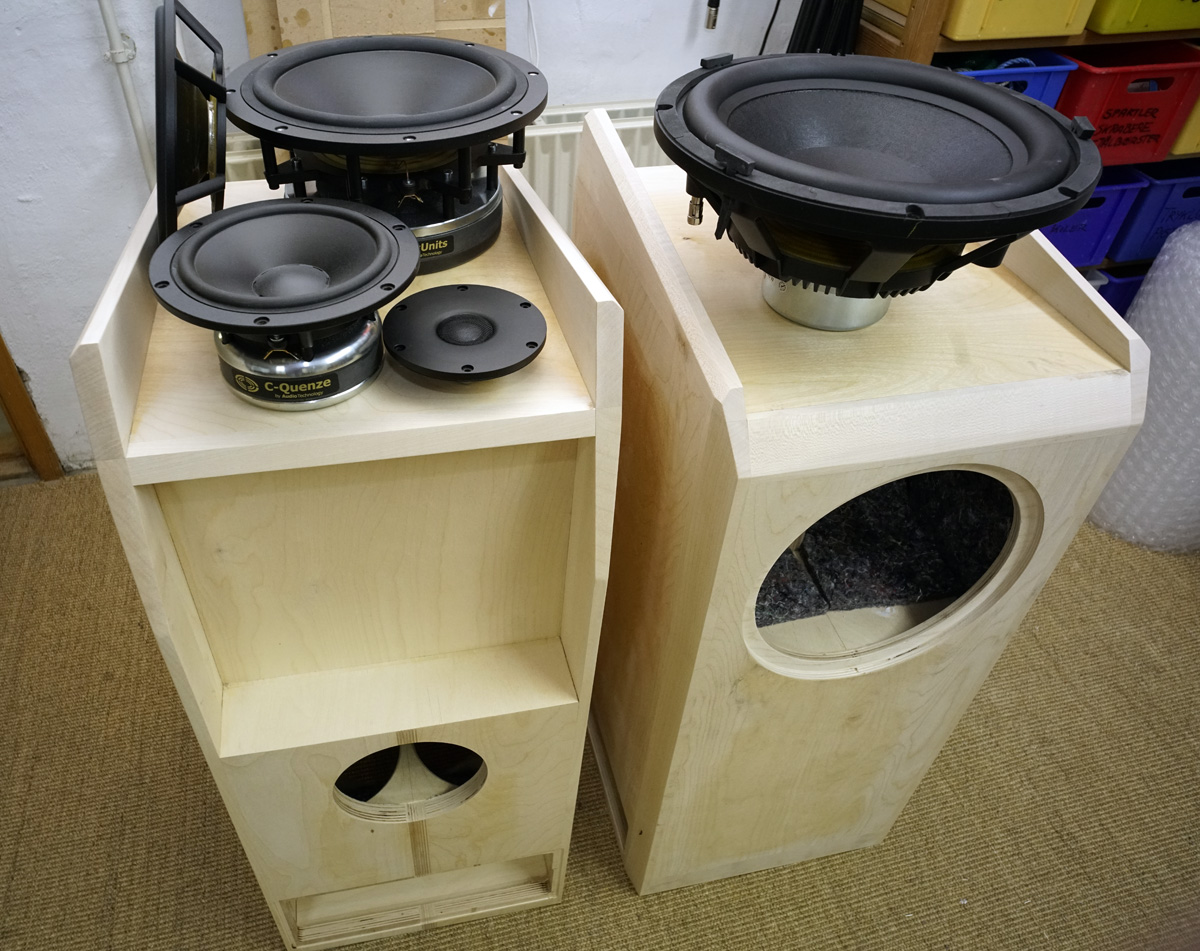
DRIVERS and GEAR
BACK TO INDEX
Click images to view large

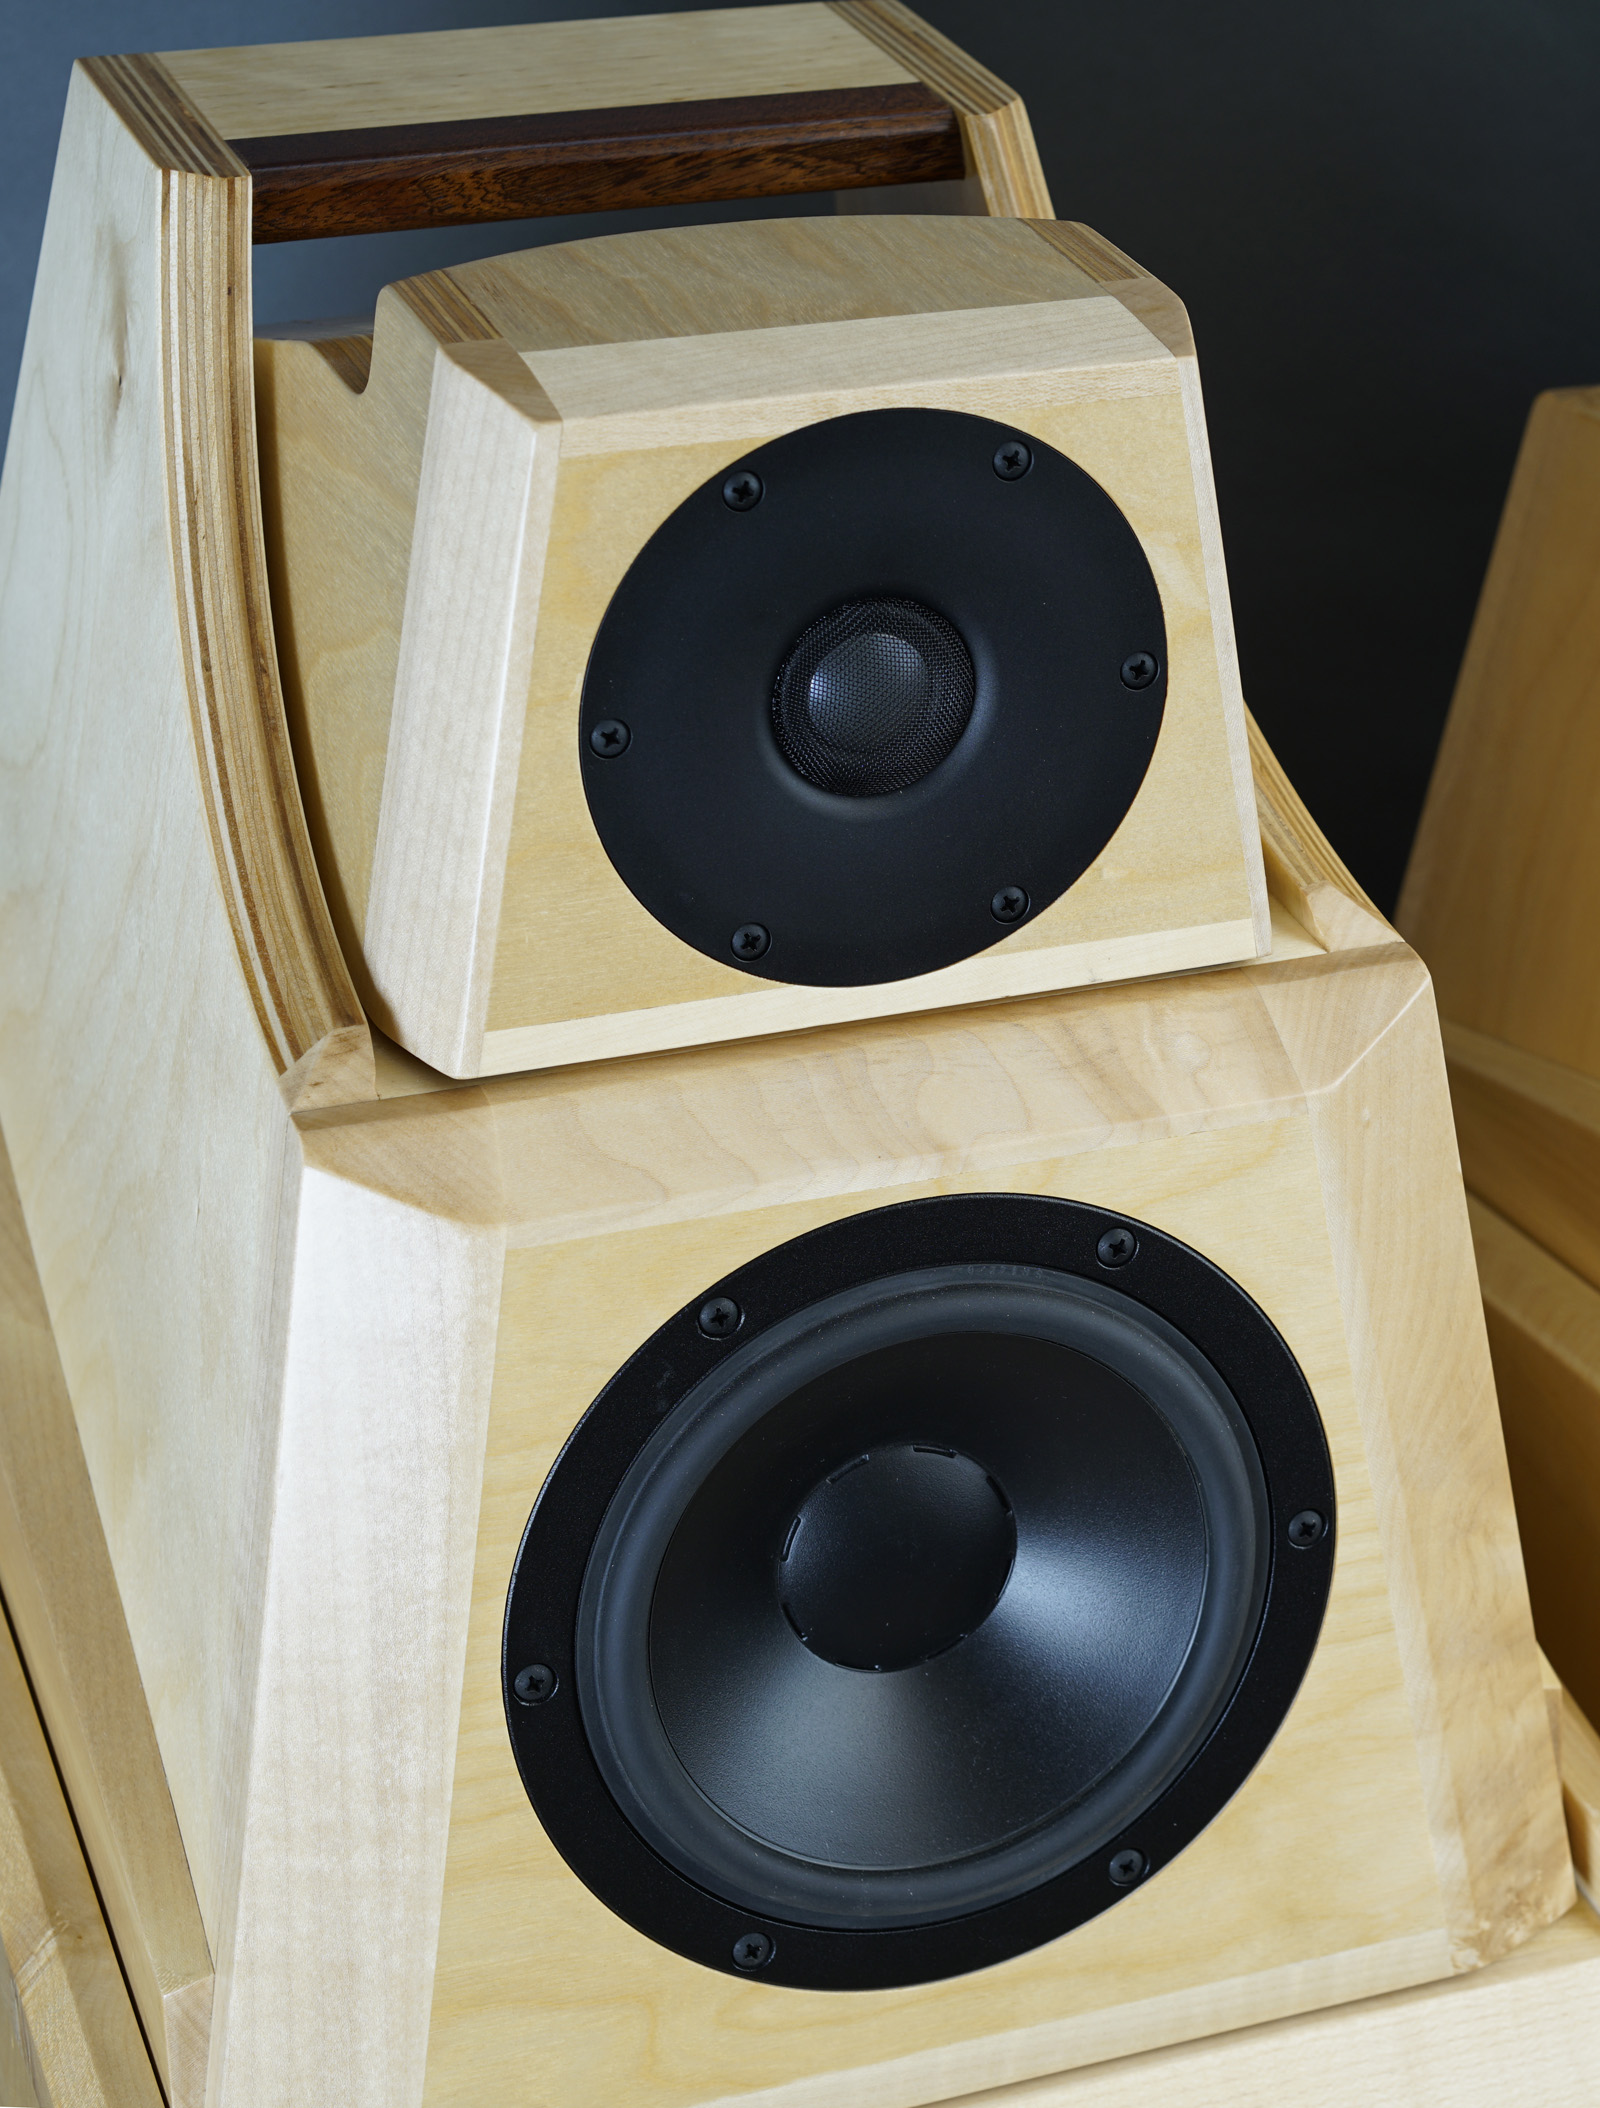
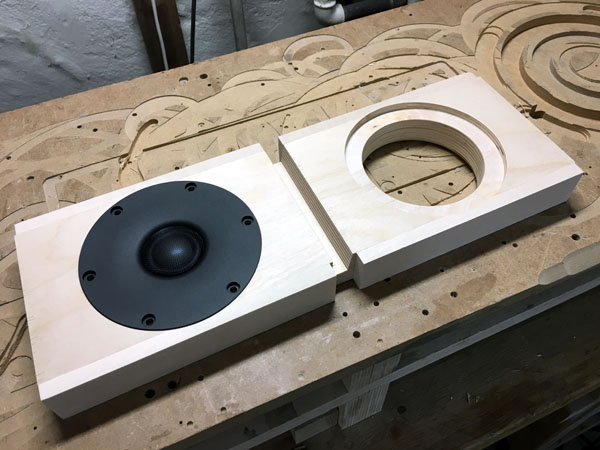
Left: ScanSpeak D2908/714000. One of my favourite domes.
To the right the 18H52-06-13-SDKA (LR version = rounded magnet parts).
On of my favourite midrange drivers.
New kid on the block, the C-Quenze "23" frame and a passive version.
Helps the 18H52 in its lower band-pass area.
The actual PR units do not have terminals. Prototype here.

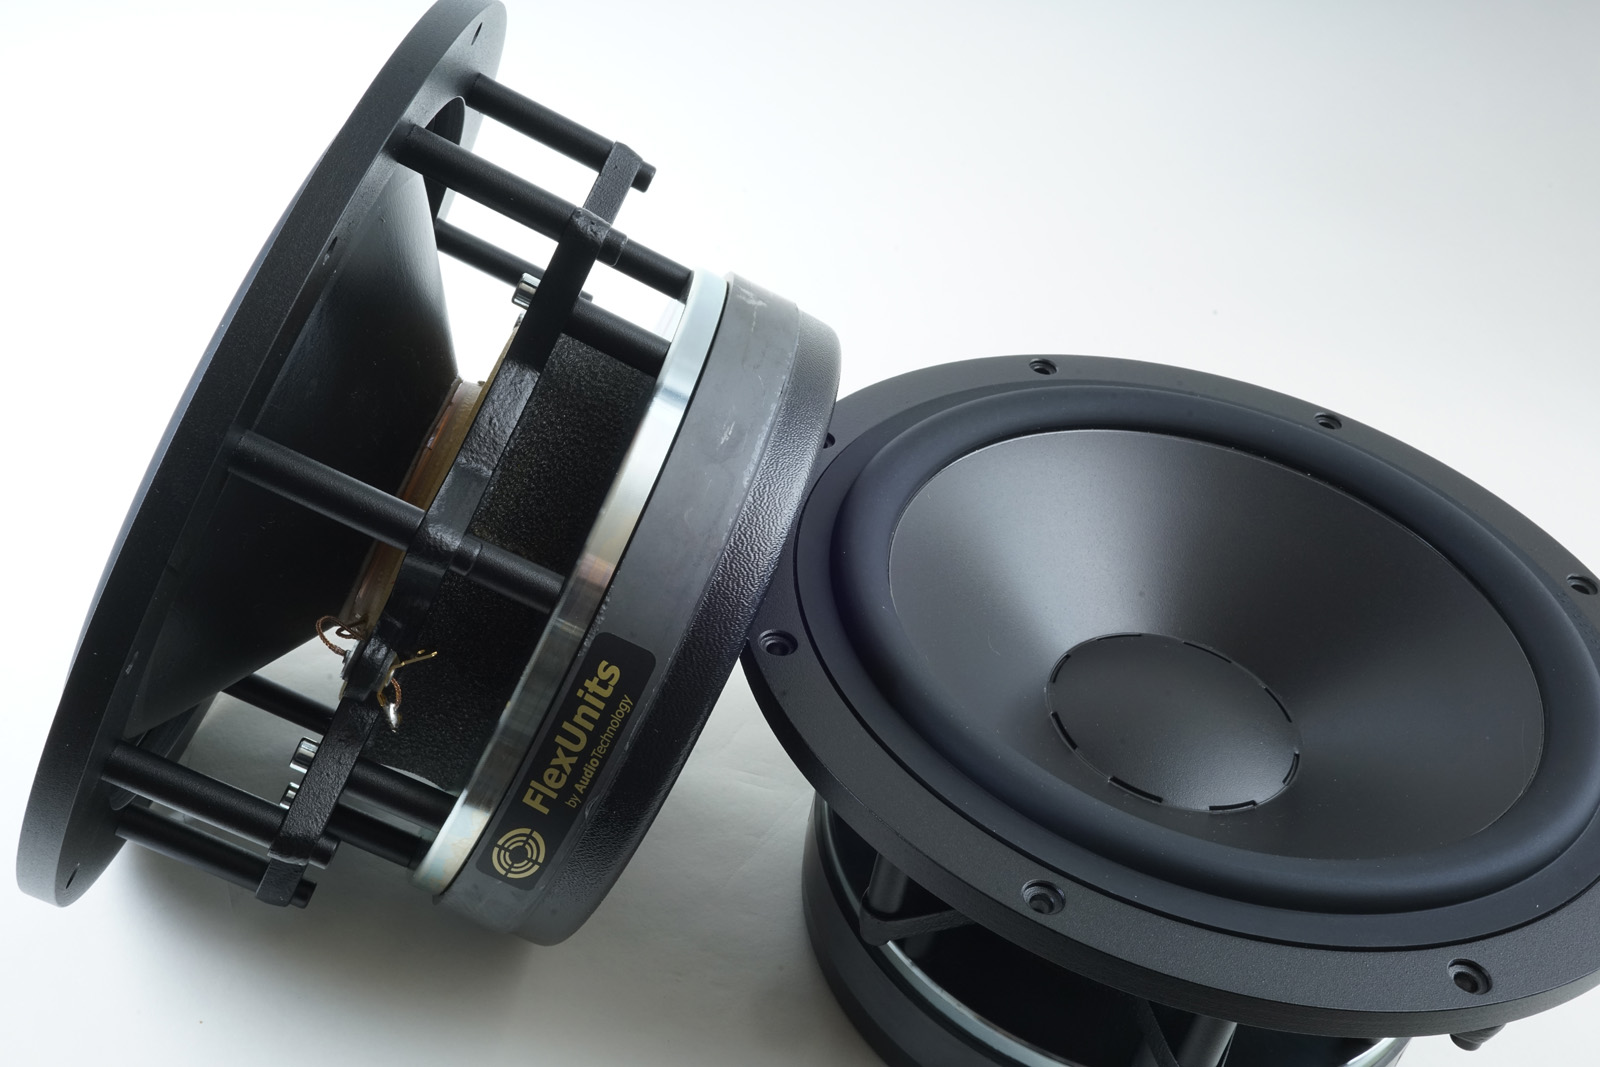
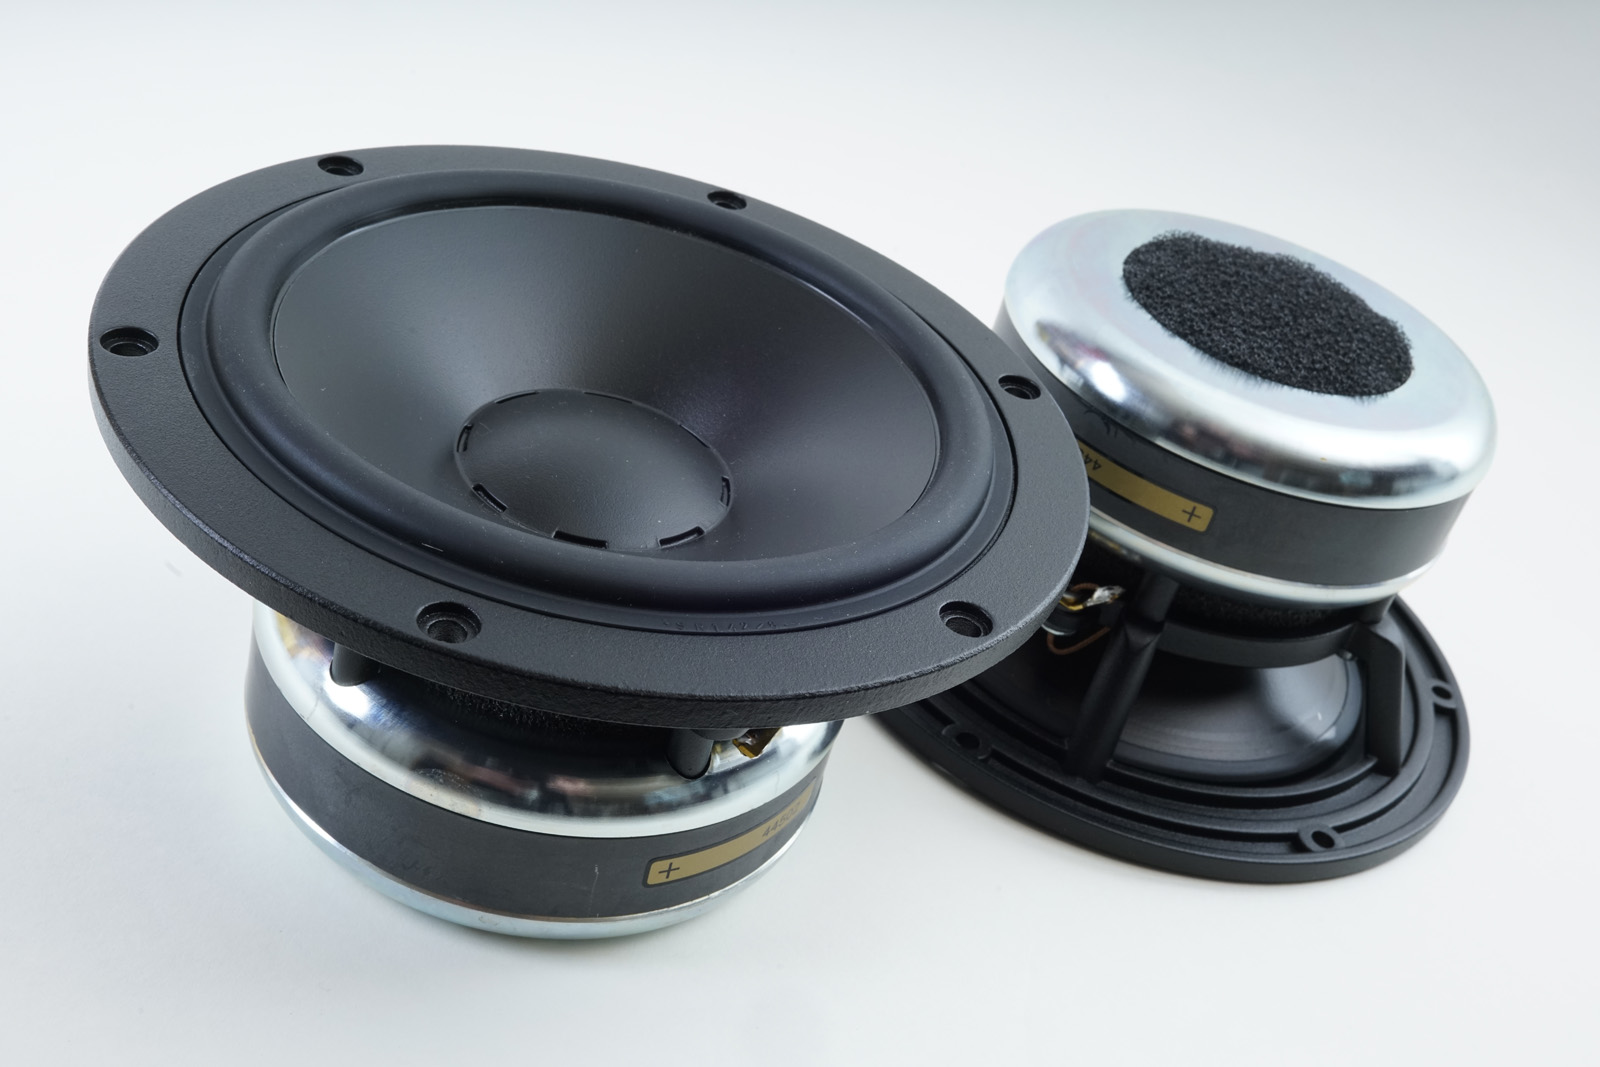
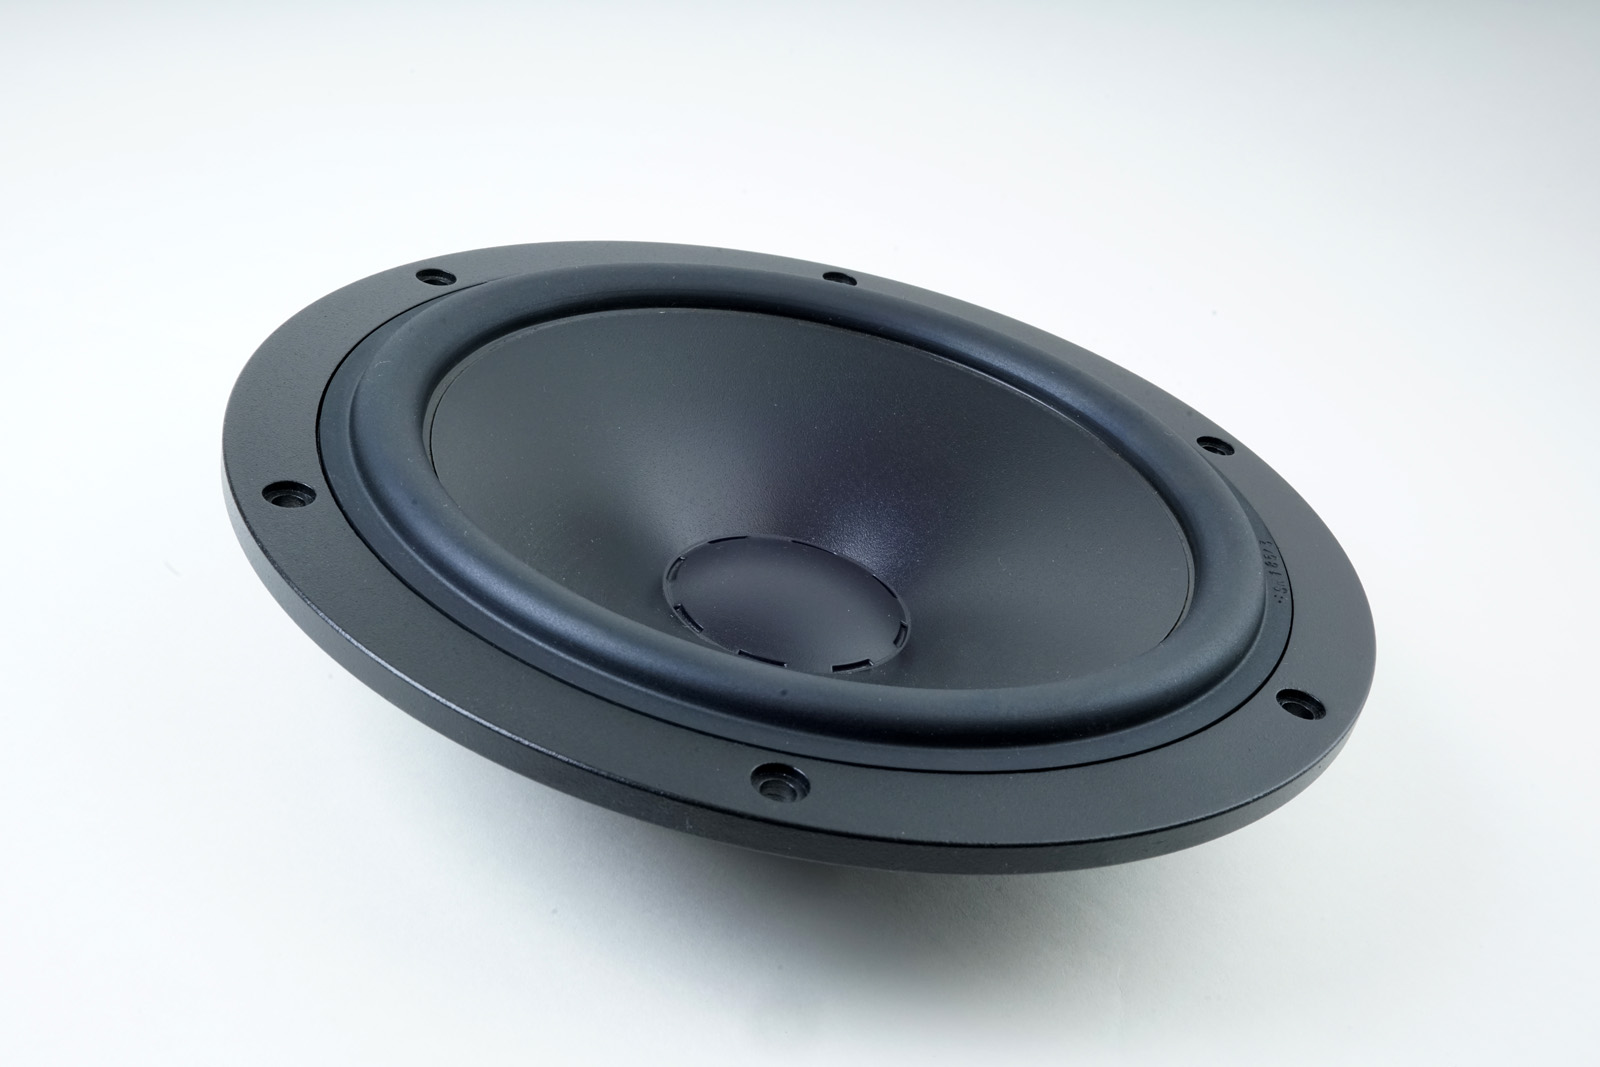
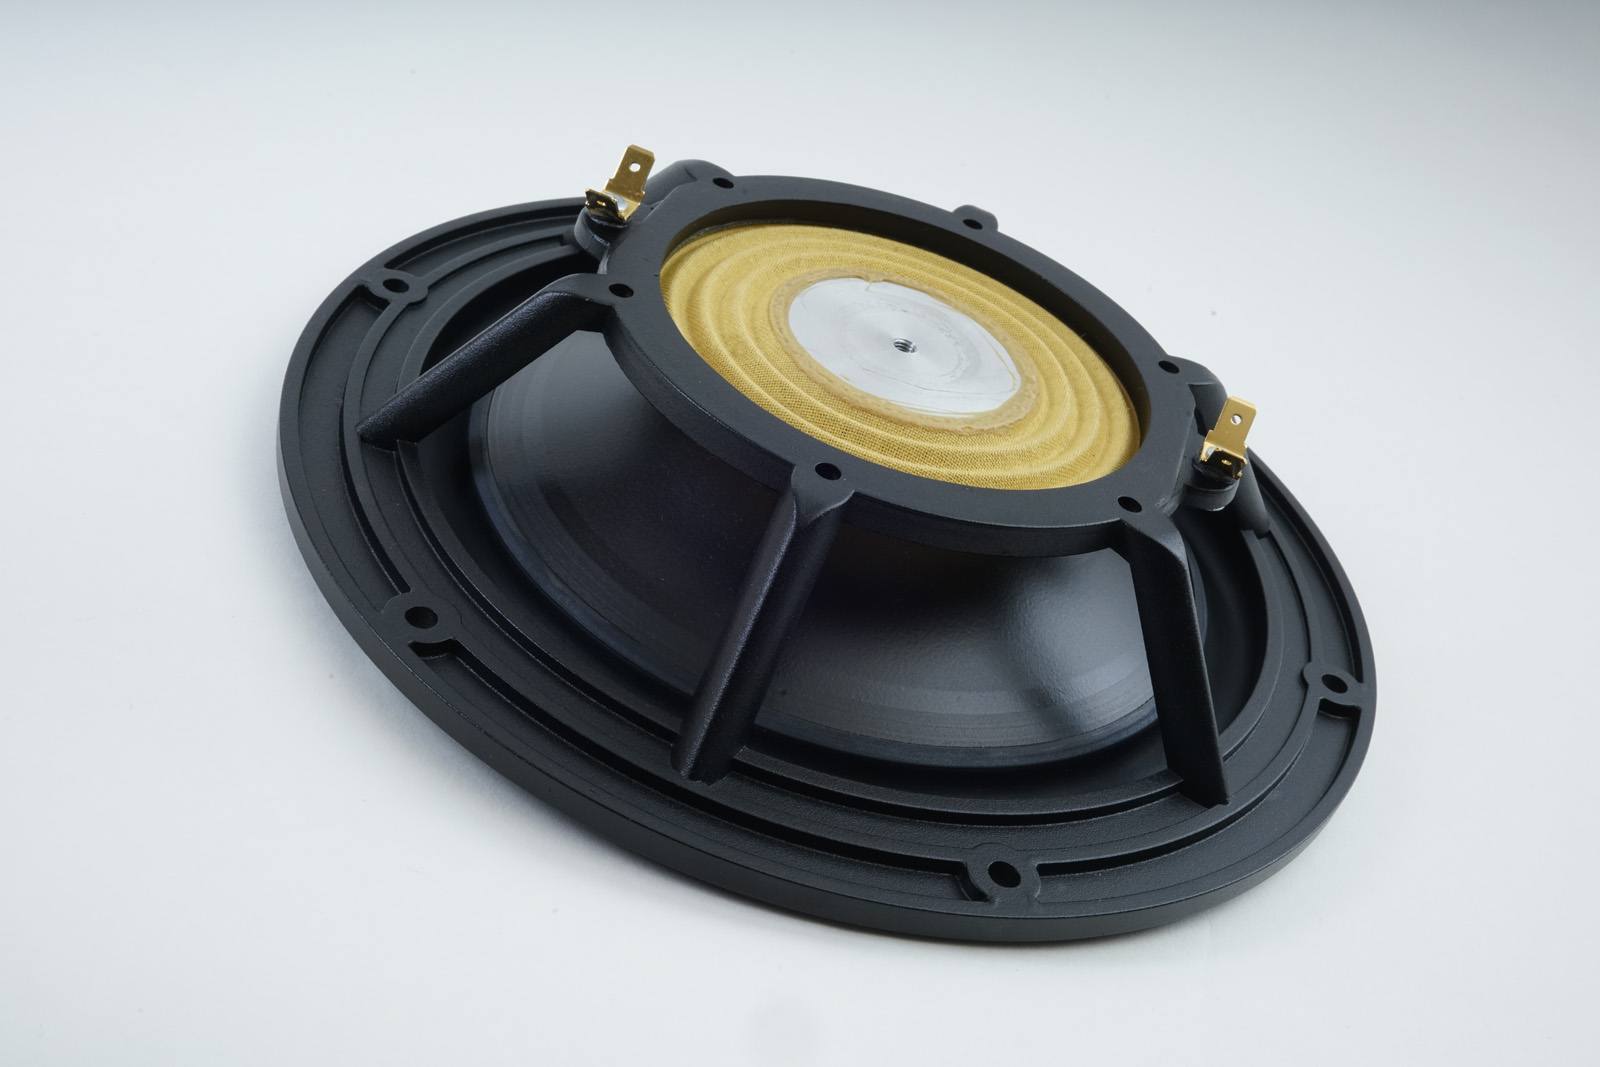
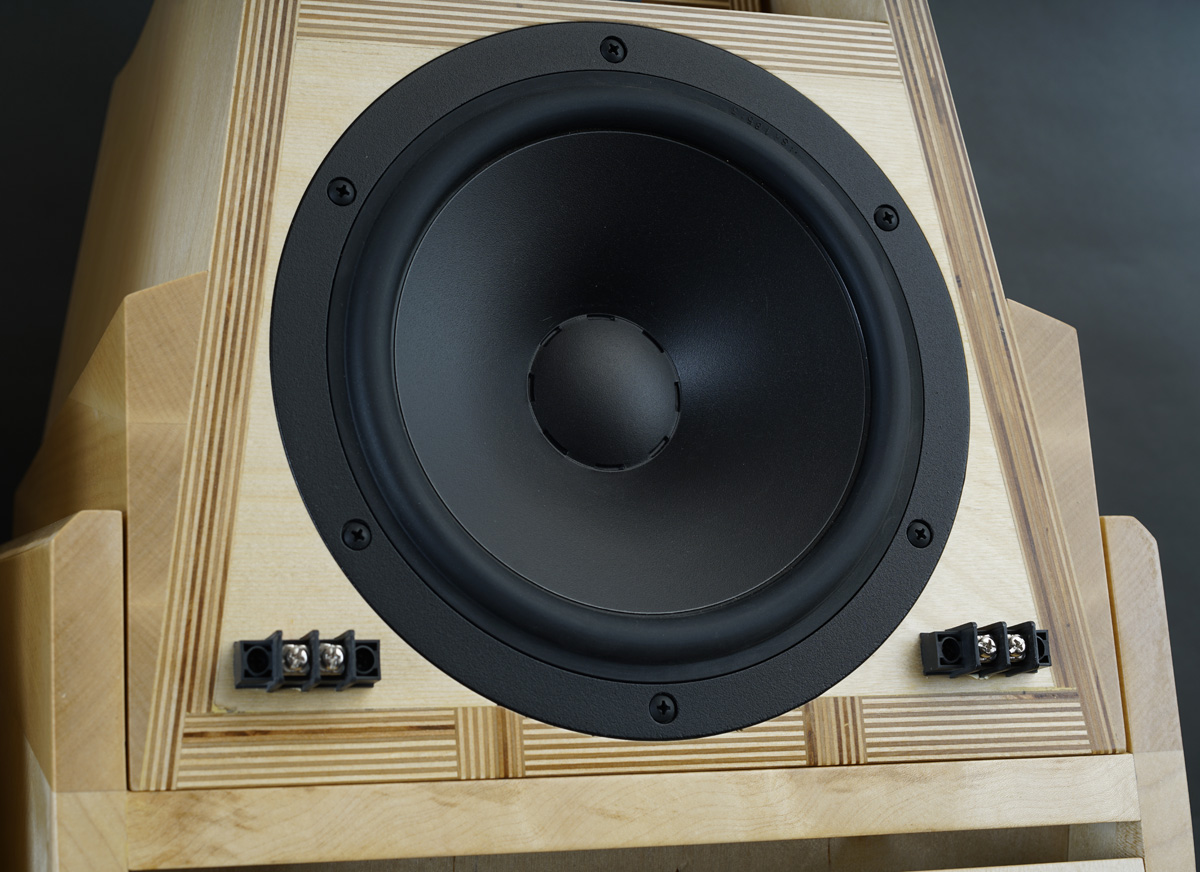
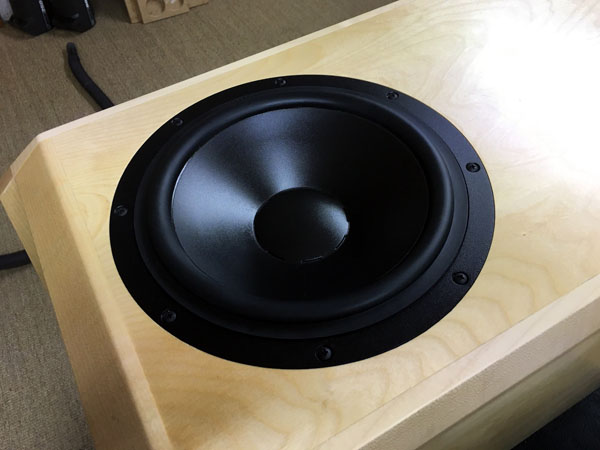
Second new kid on the block: 10C77-20-10-KA, Re 5.4 Ohm.
This simply is an awesome driver and very important for the efficiency
of this speaker system.
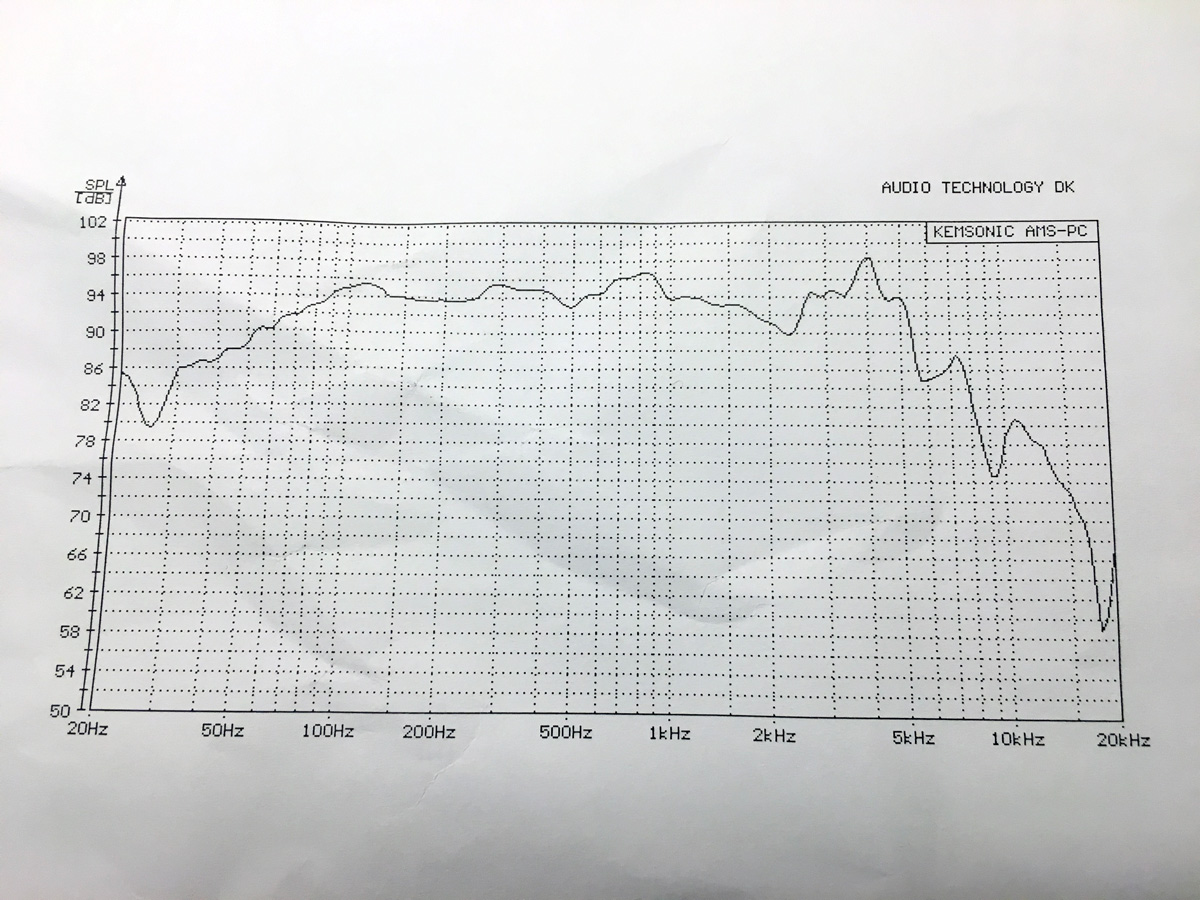
Frequency response of 10C77 measured at
AudioTechnology. 94 dB
sensitivity on an infinite baffle!
Quite nice frequency response too!


The workhorse for all of the above drivers, handling the lower octaves.
This BMS driver is supposed to be moving air - and it does.
With its 3"
voice coil it handles some 600 watts and it does whatever we ask the Hypex modules to do.
Download specs here: BMS 12N630 10C77-20-10 KA 18H52-0613-SDKA D2908/714000
Where to get the drivers
The ScanSpeak D2809/714000 tweeter comes with the kit from Jantzen Audio. See below.
The BMS bass drivers can be purchased from Thomann, very reliable
source:
https://www.thomann.de/gb/bms_12n6308_ohms.htm?ref=search_prv_7
AudioTechnology drivers:
Contact Per Skaaning at:
mail@audiotechnology.dk
2 pcs 18H52-06-13-SDKA (LR version), Re 5.4 Ohm
2 pcs
PR23, passive radiator, 15 grams, Cms 1 mm/N
2pcs
10C77-20-10-KA, Re 5.4 Ohm

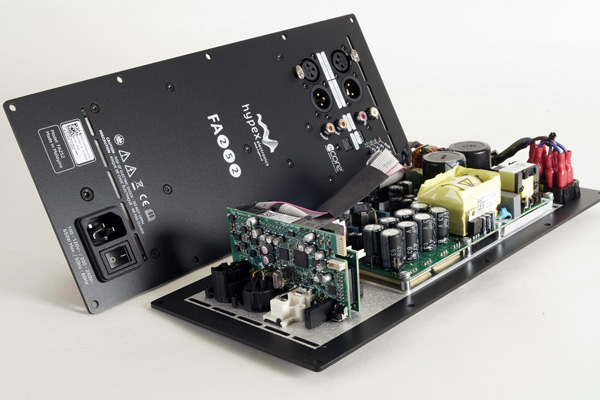
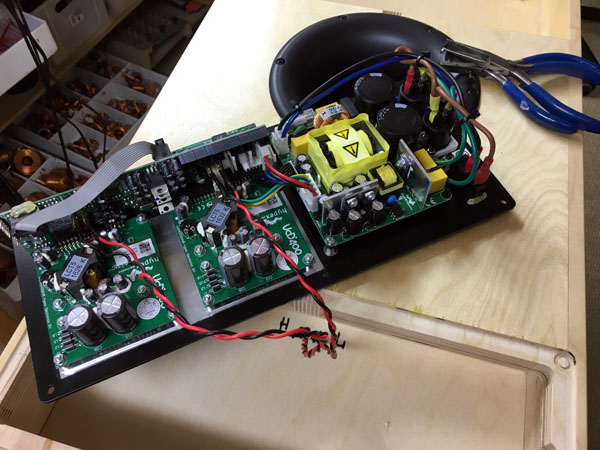
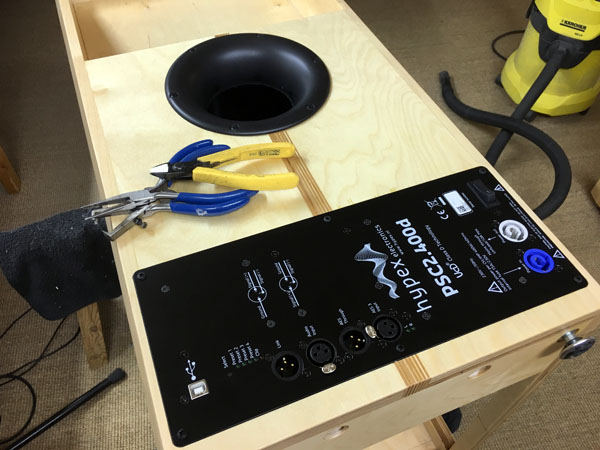
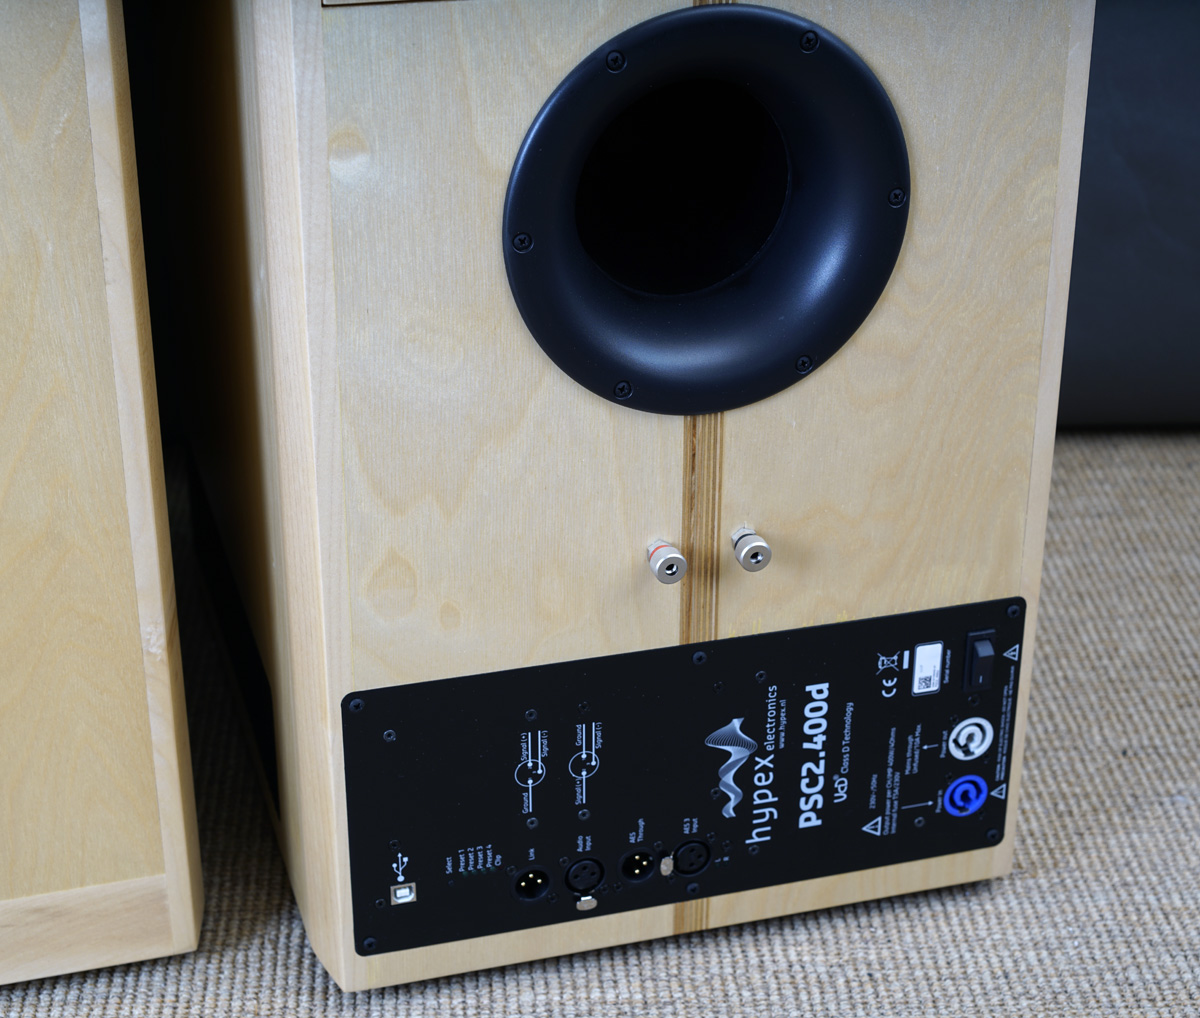
HYPEX FA252 MODULE
BACK TO INDEX
Click images to view large
Go to FA252 page for further instruction.
Driven in balanced mode from my preamp, the FA252 makes 28, 26 and 24 dB
gain from preset 1-2-3 respectively.
This should match most power amplifiers driving the MT section.
The FUSION FA252 gain can be set to match almost anything. Click link
above.
Above the fairly simple passive LR2 filter for the midrange and tweeter.
To the right the simulated response.
If you use a tube amp for the MT section you may add a 1 kOhm resistors
across speaker terminals or on the crossover board as some tube amp
designers have concerns about a tube amp running a pure capacitive load.
I never had any problems with this from my GlowMaster or EAR 861.
The passive radiator and terminals for midrange and tweeter.
And believe me, you don't get better connections than the terminal blocks!
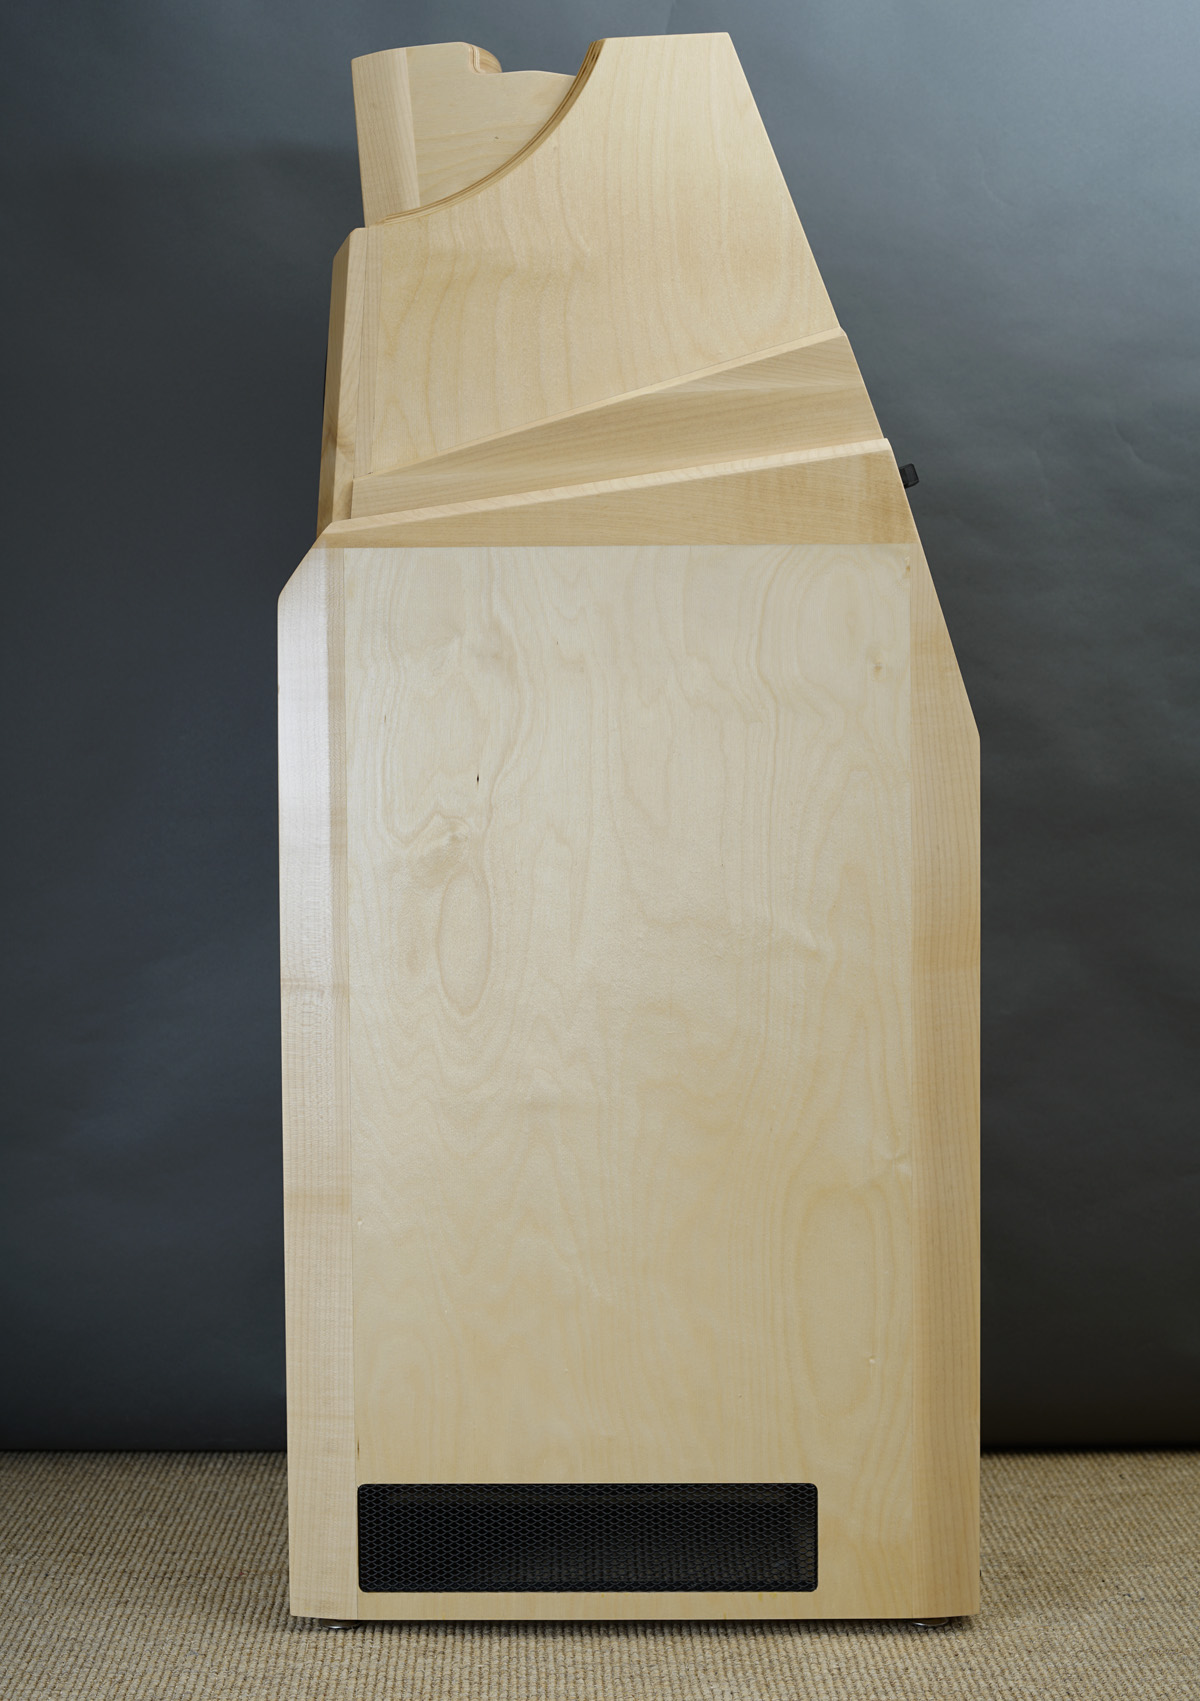
BASS CABINETS
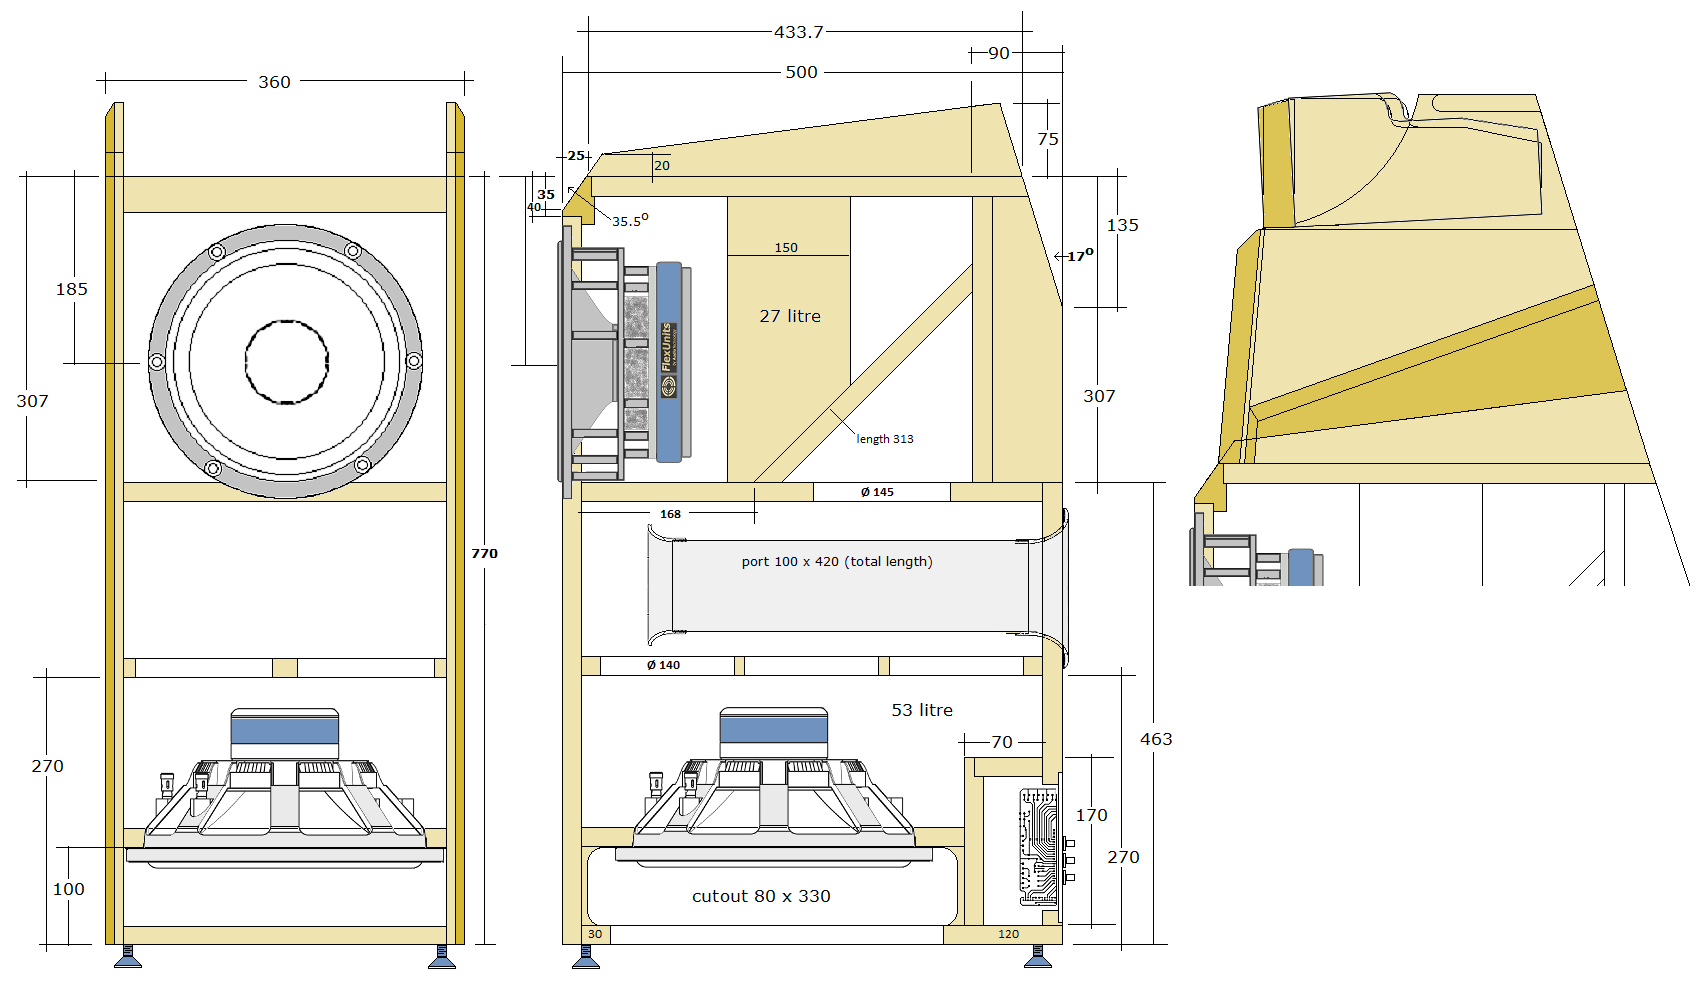
Click image to view large.
MID TWEETER CABINETS
Click image to view large.
As always: Any change to front panel design and drivers'
placement and you need and new crossover and I can't help. What's behind
the drivers is up to your as long as you stick to volumes and port
tuning.
Please read:
http://www.troelsgravesen.dk/crossovers.htm.
And please, all of it before writing.
No CAD drawings available.
Also check this file on construction tips:
http://www.troelsgravesen.dk/tips.htm
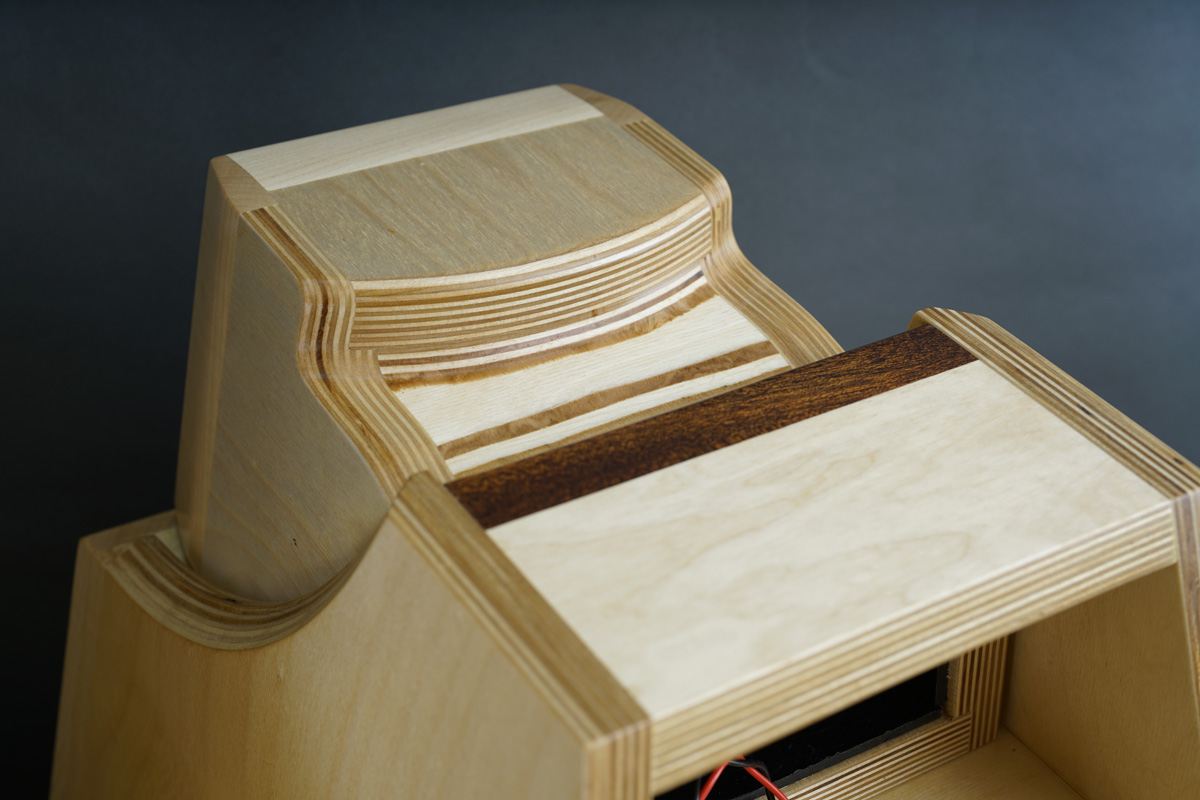
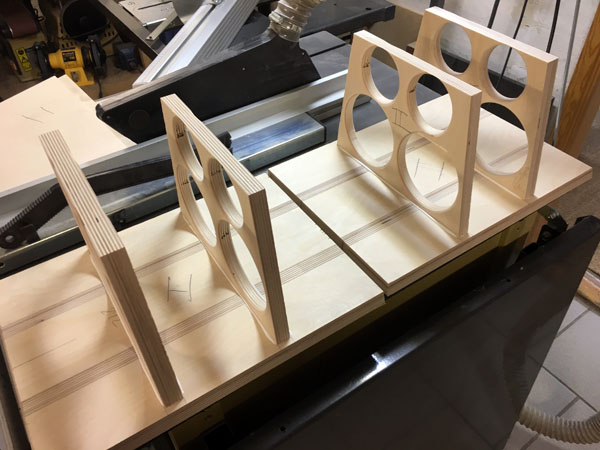
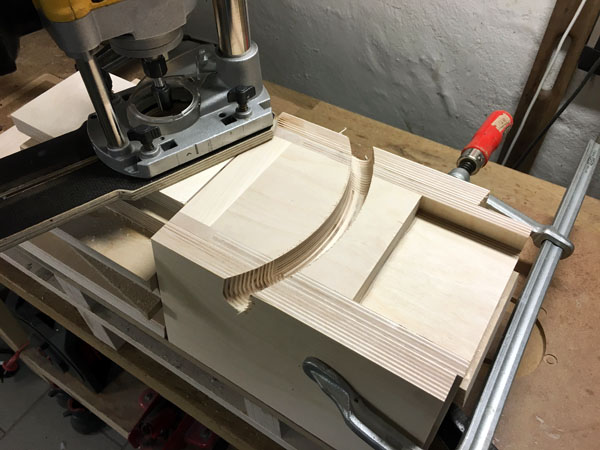
Some details on fillets and side bars for the midrange cabinet.
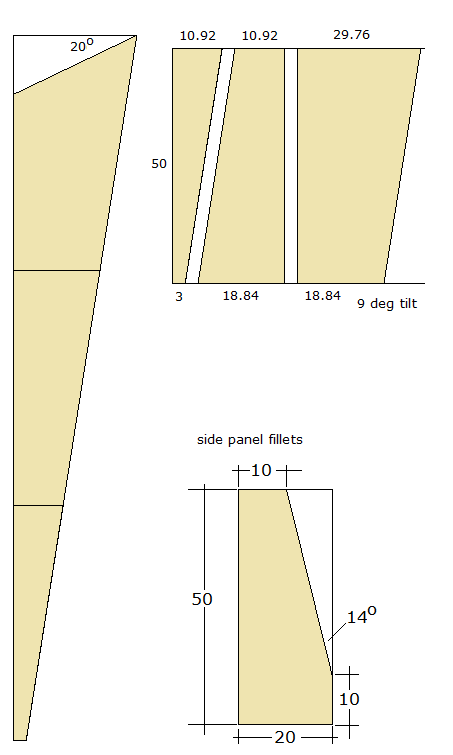
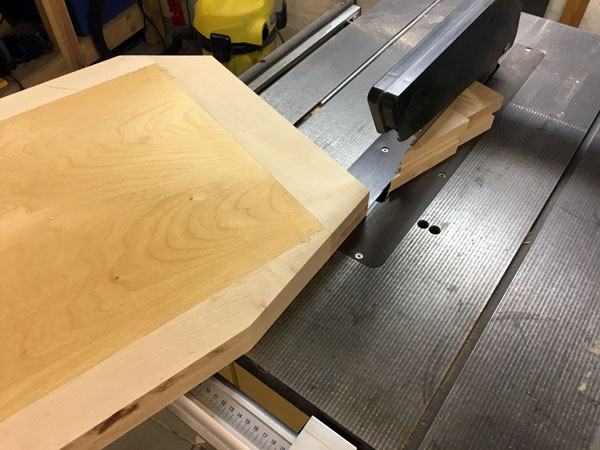
A slant of maple was planed to 50 mm thickness and cut in 3 sections and
glued together.
Horizontally they were cut at a 14 deg. angle and chamfered 20 deg.
Highest point is 150 mm.
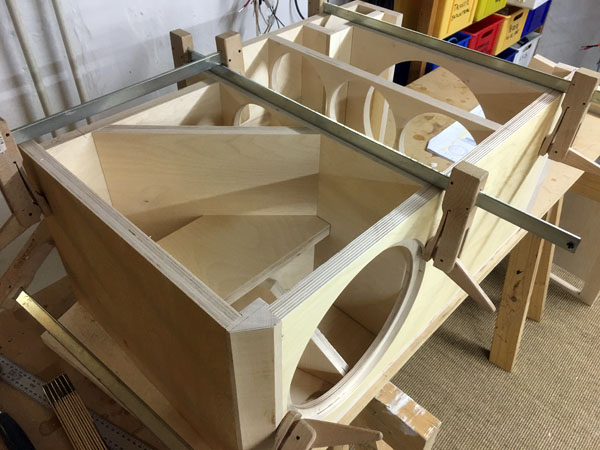
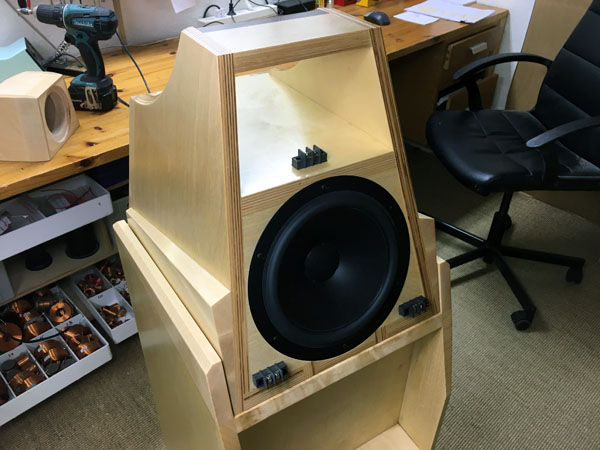
From the workshop
Every project starts with test cabs to see/hear if everything works as
intended.
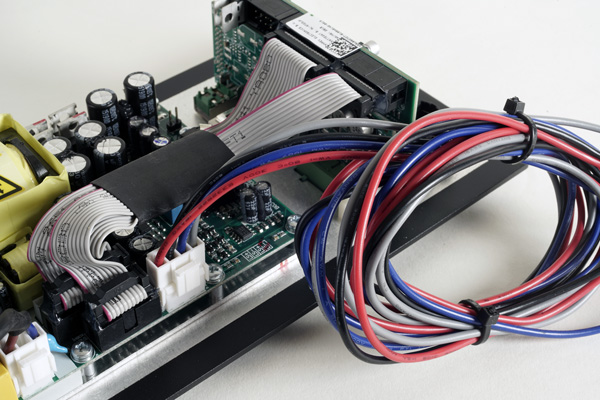
Next thing is getting the Hypex modules working and doing measurement to
align bass level with the intended response of the midrange/tweeter.
I do have to make a few comments on the software following the Hypex
modules. It's written by geeks - for geeks. Any Apple intuitive programming is
far off. The Hypex modules can do a thousand
things and we only need it to do a few. All that said, trial'n error
quickly produced the results I wanted and using my CLIO measuring
system, I could check if things were as predicted. The good news is that
should you decide to build this speaker, you can download the actual
file for the speaker
here. Once
you have connected the Hypex to your computer and have your firmware
installed, you open the file in the program and upload this
to the Hypex module. That's it! This obviously has to be done for both
modules. Each module has to channels. Channel 1 is for upper 10C77 bass and channel 2 is for the 12" BMS
bass driver, so be sure having your drivers connected to the correct
modules. The great thing about all this is that you can adjust bass
levels to adjust for room conditions, something that is practically
impossible with passive filters.
Please note: If you have problems with your Hypex modules,
please ask Hypex, not me! I've now bought eight of these modules
and haven't had any problems at all.
Link to Hypex FA252 page
here.
Left:
First time workshop set-up for crossover fine-tuning with generic 10"
upper bass driver.
Right: The final
drivers in place and further living room fine tuning.
This 10C77 PP driver is just phenomenal! Sorry, think I said that
before.
Now, the mockup system is so far in development that it's time preparing for the 200
workshop hours making the final cabinets.
It takes some kind of mental preparation starting cutting sheets and
making maple fillets. A lot of work!
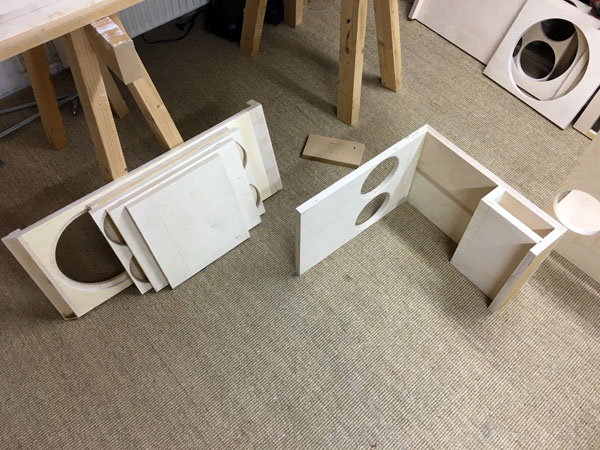
The real cabs
BACK TO INDEX
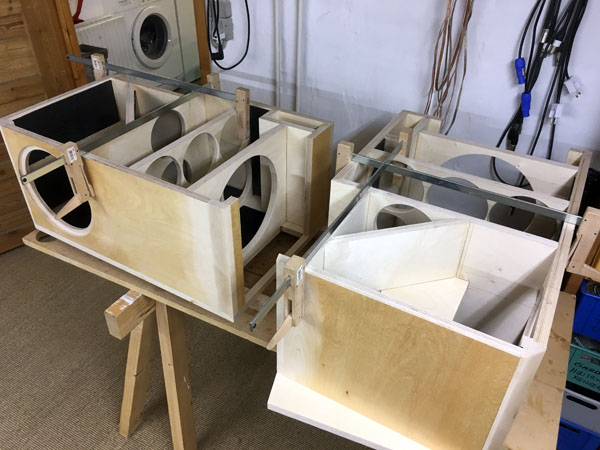
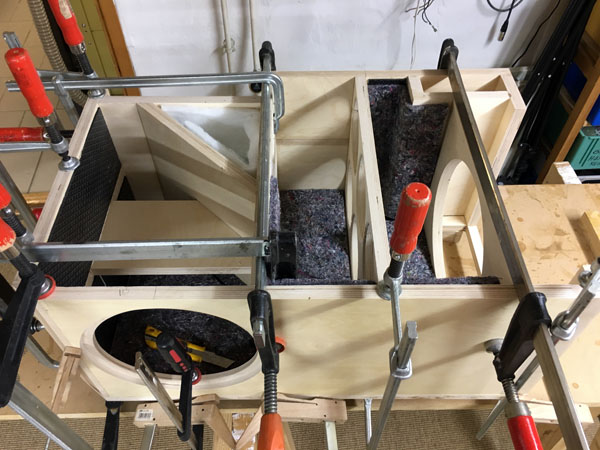
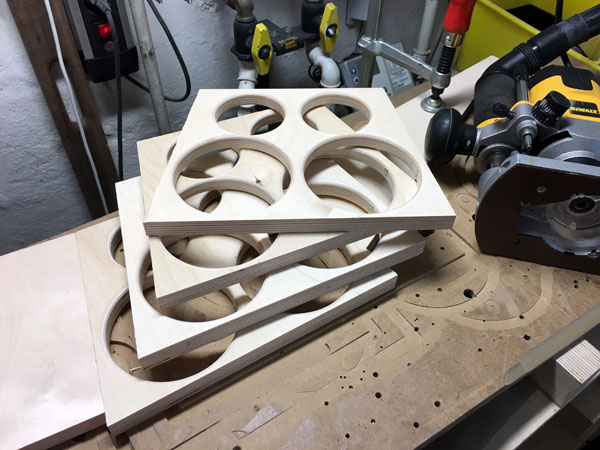
Making the bass cabs, workshop images
As always: Any change to front panel design and drivers'
placement and you need and new crossover and I can't help.
Please read:
http://www.troelsgravesen.dk/crossovers.htm.
And please, all of it before writing.

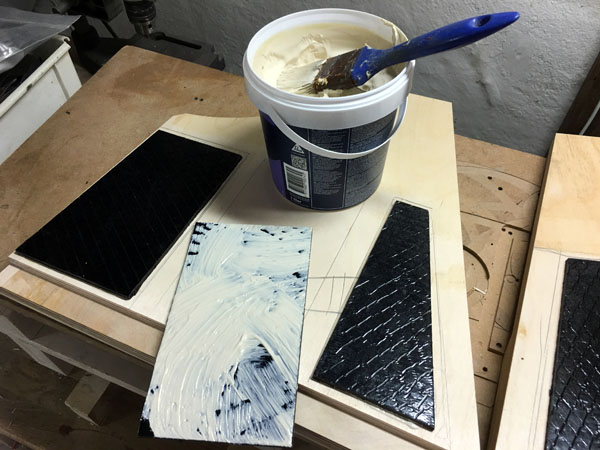
The bitumen pads are optional and
must be added to your order.
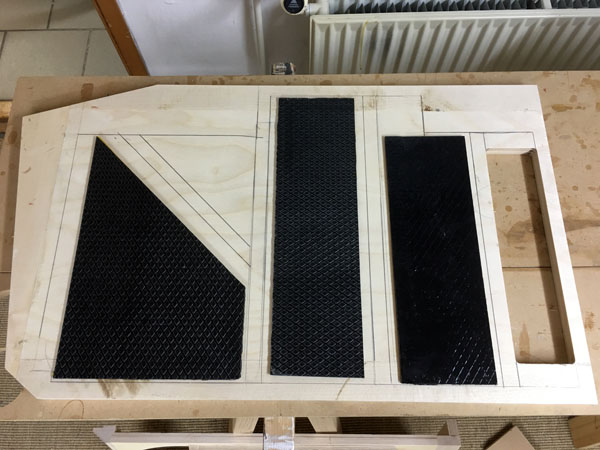

4 mm bitumen pads for two cabs:
4 pcs 35 x 14 cm: top panel:
2 pcs 50 x 25 cut like this:
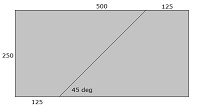 : Upper
bass, sides.
: Upper
bass, sides.
4 pcs 45 x 12.5 cm: bass cab, upper section.
4 pcs 38 x 12.5 cm: bass cab, lower section.
4 pcs 30 x 12.5 cm: front panels.
2 pcs 30 x 25 cm: upper bass cab, rear of 45 deg. panel.
Total amount: 1.161 sqm, 1.25 sqm supplied with kit (5 sheets 50 x 50 cm).
The bitumen pads are optional and must be added to your order.
Click image to view small video on bitumen pads
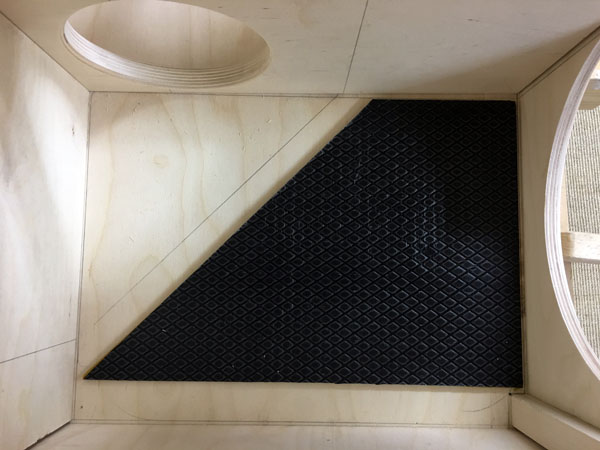
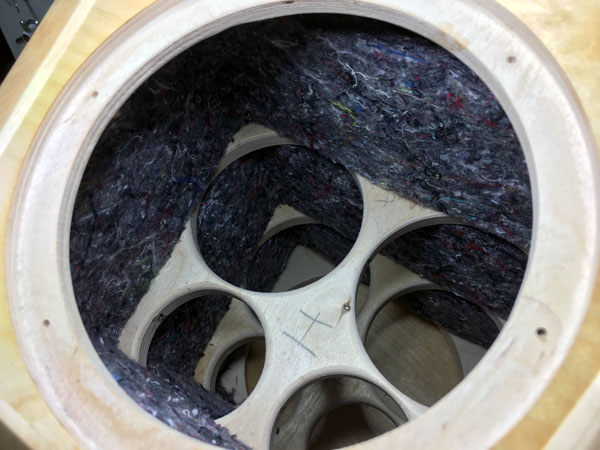
Right: 30 x 50 cm acoustilux behind 10C77 bass driver.

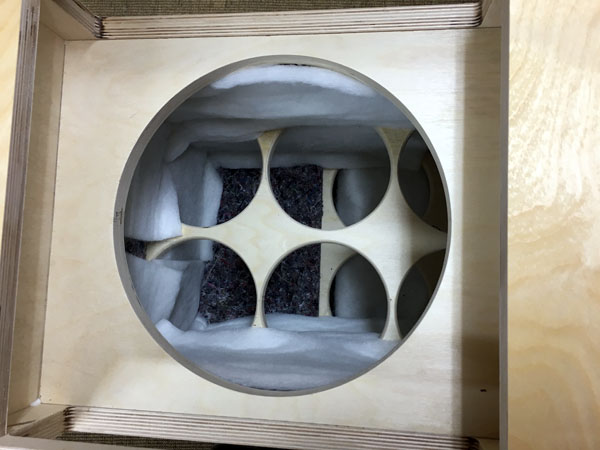
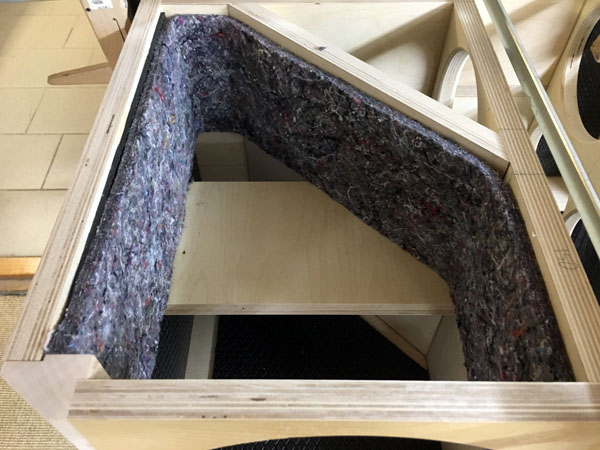
Bass cabs with felt and acoustilux.
Felt cutting for bass two bass cabs:
4 pcs 87 x 14 cm (upper bass)
4 pcs 45 x 15 cm (sides i lower bass cab)
4 pcs 38 x 15 cm (sides in lower bass cab)
4 pcs 20 x 30 cm (bottom panel of 10C77 cab)
4 pcs 15 x 30 cm (front panel)
2 pcs 28 x 51 cm (side panels for 10C77 cab, cut travers to fit shape)
2 pcs 30 x 20 cm (round Hypex cabinet)
Total 2.81 sqm. 3 sqm supplied + felt for mid cab.
Acoustilux
2 pcs 30 x 50 cm (behind 10C77 cab)
8 pcs 16 x 100 cm (12N and 10C77 cabs). View images.
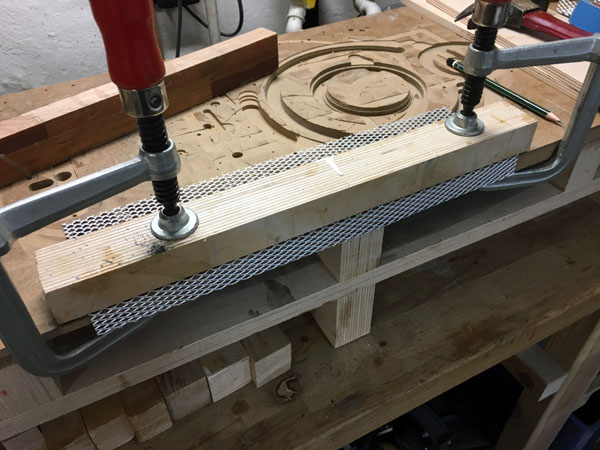
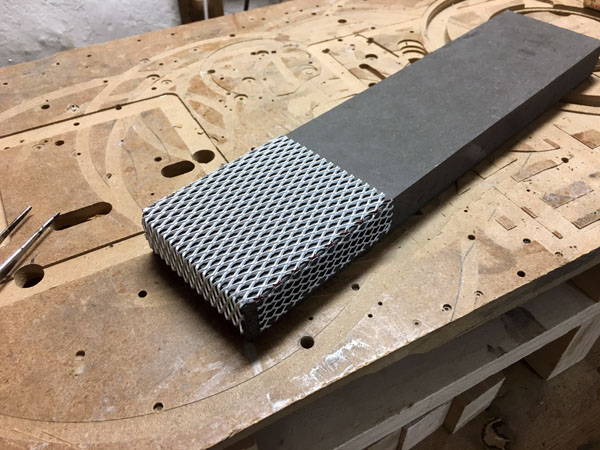
Chamfering side panels fillets. Fillets are 20 x 50 mm and the
chamfering is 10 mm wide and 40 mm deep. Angle 14 deg.


Sometimes a frame and additional support is needed for making perfect
routing. Here for the Hypex modules.
Flush mounting is not really needed, but here all sails are set.
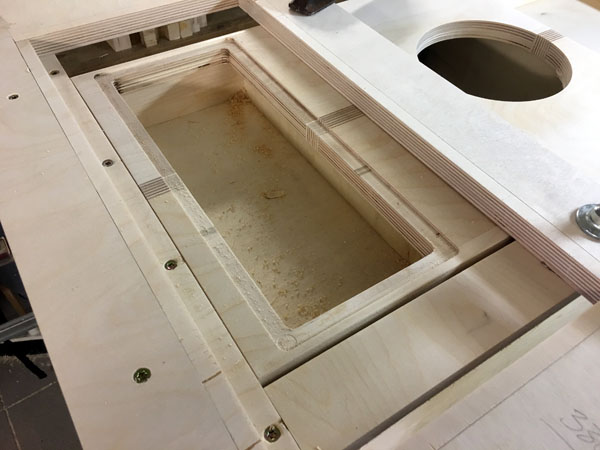
Routing for Hypex and port finished.
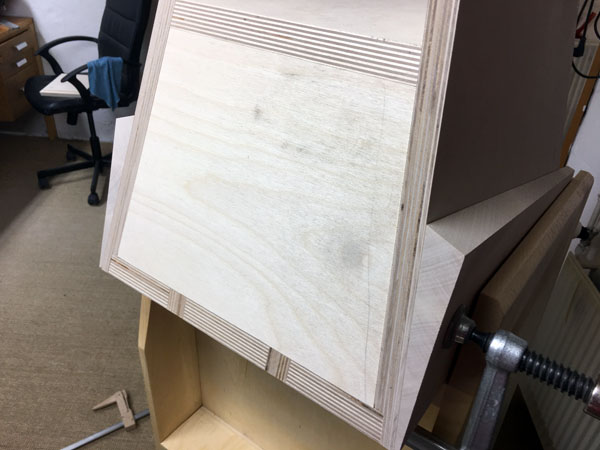
Bass cabs ready for filler, sanding and lacquer.
Building speakers like these is a long process, probably more than 200 hours. Once and awhile you place the half finished cabs on the workshop floor, go to the kitchen to make coffee and sit back and evaluate what you have done so far. Are all the joints correct? Do they visually start resembling the speakers you had in mind in the planning stage? You try forgetting all the small imperfections you know nobody else will see. Sometimes it takes a good night's sleep before you can really see what you have done. There are ups and downs in any speaker building process and these are the 8th speakers I've done based on this basic design with separate cabinets for bass, midrange and tweeter and this time there were a number of things I just knew how to do right. I'm talking technicalities in terms of woodwork. From the test cabs I know it works sonically and I'm looking forward to the day they go into our living room. Still some 100 hours left.
More workshop images.
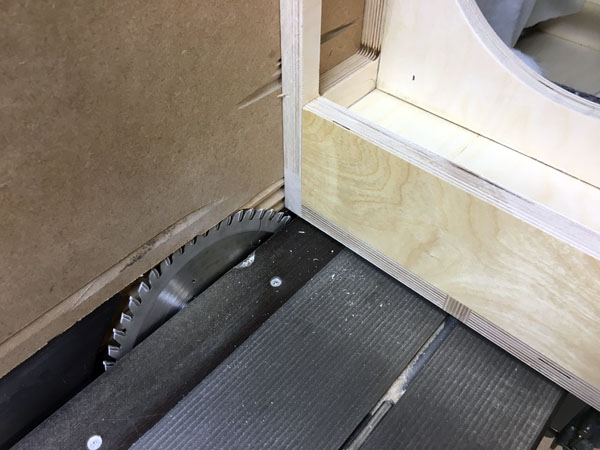
Time for drilling all the holes needed, port, wires, support for feet,
etc.
I made two holes for ventilation of the Hypex modules. Not needed, but
doesn't hurt.
Left: After the final sanding, Araldite is fixating the nuts for the
feet and left over night for curing.
Right:
Fine-tuning the Fb. For a straight 100 mm port we can almost count on
math and not do the usual x 0.7 corrections, as is mostly needed for
small ports to make proper length. With port tuning of 30 Hz we need a
420 mm length. The actual tuning may be around 28 Hz, but I'll leave the
port length at 420 mm.
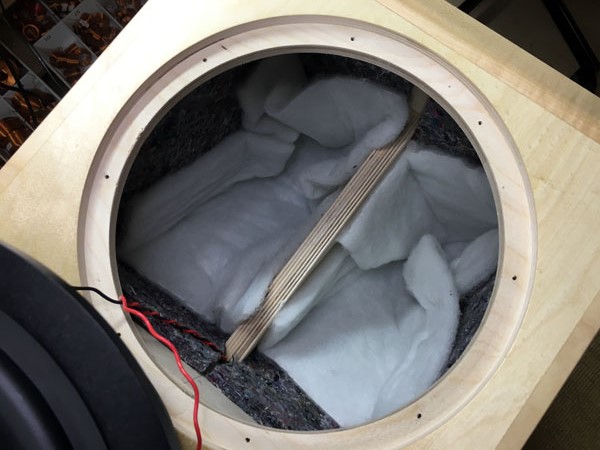
Add two pieces of acoustilux, 30 x 50 cm, to the upper bass cabinet.
Installing port and Hypex module.
Now replaced by FA252 modules, which are slightly smaller.
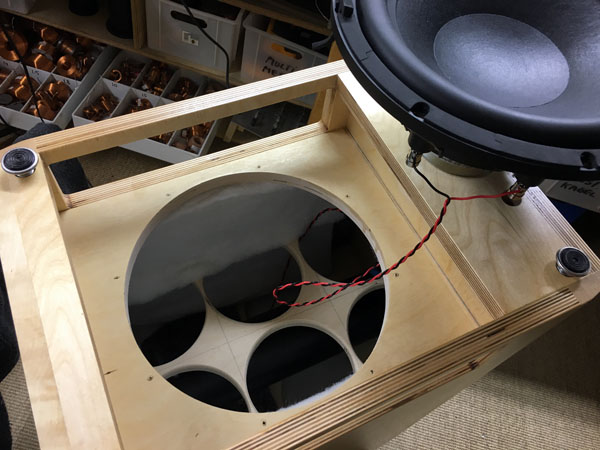

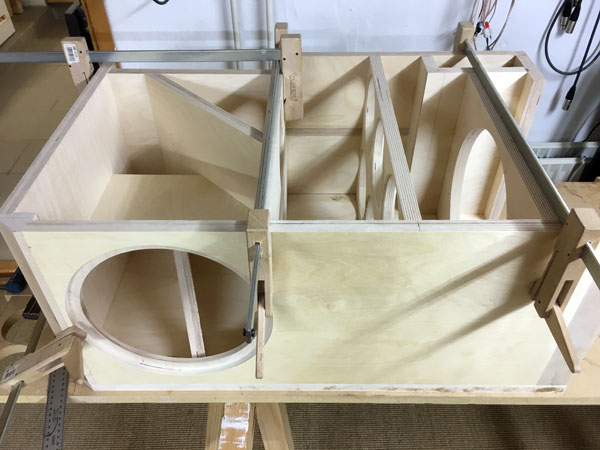
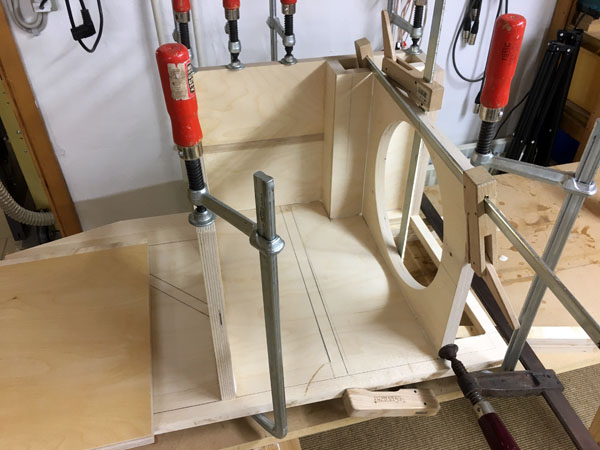
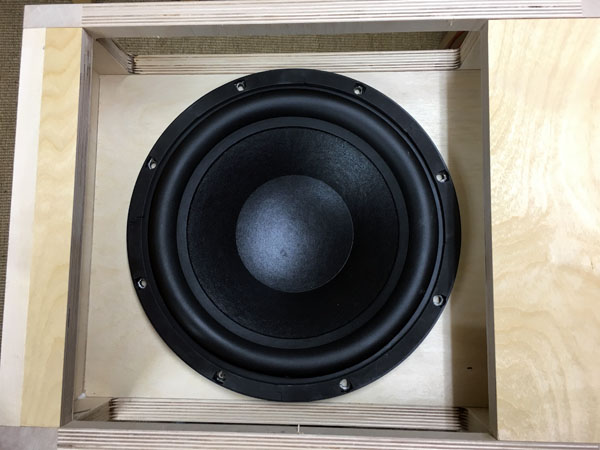
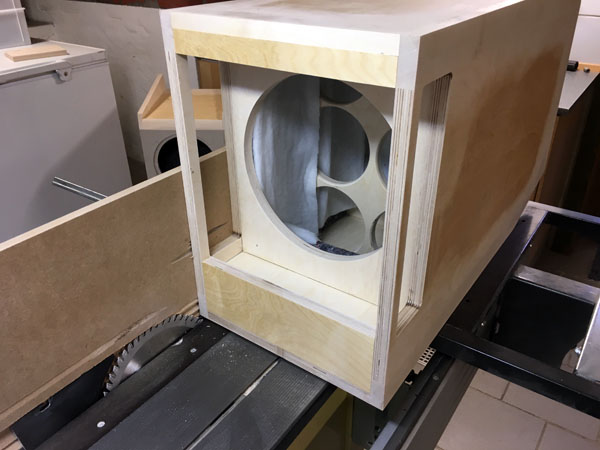
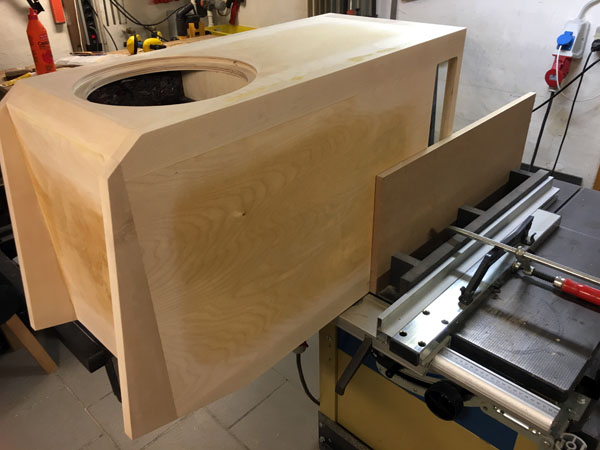
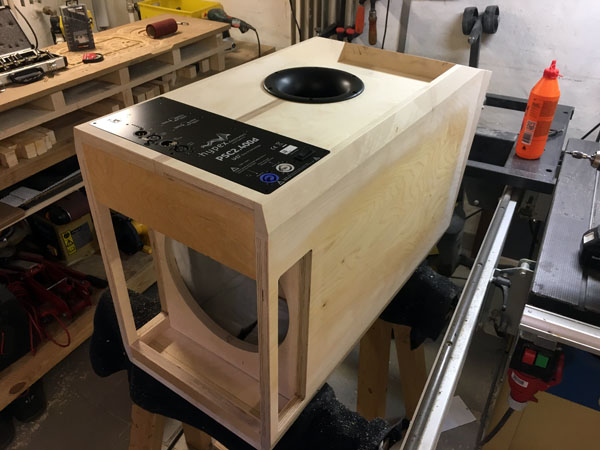
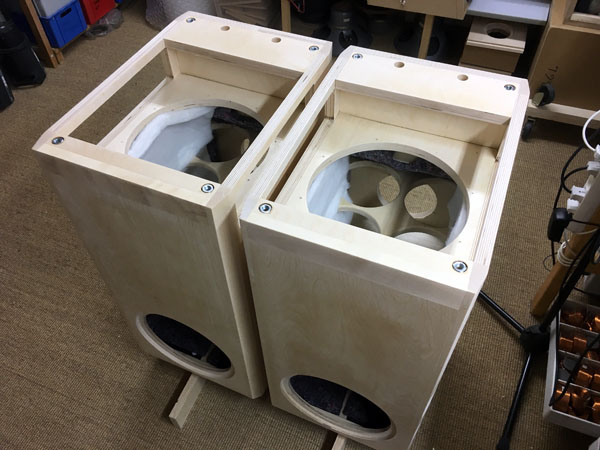
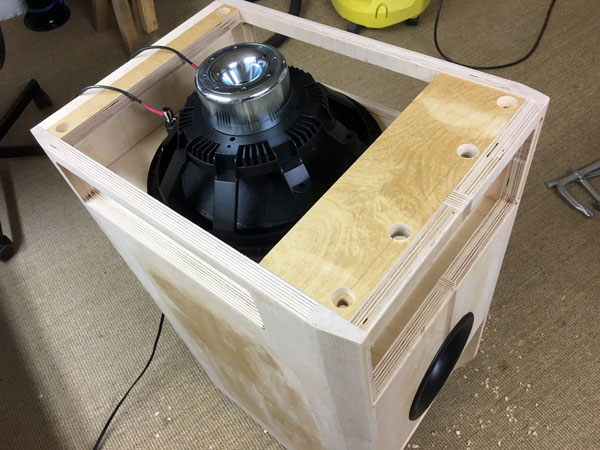
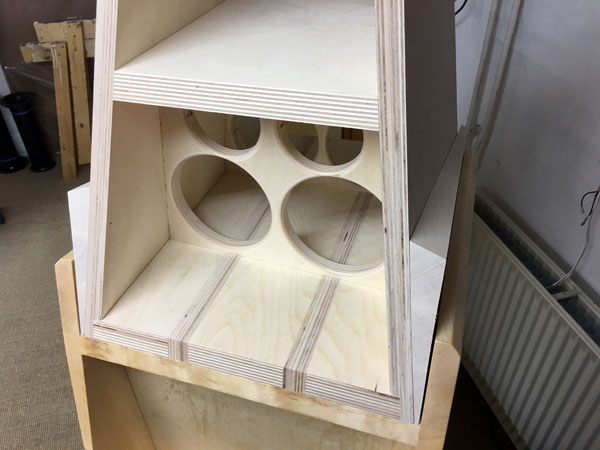
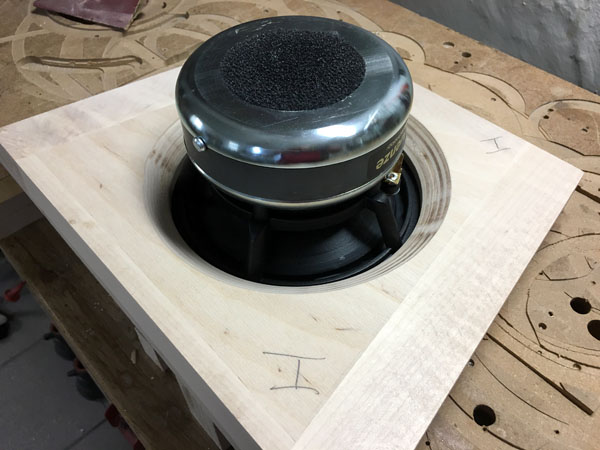
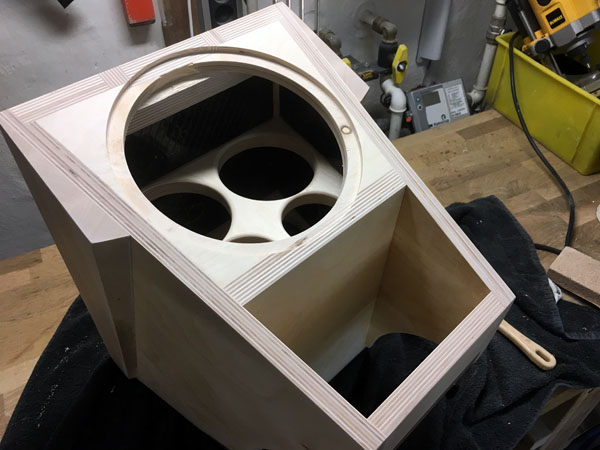
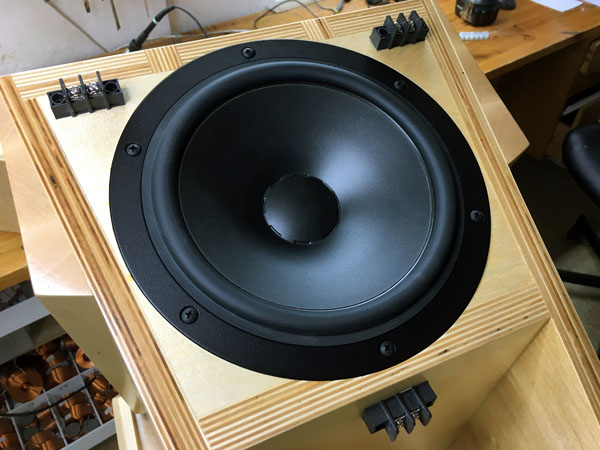
Installing BMS unit and bass cabs finally finished.
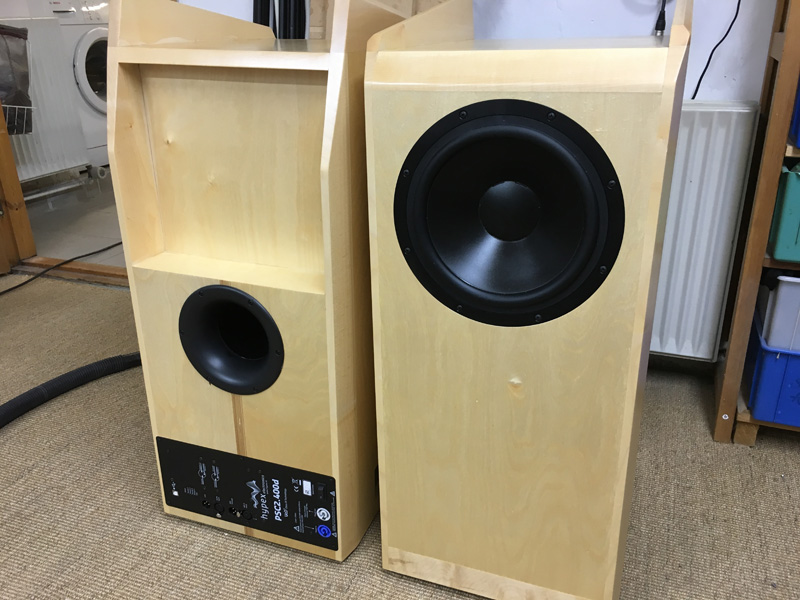
Finally! The finished bass cabs. OK, still needs cover panel for the
crossover and metal grilles for the BMS cutouts.
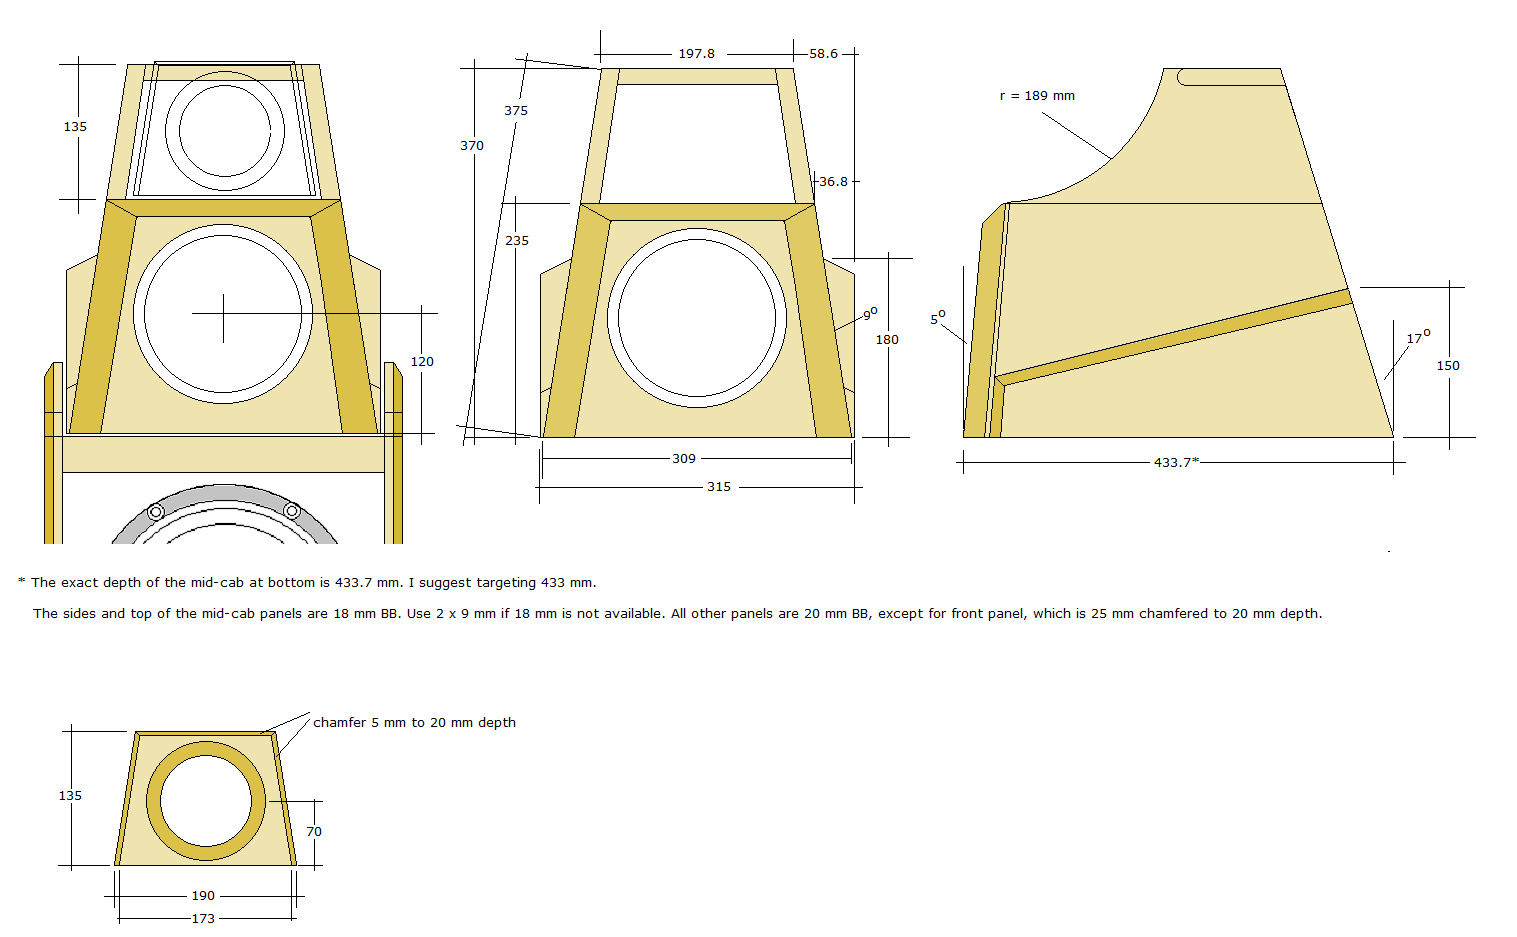
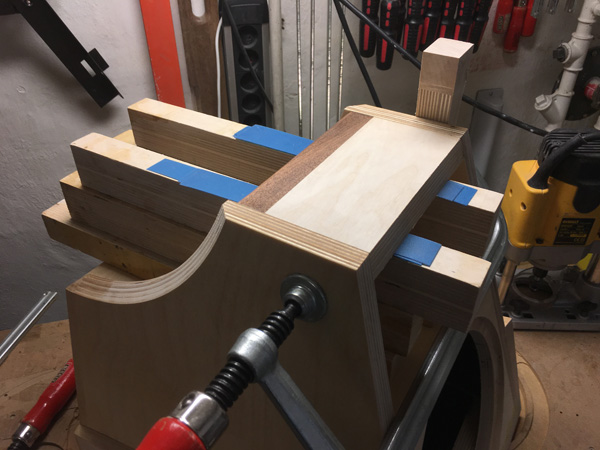
The midrange cabinet
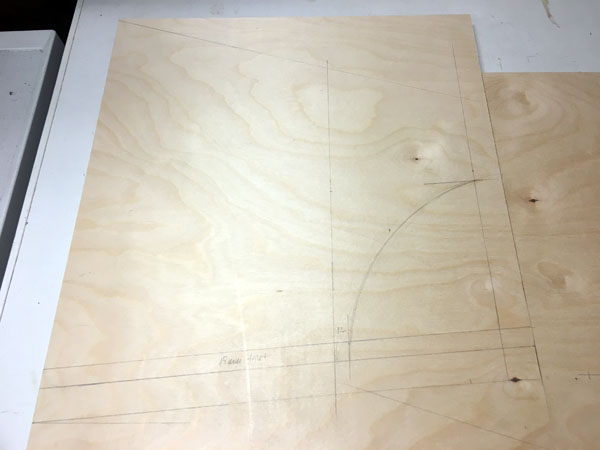
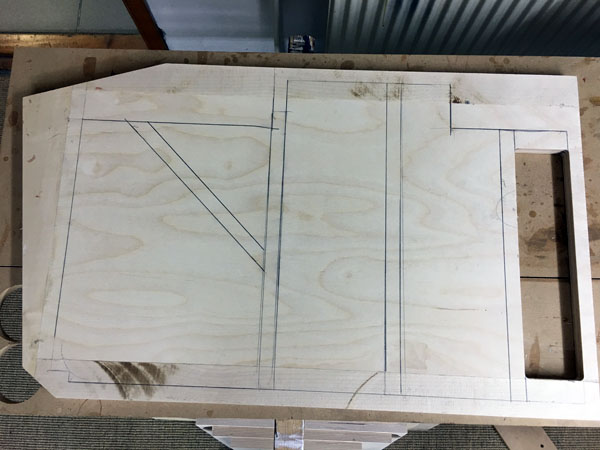
Start drawing the side panels and but front and rear, 5 and 17 deg.
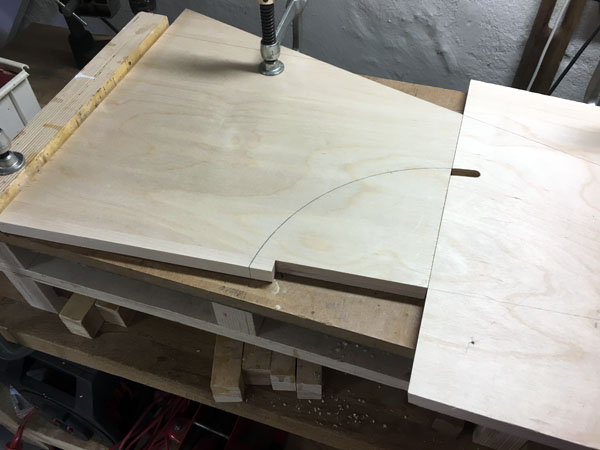
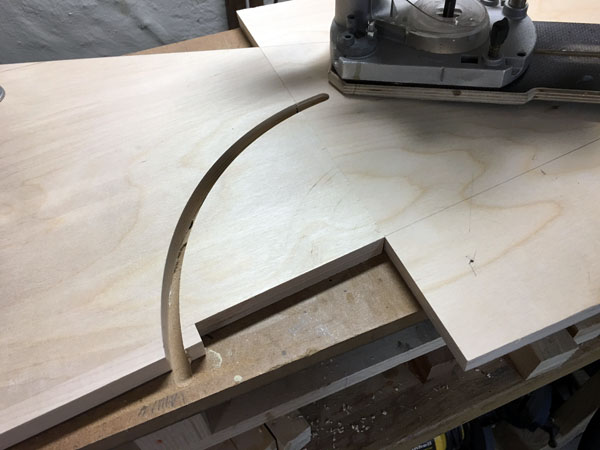
Do the cutout routing, r = 19 cm. Chamfer 45 deg. some 13 mm deep.

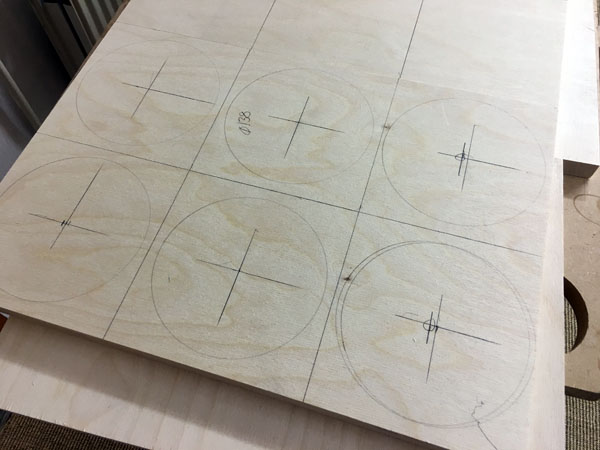
Making speakers like these produce a lot of waste!!

The mid-cab holds two bracing.
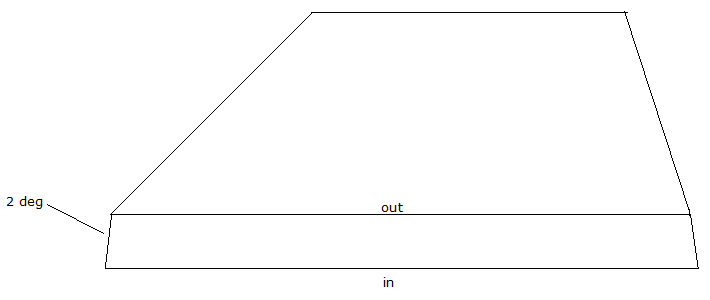
Doing the rear panel is tricky! Top and bottom is easy: 17 deg., but the
sides have to be cut some 8.5 deg. and some 2 deg. outwards because the
panel is tilted inwards. Start with the two 17 deg. cuts and adjust the
vertical angle at one side and check how it fits and adjust the vertical
angle as you go along. Add a fillet to the top panel to keep the rear
panel in place, otherwise it's major trouble keeping the rear panel in
place.
Here an exaggerated view of the rear panel.
From my construction the vertical cuts were 8.5 deg. with the table saw
tilted 2 deg. towards the side facing the cabinet.
Top and bottom both cut 17 deg.
The vertical cuts may have to be adjusted to your actual situation.
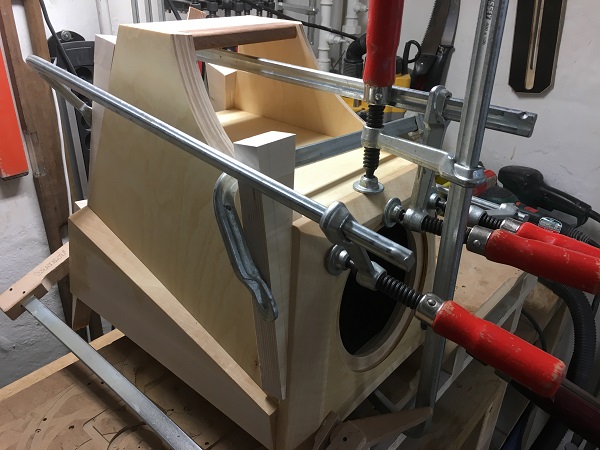
Things happen when we start building asymmetrical pyramids!
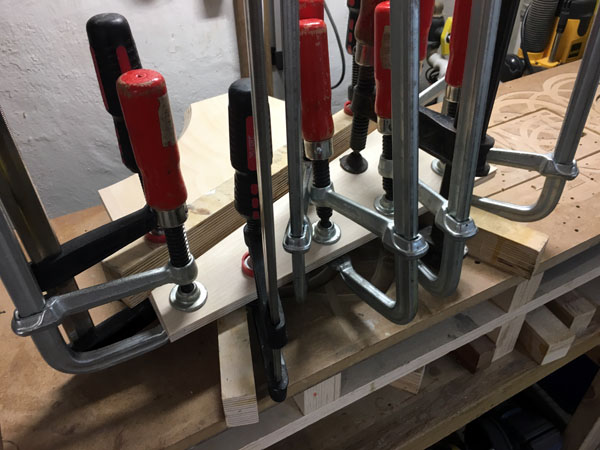
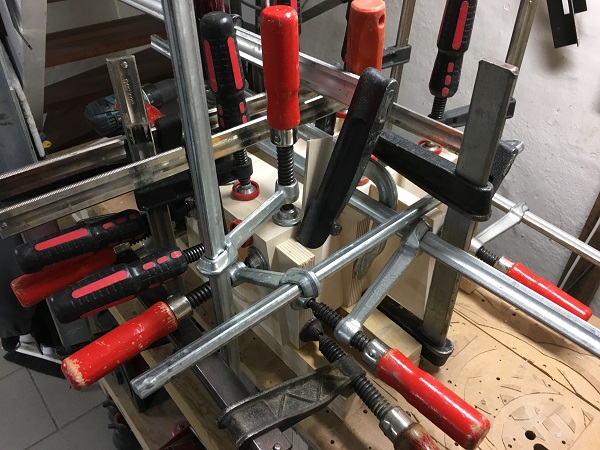
Left: Gluing the bracings in place. This will ease any further set-up
enormously.
Right: Gluing the side panel reinforcements. Place bar on top as any
pressure to the panels will make them slide upwards.
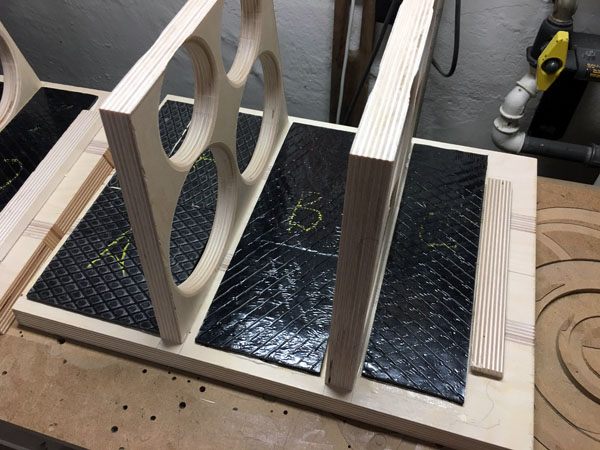
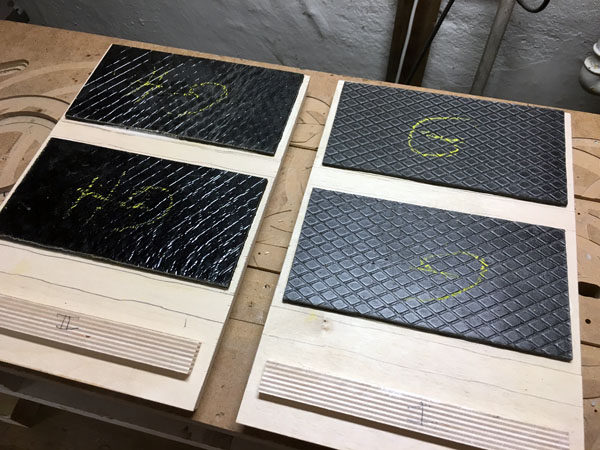
Bitumen pads on bottom panel, top panels and below side panels.
The bitumen pads are optional and
must be added to your order.
In total I used 0.42 sqm 4 mm bitumen pads for the midrange cabinets.
0.5 sqm supplied (two sheets of 50x50 cm) with the kit (optional, but I
strongly suggest using this at least for the midrange cabinet).
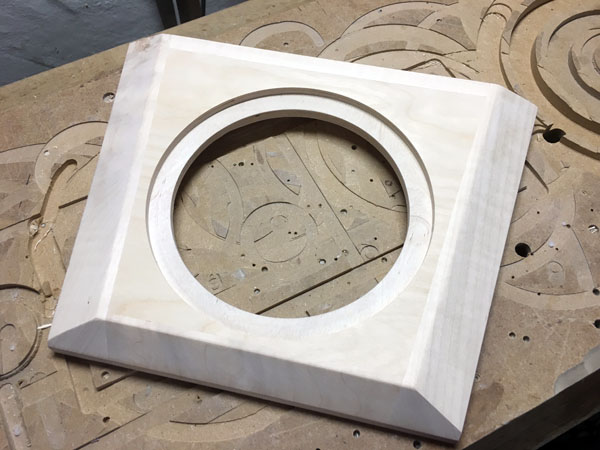
Making the midrange cabinet front panels. Top is chamfered 45 deg. to 20
mm depth. Side bars chamfered 25 deg. to ~15 mm depth.
Make sure to chamfer well for the driver down to 6-7 mm from the edge of
the driver rebate.
Left:
Gluing top bar of mid cab. Right: Gluing front panel.
Make the PR routing exactly in the middle of the rear panel.
Mid cabs sanded and finally ready for lacquer! These mid cabs took a
long time!
All internal mid-cab panels covered with 8 mm felt damping. Passive
radiator and terminals in place.
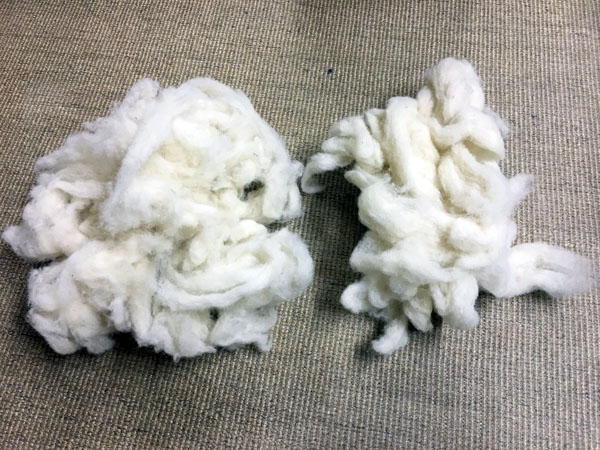
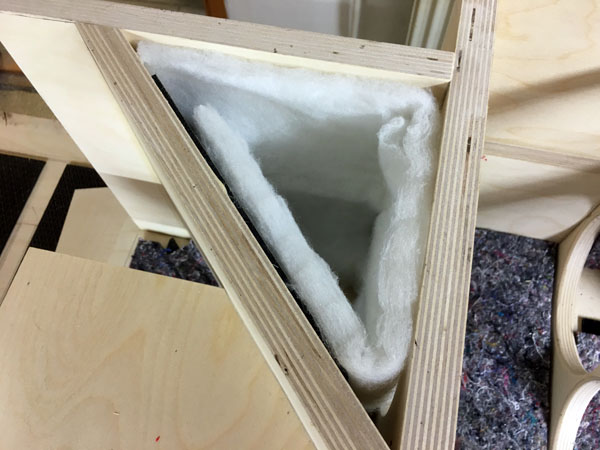
As noted from parts list, some 100 gram sheep's wool in included for
damping of midrange cabinet.
Split the wool in two and pull to make as fluffy as possible.
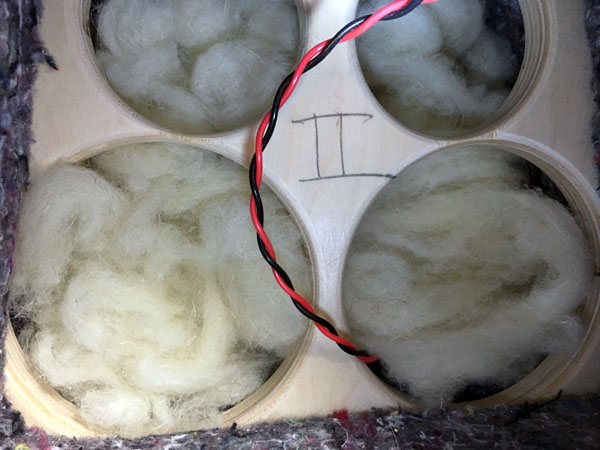
Place the wool evenly in the middle section as seen on photo.
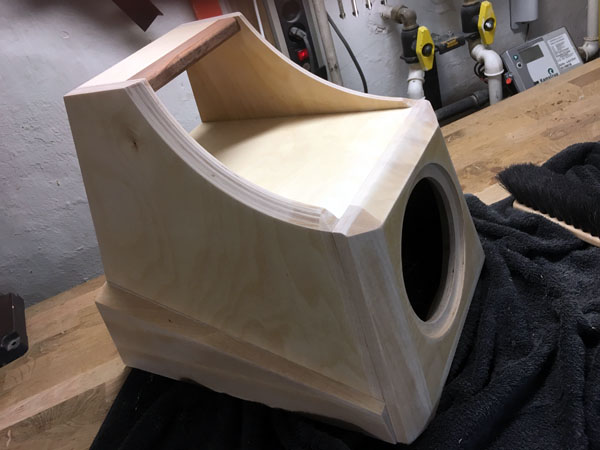
The finished mid-cabs.
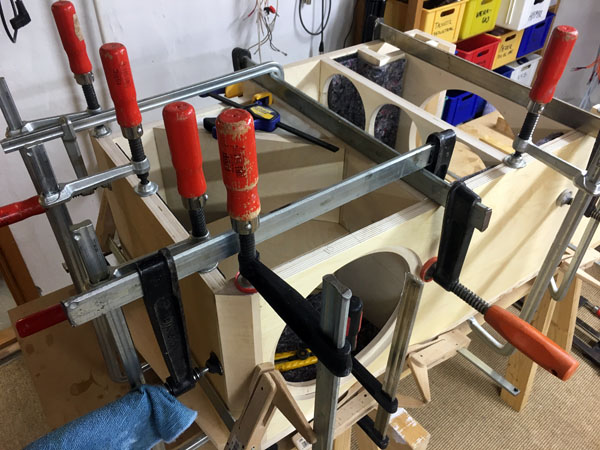
Making the tweeter front panels and gluing it all together. Lots of
clamps!
Routing the top tweeter panels. Finally, ready for lacquer.
Making grilles for the BMS bass driver cutouts. Soft alu stretch metal,
found at the local Bauhaus. To the right a test bend.
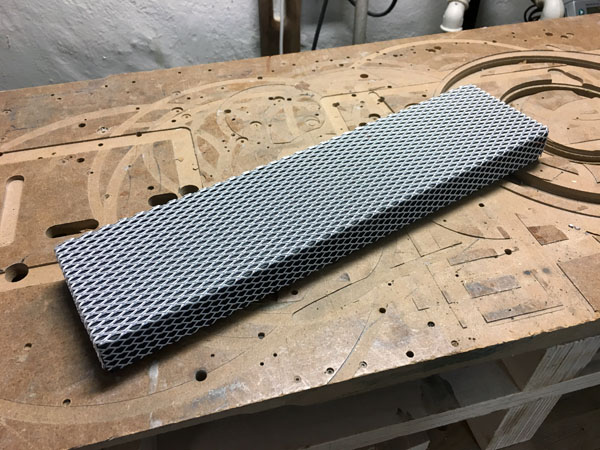
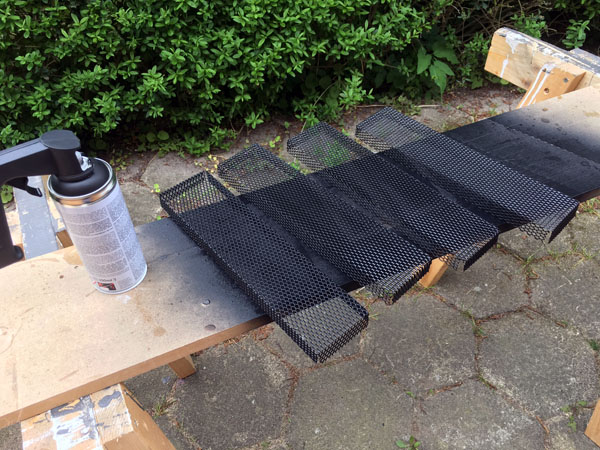
Bend around a piece of MDF - and make sure the outer dimensions fit the
hole once bent! To the right matt black spray paint. Do both sides.
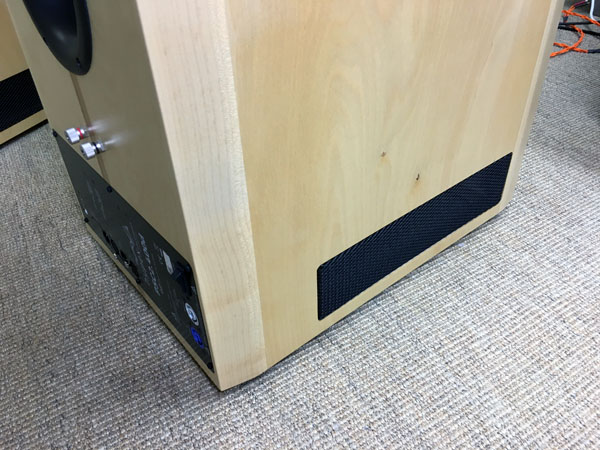
Grilles and rear cover in place fastened with rugged staples. Alignment of tweeter housing.
Take care when fastening the port. This is ABS plastic and can break if
screws are too tight. Do by hand so you can feel the tension.
Everything that
can be counted does not necessarily count; everything that counts cannot
necessarily be counted". Albert
Einstein.
A few
comments on MEASUREMENTS before you start interpreting all the readings
below.
First of all, if we think measurements will tell us how a speaker
sounds, we're wrong. The perception of sound is way too subjective to be
reflected in any measurements we can perform. A loudspeaker system is
meant to give us a satisfying idea of an acoustic event and for some
people a pair of 5 USD ear-plugs are enough, others spend 200 kUSD on a
truly full-range pair of speakers - and the latter may not be happier
than the former.
Measurements may give us an idea of tonal balance of a system, i.e. too
much or too little energy in certain areas. Measurements may tell us
about bass extension if far-field measurements are merged with
near-field measurements. In addition to this, ports may contribute to
bass extension. Most of us diy'ers do not have access to an anechoic
room for full-range measurements down to 20 Hz.
What cannot be seen is what kind of bass performance we get in a given
room. Bass performance is highly dependent on in-room placement of your
speaker and the same speaker can be boomy in one place and lean in
another. Actual SPL level at 1 meter distance and 2.8V input is useful
for en estimate of system sensitivity and combined with the impedance
profile may give an idea of how powerful an amplifier is needed to drive
the speaker to adequate levels.
What measurements do not tell is the very sound of the speaker unless
displaying serious linear distortion. The level of transparency, the
ability to resolve micro-details, the "speed" of the bass, etc., cannot
be derived from these data. Distortion measurements rarely tell much
unless seriously bad, and most modern drivers display low distortion
within their specified operating range.
Many people put way too much into these graphs and my comments here are
only meant as warning against over-interpretation. There are more to
good sound than what can be extracted from a few graphs. Every graph
needs interpretation in terms of what it means sonically and how it
impacts our choice of mating drivers, cabinet and crossover design.
What measurements certainly do not tell is the sonic signature of the
speaker, because speaker cones made from polypropylene, aluminum,
Kevlar, paper, glass fiber, carbon fiber, magnesium, ceramics or even
diamonds all have their way of adding spices to the stew. Nor do
measurements tell what impact the quality of the crossover components
add to the sound, from state of the art components to the cheapest of
coils and caps, they all measure the same if values are correct.
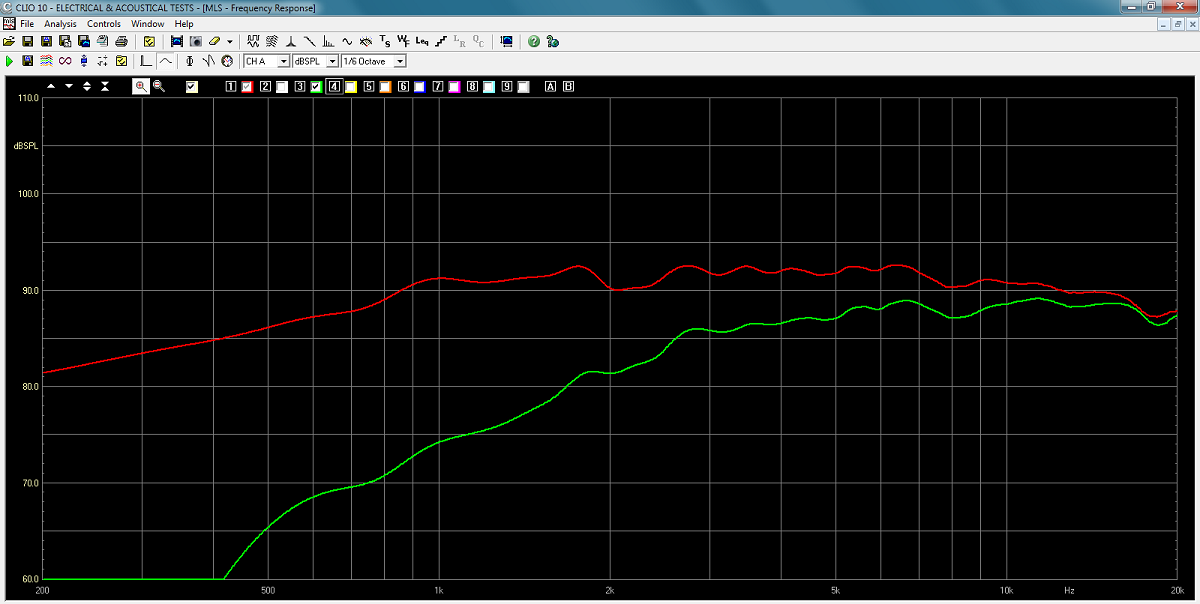
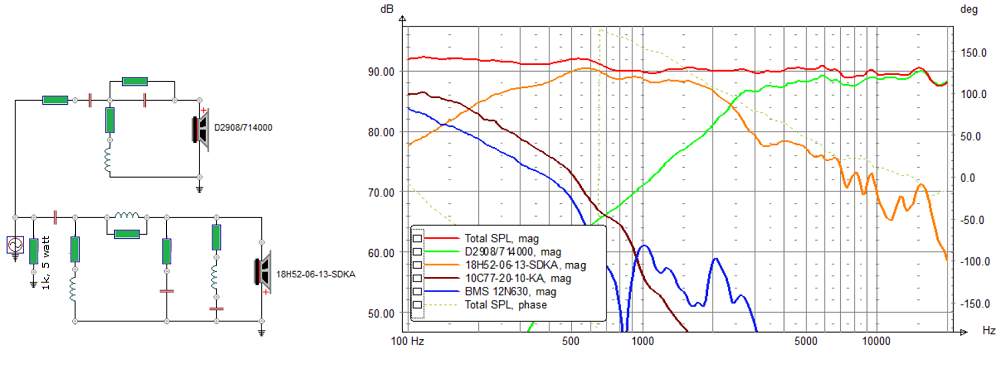
Tweeter response w/wo crossover.
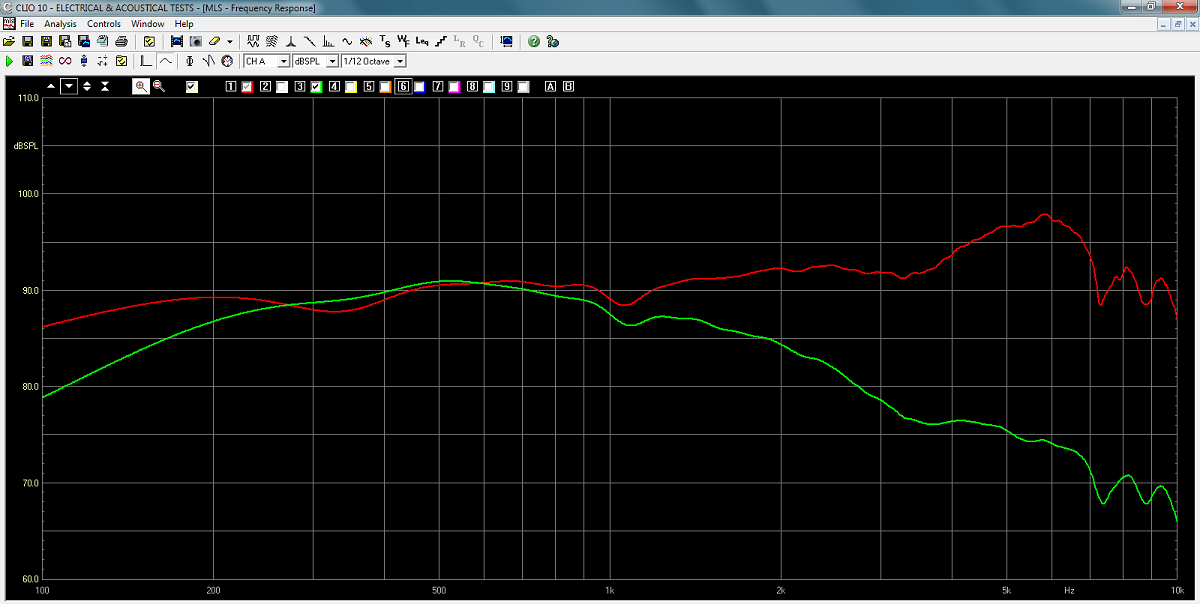
Midrange response w/wo crossover.
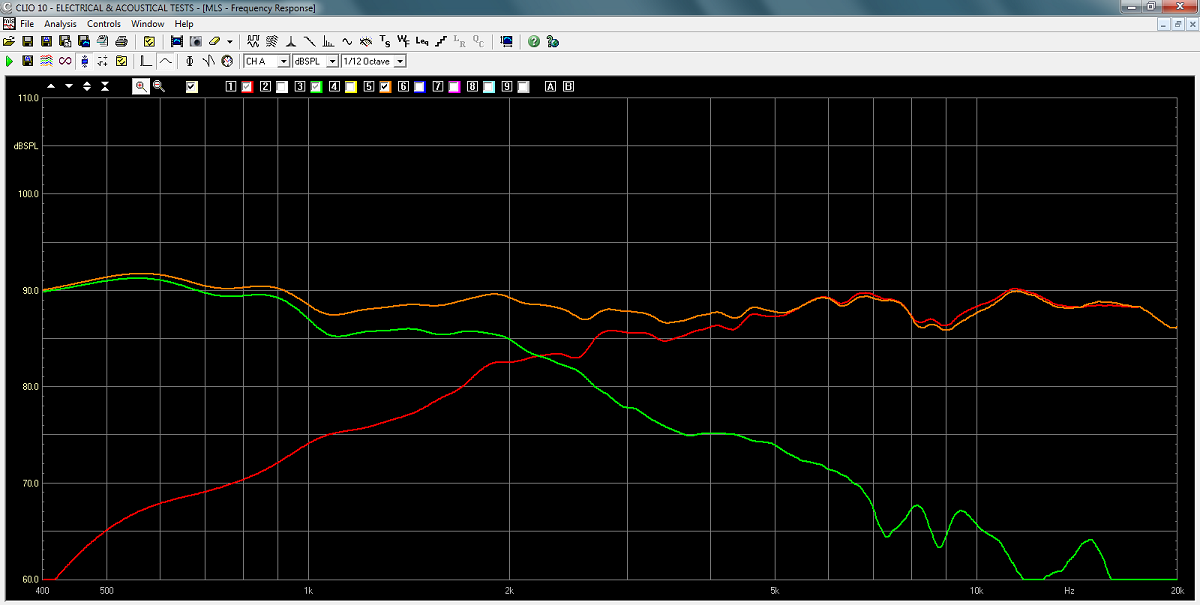
Individual response and summed response of MT section.
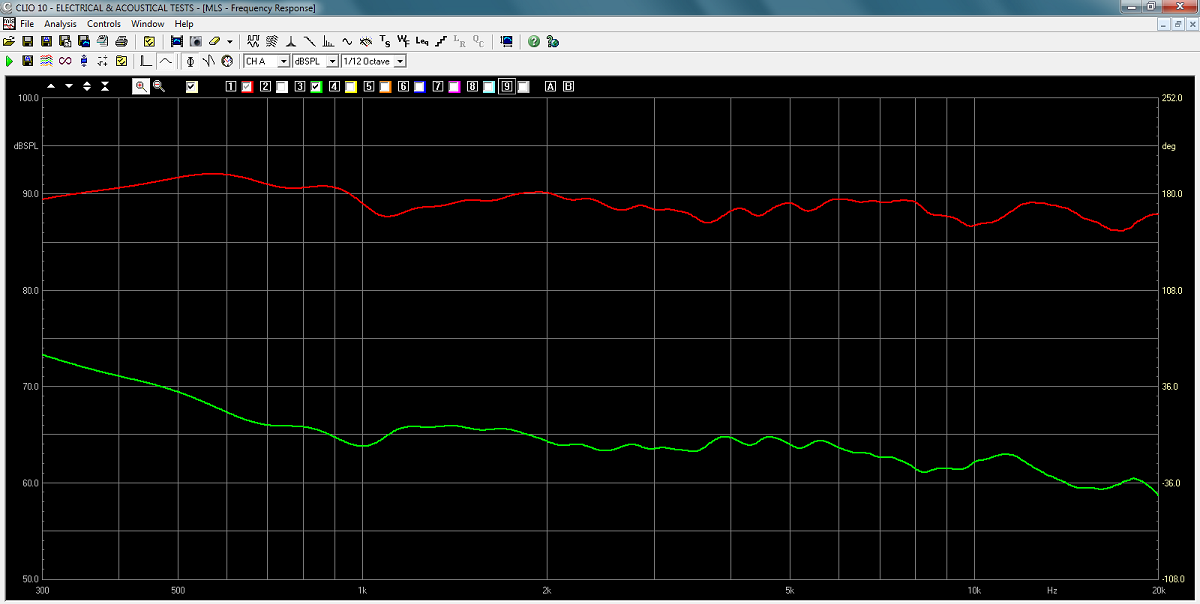
Frequency response of MT section, measured at 0.5 meter, normalised for
1 meter/2.8V.
Green = minimum phase.
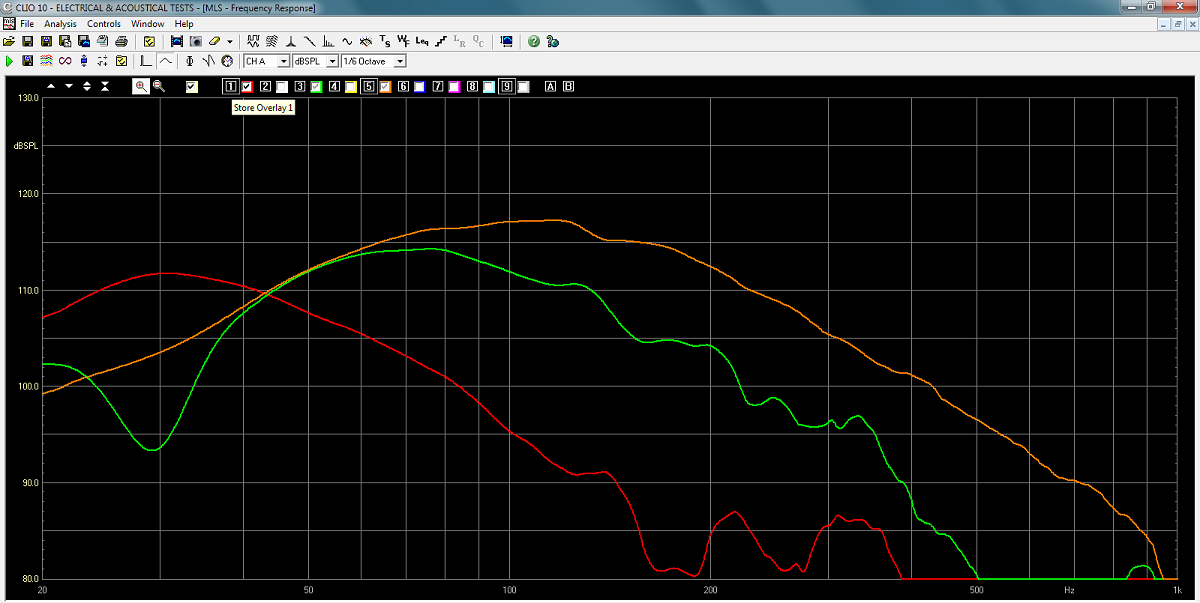
Nearfield measurements of port (red), lower bass (green) and upper bass
(orange).
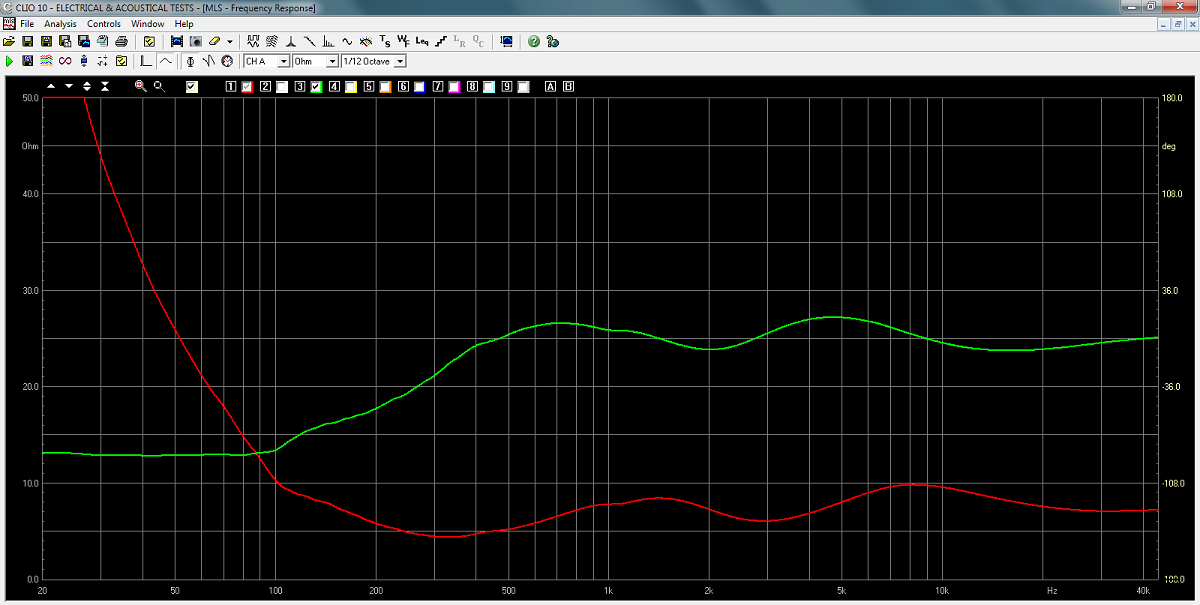
Impedance and phase (green) of MT section.
Regard the MT section as an 8 Ohm speaker with minimum impedance of 4.4
Ohm @ 335 Hz.
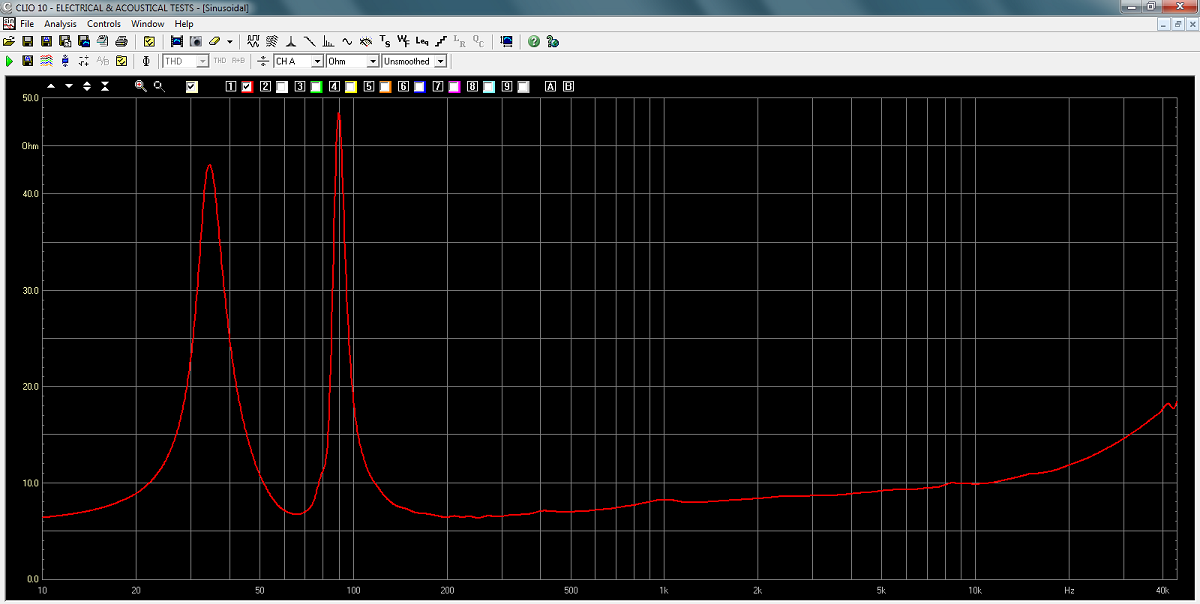
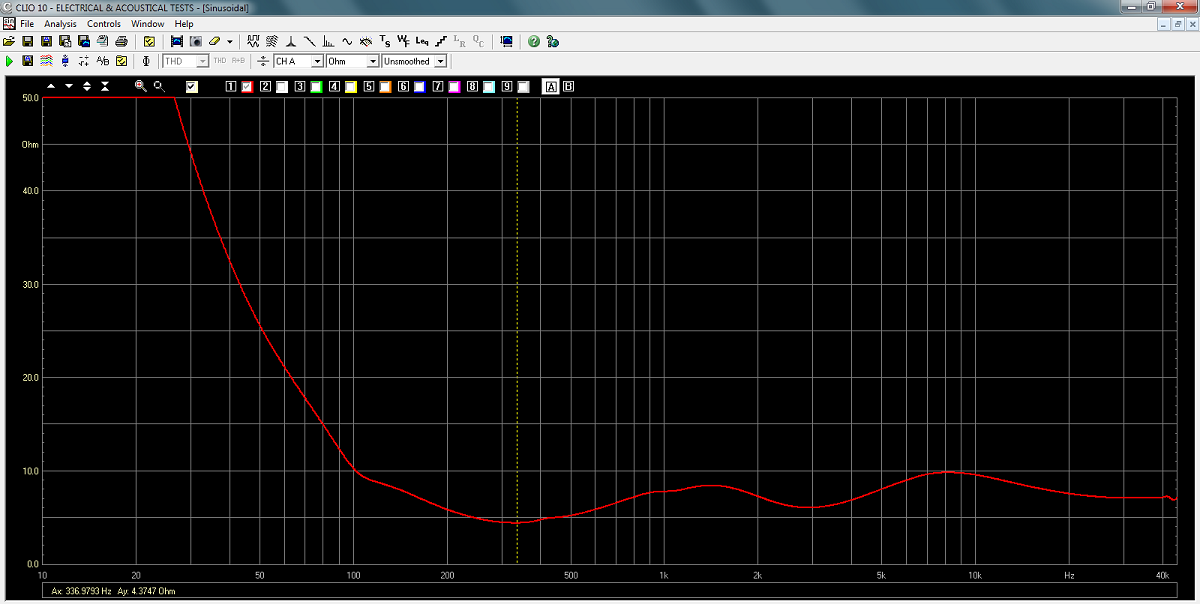
For those interested, here the midrange/passive radiator impedance
profile.
The bitumen pads are optional and
must be added to your order.
You can buy the kit with or without the tweeter.
Please ask Jantzen Audio
for options.
Feel sure prices are competitive!
The BMS bass drivers can be purchased from Thomann, very reliable
source:
https://www.thomann.de/gb/bms_12n6308_ohms.htm?ref=search_prv_7
Alternatively from LEAN, UK. Very reliable source too.
http://www.lean-business.co.uk/eshop/bms-12n630-12-600-watt-neodymium-speaker-8-ohm-p-2566.html
AudioTechnology drivers:
Contact Per Skaaning at:
mail@audiotechnology.dk
2 pcs 18H52-06-13-SDKA (LR version), Re 5.4 Ohm
2 pcs
PR23, passive radiator, 15 grams, Cms 1 mm/N
2pcs
10C77-20-10-KA, Re 5.4 Ohm
All kit and component prices may be subject to change and are always to be confirmed by Jantzen Audio Denmark.
Download Complete Kit
Sale Presentations:

All technical questions to troels.gravesen@hotmail.com
All questions regarding purchase of kits, please mail Jantzen Audio at contact@jantzen-audio.com
CROSSOVER-LAYOUT
BACK TO INDEX
Check this out before start making crossovers:
http://www.troelsgravesen.dk/tips.htm#CONSTRUCTION_OF_CROSSOVERS
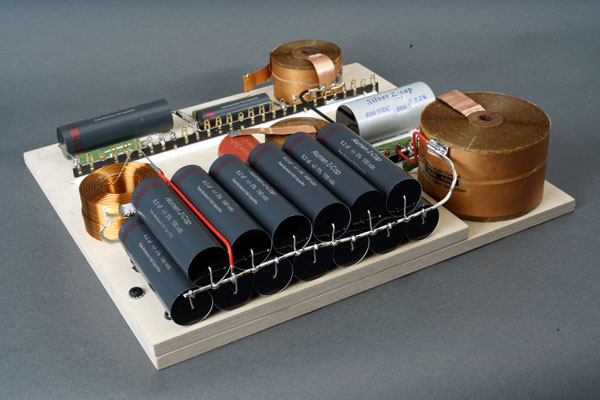
Level 1 layout
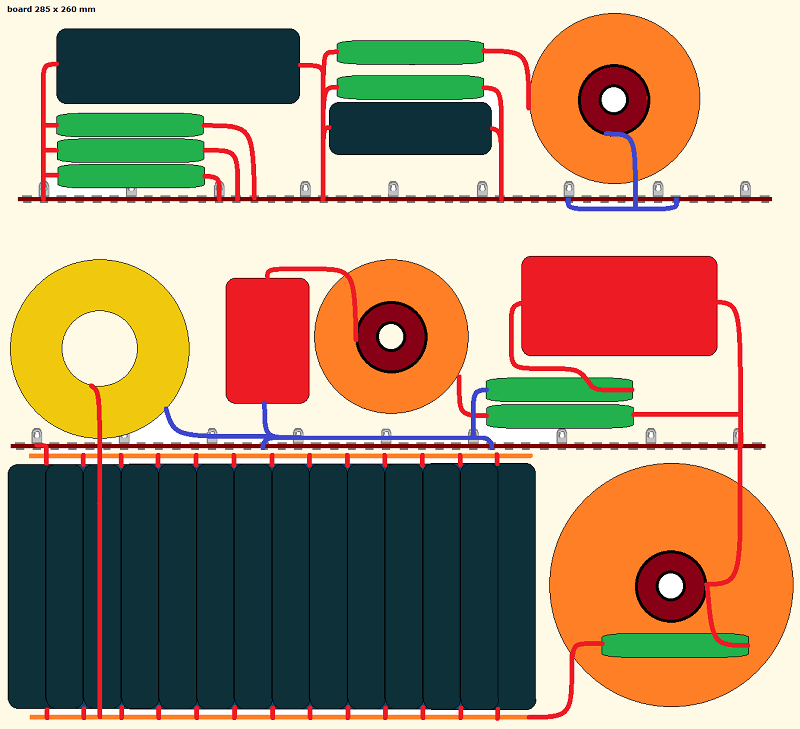
Level 1 layout.
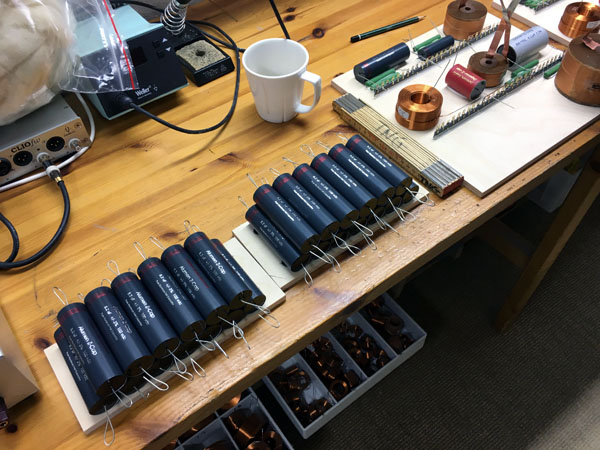
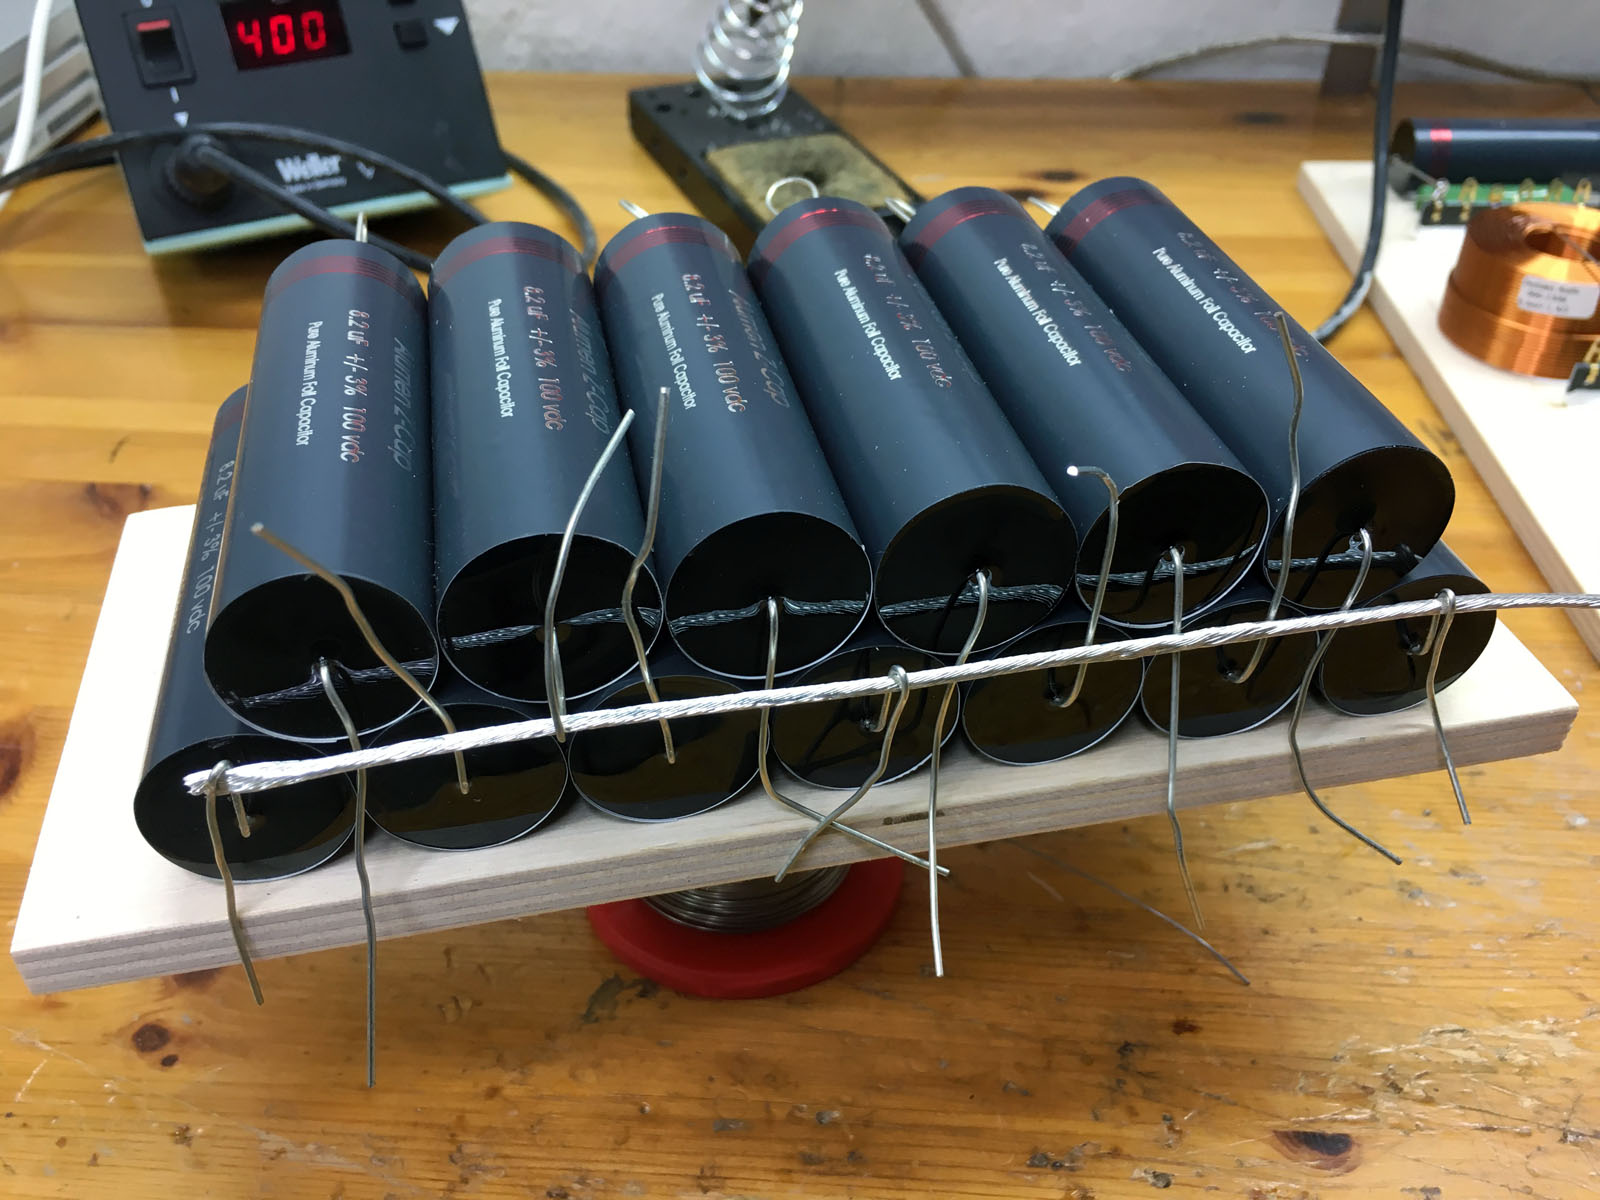
I decided to use Alumen-Z for the midrange. An insane amount of money!
Click some images to view large.
I striped a piece of 2.5 sqmm silver plated cupper/Teflon wire and used
this for connecting all of the caps.
Place the wire in the middle between the two layers and start fastening
the wire at the end at middle.
Twist all cap leads around the wire and solder. Allow some extra cm at
the end for connection to solder rail and series coil.

Make sure all solder joints are safe. This goes for all parts.

Click image to view large
Due to the height of the midrange series coil, the by-pass resistors had
to go on the board.
Otherwise the layout drawing is followed closely.
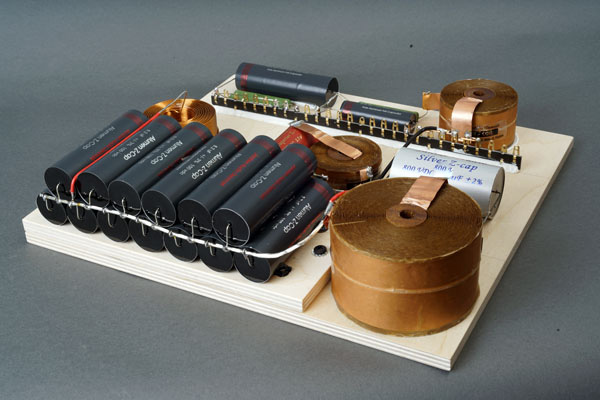
I placed the bulk of Alumen-Z on a subpanel, allowing me to use this
high-value bank of uF in other places.
The overall height is around 66-67 mm, just enough for the 68 mm space
available.
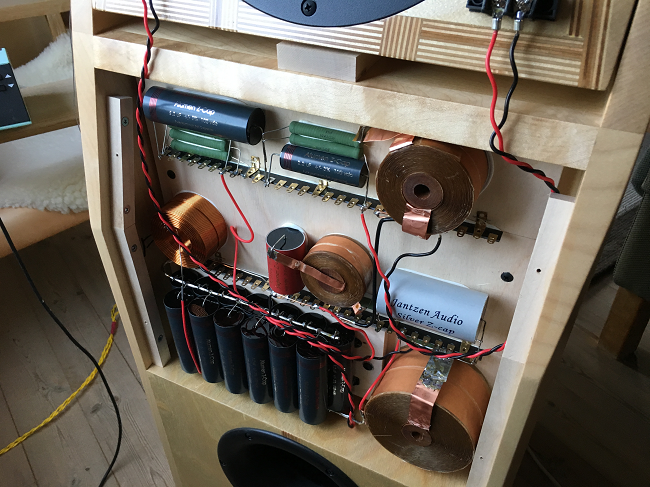
The trained eye will notice the upper 14 AWG wax coil is too high to allow the
cover to rest on the fillets.
Have to replace the coil by a 16 AWG coil.
Last minute surprises...
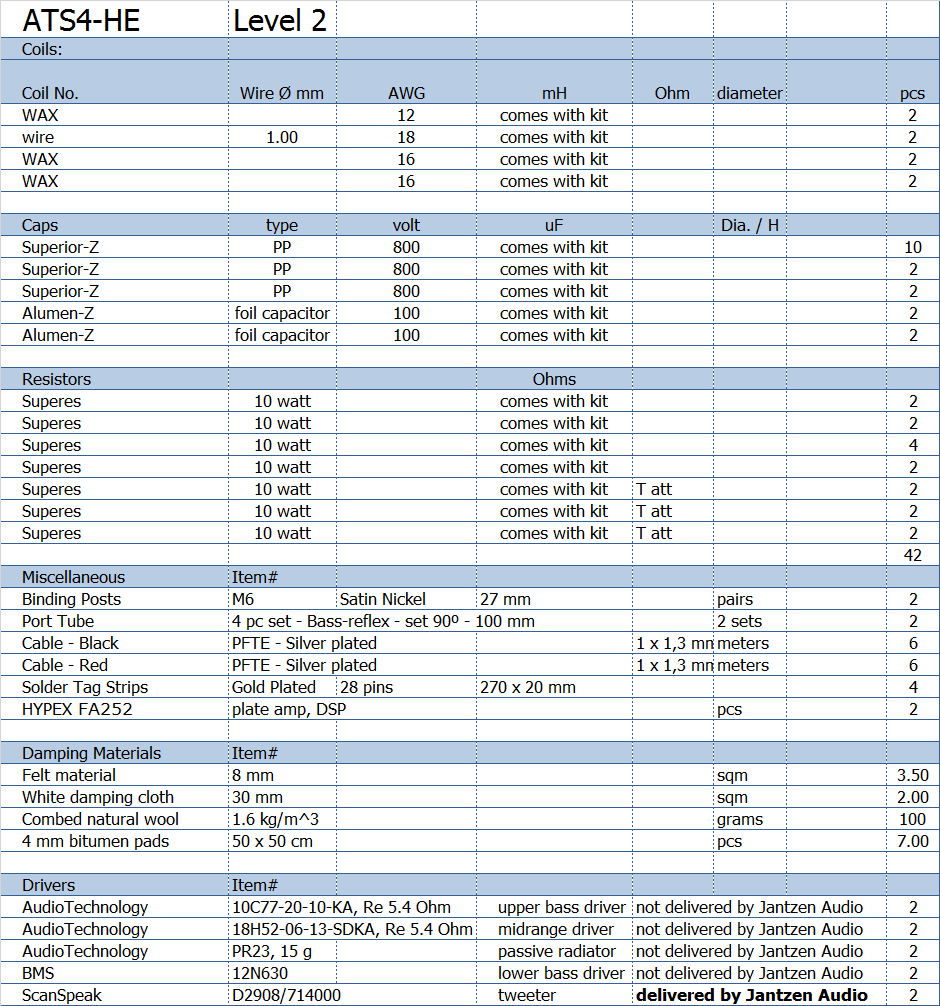
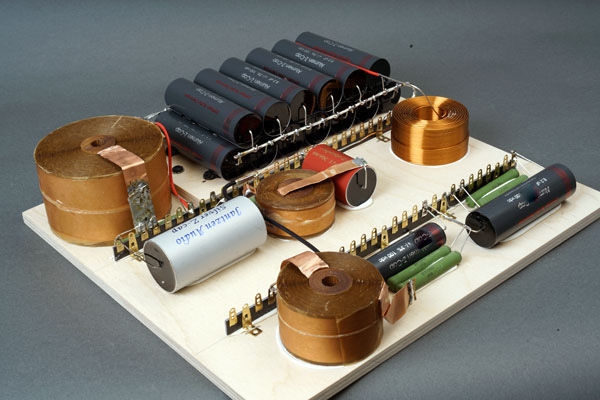
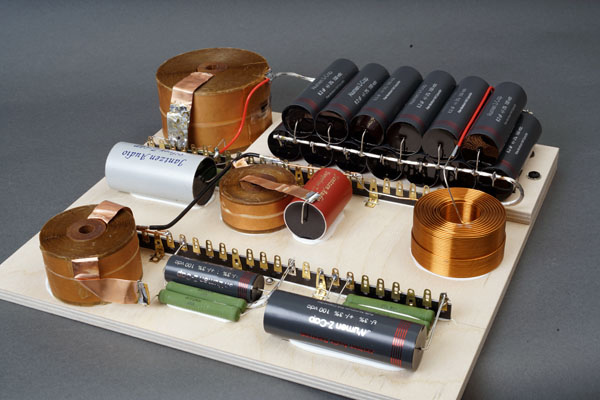
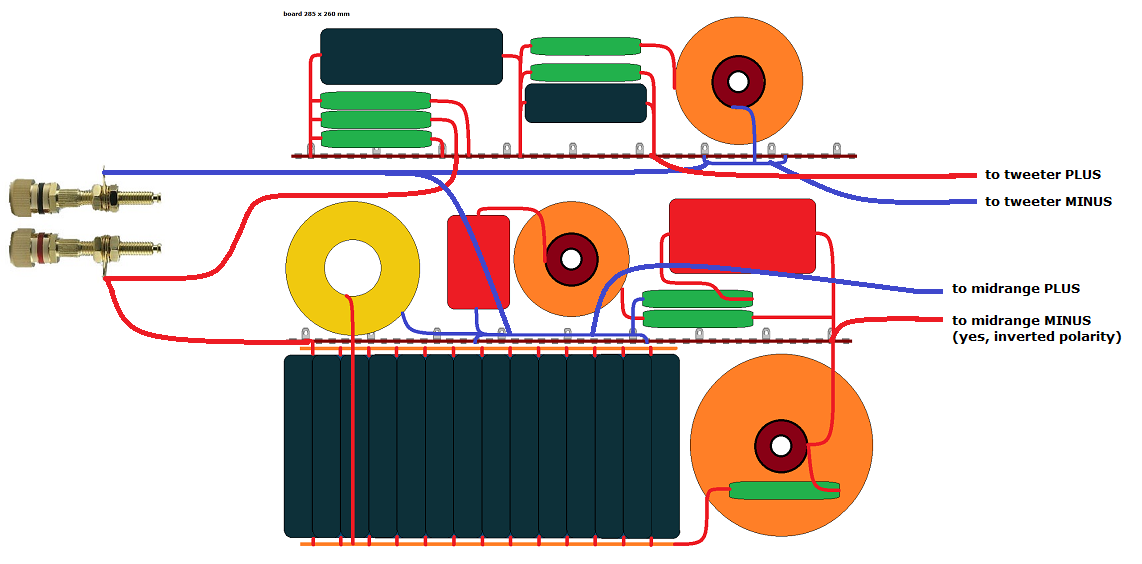
Level 2 layout
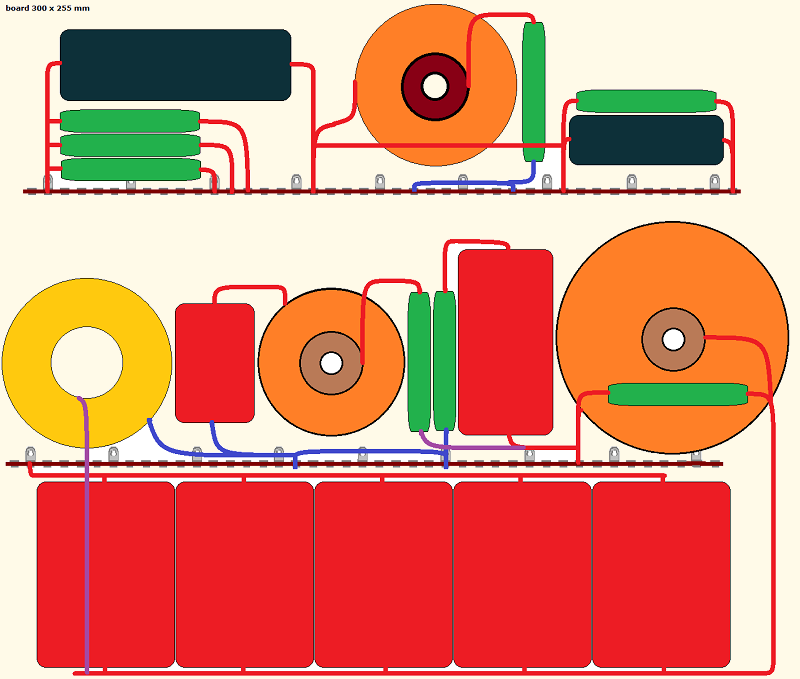
Level 2 layout. The 22 uF Superior-Z caps are bulkier compared to Alumen-Z,
hence some changes to layout.
Speaker wiring for Sup-Z version
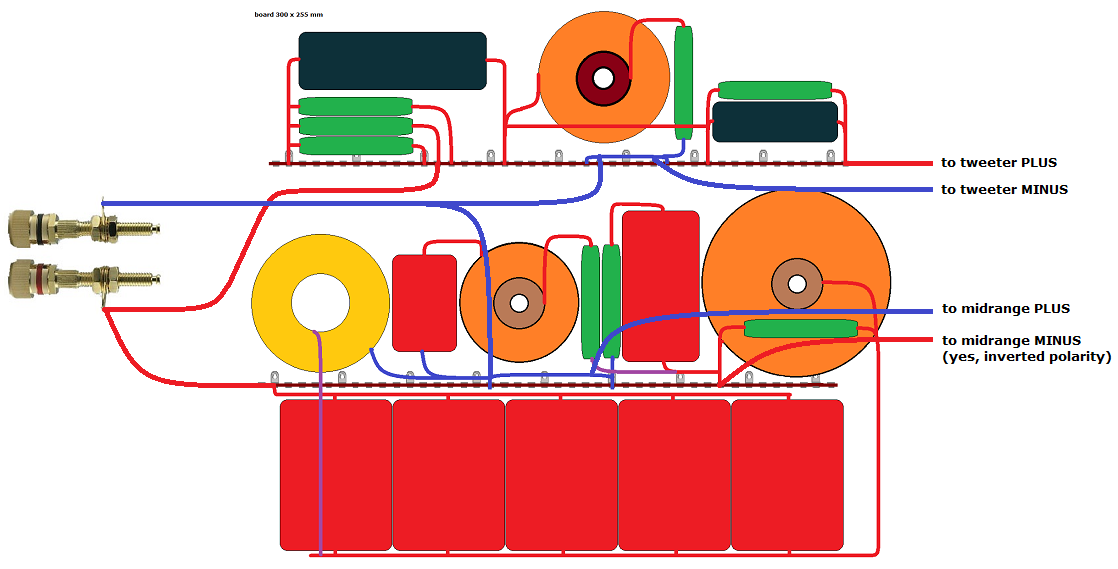
Wiring for Alumen-Z version
First of all the bass here rivals the OBL-15! So, I have to revise the OBL file as it no longer holds the #1 place for bass performance. Actually the BMS and 10C77 make the same membrane area as the 15" driver used in the OBL, ~830 cm^2. Due to equalisation the BMS goes deep and be prepared for having to rearrange things in your room due to buzz and rattling.
Balancing the mid and tweeter took longer than anticipated. What looked
nice from modeling turned out too forward and bright in real life.
Several iterations of the crossover was made before finally things
started falling into place and a passive radiator was added to the
midrange to provide better low-end weight. The latter is arguable, but
it did something to the sound of the midrange as well, and it was good.
I had been listening to the prototype crossover for months before I finally got all the Alumen-Z for the midrange. Installing the final crossover made a dramatic change, in fact a lot more than expected. The fidelity in lower-mid/middle-mid (160-640 Hz) is astonishing, cellos, etc. With my new preamplifier truly the best sound I've ever had in my room. The Alumen-Z combined detail with smoothness and it's really up to the front end to deliver the rest.
Dynamics are almost scary! These two bass drivers deliver a true full-bodied sound and enhance the perception of mid and treble performance as so often experienced. Midrange and treble, utterly transparent. Honestly, I don't think I have to say more. This is what I wanted, and I got it.