DIY Loudspeakers: HOME INDEX UPDATES RESPONSE WHAT'S NEW
ScanSpeak Bookshelf-3WC
Copyright 2018-21 © Troels Gravesen
Go to on this page:
DRIVERS
CROSSOVER
CABINET
MEASUREMENTS
SPEAKER-KIT
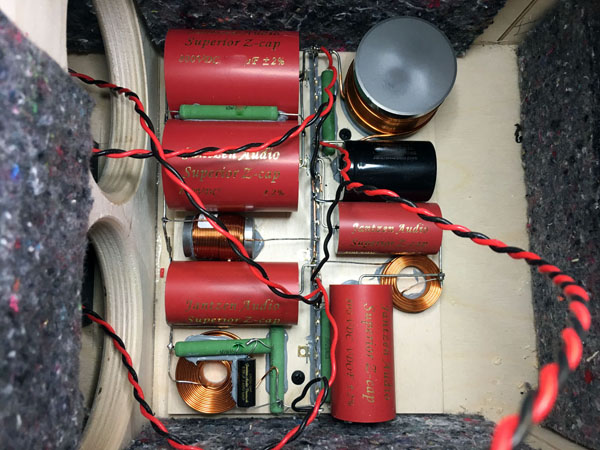
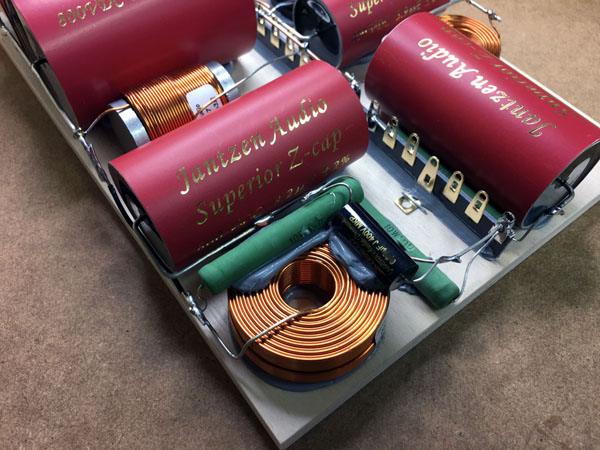
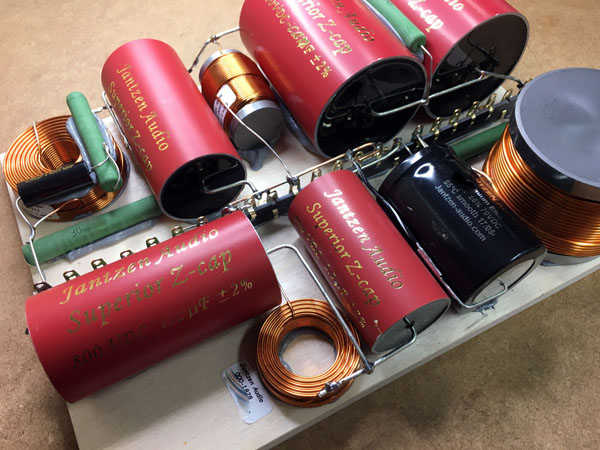
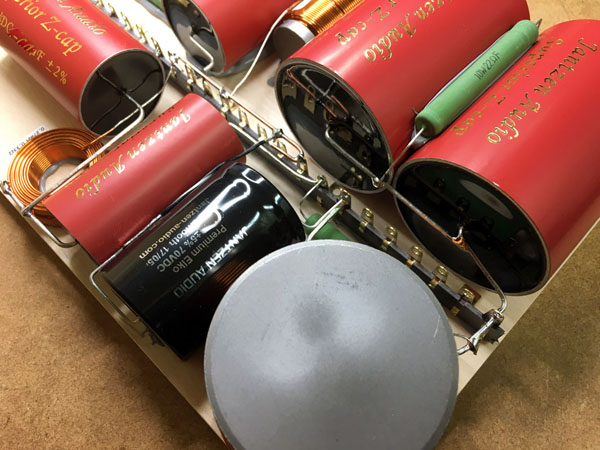
CROSSOVER LAYOUT
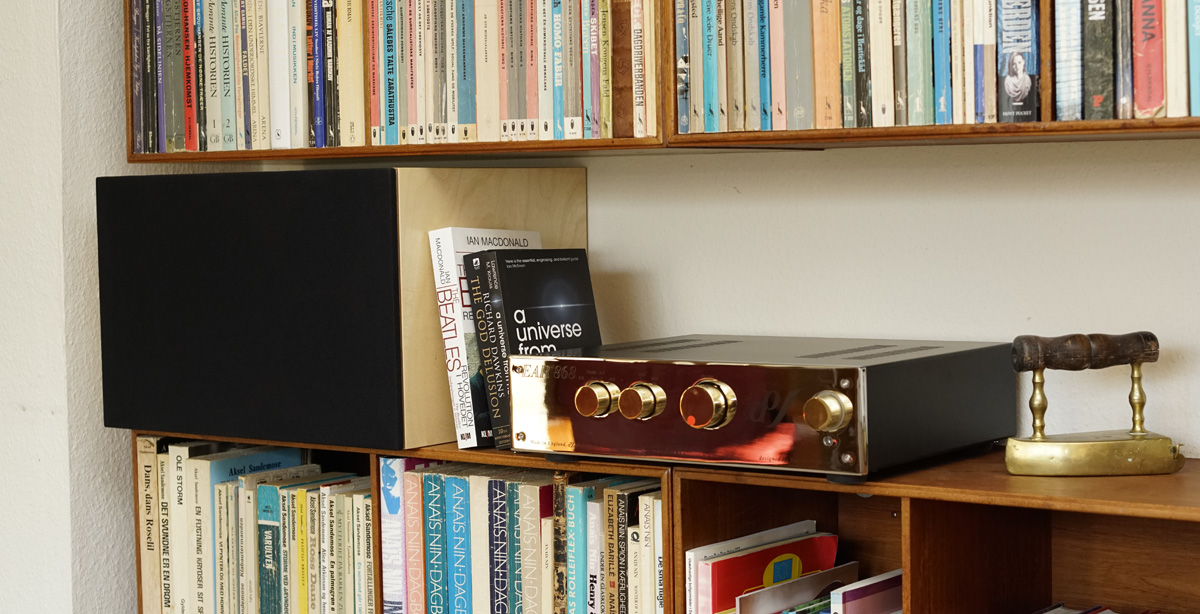
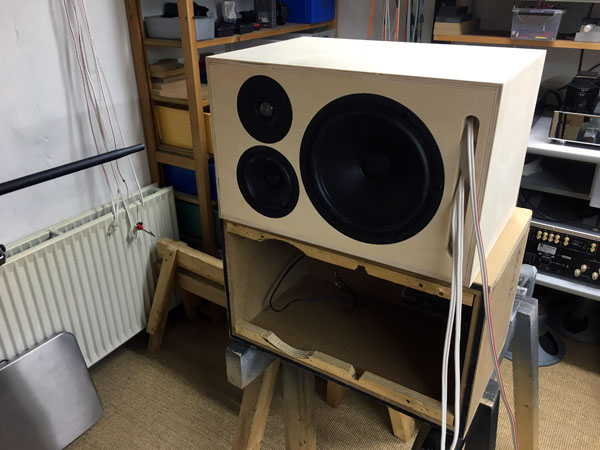
This 3-Way-Classic is designed for bookshelf placement or on stands up against
a wall. You can also build the speaker into the wall having the front
panel flush with the wall. I know it's out of fashion to have books on
display in your living room these days, which is a mystery to me, but
I'm an old fart.
Placing a speaker up against the wall takes special voicing of the speaker in
order to balance the significant room-gain we experience. Please google
room-gain to learn more.
Against the wall is what's called a 2pi situation, half-space. Check
here.
Against a wall, against a wall + side-wall
(quarter space) - or literally in the corner (eighth space) will
gradually increase response at lower frequencies. We have a bass boost -
and it comes for free!
To compensate for this we have to increase midrange and treble and
manage bass accordingly to make an overall balanced sound.
All my former
constructions, except the
8008-CORNER, are tuned to be out on the floor, thus midrange and treble
is attenuated according to the bass response in this position. There are
always compromises to be made here, because people may have to place
their speakers in less than ideal acoustic environments - and we badly
miss the tone-controls of our 70'ies amplifiers.
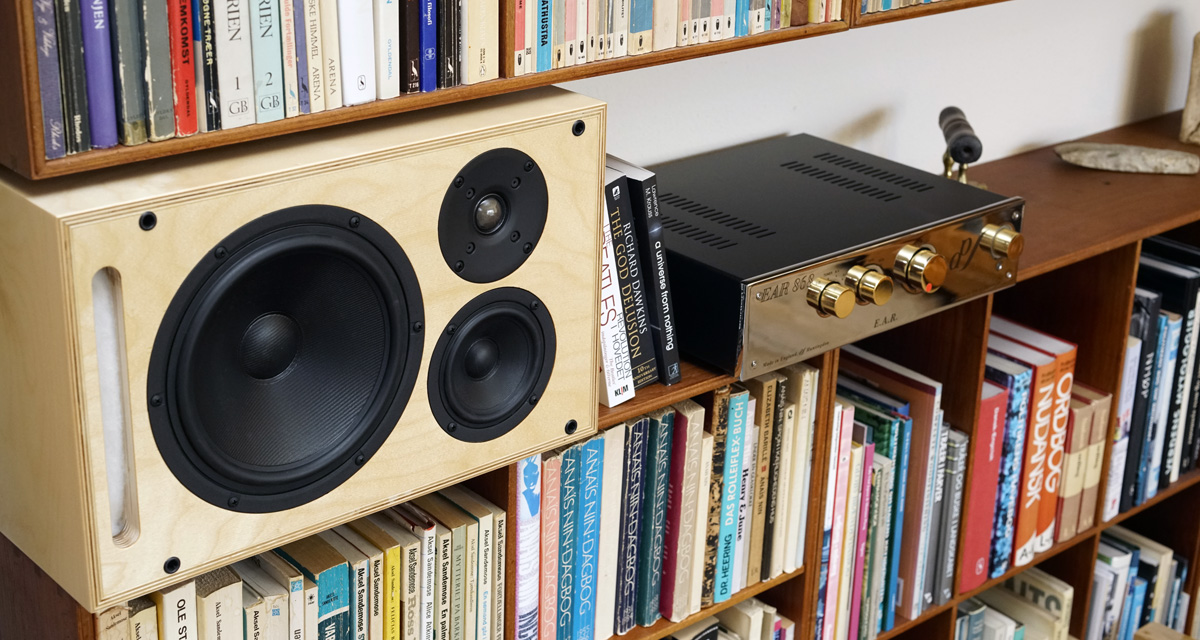
The Bookshelf-3WC is also designed to provide a significant
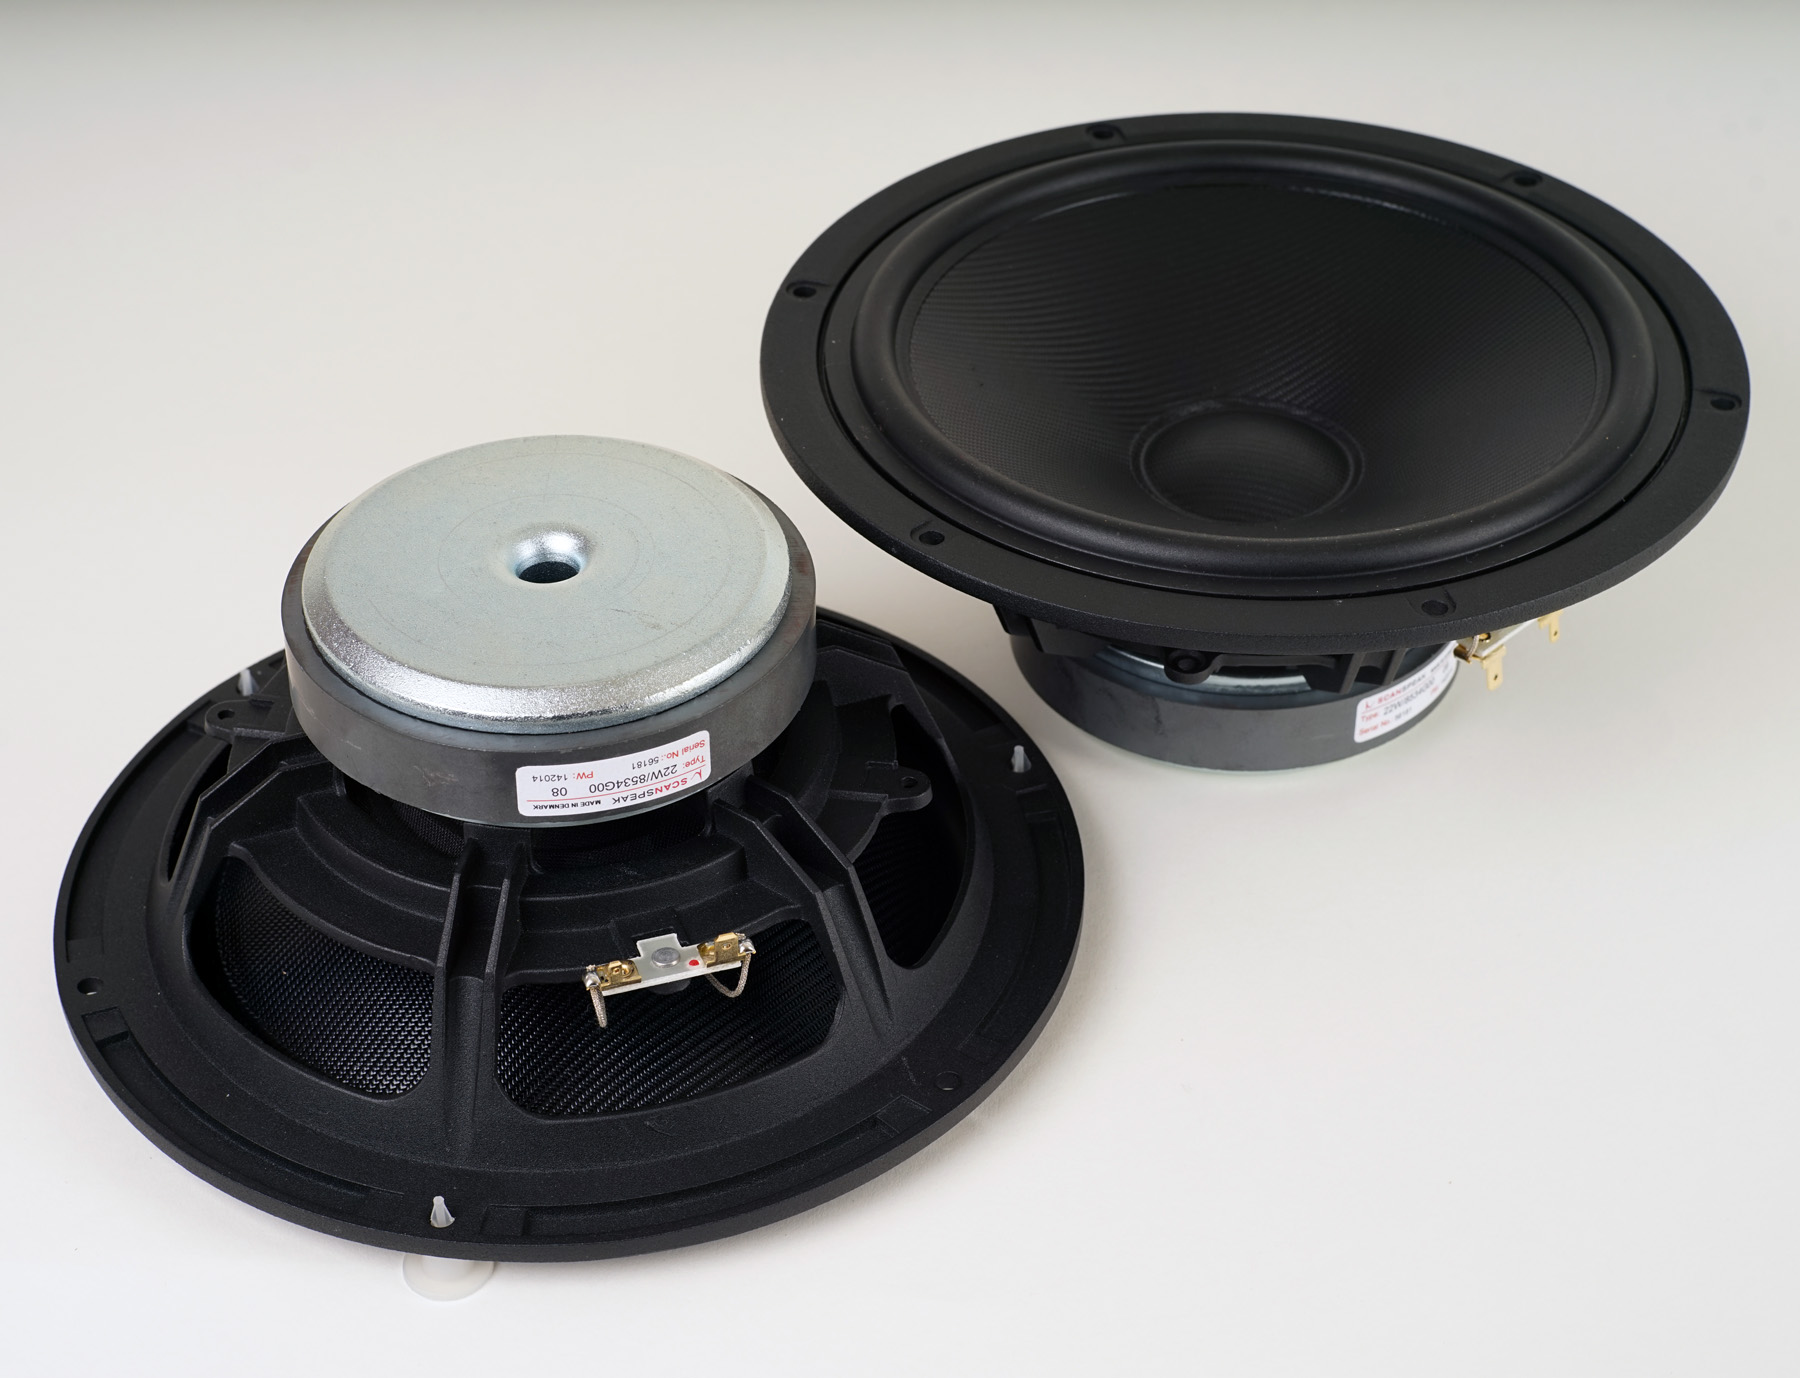
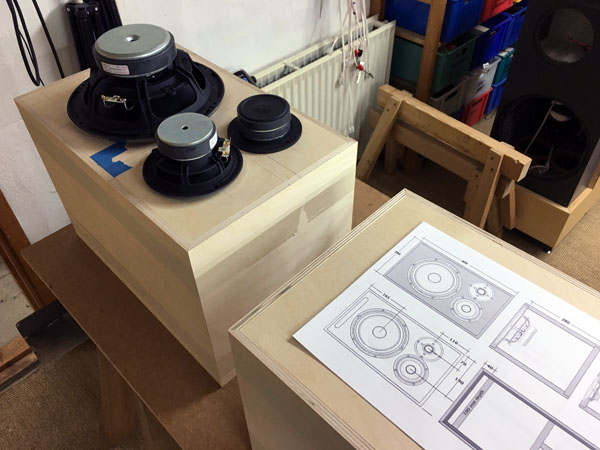
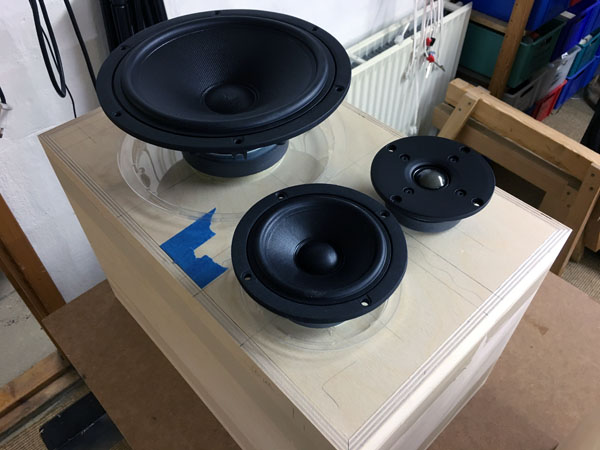
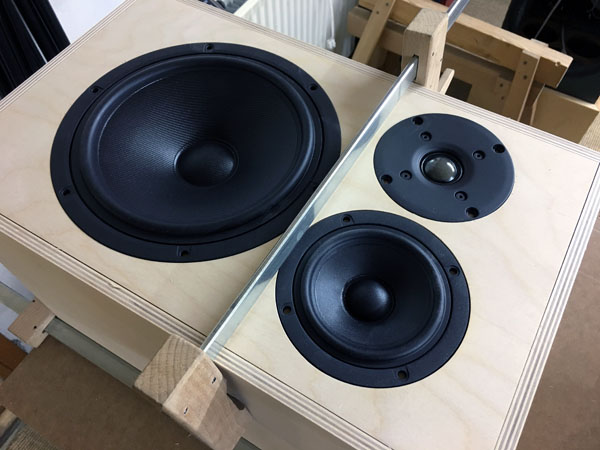
sound-pressure, thus we start with a powerful 8" bass driver. The 22W
bass driver comes with a 235 cm^2 membrane area, quite high for an 8"
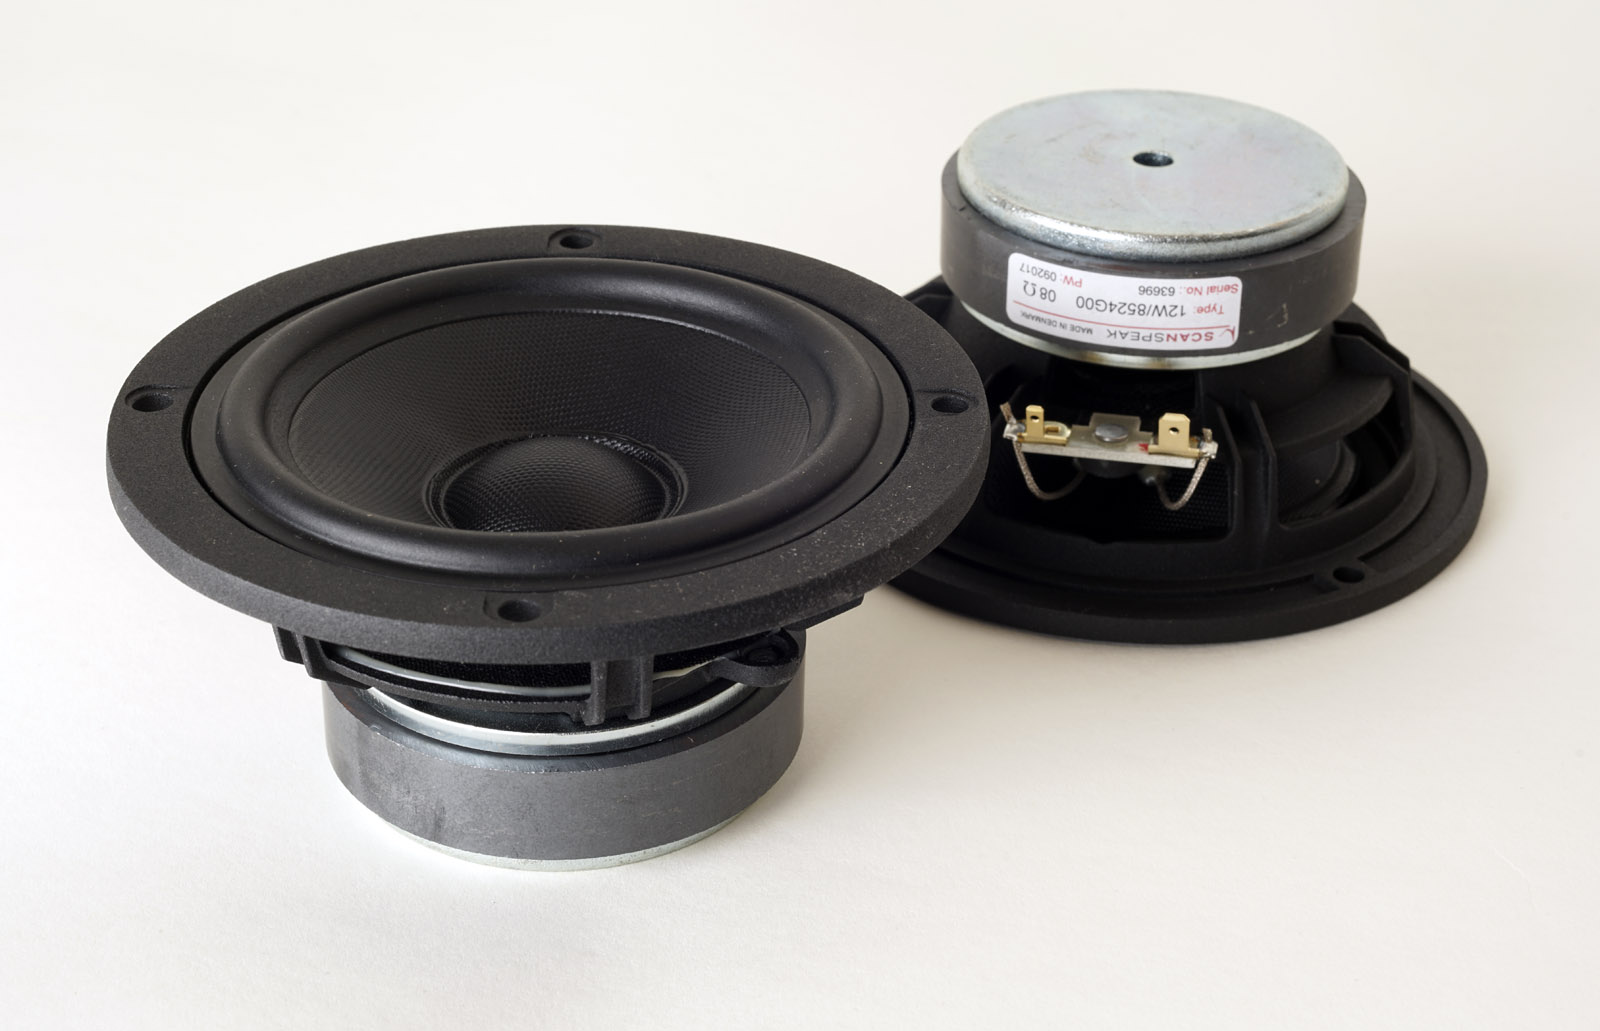
driver. For midrange I picked the 12W/8524G00 used in my
mini-12W some time ago. This midrange is extraordinarily linear and
easy on crossovers - and it sounds great too! For tweeter the D2608/913000 used in two of
my recent constructions (Ekta mkII and NOMEX 164 mkII). You hardly find
better for the money and you may check out this
test to see how well it performs.
I also wanted this speaker to be easy on cabinet construction, hence a
flat front panel and a 4th order crossover between mid and tweeter,
allowing proper phase integration - and not least reduced crossover
lobing in upper-mid/lower treble, as this speaker is likely to be
used for "music in a room" - and not "head-in-vice" pin-point-imaging
kind of situation. Most of us listen to music while doing something
else.
The cabinet may be added a front grille to increase WAF should this be
needed. As can be seen from the
measurements below, impact on frequency response is modest.
Basics:
Three-way bookshelf-speaker from 8+4+1 inch drivers.
Sensitivity: 90 dB/2.8V/1 meter.
Impedance: 8 Ohms, minimum 3.3 Ohms @ 125 Hz.
Points of crossover: 350 and 3000 Hz.
Cabinet dimensions: 45 x 30 x 28 cm (WxDxH)
Power requirement: 20+ wpc. Actually depends on how loud you play.
Power handling: 120 watts, please also read this:
http://www.troelsgravesen.dk/power-handling.htm.
Any burned driver is a misused driver!
Useful links (Please read before writing!):
http://www.troelsgravesen.dk/tips.htm
http://www.troelsgravesen.dk/crossovers.htm
http://www.troelsgravesen.dk/LCR-RC.htm
FAQ (Please read before writing!):
You cannot change cabinet front panel dimensions and drivers' placement
without needing a new crossover - and I cannot help.
You cannot use any other drivers with the crossover shown here.
Please read these files before e-maling:
http://www.troelsgravesen.dk/crossovers.htm
http://www.troelsgravesen.dk/choices.htm
Click images to view large
Download specs: 22W/8534G00 12W/8524G00 D2608/913000
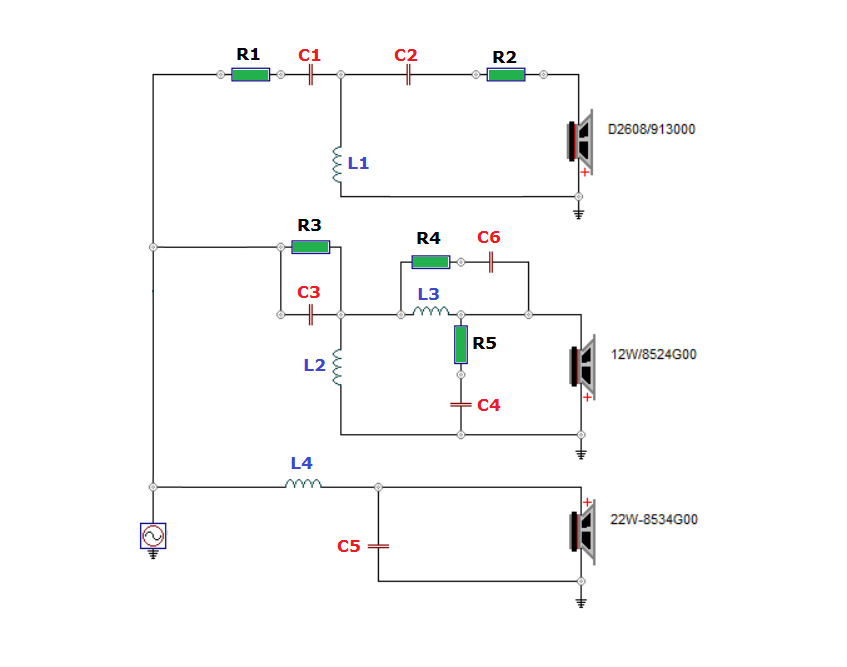
The crossover features LR2 filter for bass-mid and LR4 for mid-tweeter
sections. As these speakers are designed to be placed horizontally,
crossover
lobing is a concern and here the LR4, due to
reduced overlap does better. LR4 for bass-mid was tried but didn't pay
off, hence the simpler LR2 at this stage. LR4 for mid-tweeter also
allows us to use a flat front panel and do proper phase tracking between
mid and tweeter, the most critical range.
Initially I tried a point of crossover around 700 Hz between bass and
mid, but this made a fuzzy midrange when moving horizontally. Knowing
the 12W driver from previous construction, I knew this could go much
lower and the point of crossover was moved down to around 300 Hz and
things started working out. Only disadvantage is the need to double C3
compared to the earlier version, which adds to the kit costs, if really
good caps are chosen.
The midrange/treble here is tuned some 2 dB higher compared to the
Discovery 3WC featuring the same bass. This due to room-gain adding
weight to the lower octaves. To guess what level of room-gain you
will have in your room on your shelf is impossible for
me to tell,
but unless you also place the speaker in a corner, the chosen voicing
should fit most situations. There are options for tuning the bass in
case of excessive room-gain by placing resistors in front of the bass
crossover section. Some will point fingers to this, but I don't care, it
works. More on this in measurement section.
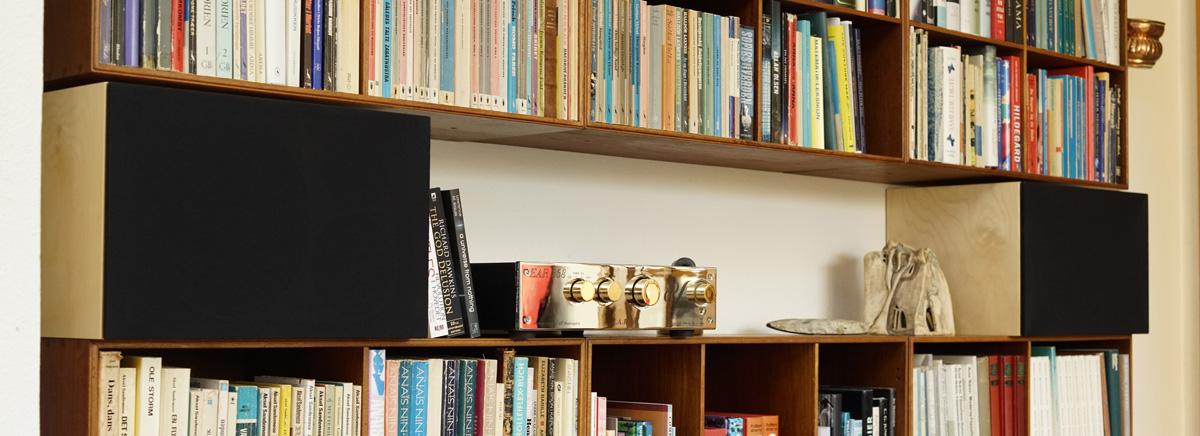
"I think they're beautiful" my wife said, entering the dining room.
YES! High-WAF accomplished.
The 12W taken down to 350 Hz and the 4th order crossover between mid and
tweeter works really, really well. So well, I might consider a
stand-mount version from the same drivers. Vocals, violins, saxophones,
everything come trough smooth and easy. The bass is powerful despite the
reduced cabinet volume. From my set-up above I have 1 meter to side
walls and the aperiodic tuning works very well.
What has surprised me the most is the soundstage depth and spaciousness. There's a thing with a loudspeaker tuned for playing with the room, rather than - sometimes at least - against the room. It energises the room in a more natural way. I came to think of an article of Roy Allison of Acoustic Research and his research into boundary effects on loudspeakers. Here's his patent. And here's the article thanks to Bruce/US. You may visit this interesting site.
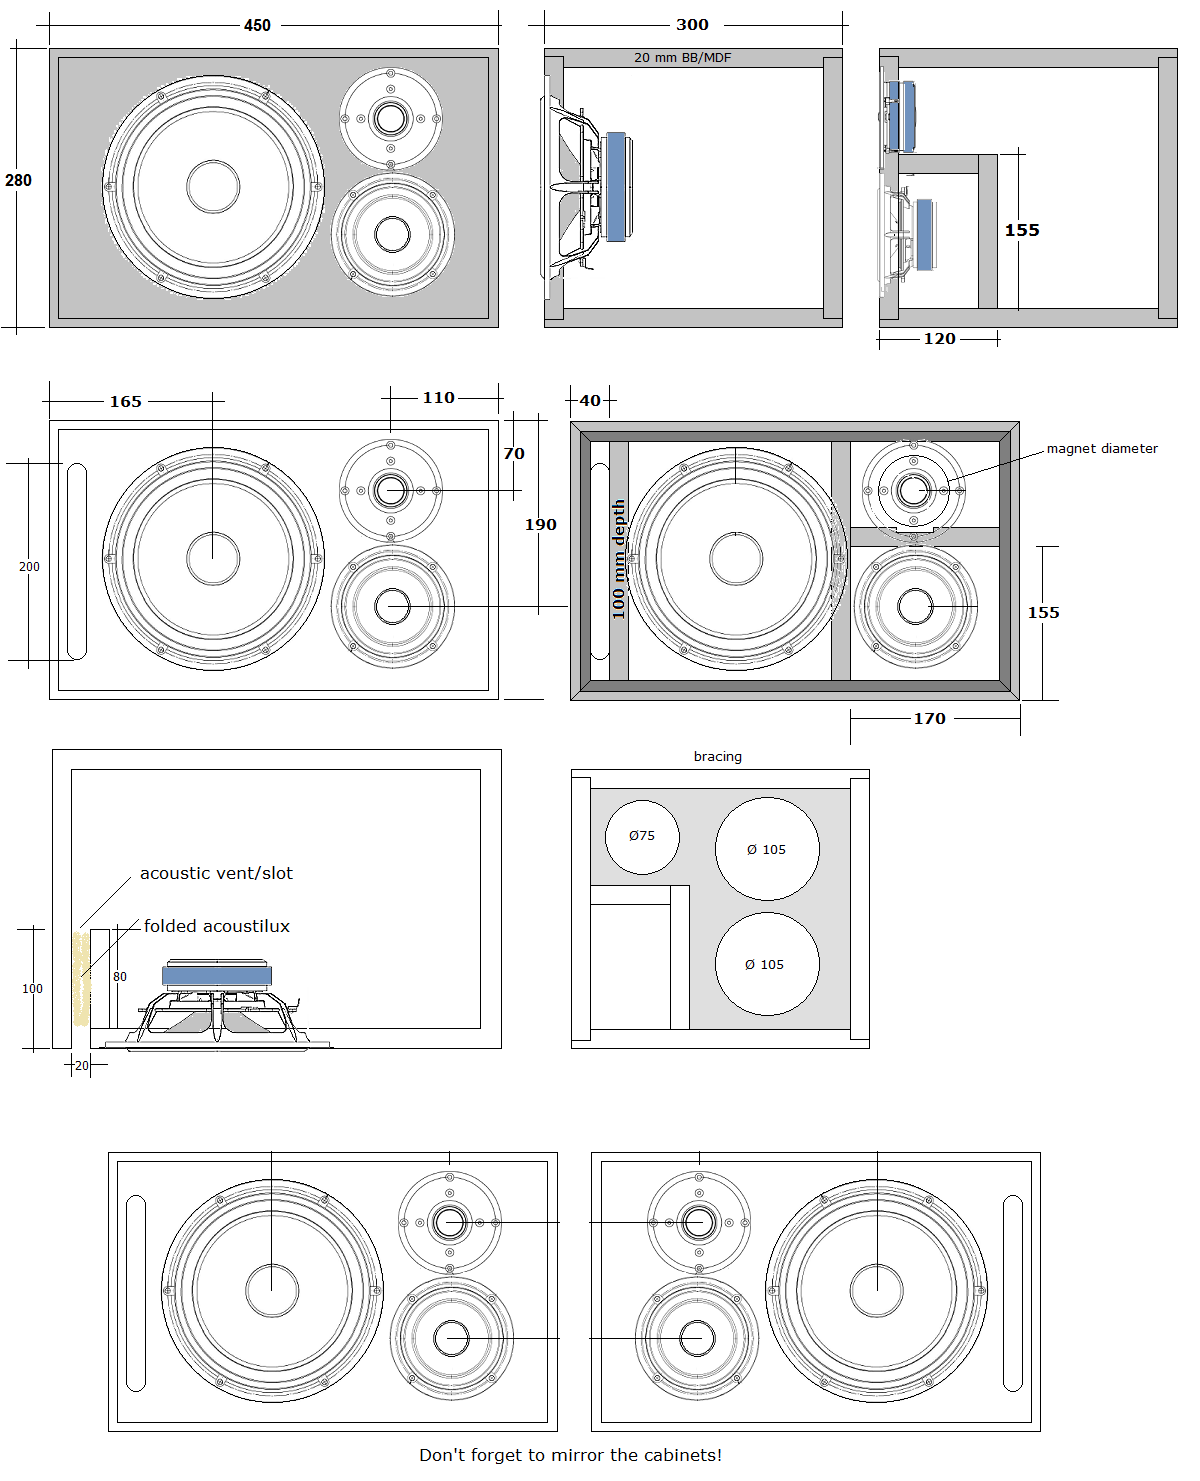
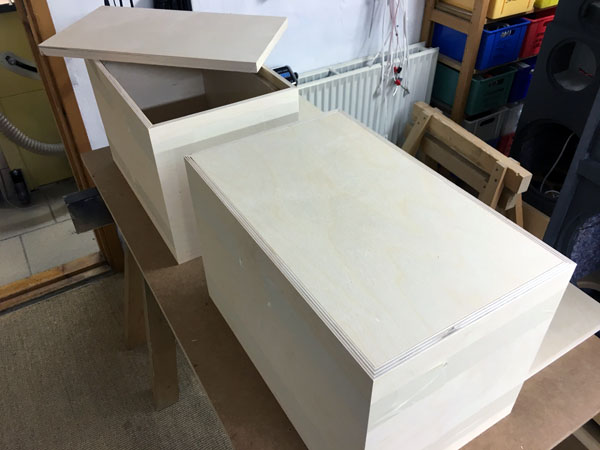
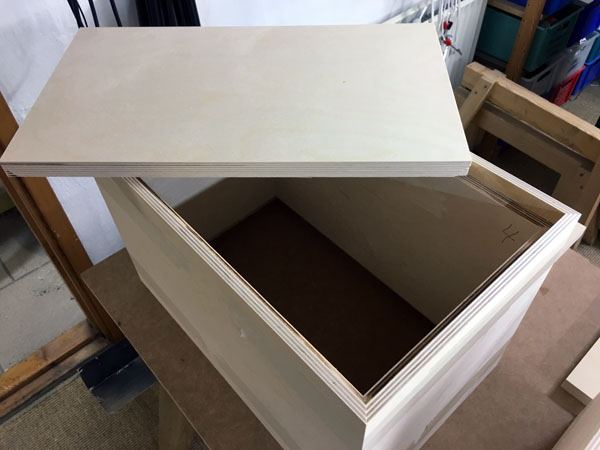
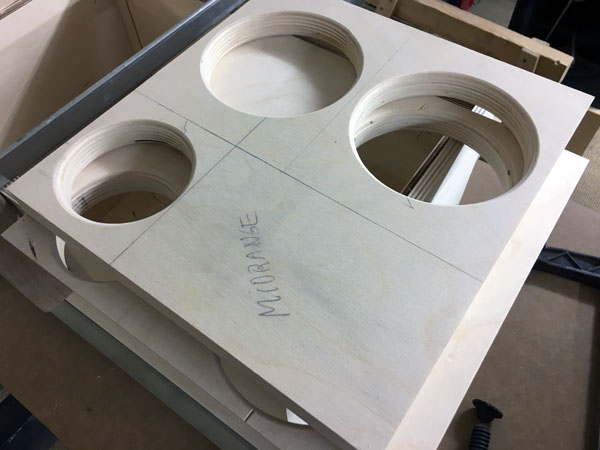
Cabinet is made from 20 mm Baltic birch. Obviously you can use 19 mm
stabdard MDF. Bracings and midrange cabinet can be made from 15-20 mm
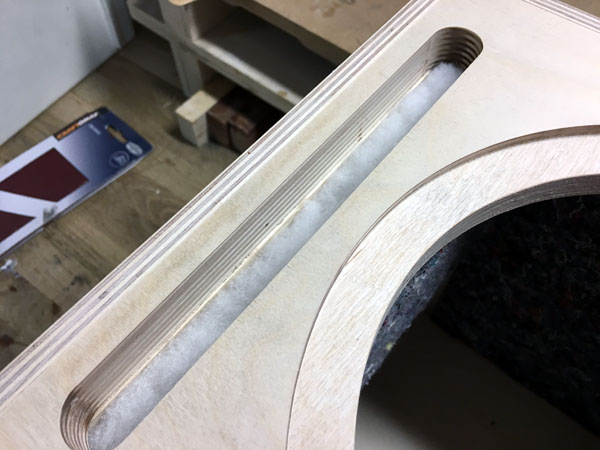
materials. The bracing left to the bass driver goes 100 mm into the
cabinet to make a 20 mm wide slot. This to
contain a sheet
of acoustilux, 200 x 240 mm, folded and stuffed up against the 20 x 200 mm slot in
front panel. This makes the
aperiodic tuning.
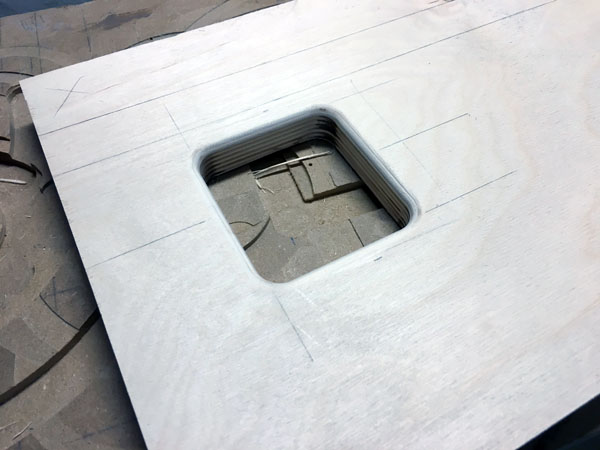
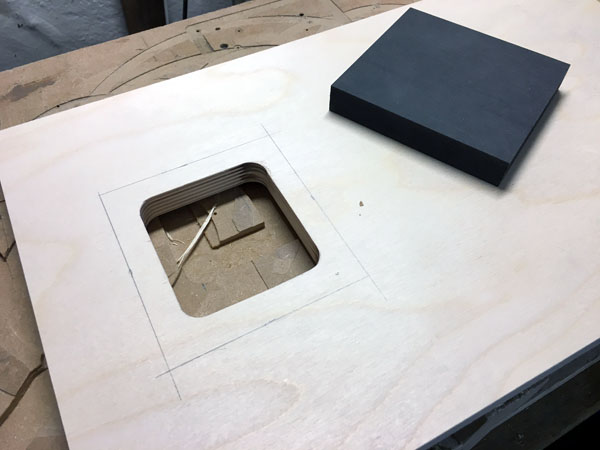
The midrange cabinet is 8 x 13.5 x 15 cm internal dimensions = 1.6 litre.
You may have to chip off a bit for the tweeter magnet.
Useful links:
http://www.troelsgravesen.dk/tips.htm
http://www.troelsgravesen.dk/crossovers.htm
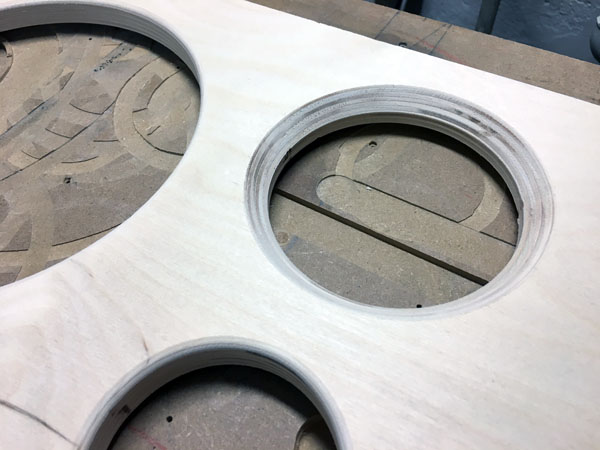
Fitting in front and rear panels.
Preparing for the drivers.

Making braces.
One reader asked if I really made these holes with the
router... Indeed I do.
This time I recorded the time making one 105 mm holes. 70 sec. I mean,
even with a bunch of holes, this doesn't take long.
Smooth the edges with a rounding router bit.
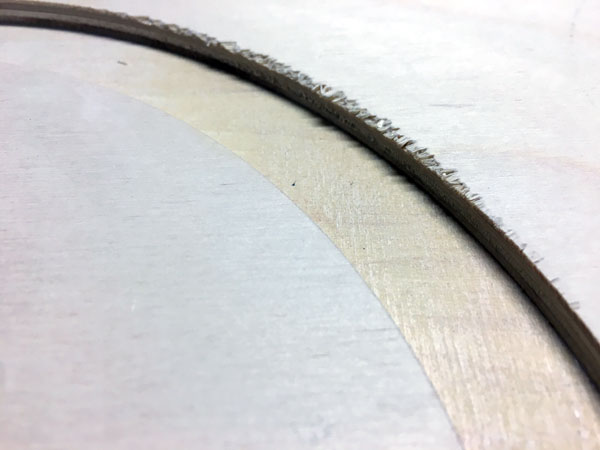
Left: Routing for drivers on Baltic birch can be a real pain! After a
perfect rebate, I slid back the router and it made this! New front
panel.
Right: Chamfer mid-driver hole! No need for bass due to large diameter.
Left: Testing driver rebates. Right: As the speaker is meant to be up
against a wall, the binding posts need recessing.
Binding post panel. Place it behind the midrange section as you need the
space behind bass driver for the crossover.
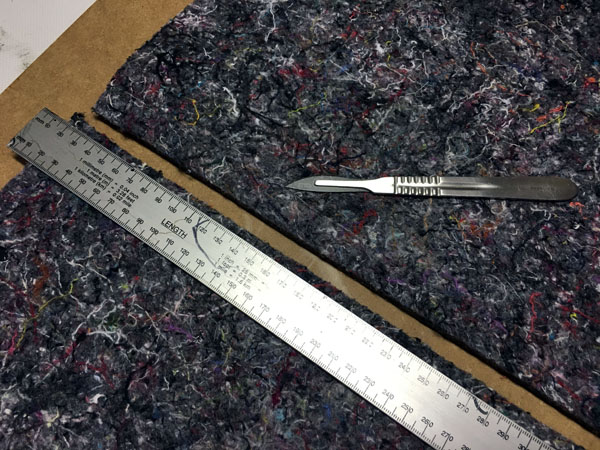
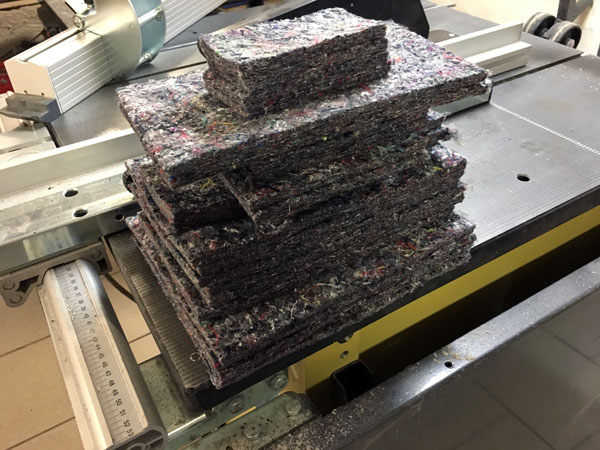
Damping felt I cut with a scalpel and a ruler. Takes quite some blades!
They go blunt very quickly.

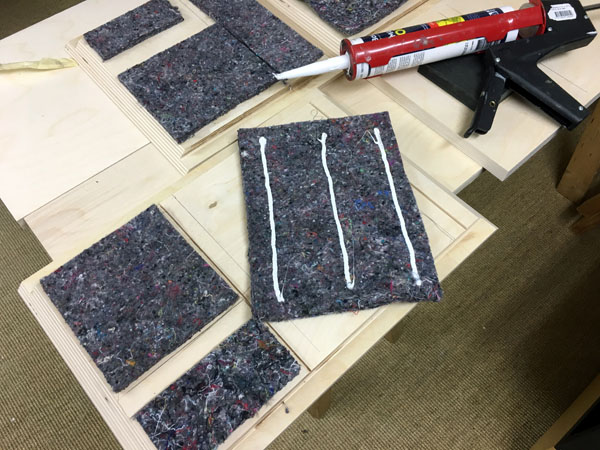
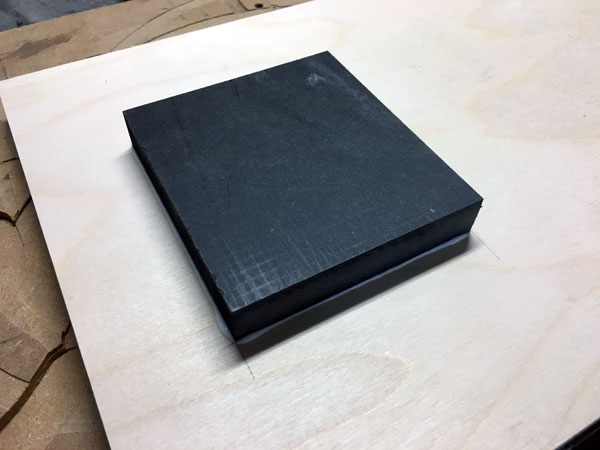
MaxiBond for glueing felt sheets.

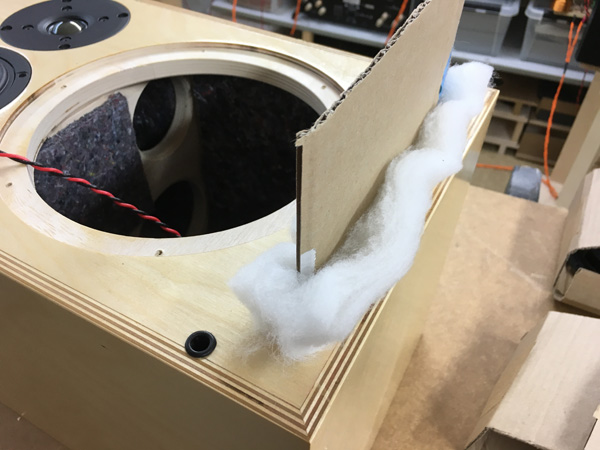
Fold a piece of 200 x 250 mm acoustilux. Fold over a piece of cardboard and slide into the slot.
Acoustilux damping:
Add a piece of 15 x 15 cm to the midrange cabinet.
A piece of 20 x 50 goes behind mid tweeter section.
Fold a piece of 25 x 50 cm over the crossover on the rear panel.

Preparing for the final measurements for simulation and making the frame
for the front grille.
A few comments on MEASUREMENTS before you
start interpreting all the readings below.
First of all, if we think measurements will
tell us how a speaker sounds, we're wrong. The perception of sound is
way too subjective to be reflected in any measurements we can perform. A
loudspeaker system is meant to give us a satisfying idea of an acoustic
event and for some people a pair of 5 USD ear-plugs are enough, others
spend 200 kUSD on a truly full-range pair of speakers - and the latter
may not be happier than the former.
Measurements may give us an idea of tonal balance of a system, i.e. too
much or too little energy in certain areas, although dispersion
characteristics play a vital role here. A two-way 7+1 and a three-way
7+4+1 may display similar horizontal dispersion, yet sound very
different. Measurements may tell us about bass extension if far-field
measurements are merged with near-field measurements. In addition to
this, ports may contribute to bass extension. Most of we diy'ers do not
have access to an anechoic room for full-range measurements from
20-20000 Hz.
What cannot be seen is what kind of bass performance we get in a given
room. Bass performance is highly dependent on in-room placement of your
speaker and the same speaker can be boomy in one place and lean in
another. Actual SPL level at 1 meter distance and 2.8V input is useful
for en estimate of system sensitivity and combined with the impedance
profile may give an idea of how powerful an amplifier is needed to drive
the speaker to adequate levels.
What measurements do not tell is the very sound of the speaker unless
displaying serious linear distortion. The level of transparency, the
ability to resolve micro-details, the "speed" of the bass, etc., cannot
be derived from these data. Distortion measurements rarely tell much
unless seriously bad, and most modern drivers display low distortion
within their specified operating range.
Many people put way too much into these graphs and my comments here are
only meant as warning against over-interpretation. There are more to
good sound than what can be extracted from a few graphs. Every graph
needs interpretation in terms of what it means sonically and how it
impacts our choice of mating drivers, cabinet and crossover design.
What measurements certainly do not tell is the sonic signature of the
speaker, because speaker cones made from polypropylene, aluminum,
Kevlar, paper, glass fiber, carbon fiber, magnesium, ceramics or even
diamonds all have their way of adding spices to the stew. Nor do
measurements tell what impact the quality of the crossover components
add to the sound, from state of the art components to the cheapest of
coils and caps, they all measure the same if values are correct, yet
sound very different.
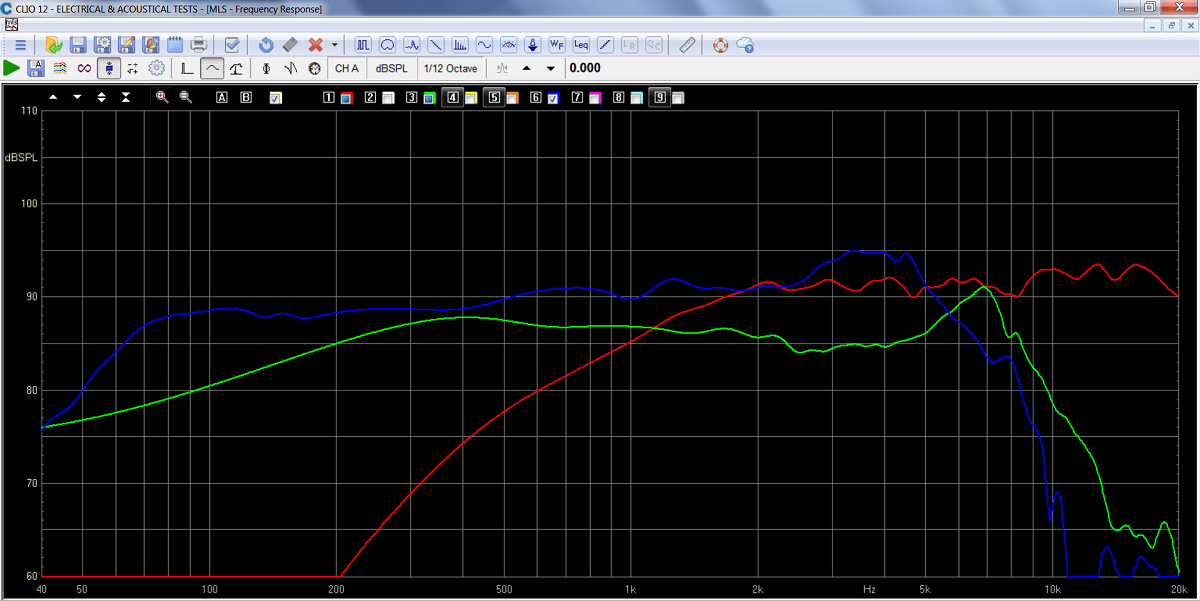
Response of drivers with no crossover. All of
these drivers are very easy given the baffle size and drivers'
placement.
Bass response merged with near-field response @ 175 Hz.
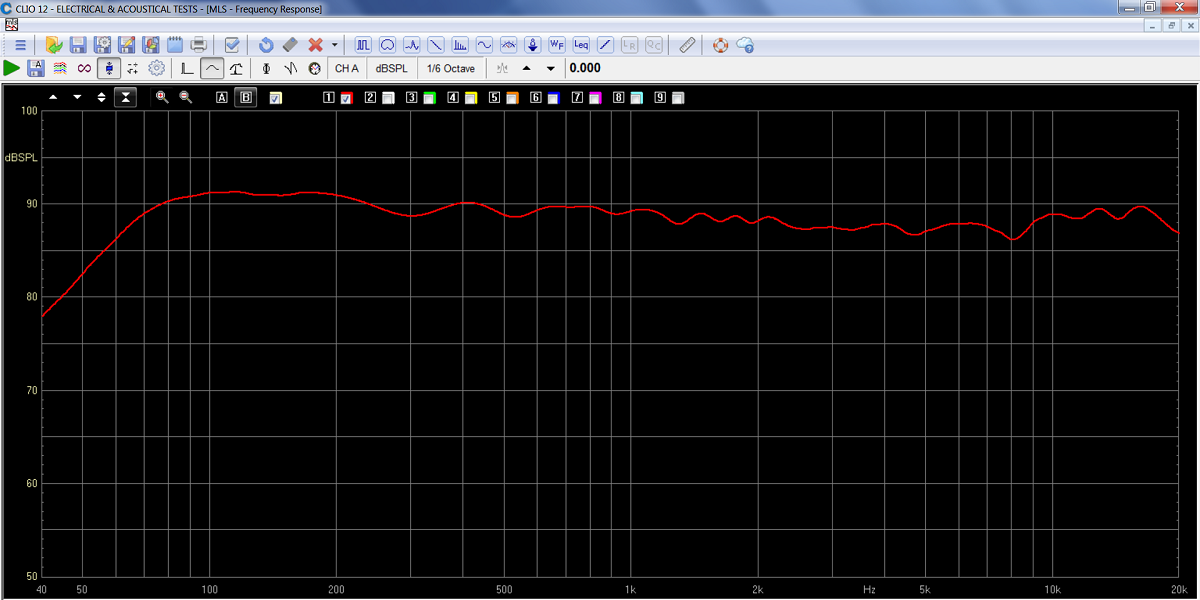
Final system response. Overall system sensitivity around 89 dB.
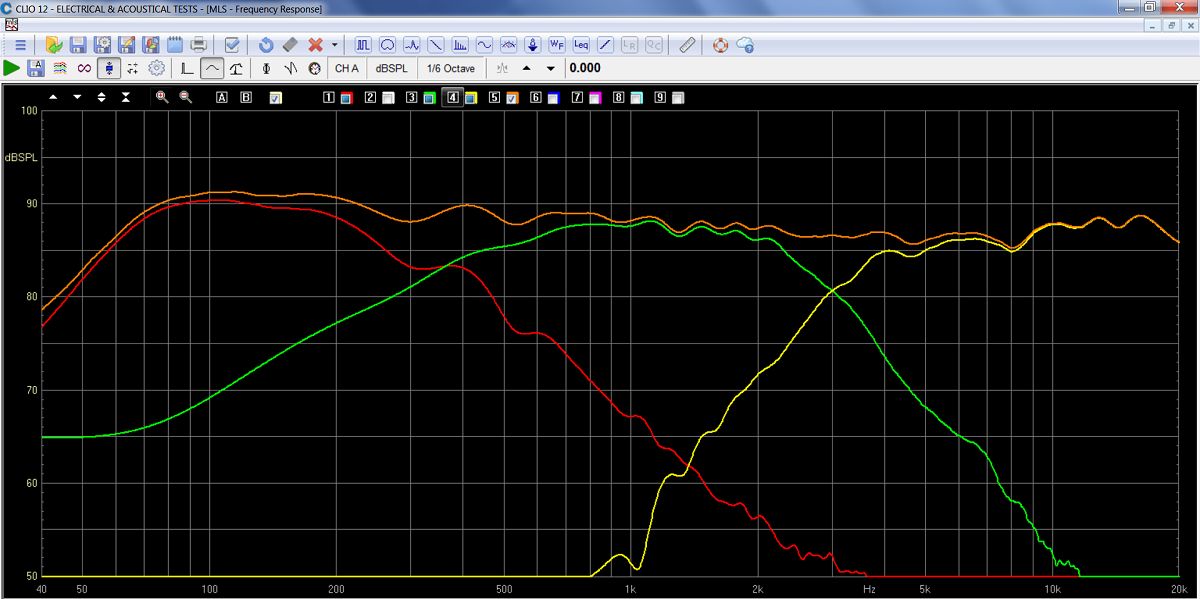
Displaying points of crossover, ~300 Hz
between bass and mid and ~3 kHz between mid and tweeter.
Bass response merged with near-field response @ 175 Hz. Orange = summed
response of drivers.
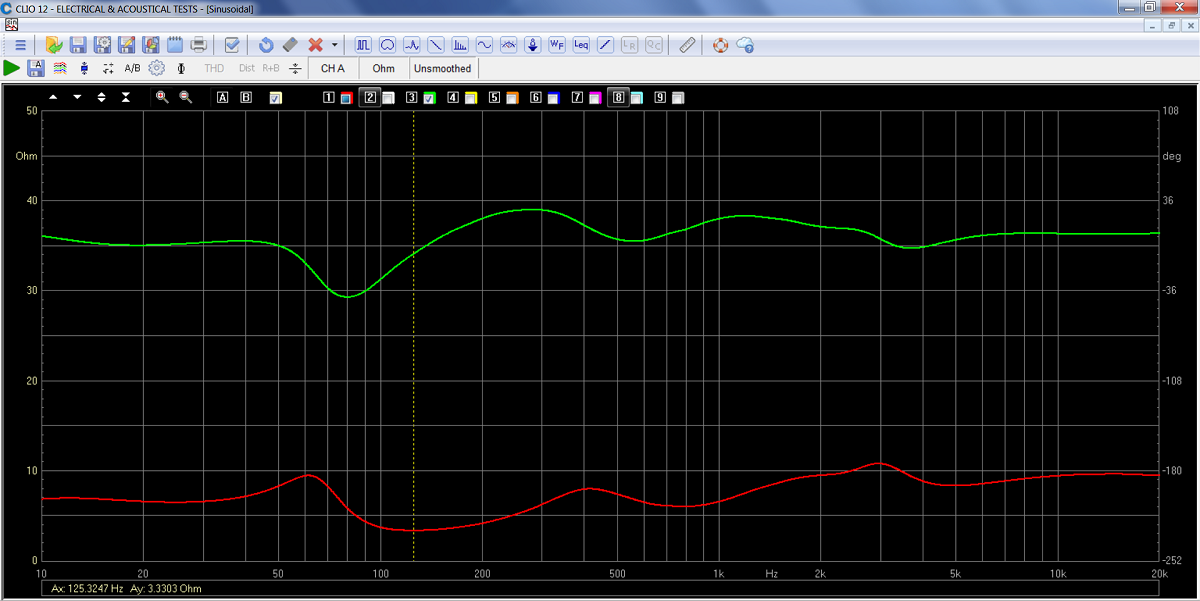
Final system impedance. Basically an 8 Ohm speaker with minimum of 3.3
Ohm at 125 Hz.
Thanks to the acoustic vent, this speaker is indeed an easy load and my
32 tube watts plays it to thunderous levels.
Now, placement!
You may have to place this speaker in less than ideal positions, e.g.
close to the corner and render just too much room gain.
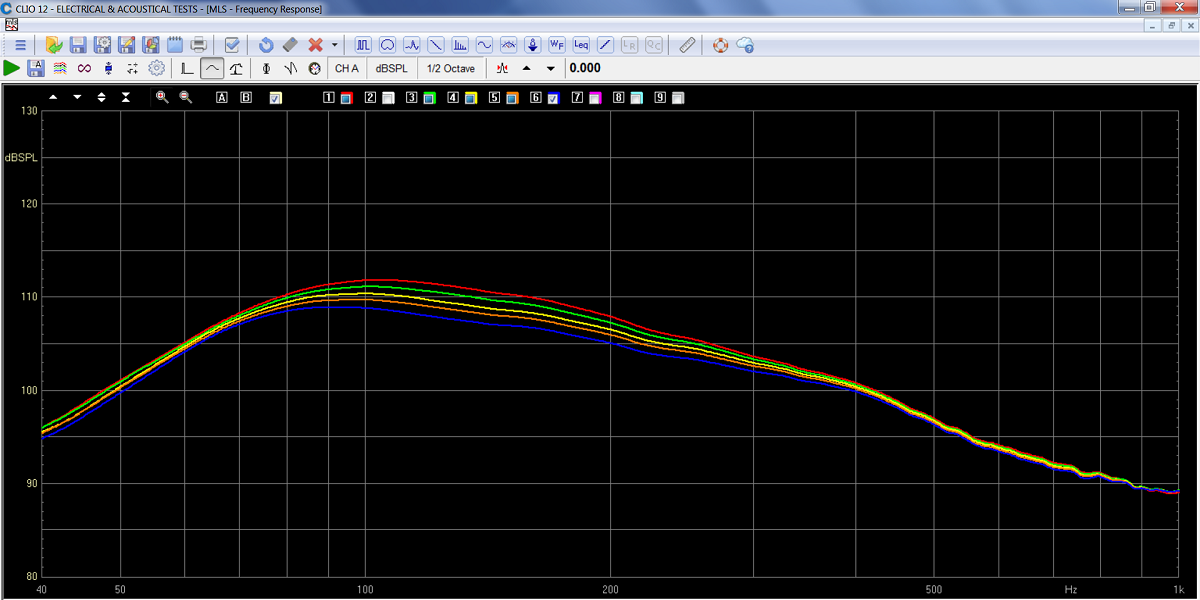
Above you see what happens to the bass level from adding resistors in
front of the bass crossover section.
Red, green, yellow, orange and blue respectively: 0R, 0R47, 1R0, 1R5,
2R2. I suggest 20 watt resistors.
Due to the fairly low point of crossover between bass and mid, this is a
viable solution in case you don't have tone-controls, which most people
these days have not.
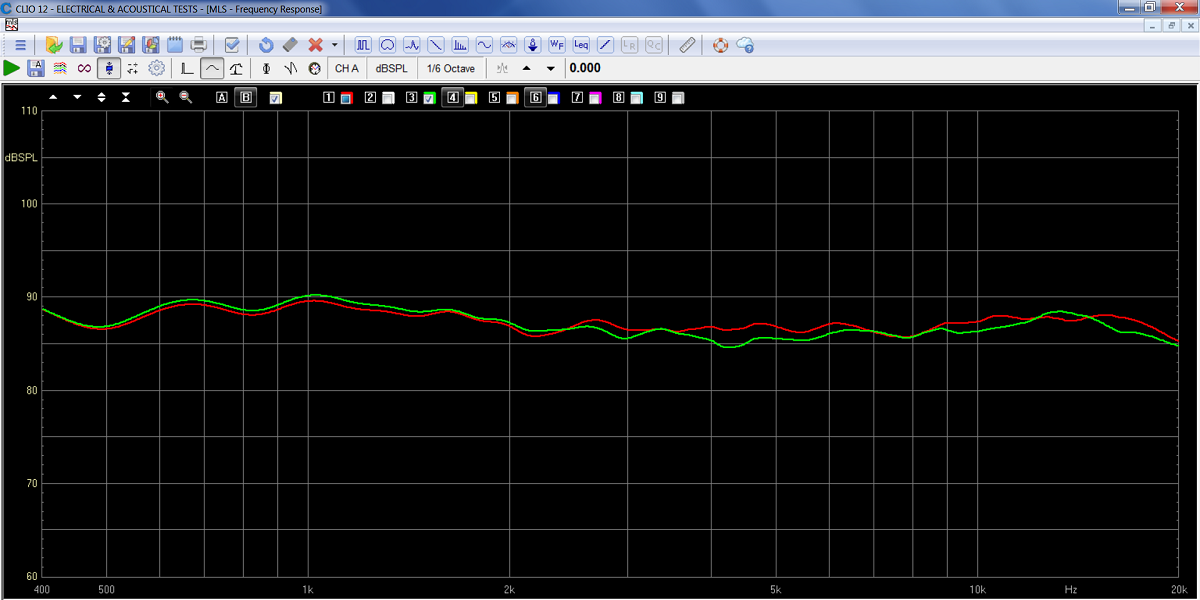
Response w/wo front grille. Green = with front grille. Very little impact in tonal
balance and no peaks/dips.
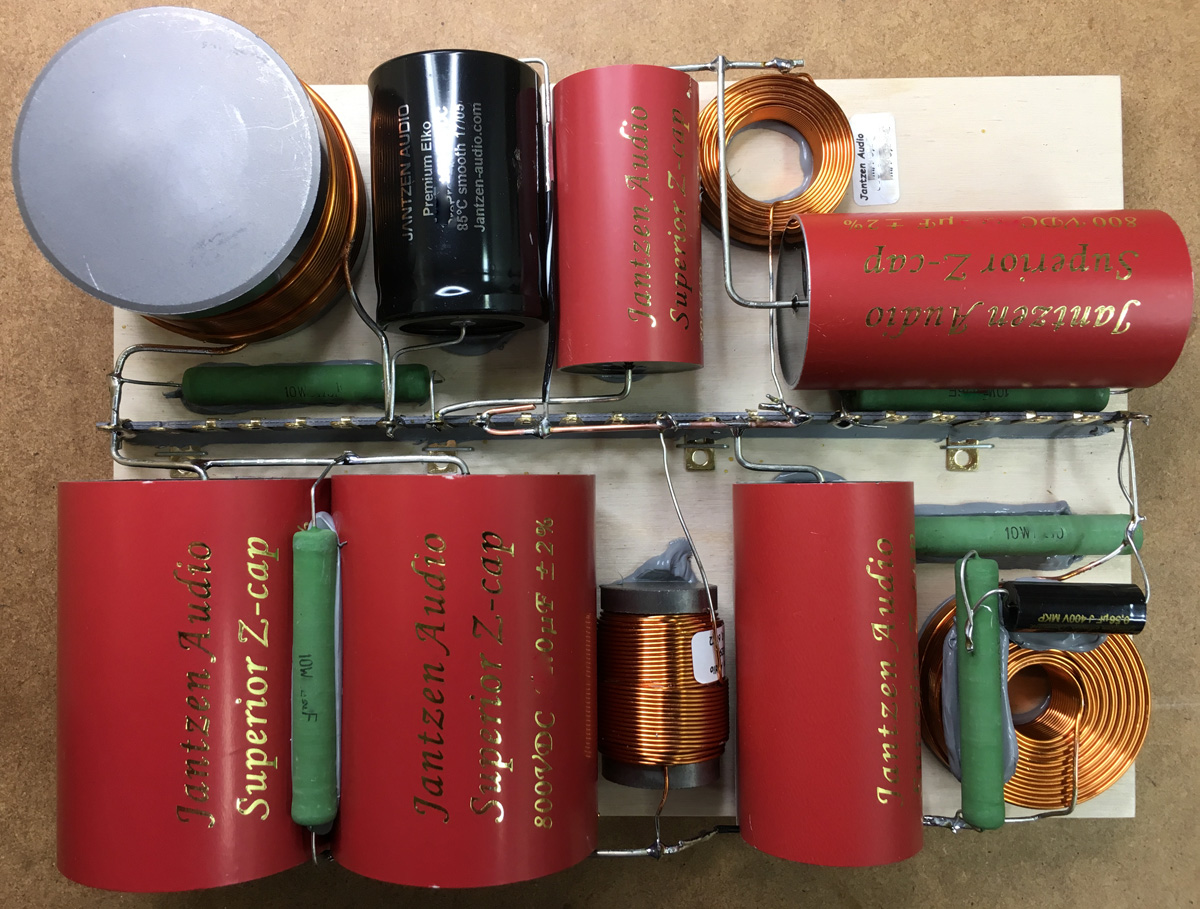
In the STANDARD-Z version all caps, except
the MKT Z-cap, are STANDARD-Z, everything else is the same.
Specify front grille fabric colour if you want this!
And order grille pegs and grille peg catchers. See Jantzen Audio
website.

All kit and component prices may be subject to change and are always to be confirmed by Jantzen Audio Denmark.
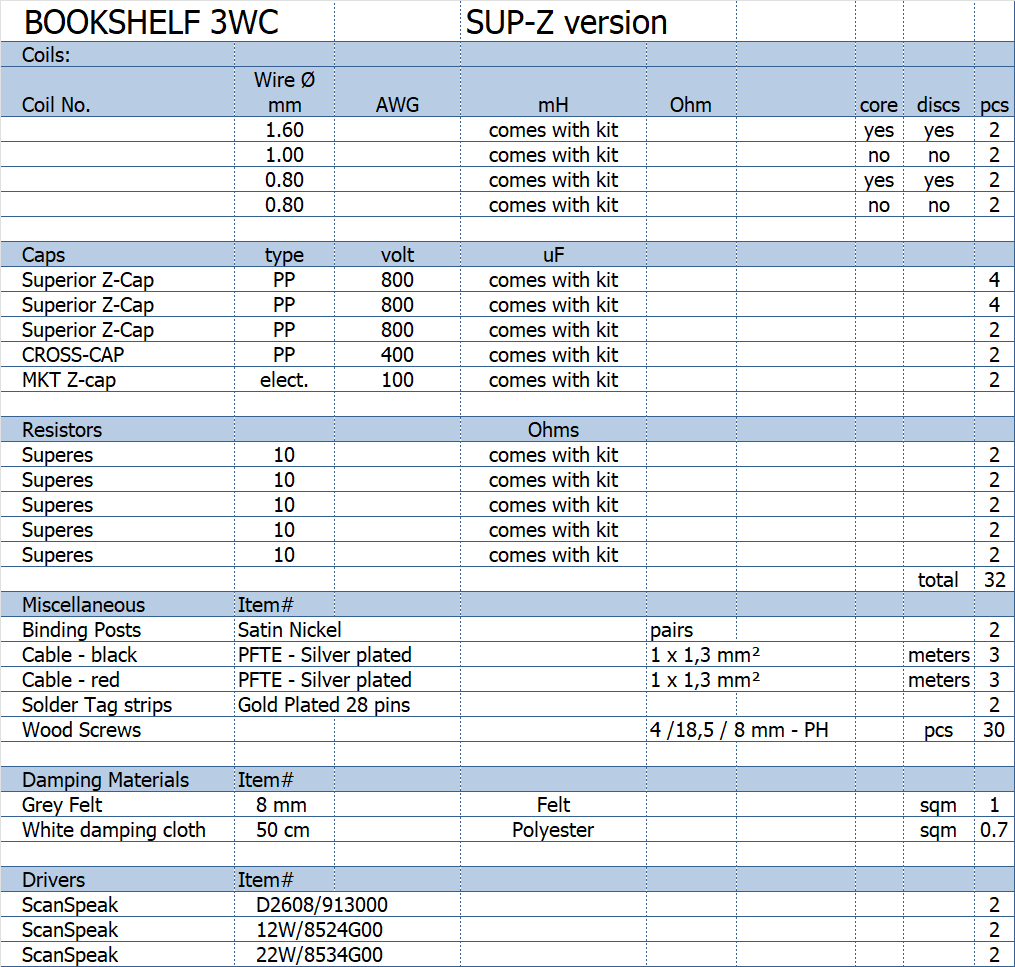
Download Complete Kit
Sale Presentations:

All technical questions to troels.gravesen@hotmail.com
All questions regarding purchase of kits, please mail Jantzen Audio at contact@jantzen-audio.com
CROSSOVER-LAYOUT
BACK TO INDEX
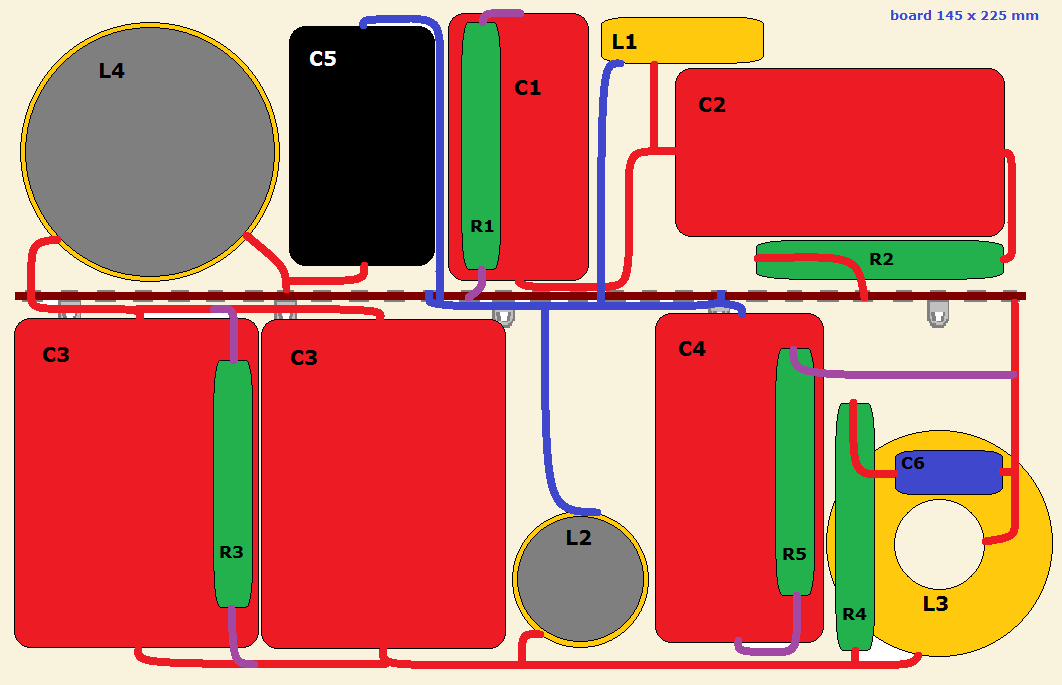
For C5 we now use MKT Z-cap, bigger than the
one seen above, so you may expand board a little.
Bookshelf - wiring
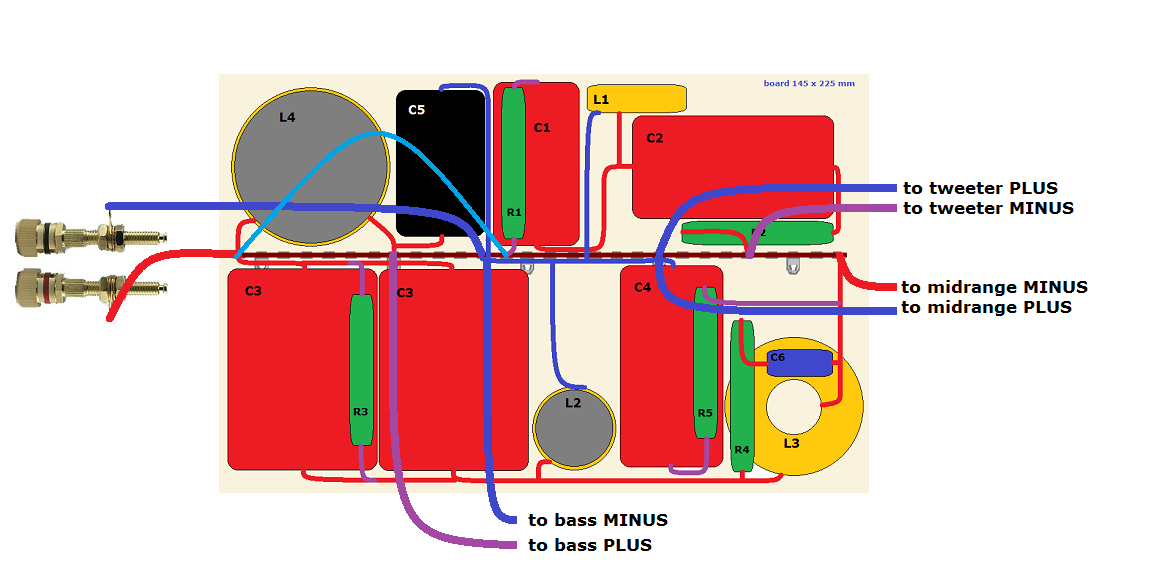
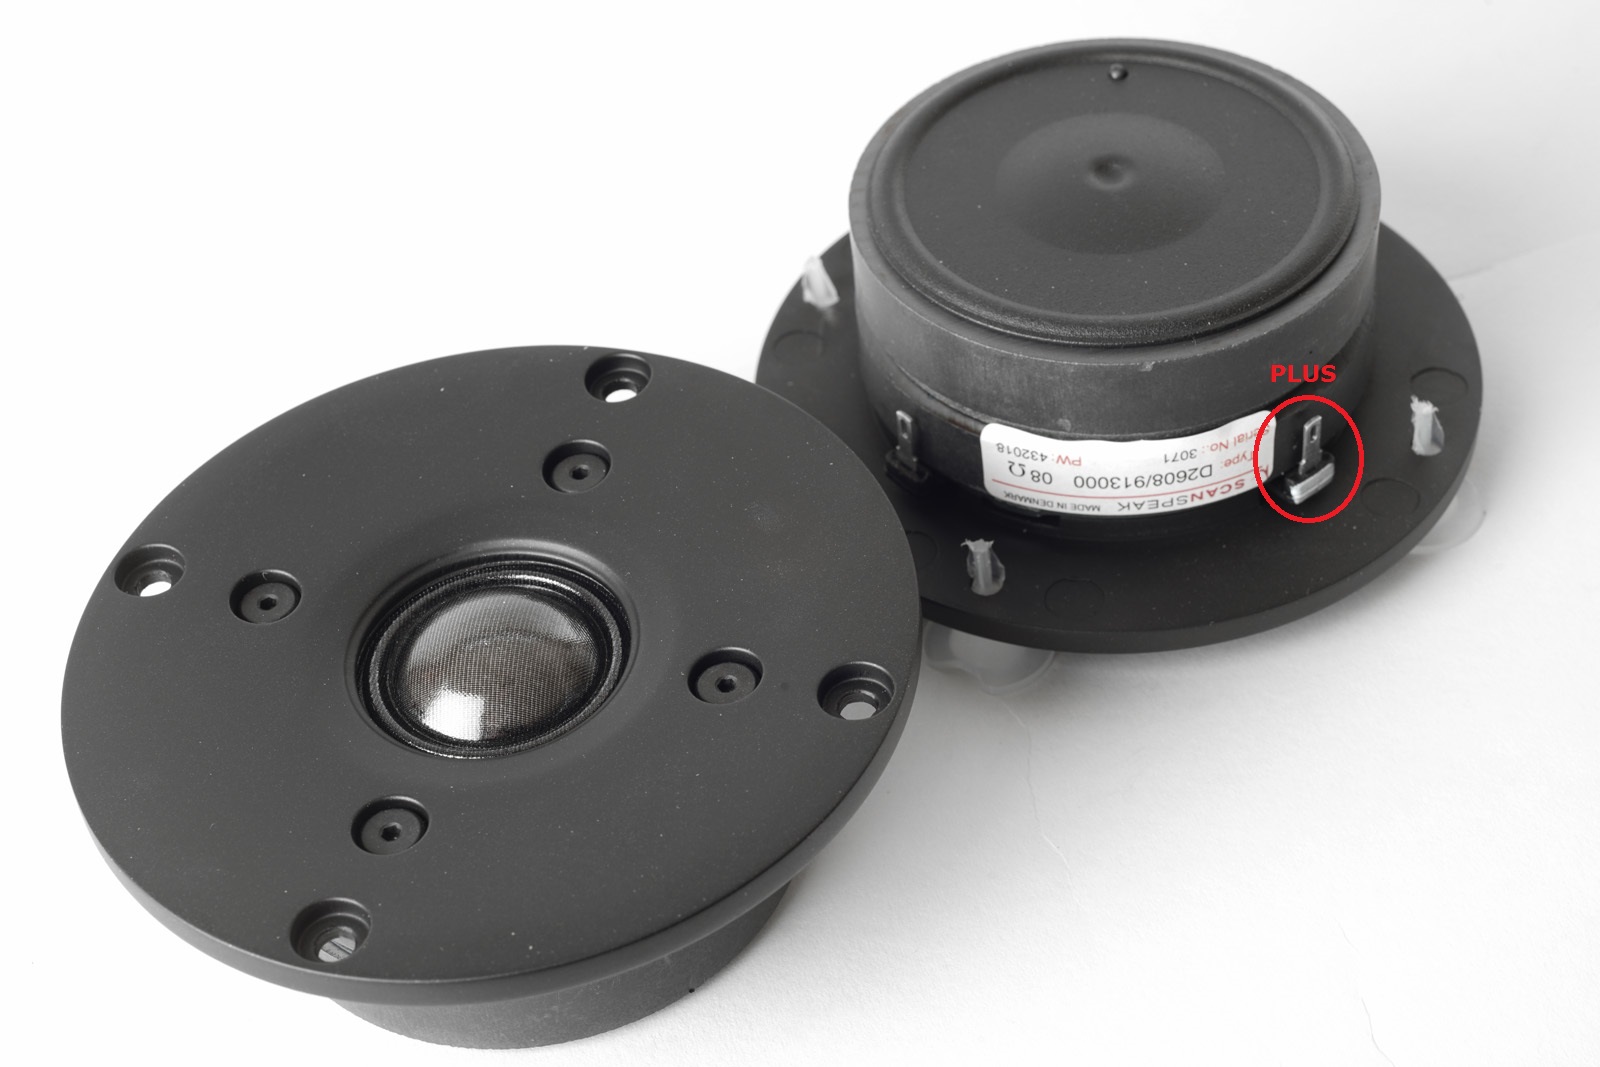
Connect PLUS in to R1 with wire.
Pay notice to inverted polarity of midrange and tweeter.
I don't think you've ever seen a bookshelf speaker with such
high-quality crossover.
Overkill? Not at all. Why should bookshelf speakers not be
allowed performing their best?
Obviously you can replace all caps with standard PP caps, STANDARD-Z,
and it works fine, but you loose detail and resolution.
In the actual crossover, I expanded the width a little allowing R1 and
C1 to reach the input of L4.
With the introduction of MKT Z-caps, the size i bigger, but there is
place for it.