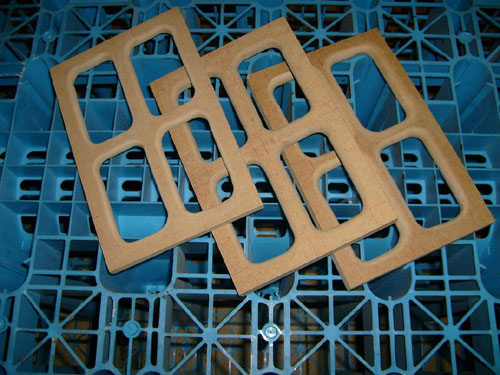
| CNO-builder's
diary: Things
are starting to take shape! As promised, I said
I'd send photos after the weekend.
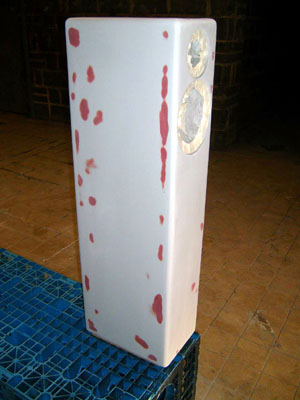
They're a bit messy with
the glue round the edges (admittedly this is the
worse of the two cabinets - finished clamping it
up at nearly midnight - I booked an assistant for
the 2nd cab!), but as I'm planning on spray
painting them, I'll need to sand them down
anyway.
Just got to line the cabinets with the damping
materials and fit the front baffles (after I've
chamfered the woofer's opening) then I can get on
with finishing them off. More pictures again next
week.
One last question (I
promise!): Is it worth filling the cavity in the
base with anything? Sand for example? I had
thought of filling it with Polyester Resin (and a
mineral dust), but as I'm not going to bother
with the fibreglass I'd mentioned previously, I
haven't bought the supplies in time to do that
this weekend.I'll go and see how much sand is at
the builder's merchants near my workshop in the
morning!
As for your comment about
creating a file for my images. I can burn them
all onto CD at a higher resolution and post them
out to you if you like? (we have an email file
size limit so I have to shrink them down to email
them). As suggested beforehand, I'm more than
happy to send you all the drawing and 3D data
I've created also? As before, another update will
follow the weekend. Have a good one! Ooops!
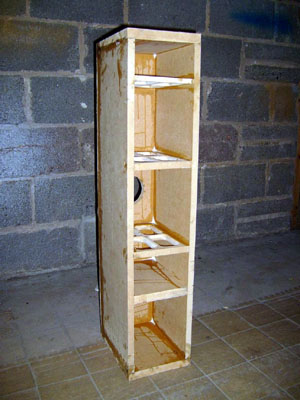
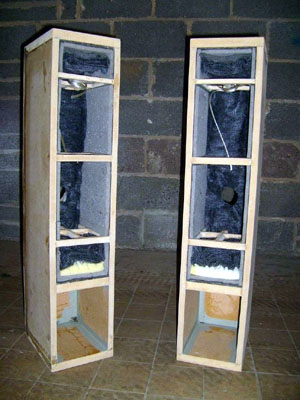
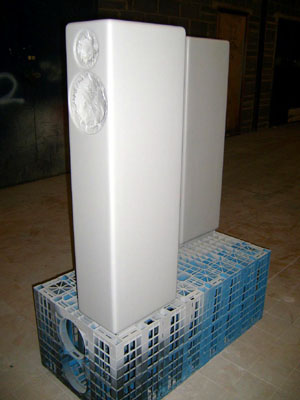
Forgot to send you an
update after the last weekend! The cabinets are
now lined with damping and fully assembled with
the front panels. I 'just' have to prepare them
for painting and get them sprayed up now. and the
crossovers - I've been putting them off for now!)
Anyway, the driver opening chamfers: Not as deep
as I would have liked (about 12mm), but the best
I could do with the wrong router bit. Finished
with the Dremmel and lots of hand sanding anyway!
Damping1st, the 6mm Bitumen Rubber strips. Then
the Antiphon LDA sheets (2mm felt material
laminated with 10mm Foam) Egg Crate foam: I told
you I had lots! (in a number of different
thicknesses and profiles) I used the thickest
foam immediately behind the driver: And the
deepest profile at the bottom of the cabinet's
internal volume (the solid brace that separates
the cabinet): I used some of the thinner
materials on the other facesThen lined the rear,
top and base of the cabinet with the fibre (after
fitting the speaker cablesI used masking tape to
position some strips of the Antiphon material
between the brace panels with the backing
material removed. Then trial fitted the front
panel to allow the self adhesive to locate them
in the correct locations on the rear of the front
panelsI did use sand in the bottom of the cabs in
the end.
I'll weigh the finished cabinets to see how heavy
they are! I have Thursday booked off work in
advance of the Easter bank holiday, which should
give me plenty of time to rout the radii onto the
cabinet edges and start painting them with
primer, so I should have some more pictures for
you next week!
Latest images: Black
aerosol spray lightly applied to aid visibility
of low, pitted areas. Where the low spots remain,
the black remains in place after sanding, showing
where more filler is required (there's a patch on
the side edge positioned roughly between the
driver openings). More pictures of them after the
1st coat of primer should follow. I sprayed them
at the weekend, but the batteries ran out on my
camera before I'd had chance to get any more
images. I'll get some tonight if I get chance to
make it down to the workshop! Should be ready to
top coat by this weekend...
Thanks for the comments
on my CNO build. I agree, I think they're going
to look really good once they're sprayed and
assembled up. As usual, there'll be some more
images after the weekend, hopefully showing them
in full colour. There's just a couple of hours
prep work left to do on them in the morning now
then I should hopefully be spraying them in the
afternoon. However, I've been doing some thinking
while I've been doing all this sanding! (I've had
a lot of time to just think while my elbow's been
doing the work flatting the primer down!) I have
come up with an idea for a "Deluxe"
version of the CNO cabinets. Using the same
laminating production method as I plan to build
my TL design with, I thought that it would be
really easy to make a curved/elliptical version
of the cabinets. By using several layers of MDF
or Timber (Plywood would look amazing, showing
it's own laminates on the end grain), they could
be laminated together to generate the required
cabinet internal volume. I've looked at the
internal volumes, and the necessary dimensions
the laminates would need to be to achieve the
volumes of the CNO designs:
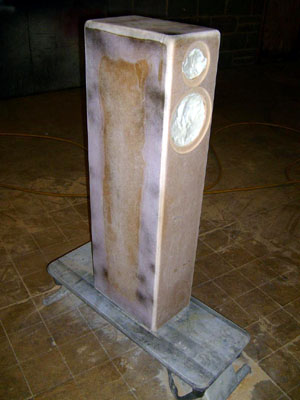
Not finished I'm afraid,
ran out of light on Saturday, so I still have to
spray the clear coats to achieve the gloss.
Apologies for the quality of the final image, the
batteries on the camera were running low, so I
couldn't use the flash! Better images to follow
later in the week..
Wow! I wasn't expecting
the images to be up on the site so soon! I had
better pull my finger out and make sure I get the
cabinets finished this week/end now! Feel free to
include any of the following drawings or 3D files
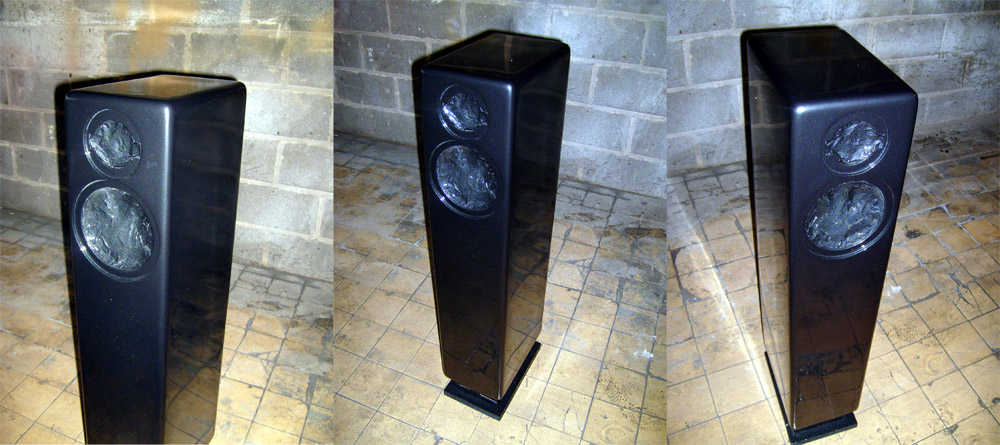
I have produced on your site also: Finally got
the cabinets sprayed: You can take the blurry
image off your website now! I'll get some better
photos for you once I've polished the paint
finish and assembled the drivers. Regards
Thanks, Yeah, the hours
of sanding have paid off finally! Can't wait to
hear them now! Regards.
Mirror polished: Assembly
tonight... It's crossover time!
Hi Troels,
Finally!
They make noise!
Had a slight
delay with the crossovers at the weekend when I
noticed that some of the resistors were the wrong
value (0.33's instead of 3.3's! My mistake
for not ordering the right ones, but a good job
we spotted the mistake!) Also, I noticed that I'd been
supplied with Cross Caps, rather than the
Standard Z's I'd ordered! Too late now though,
they're soldered up!
I was a little apprehensive before powering the
amp up to be honest, but all that dissolved
during the first intro I listened to. These
speakers truly do sound amazing!
I can't
imagine how they're going to improve as the
drivers break in over the next couple of weeks
listening!?!?
The cabinets
are nice and sturdy too, even heavy basslines
played at substantial volume levels don't make
the sides of the boxes resonate (remember the
sides are 18mm material, thinner MDF than the
rest of the panels so I was concerned they
wouldn't be strong enough). I'll send some better pictures in
a day or so when I have better light. Thanks again for all your help and
correspondence, I hope my realisation of your
design has done it justice? Regards Ray
|


.jpg)
