ScanSpeak
Discovery-3WC-10
Copyright 2023 © Troels Gravesen
Go to on this page:
DRIVERS
CROSSOVER
CABINET
WORKSHOP PICS
MEASUREMENTS
SPEAKER-KIT
CROSSOVER LAYOUT
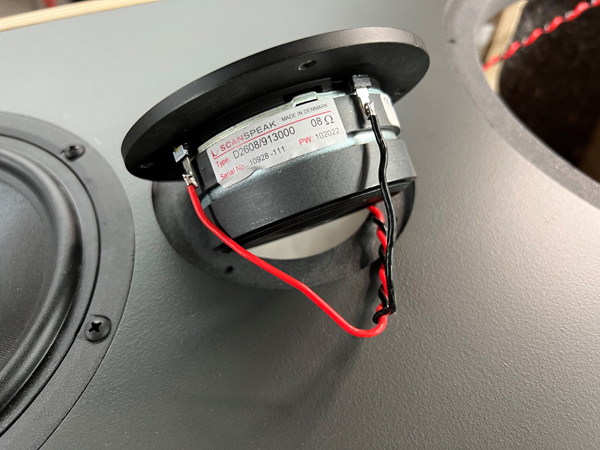
Be-DOME
VERSION
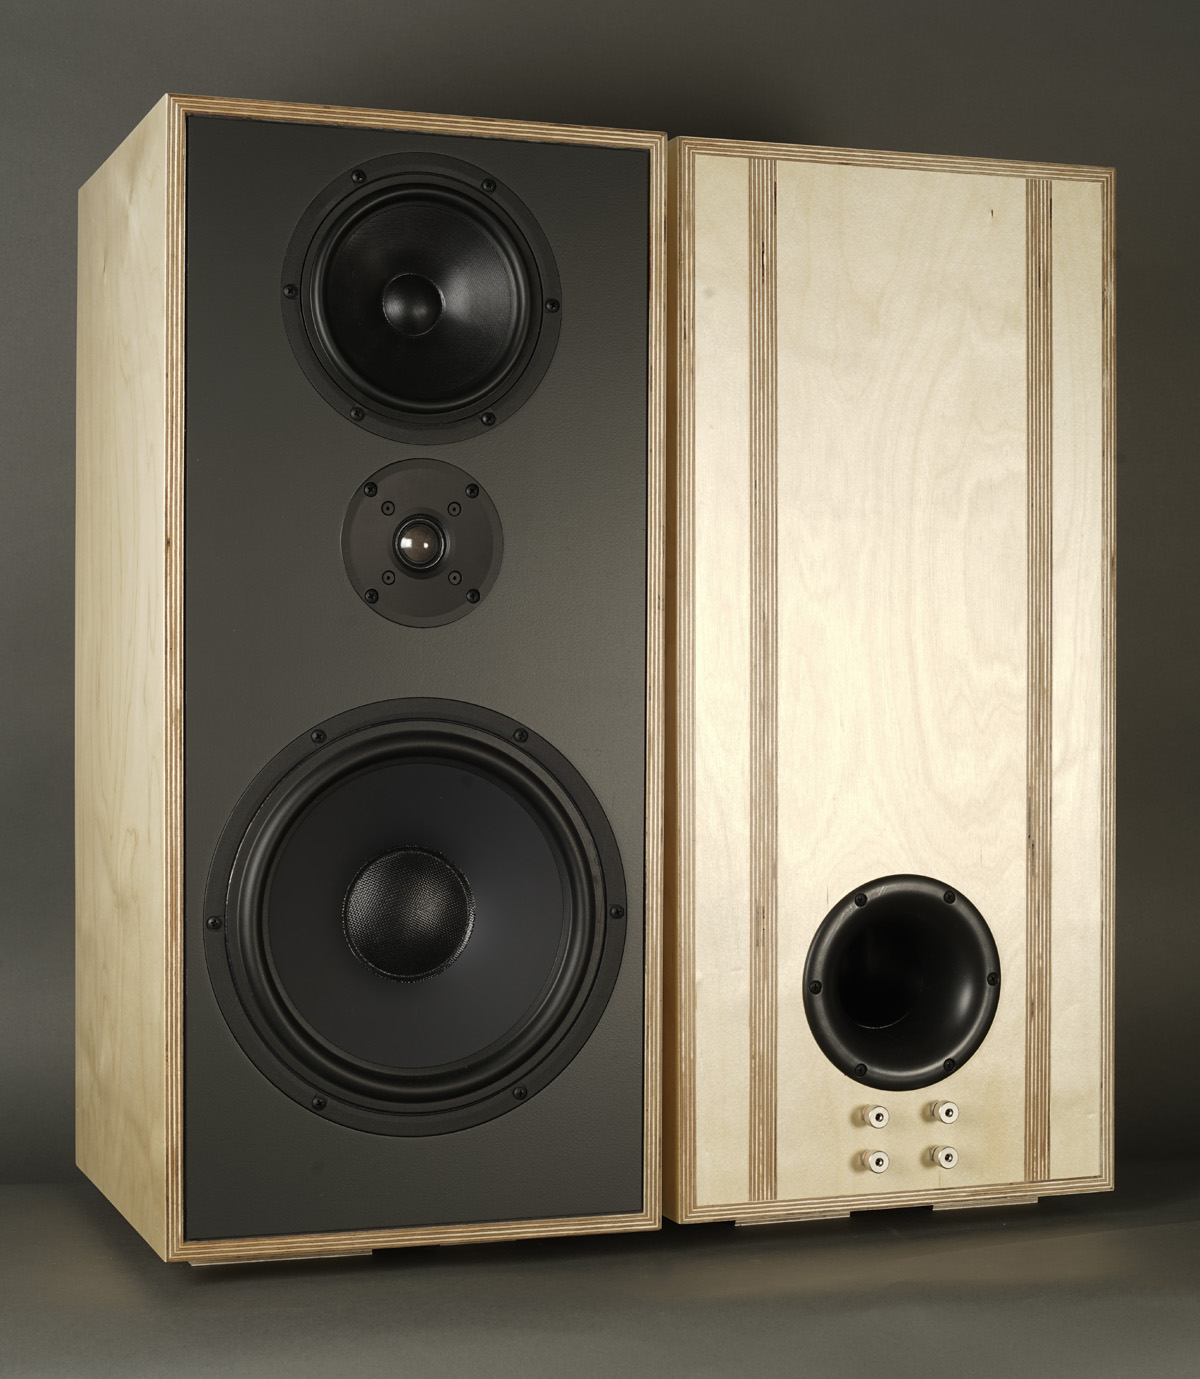
My classic 3-/4-way kits, primarily based on straight rectangular boxes,
have become our best selling kits. Apparently these classics have the
right combination of size, sensitivity, price, ease of construction and
not least - sonic quality based on good drivers and premium crossover
components. And coming to think about it, there really weren't that many
kits like these on the market some 5 years ago. Mostly we find small
"6+1"s or 2½-3way slim floorstanders, apparently targeting customers
with WAF issues. But fortunately there was another audience out there,
yearning for speakers that can replicate some of the dynamics of live
music.
A lot of things have to come together to make a classic a commercial
success. Size for one thing. The 10" bass driver is another good reason. It delivers decent bass,
can play reasonably loud, the cabinets are easy to construct, they're not too big, not too small - it's
the Goldilock of speakers.
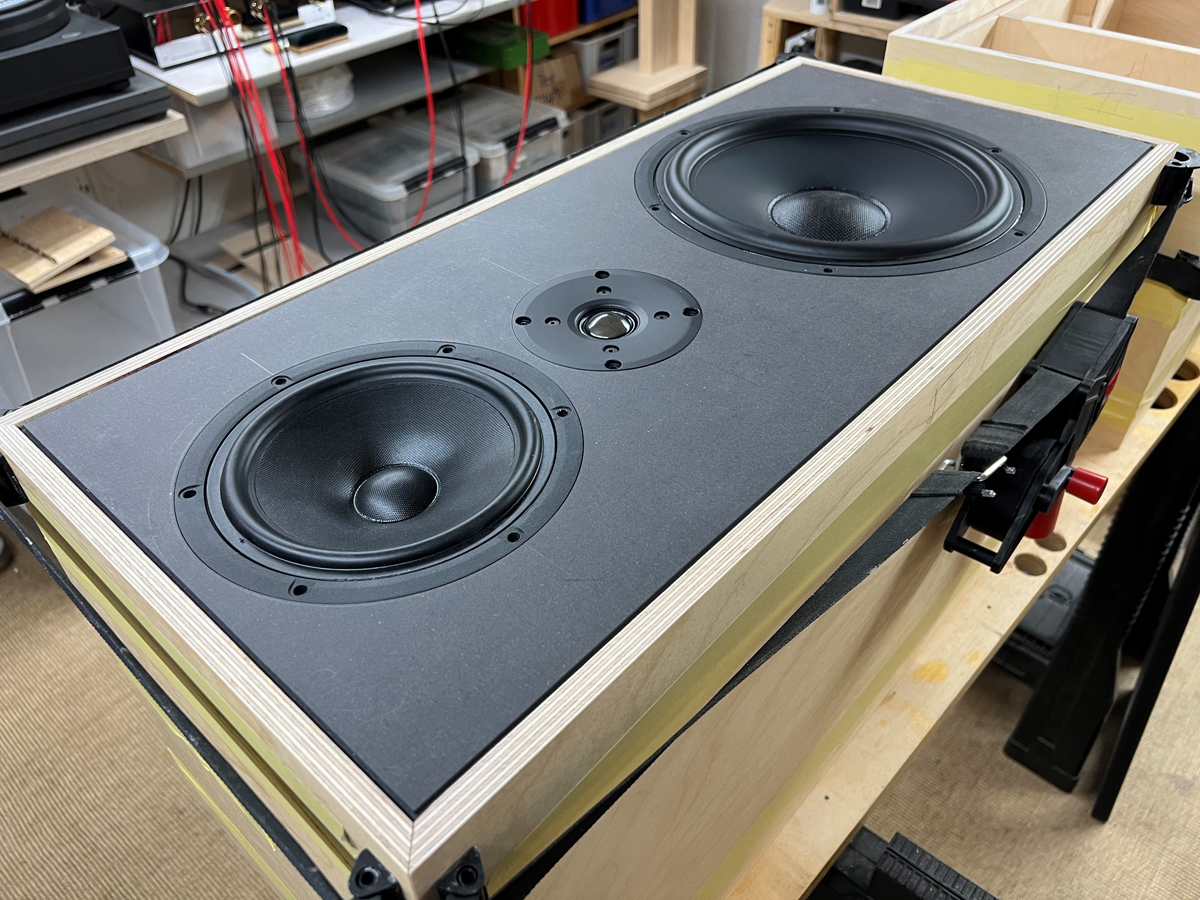
This new 3-way classic builds on exactly the same principles, but here based on ScanSpeak Discovery drivers,
delivering unparalleled performance from modest priced drivers.
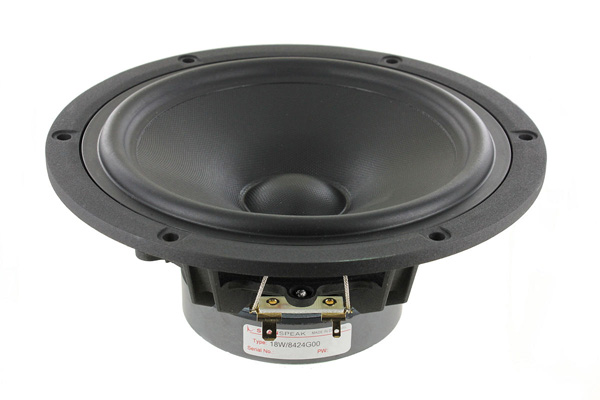
Some may ask why I use a 6" midrange driver and not a 3-4". The answer
is simple as a larger driver moves less, meaning less distortion. Also a
larger midrange tends to be less critical on source material compared to
a small 3-4" due to its wider dispersion. All things come at a cost. In
addition to this I wanted a fairly low point of crossover to the bass. Actually the
18W/8424G00 is only 9 cm^2 larger than the 6RS140 midrange driver of the
Faital-3WC-10. And by using a larger midrange driver we increase dynamic
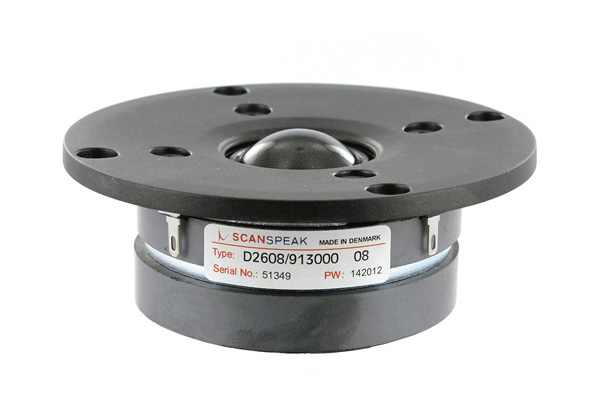
headroom. Not least, the Discovery 18W/8424G00 has a ruler flat response in all of
the midrange with no rubber surround resonances. See measurements
below. The reason for using the 18W/8424G00
and not the 18W/8434G0, as used in the
Discovery-861, is the "-24"'s 1" voice coil, giving it extended
frequency response - and here we have a high-pass filter and no need for
the extra power handling of the "-34". I'd say the 18W/8424G00 is the "Vifa
C17" of today, only with a much better frequency response and better bass
extension.
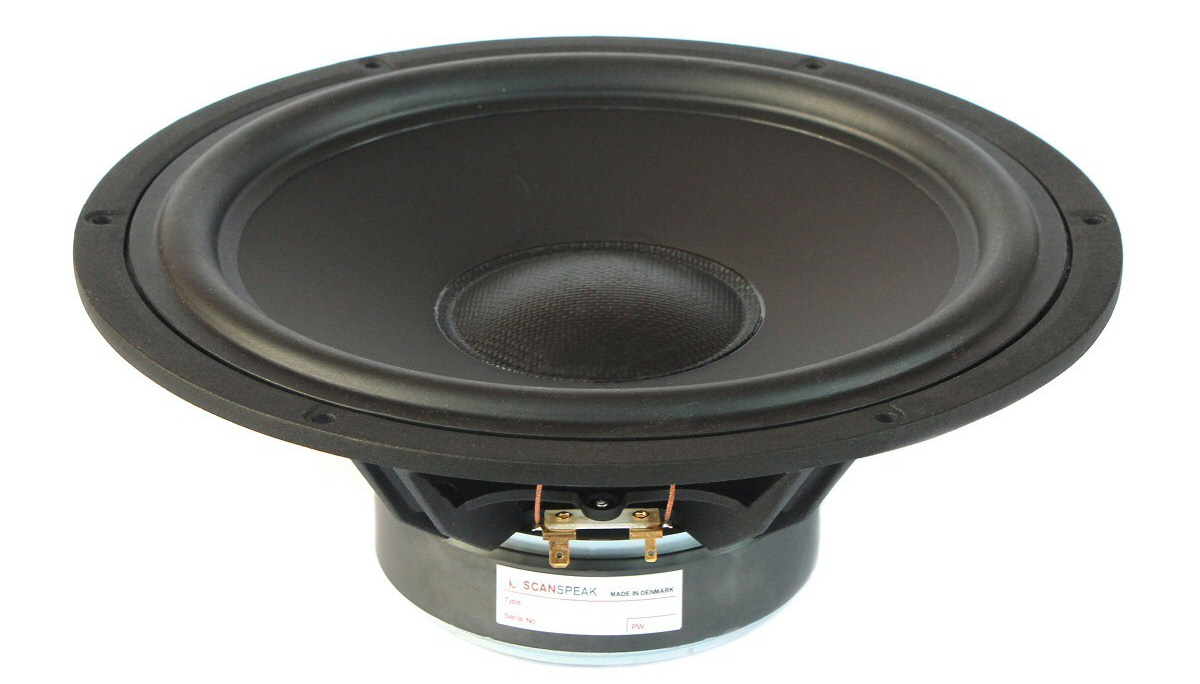
The powerful 10" Discovery bass driver has been used before in my
Discovery-4 construction, only here we use the 4 Ohm version to beef
up the overall system sensitivity to around 90 dB. My 32 wpc tube power
amp has no problem running this speaker to significant levels - and this
from its 8 Ohm tabs. I've said it before, but what tab should be used on
a tube amp must be tried. Just because a speaker has a nominal impedance
of 4 Ohms doesn't mean it sounds the best from a tube amp's 4 Ohm tabs.
Your ear is the final judge.
So, what's the difference between the Faital-3WC-10 and this
Discovery-3WC-10? Please read my
CHOICES file! Please read all of it carefully! I know some of you
will try to get around this and ask which I like the best.
Sorry, you won't get an answer. My job is not to tell you what is right,
but to give you choices.


Quite a number of records were used for finetuning midrange and treble -
as always. Some of the records above. The Barber record is - as almost
always - a stellar recording, this time mastered by Bob Ludwig and cut
by Bernie Grundman. Coming from the
Ellipticor-A50 the 10" bass drivers did a really good job - and they
go deep.
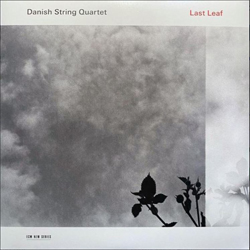
Danish String Quartet, Last Leaf, is a record I always use as
these strings can be the litmus tests of any midrange driver. They came
out really well without any aggressiveness.
So did the piano of Herbie Hancock. Well, too
much material on this double LP to boil down to a few lines. If you like
jazz and Joni, a must have album. The Discovery 3WC-10 was never short
of delivering the goods.
It's been years
since I've heard my Dali #1 CD! Hearing
Hugh Masekela
- Stimela (The Coal Train) again was a delight - with deep bass and
powerful dynamics.
My first-to-hear friend: "Who said high-end cannot come from modest prices drivers?" I couldn't agree more. The exceptional linear response of the midrange driver plays a significant role in this. Bass and treble is pretty much a matter of speaker voicing.
Basics:
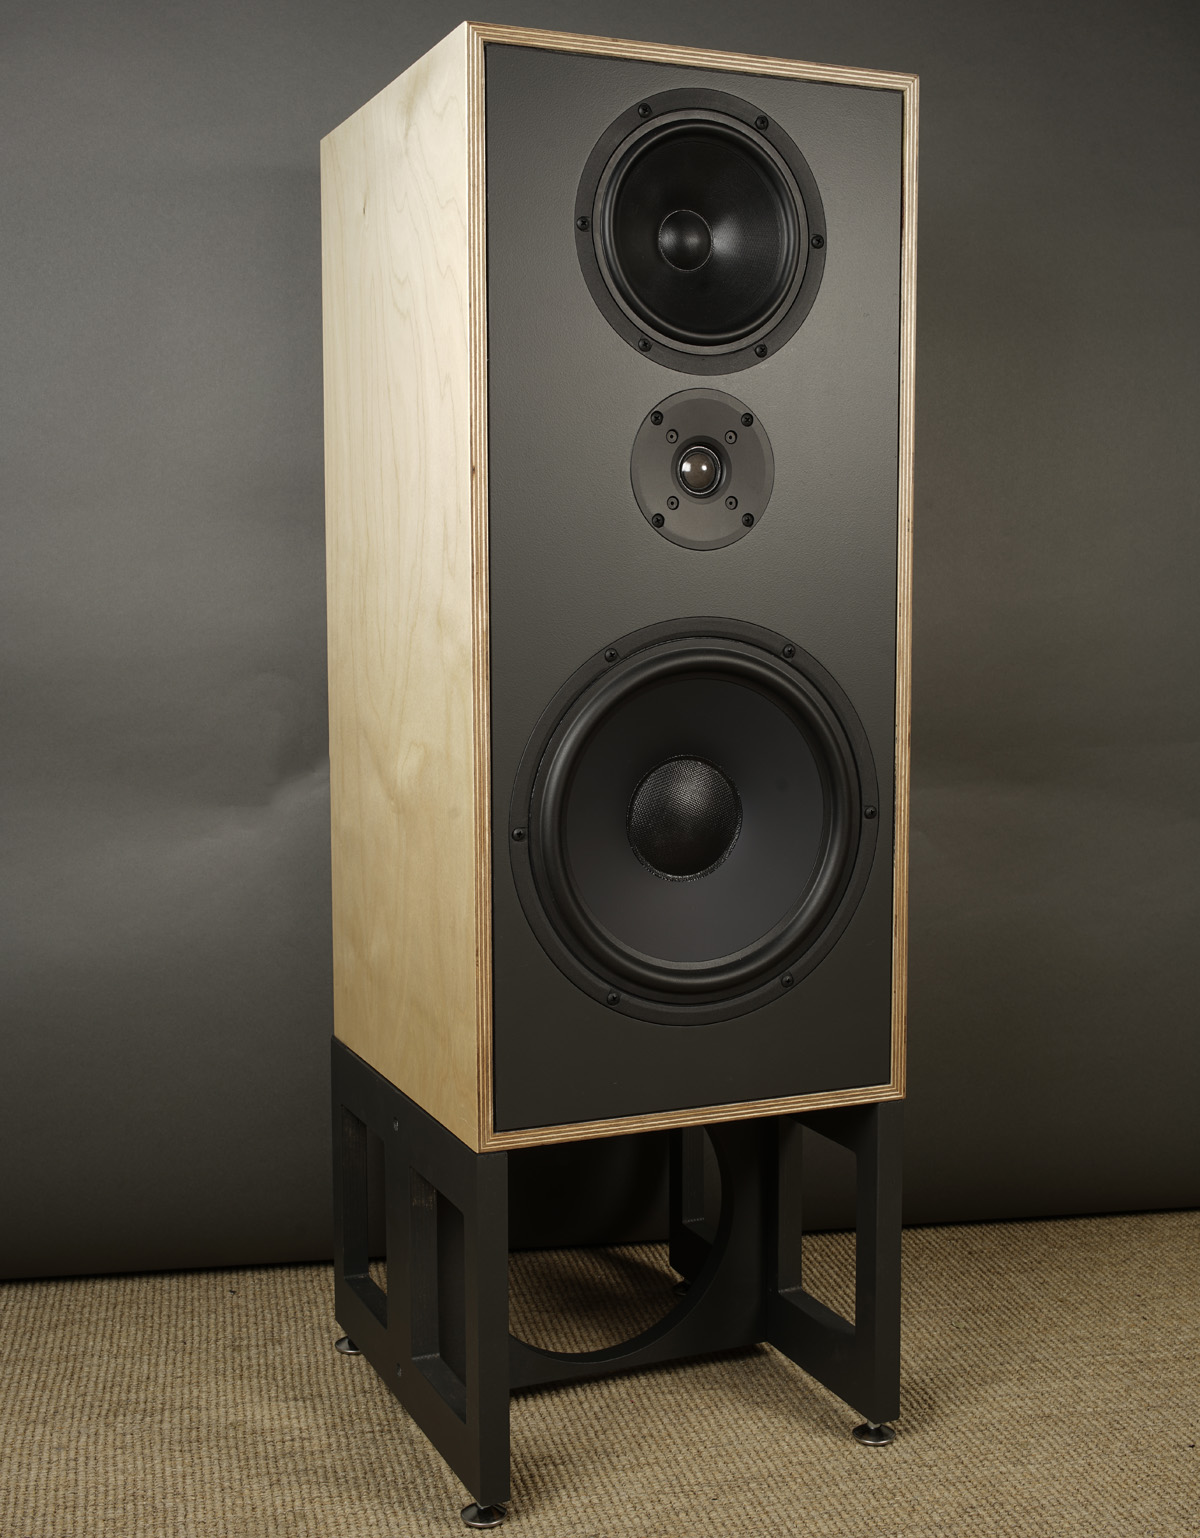
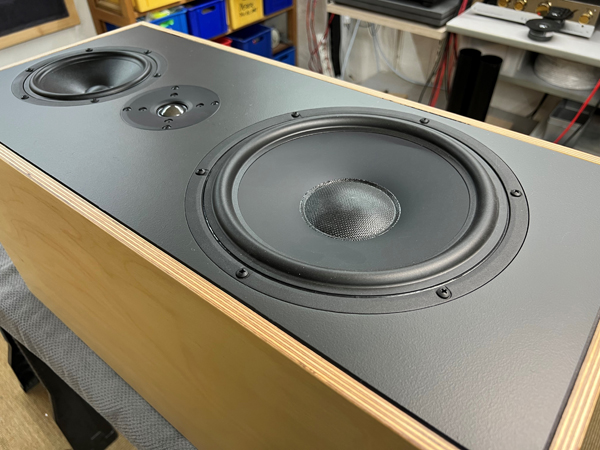
3-driver speaker.
Dimensions: 32 x 34 x 70 cm, WxDxH.
System sensitivity: 90 dB/2.8V/1 meter.
Impedance: 4-8 Ohms.
Power requirement: 30+ watts/channel.
Power handling: 100 watts.
Useful links (Please
follow all links before e-mailing!):
http://www.troelsgravesen.dk/tips.htm
http://www.troelsgravesen.dk/tips.htm#CONSTRUCTION_OF_CROSSOVERS
http://www.troelsgravesen.dk/crossovers.htm
http://www.troelsgravesen.dk/LCR-RC.htm
http://www.troelsgravesen.dk/Inverted-Polarity.htm
http://www.troelsgravesen.dk/choices.htm
http://www.troelsgravesen.dk/power-handling.htm
Download specs here: D2608/913000 18W/8424G00 26W/4534G00
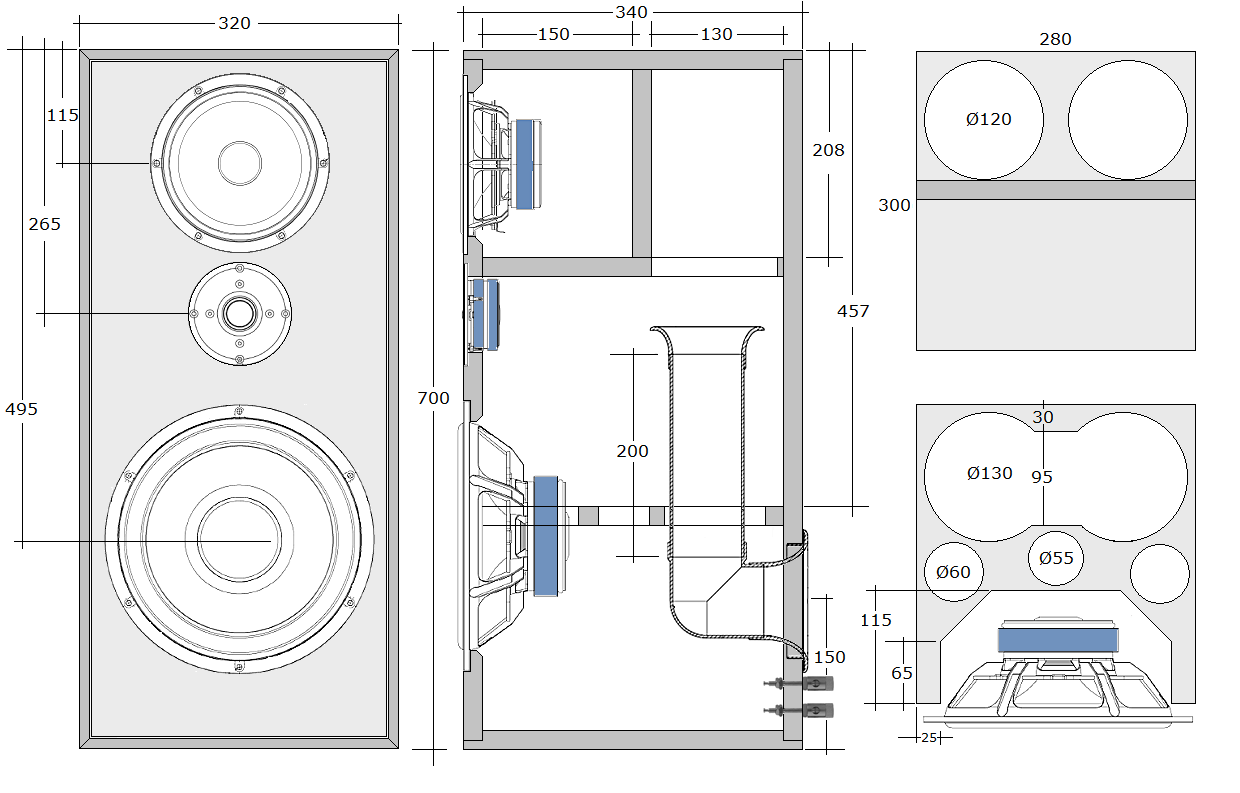
Cabinets were made from 20-21 mm Baltic birch and for front panel I
decided to use 25 mm HDF, not that it matters, but just for the sake of
change. And I kept outer dimension, too little to make any impact on
bass performance.
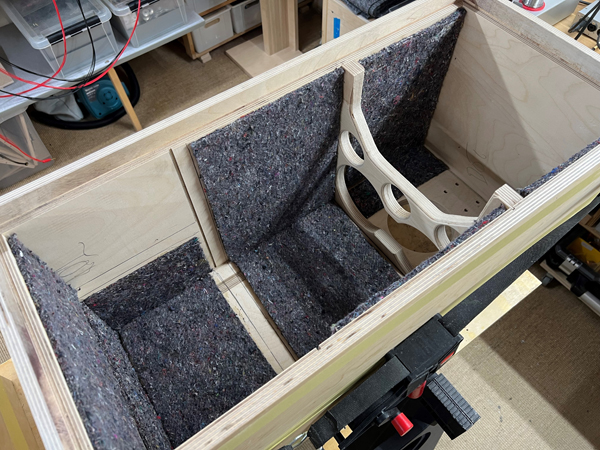
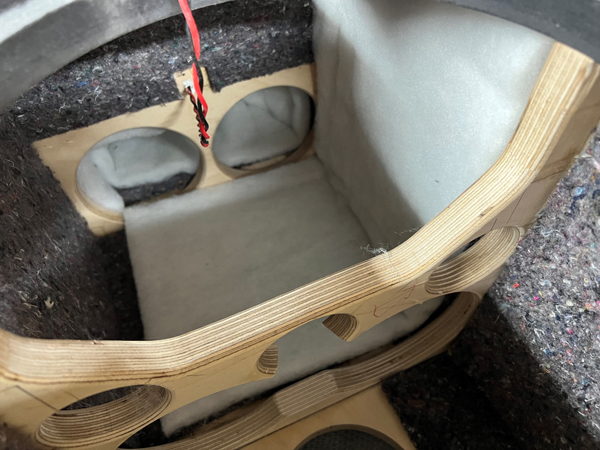
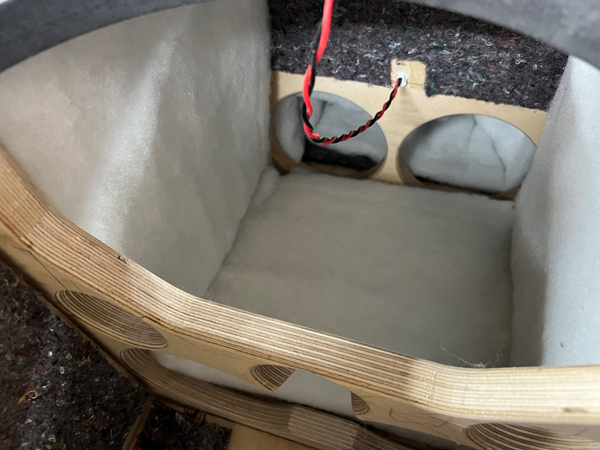
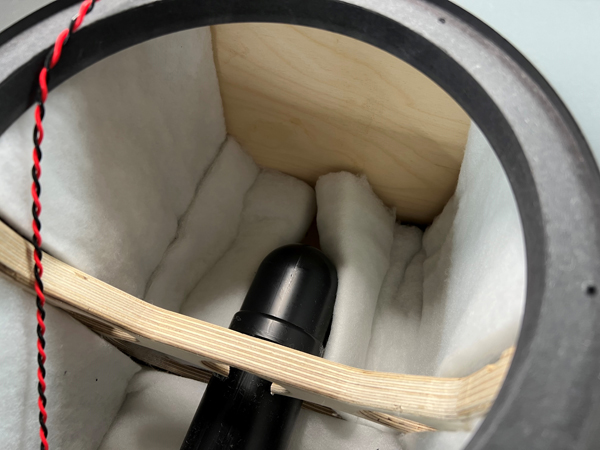
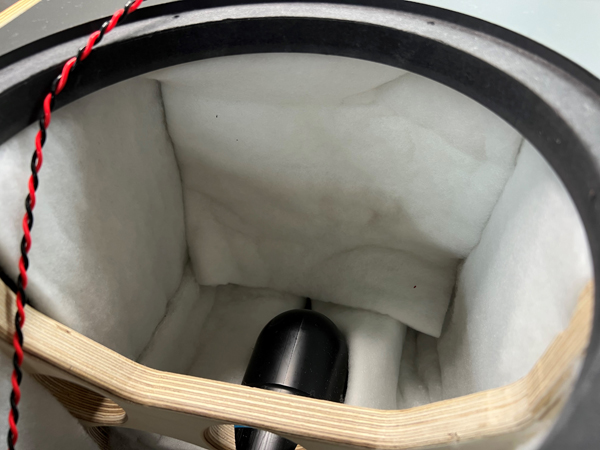
Cover all internal walls with felt
material except for the bottom panel, where the crossover will be
placed. The midrange cabinet is further stuffed with 75 grams sheeps
wool. The cavity behind the midrange cabinet is stuffed with a 25 x 50
cm piece of acoustilux. See further instruction of the use of acoustilux
below.
Flat-packed cabinets now available from EBEL Holztechnik, Germany:
https://www.ebelholztechnik.de/galerien/index.php/category/437-discovery_3wc_10
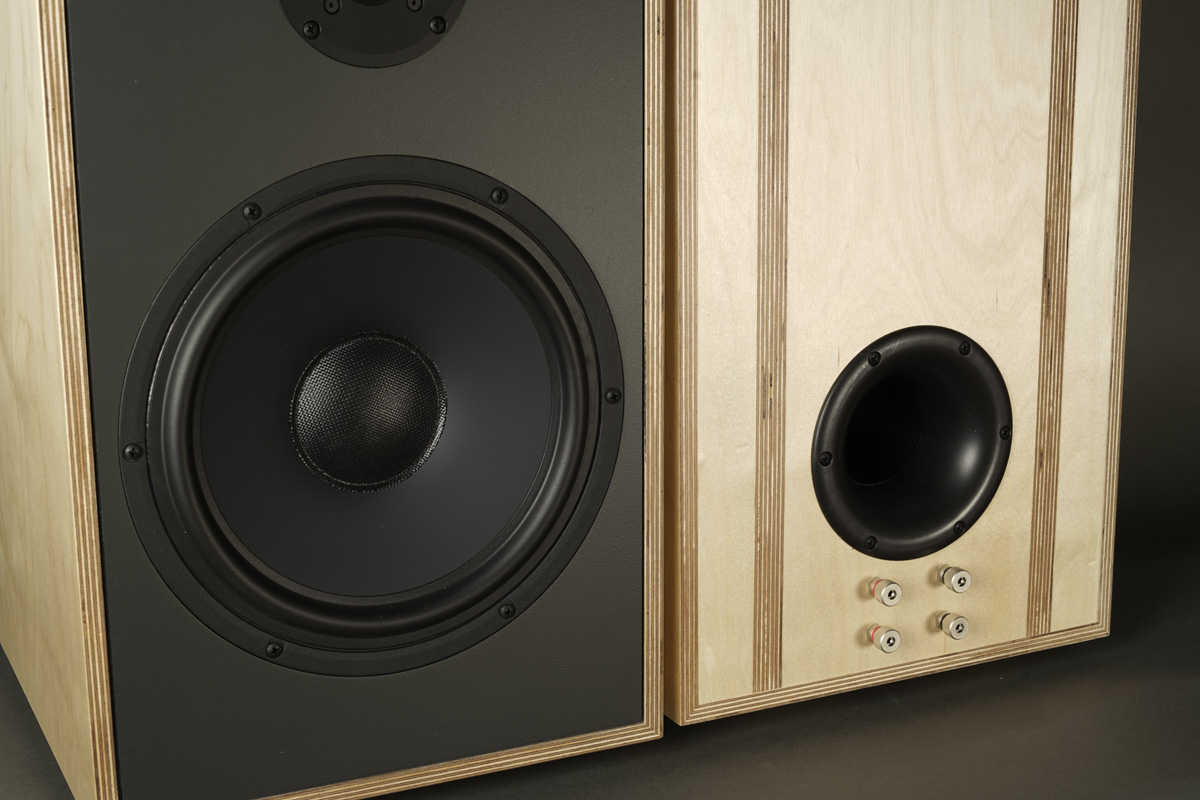
The cabinets should be placed on stands having a height of placing the
midrange driver at ear height.
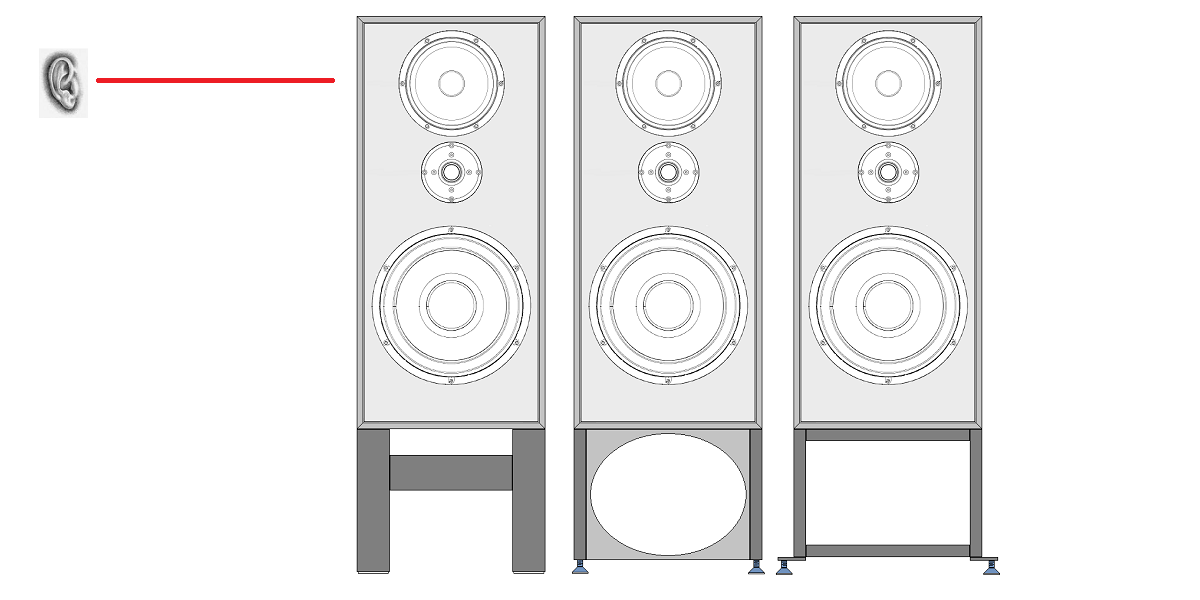
Design to your liking :-)

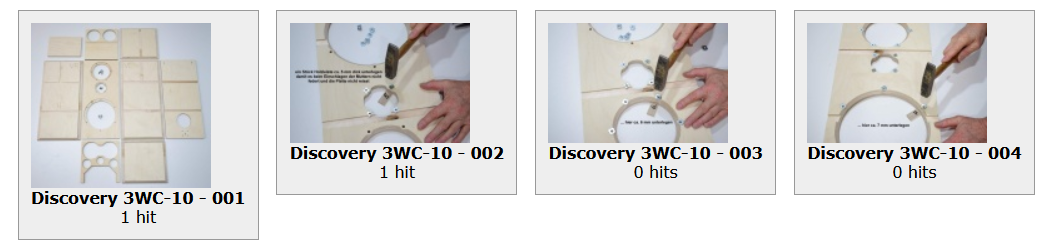
Cabinet materials piling up.
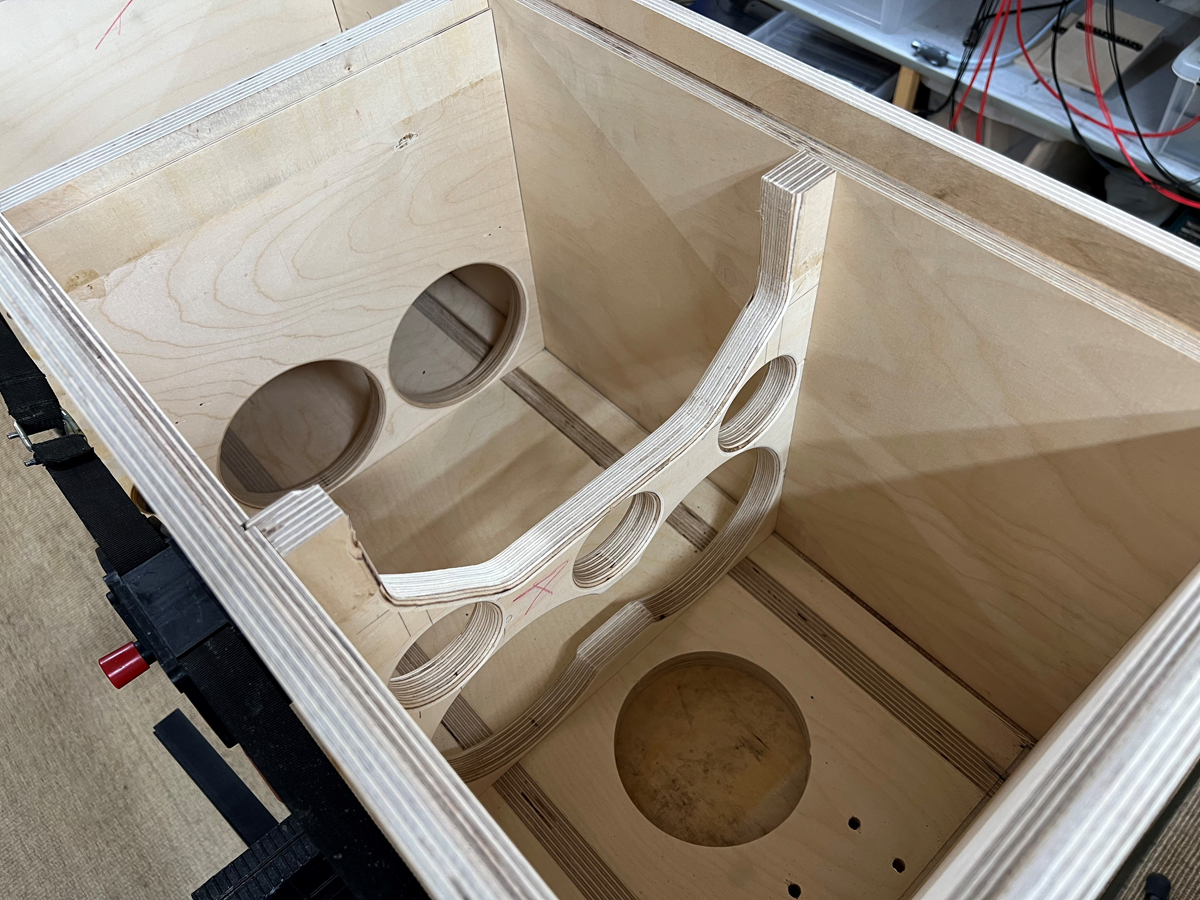
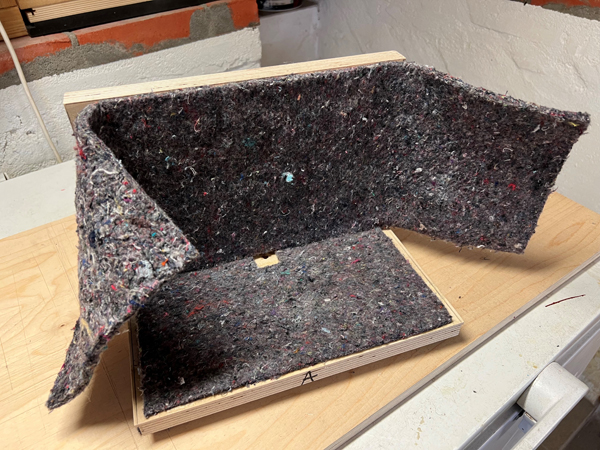
For rear panel, braces and midrange cabinet I used bits and pieces.
My front panels will be made from 25 mm HDF (Valchromat).
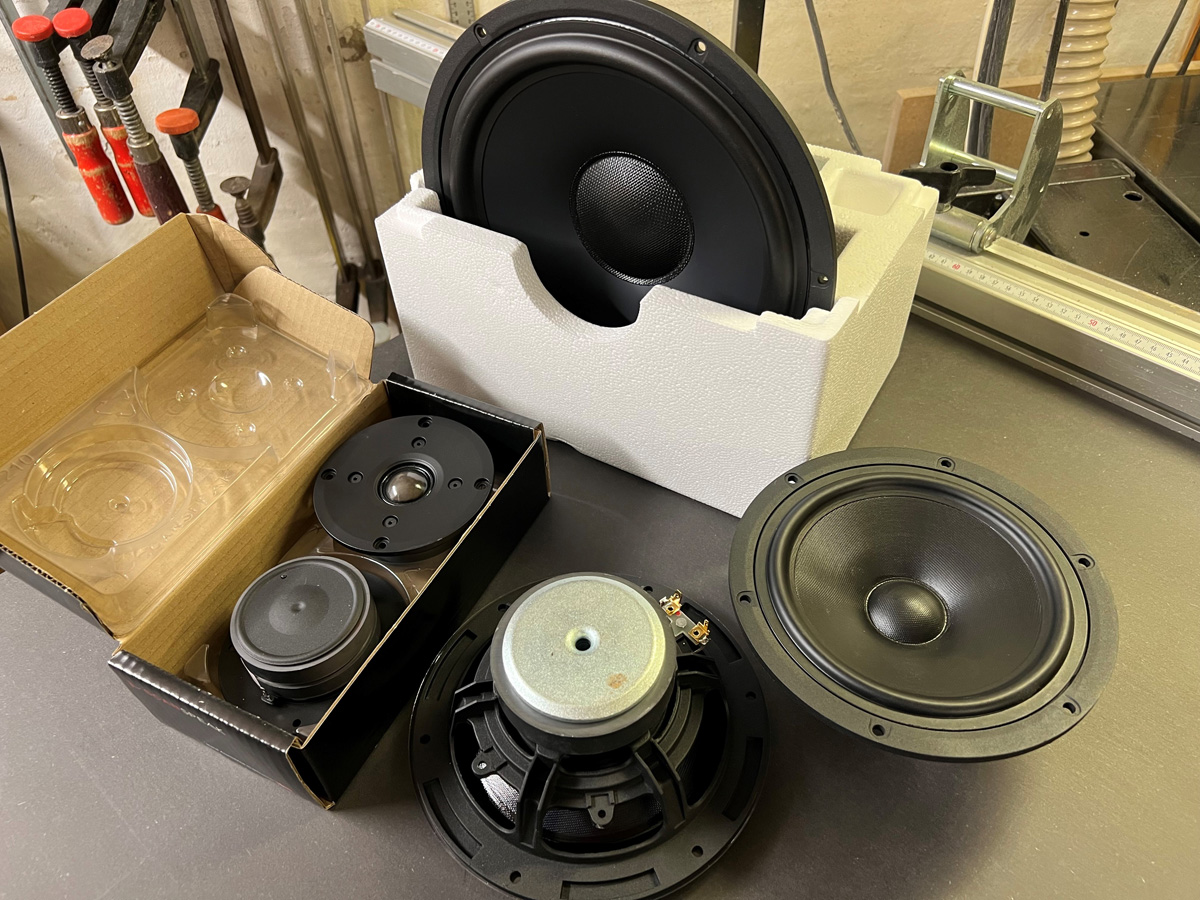
All drivers ready.
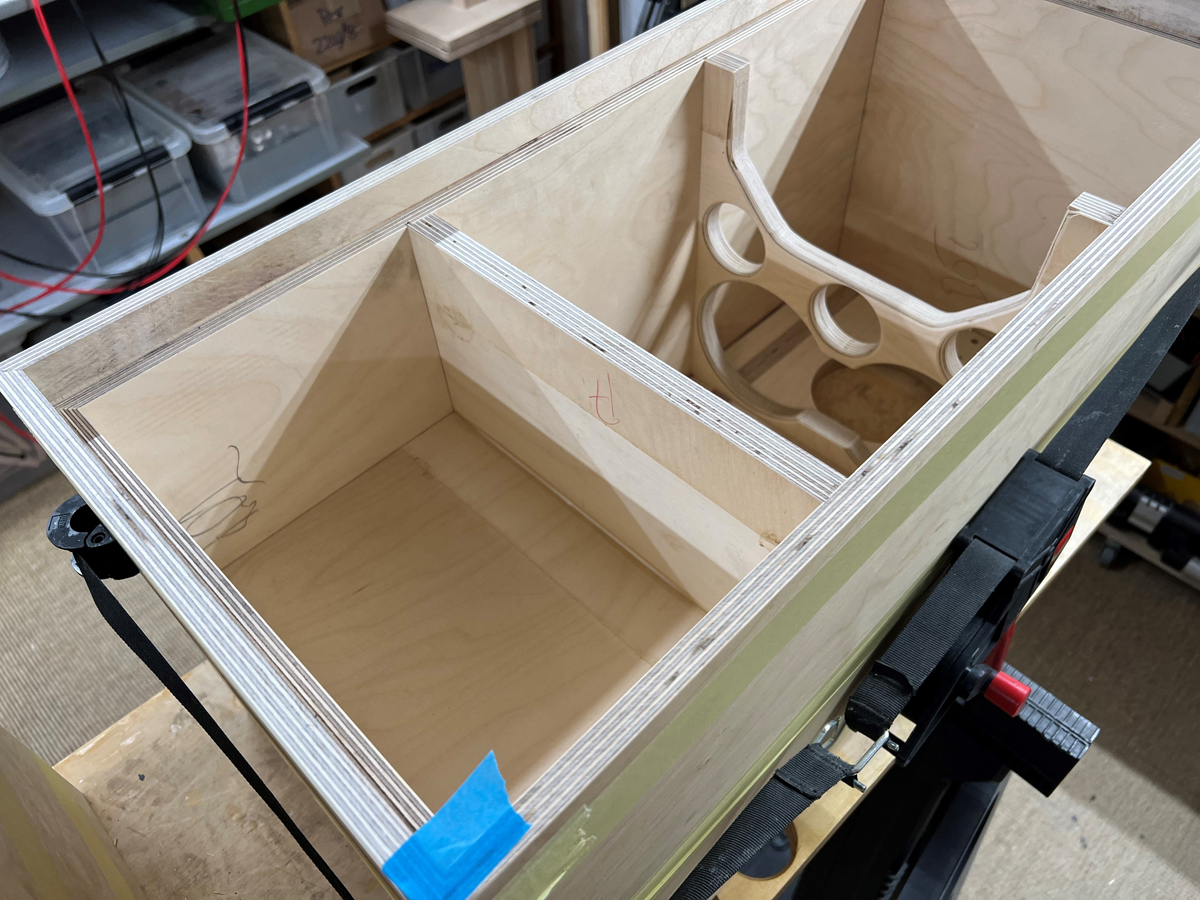
Braces and rear panel of midrange cabinet in
place.
Testing driver rebates on front panel.
Cabinets ready for gluing.
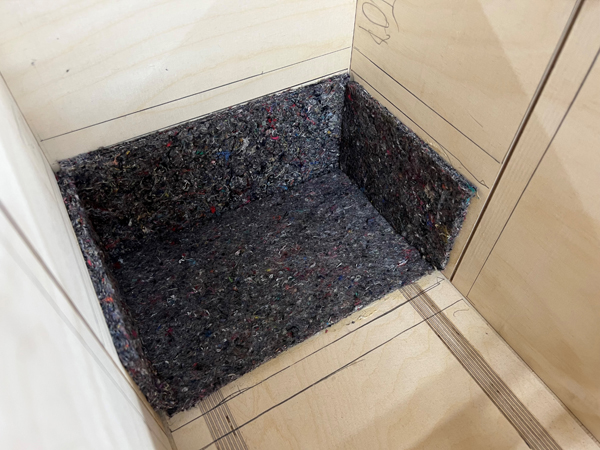

Damping: Add felt to all internal panels except braces and bottom, where
crossover is to be placed.
The bottom and rear panel of the midrange cabinet has felt on both
sides.
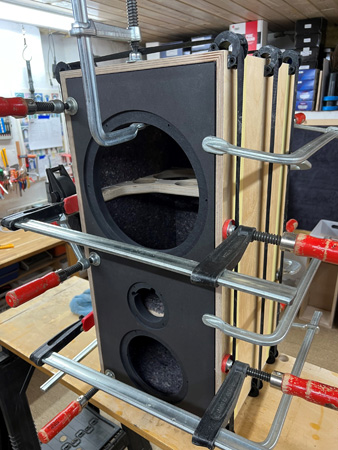
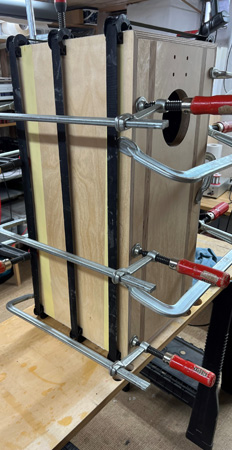
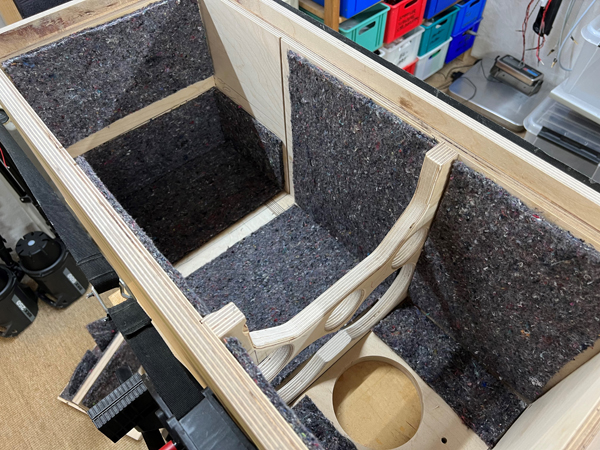
With three straps and a handful of clamps,
all glued in one operation.
Acoustilux:
4 pcs 25 x 50 cm
4 pcs 22 x 50 cm
4 pcs 20 x 50 cm
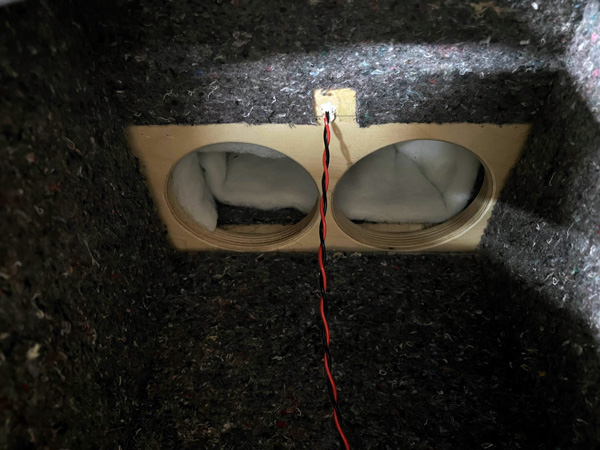
Left: Stuff cavity behind midrange cabinet with 1 pcs 25 x 50 cm.
Right: Add 1 pcs 22 x 50 cm to one side and rear of upper bass cabinet.
Remember to
seal the wire hole with Superfix. Push the midrange cone to make
sure the midrange cabinet is absolutely air-tight!
Left: Add 1 pcs 22 x 50 cm to other side of upper bass cabinet, so that
the rear panel has two layers.
Fasten both sheets with staples/dots of Superfix towards front panel to
secure position.
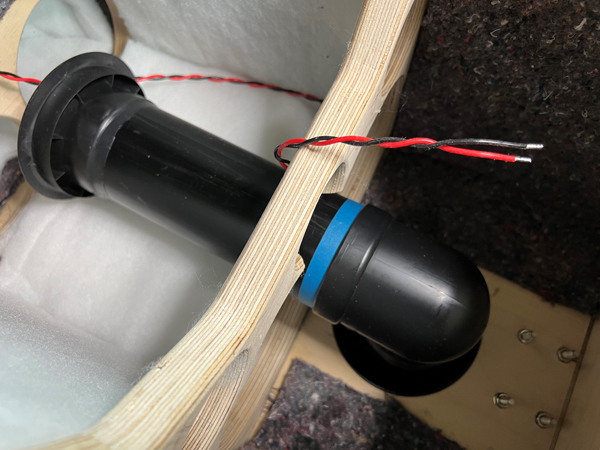
Right: Port in place.
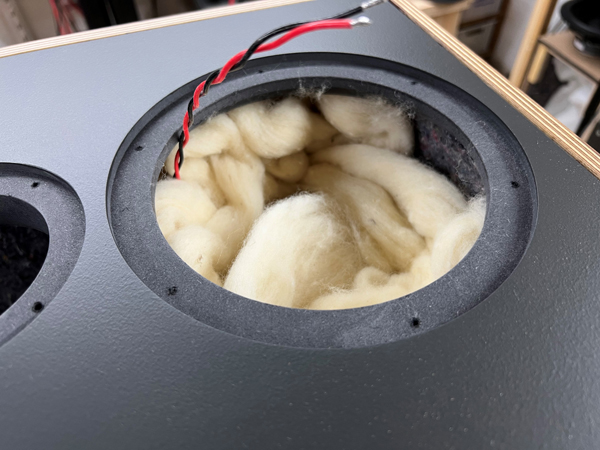
Stuff midrange cabinet with 125 grams sheeps wool.
Cover side walls of lower bass cabinet and rear panel with 2 pcs 20 x 50
cm.
Right: Cover bottom with a folded piece of 25 x 50 cm to cover
crossover.
(Crossover not mounted yet when this picture was taken)

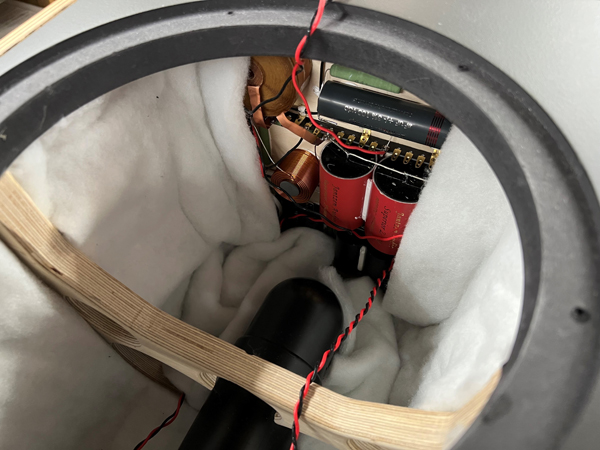
Remember inverted polarity of midrange driver when you connect to crossover
board.

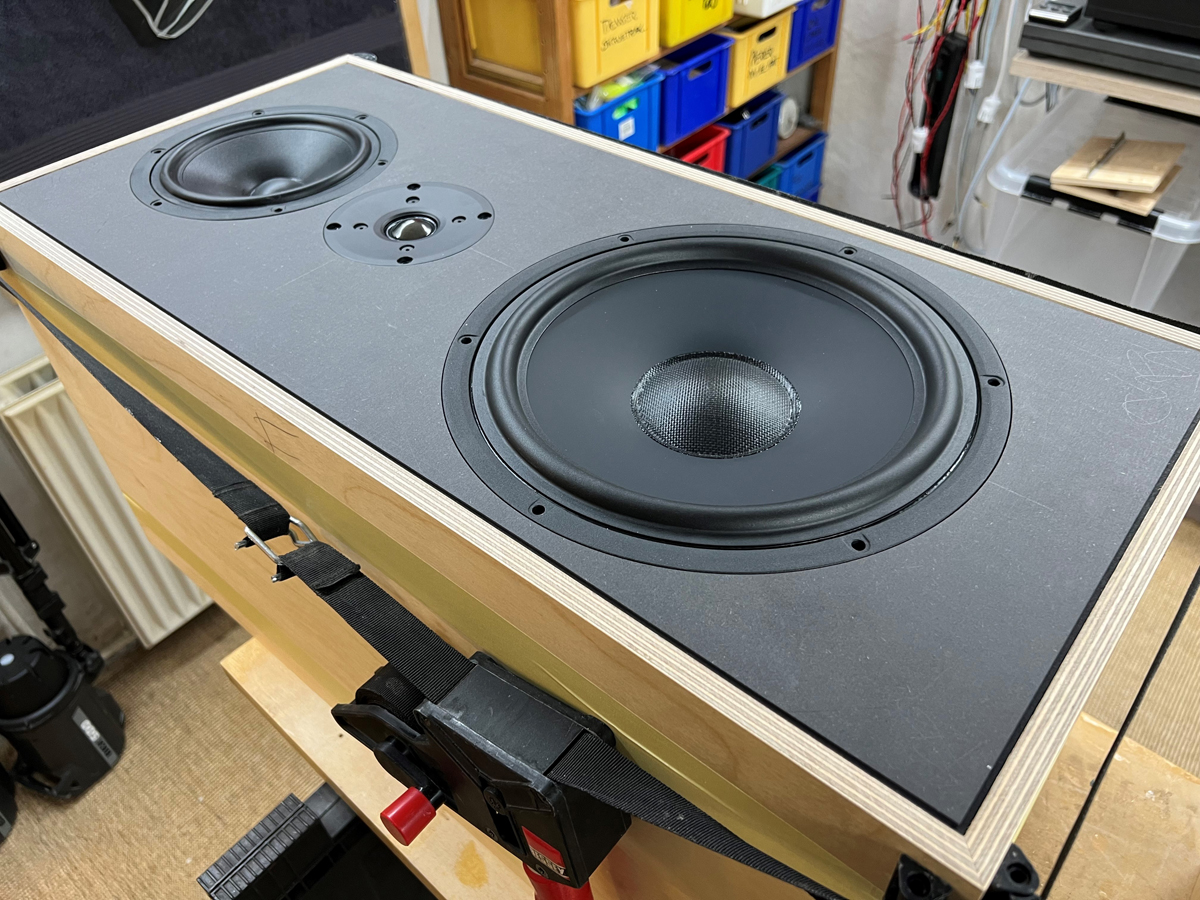
All drivers mounted.
A few comments on
MEASUREMENTS before you start interpreting the readings below.
First of all, if we think measurements will
tell us how a speaker sounds, we're wrong. The perception of sound is
way too subjective to be reflected in any measurements we can perform. A
loudspeaker system is meant to give us a satisfying idea of an acoustic
event and for some people a pair of 5 USD ear-plugs are enough, others
spend 200 kUSD on a truly full-range pair of speakers - and the latter
may not be happier than the former.
Measurements may give us an idea of tonal balance of a system, i.e. too
much or too little energy in certain areas, although dispersion
characteristics play a vital role here. A two-way 7+1 and a three-way
7+4+1 may display similar horizontal dispersion, yet sound very
different. Measurements may tell us about bass extension if far-field
measurements are merged with near-field measurements. In addition to
this, ports may contribute to bass extension. Most of we diy'ers do not
have access to an anechoic room for full-range measurements from
20-20000 Hz.
What cannot be seen is what kind of bass performance we get in a given
room. Bass performance is highly dependent on in-room placement of your
speaker and the same speaker can be boomy in one place and lean in
another. Actual SPL level at 1 meter distance and 2.8V input is useful
for en estimate of system sensitivity and combined with the impedance
profile may give an idea of how powerful an amplifier is needed to drive
the speaker to adequate levels.
What measurements do not tell is the very sound of the speaker unless
displaying serious linear distortion. The level of transparency, the
ability to resolve micro-details, the "speed" of the bass, etc., cannot
be derived from these data. Distortion measurements rarely tell much
unless seriously bad, and most modern drivers display low distortion
within their specified operating range.
Many people put way too much into these graphs and my comments here are
only meant as warning against over-interpretation. There are more to
good sound than what can be extracted from a few graphs. Every graph
needs interpretation in terms of what it means sonically and how it
impacts our choice of mating drivers, cabinet and crossover design.
What measurements certainly do not tell is the sonic signature of the
speaker, because speaker cones made from polypropylene, aluminum,
Kevlar, paper, glass fiber, carbon fiber, magnesium, ceramics or even
diamonds all have their way of adding spices to the stew. Nor do
measurements tell what impact the quality of the crossover components
add to the sound, from state of the art components to the cheapest of
coils and caps, they all measure the same if values are correct, yet
may sound very different.
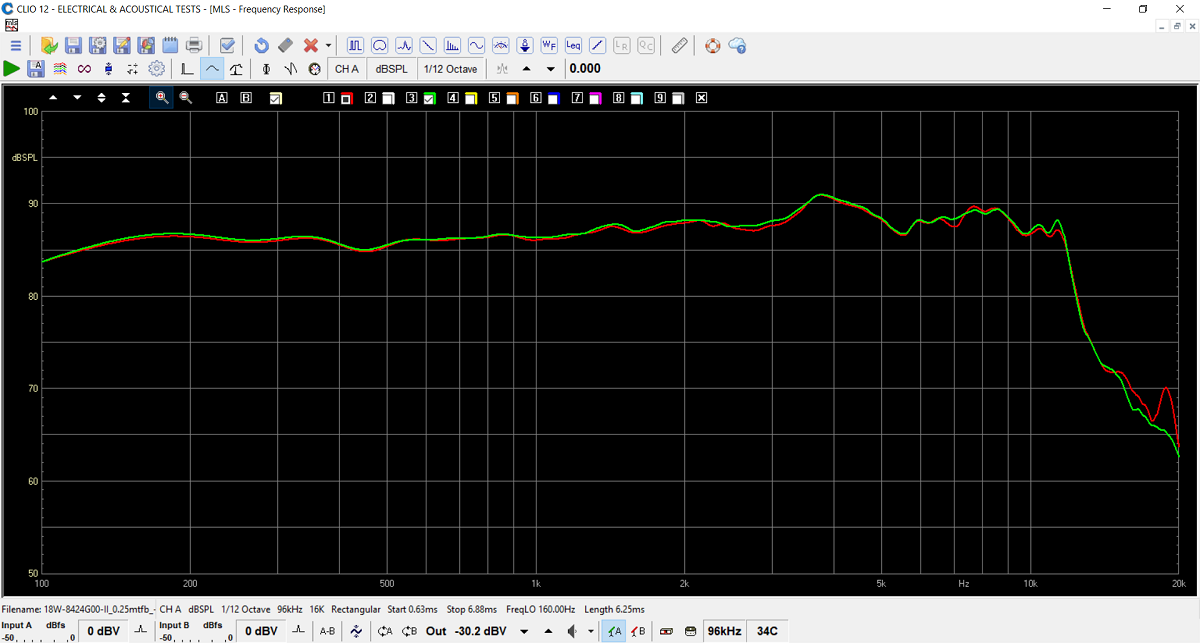
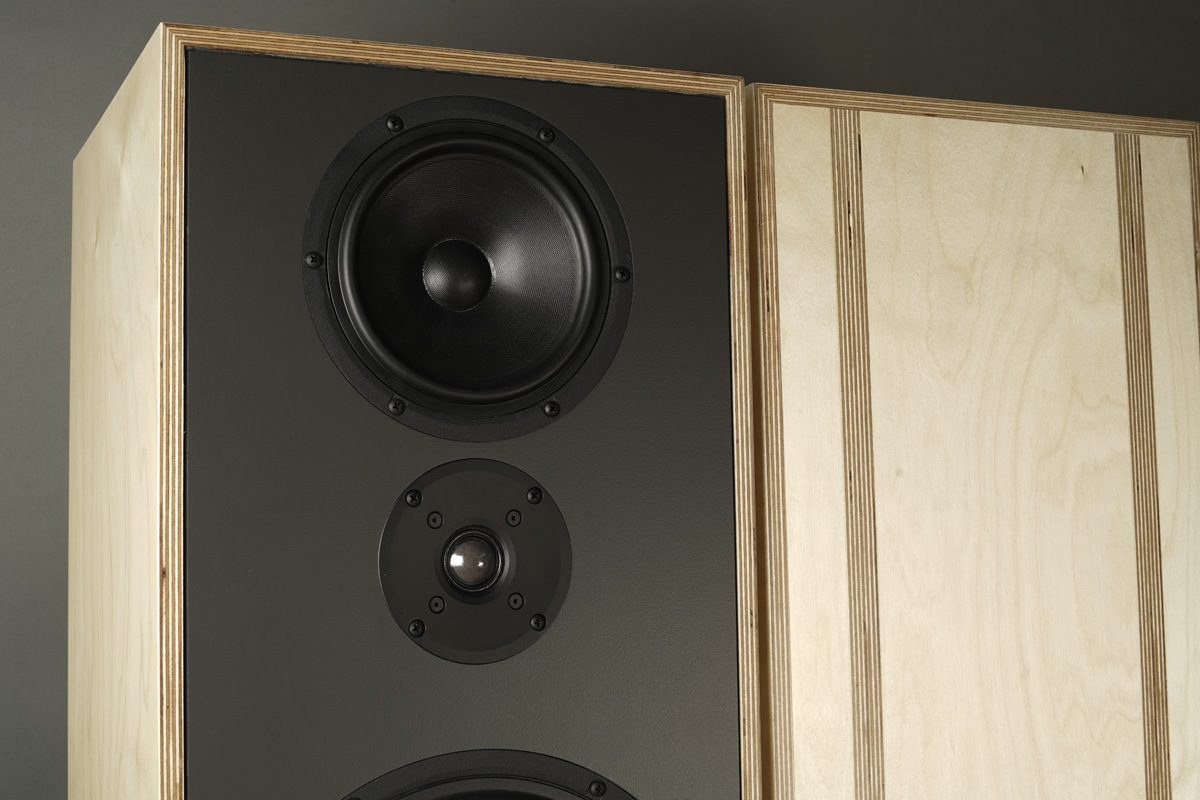
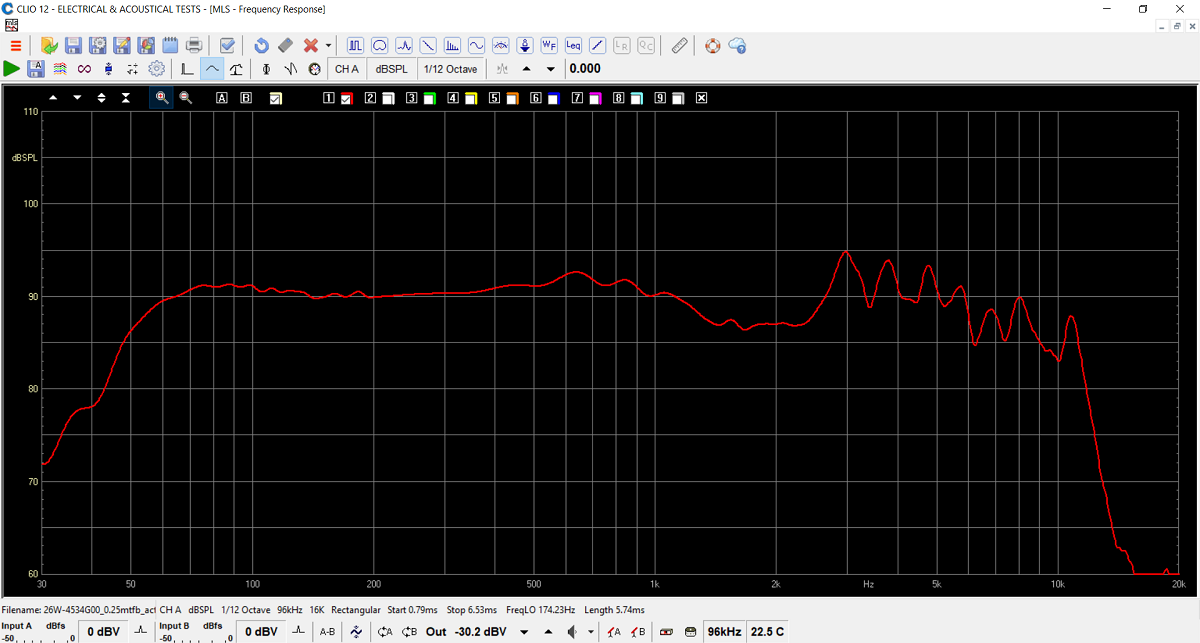
The midrange 18W/8424G00 response on a 80 x
120 cm test baffle.
Ruler flat up to above 3 kHz and an extended response all the way to a
little above 11 kHz.
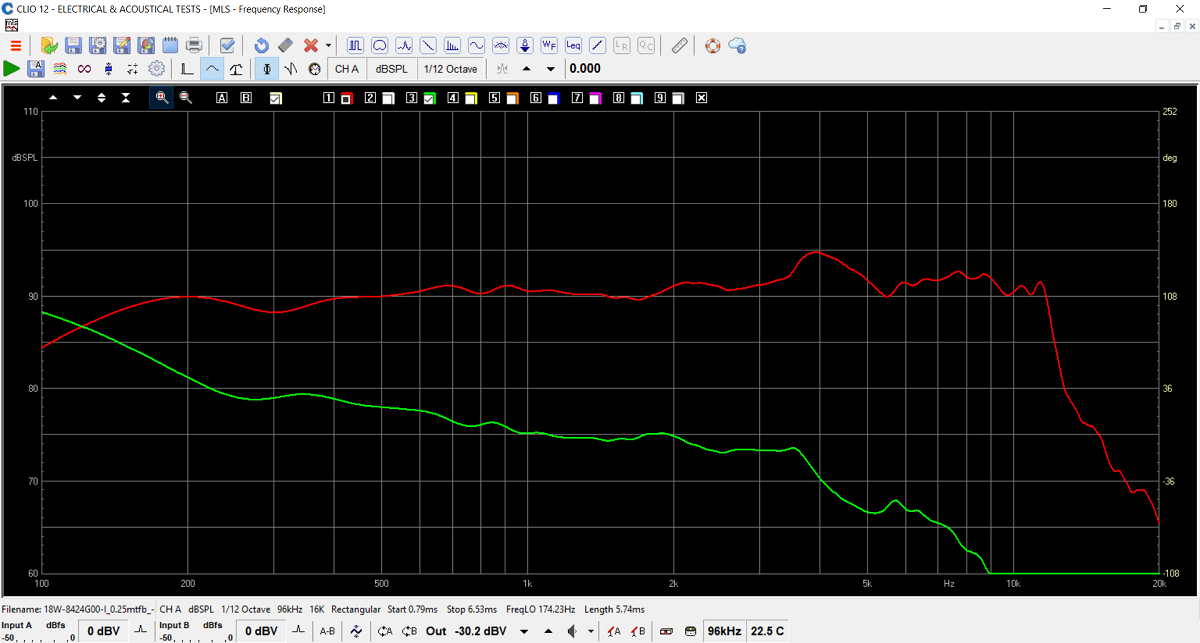
Same driver on the actual cabinet. Green is
minimum phase.
As can be seen it maintains the ruler flat response in all of the
midrange and we see a minor decline at lower frequences due to baffle
step loss.
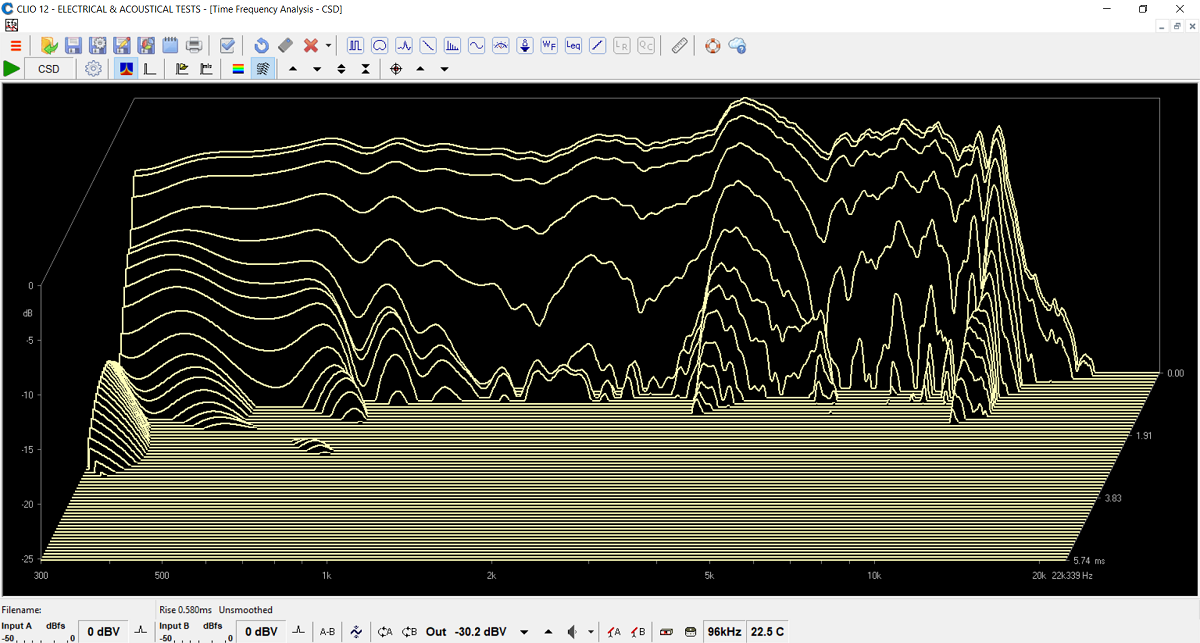
Also the CSD looks impressive. Measurement
from actual cabinet.
All in all I wanted to show the emphasis on midrange performance. This
is where the majority of music information is.
Also the 10" bass driver performs very well,
all the way to 2.5 kHz.
The rigid cone ensures pistonic movement in bass region.
Measurement merged with nearfield response at 200 Hz.
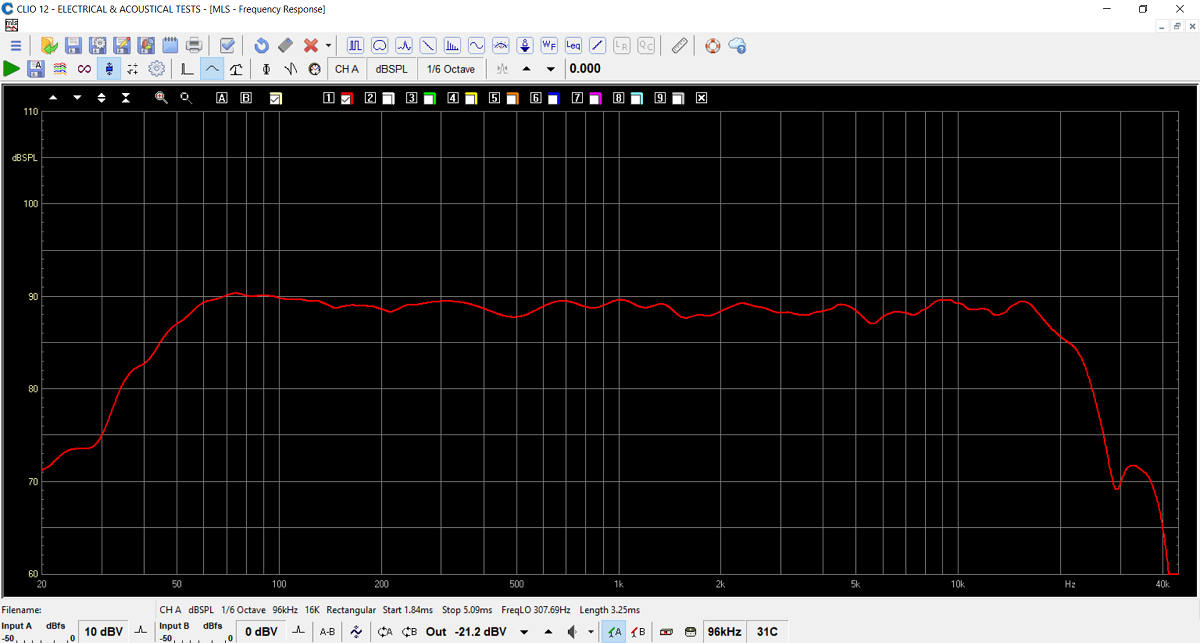
Final system frequency response measured at 1 meter distance and merged
with bass nearfield reaponse @ 300 Hz.
System sensitivity around 89-90 dB.
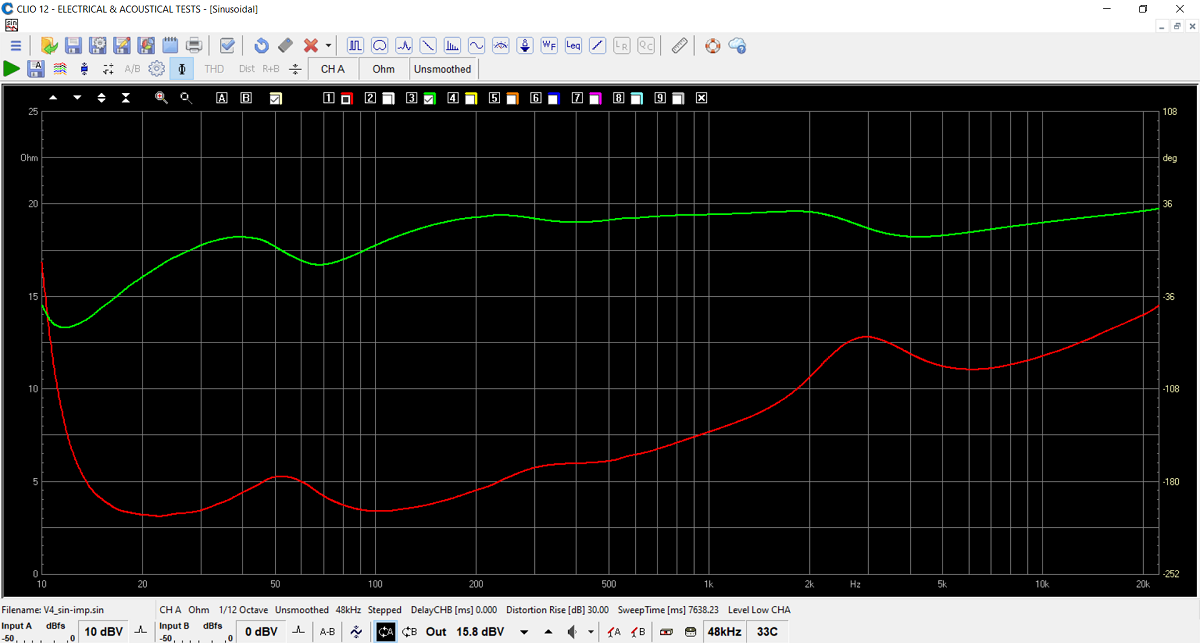
Final system impedance. Minimum 3.1 Ohm at ~23 Hz.
My 32 wpc tube amp runs this speaker well to decent levels. For more
bass impact use bi-amping or larger solid state.

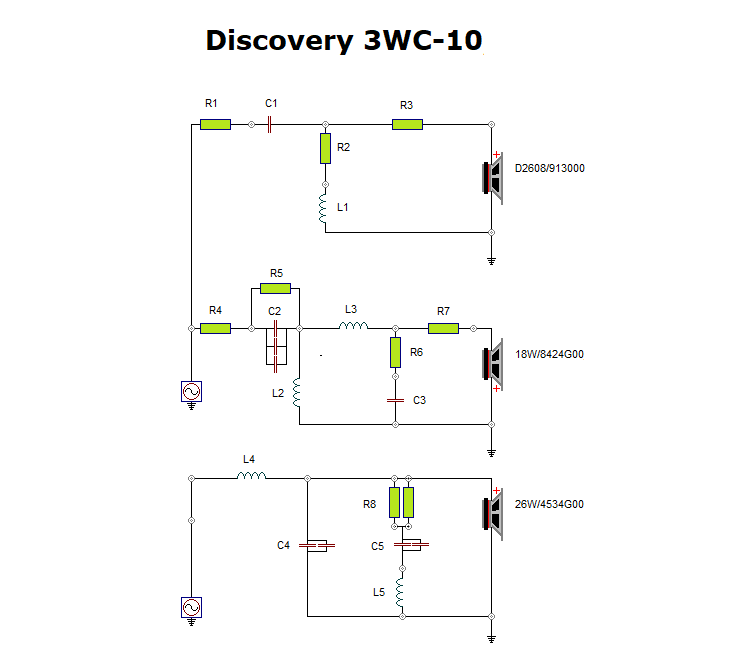
The items marked with colour are the positions replaced by cheaper
components for level 2.
C1: Alumen-Z replaced by Superior-Z.
C2: C2 consists of 3 capacitors in parallel. Two of these are replaced
by STANDARD-Z in level 2.
C3: Superior-Z replaced by STANDARD-Z in level 2.
For the Beryllium dome version, only level-1 is offered.
Remember bitumen pads are always optional due to weight.
Kits can always be bought with/without drivers, or some of the drivers.
All kit and component prices may be subject to change and are always to be confirmed by Jantzen Audio Denmark.
Download Complete Kit Sale Presentations:
![]()
All technical questions to troels.gravesen@hotmail.com
All questions regarding purchase of kits, please mail Jantzen Audio at contact@jantzen-audio.com
CROSSOVER-LAYOUT
BACK TO INDEX
Check this out before start making crossovers:
http://www.troelsgravesen.dk/tips.htm#CONSTRUCTION_OF_CROSSOVERS
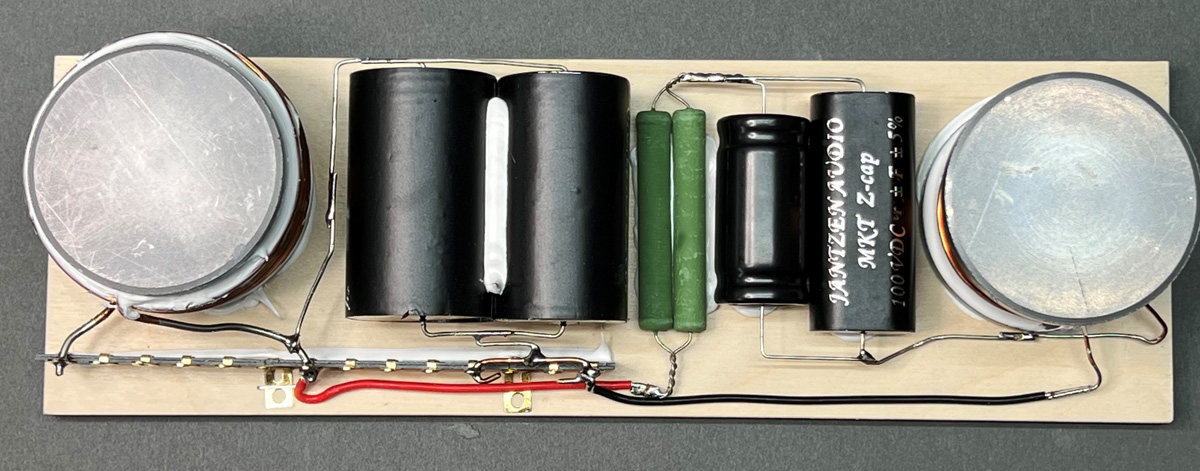
Bass crossover layout.
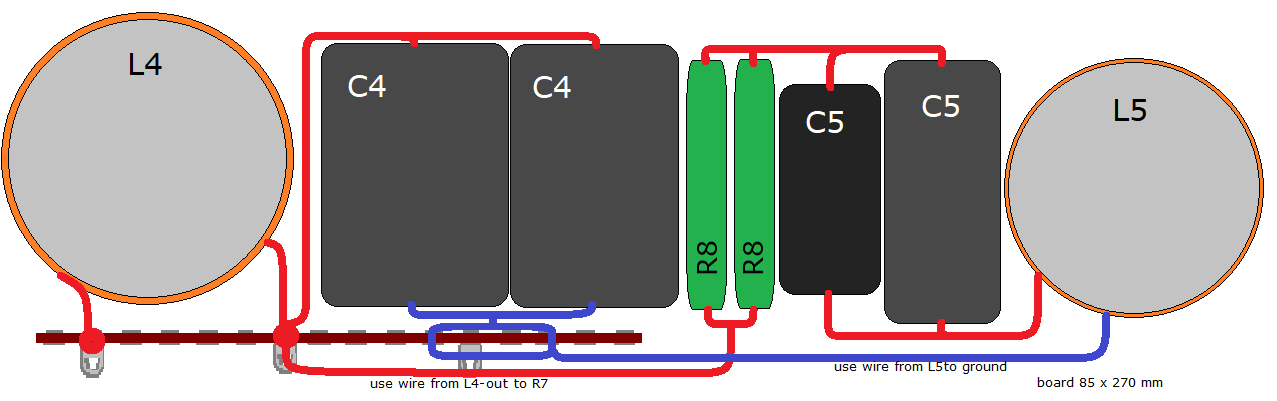
Mid-tweeter crossover layout.
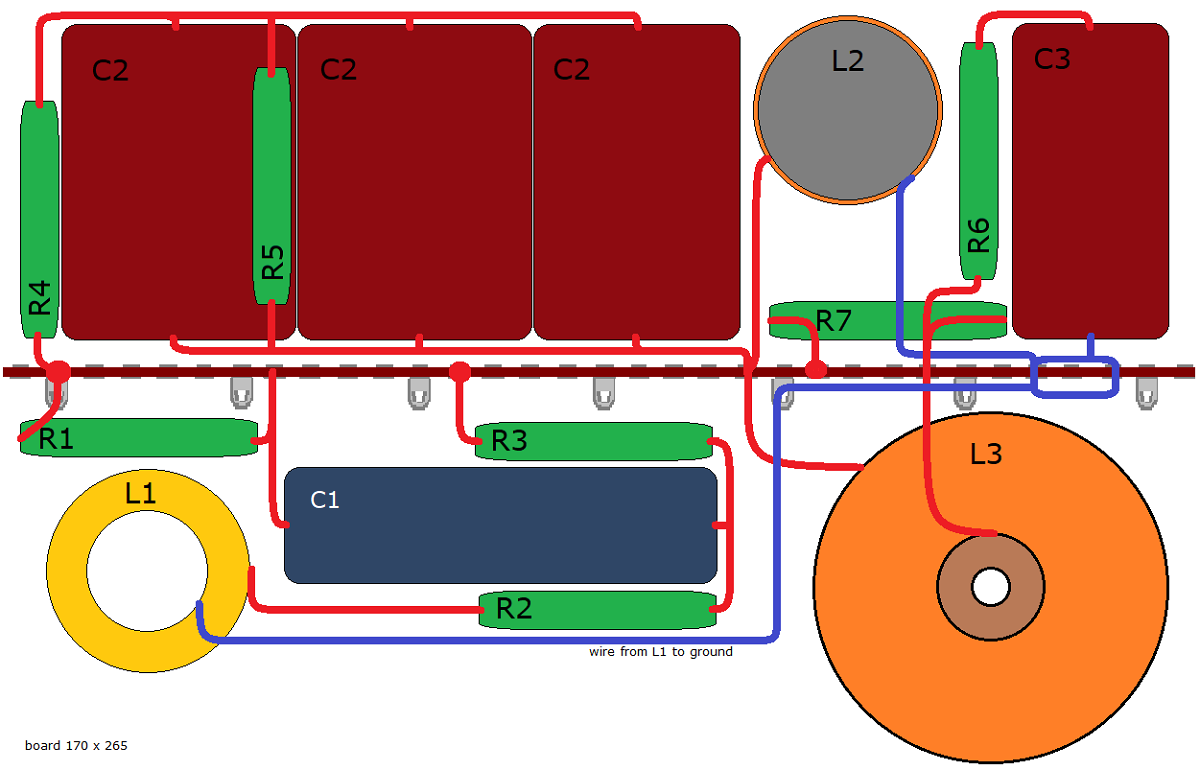
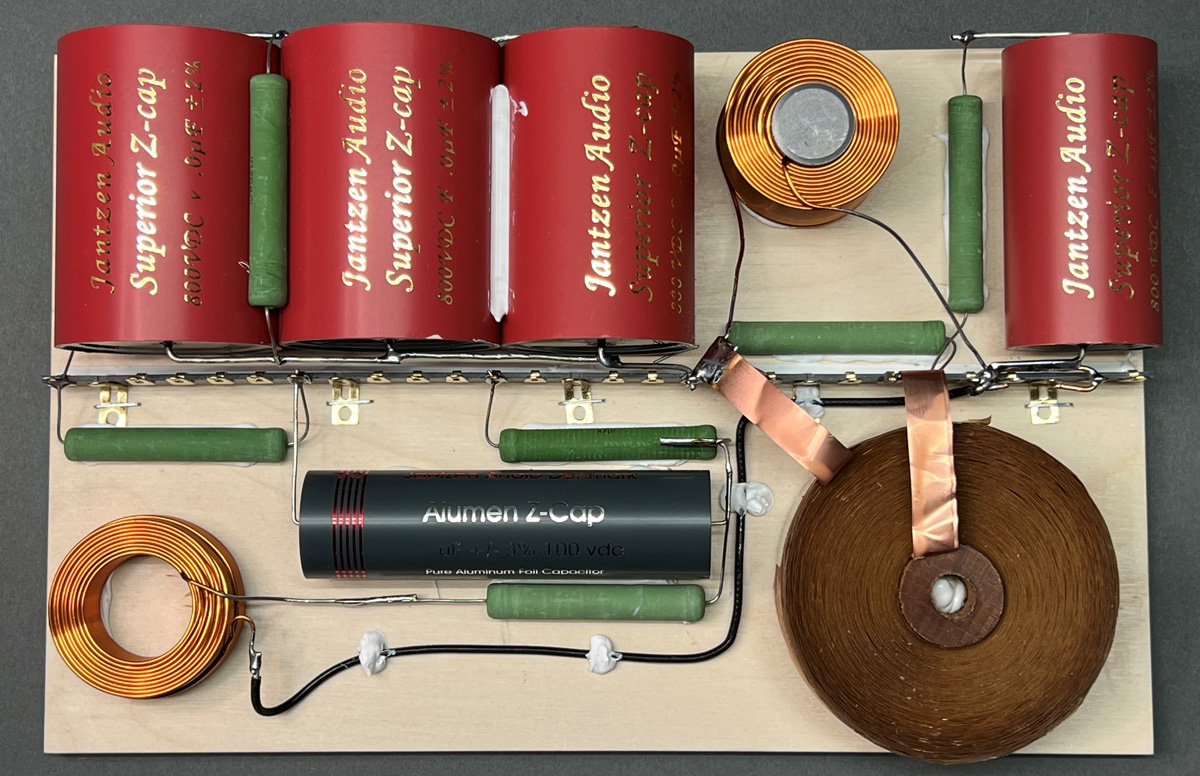
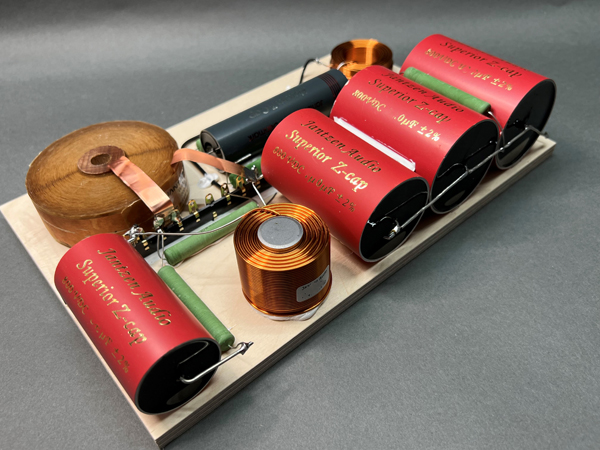
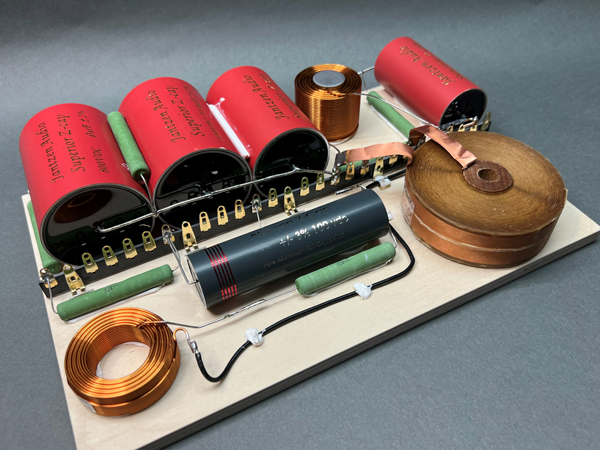

Mount first the bass crossover and connect to terminals.
Next the mid-tweeter section and connect to terminals.
Make sure you have wires in place for drivers.
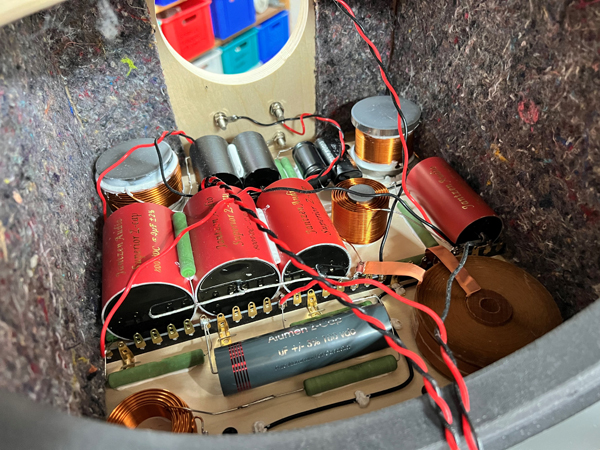
Place first the acuostilux on lower side panels and fasten with staple.
Next cover the crossover with two layers as described above.
SPEAKER WIRING
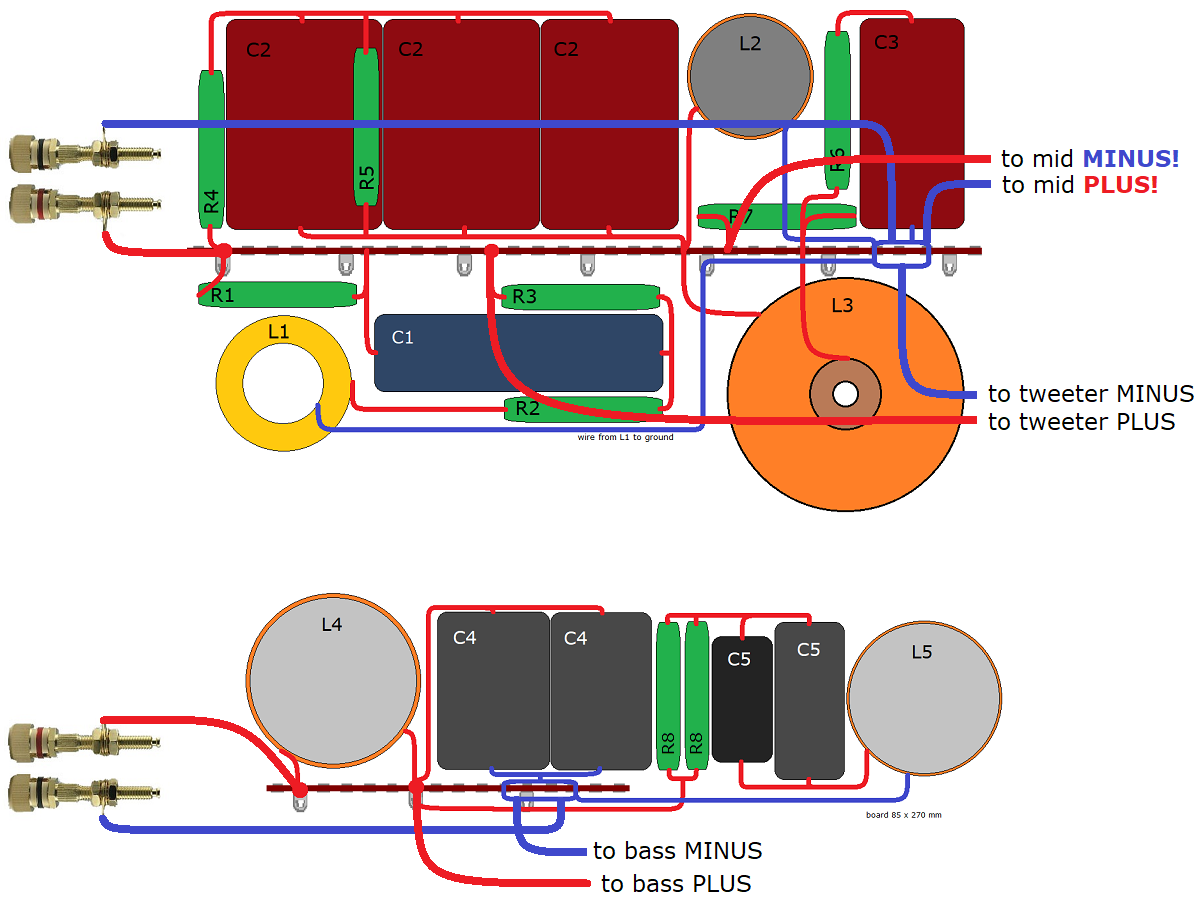
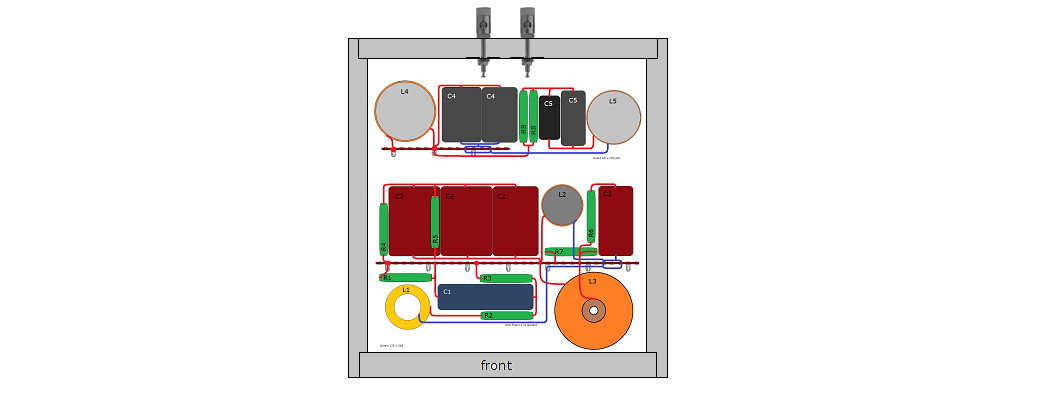
Placement of crossover on bottom panel.
Fasten boards with screws!
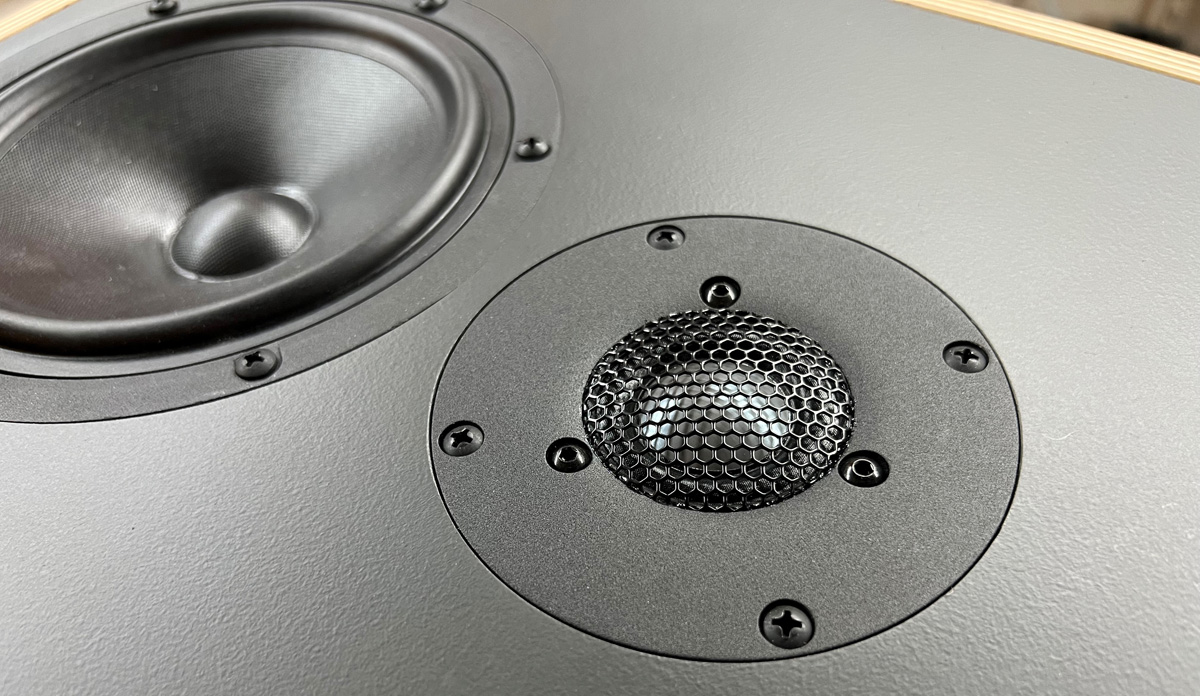
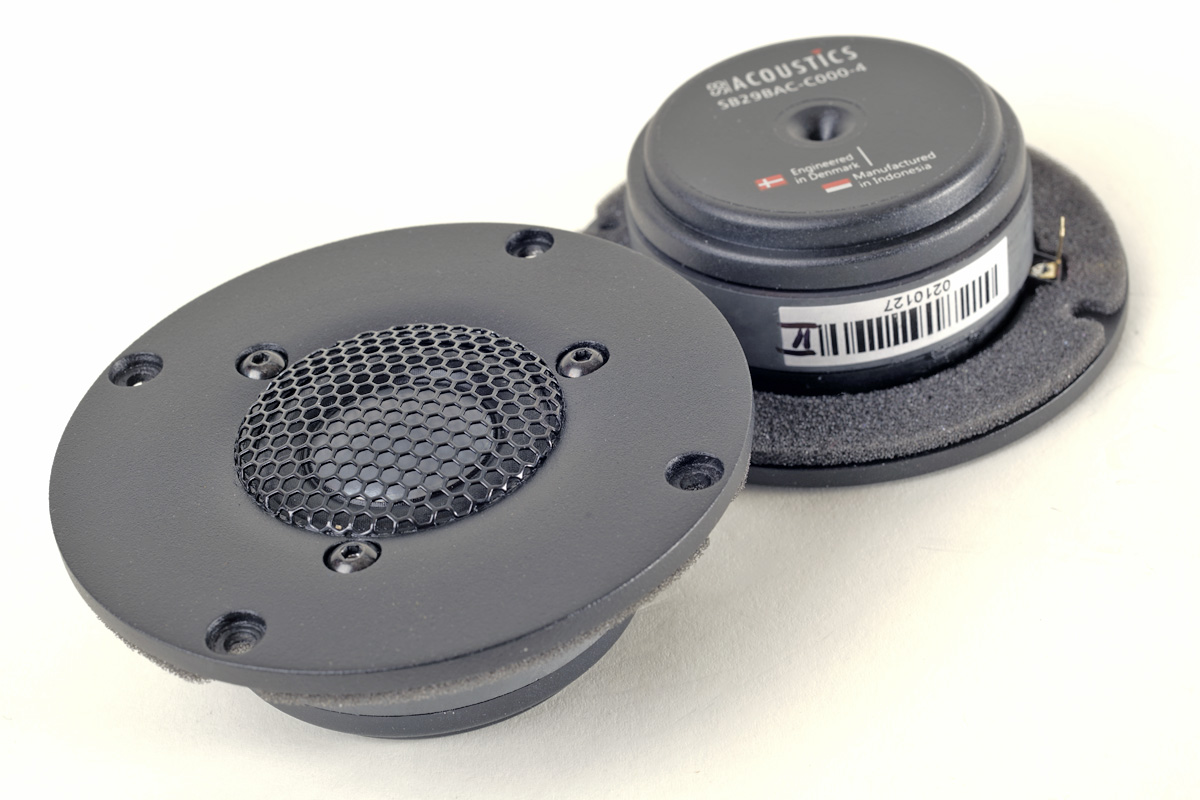
To find something in a suitable price
range of the Discovery-3WC-10, I have chosen the magnificent
SBAcoustics SB29BAC-C000-4 Be dome tweeter. I know of no other
tweeter offering the performance of this tweeter - in this price
range.
Download data sheet
here.
The crossover schematics only vary by the value of three resistors
in the tweeter section, thus layout and wiring is the same.