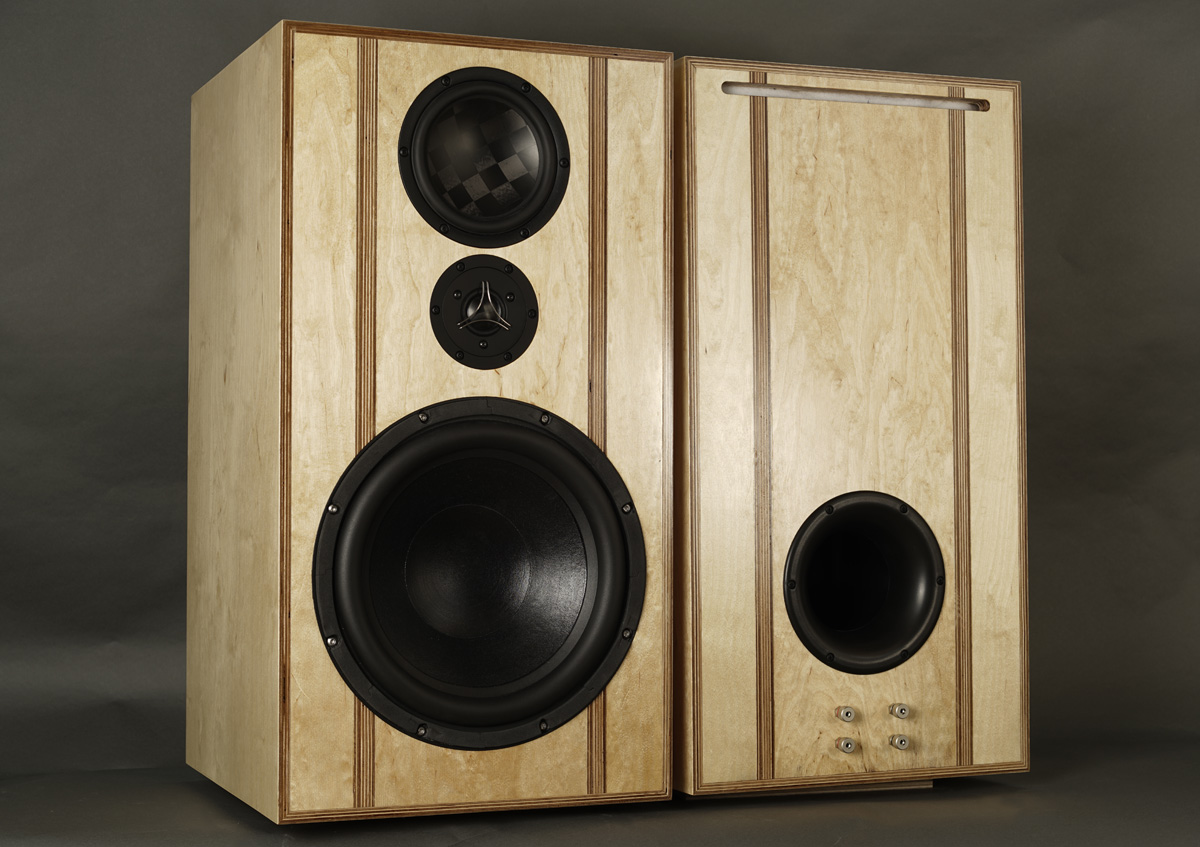
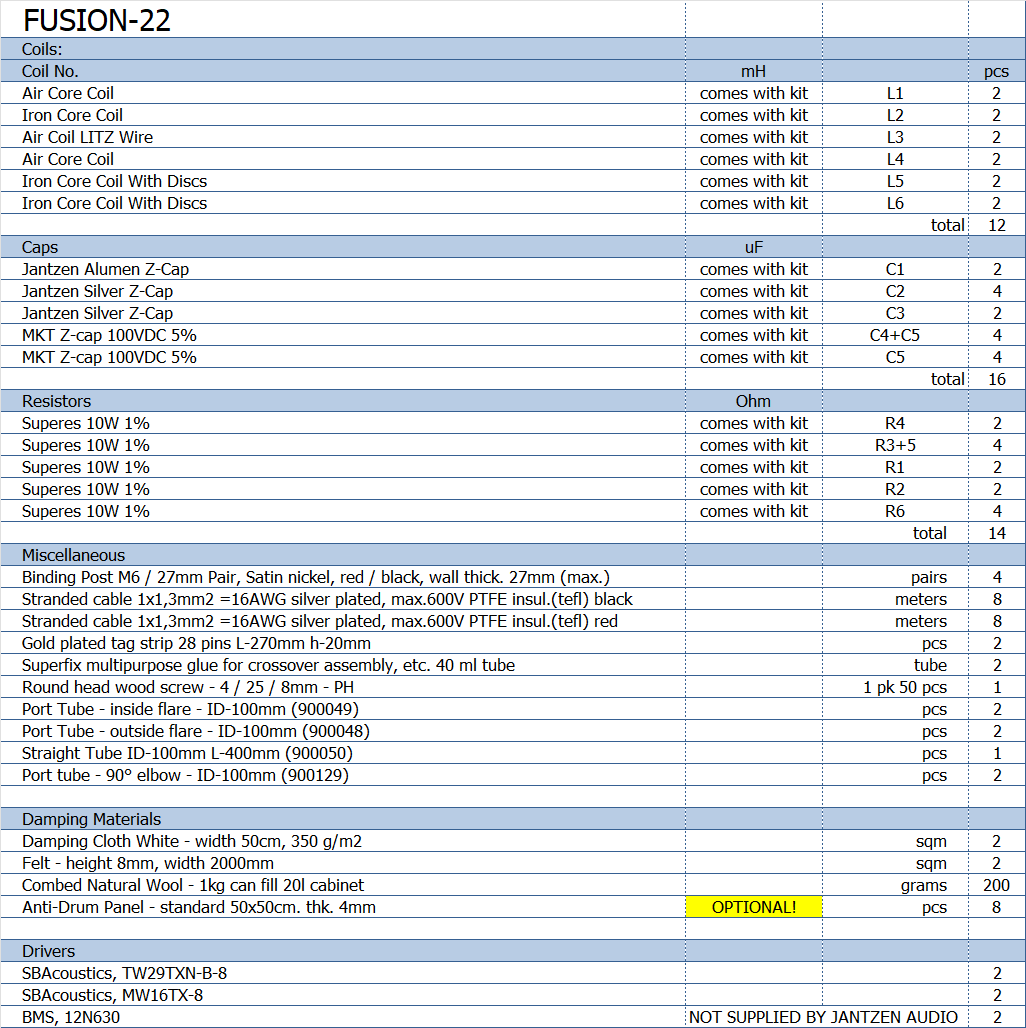
FUSION-22
BMS and SBAcoustics drivers
Copyright 2022 © Troels Gravesen
Go to on this page:
DRIVERS
CROSSOVER
CABINET
WORKSHOP PICS
MEASUREMENTS
SPEAKER-KIT
CROSSOVER LAYOUT
Why another 3-way classic having done all the Faital
3WC speakers? Well, the
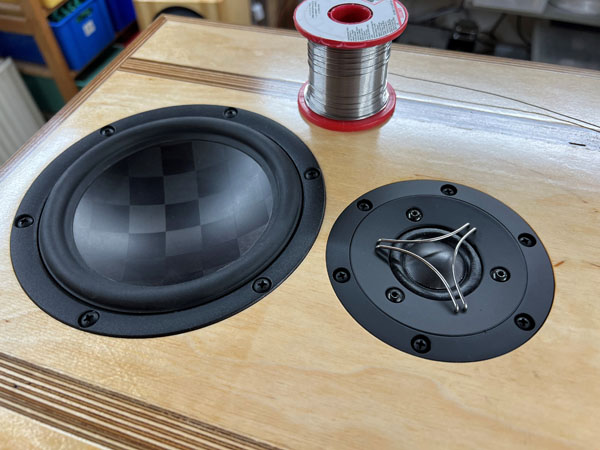
SBA-7MD, featuring the new carbon cone driver, triggered my
imagination and the inevitable "what-if" started spinning in my head. I
also wanted to try out the TX tweeter, having a friend praising its
performance. So, I had a pair of MW16TX-8 and SB29TXN-B-8 drivers from
SBAcoustics. Thank you guys!
In principle this speaker is identical to the
Faital-3WC-12, but here I
wanted deeper bass. Deeper bass for the same size means we have to let
go of some efficiency, the inevitable balance of size, efficiency and
low-end extension. Read
here.
With the BMS 12N630 in the
cabinet shown below, we get F3 = 32 Hz compared to 48 Hz for the Faital.
Still, we can tune the FUSION-22 to some 89-90 dB sensitivity with a decent
impedance not getting below 5 Ohms. The 3" voice coil can handle a lot
of power.
Again, I wanted a cabinet that would be easy to construct. And
if you ever want to make your own speaker, you will have to make
at least a simple rectangular box. It doesn't get much easier unless you
want an open baffle.
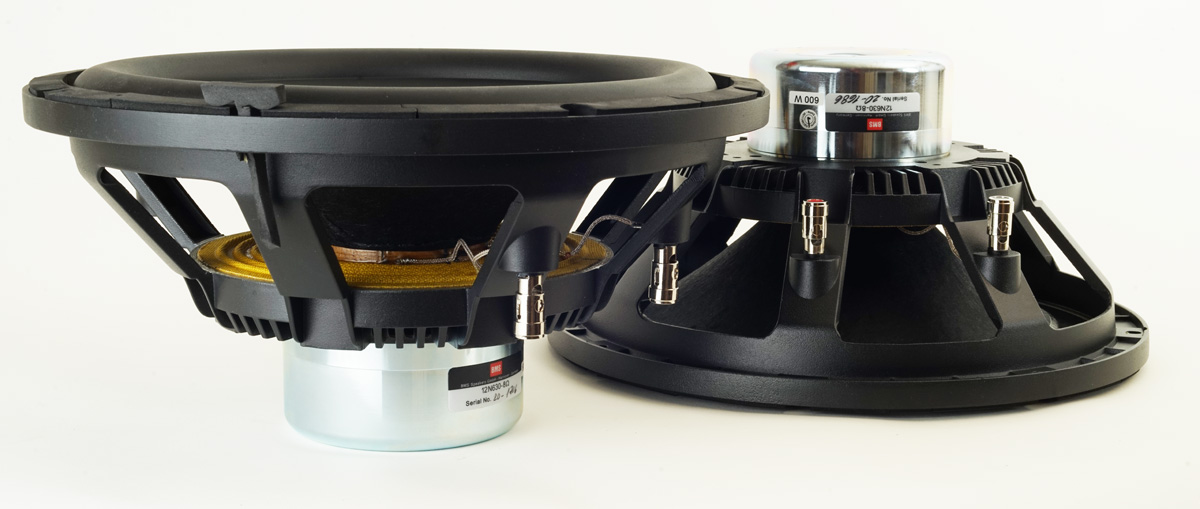
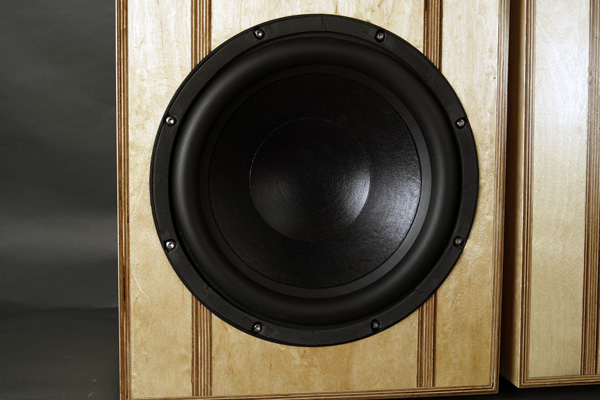
For bass there was no doubt in my mind that I would use the BMS 12N630
driver again. I've used this driver many times before and it's a great
driver at a reasonable price and together with the SBA mid and
tweeter - a seriously powerful speaker is at hand.
The discerned reader will notice there is an impedance flattening
circuit on the bass driver that was not there with the
FUSION speaker. In my rather small workshop with speakers
close to corners, this was an absolute necessity for the bass not to
become too boomy. In my living room, where the speaker are out on the
floor, not so much. Here I reduced the value to half and the bass became
balanced. Thus, a speaker with passive room adaption. Corner placement:
Connect both R6 resistors to C5. Out on the floor: Connect one of R6 to
C5. For bass freaks and head-bangers: Disconnect R6 from C5.
Basics:
3-driver speaker.
Dimensions: 375 x 400 x 700 mm, WxDxH.
System sensitivity: 89-90 dB/2.8V/1 meter.
Impedance: 5-8 Ohms.
Power requirement: 50+ watts/channel. It runs beautifully from my 32 wpc
tube amp, but bi-amping with my
Hypex
UcD doing the bass, certainly adds solidity and punch to the bass performance.
Power handling: Enough!
Useful links (Please
follow all links before e-mailing!):
http://www.troelsgravesen.dk/tips.htm
http://www.troelsgravesen.dk/tips.htm#CONSTRUCTION_OF_CROSSOVERS
http://www.troelsgravesen.dk/crossovers.htm
http://www.troelsgravesen.dk/LCR-RC.htm
http://www.troelsgravesen.dk/Inverted-Polarity.htm
http://www.troelsgravesen.dk/choices.htm
http://www.troelsgravesen.dk/power-handling.htm
Sound:
Sparkling clean treble, ultra-transparent midrange and dynamic
deep, deep bass, the latter not least when I bi-amp with my Hypex UcD.


Our local heroes, Uffe Steen Trio and Michael Vestbo Trio forming a
sextet and doing a fabulous live recording, Grooves. When first
hearing this LP it made me think of a mix Mark Knopfler and Hank Marvin
added spices of African music, blues and ballads. This is some music
really hard to categorise. Sometimes very melodic - and these guys have really
found someone doing great live recordings.
Find examples on youtube:
https://www.youtube.com/watch?v=gWFUfoCKC0A
https://www.youtube.com/watch?v=DYRdp-PwqHA
The Percussion Direct is a record I really haven't heard much. I bought it on recommendation of Michael Fremer and it's a fabulous recording where the lacquer is cut directly from the session - and it's 45 rpm. Rather avantgardistic music and not exactly my favourite taste, but nothing less than phenomenal example of what vinyl can do. Suffice to say the FUSION-22 did a magnificent job of rendering the exceptional dynamics of this recording.
I bought the Pat Metheny/Charlie Haden CD in 96', I think it was, and had been longing for the vinyl edition ever since, and finally it was re-pressed. Few made vinyl edition in the 90'ies, and although I had heard the CD numerous times it was a great pleasure hearing it again, with the vibrant, dynamic presence of the vinyl. The FUSION-22 certainly made it worthwhile.
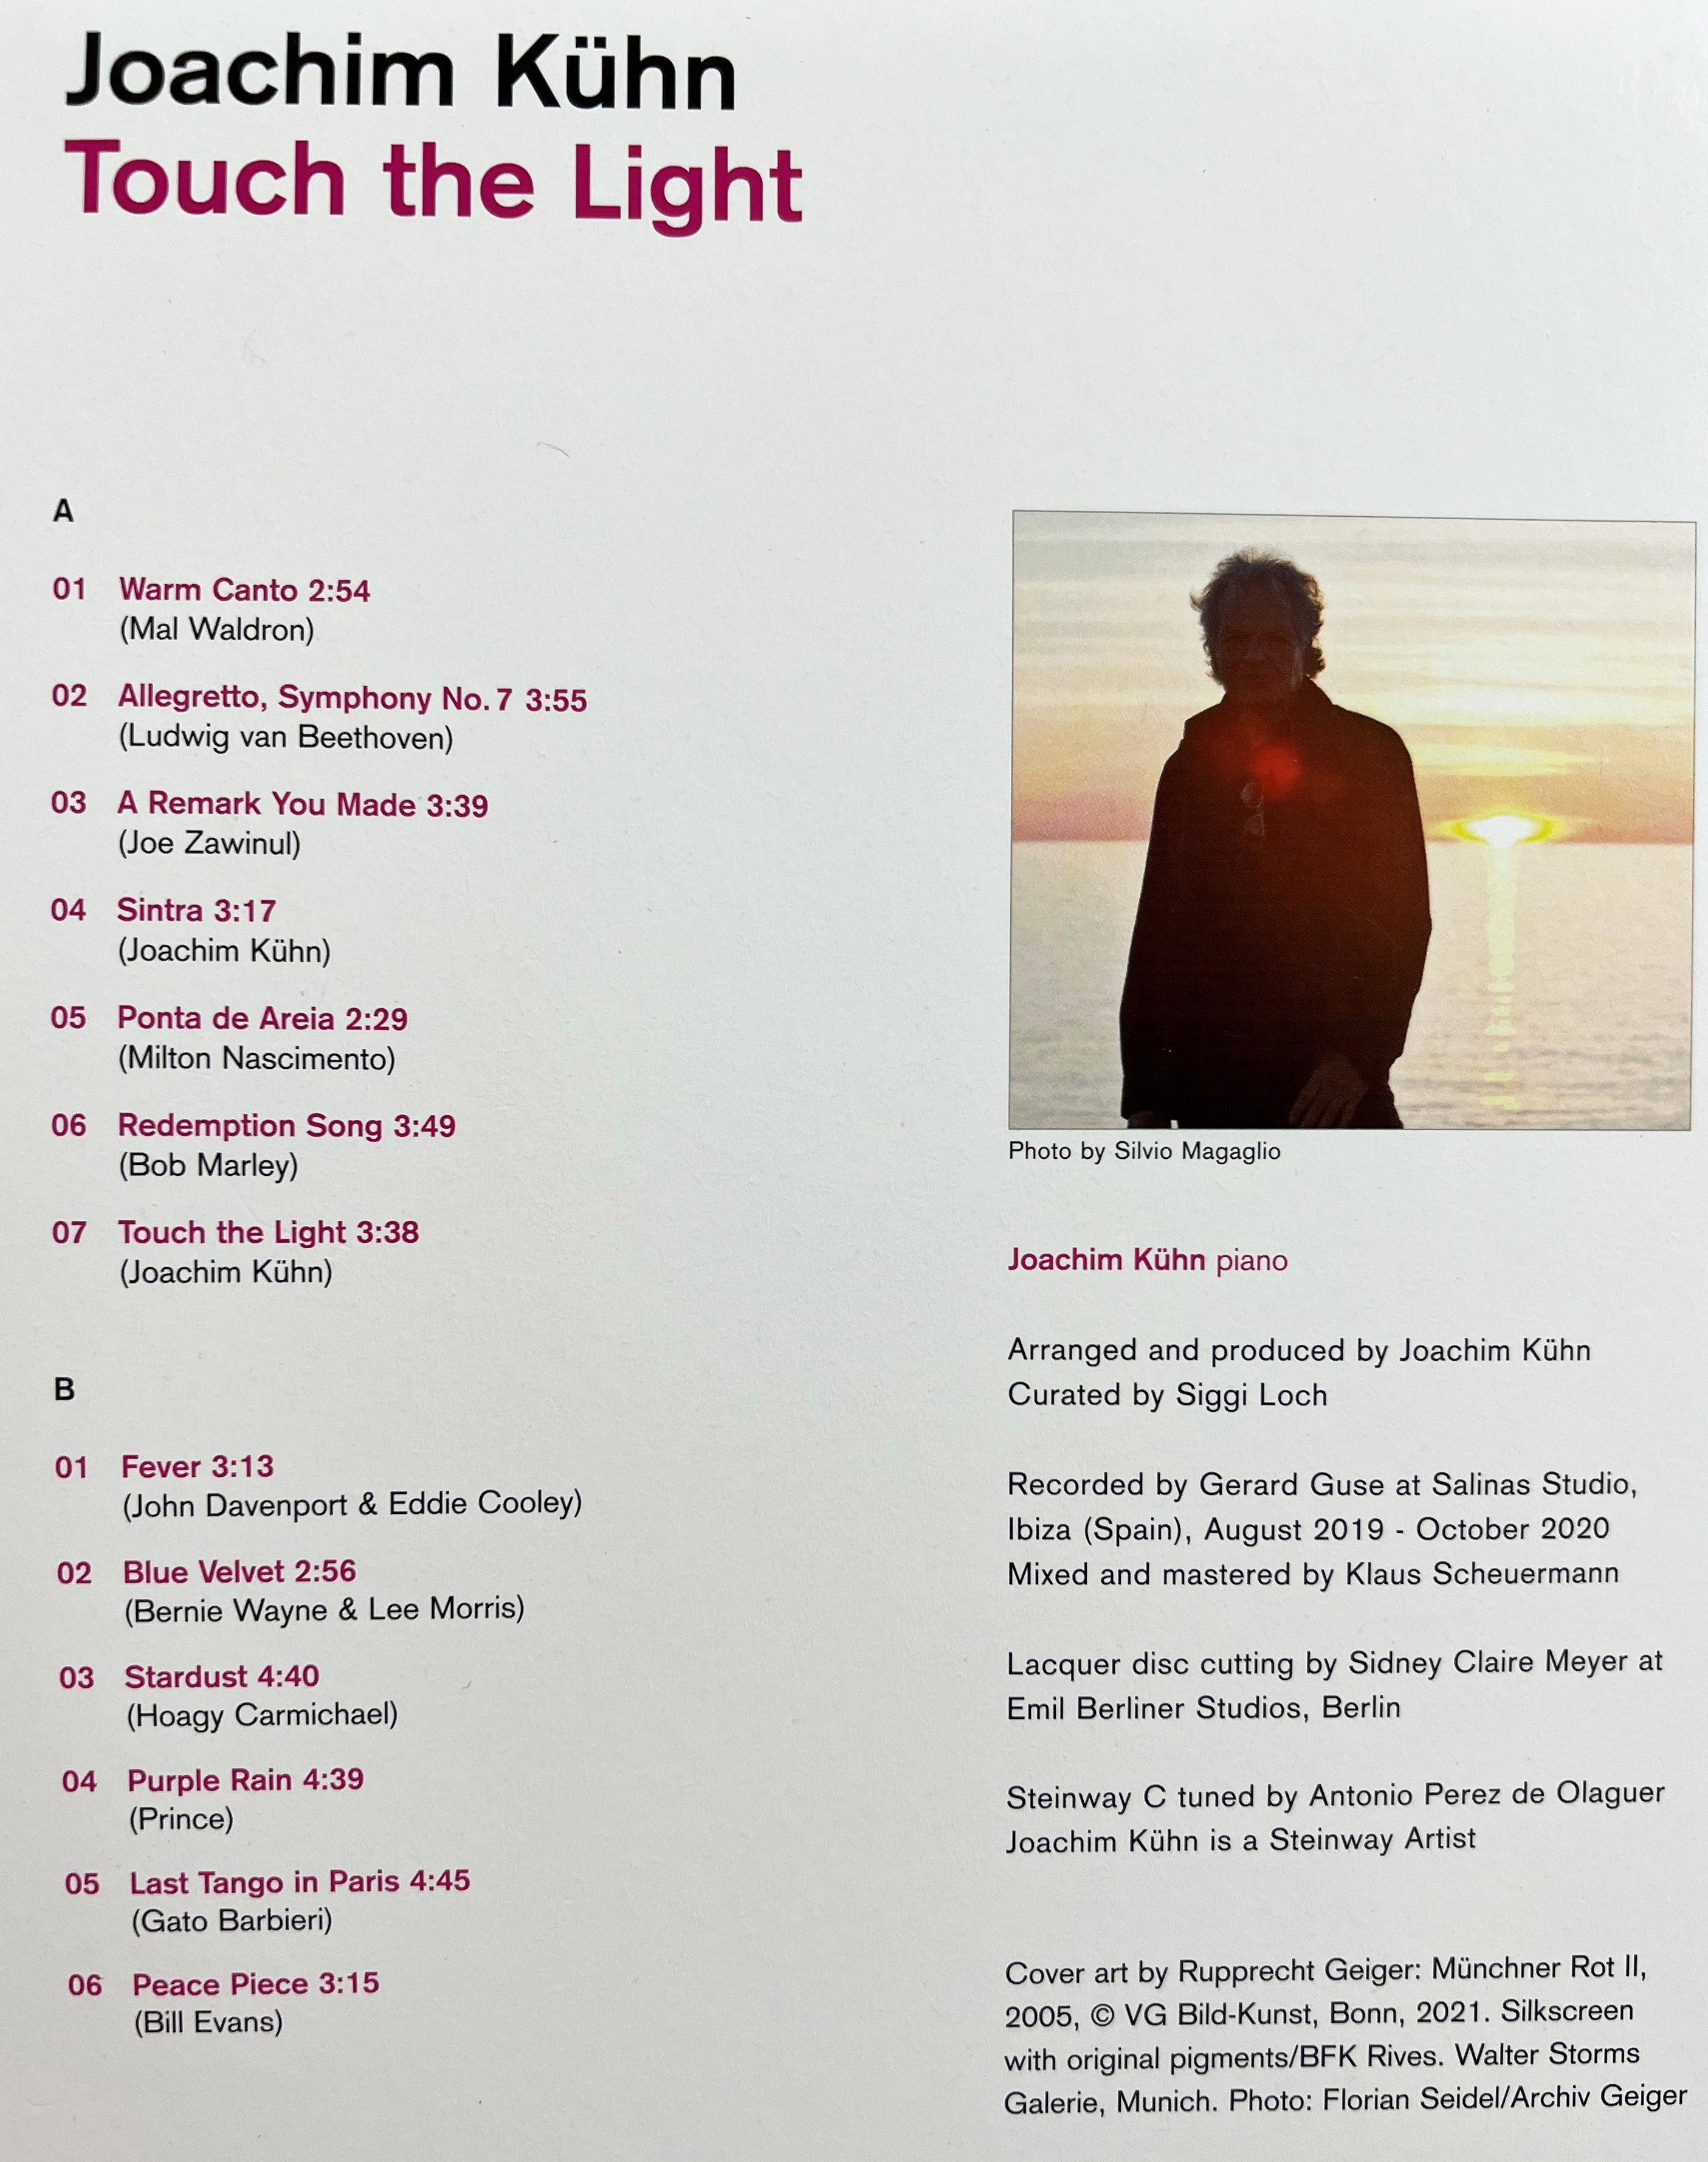
A friend suggested a listen to German pianist Joachim Kühn. This guy plays a Steinway C piano. This LP was un unexpected surprise. I really like his playing and this Steinway delivers a surprisingly powerful bass. Maybe the room or the recording - whatever, great sound and some really good interpretations of classics plus two compositions by himself. Highly recommended. The 12" bass certainly does well in rendering the powerful bass.
Click image to view large.
Download specs here:
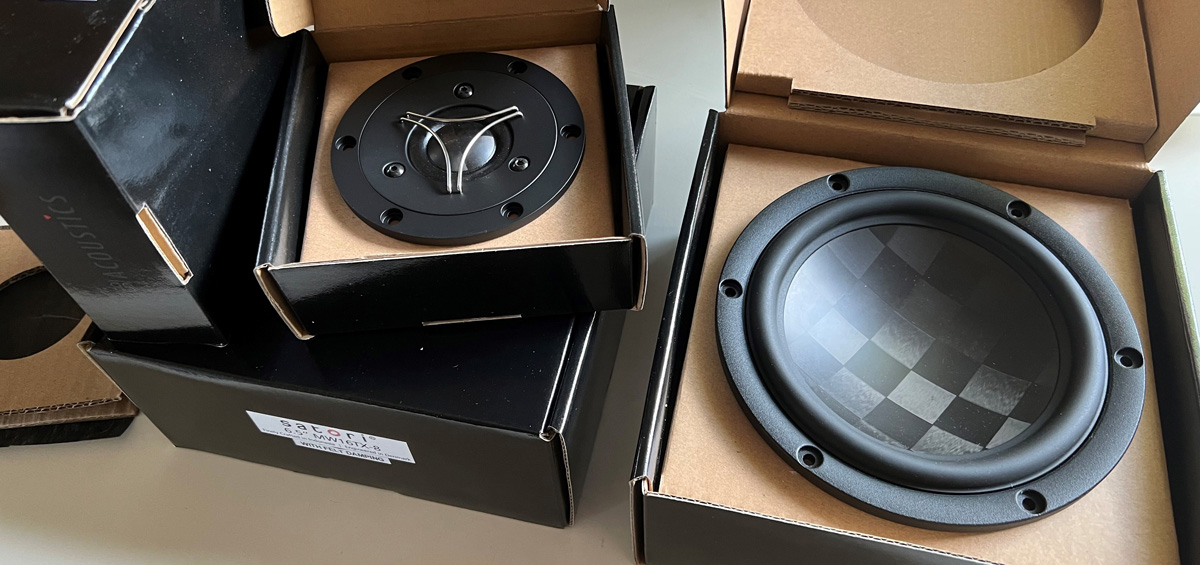
SBAcoustic
TW29TXN-B-8,
SBAcoustics
MW16TX-8, BMS
12N630-8
All drivers 8 Ohms.

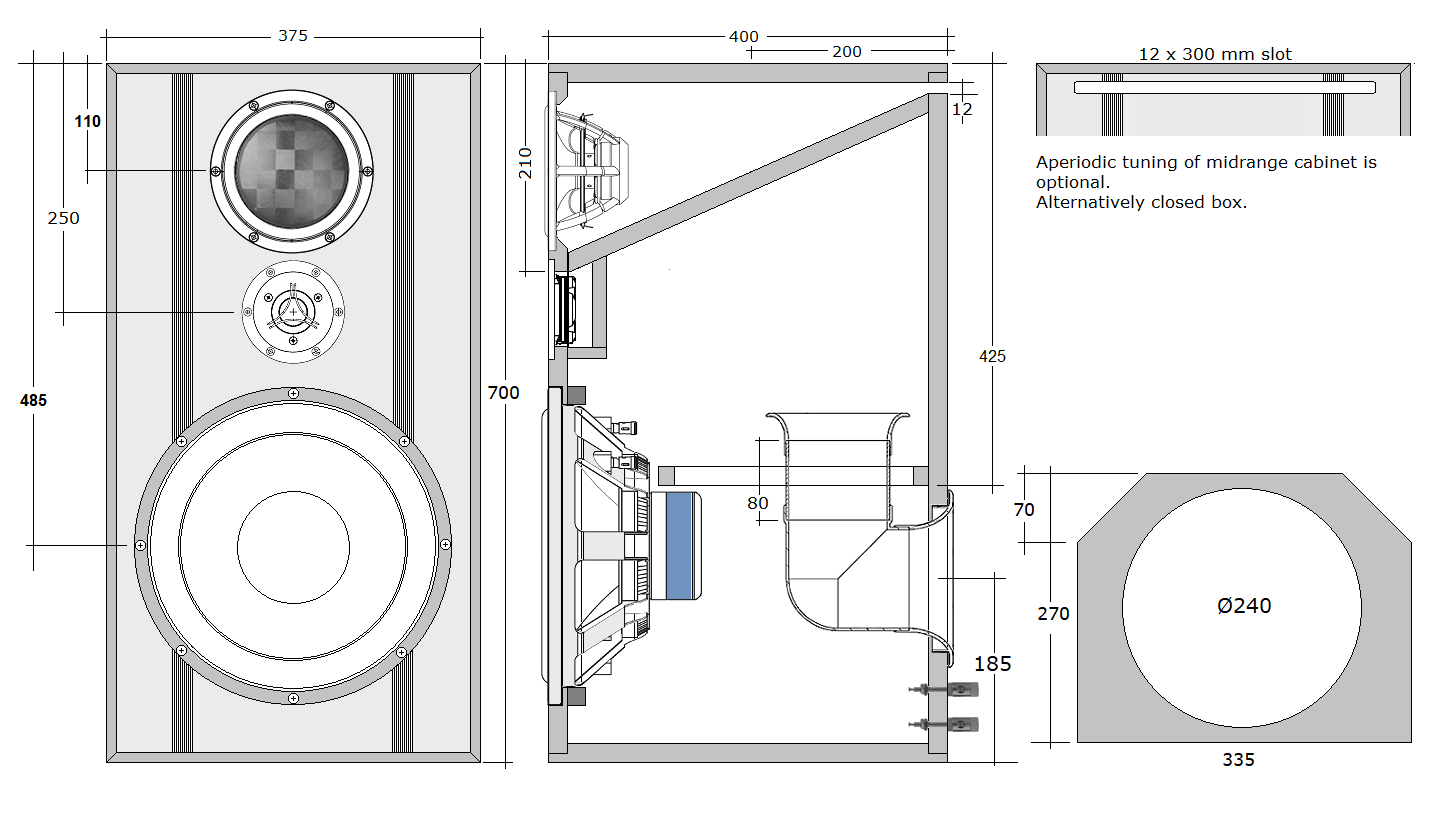
Click image to view large. All cabinet details here, no further drawings in
Kit Instruction. No CNC files available.
You can open this png file in MSPaint, and 1 pixel = 1 mm.
Cabinets were made from 20.5 mm Baltic birch (thickness may vary,
usually +/- 0.5 mm). Alternatively, use 19-22 mm MDF or HDF (Valchromat).
If 19 mm is used, I suggest adding 4 mm bitumen pads to your order, 2 sqm, 8 pcs 50 x
50cm (~16 kgs).
Cabinets were assembled by
wood glue.
Cabinet damping, see images below.
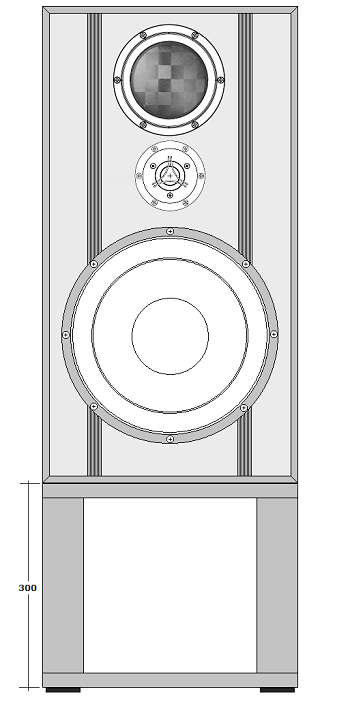
Give the speaker a stool of ~30 cm height to make midrange driver at
ear/listening height.
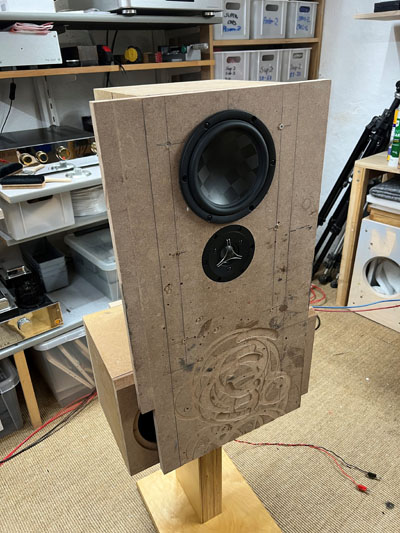
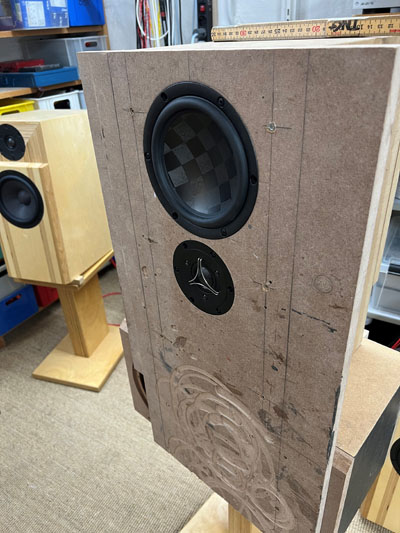
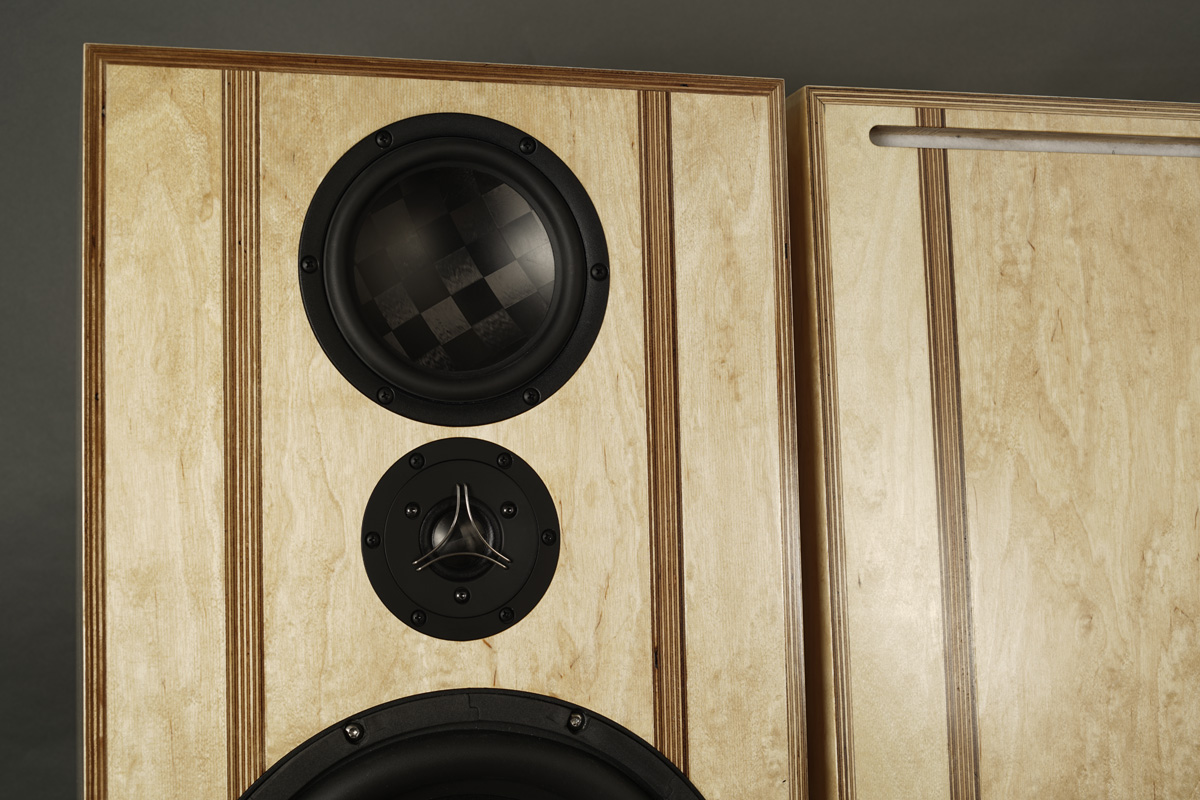
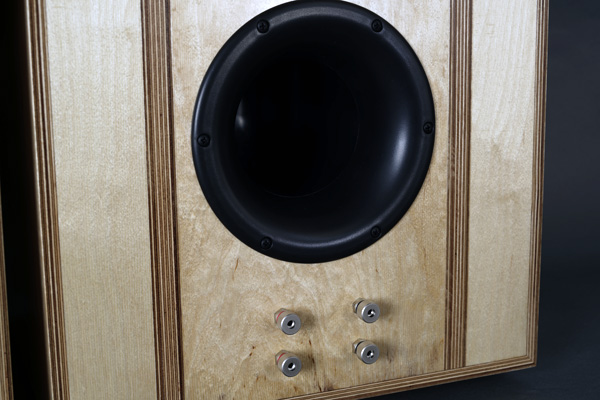
As always, starting a new project, the first thing to do is making a mockup of the midrange and tweeter drivers, determine dZ and do simulations to see if this has any future. The reason for having the midrange on top - and at listening height - is time-alignment. I knew the bass performance, so no need to include this here and dZ is irrelevant at the target low point of crossover between bass and mid.
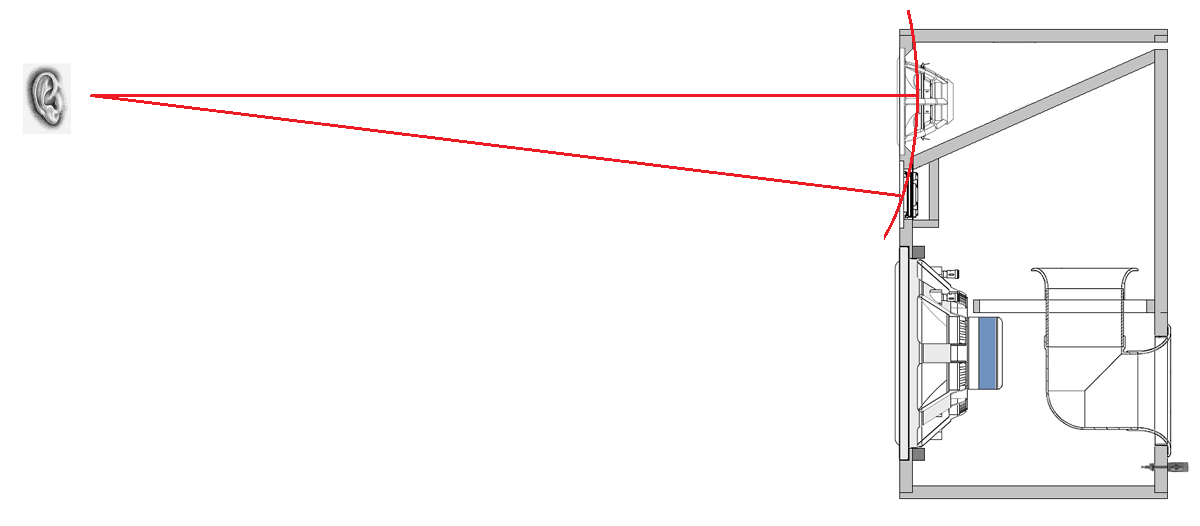
The question here was whether the MW16 could be flush-mounted or not like done on the Faital-3WC speakers. So, I made measurements from both situations as seen on photos. With the driver flush-mounted and listening height a little above center axis of MW16, everything just works perfect. No time-alignment is perfect anyway as soon as we move our listening position a little. The MW16 also measures better when flush-mounted and it also had a little impact on the TW29 tweeter, thus, flush-mounted it must be. The MW16 needs a rebate of 7 mm and for sure - it looks better this way.
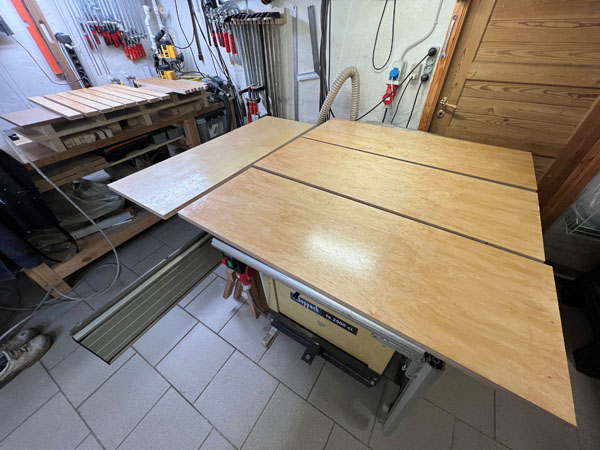
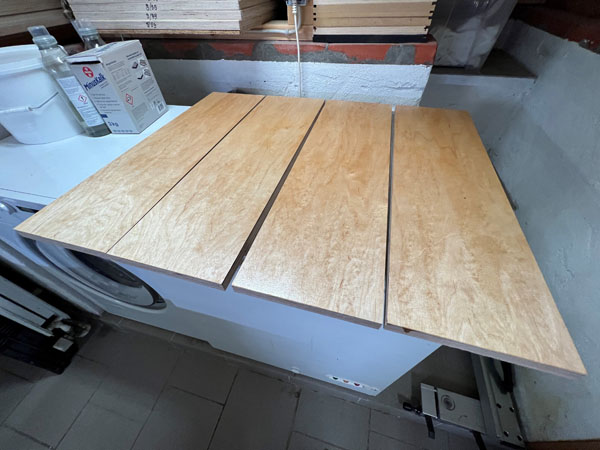
I always start cutting all sheets + 5 mm, sand them and add one coat of
lacquer. This reduce edge-ripping further down the line. The vertical
"strips" on front and rear have no structural impact, it reduce my waste
by using smaller dimension from cutting my stock 122 x 61 cm sheets. I
don't have room for full size sheets, hence cut a 122x244 sheet into 4
sheets that fit my storage facility.
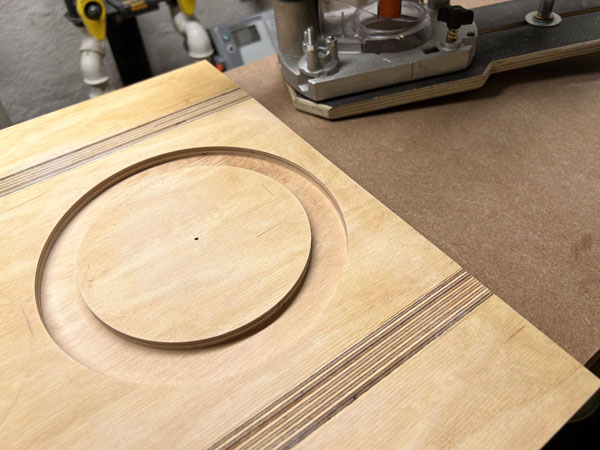
Making the front panel routings. Remember to chamfer the midrange driver
hole, 45 deg. to ~8 mm depth.
The other drivers don't need any chamfering.
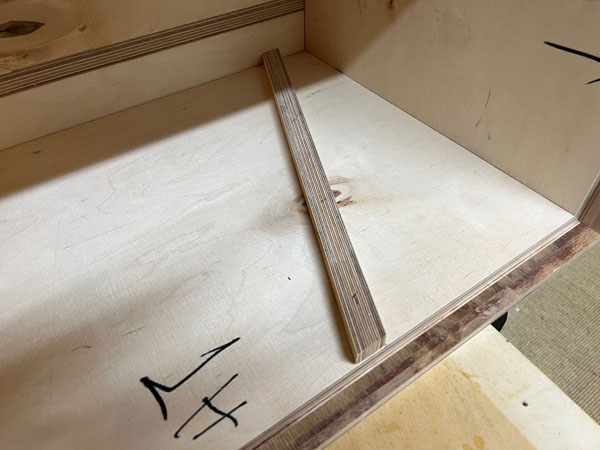
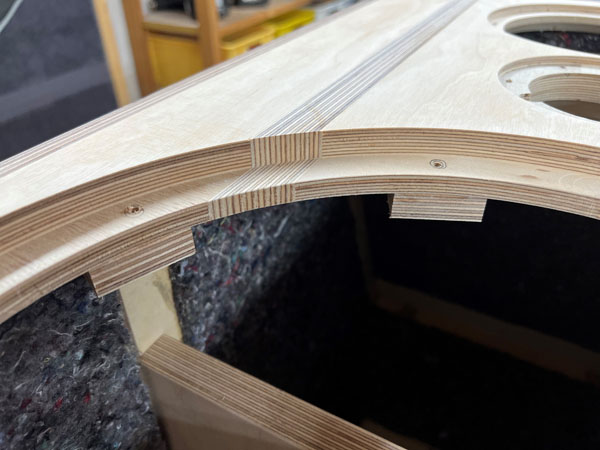
Preparing the midrange cabinet bottom panel. I used fillets to keep
panel aligned.
Cut panel ~24 deg. to be flush with rear and front panel.
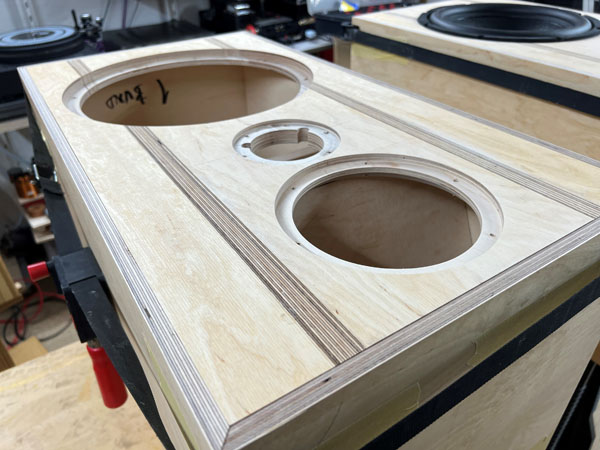
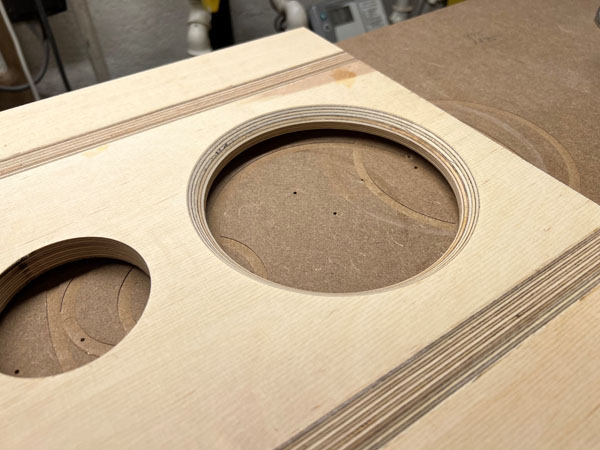
Testing front panel i cabinet and driver rebates. 7 mm for the midrange,
5 mm for tweeter and 12 mm for the bass.
Add blocks of wood below bass driver screw holes to secure proper
tightness.
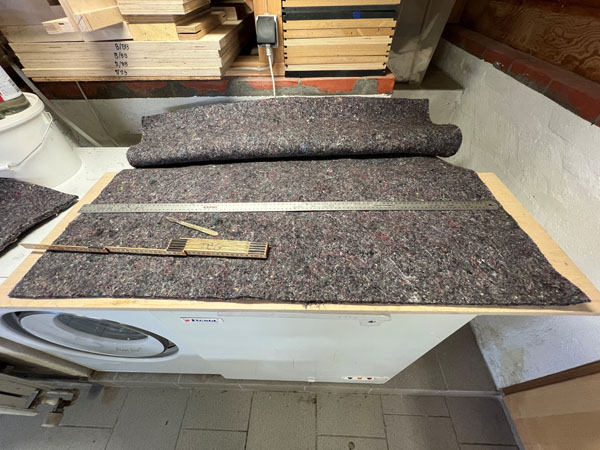
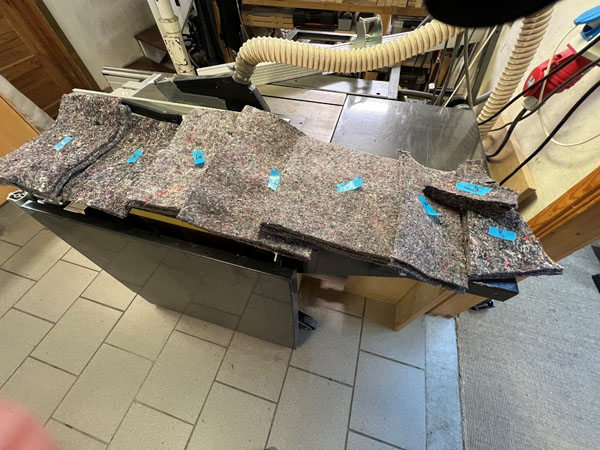
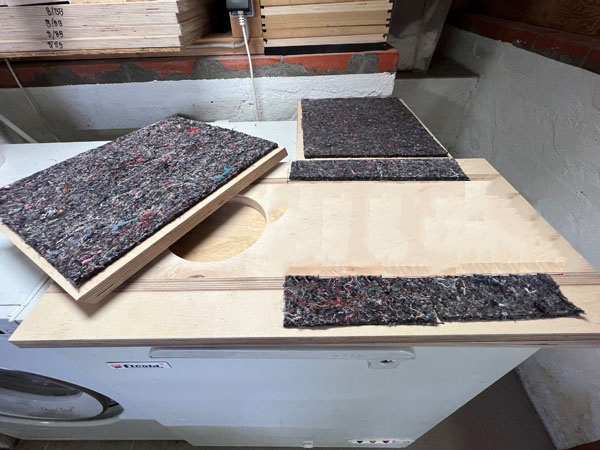
Here's my setup for cutting damping sheets. All felt damping was added
before gluing the cabinets.
http://www.troelsgravesen.dk/tips.htm#Gluing_felt_and_acoustilux
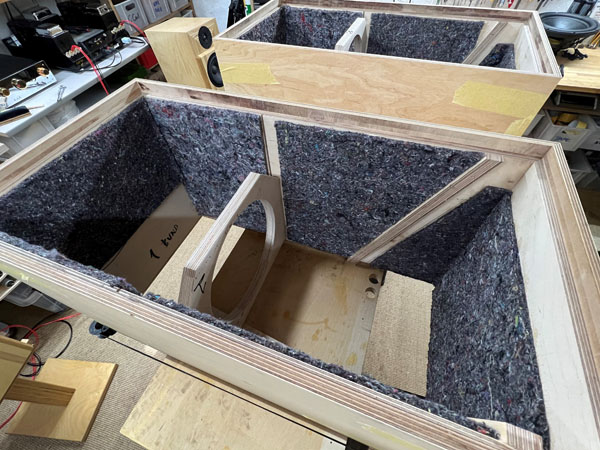
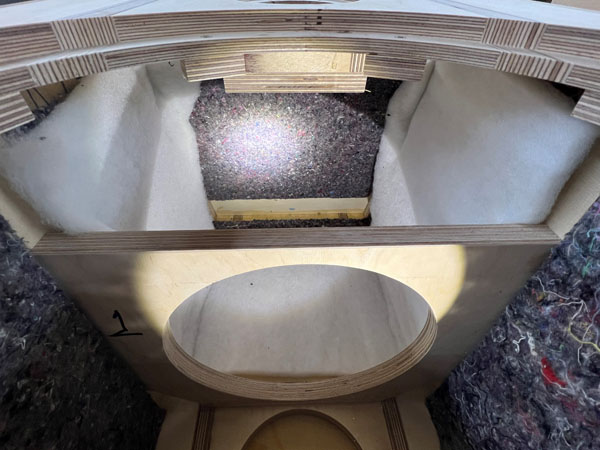
Left: Interior with felt. Right: Rear panel and midrange lower panel.
Only half the bottom panel towards rear is covered with felt allowing
bass crossover to be placed here.
On rear panel the area above the port is left bare for the mid-tweeter
crossover board.
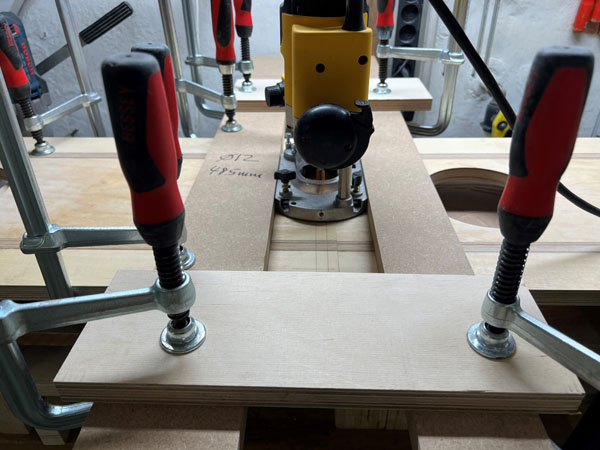
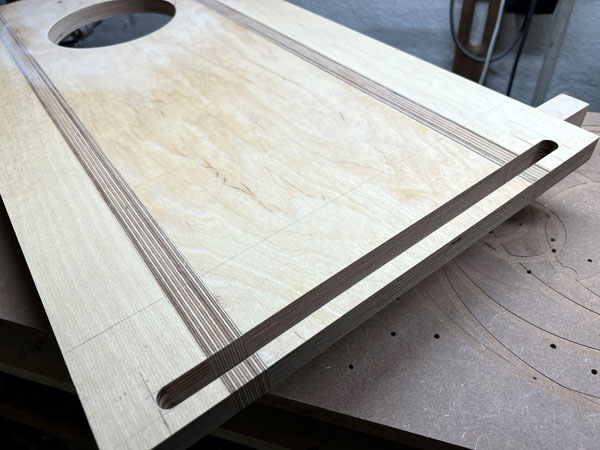
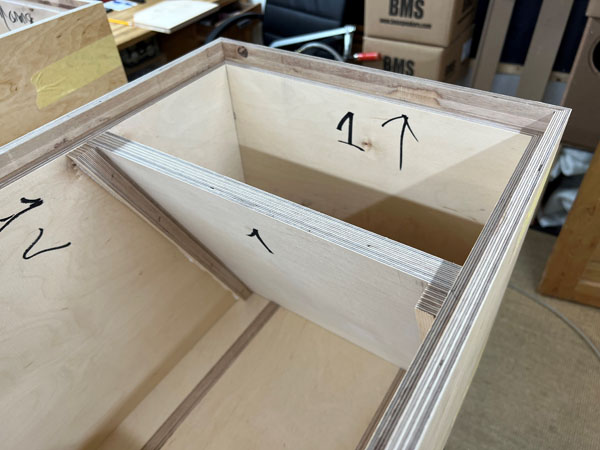
Routing the 12 mm rear slot for the midrange cabinet. See drawing above.
The slot can be 10-12 mm, not critical.
If the slot is too much trouble, leave the midrange cabinet closed. It
makes a slightly more dry sound compared to the
aperiodic midrange cabinet shown here.
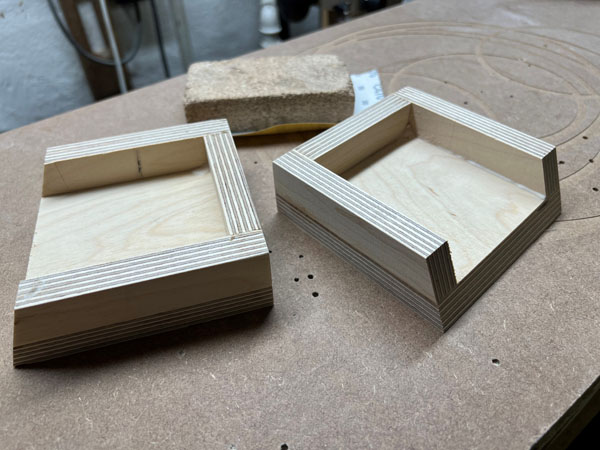
Left: Add blocks of wood below bass driver screw holes.
Right: Preparing the tweeter back housings. 20 mm inner depth is
enough. Remember to seal the
wire holes.
Acoustilux

400 cm, 50 cm width of acoustilux is supplied with the kit.
Cut pieces as seen above.
15 x 75: Fold and place at bottom below port.
25 x 80: Fold and place at bottom below bass driver (on top of bass
crossover).
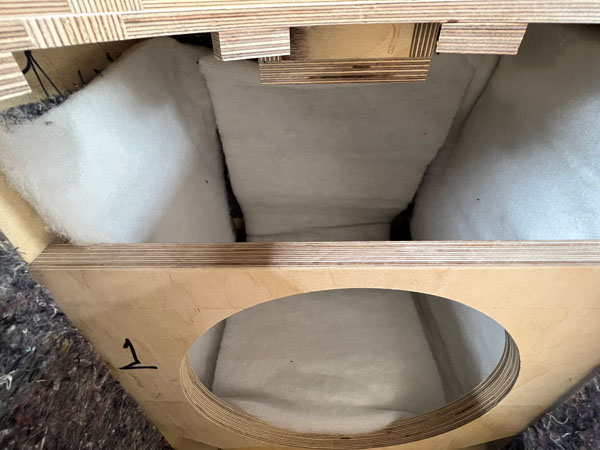
A: Place 1 piece 25 x 100 cm in upper part of bass cabinet covering rear
and sides. Attach with staples or dots of Superfix close to front panel
allowing access to mid-tweeter crossover.
B: Place piece of 25 x 65 cm at midrange bottom panel and down at rear
panel, thus double layer on rear here.
Make absolutely sure the midrange cabinet is isolated from the bass
driver.
Place tape over the midrange cabinet slot (rear side), stuff the vent
and push the bass driver hard.
Midrange driver MUST NOT move.

Left:
Place 1 piece 35 x 75 on bottom and sides i lower bass cabinet section.
Residual material, 15 x 75 is placed on bottom below entrance.
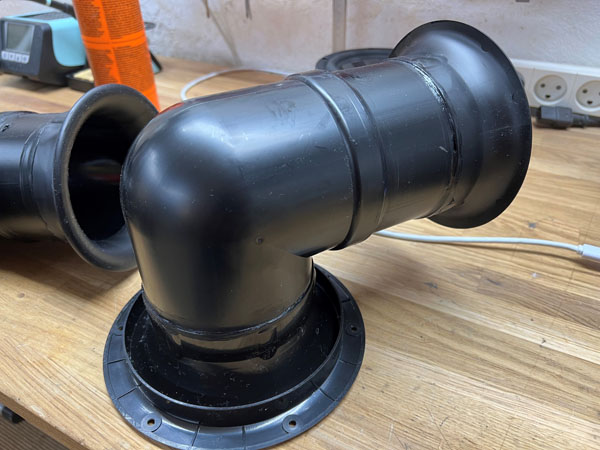
Right: Gluing the port with Superfix. Cut the straight port tube to 8
cm.
Midrange cabinet is filled with 100 grams sheeps wool.
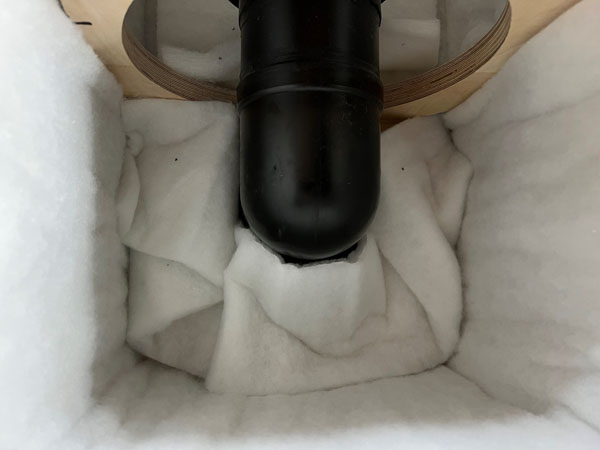
Stuff the 15 x 75 cm strips on rear panel around the port.
Soldering wires to speaker driver terminals: Always apply some solder to
wire and terminal before connecting. This way you add a minimum amount
of heat to the speaker terminal when combining.
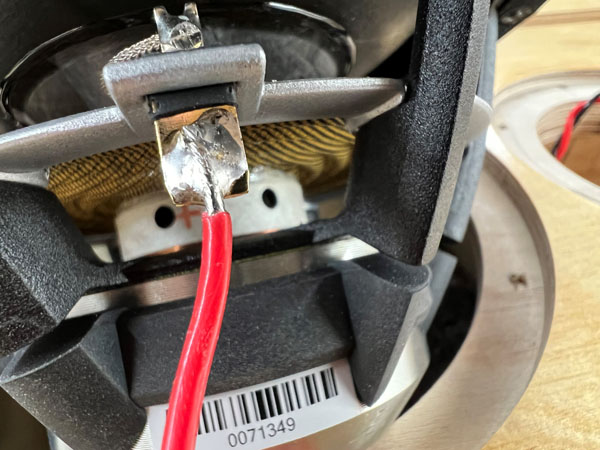
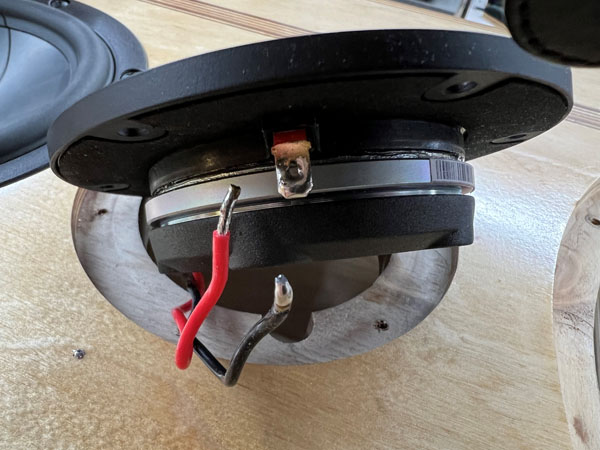
This goes in particular for tweeter terminals. They are fragile and you
should heat the wire/terminal for no more than a second.
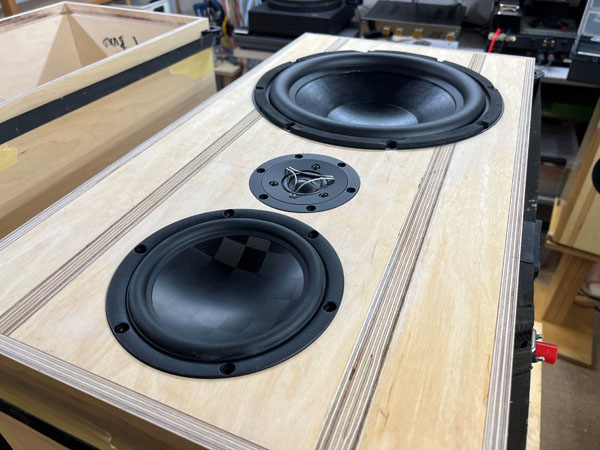
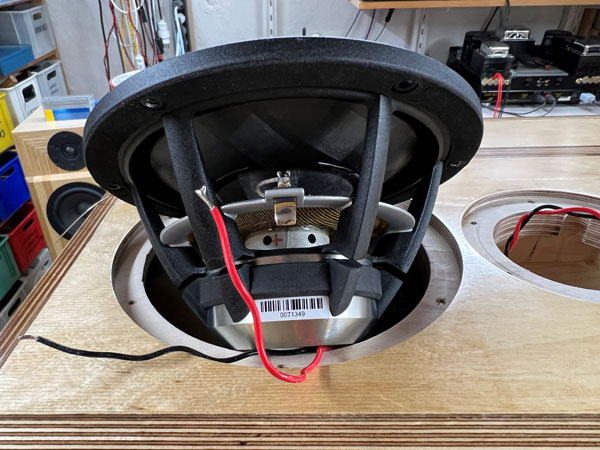
Drivers in place, and ---
Phew!! Test crossovers in place and time for a double expresso and some LPs.
My goodness, this midrange is clean and transparent - yet smooth on the
ear.
As often is the case, the tweeter needs a little more attenuation than
predicted from simulation.
12" bass certainly does its thing!
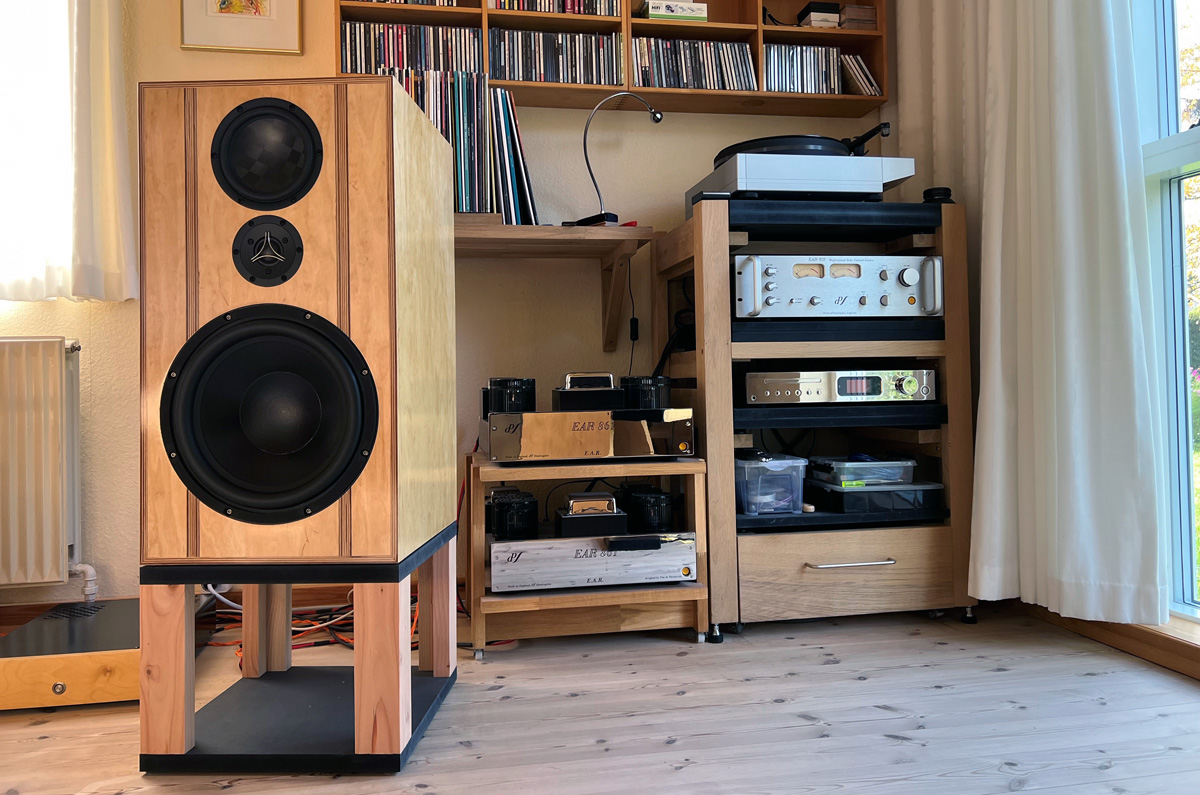
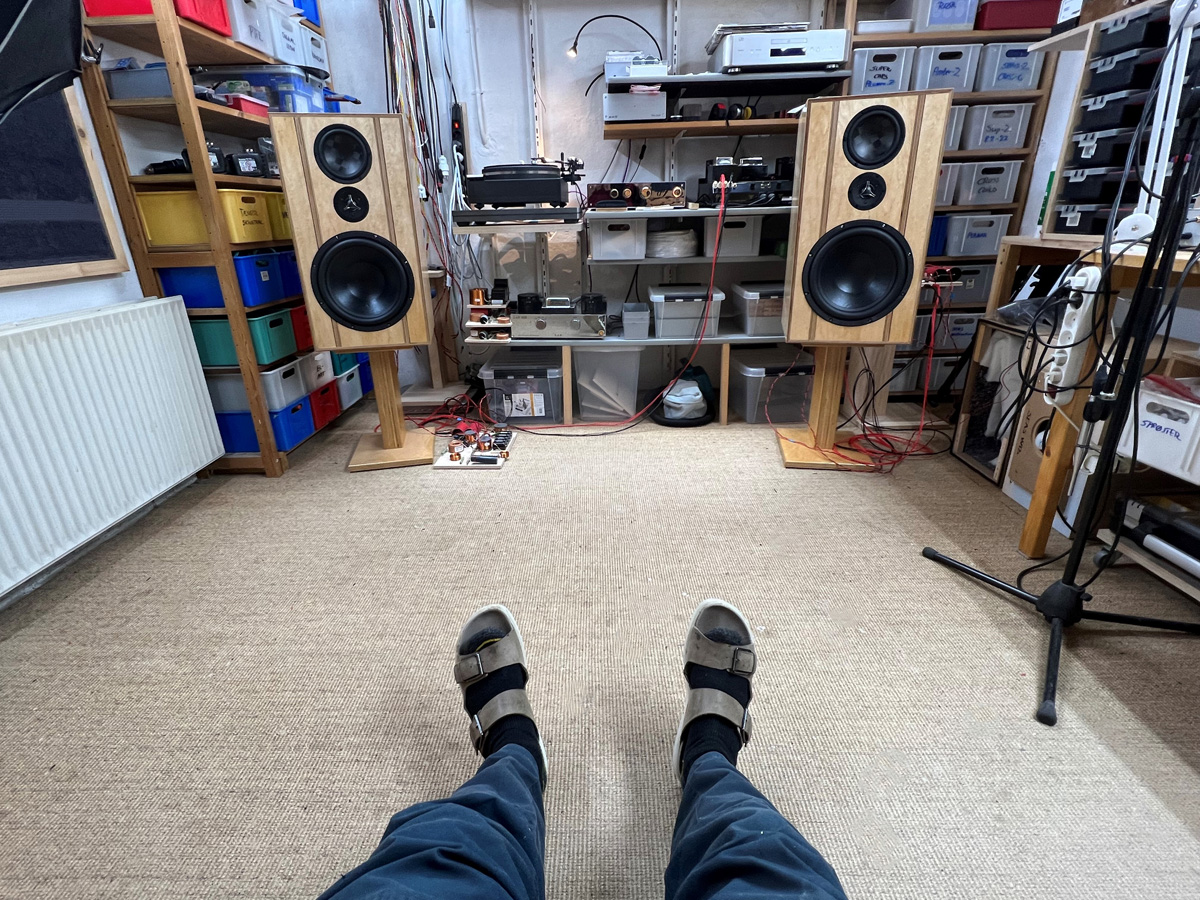
My living room setup on half-finished stands.
Need some paint and lacquer.
The stands were made from 25 mm HDF and douglas wood.
A few comments on
MEASUREMENTS before you start interpreting the readings below.
First of all, if we think measurements will
tell us how a speaker sounds, we're wrong. The perception of sound is
way too subjective to be reflected in any measurements we can perform. A
loudspeaker system is meant to give us a satisfying idea of an acoustic
event and for some people a pair of 5 USD ear-plugs are enough, others
spend 200 kUSD on a truly full-range pair of speakers - and the latter
may not be happier than the former.
Measurements may give us an idea of tonal balance of a system, i.e. too
much or too little energy in certain areas, although dispersion
characteristics play a vital role here. A two-way 7+1 and a three-way
7+4+1 may display similar horizontal dispersion, yet sound very
different. Measurements may tell us about bass extension if far-field
measurements are merged with near-field measurements. In addition to
this, ports may contribute to bass extension. Most of we diy'ers do not
have access to an anechoic room for full-range measurements from
20-20000 Hz.
What cannot be seen is what kind of bass performance we get in a given
room. Bass performance is highly dependent on in-room placement of your
speaker and the same speaker can be boomy in one place and lean in
another. Actual SPL level at 1 meter distance and 2.8V input is useful
for en estimate of system sensitivity and combined with the impedance
profile may give an idea of how powerful an amplifier is needed to drive
the speaker to adequate levels.
What measurements do not tell is the very sound of the speaker unless
displaying serious linear distortion. The level of transparency, the
ability to resolve micro-details, the "speed" of the bass, etc., cannot
be derived from these data. Distortion measurements rarely tell much
unless seriously bad, and most modern drivers display low distortion
within their specified operating range.
Many people put way too much into these graphs and my comments here are
only meant as warning against over-interpretation. There are more to
good sound than what can be extracted from a few graphs. Every graph
needs interpretation in terms of what it means sonically and how it
impacts our choice of mating drivers, cabinet and crossover design.
What measurements certainly do not tell is the sonic signature of the
speaker, because speaker cones made from polypropylene, aluminum,
Kevlar, paper, glass fiber, carbon fiber, magnesium, ceramics or even
diamonds all have their way of adding spices to the stew. Nor do
measurements tell what impact the quality of the crossover components
add to the sound, from state of the art components to the cheapest of
coils and caps, they all measure the same if values are correct, yet
sound very different.
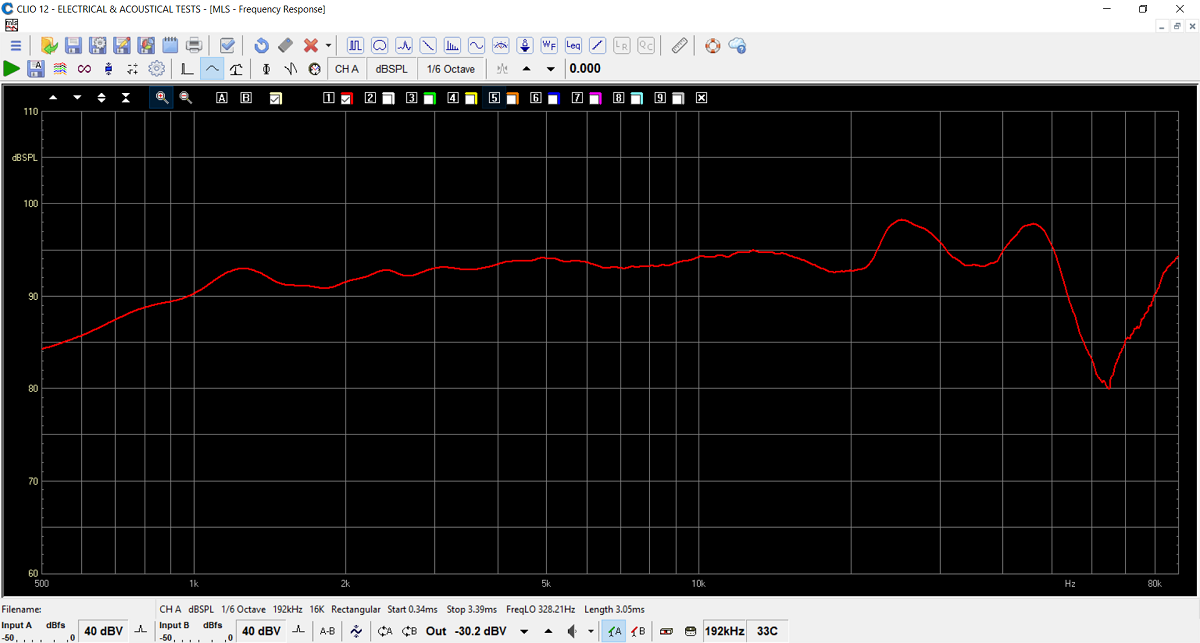
Here the TW29TXN-B-8 on an 80 x 120 cm
baffle.
Out of curiosity I did a 192 kHz sampling
rate measurement although my microphone is only calibrated to 50 kHz.
For sure this tweeter does 50 kHz, not exactly linear above 20 kHz, but
this should be of minor importance and above 20k the wavelengths are so
short anything can happen.
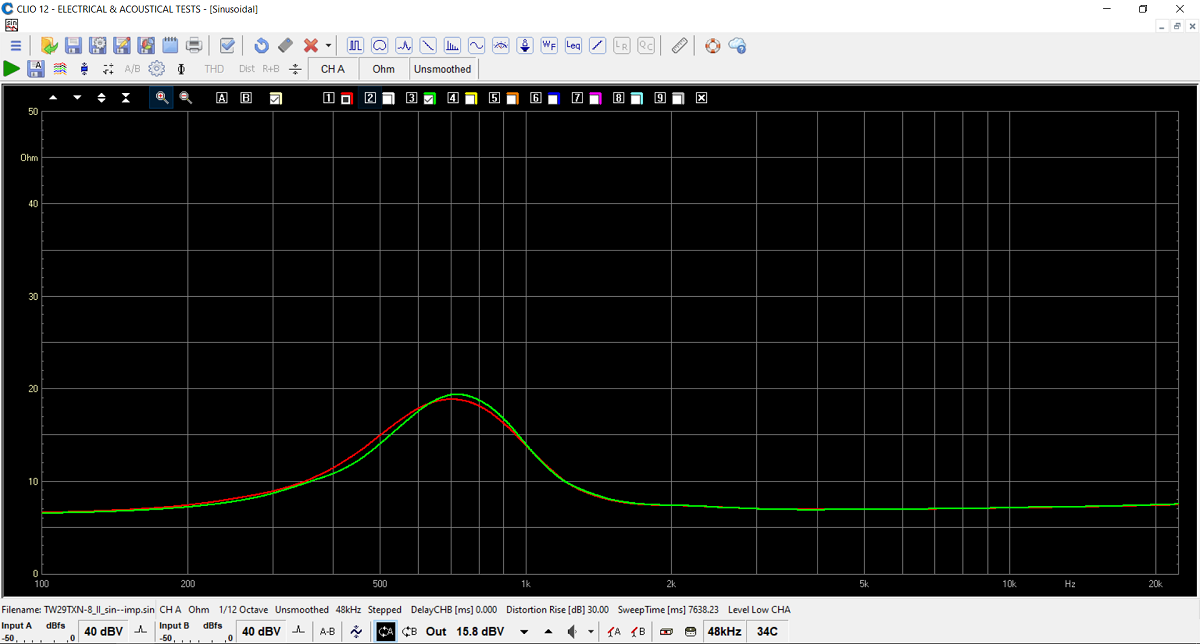
TW29TXN-B-8 impedance profile of the two
units.
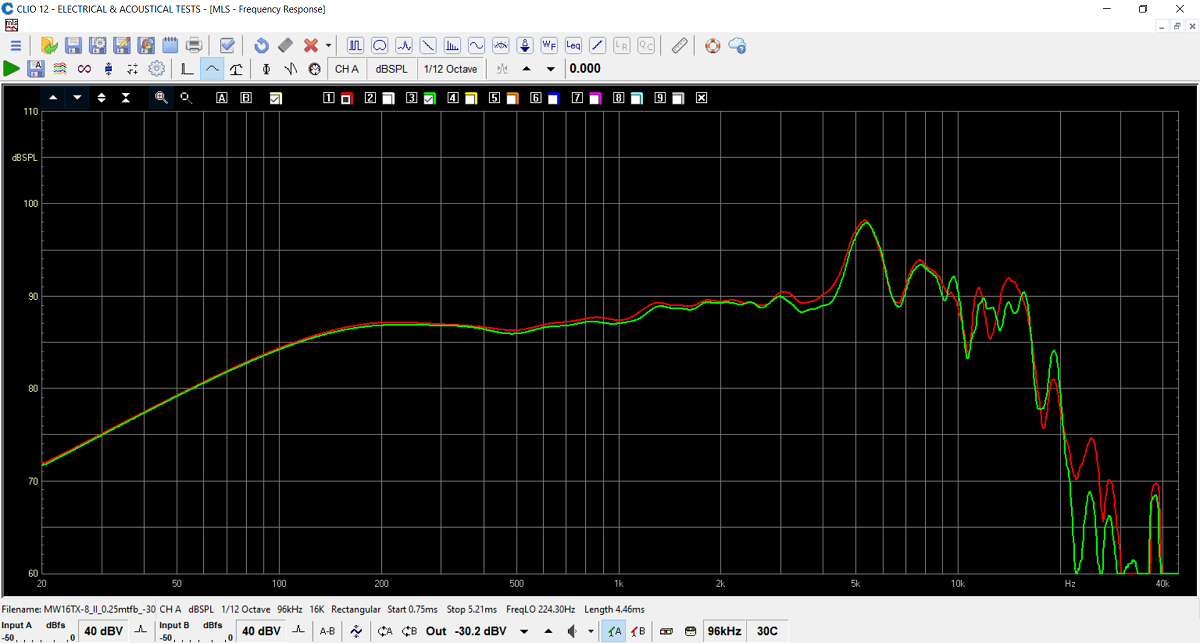
MW16TX-8 units on an 80 x 120 cm baffle.
The peak at 5 kHz must be tamed, but from simulation an easy task.
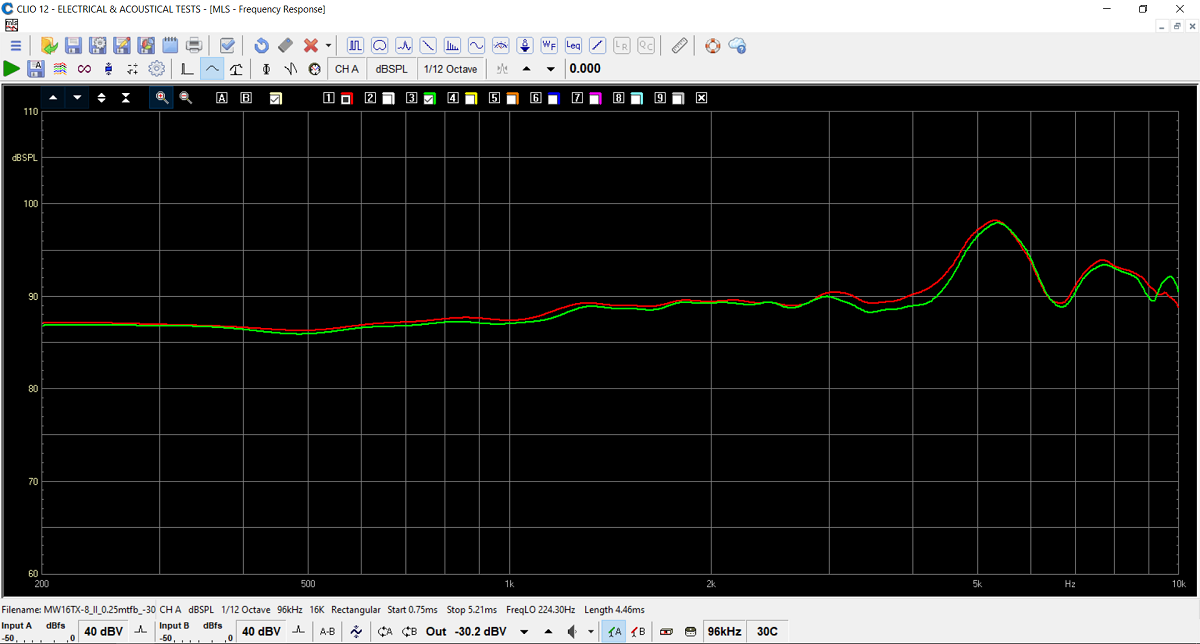
MW16TX-8 from 200 to 10000 Hz.
Exceptionally smooth in the range of 200-4000 Hz.
No sign of
any ~1kHz rubber resonances at all, which is a feature it shares with other hard-cone drivers
and promises clean transparent midrange.
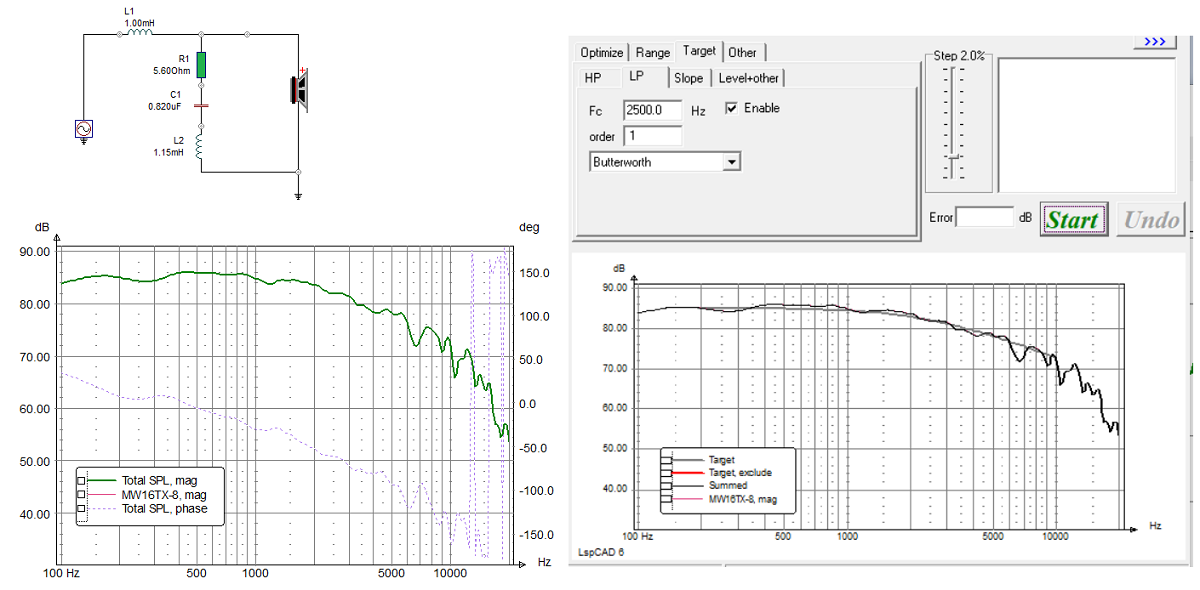
The above just an example of fine-tuning
notch-filter for the 5 kHz peak for a 1. order roll-off. This is not the
LCR circuit used here. As soon as we change L1, then all other values
changes too.
Needless to say this has to be done my hand and measurements.
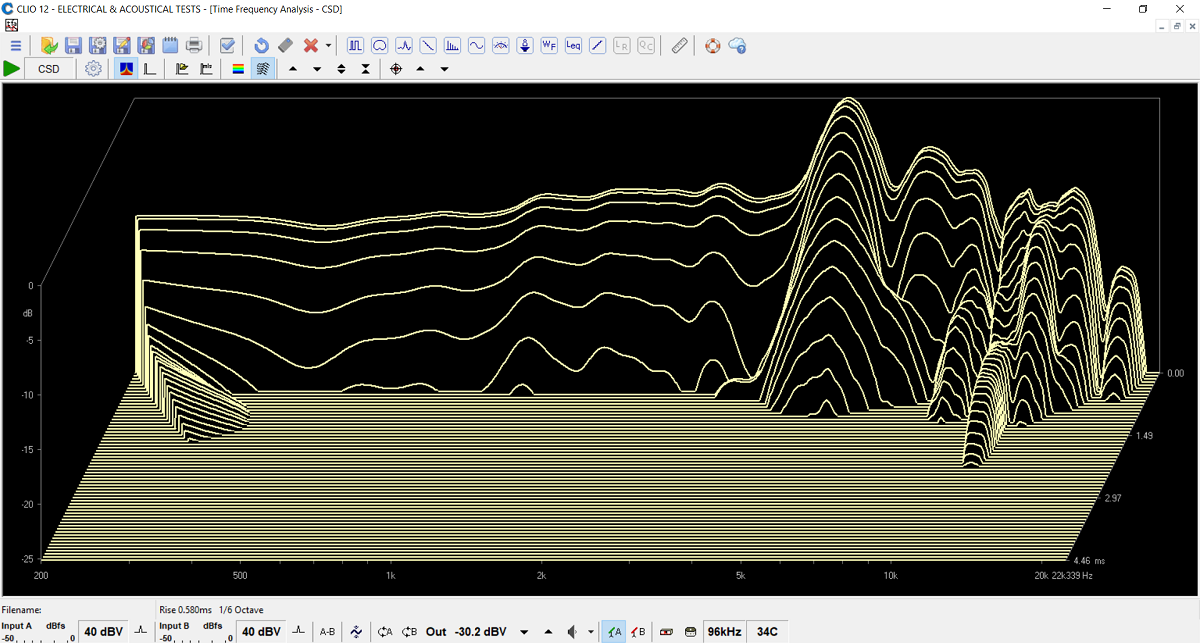
MW16TX-8, waterfall plot. The peak at 5 kHz
quickly dies out and from the impedance curve below we see no sign of any disturbances
in this area.
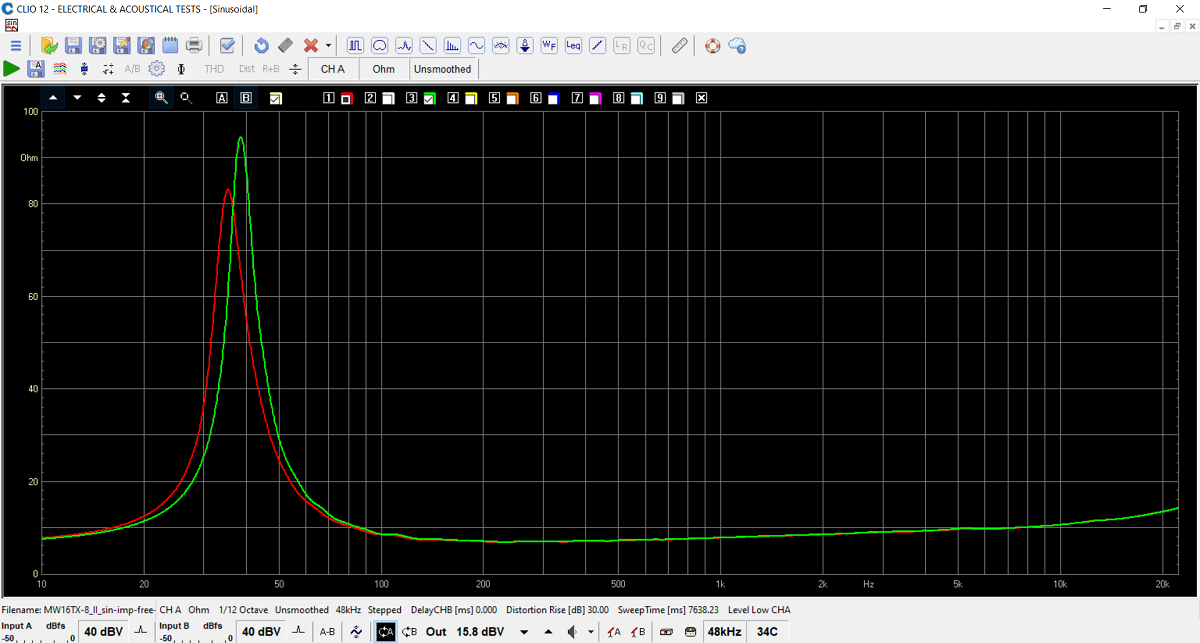
Impedance of two MW16TX-8 units. Units out of
the box.

Above the MW16 and SB29TX on test baffle with
the MW16 flush-mounted.
This looks really good and was the basis for the first crossover
simulations.
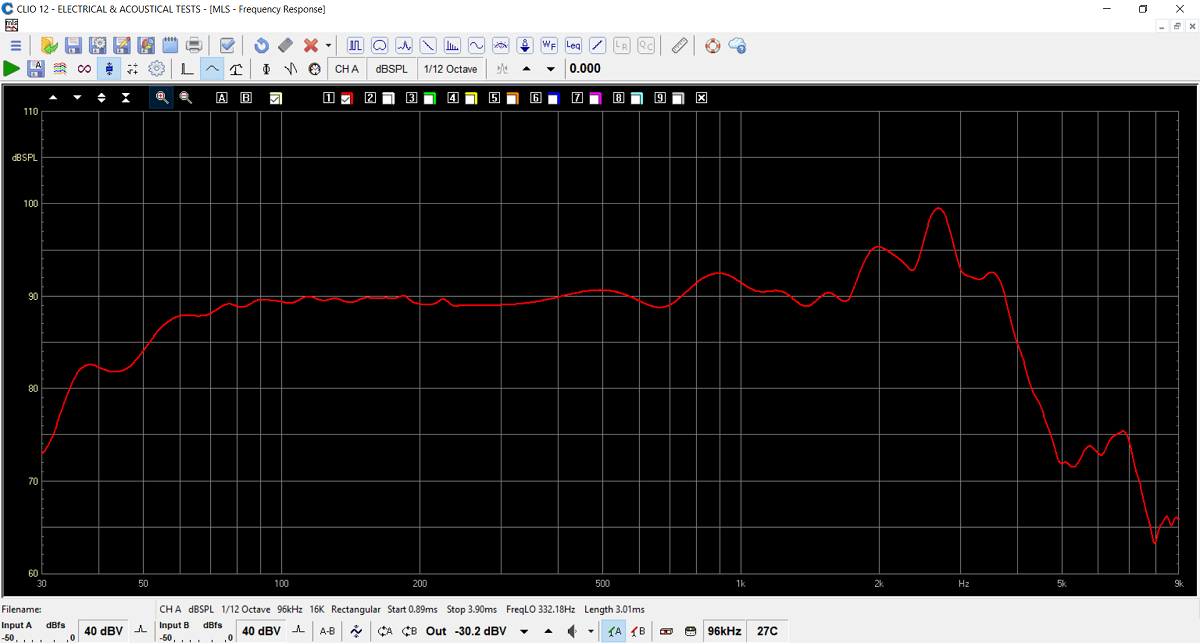
Frequency response of 12N630 bass driver
in-cabinet.
Measurement merged with near-field response @ 250 Hz.
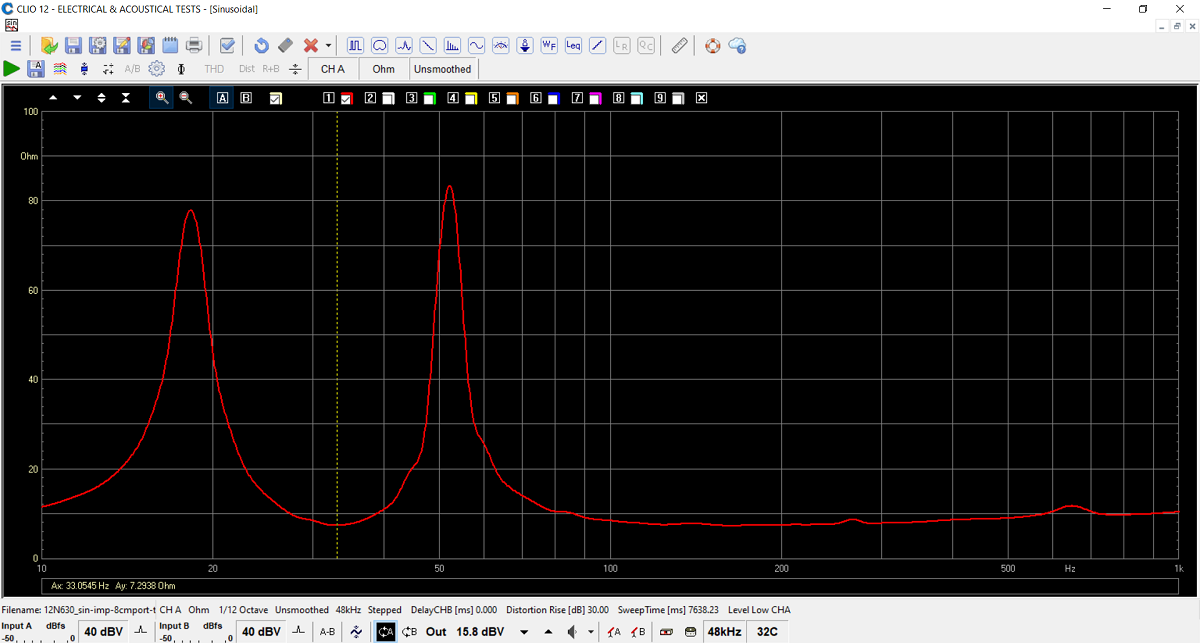
12N630 impedance in-cabinet with straight
port section being 80 mm.
Various port lengths were tested before I settled on this port tuning of
33 Hz. This is pretty close to simulation of the driver, which tells a
port length of 250 mm/port diameter 100 mm. When ports get really big
the usual length calculation does not have to be multiplied with 0.7 to
match reality. The generously flared ends of this 100 mm port helps
reducing the acoustic resistance of the port.
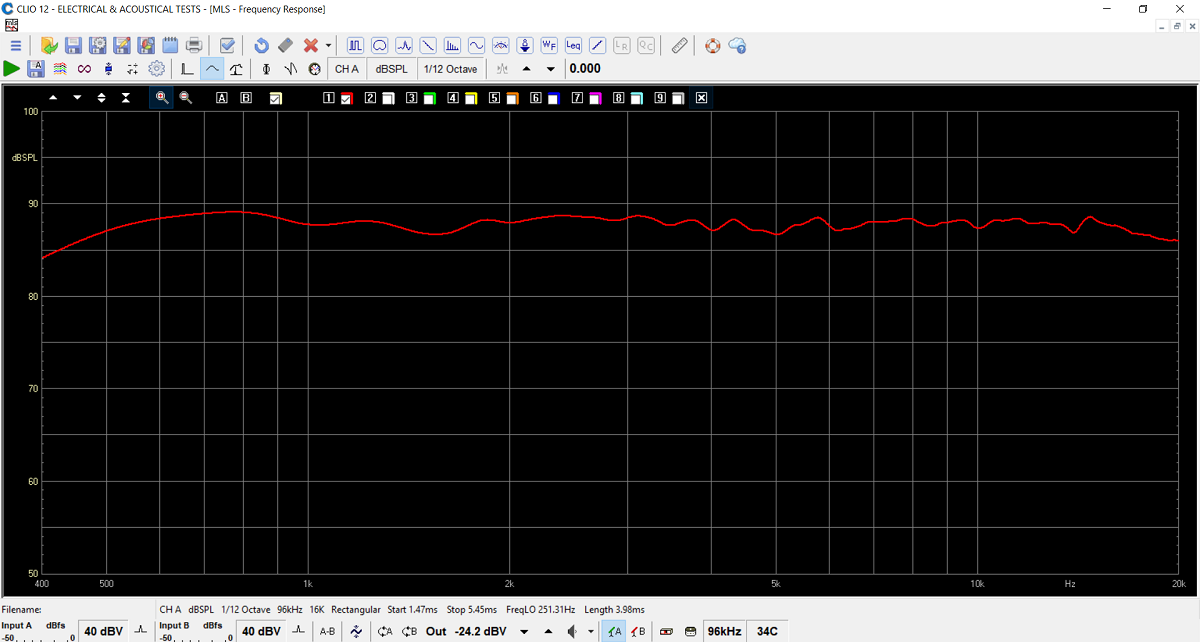
Mid-tweeter from ½ meter distance at a height
of lower edge of midrange driver.
Pretty flat - and after some serious listening, the tweeter is a bit too
hot.

Here's the midrange response driven from
crossover. I couldn't be more pleased! Nice roll-off from the LCR notch
filter.

Final system impedance. Quite an easy load.
All kit and component prices may be subject to
change and are always to be confirmed by Jantzen Audio Denmark.
Bitumen pads (anti-drum panels) have to be ordered separately.
You have to order the BMS 12N630 from a dealer.
Recommended are
LEAN, UK and
Thomann, EU
Kits can always be bought with/without SBA drivers, or some of the drivers.
Download Complete Kit Sale Presentations:

All technical questions to troels.gravesen@hotmail.com
All questions regarding purchase of kits, please mail Jantzen Audio at contact@jantzen-audio.com
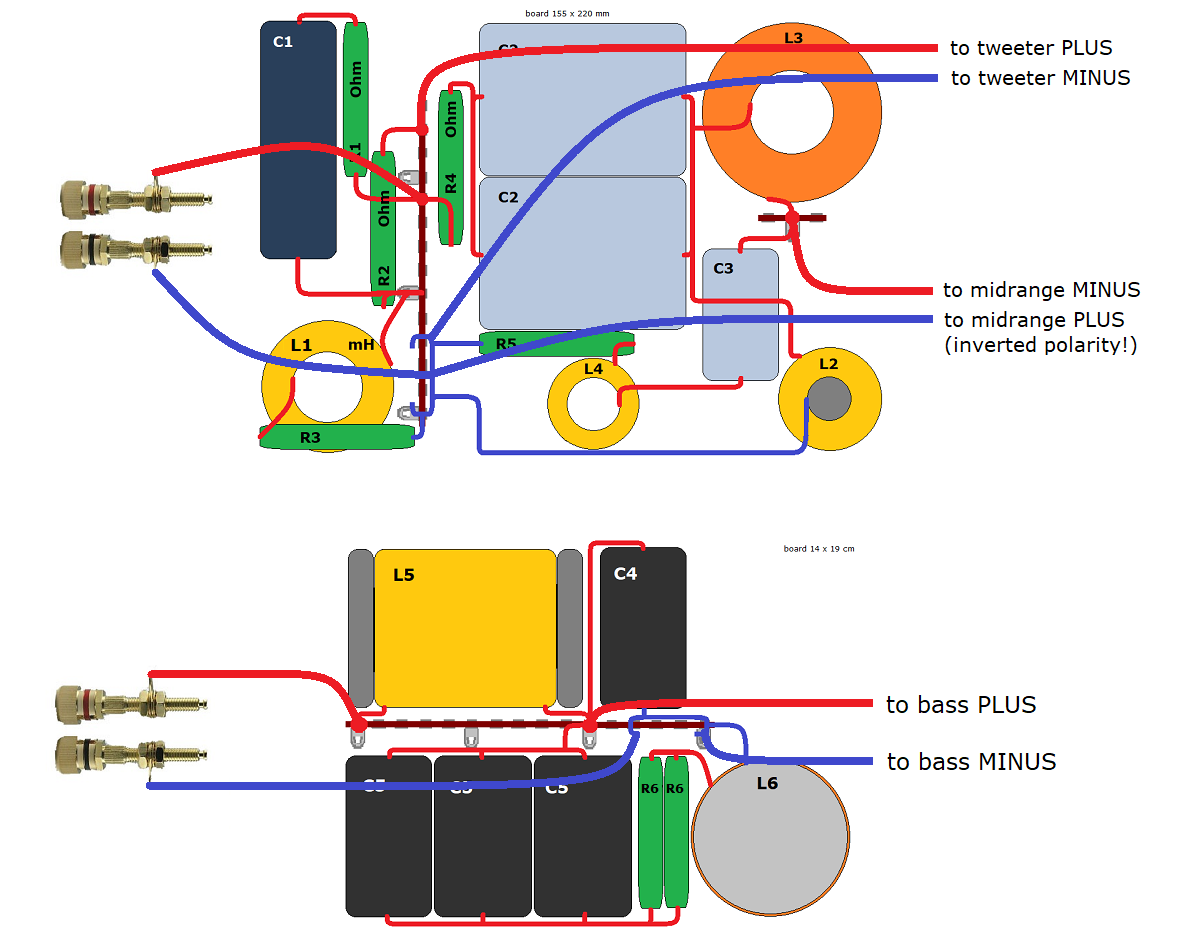
CROSSOVER-LAYOUT
BACK TO INDEX
Check this out before start making crossovers:
http://www.troelsgravesen.dk/tips.htm#CONSTRUCTION_OF_CROSSOVERS
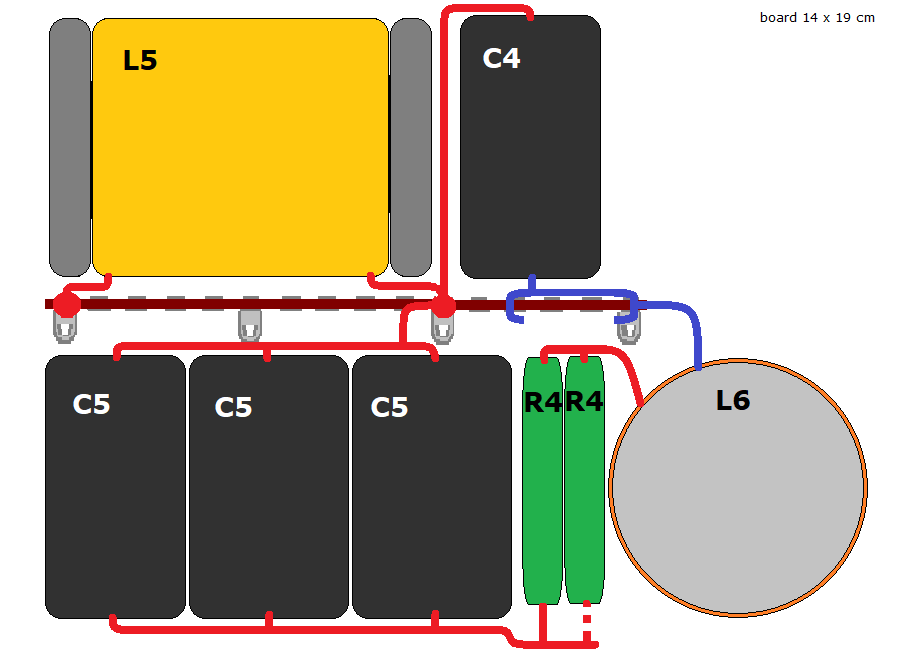
Bass crossover layout. Place board at bottom of cabinet.
Connect one or both of R4. Read below.
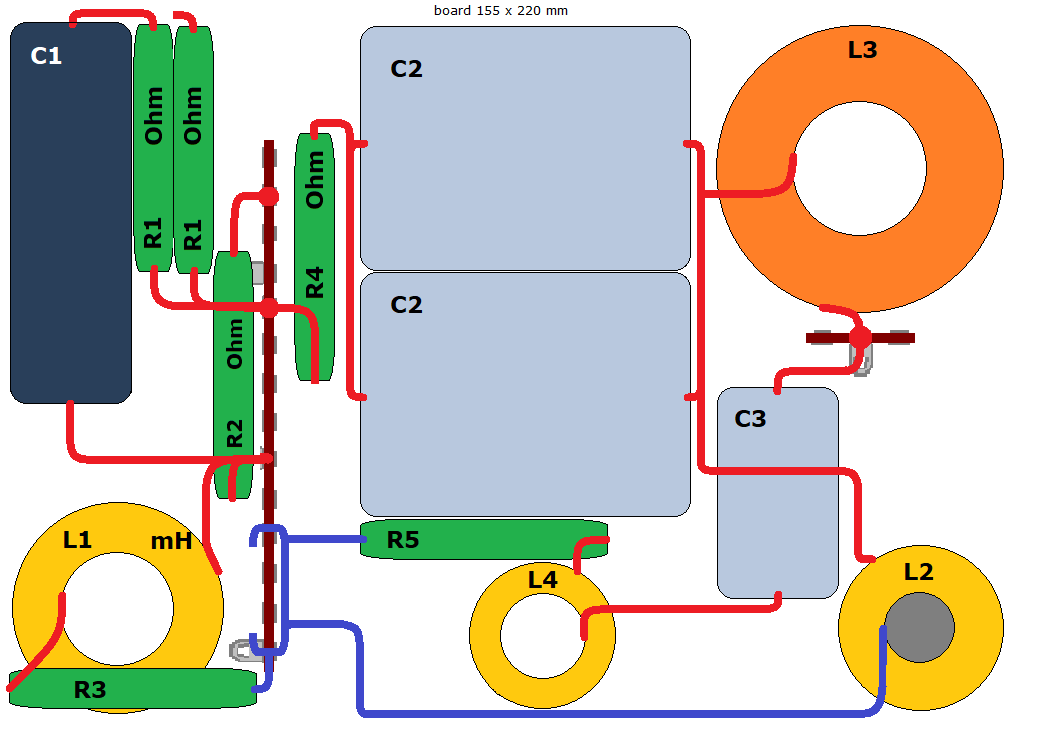
Mid-tweeter layout. Place on bottom panel as shown below.
Speaker wiring.
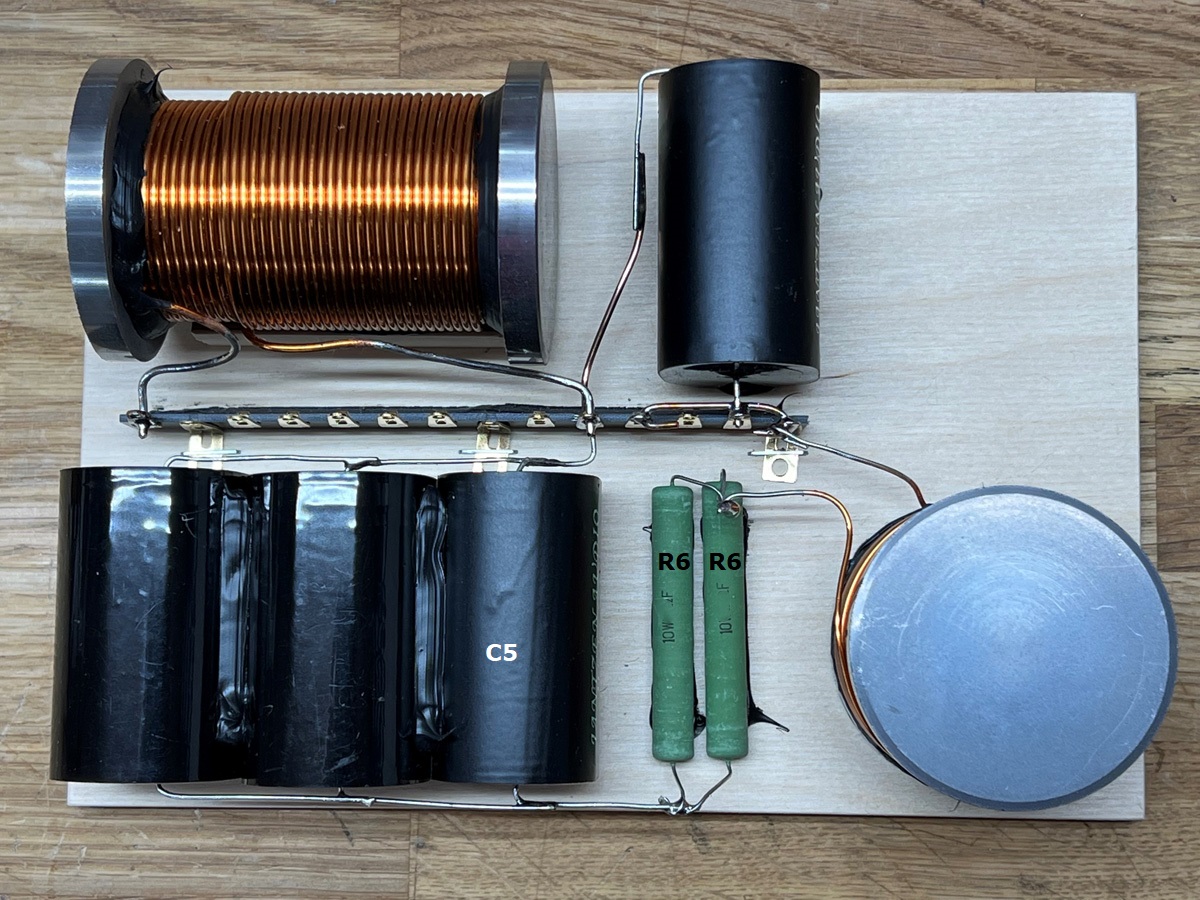
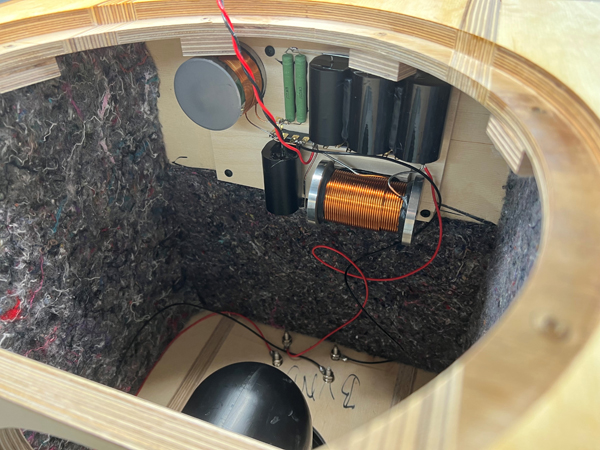
For the bass series coil we need low resistance, hence a cored 1.6 mm
wire coil making 0.2 Ohm resistance. An air-cored coil would be some 2
kgs of copper, cost a fortune and only reach ~0.6 Ohm resistance. Not good.
Securing cored coils, read
here.
The discerned reader will notice there is an impedance flattening circuit on the bass driver that was not there with the FUSION speaker. In my rather small workshop with speakers close to corners, this was an absolute necessity for the bass not to become too boomy. In my living room, where the speaker are out on the floor, not so much. Here I reduced the value to half and the bass became balanced. Thus, a speaker with passive room adaption. Corner placement: Connect both R6 resistors to C5. Out on the floor: Connect one of R6 to C5. For bass freaks and head-bangers: Disconnect R6 from C5.
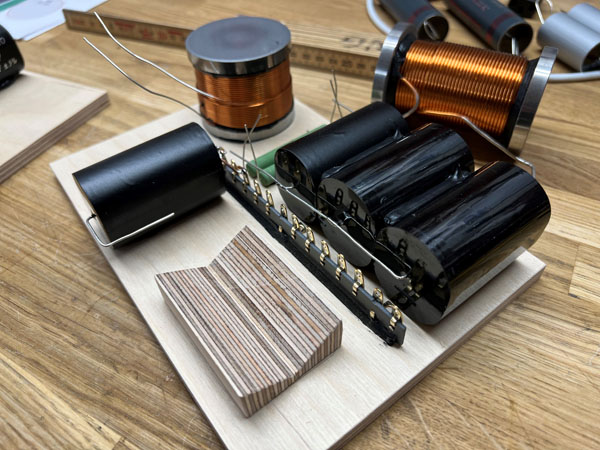
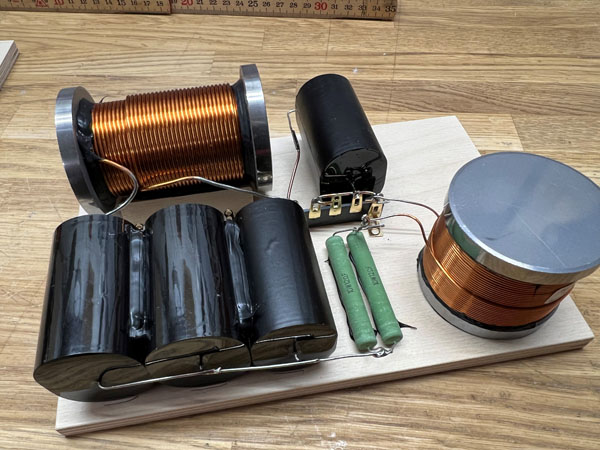
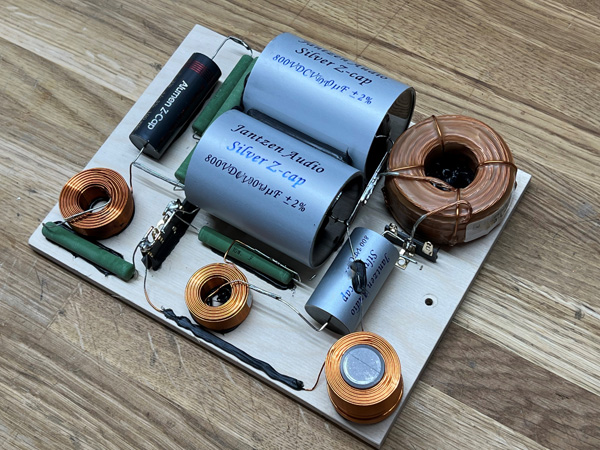
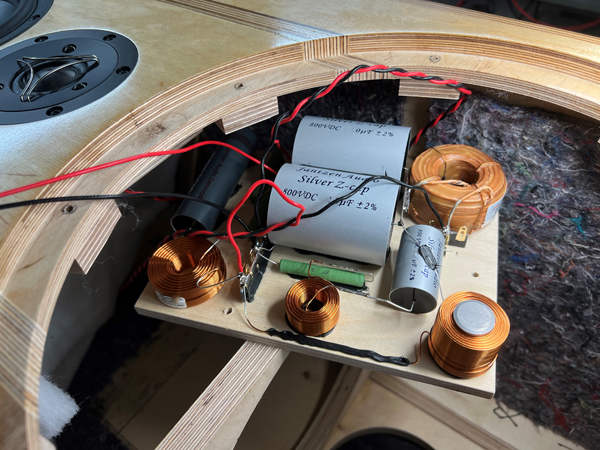
I made a cradle for the large coil as seen above.
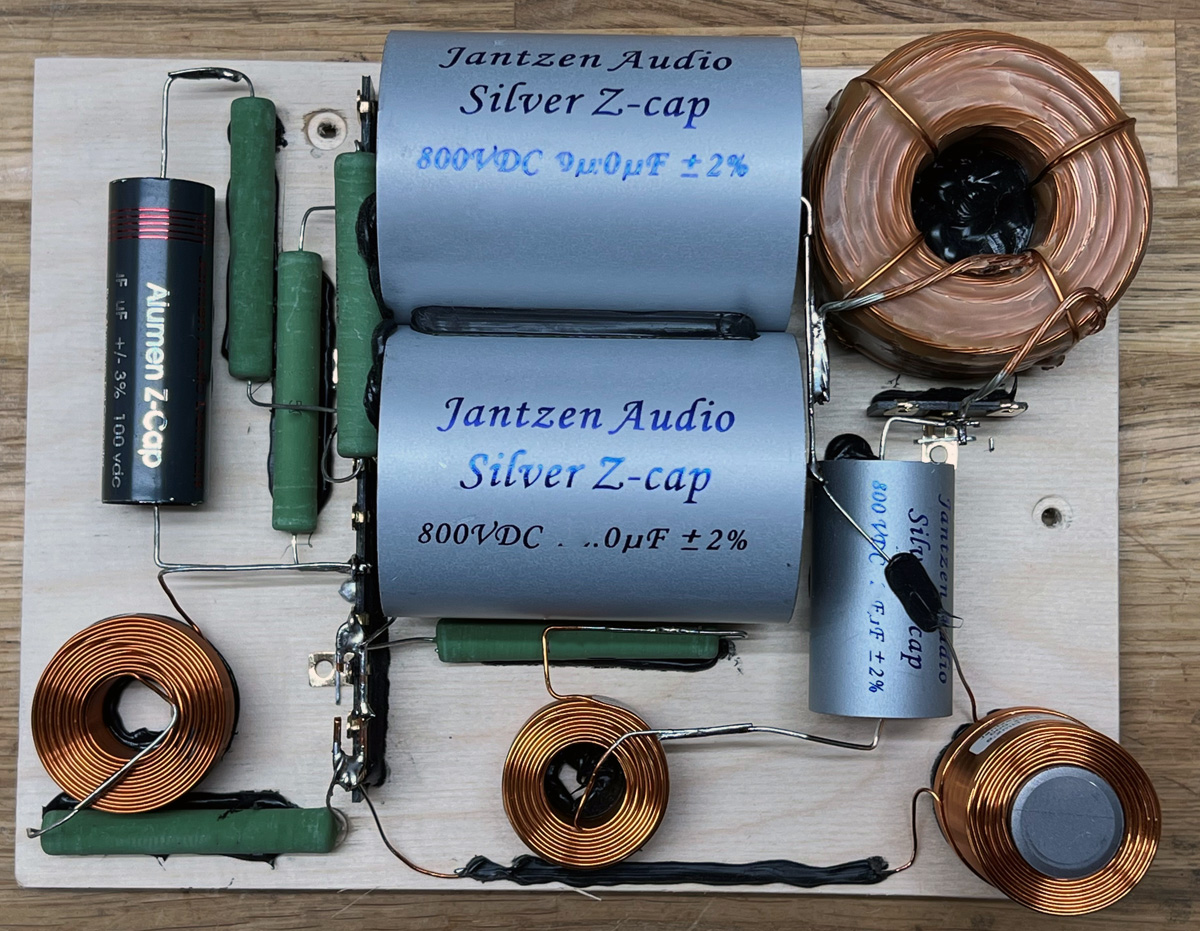
My prototype crossover is a little different from the layout because R4
came on later. There is always a bit of fine-tuning after some weeks of
listening.
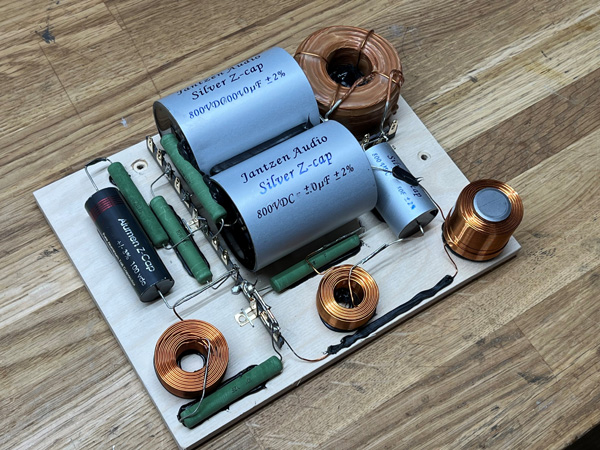
Just follow layout drawing above.
Unwind a little wire from L2 to reach ground connection.
Add a splash of Superfix to make sure wires do not buzz.
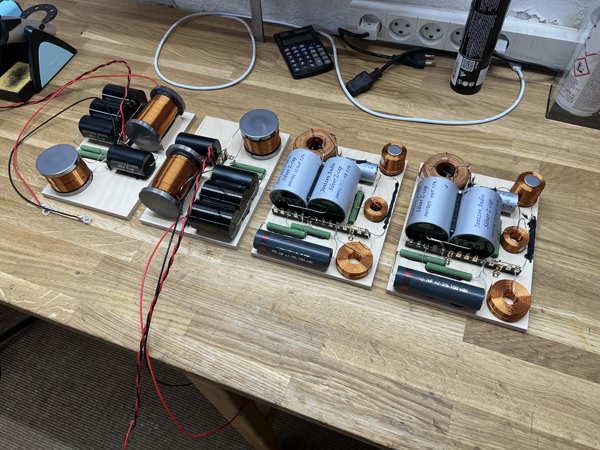
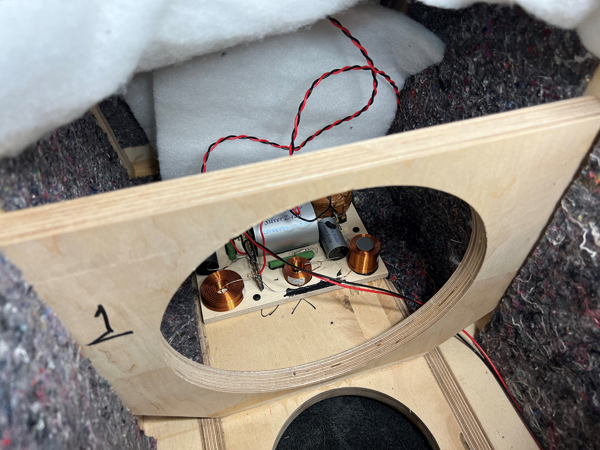
All crossovers ready for mounting.
In hindsight I would have placed both boards on the bottom panel. Simply because it is easier. There is plenty of room and it could look like this seen from above:
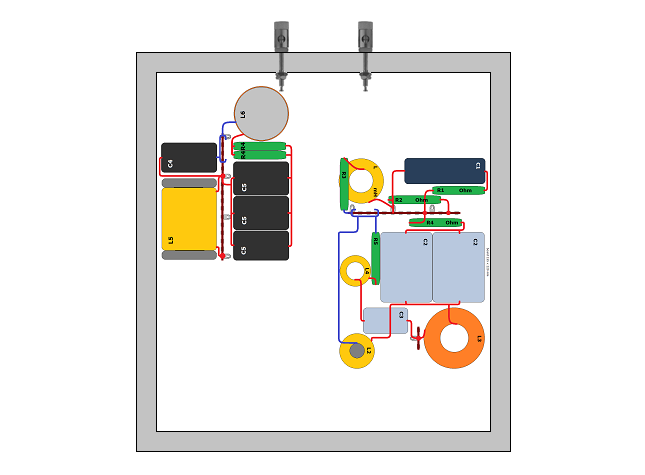
Place bass crossover as far back as possible and MT section in middle to
get L1 away from L6.
Omit felt on bottom panel and move to rear panel.