DIY Loudspeakers: HOME INDEX UPDATES RESPONSE WHAT'S NEW
FUSION-3WC
Copyright 2023 © Troels Gravesen
Go to on this page:
DRIVERS
CROSSOVER
CABINET
MEASUREMENTS IN-ROOM
MEASUREMENT
SPEAKER-KIT CROSSOVER LAYOUT SOUND BI-AMPING
This speaker is called FUSION-3WC as it incorporates drivers from three different manufacturers, BMS, ScanSpeak and SBAcoustics. What I didn't know at the time of planning, was the the new line of Hypex modules would also be called Fusion. So, FUSION-3WC it is. The speaker will come with three options, one with a fully passive crossover, the easy solution, and one with the Hypex PSC2.400d plate amp running the bass driver and passive crossover for mid-tweeter.
Over the years there have been suggestions for a larger classic 3-way
with a 12" bass driver. A serious powerful speaker that can both play
with high-end delicacy and throw a party should this be required. I know that
those who ask never build the speaker anyway, because it wasn't
exactly what they had in mind, but maybe some others
will.
Based on
first hand experience I picked some of the three best and most
cost-efficient
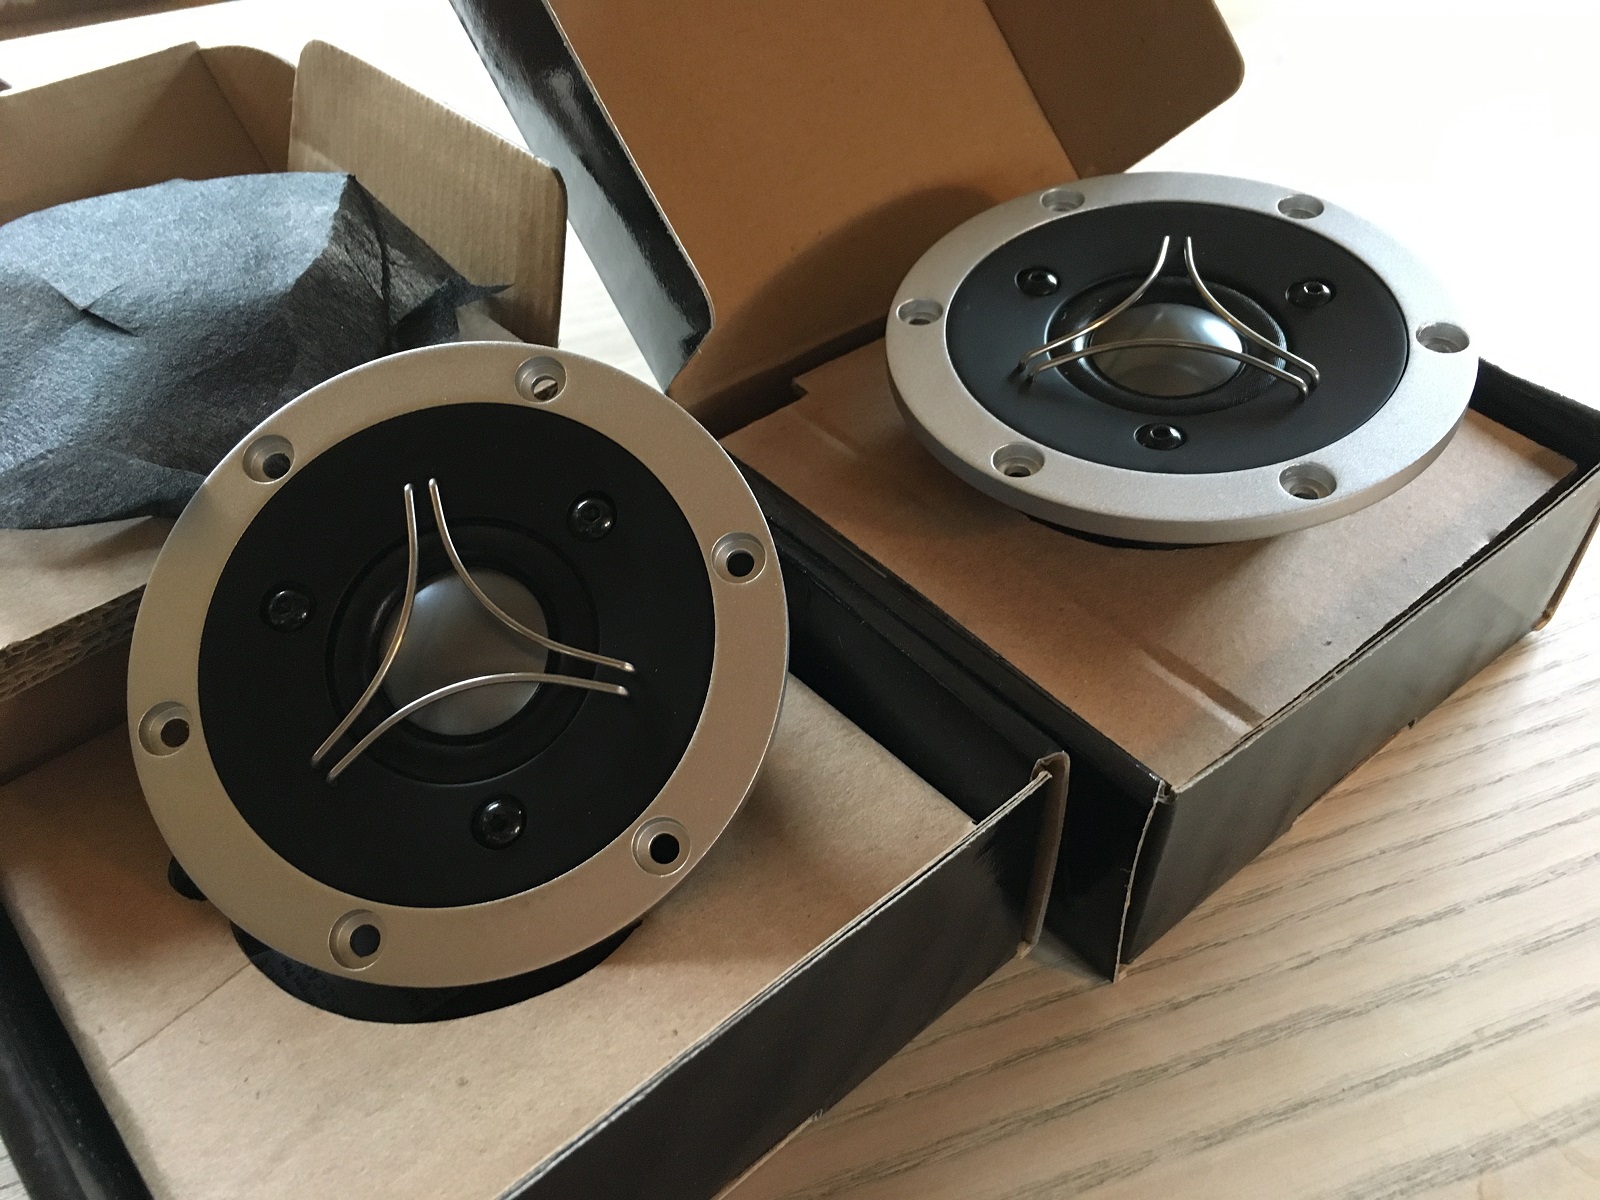
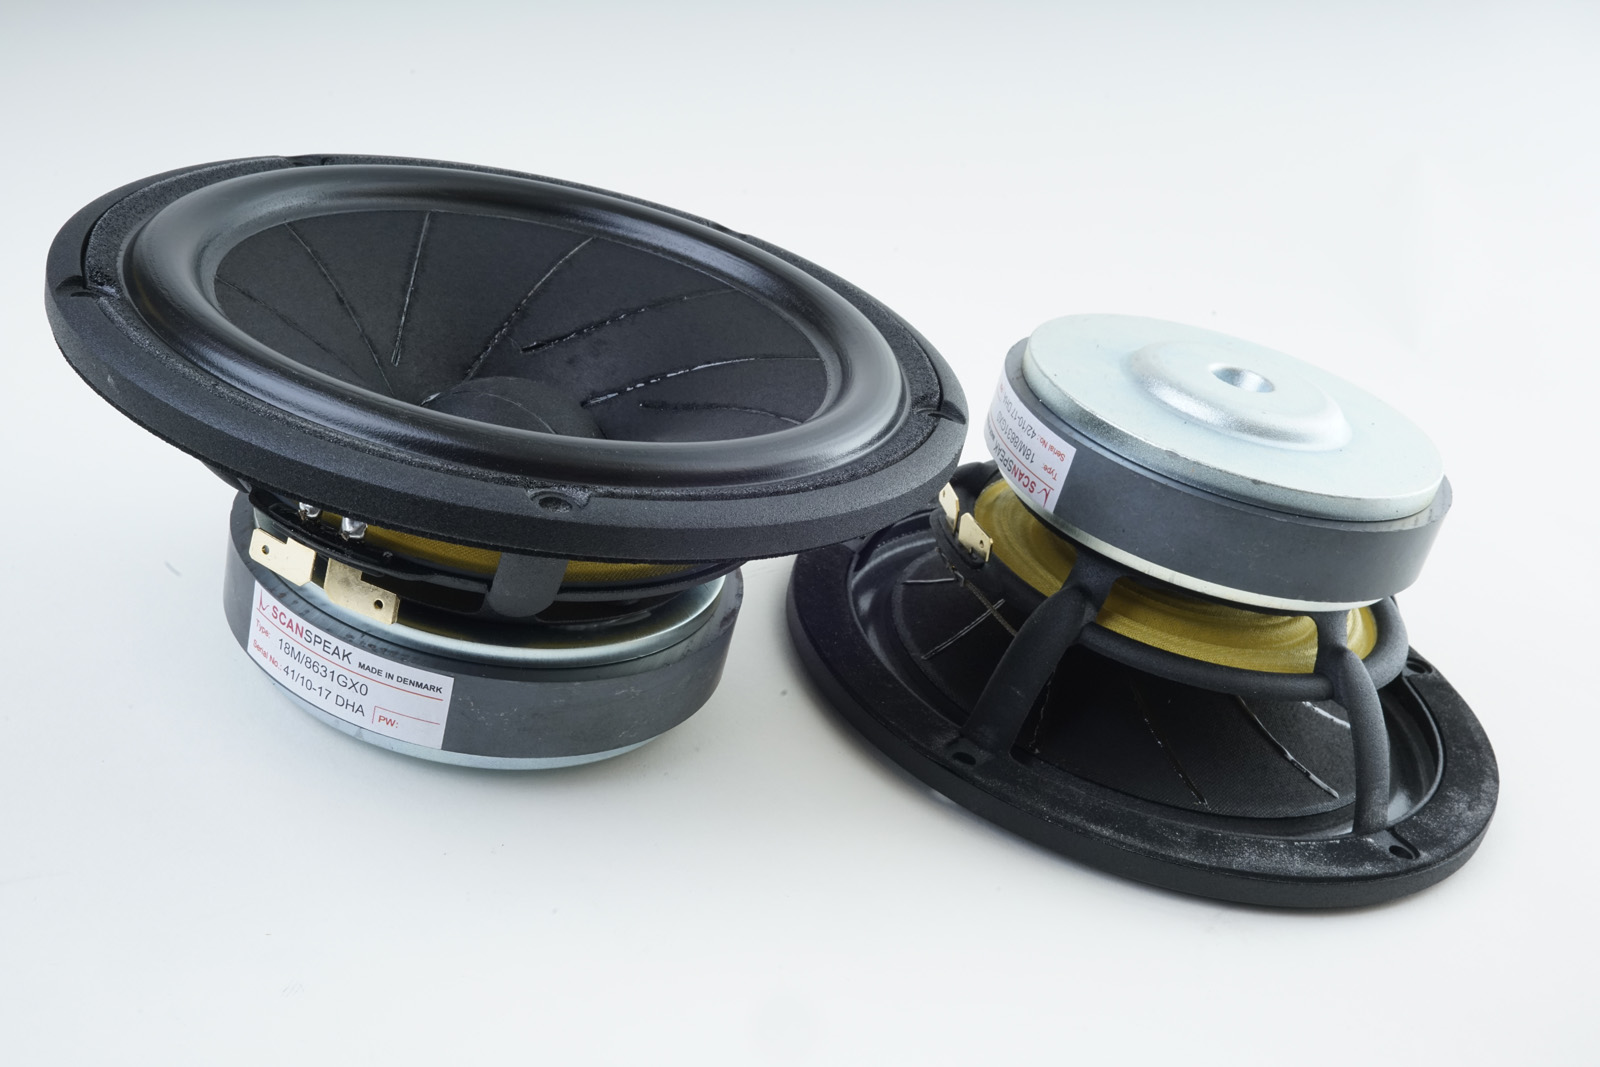
drivers I know of. The ScanSpeak 18M/8631T00 is to my ears one of the
best 6" midbass drivers around. And the midrange is very important. I
didn't want to compromise here and wanted a driver that can play
whatever we feed it. It's only up to our skills in crossover design that
sets the limits to what this driver can do. The same goes for the SBA
tweeter. Over the last year I've used this tweeter in a number of
applications and for the price of around 135 EUR it's unbeatable. You
won't find a fabric dome that does better.
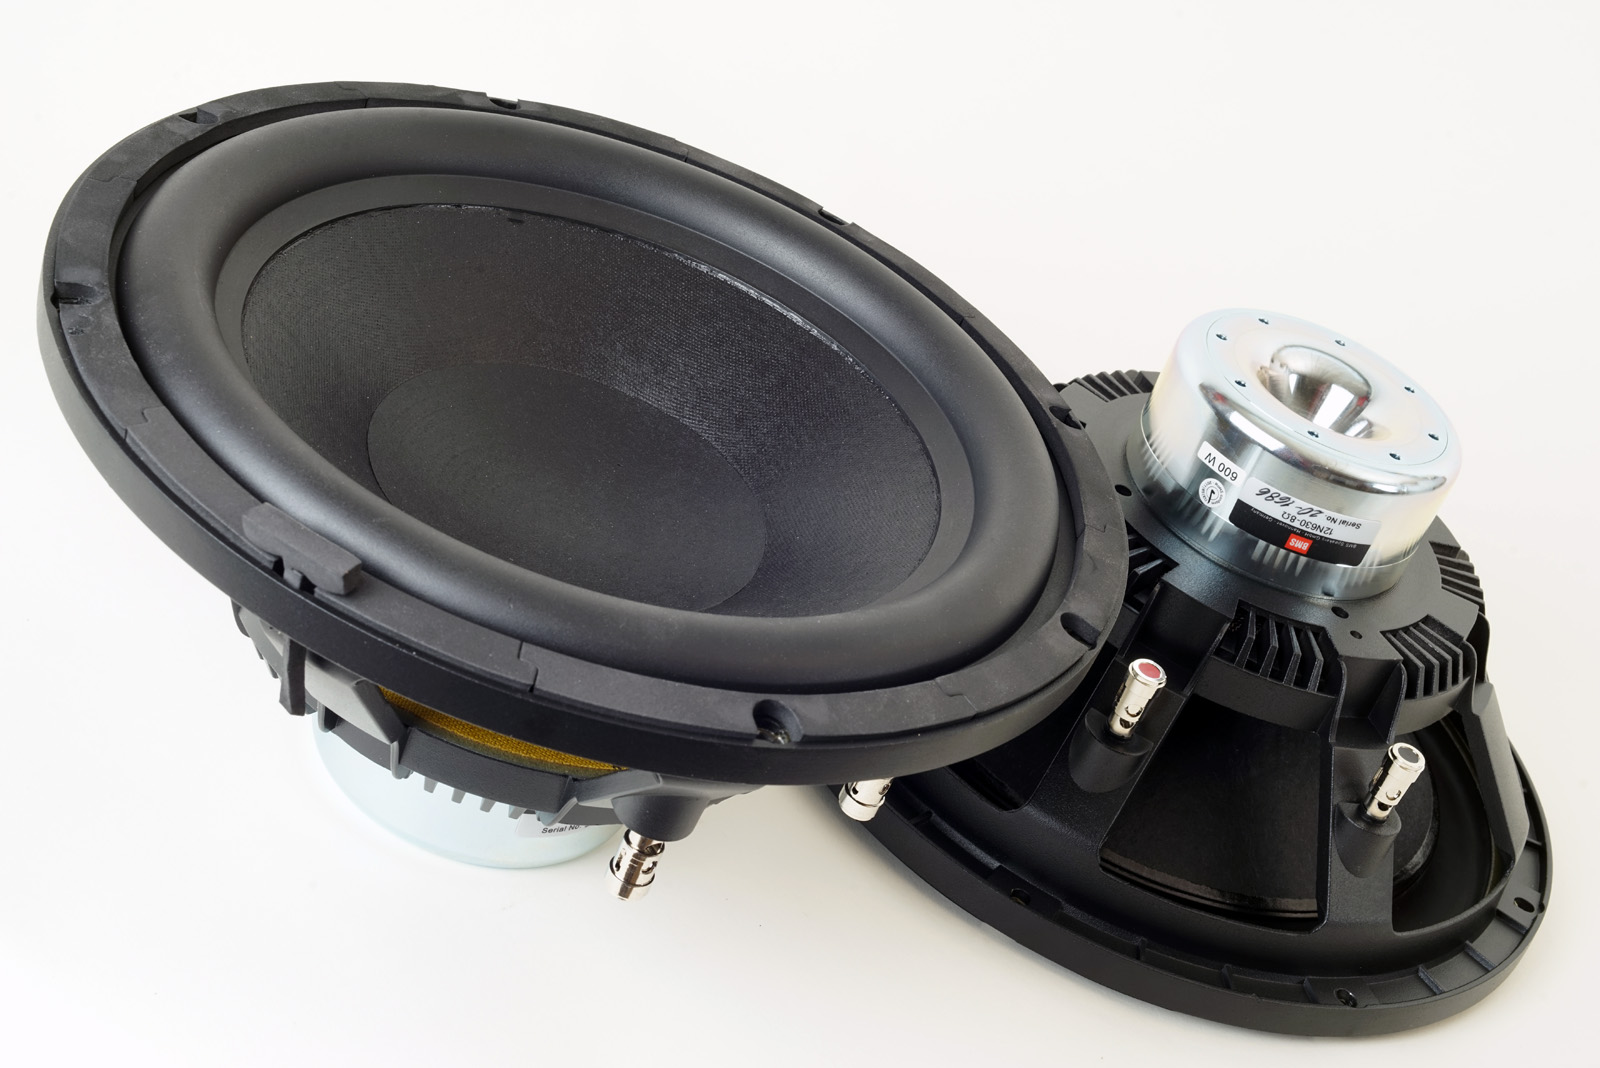
Most recent driver that impressed me in terms of performance and price
is the BMS 12N630 bass driver. This is an unusual driver from a PA
perspective. TS parameters provide an F3 = 35 Hz in a
55 litre cabinet and overall system sensitivity is still pretty high. We
can tune our system to around 89-90 dB/2.8V, 1 meter. This 12" bass
driver with its 3" voice coil takes some heavy beating and blends well
dynamically with the ScanSpeak midbass from a simple 2nd order filter. All
drivers for a pair of speaker will set you back some 1,200 EUR. A
bargain to my thinking.
Basics:
3-way speaker from 12" + 6" + 1" drivers.
System sensitivity: 89-90 dB/2.8V, 1 meter.
Impedance: 8 Ohms, minimum 5 Ohms @ 100 Hz.
Point of crossover: 200 and 2,000 Hz.
Power requirement: 25+ watts/channel. If Hypex version is used, the MT
section can be driven from 10-20 wpc.
Power handling:
A lot! Please
also read this:
http://www.troelsgravesen.dk/power-handling.htm,
and remember any burned driver is a misused driver. The bass driver is
rated at 600 watts and I guess your amp will blow up before the
speakers.
Useful links (Please
follow all links before e-mailing!):
http://www.troelsgravesen.dk/tips.htm
http://www.troelsgravesen.dk/tips.htm#CONSTRUCTION_OF_CROSSOVERS
http://www.troelsgravesen.dk/crossovers.htm
http://www.troelsgravesen.dk/LCR-RC.htm
http://www.troelsgravesen.dk/Inverted-Polarity.htm
http://www.troelsgravesen.dk/choices.htm
Also see FUSION-BAD, Hypex module for bass driver
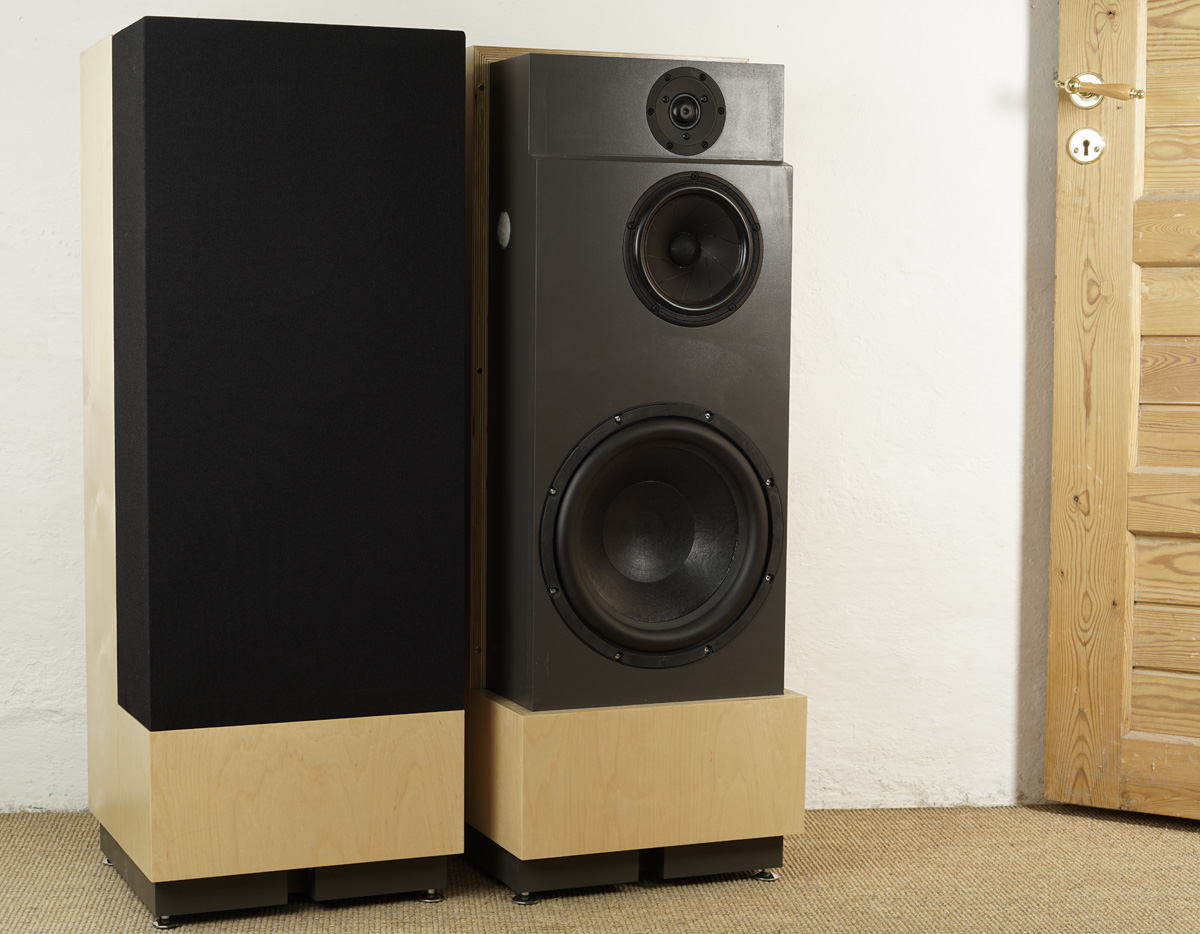
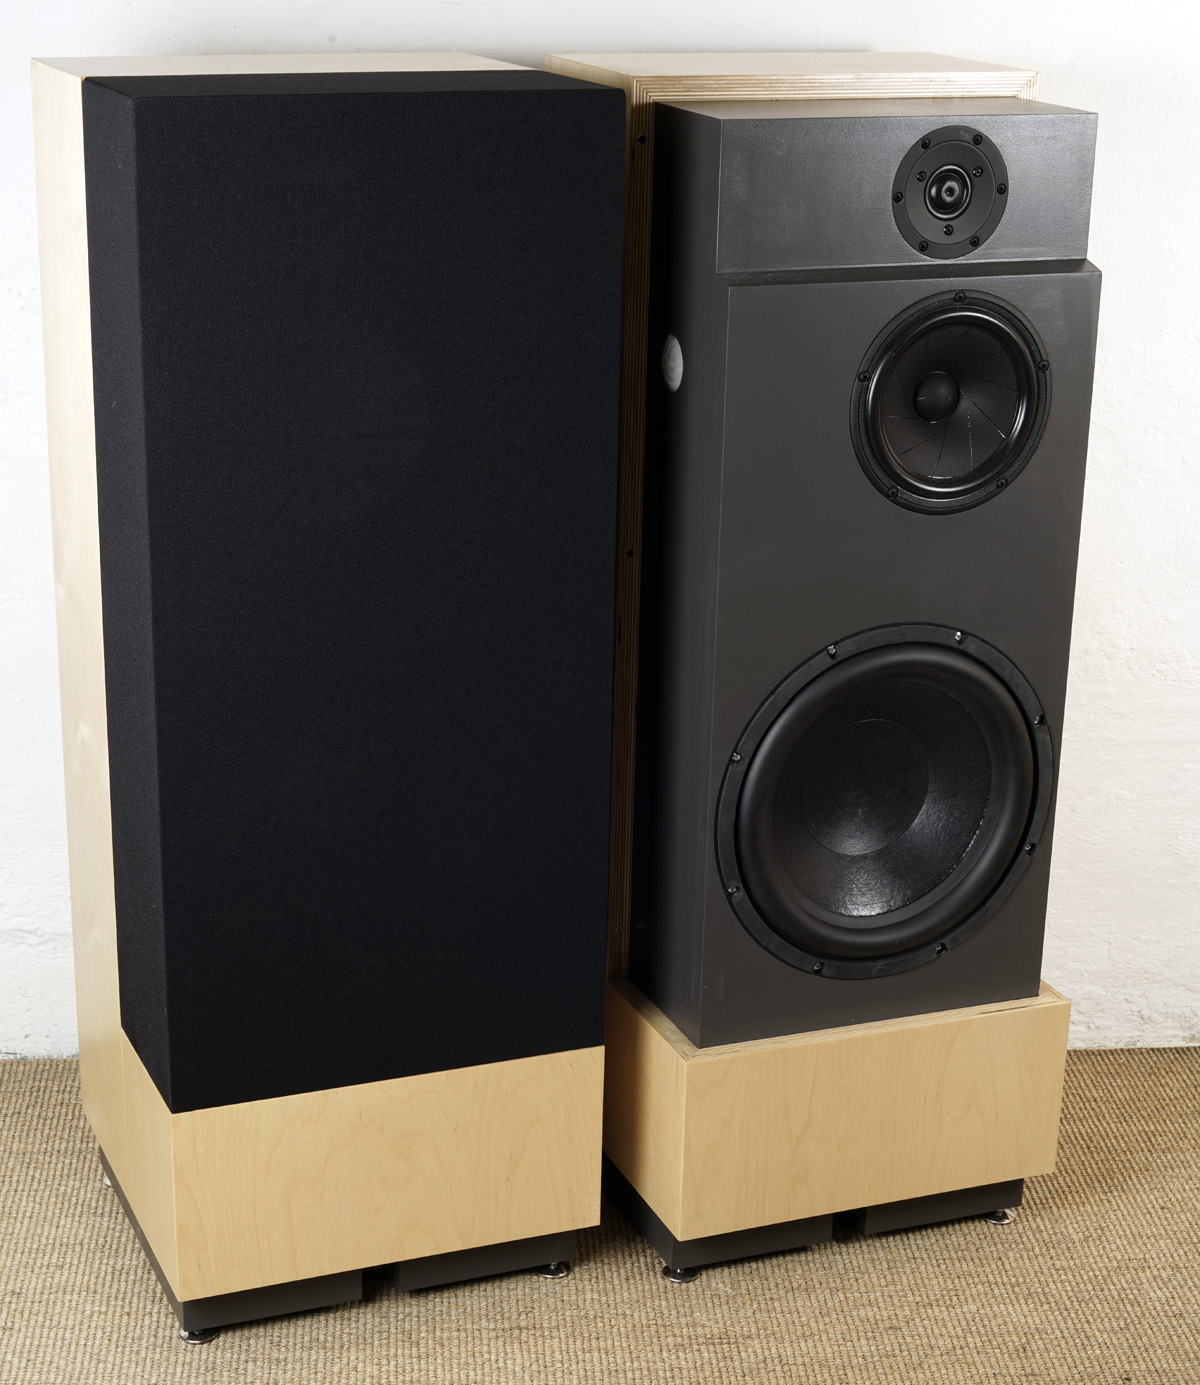
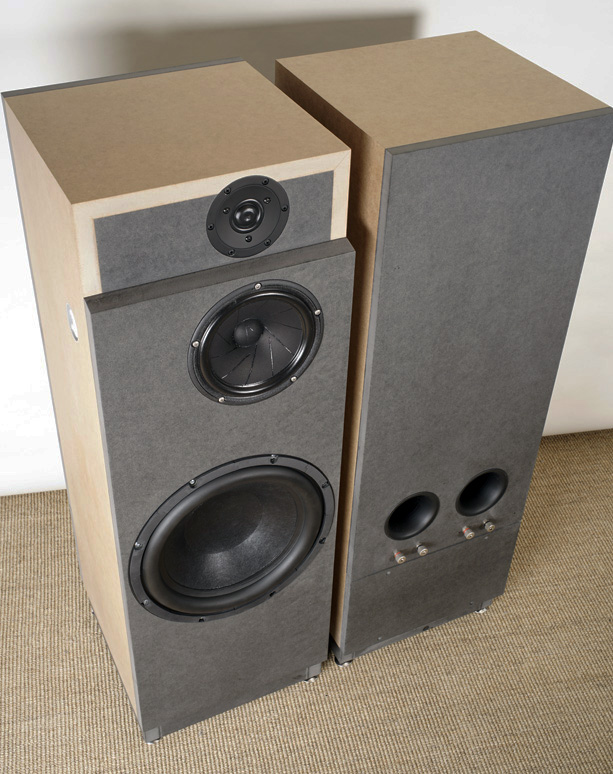
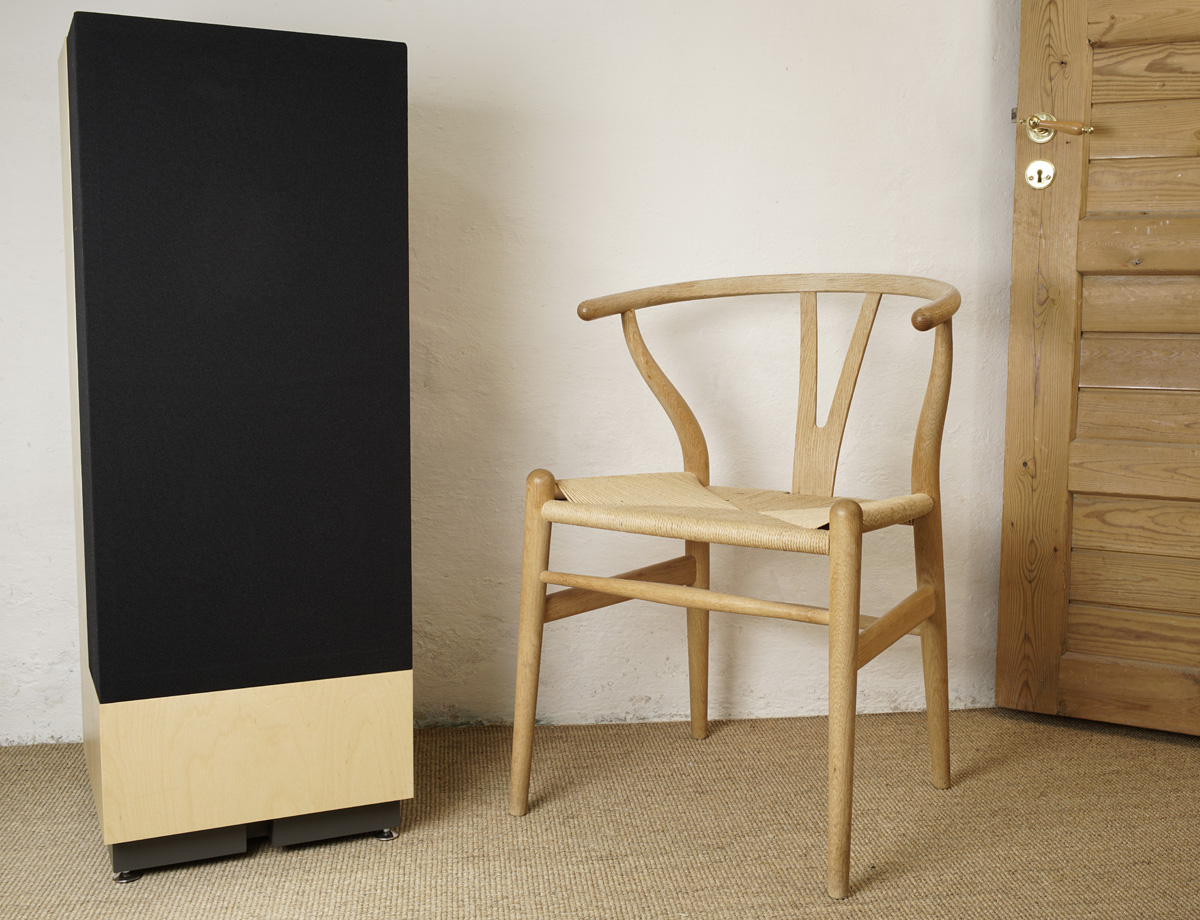
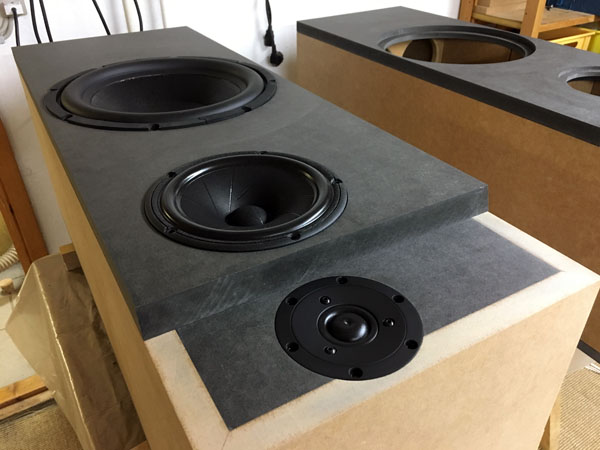
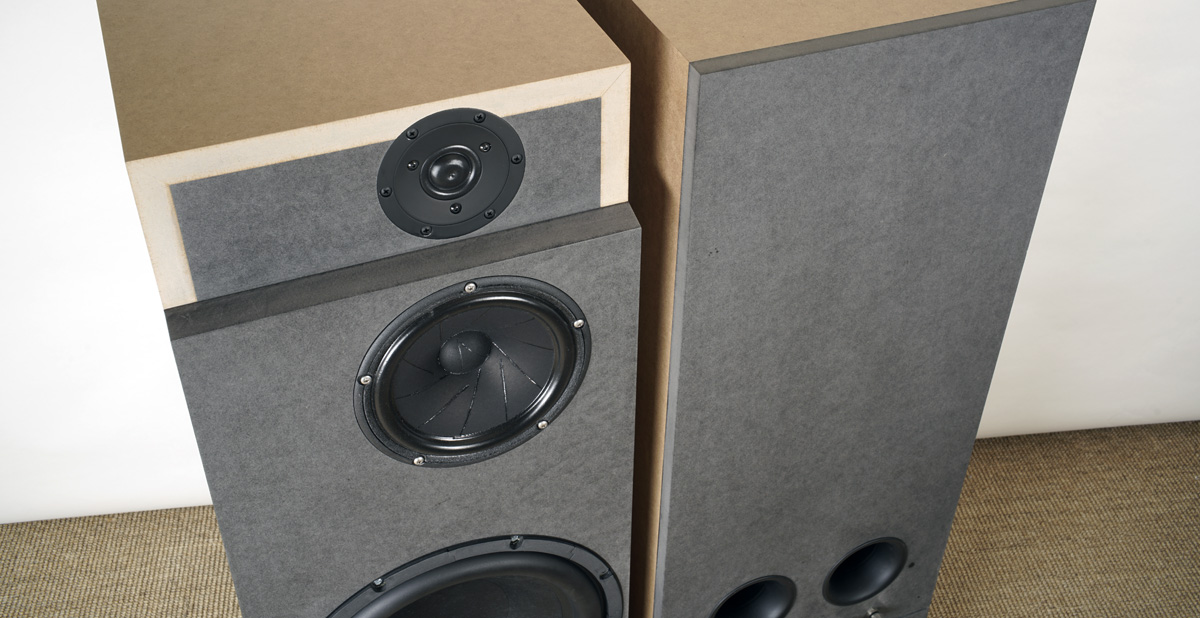
Above the speakers with their final finish. Fairly high-WAF, isn't it?
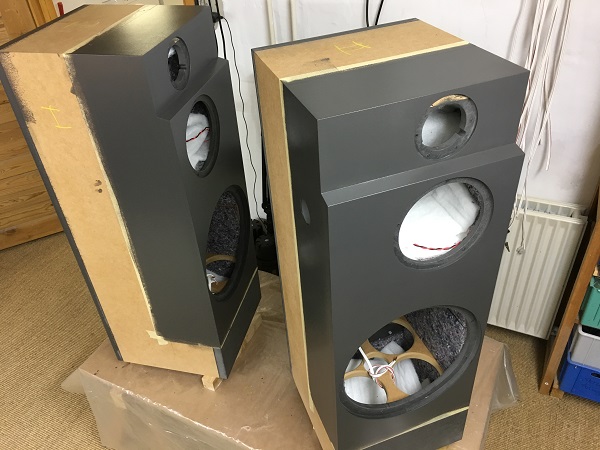
Below the raw MDF appearance. If you care more about sound
than appearance this is all you need.
If not, you may add jacaranda veneer, glossy Mercedes metallic paint or 24 karat gold leaf to your liking.
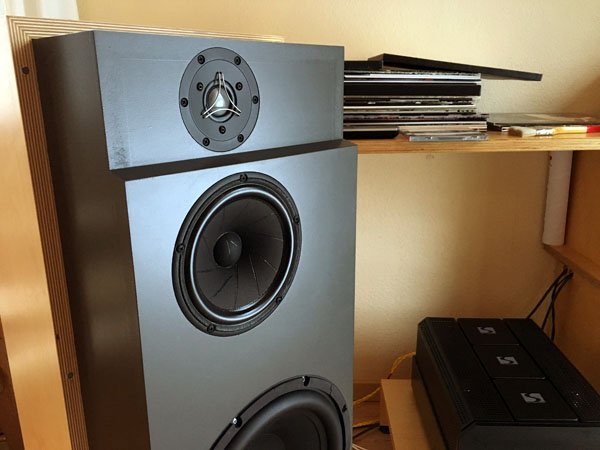
Above all you need if it has to be simple - and you could make nice
cabinets like Thibaud/Belgium
here.
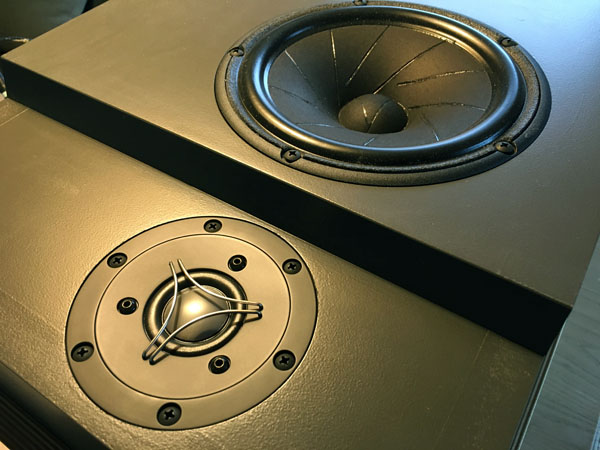
Beryllium version.
Click images to view large
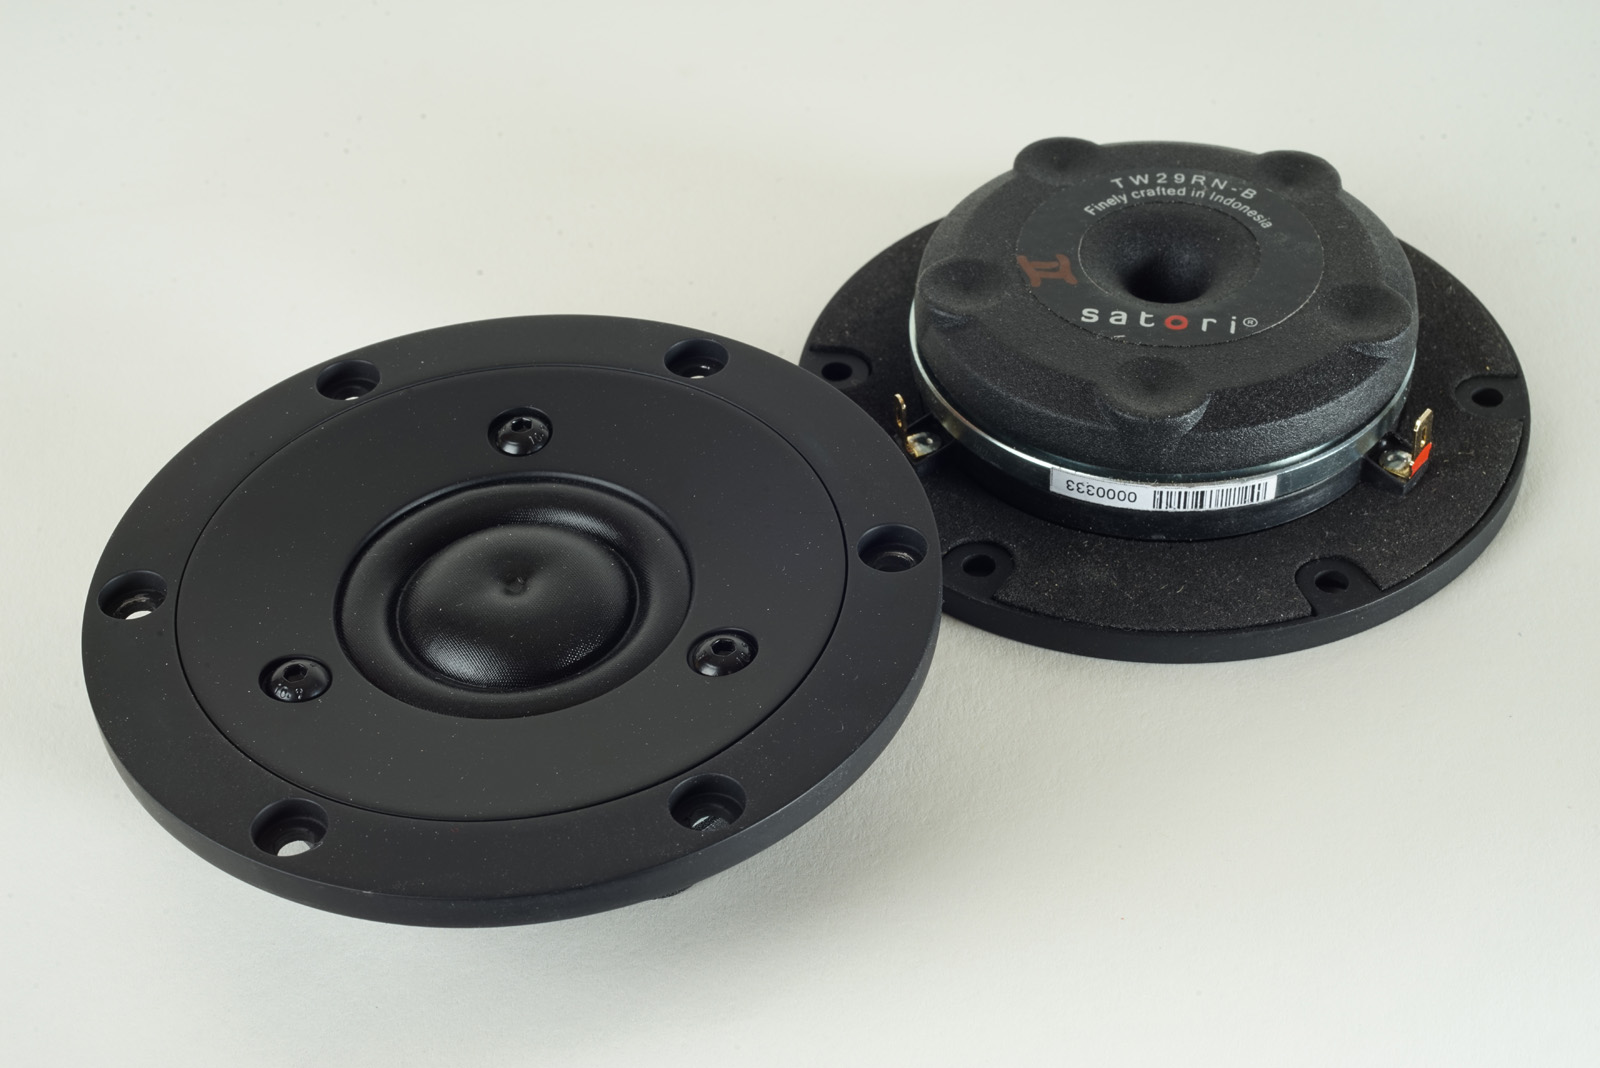
Download driver specs: BMS 12N630 (8 Ohm) ScanSpeak 18M/8631T00 SBAcoustics TW29RN SBAcoustics TW29BN-B
You can use the SBA TW29BN-B, 4 Ohm Beryllium dome tweeter if you want to. Ask Jantzen Audio for options.
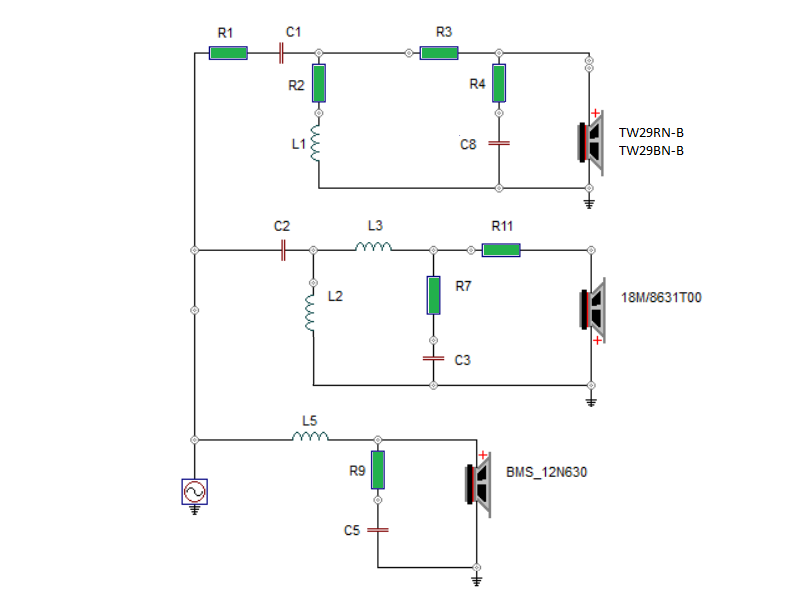
The crossover follows a simple LR2 topology. R4+C8 helps flatten tweeter
response above 10kHz.
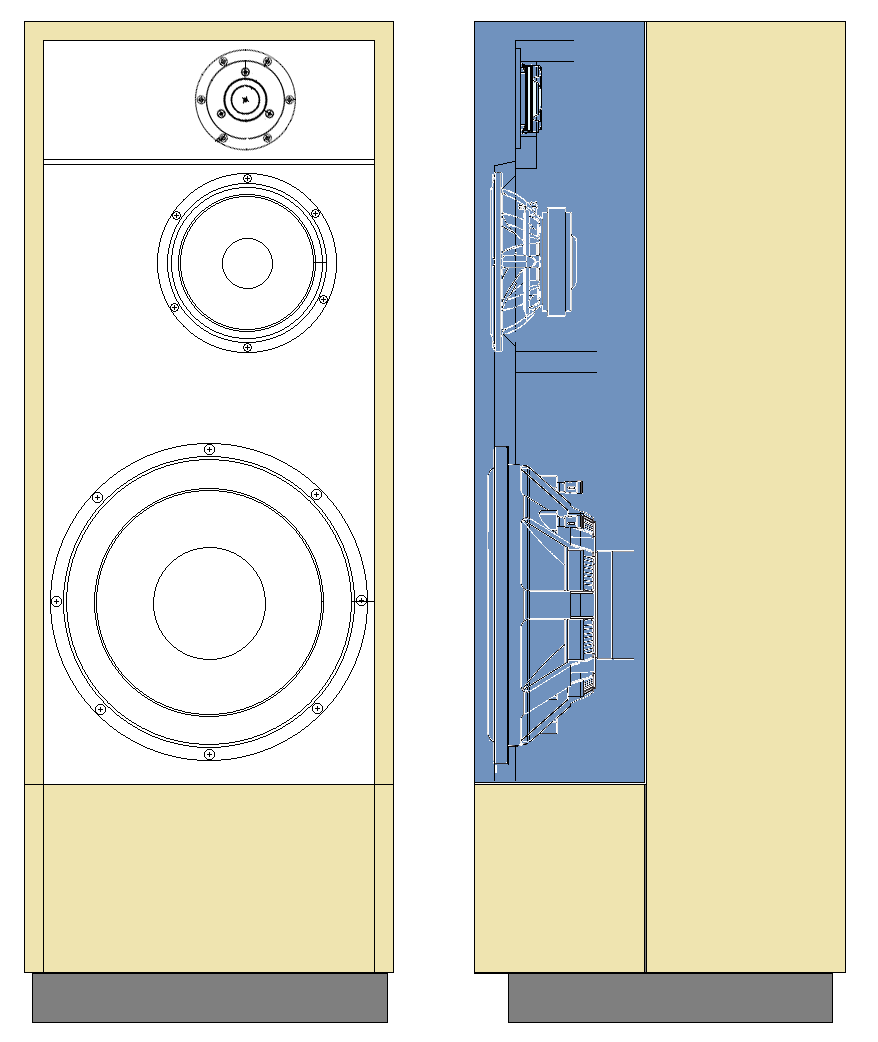
Click image to view large.
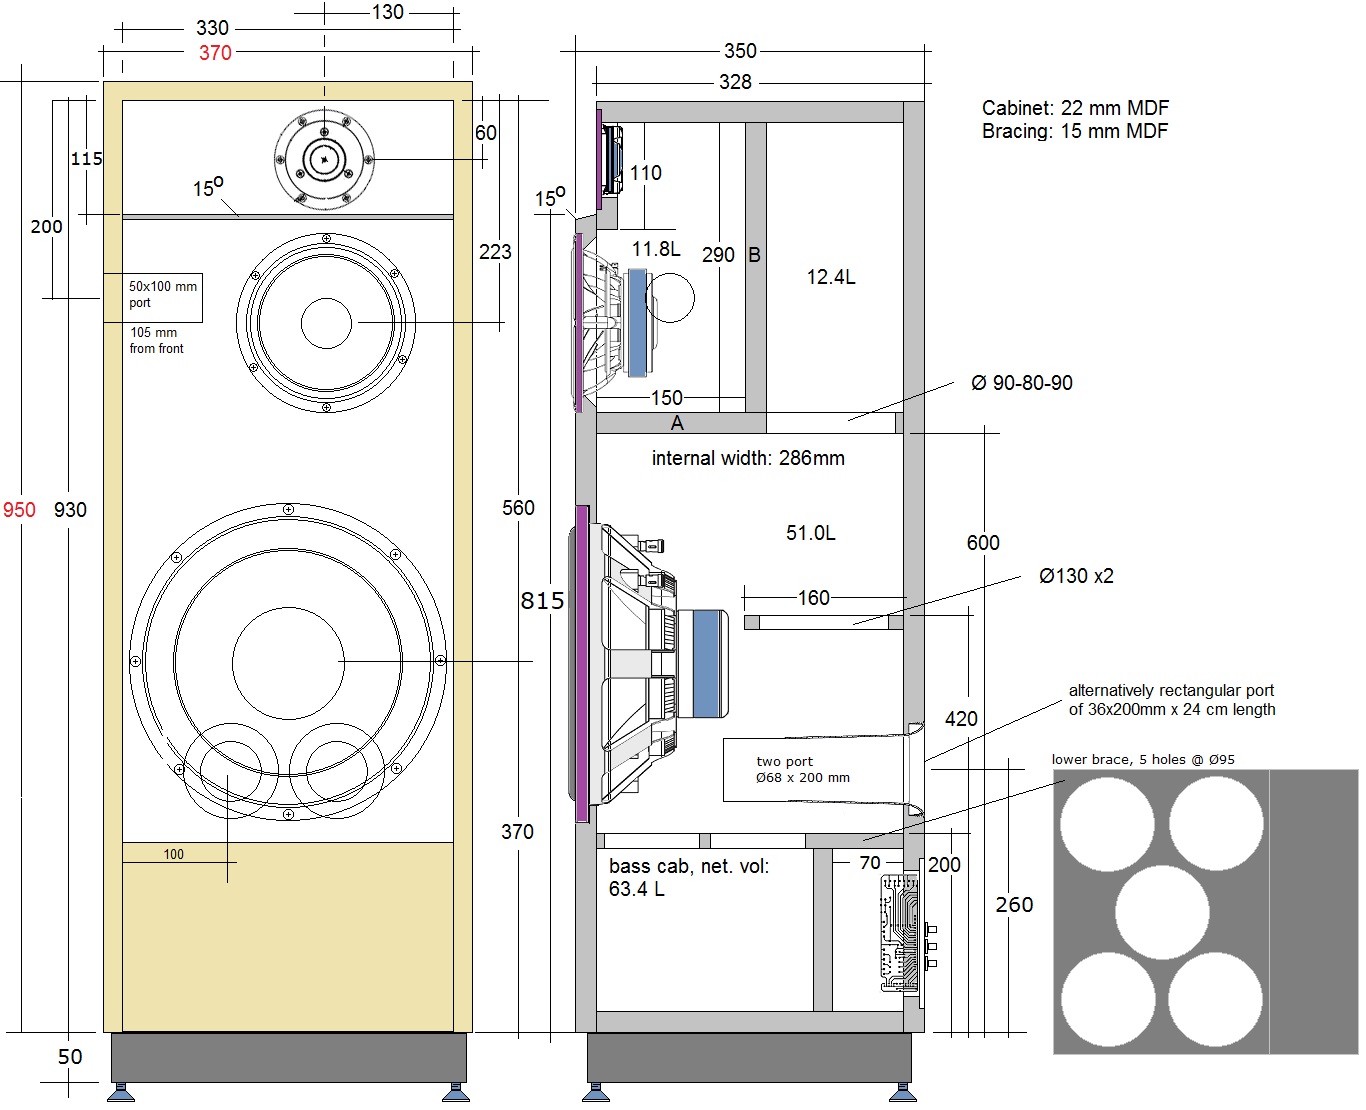
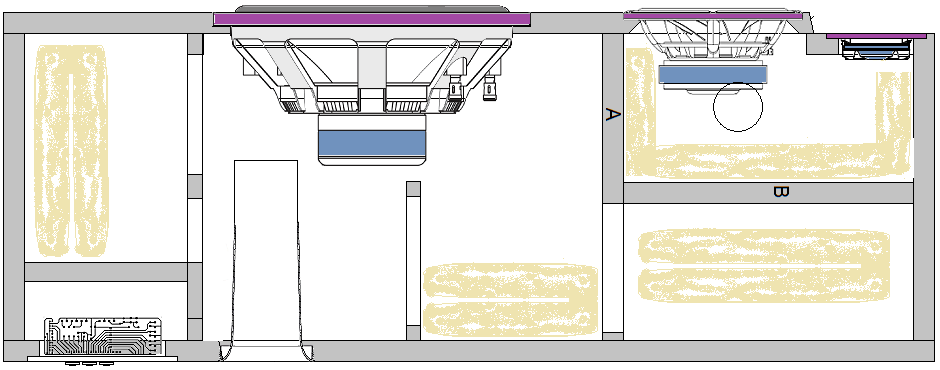
The light yellow parts is my 20 mm Baltic birch overcoat, meant to match the front grill. Obviously you can skip the extra layer of outer panels and front grill and go with the grey coloured sketch to the right, but this is also meant to be a high-WAF construction - and the outer shell does ad significantly to the overall rigidity and weight of the entire construction. If the outer shell is preferred you can use 19-20 mm for the side and top panels and 22-25 mm for rear and front panels. You don't need to adjust depth to meet target volume. +/- a couple of litres for the bass won't change performance.
As always: Any change to front panel design and drivers' placement and you need a new crossover and I can't help. Please read carefully before asking: http://www.troelsgravesen.dk/crossovers.htm
Ready made cabinets available from EBEL Holztechnik, Germany:
https://www.ebelholztechnik.de/galerien/index.php/category/376-fusion
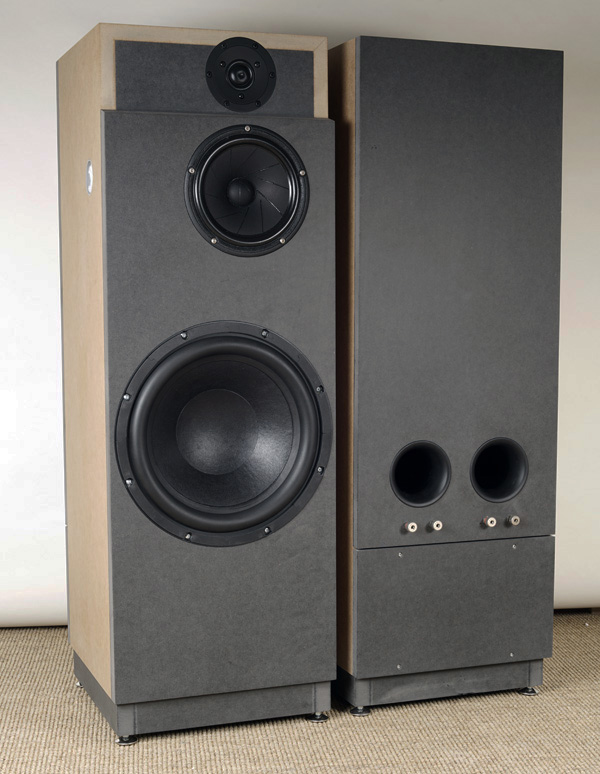
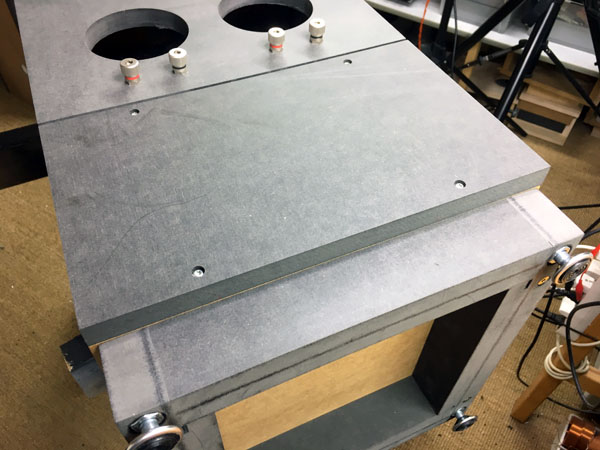
Here you see the outer panels. Click image to view large.
I made the side panels 200 mm deep and the bottom front panel 190 mm
height.
Otherwise no dimensions given as this can be made to your liking.
The design is highly inspired by my MUN-17 construction. Go to
page to see how it looks.
BASS PERFORMANCE
Let's look at the bass driver and see what level of sensitivity we can expect from the BMS 12N630 driver. Now, the specs promise rather optimistically 96 dB sensitivity, and maybe we can find some peak in the overall frequency response that would reach 96 dB, but certainly not in the bass region from real-world cabinets and real-world in-room placements. The excellent ScanSpeak EXCEL sheet tells another story:

Above we see the calculated response from a 37 cm wide baffle placed
in a anechoic room.
If we had the driver on an infinite baffle in an anechoic room we get this:
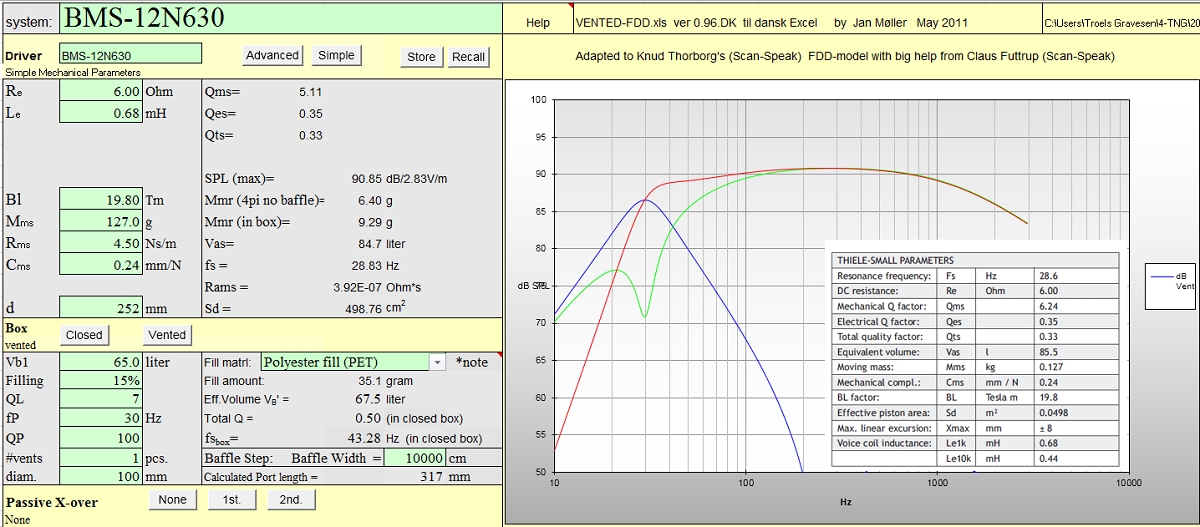
What we find is some 90-91 dB sensitivity based on the TS data. This is
more like it.
But we do not have the driver on an infinite baffle, nor in an anechoic room, rather the driver facing some boundaries like the floor, the front wall and side walls of our listening room, and the next figure tells a possible scenario:
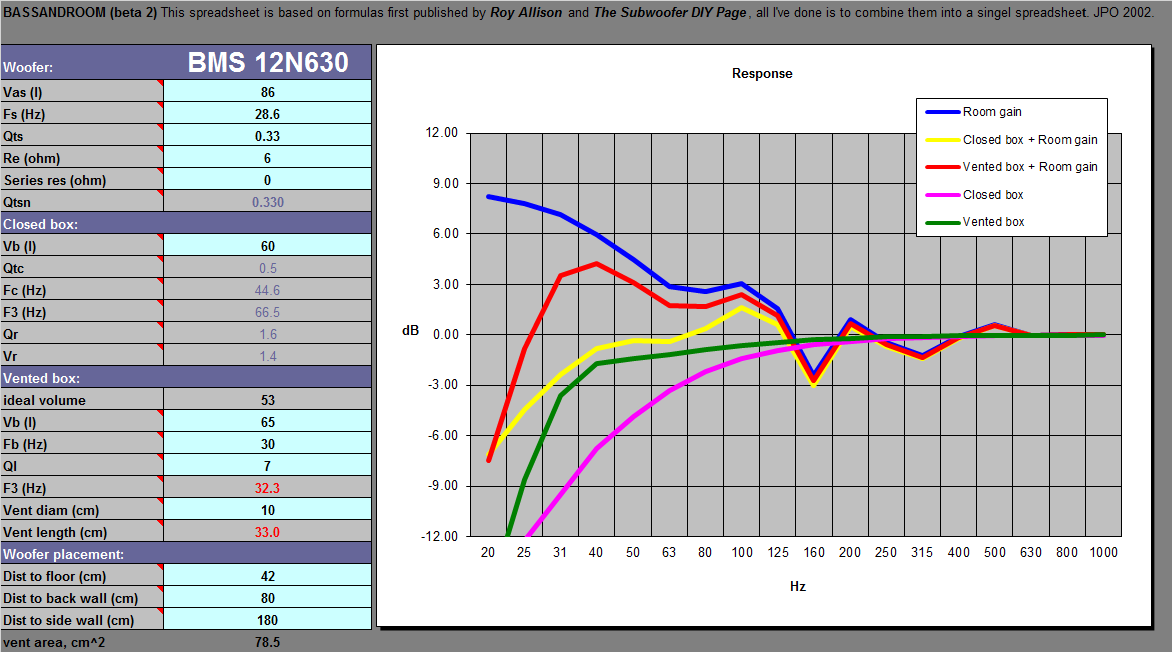
Excel sheet including room gain, and from e.g. 42 cm to the floor and 80
cm to front wall and 180 cm to side walls (my room) we have some 3 dB
room-gain in the bass region. Add some 3 dB to the first simulation
graph and we're likely to manage a system sensitivity around 89
dB/2.8V/1 meter. Designing a speaker system always includes the
choice of likely room placement.
If you build the Hypex variant, you have the option of adjusting the
bass performance better to your room depending on room dimensions and
speaker placement. With the fully passive version we have to live with
the choices made and move around the speaker for optimal
performance. Luckily this usually goes well, but there are cases where
people have to live with some terrible room acoustics and never hear
what the speaker can really do. Mails tell me "I have to much bass" or
"I have too little bass" and only advise I can give is move the speakers
around and hear what happens. "Yes, but the speakers must
be in this place" (WAF!). Sorry, new "W" - DSP - or live with it.
What happens if we place the speaker up against the front wall? (the sheet calls the front wall the back wall, matter of definition, but this is the wall behind the speaker).
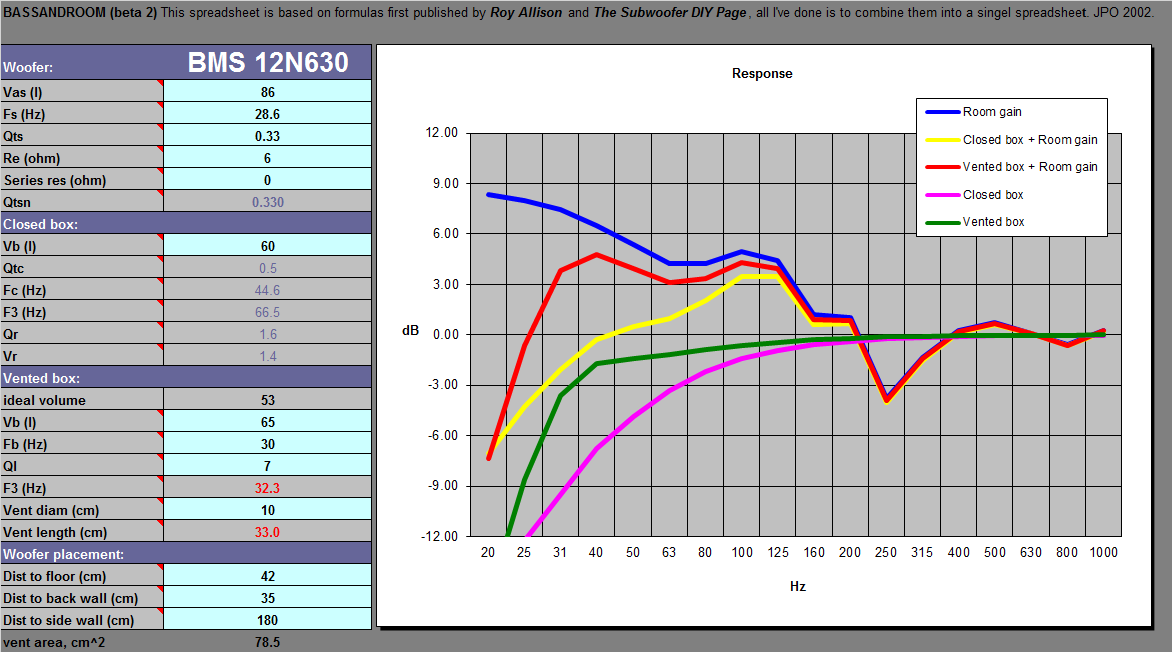
- we have some extra room-gain, like 4 dB all the way up to 150 Hz. Not
too different from out on the floor.
You can download the EXCEL file
here and try it out yourself and insert your likely
distances to nearby surfaces.
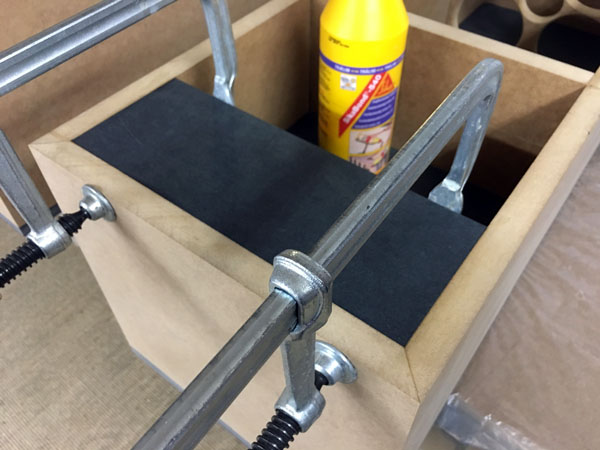
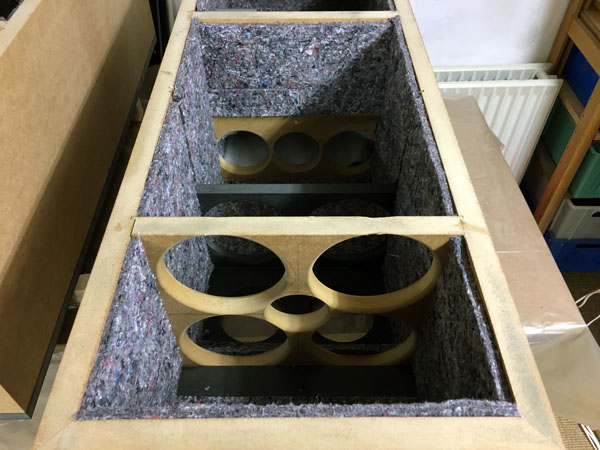
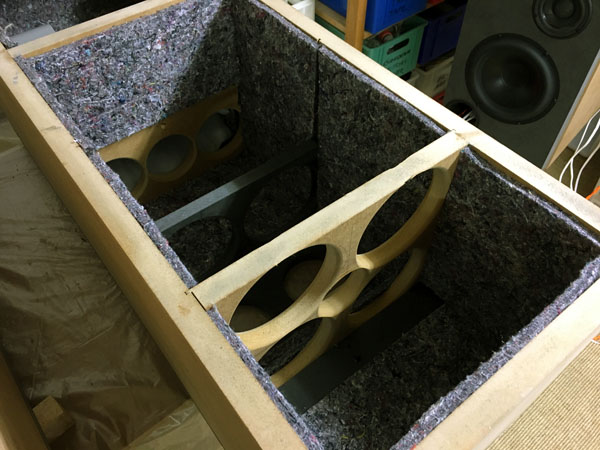
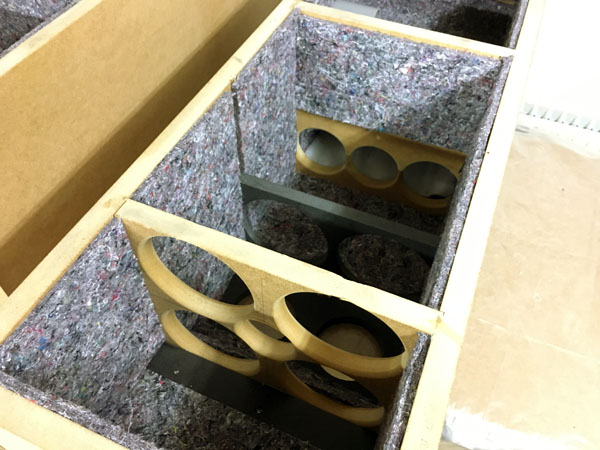
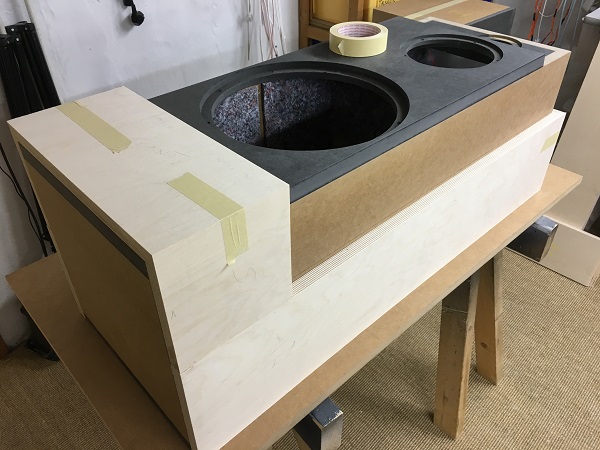
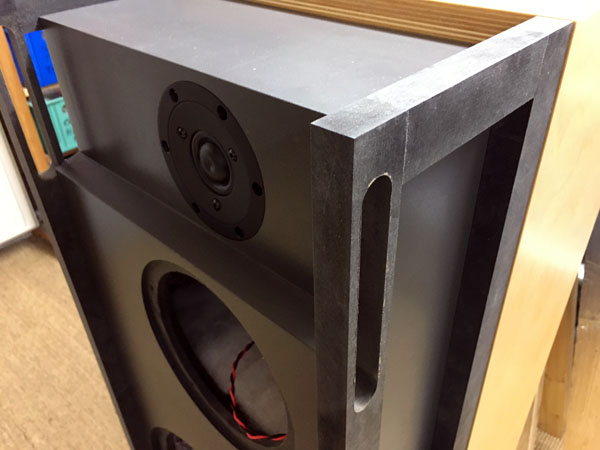
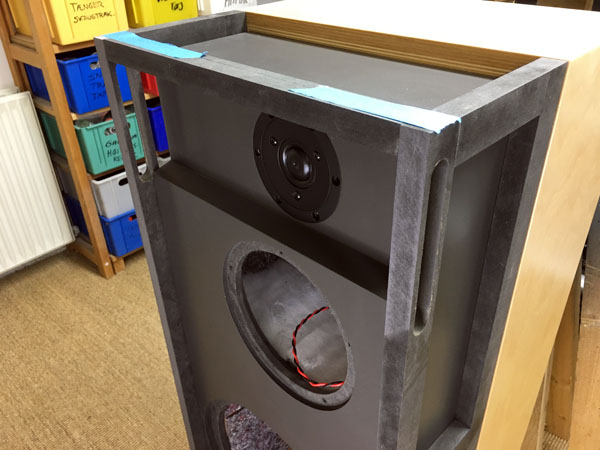
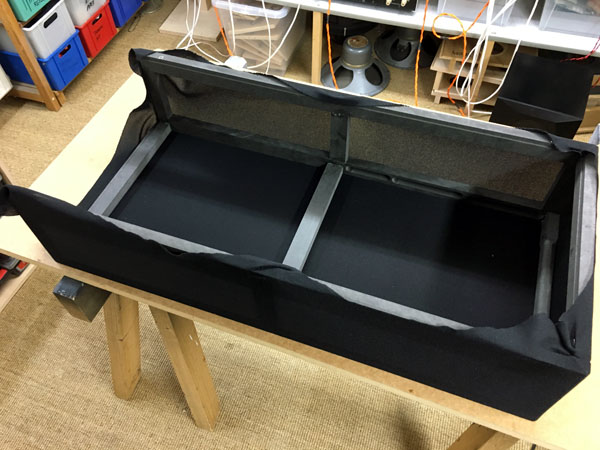
Workshop images
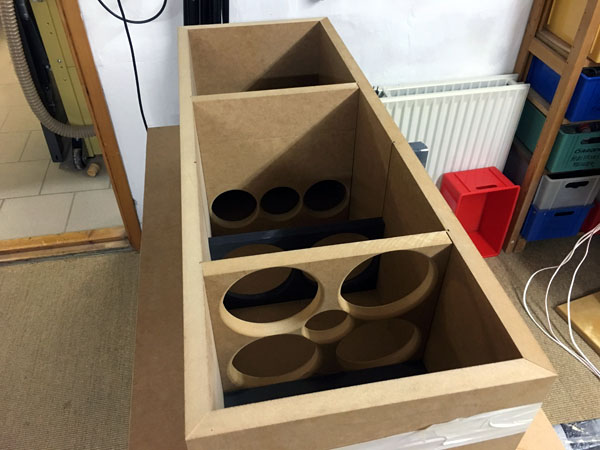
Test assembly.
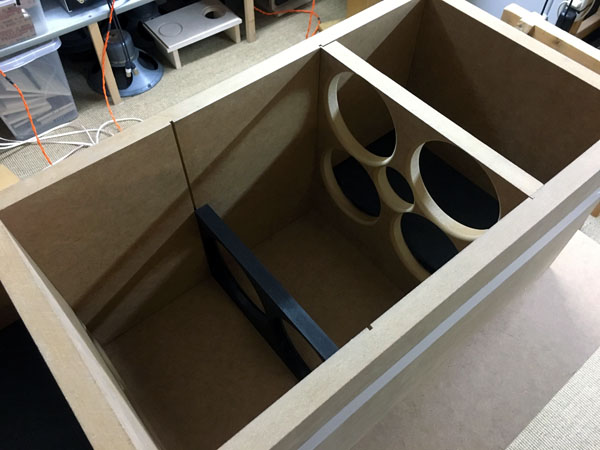
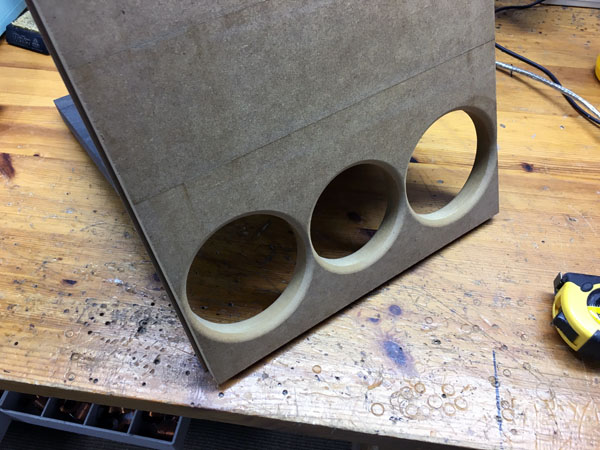
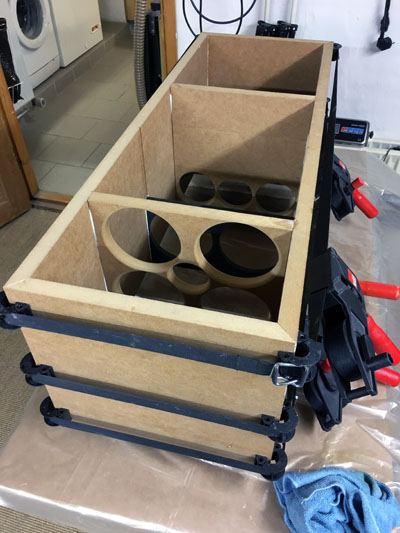

To make room for the Hypex module I had to do a bit of routing on side
panels.
Do this before assembly! Much easier.
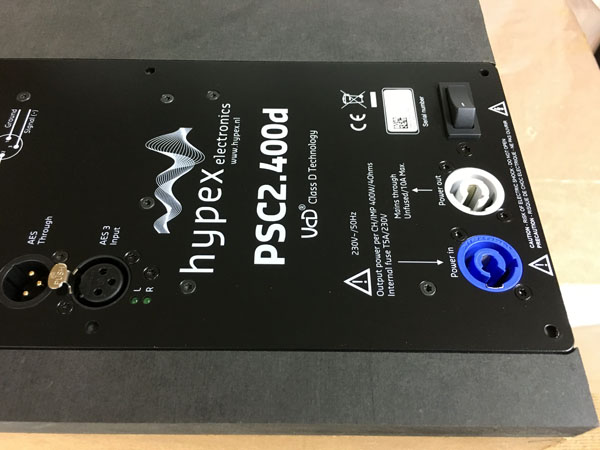
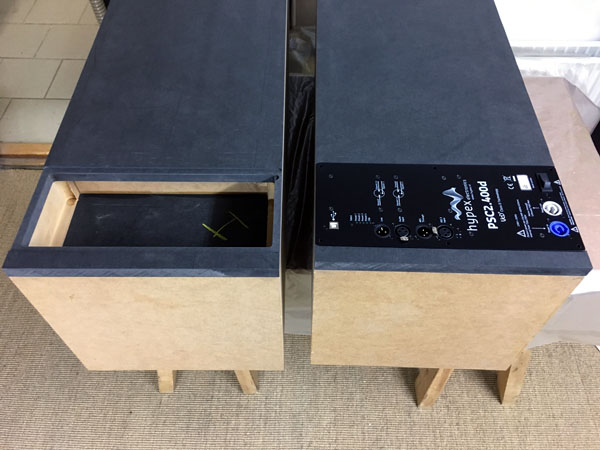
The Hypex PSC2.400d fits exactly the width of the basic cabinet, 330 mm.
The suggested FA251 has 280 mm height. An easier match. Read
FUSION-BAD.
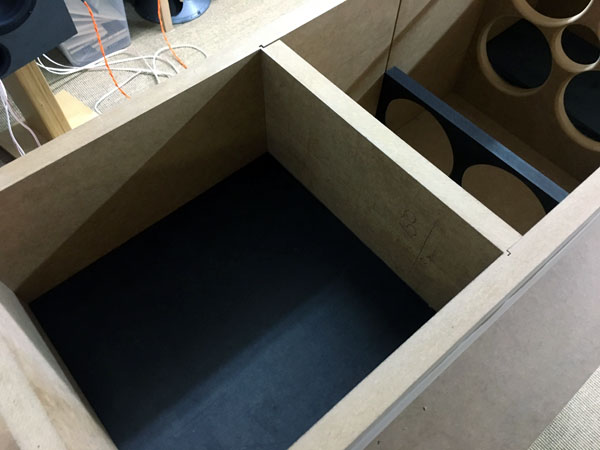
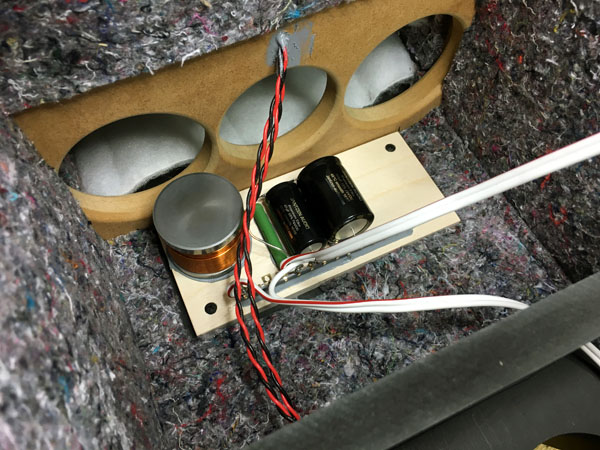
Before gluing the rear panel, add damping material to the compartment
behind the midrange enclosure. Much easier than after!
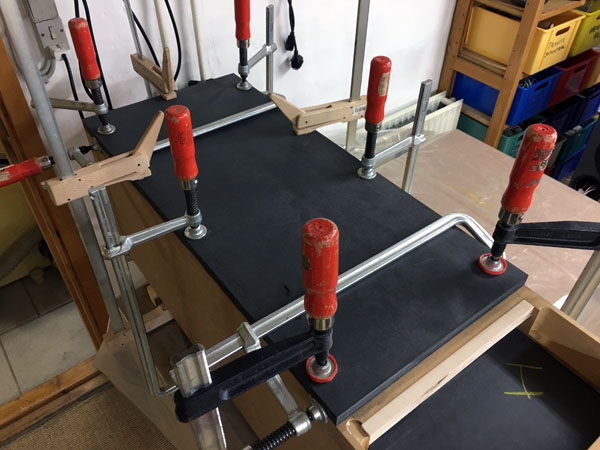
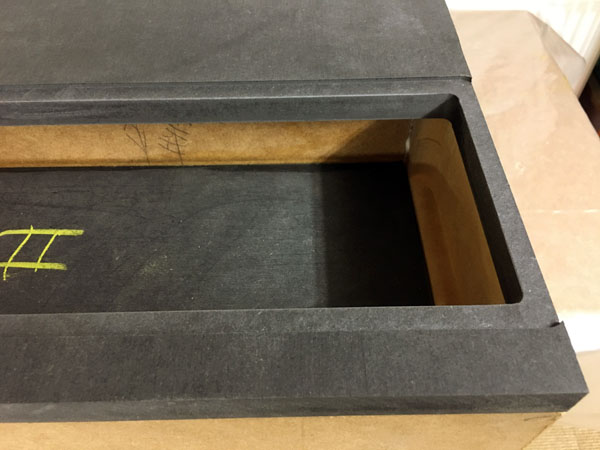
Left:
Gluing rear panel. I decided to make the panel for the Hypex removable.
Who knows what will come up some day.
The Hypex compartment makes a nice place for the mid-tweeter crossover
for the passive version.
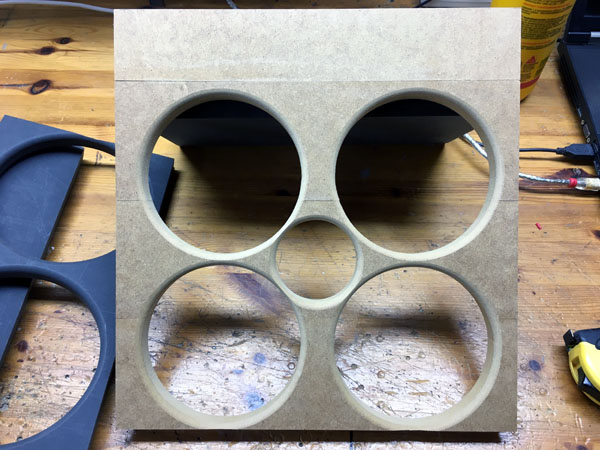
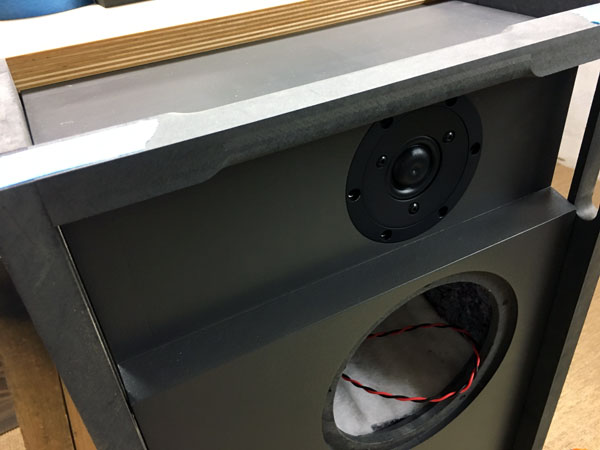
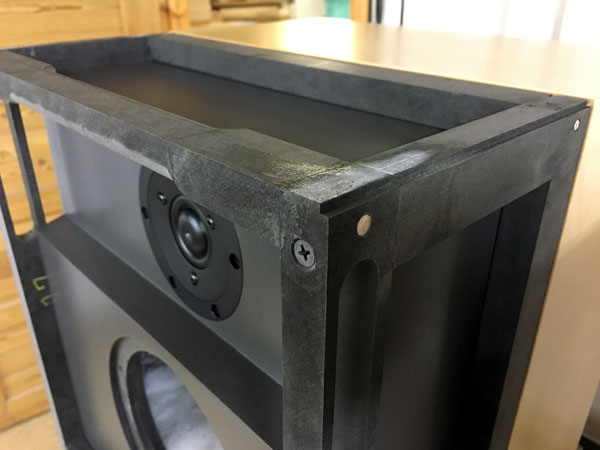
Right: Glue in 110 mm panel for the tweeter.
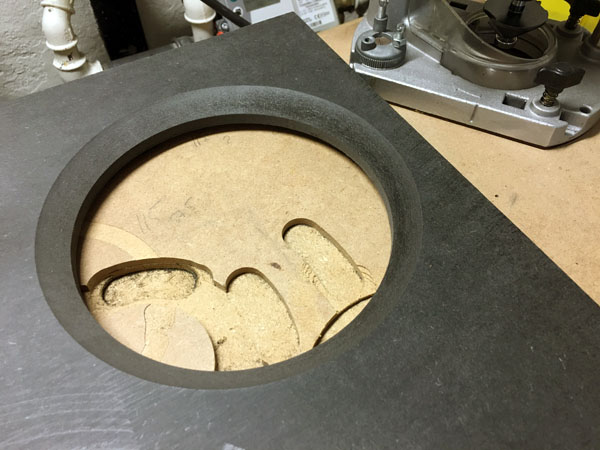
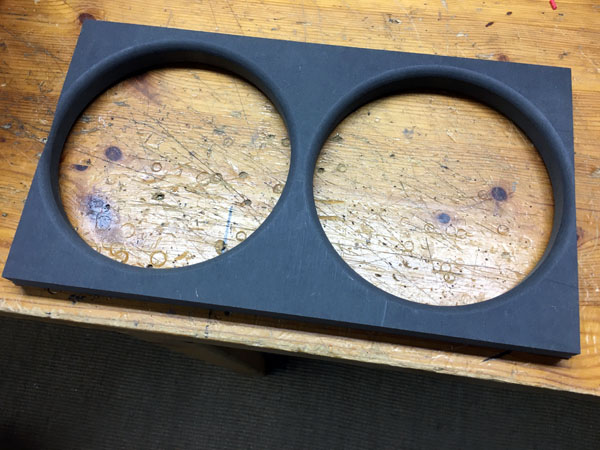
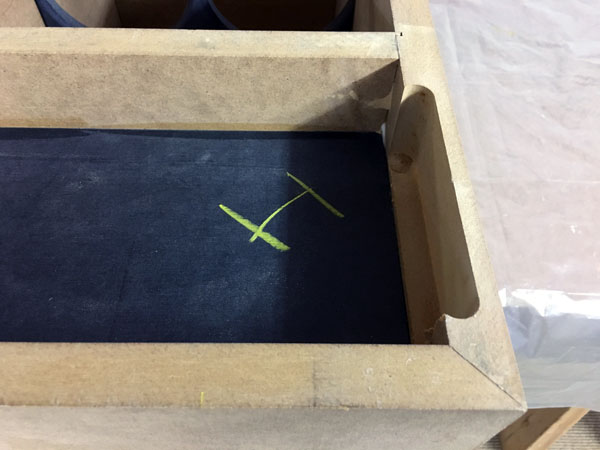
Left: Chamfer middriver hole like seen on image. No need for bass
driver.
Right: Testing mid/bass panel. I used 25 mm black MDF for the panel. 22
mm will do.
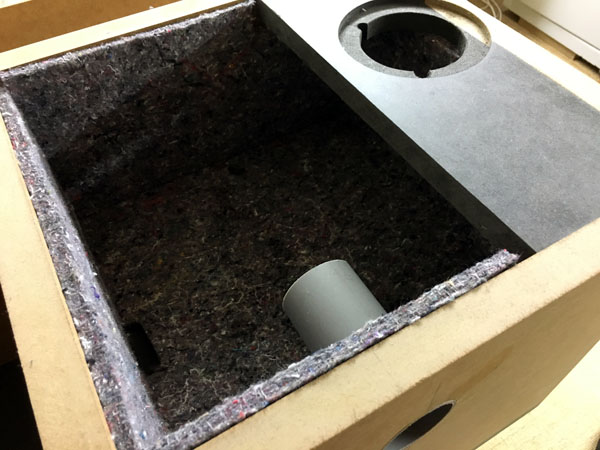
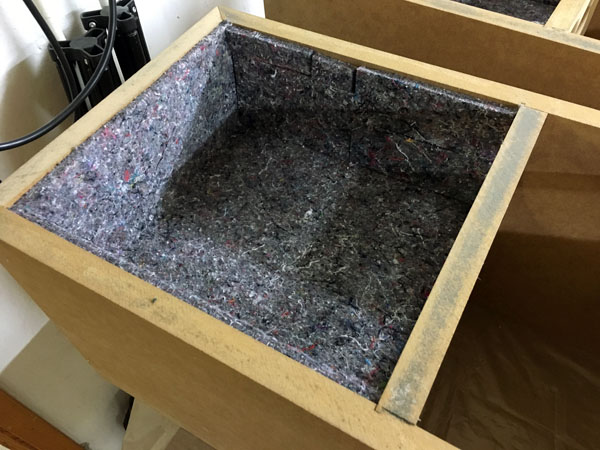
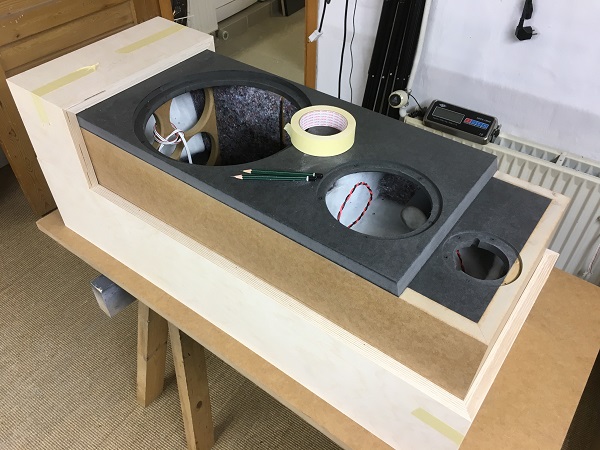
Adding felt to all internal panels.
For mid-tweeter compartment. Add a piece of 28 x 50 cm acoustilux on
rear panel and up on top and bottom.
Stuff the midrange port with a role of 10 x 20 cm acoustilux. Aperiodic
tuning.
Remember wire holes for mid-tweeter and from the Hypex compartment to
bass.
Make sure wire holes are
air-tight once wires in place.
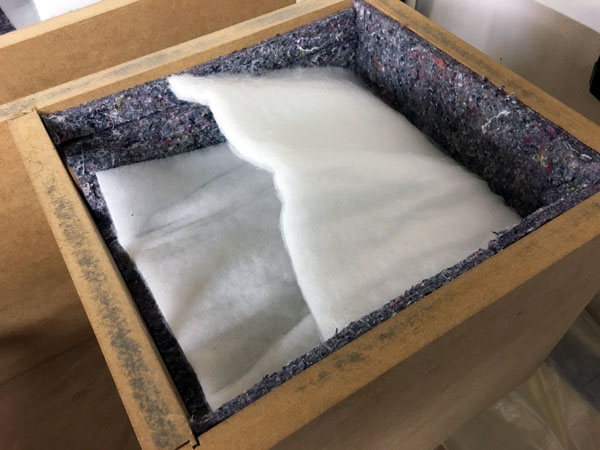
Fold a piece of 25 x 50 cm acoustilux and place at bottom.
Fold at piece of 25 x 50 cm acoustilux and place on rear panel above
ports.
Placement of acoustilux. Felt not shown.
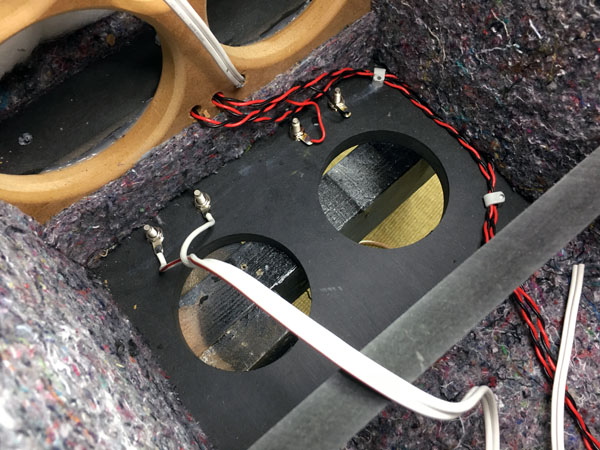
Terminals placed right below ports. MT crossover section in place in "Hypex"
compartment.
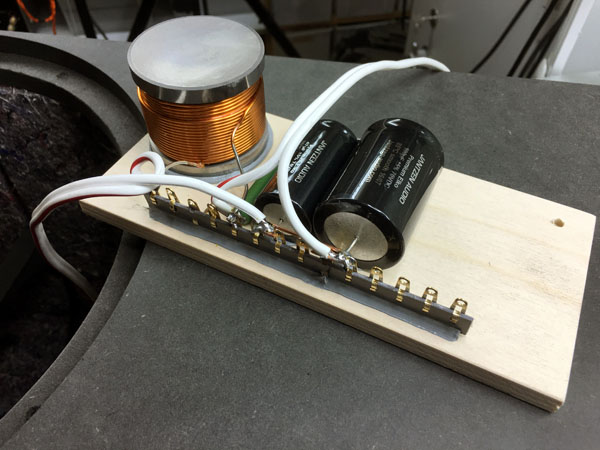
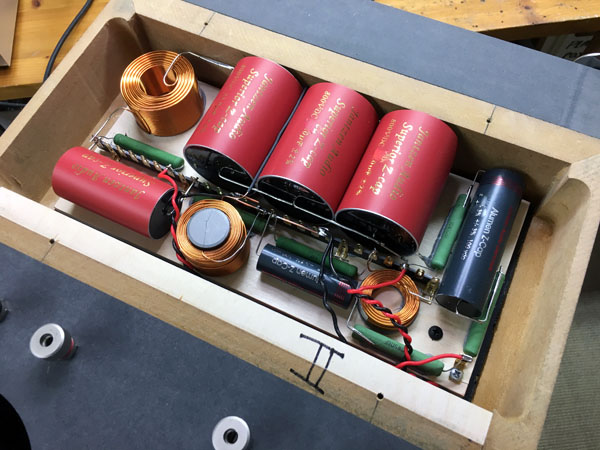
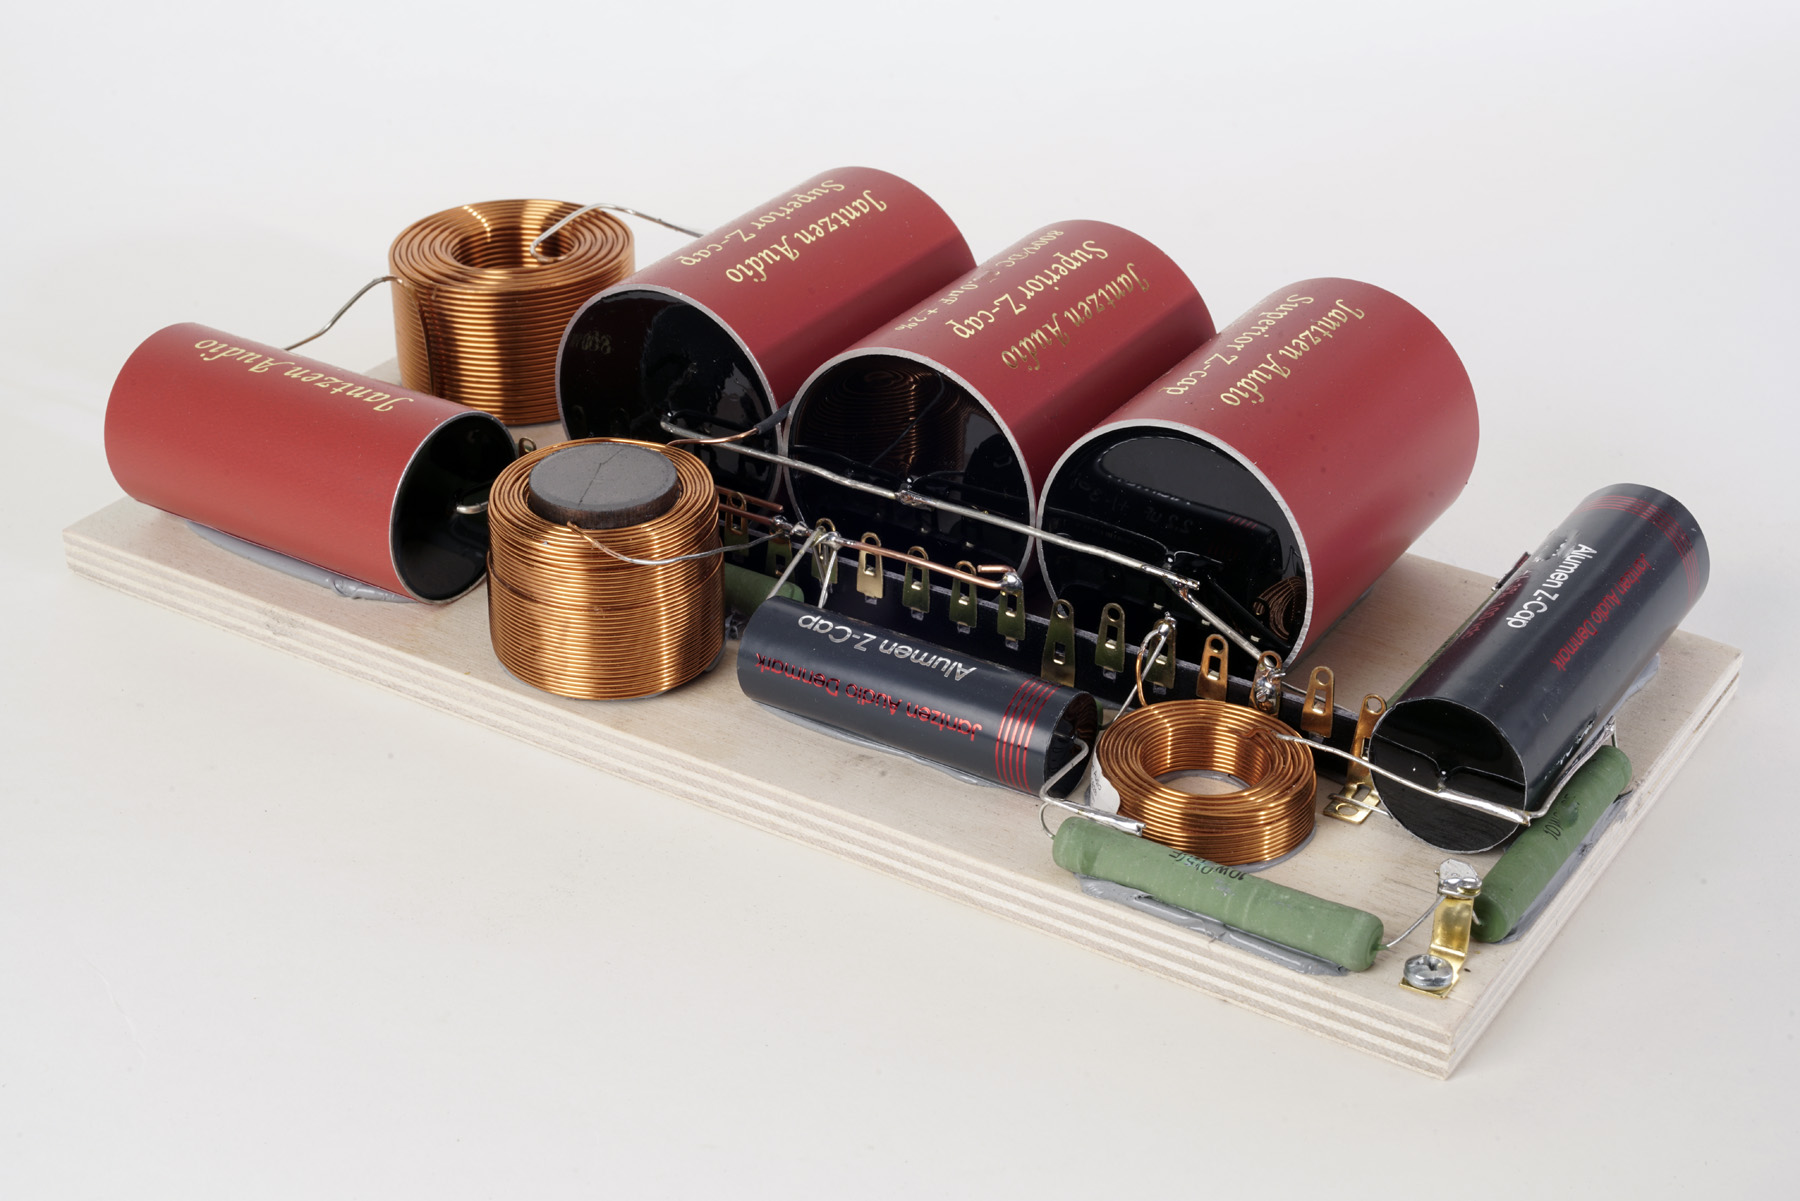
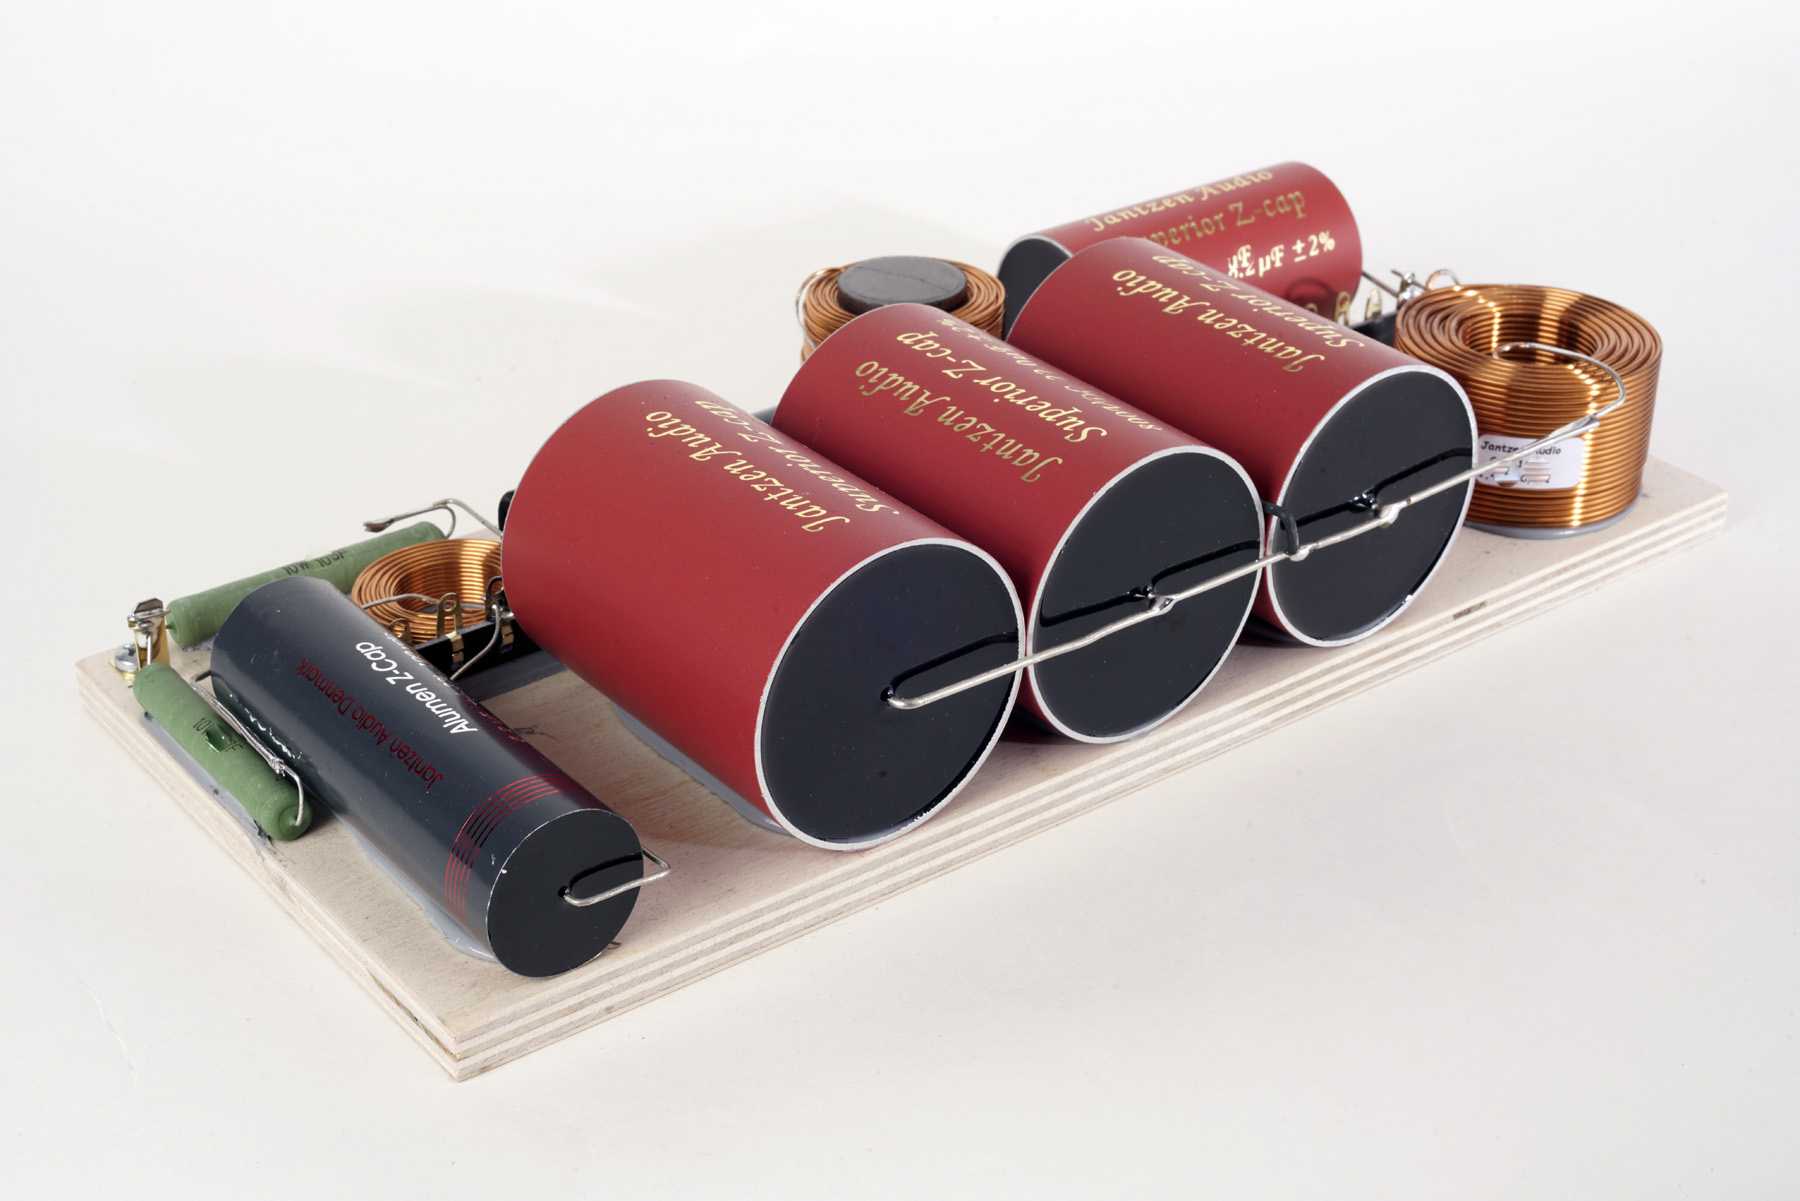
Left: Cover panel in place. Right: Bass crossover ready for mounting.
Use the teflon wire supplied with the kit. Not the same as used here.
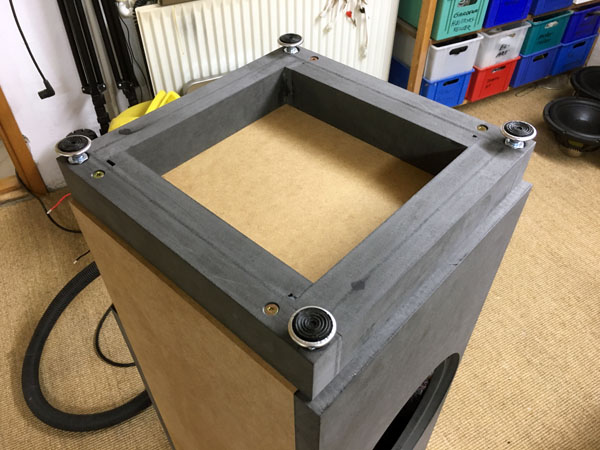
Left: Bass crossover in place on rear panel. Cover with acoustilux.
Right: Base with adjustable feet.
Ready for some action!
The final touch
Preparing the Baltic birch cladding.

Left: Painting done. Right: Adding side panels.
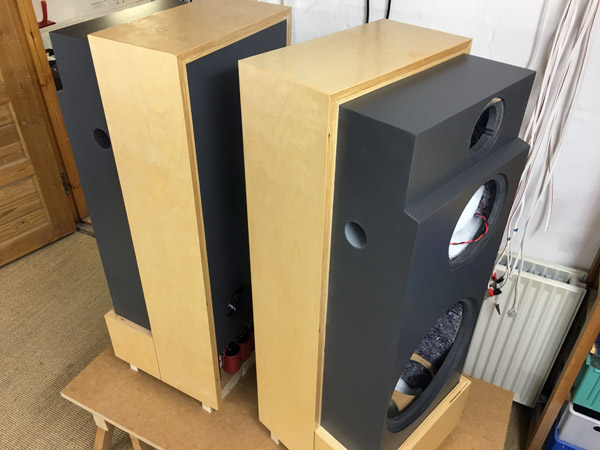
Left:
Baltic birch panels in place and first coat of lacquer.
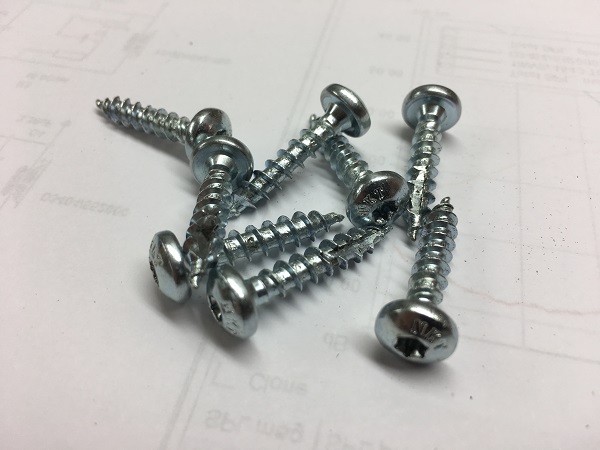
And by the way: Found some 5 x 25 mm hex screws with 10 mm head at the
local Bauhaus market. Good for bass mounting. You need 16 of these.
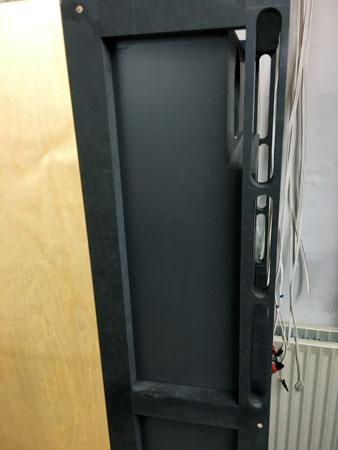
Optimising the front grille is a vital part of the design. The frame should impact the frequency response as little as possible. To cut the story short, the side frames were made from 20 x 30 mm HDF and added a slot of 16 mm width over the tweeter range until 2 cm from the top. The traverse bar really didn't impact frequency response noticeable, yet I rounded the edges on the three possible sides. The front I wanted sharp. Measurements below.

Rounding the three edges of the front top bar didn't make much impact,
if any. But it made me feel better, so it stays.
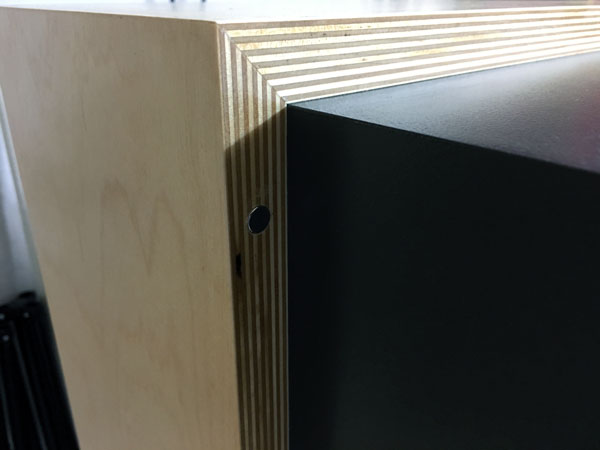
I use six 8 x 8 mm neodym magnets to hold the frame. Make damn sure you
have polarity right when inserting in frame and cabinet!
The frames here is a study and not as successful as intended, but it
works. I ended up using screws (not ideal for MDF) and dowels, dowels
are better. If I had to start all over I would use 18-19 mm plywood for
the sides. My side panels are 20.5 mm, thus 18-19 mm and make the frame
with cutouts necessary and leave a little room for the fabric.
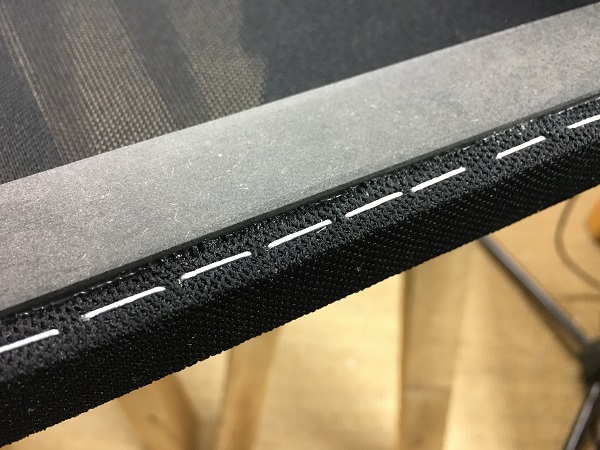
The groove at the top side is for the fabric seam.
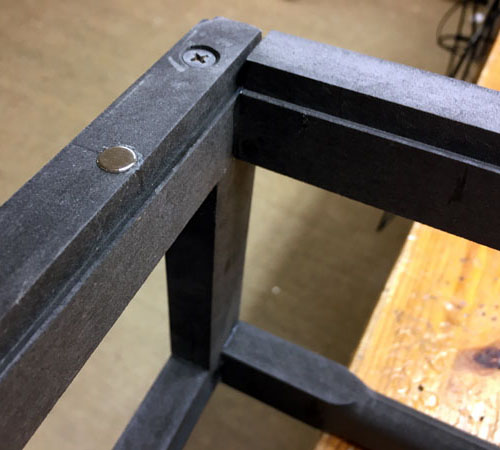

Magnets and side slots.
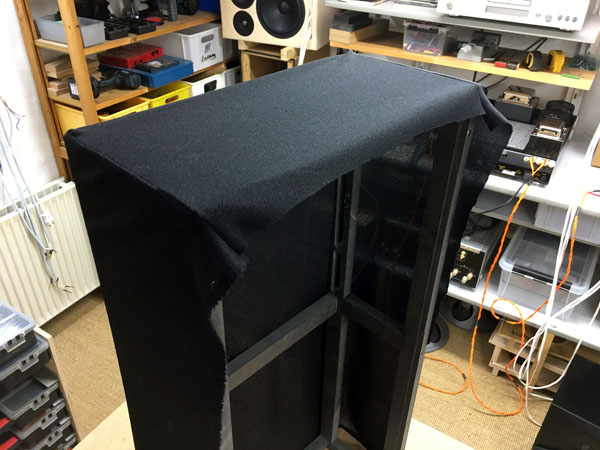
I really didn't take long to add the fabric to the grille, yet I hate
it.
Start fastening the fabric at all corners to get the seam right in the
groove. This is the most important thing.
I used staples all the way and added glue later on top of the staples,
see below.
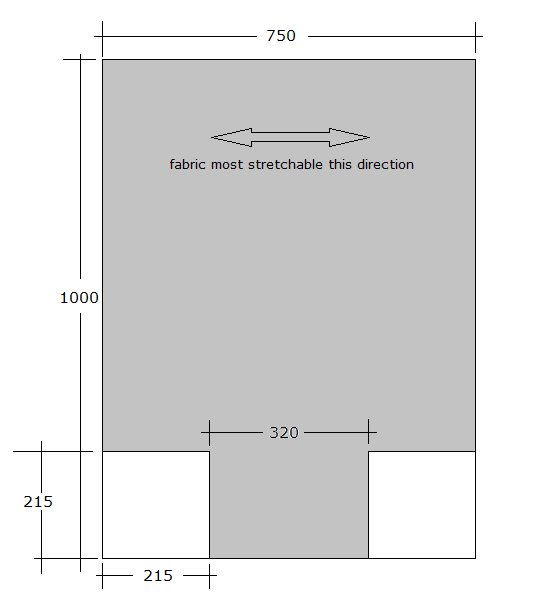
Left:
Here's how I cut the fabric.
The grille is 370 mm wide and I made the sewing to a width of 320 mm.
This makes a firm fabric once stretched to 370 mm.
The fabric has a front and back side, the back being slightly
glittering.
If you want the front grille, add 2 sqm black fabric from Jantzen Audio. Not included in kit.
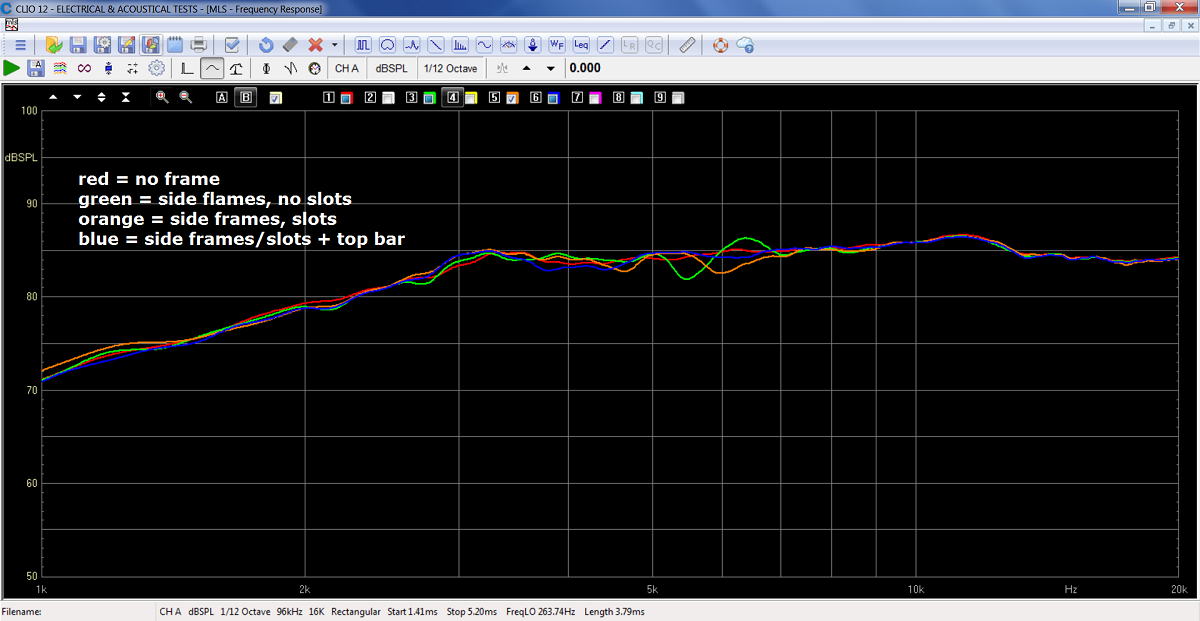
Frequency response from 4 scenarios. Tweeter response driven from
crossover.
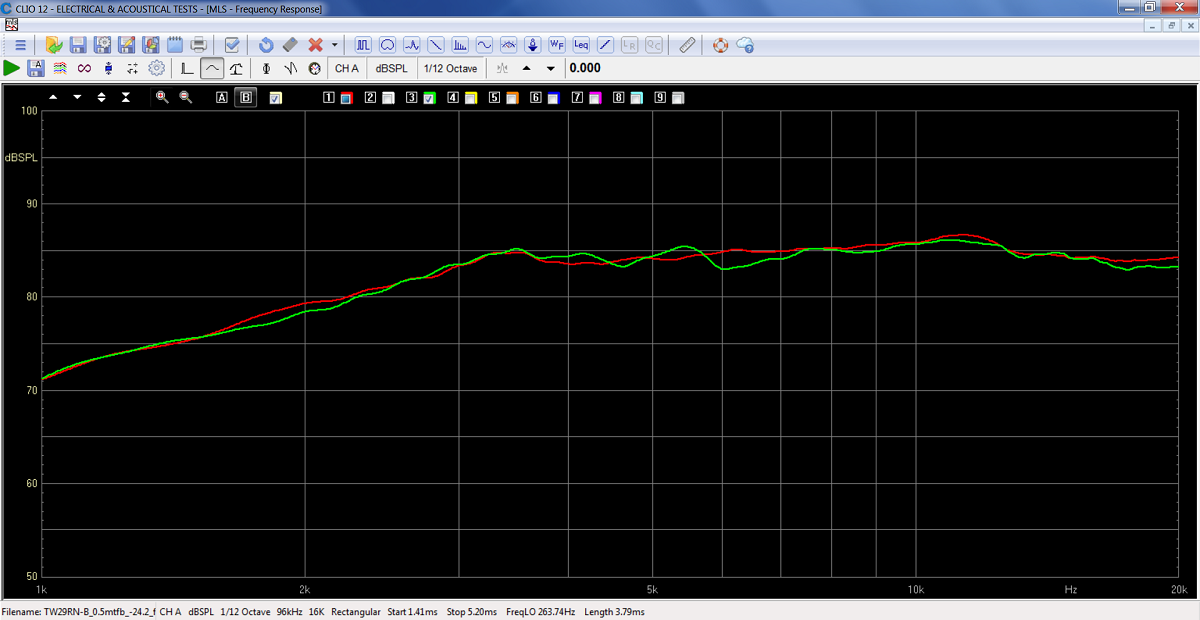
Final result from front grille. Red = without, green = with. Now, this is from ½ meter distance and can look in a number of ways depending on angle and distance. In fact, it looks even better from 1-2 meters distance. The fluctuations here are way above acceptance level and I'm pleased with the results.
Having a front grille does something to our listening experience. We kind of start listening compared to listening and seeing. Listening to a speaker with gorgeous drivers or stellar finish captures some of our attention. And I've heard numerous times that the appearance of a speaker can be as important as the sound. If it looks good, it sounds good. Which kind of proves our hearing is not one of our most trusted senses. So, the front grille may help you listening more to the music than listening to a speaker.
A few comments on MEASUREMENTS before you
start interpreting all the readings below.
First of all, if we think measurements will
tell us how a speaker sounds, we're wrong. The perception of sound is
way too subjective to be reflected in any measurements we can perform. A
loudspeaker system is meant to give us a satisfying idea of an acoustic
event and for some people a pair of 5 USD ear-plugs are enough, others
spend 200 kUSD on a truly full-range pair of speakers - and the latter
may not be happier than the former.
Measurements may give us an idea of tonal balance of a system, i.e. too
much or too little energy in certain areas, although dispersion
characteristics play a vital role here. A two-way 7+1 and a three-way
7+4+1 may display similar horizontal dispersion, yet sound very
different. Measurements may tell us about bass extension if far-field
measurements are merged with near-field measurements. In addition to
this, ports may contribute to bass extension. Most of we diy'ers do not
have access to an anechoic room for full-range measurements from
20-20000 Hz.
What cannot be seen is what kind of bass performance we get in a given
room. Bass performance is highly dependent on in-room placement of your
speaker and the same speaker can be boomy in one place and lean in
another. Actual SPL level at 1 meter distance and 2.8V input is useful
for en estimate of system sensitivity and combined with the impedance
profile may give an idea of how powerful an amplifier is needed to drive
the speaker to adequate levels.
What measurements do not tell is the very sound of the speaker unless
displaying serious linear distortion. The level of transparency, the
ability to resolve micro-details, the "speed" of the bass, etc., cannot
be derived from these data. Distortion measurements rarely tell much
unless seriously bad, and most modern drivers display low distortion
within their specified operating range.
Many people put way too much into these graphs and my comments here are
only meant as warning against over-interpretation. There are more to
good sound than what can be extracted from a few graphs. Every graph
needs interpretation in terms of what it means sonically and how it
impacts our choice of mating drivers, cabinet and crossover design.
What measurements certainly do not tell is the sonic signature of the
speaker, because speaker cones made from polypropylene, aluminum,
Kevlar, paper, glass fiber, carbon fiber, magnesium, ceramics or even
diamonds all have their way of adding spices to the stew. Nor do
measurements tell what impact the quality of the crossover components
add to the sound, from state of the art components to the cheapest of
coils and caps, they all measure the same if values are correct, yet
sound very different.
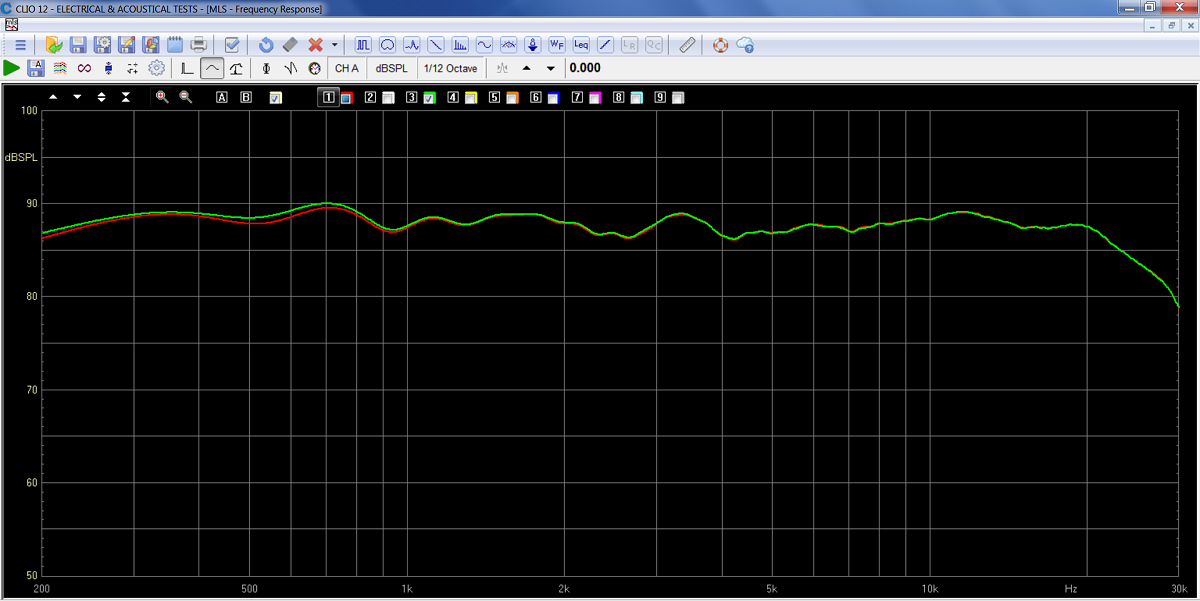
Frequency response, not merged with bass
response. Measurement valid down to 300 Hz.
Overall system sensitivity is around 89-90 dB/2.8V, 1 meter.
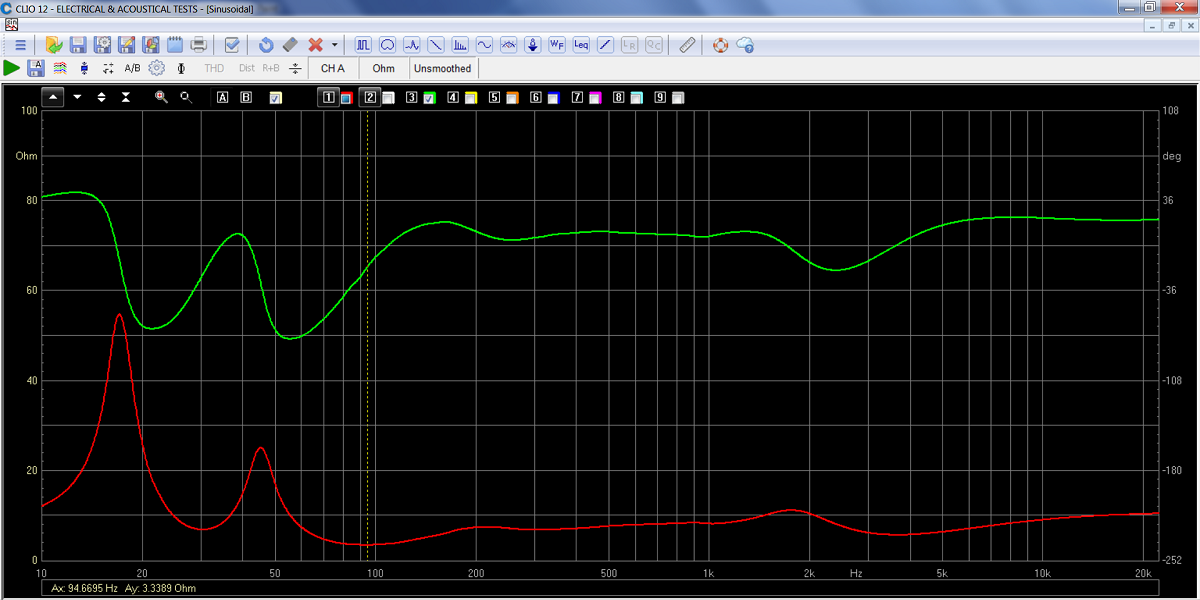
Final passive version impedance plot from stepped measurement. Green =
electrical phase.
Basically an 8 Ohm speaker with minimum 3.4 Ohm at 95 Hz.
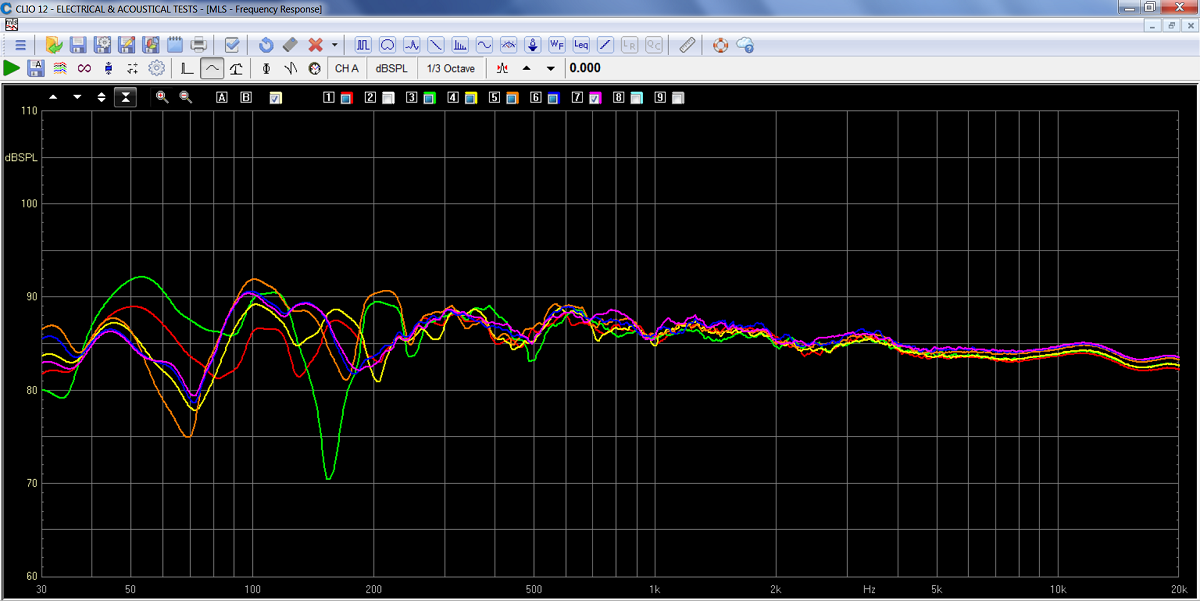
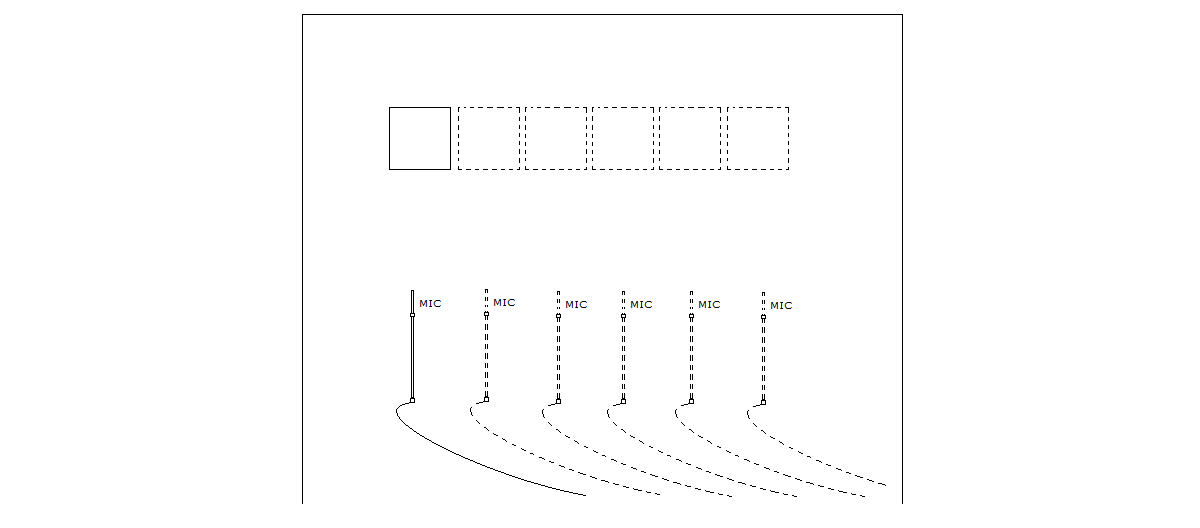
Just to give you an idea of significance of speaker placement in your
room.
This is from my workshop, 3 meters wide. Speaker front about 1 meter
from front wall.
0.75 m distance to microphone, 340 ms window, 1/3 octave smoothing.
Speaker placed in 6 different places across front wall from left to
right.
As can be seen, midrange and treble is little impacted as long as we're
in safe distance from side walls.
Bass response varies greatly and response up to around 250 Hz is
impacted by placement.
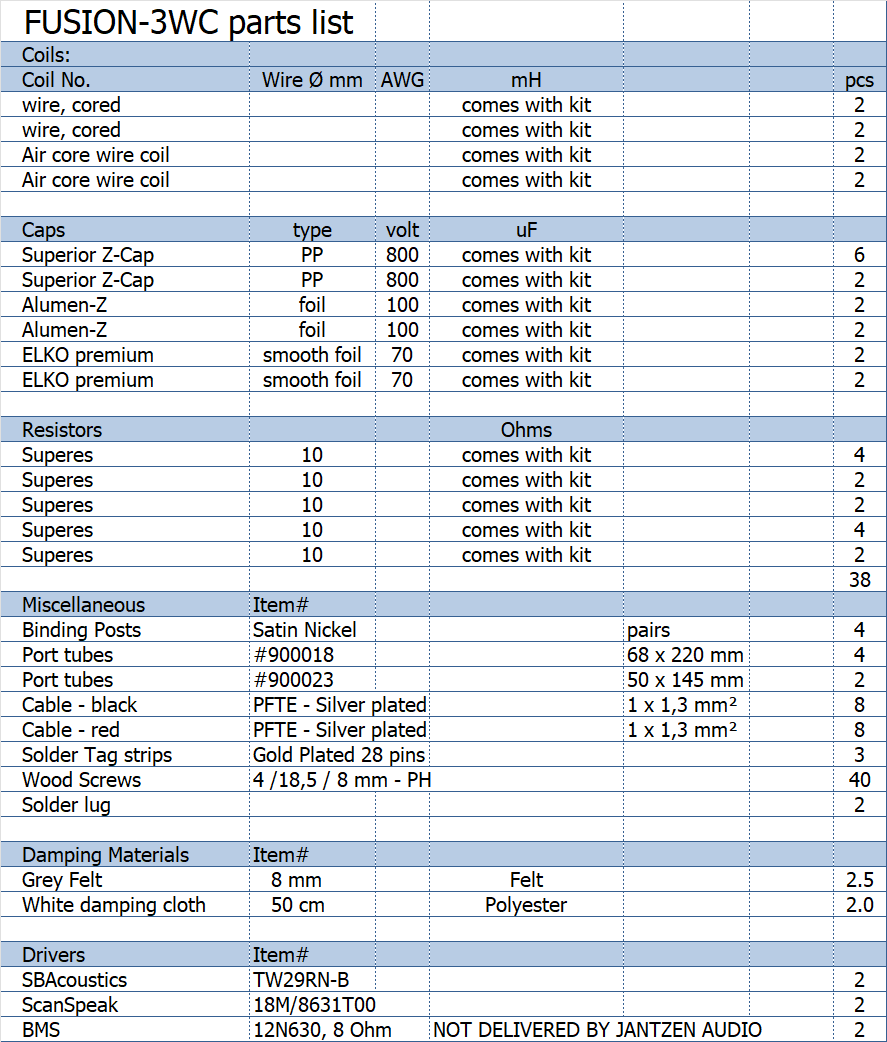
You can buy the kit with or without the midrange and tweeter. Feel sure prices are
competitive.
You can use the SBA TW29BN-B, 4 Ohm Beryllium dome tweeter without
changes to crossover.
Please ask Jantzen Audio
for options.

Should you want to make the front grille, order 2 sqm cloth in the
colour of your taste.
Also order grille pegs and grille catchers. See Jantzen Audio website
for options or order neodym magnet on eBay.
The bass drivers can be had from various
sources, e.g.:
http://www.lean-business.co.uk/eshop/bms-12n630-12-600-watt-neodymium-speaker-8-ohm-p-2566.html
(217 £)
https://www.thomann.de/de/bms_12n6308_ohms.htm?ref=search_prv_6 (246
€)
Both very reliable dealers to my experience.
All kit and component prices may be subject to change and are always to be confirmed by Jantzen Audio Denmark.
Download Complete Kit
Sale Presentations:

All technical questions to troels.gravesen@hotmail.com
All questions regarding purchase of kits, please mail Jantzen Audio at contact@jantzen-audio.com
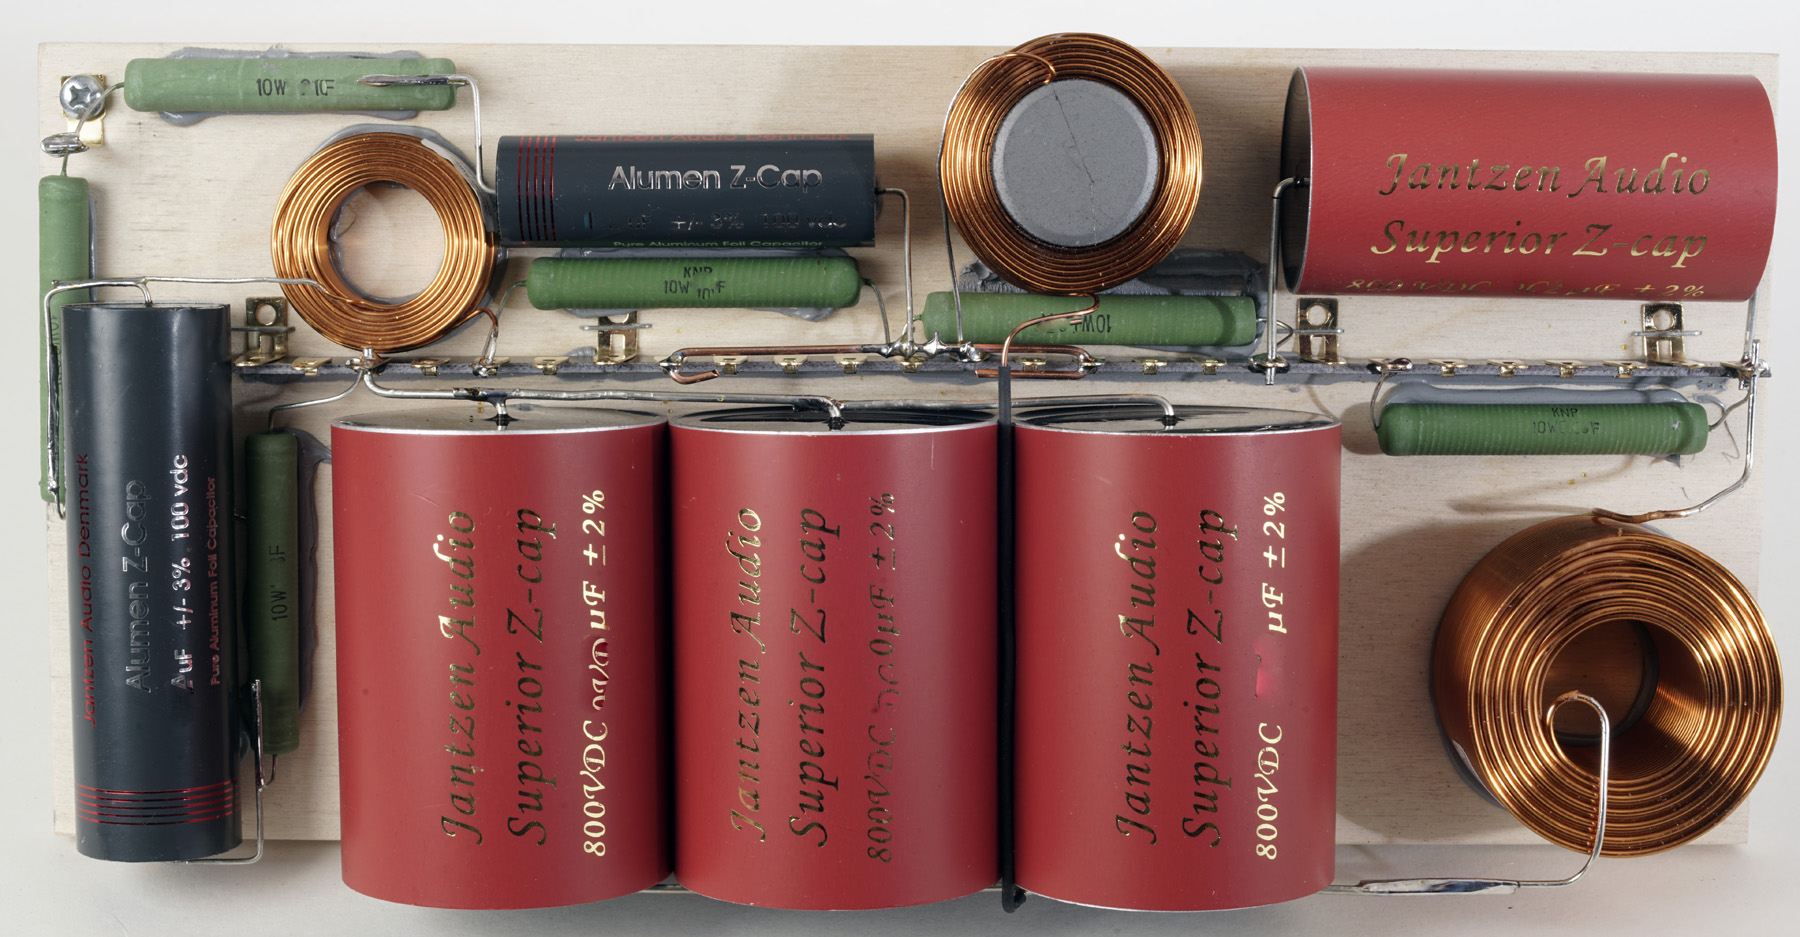
CROSSOVER-LAYOUT
BACK TO INDEX
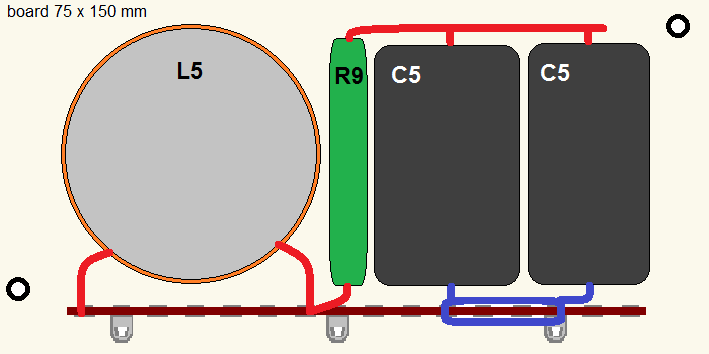
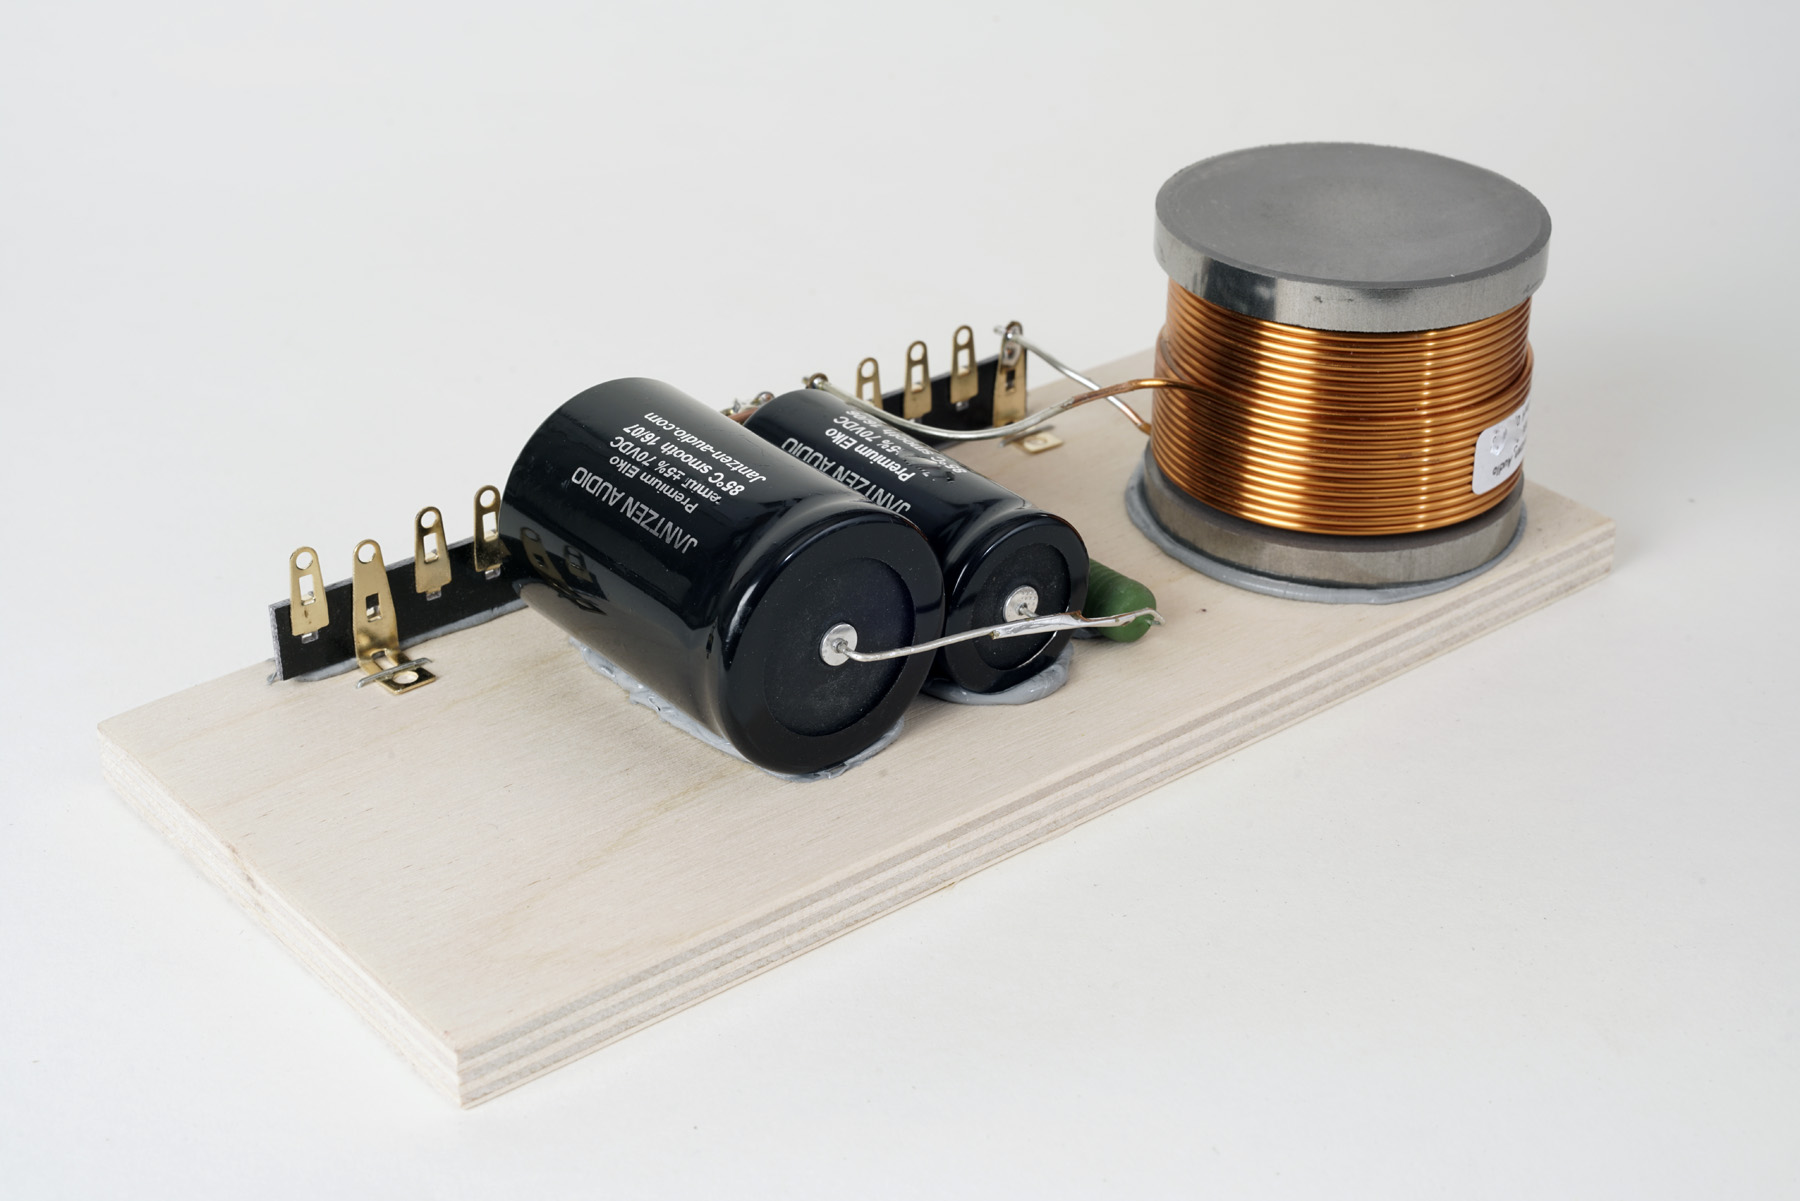
Bass crossover layout
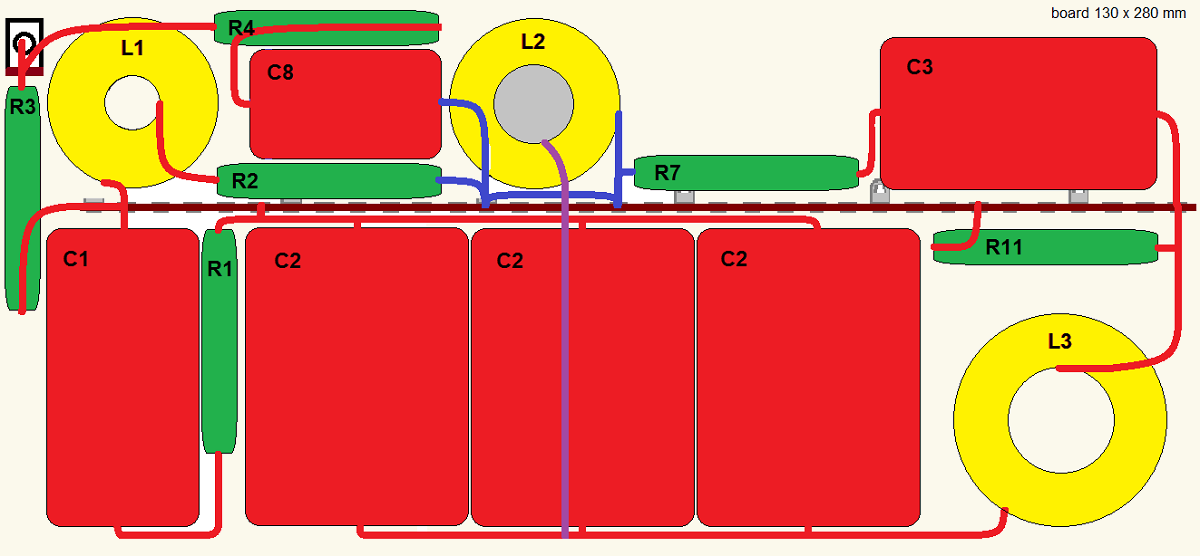
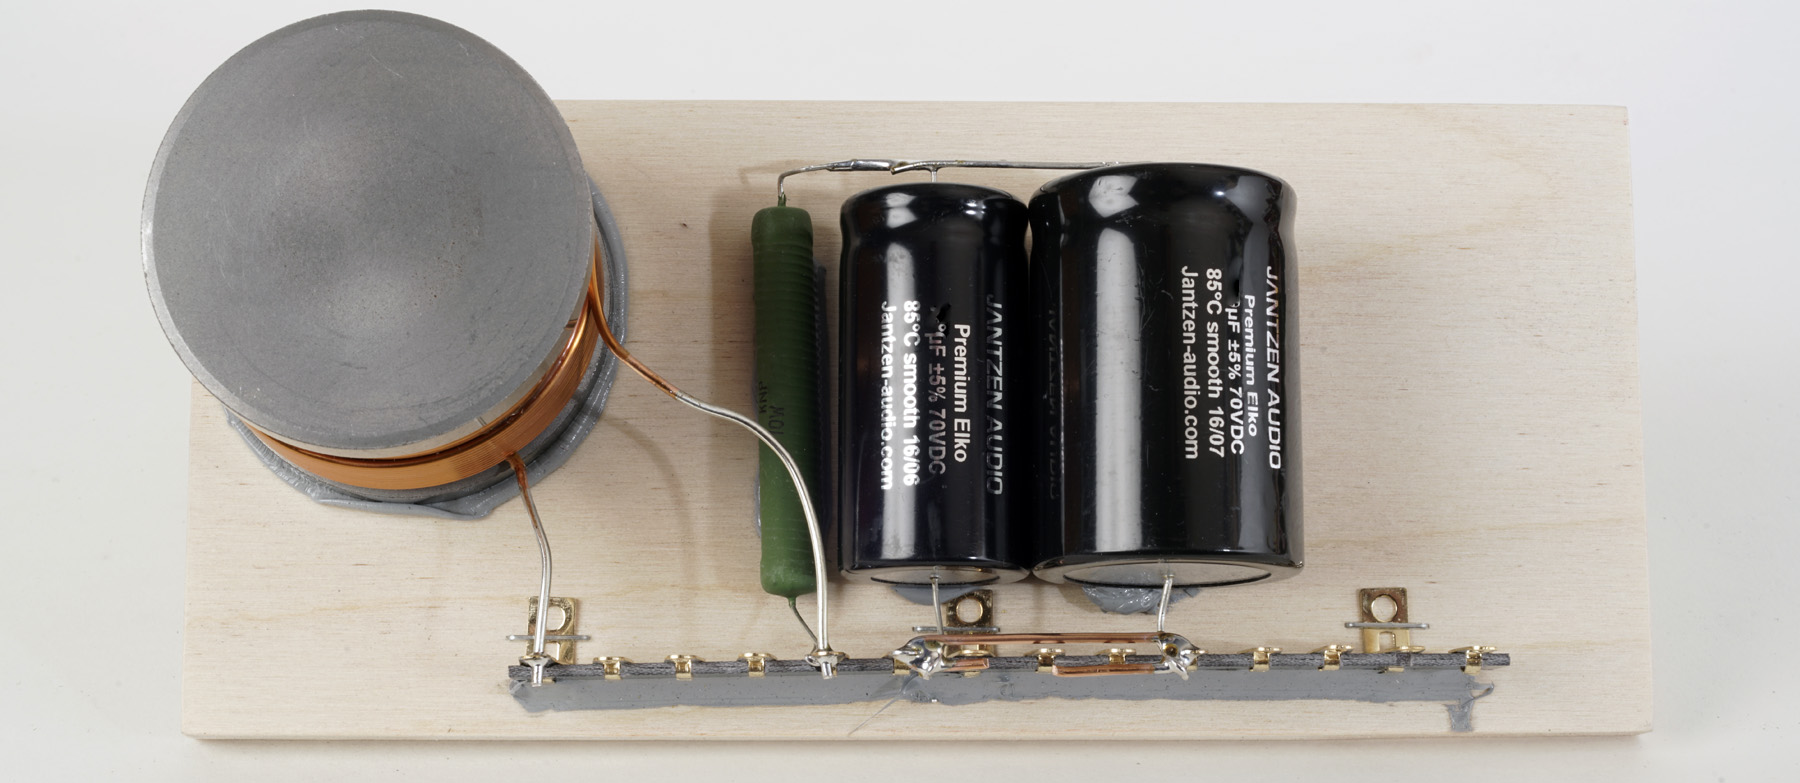
Mid-tweeter section layout
Below, click images to view large.

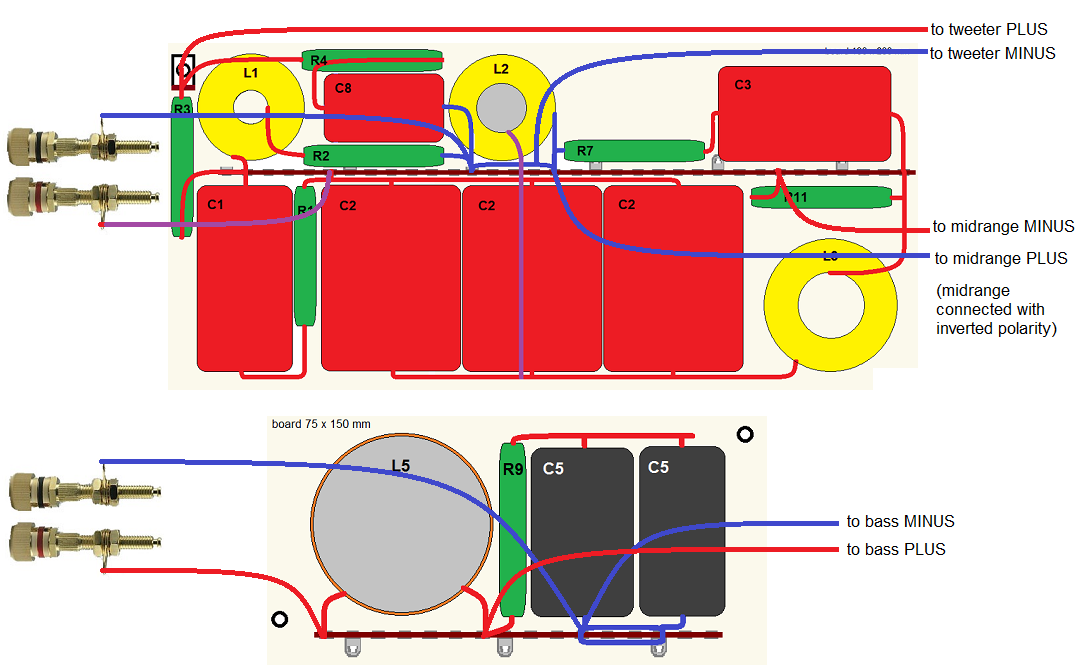
Speaker wiring
Not sure what's the first thing you notice about this speaker. Probably
the deep and agile bass. Dry, deep and punchy, even from some good 32
tube watts. I'm not even considering bi-amping although some decent
solid state watts make these bass attributes even stronger.
Next the midrange. This 18M from ScanSpeak - as for the
MUN-17 speaker - is impressively fast and dynamic. Transparency is
top-notch and in terms of putting a label on it, I would call it crisp
without ever being edgy.
Its paper cone, titanium voice coil and coated foam surround most likely
contributes to these qualities and from its 8 Ohm voice coil we can get
away with a modest amount of uF for the high-pass section to make a 200
Hz point of crossover.
The tweeter? Have used this tweeter extensively. Does what a tweeter
should do. A tweeter shouldn't be silky, smooth, metallic or any other
thing. It should just play treble. This does. End of story.
A speaker this size is not primarily aimed at heavy metal geeks,
although I'm sure it will satisfy their preferences. I've equally
enjoyed classical music and jazz and having a 12" bass driver so much
enhance the perception of the live experience.


Celebrating the set-up of a new loudspeaker I have the habit of pulling
out records I haven't heard for a long time. Anthony Wilson is a new
one, but the two magnificent EMI pressings are records I acquired back
in the 80'ies and I don't think I've heard them for more than twenty
years. It was a pleasant reunion and the FUSION clearly demonstrated how
much has happened to my playback system over that period of time. No
comparison.
For the Anthony Wilson I re-installed the
Hypex
Ucd power amplifier I built for the ATS4. Although my two tube power
amps run the FUSION smoothly, bi-amping with the Hypex brought further
firmness and punch to the bass lines.
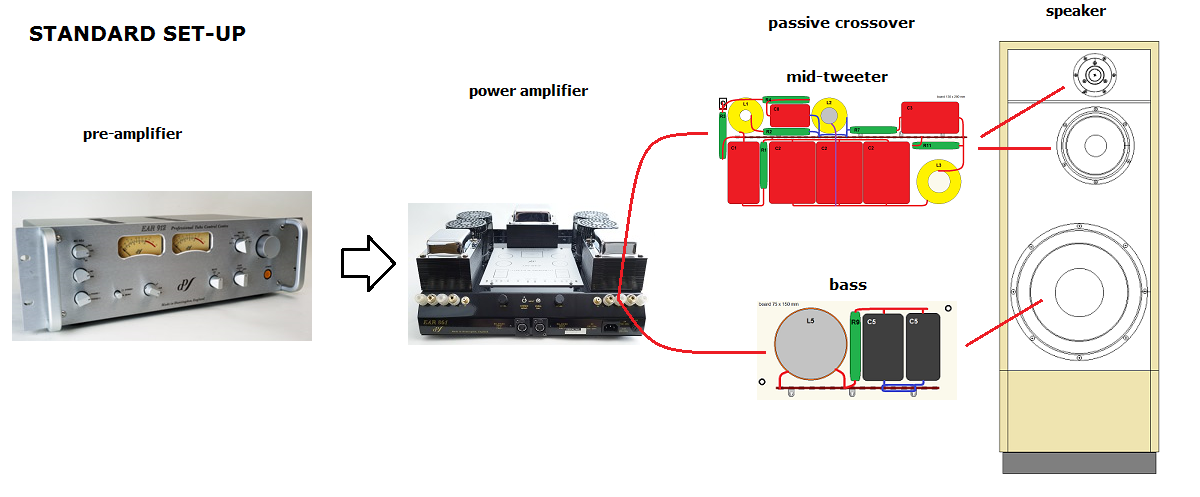
STANDARD SET-UP, passive crossover
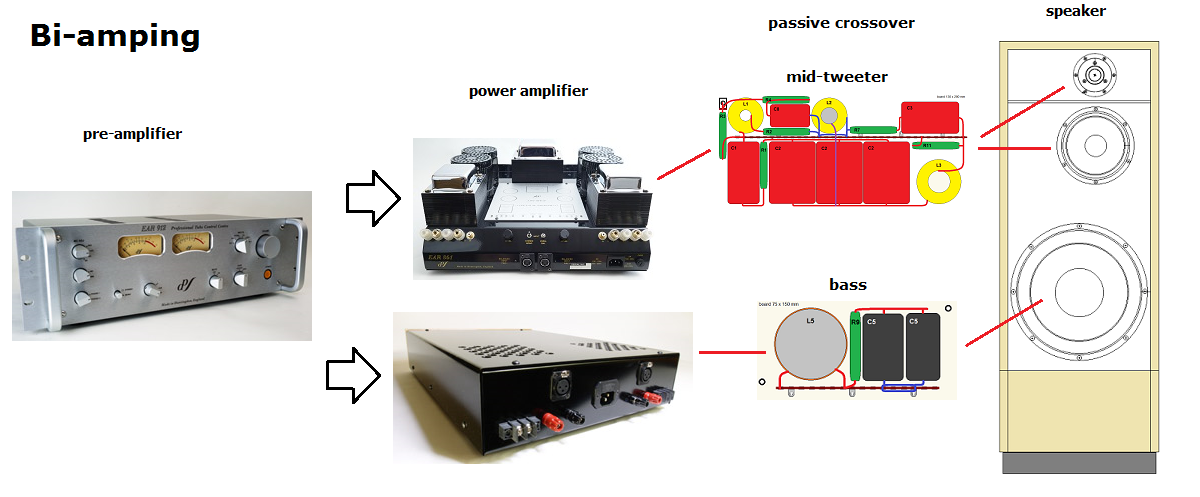
By-amping the FUSION speaker.
Make sure the two power amps have the same gain.
FUSION-BAD,
bi-amping/DSP
BACK TO INDEX
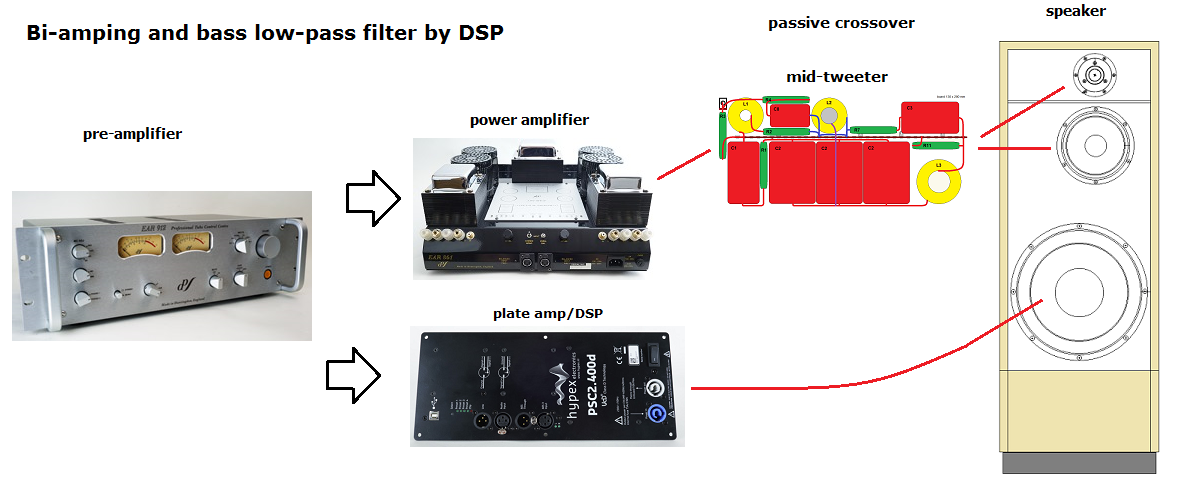
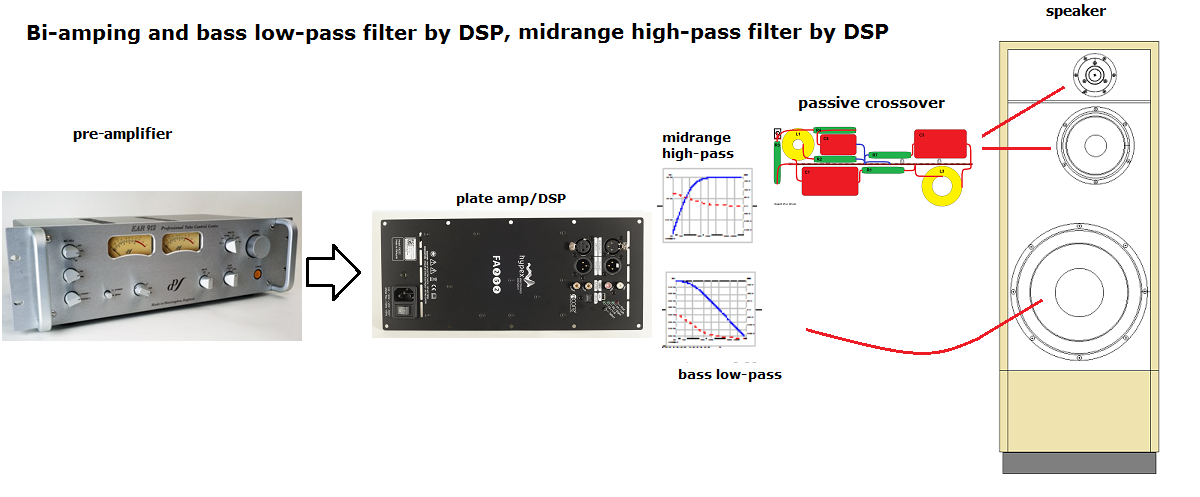
FUSION-3, bi-amping/semi-digital
BACK TO INDEX
Hypex runs the whole speaker and provides bass low-pass filter and midrange
high-pass filter. No power amp needed!
This means the expensive capacitors for the midrange can be eliminated.
Midrange low-pass and tweeter high-pass sections from passive crossover.
There won't be an all-digital version as it won't sound better than this FUSION-3.