DIY Loudspeakers: HOME INDEX UPDATES RESPONSE WHAT'S NEW
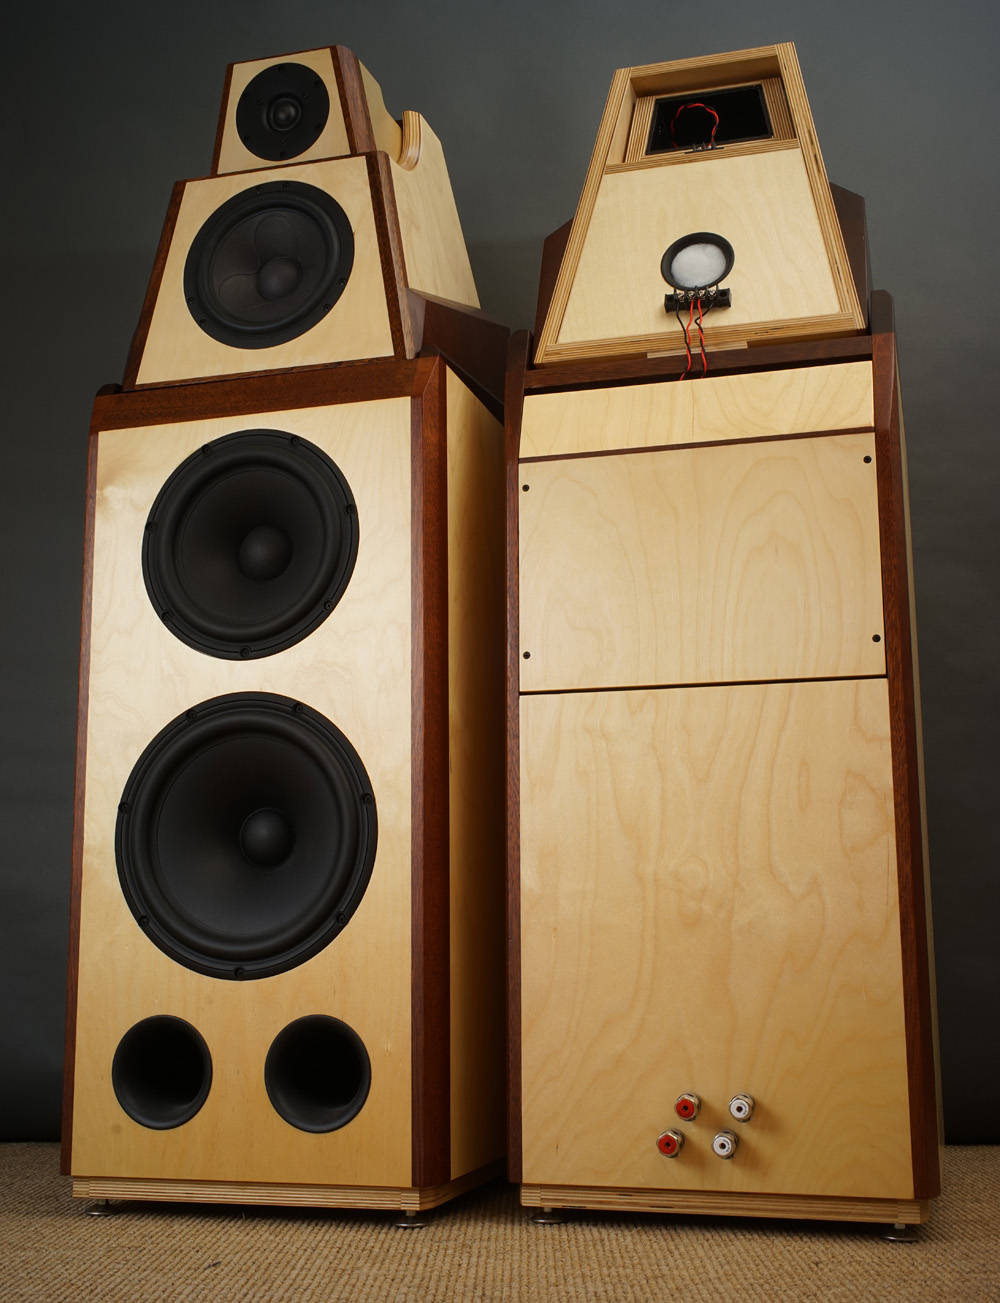
Illuminator 4
Copyright 2016-22 © Troels Gravesen
Go to on this page:
DRIVERS
CROSSOVER
CABINET
MEASUREMENTS
SPEAKER-KIT
CROSSOVER LAYOUT
SOUND
This speaker actually came before the
Illuminator-5,
having done similar 4-way constructions from
AudioTechnology,
SEAS
and ScanSpeak
Discovery
drivers. An ATS-4 set-up had to be tried with the best of ScanSpeak
drivers. It may have been called Revelator-4, but I render the middriver
the most important in these constructions, thus Illuminator.
I had this speaker running for 3 months before the idea of an
Illuminator-5 appeared, and I really wasn't thinking of the
Illuminator-4 until a year later and setting it up again I found it to be too good to
let go and here it is. Less elaborate than the Illuminator-5 and by
having the 7100 tweeter with its good low-end response, it's no problem
taking the point of crossover between mid and tweeter down to around 1.7
kHz, delivering a presence close to the Ill-5.
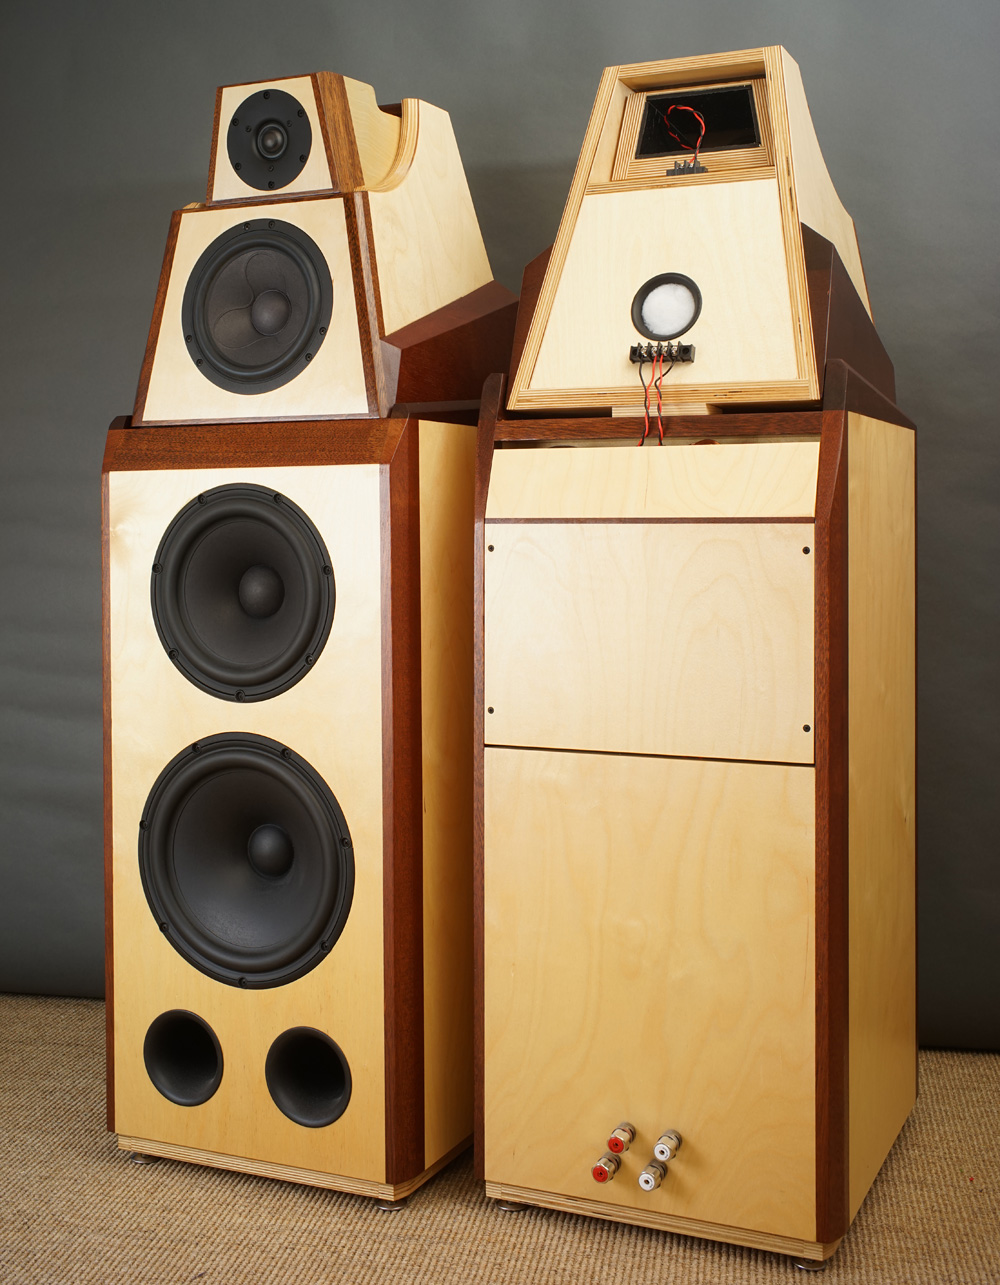
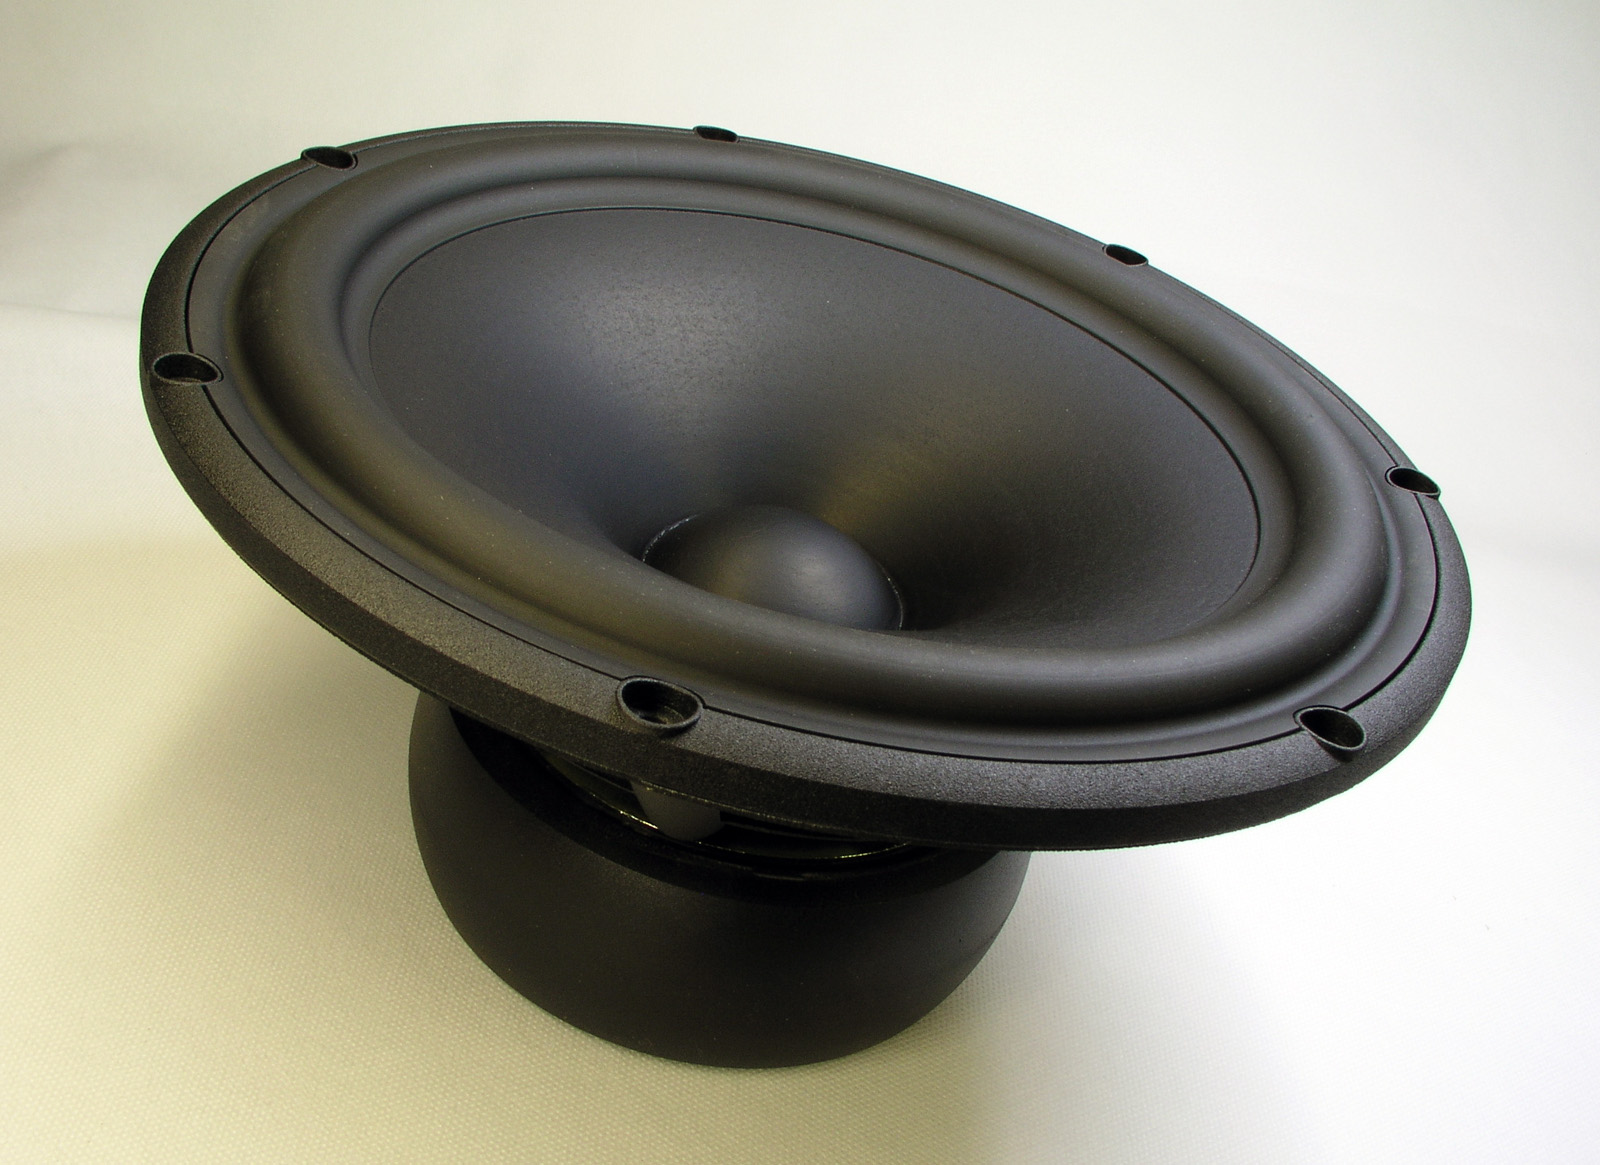
The "thing" about these now five constructions is the use of an 8"
driver in a closed box delivering the slam we wouldn't have from a
single 10" driver in a vented enclosure. It works! We have the low
bottom end from the 10" driver in a traditional vented box and the
transient attack of the closed box.
The drivers alone are around 2,800 EUR, not cheap,
but it's worth it if you want a speaker with a significant soundstage
capable of energising bigger rooms.
The 18WU sandwich cone and overall construction enables a dynamic
headroom superior to the Revelator 18W.
The Revelator is easy on crossover due to smooth roll-off towards
higher frequences, but fall short compared to Illuminator when played
really loud - to my experience.
The hard pressed paper cones of the bass drivers deliver pistonic
movement beyond their operating range and I can understand why no
8-10" bass drivers were developed for the Illuminator range of drivers.
Simply not needed.
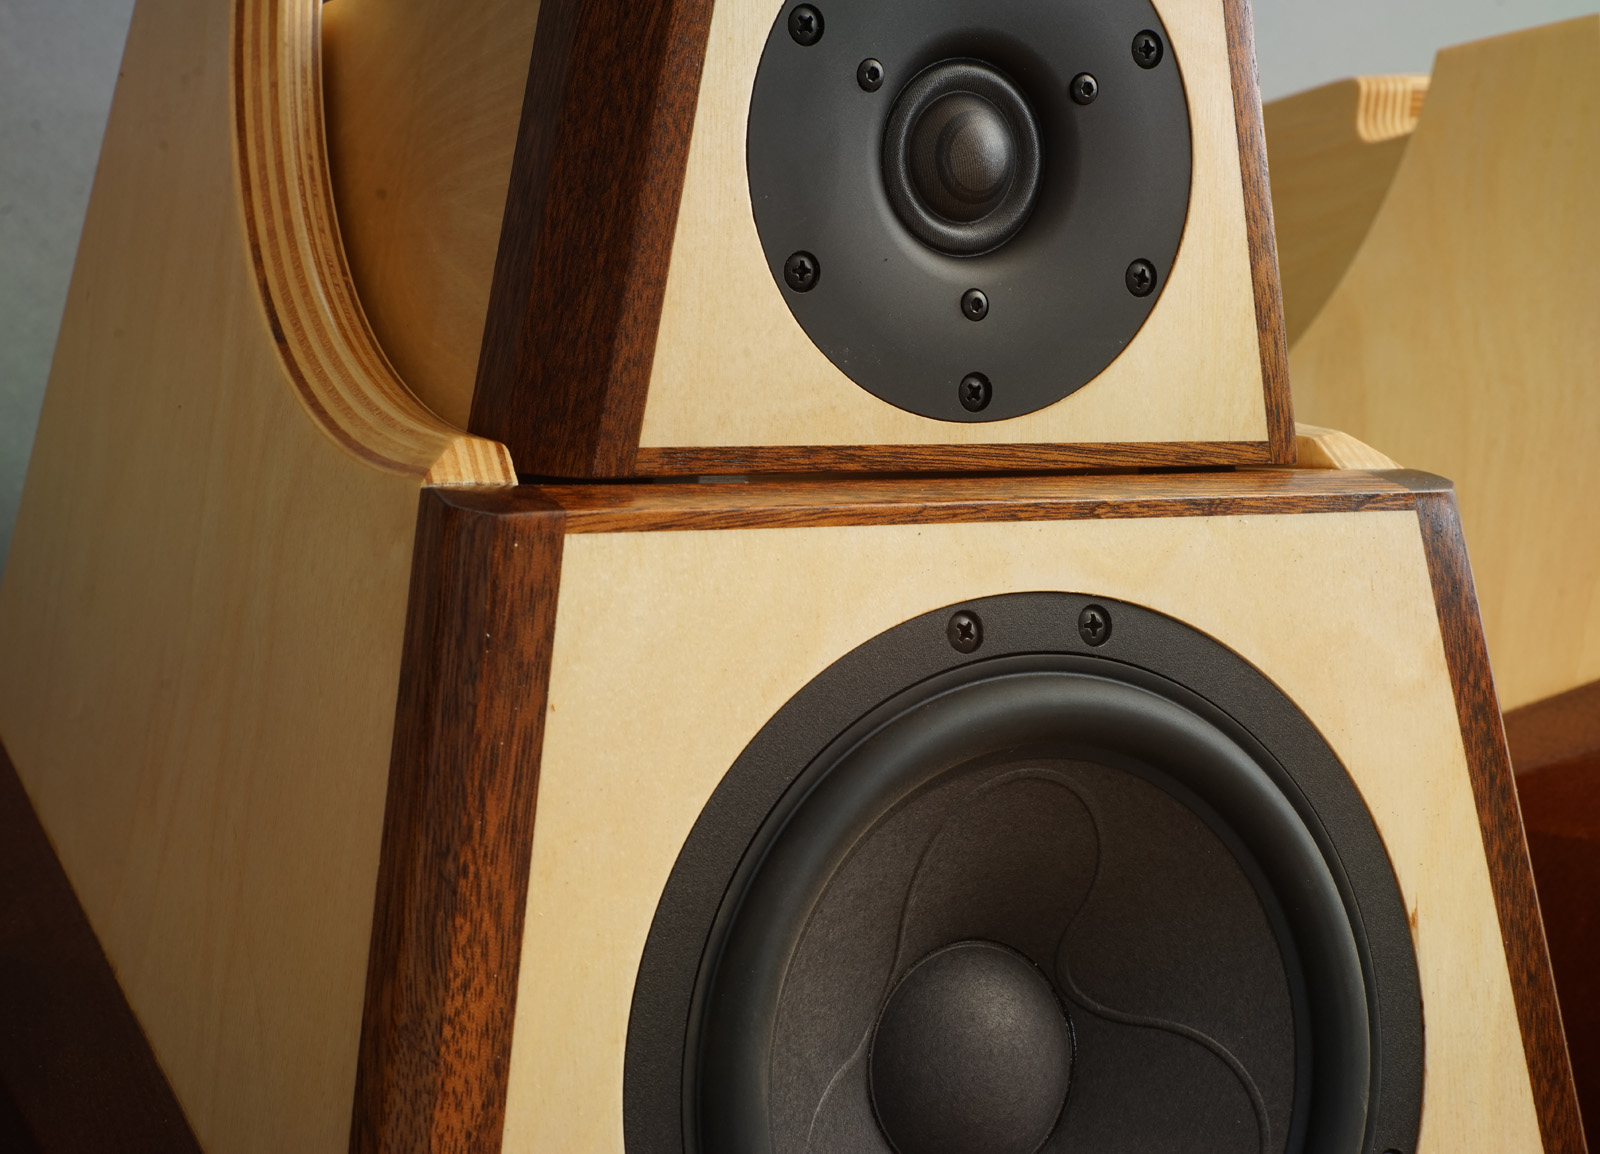
Now, I'm sure the choice of tweeter will cause controversy! Why not the
Beryllium dome? Because this 7100 tweeter works! Everyone has his own idea of the best tweeter and as I have responded in
numerous mails, it has to be tried which tweeter makes the best partner
for a midrange driver. It depends on the individual performance of
the drivers, their frequency response, phase behavior, point of
crossover and not least which tweeter just makes the best musical blend
with the mid-driver. Mating drivers cannot be done on paper. The 7100 tweeter goes low and here we need low to
mate the 18WU mid-driver at around 1.7 kHz,
delivering even power response in critical upper mid/lower treble.
With the Alumen-Z caps the 7100 tweeters deliver astonishing treble,
smooth if smooth, harsh if harsh - all depends on source material and
equipment in front. I dare say you can put the very best amps money can
buy in front of these speakers. From the level 1 kit you'll get quality
you rarely find in any commercial design.
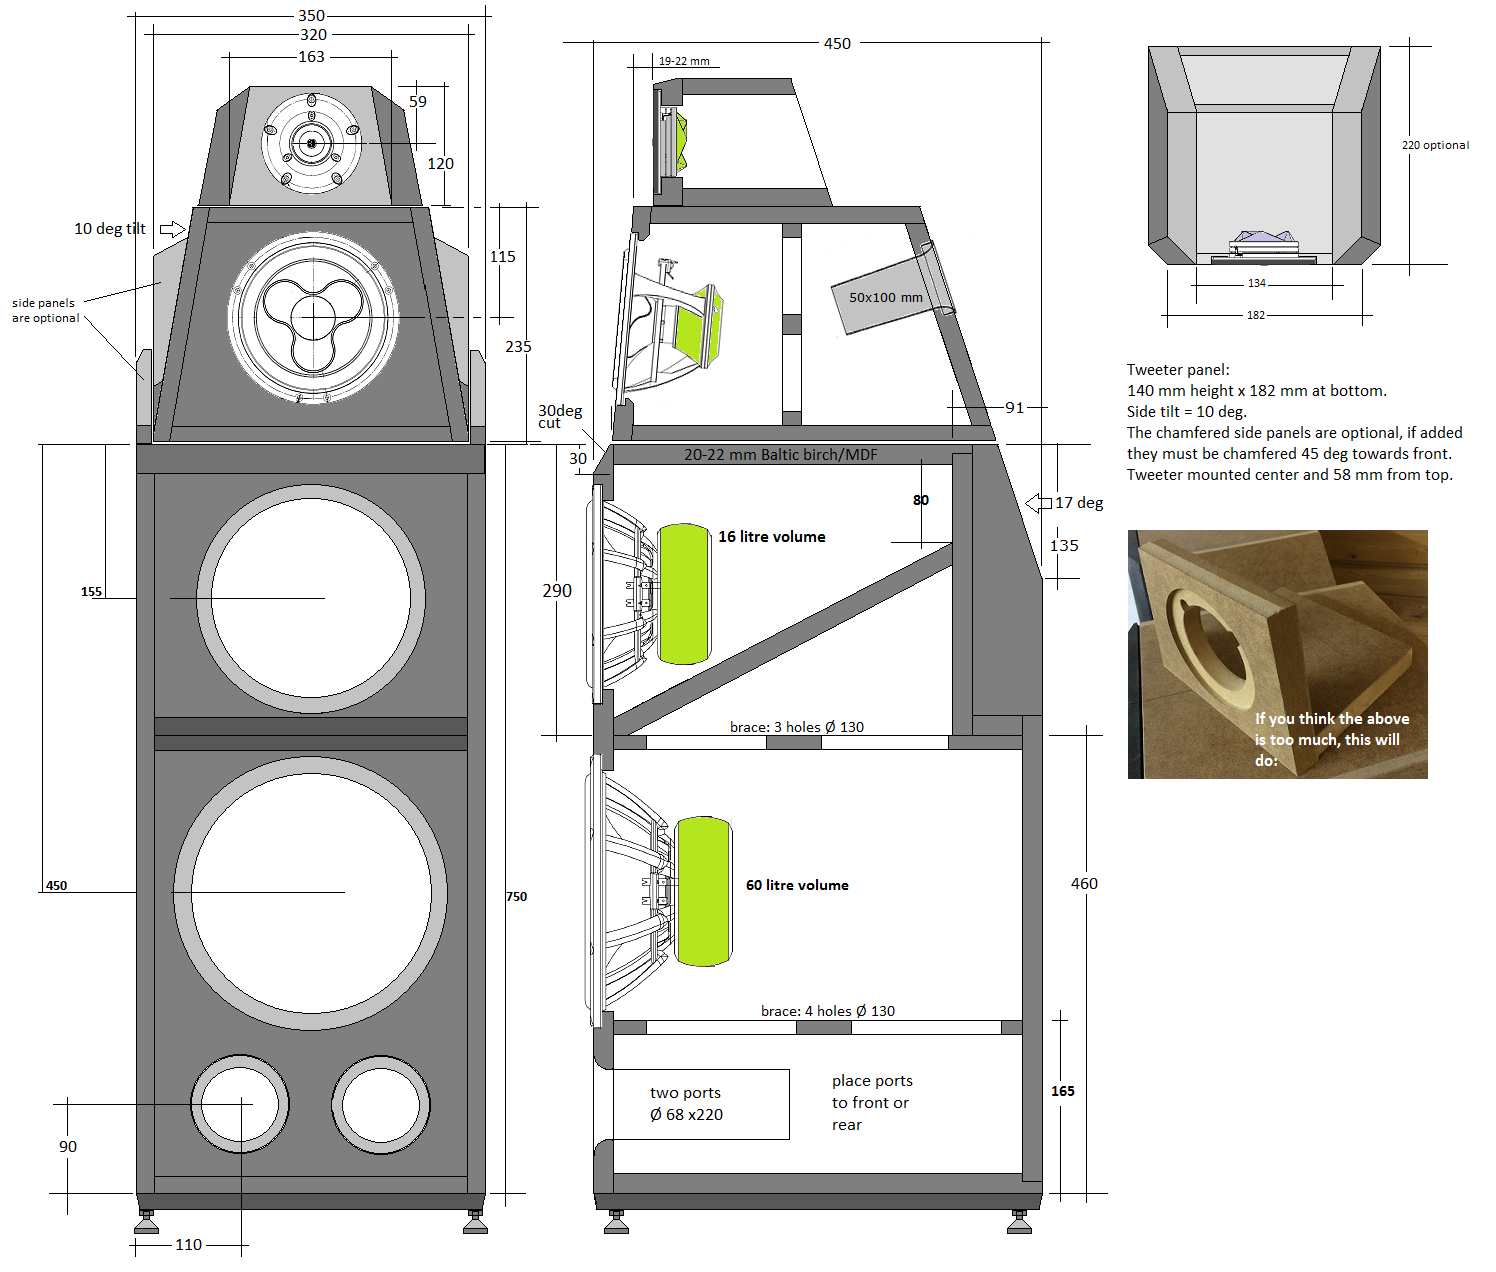
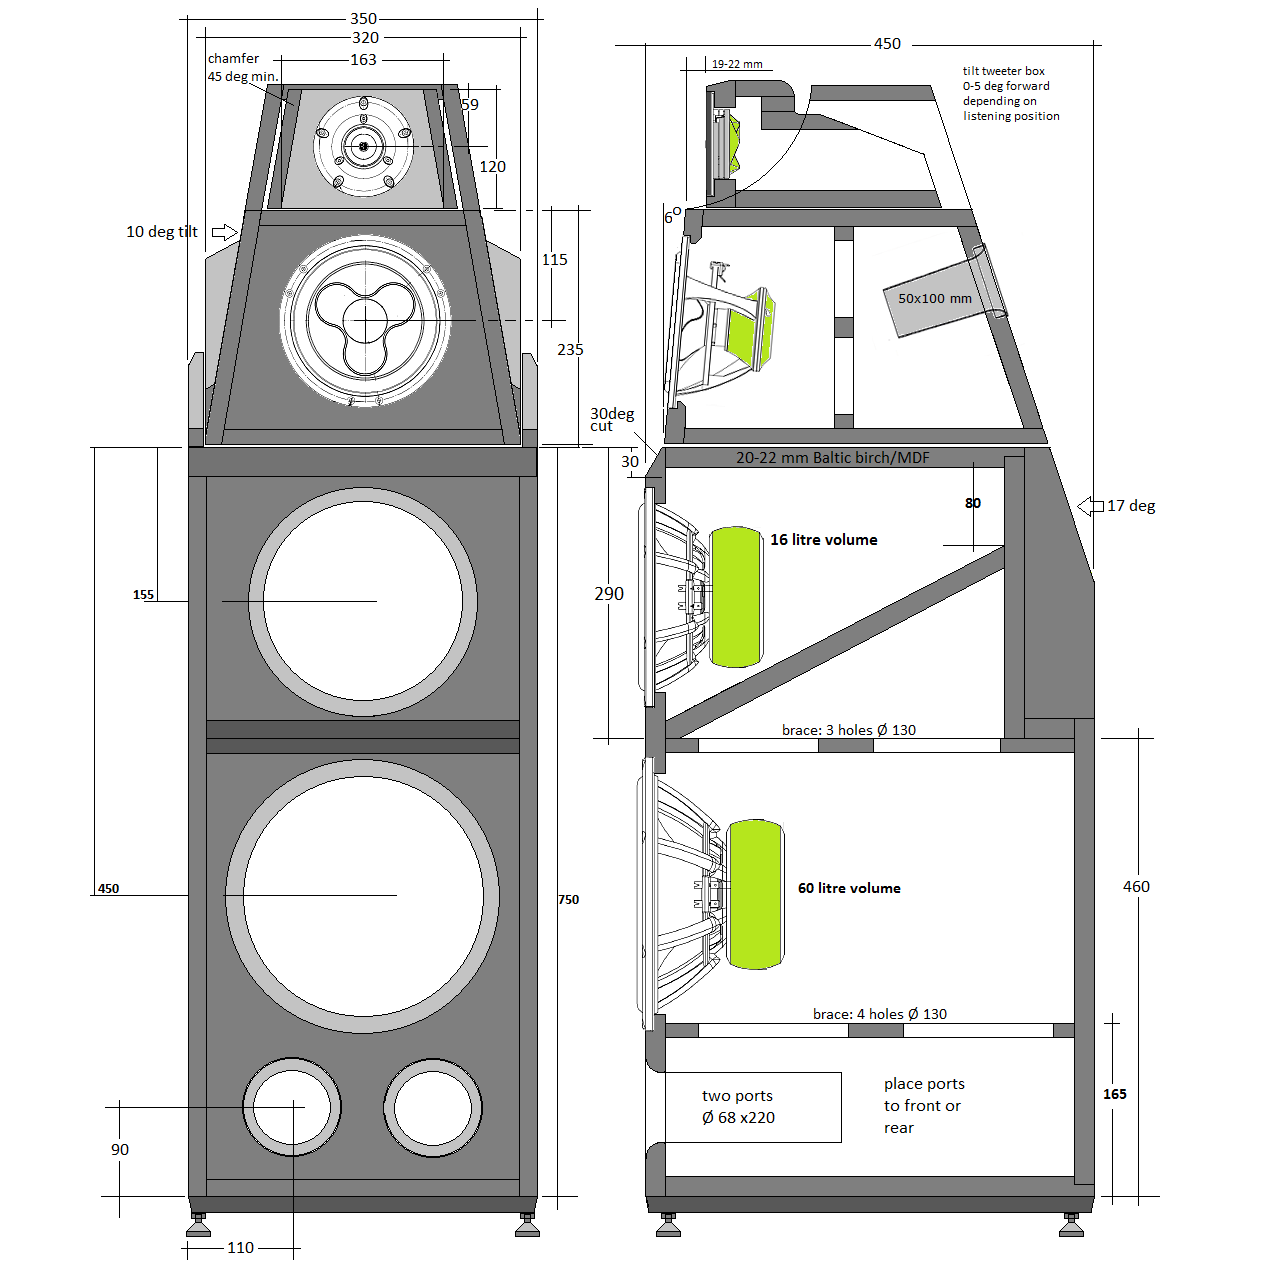
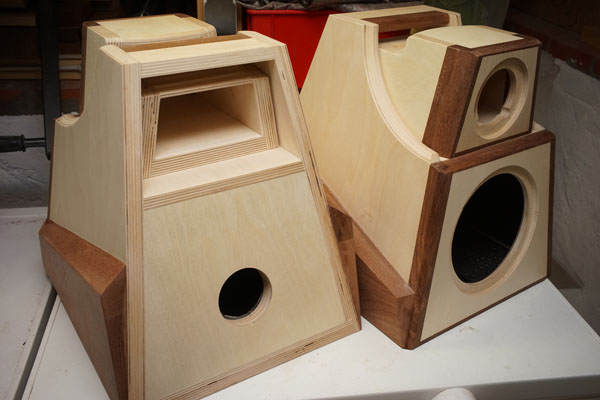
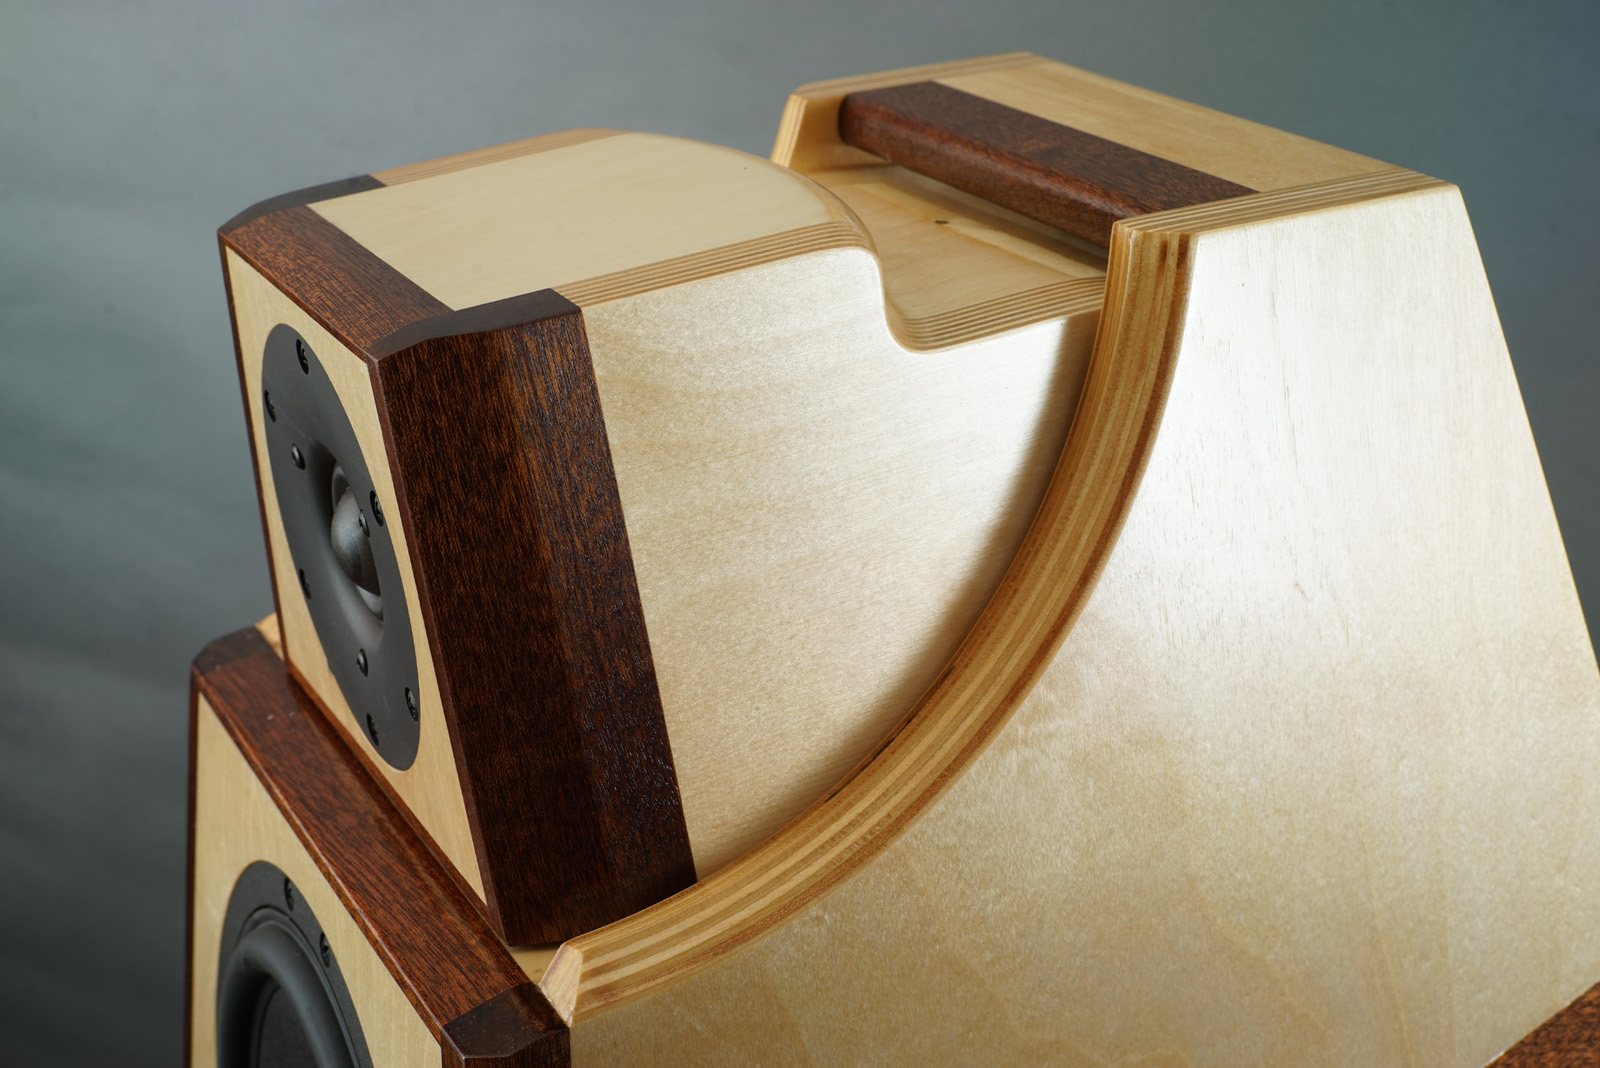
The cabinets can be made very simple as seen below but do you have a
flair for woodworking, some more attractive suggestion will be shown.
Please read this file before writing. Practical tips that may solve some
issues:
tips
Click images to view large
Click image to view large
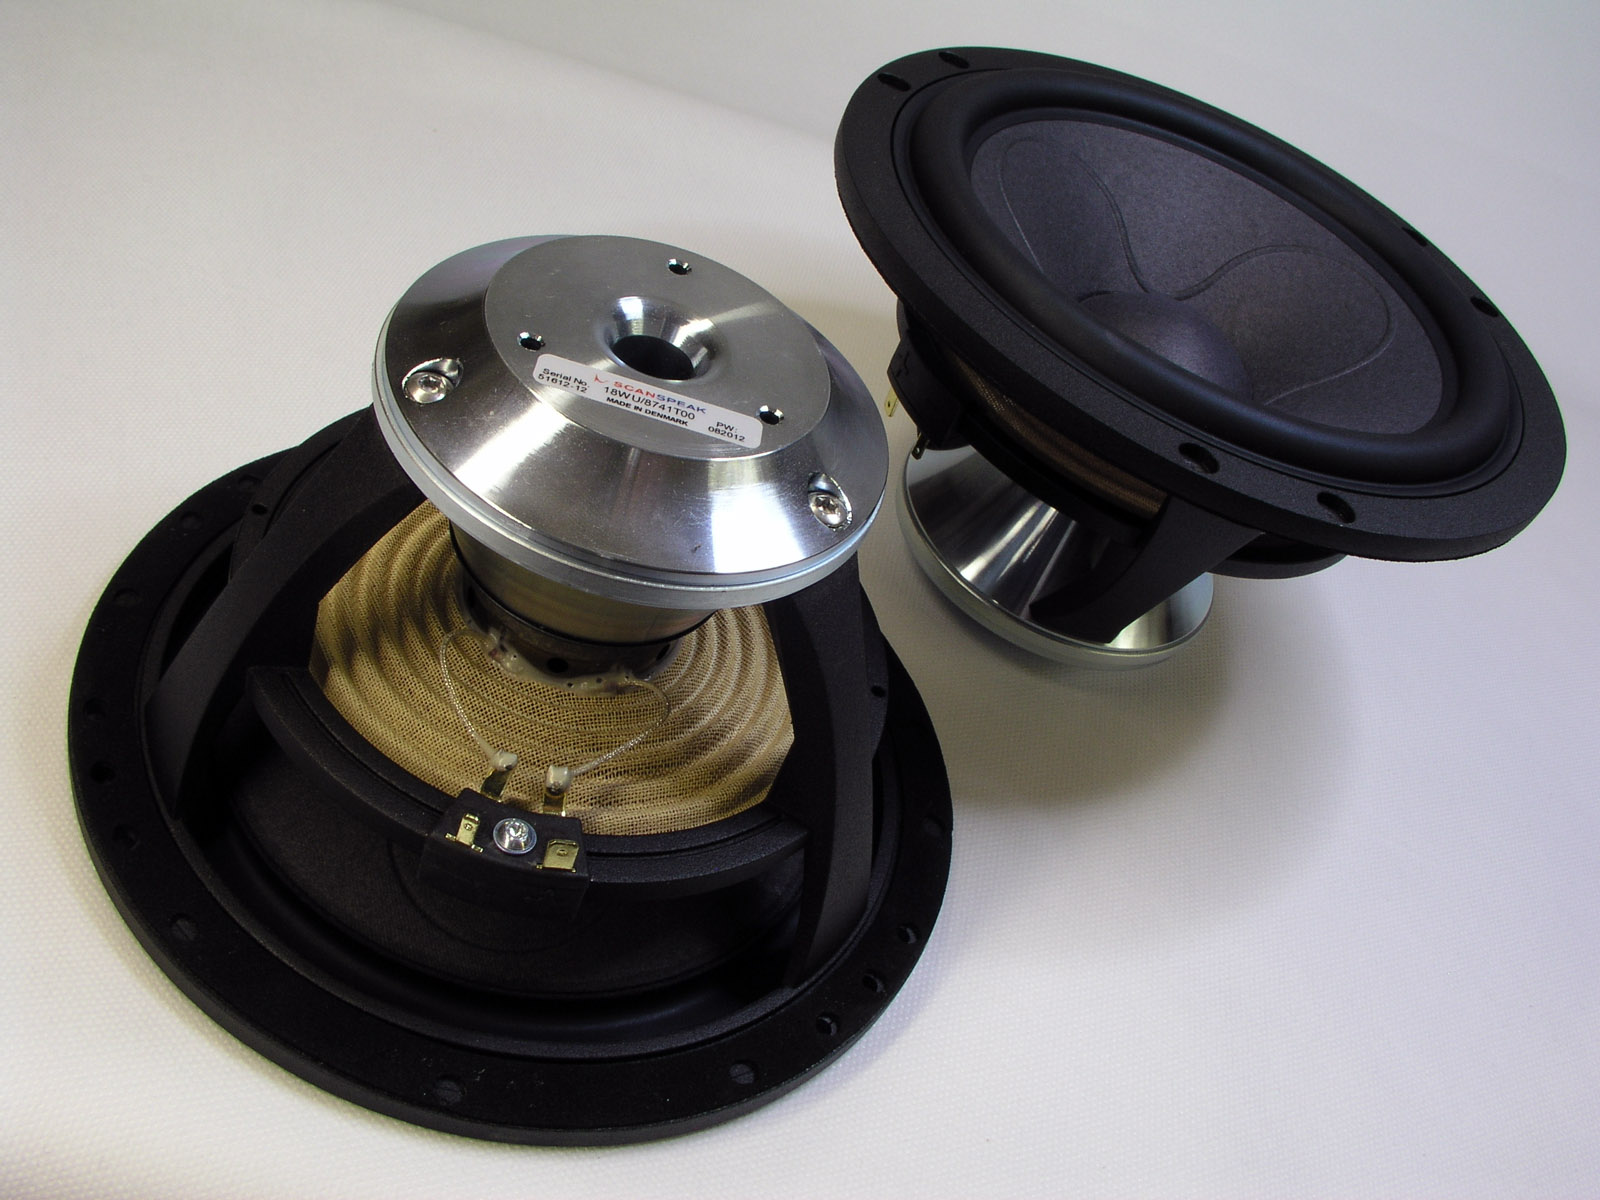
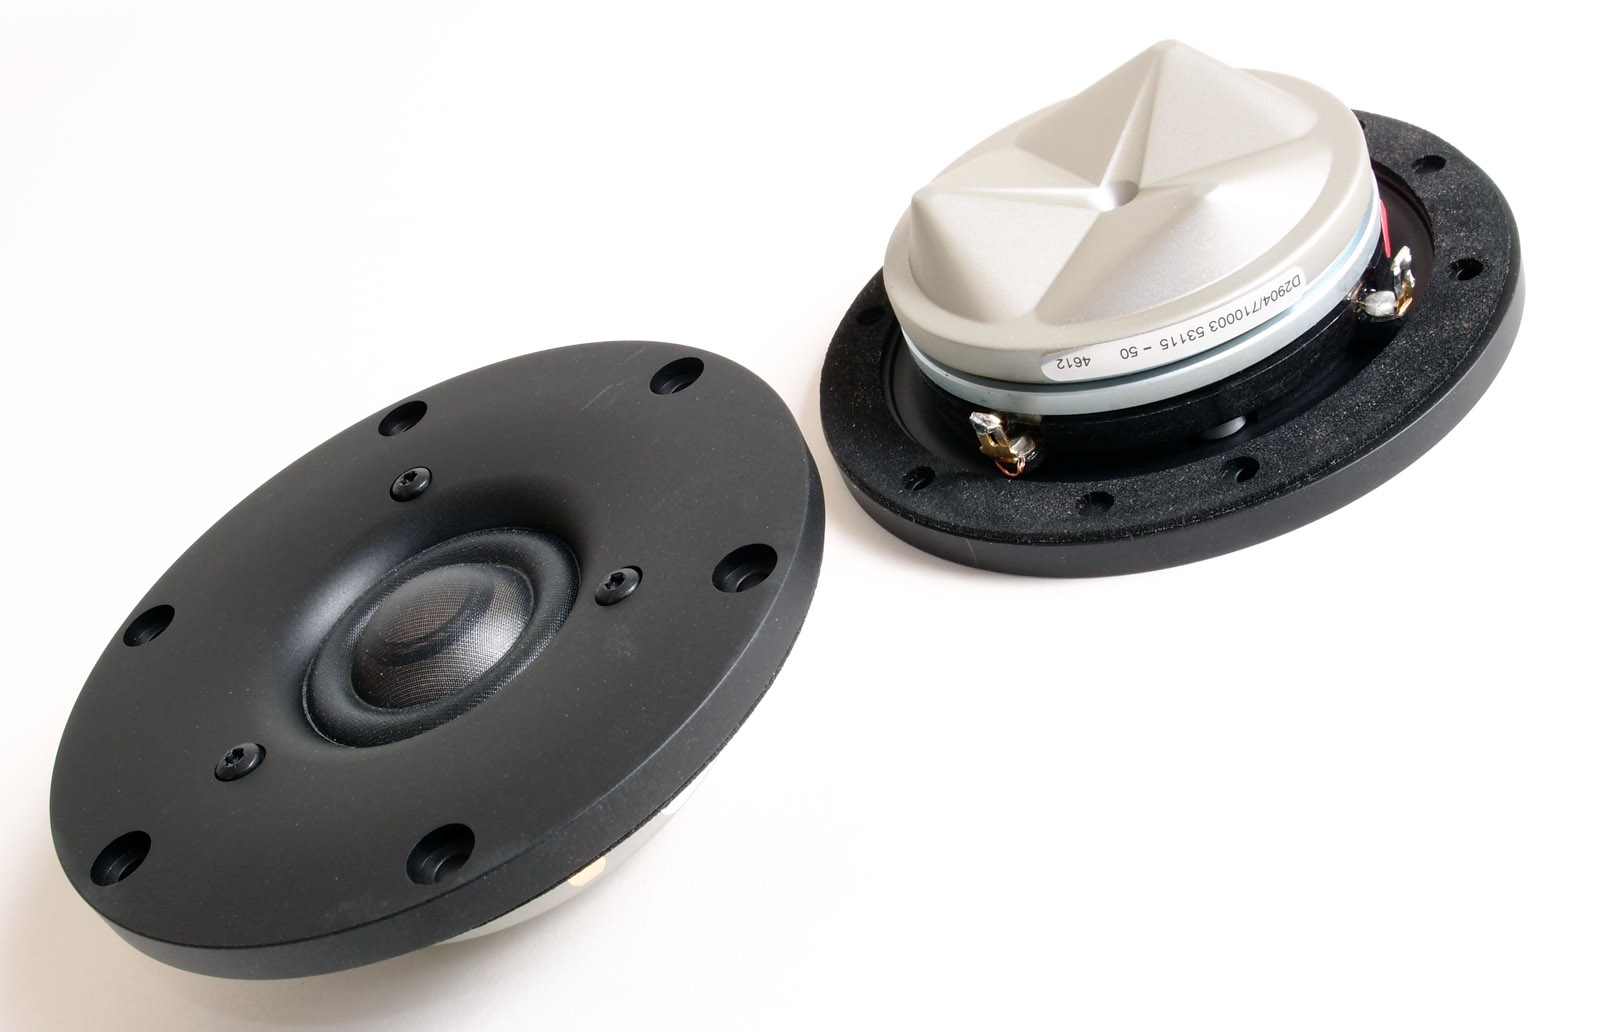
Download specs: 26W/8861T00 22W/8851T00 18WU/8741T00 D2904/710003
Speaker basics:
4-way speaker system or you could argue the 22W not having a high-pass
filter makes it a 3½-way due to the use of two bass drivers having
different low-pass transfers.
Bass reflex, closed box and aperiodic
tuning is used for lower bass, upper bass and mid-driver respectively.
Points of crossover; 80, 200 and 1700 Hz, 2nd order LR, mid and tweeter
time-aligned.
Impedance: 4 Ohms, minimum 3 Ohms.
Sensitivity: 88-89 dB/2.8 volts, 1 meter.
Amplifier requirement: Minimum 50 watts with decent current delivery.
Power handling: A lot! Read
here.
You cannot use any other driver than those specified, or you need a new
crossover - and I can't help.
Any change to front panel design and drivers' placement and alignment - and you need a
new crossover. Sorry, can't help.
Useful links (Please follow all links before e-mailing!):
http://www.troelsgravesen.dk/tips.htm
http://www.troelsgravesen.dk/tips.htm#CONSTRUCTION_OF_CROSSOVERS
http://www.troelsgravesen.dk/crossovers.htm
http://www.troelsgravesen.dk/LCR-RC.htm
http://www.troelsgravesen.dk/Inverted-Polarity.htm
http://www.troelsgravesen.dk/choices.htm
http://www.troelsgravesen.dk/power-handling.htm
Crossover components' values come with the kit.
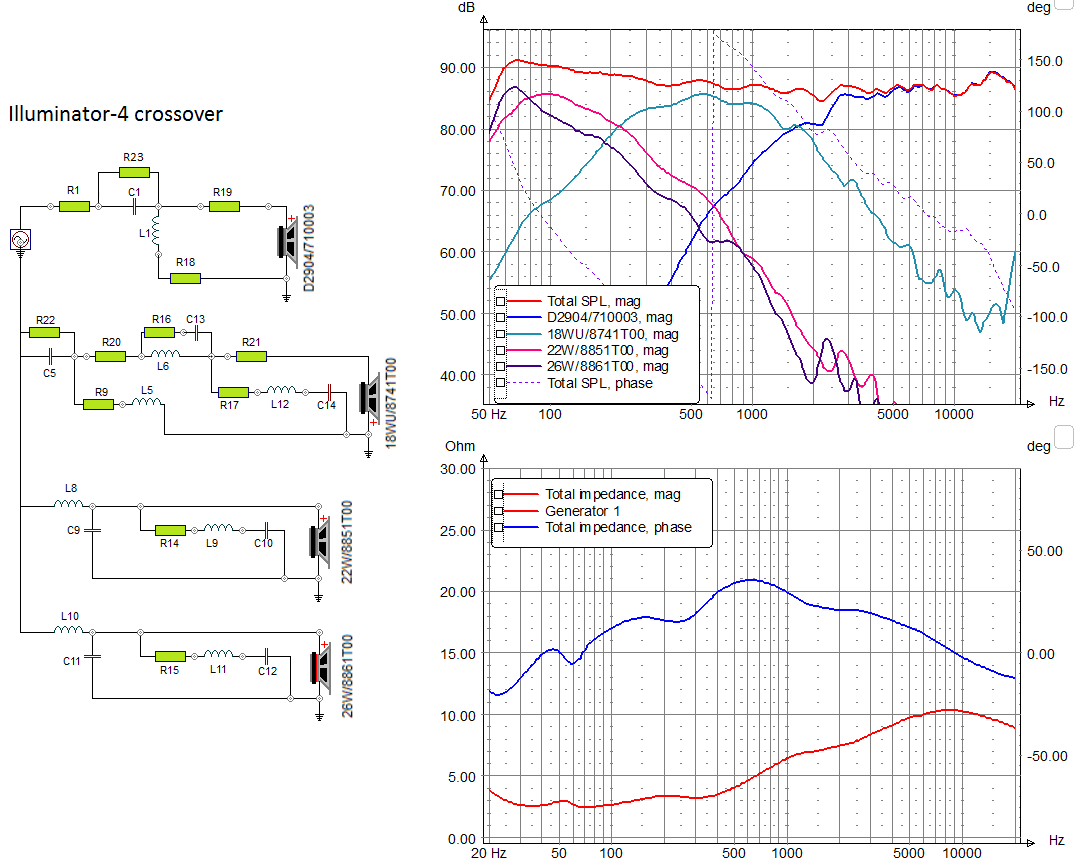
Above crossover simulation displaying working range of drivers and
points of crossover. Lower graph display predicted impedance profile.
Click images to view large
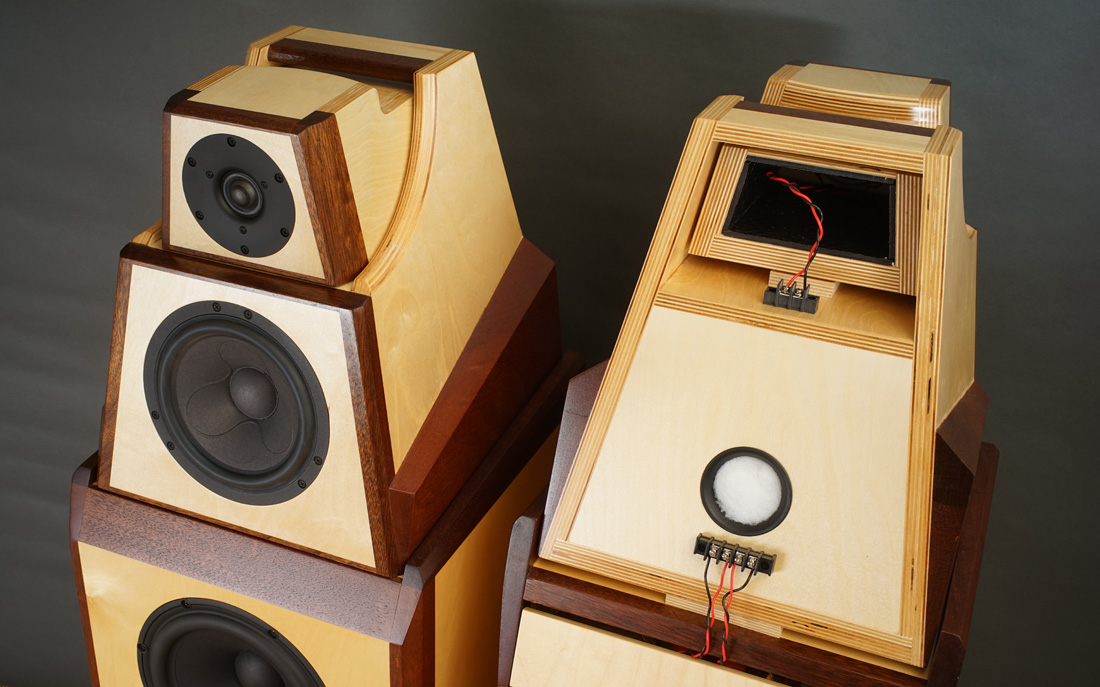
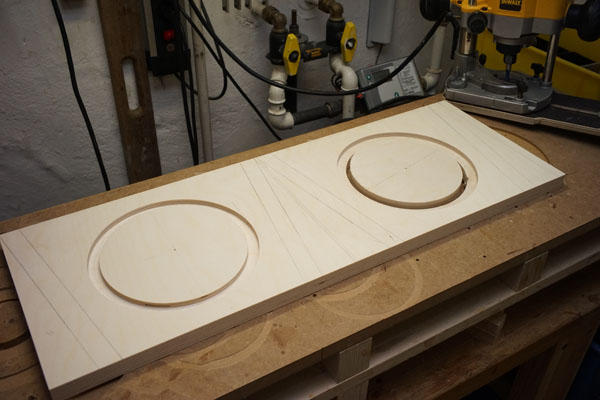
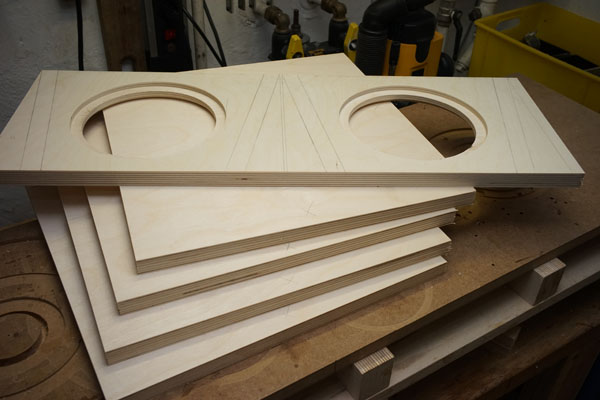
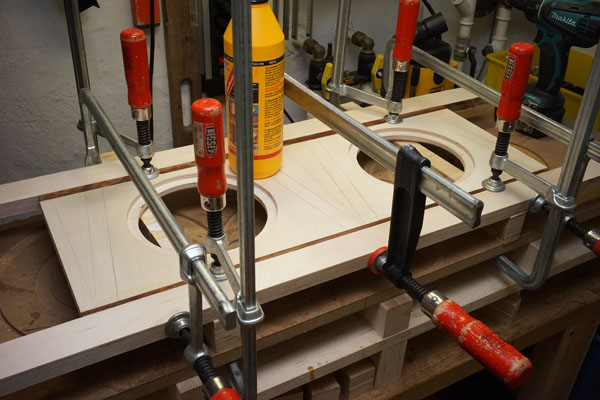
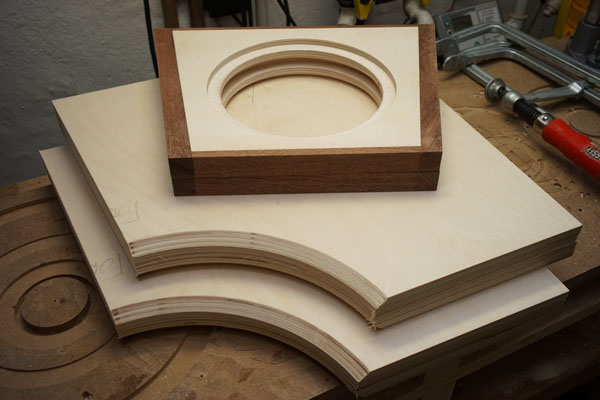
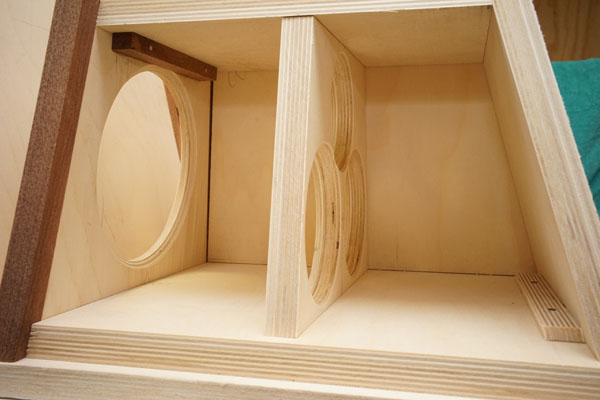
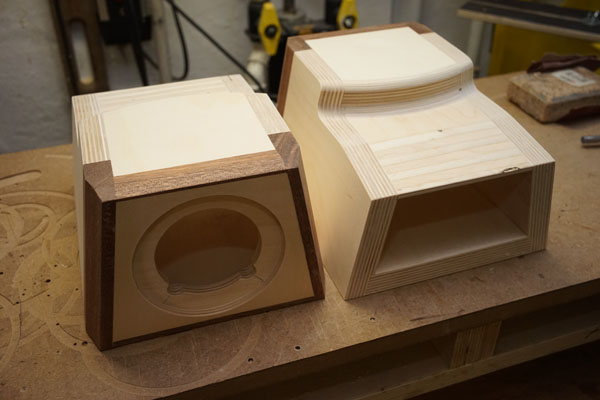
Above the fairly simple way to making the Illuminator-4.
The side panels of the midrange cabinet are optional.
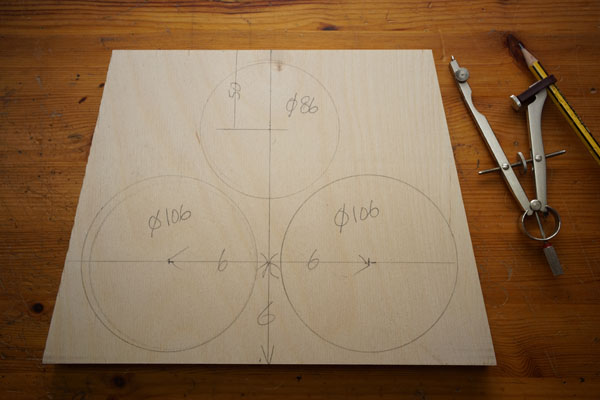
Midrange port: 50x100 mm. Stuff with acoustilux. Roll 10x20 cm
acoustilux and insert in port.
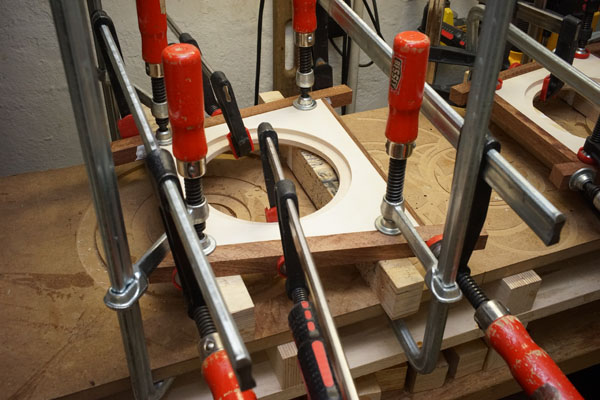
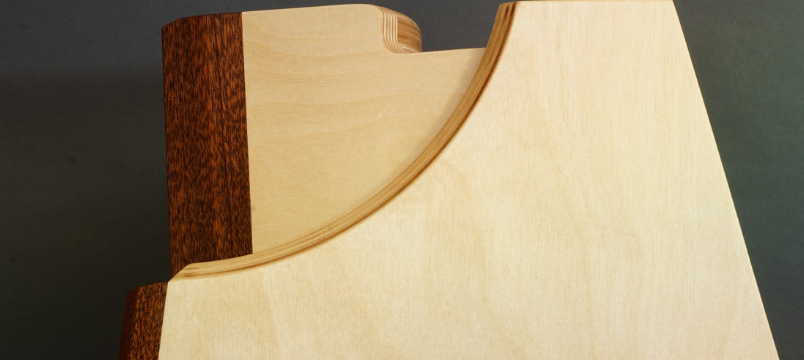
The not so easy way of making the Illuminator-4.
Upper part of mid and tweeter is fully up to you. No further details
available.
Look at ATS4 and
Jenzen-ATS for
inspiration.
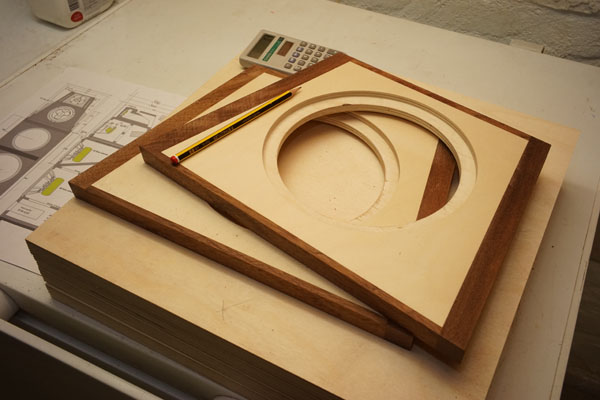
If this is all to much, check this drawing:

It doesn't have to be complicated as long as you stick to the few basics
outlined on the drawing.
Make good non-resonant cabs and this will sound any bit as good as the
more complicated constructions.
All things start with test set-up for fine-tuning cabinet design and
make crossover work as easy as possible.
In particular tweeter and midrange front panels can make huge
differences and jeopardize drivers' frequency response.
Click image to view large
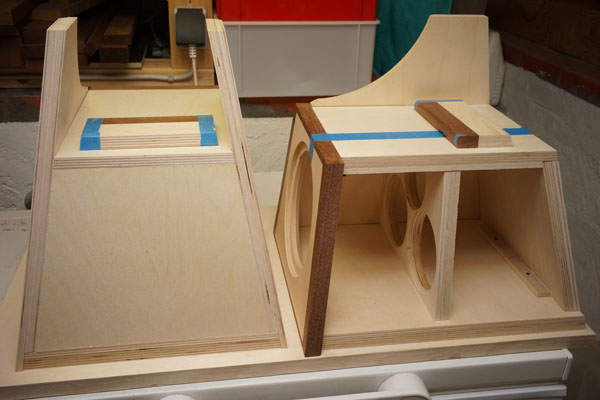
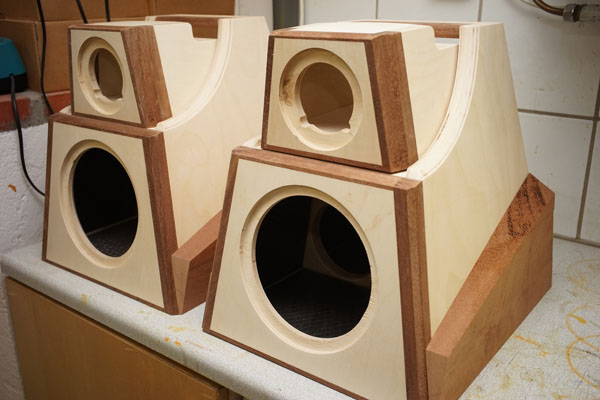
Construction pics
For bass cabinet, please go to
Illuminator-5 page.
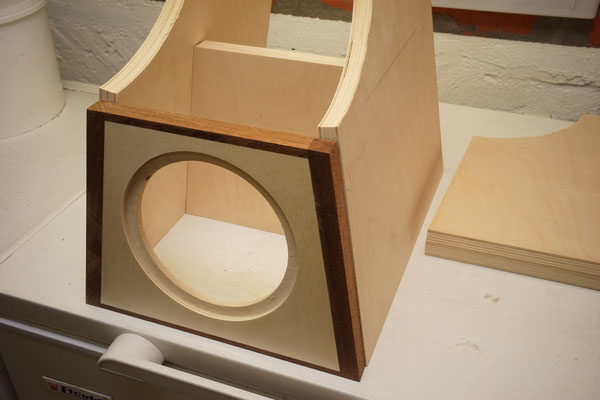
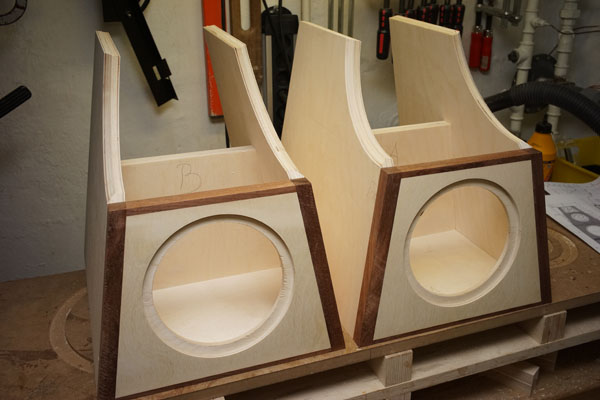
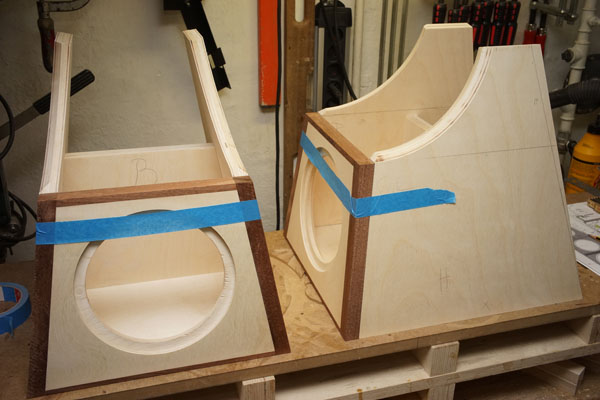
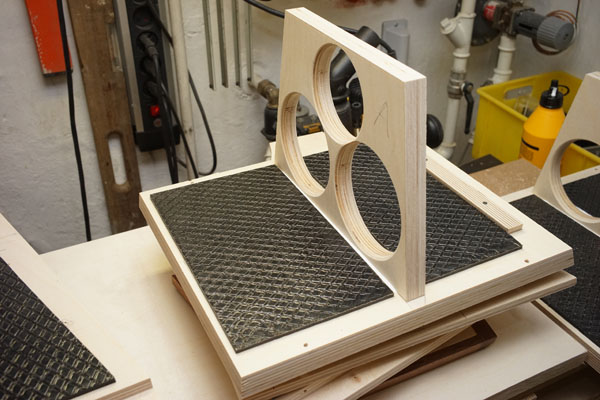
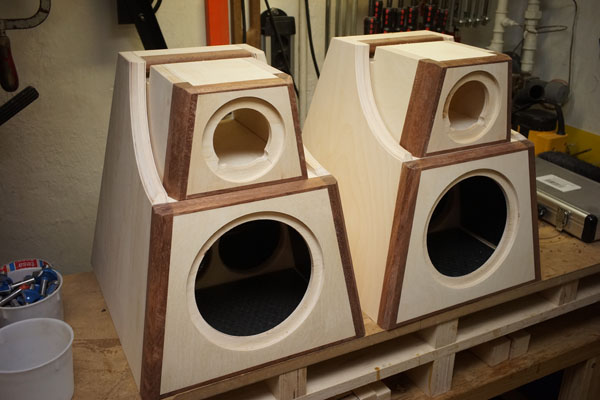
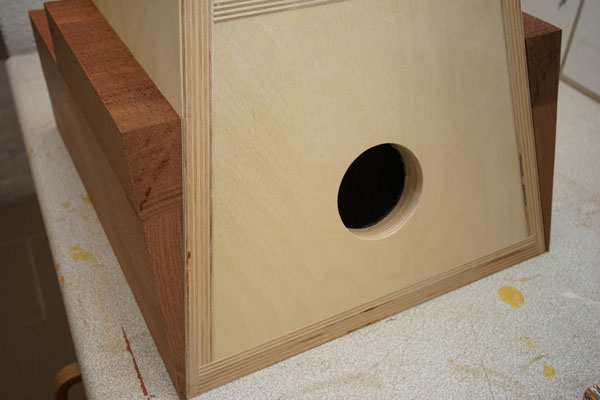
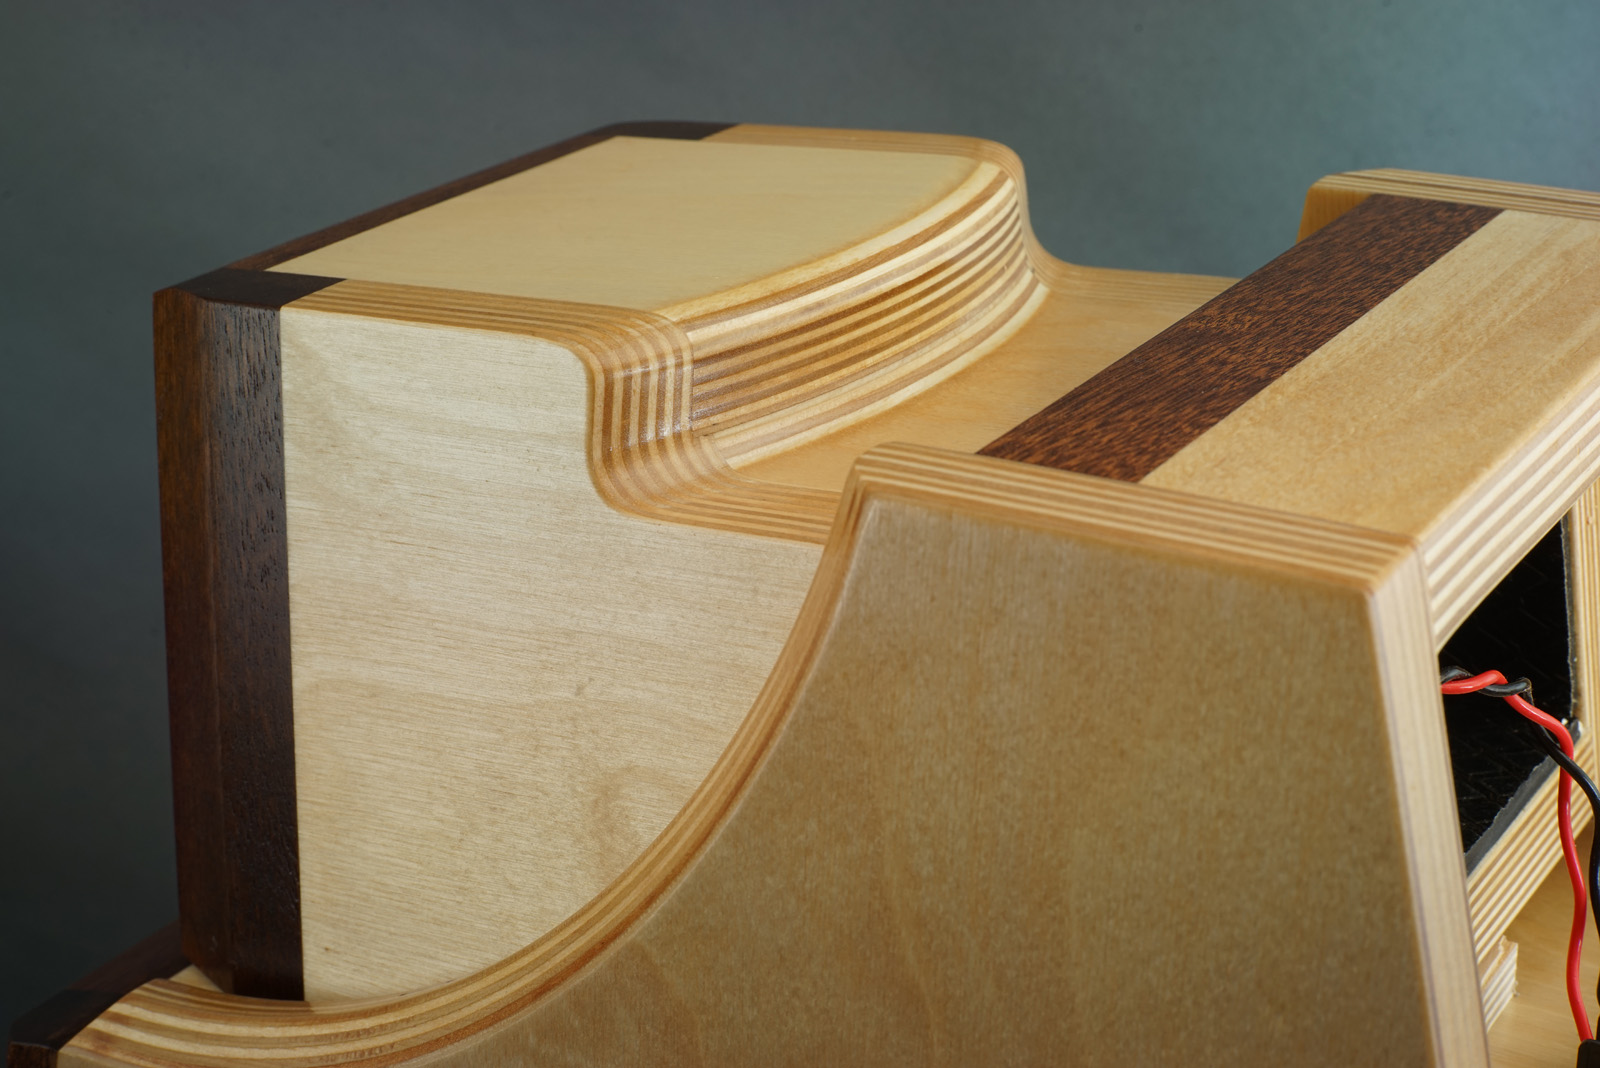
Below the mid and tweeter cabs.
Starting with the mid front panel. I used 18 mm BB made from laminating
2 x 9 mm.
Matter of taste, 15 mm too thin and 20 mm too thick.
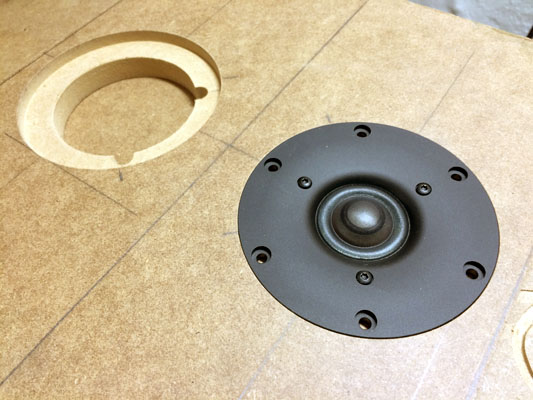
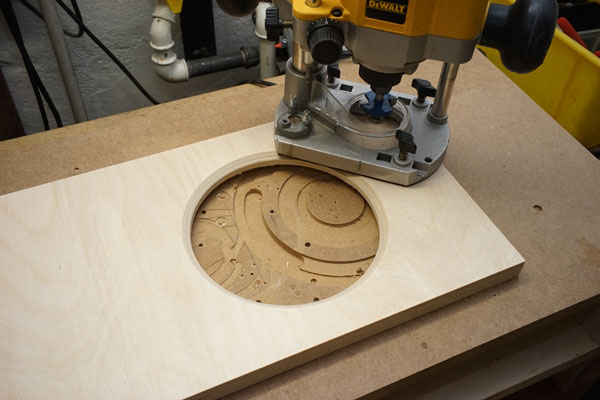
Front and side panels ready for further work. Checking out driver
rebate.
Never route for drivers before you have them at hand and can measure
exact diameter.
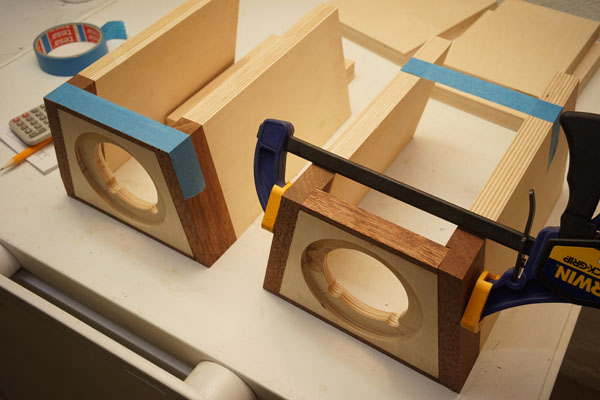
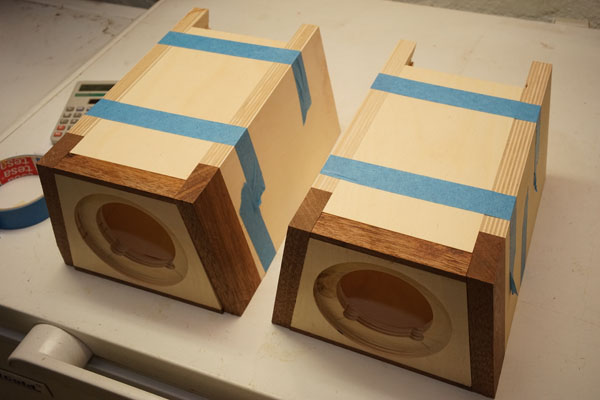
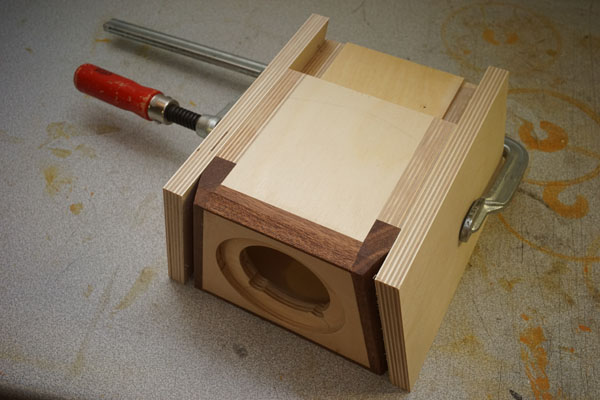
Gluing mahogany fillets to midrange front panel.

Mid front panels ready and routing side panel cut-outs.
The midrange front panel is cut 6 deg. at bottom and top to fit the
tilt.
Right: Cutting side panels 6 deg. towards front.
Right: Chamfering cut-outs 45 deg. half way through.
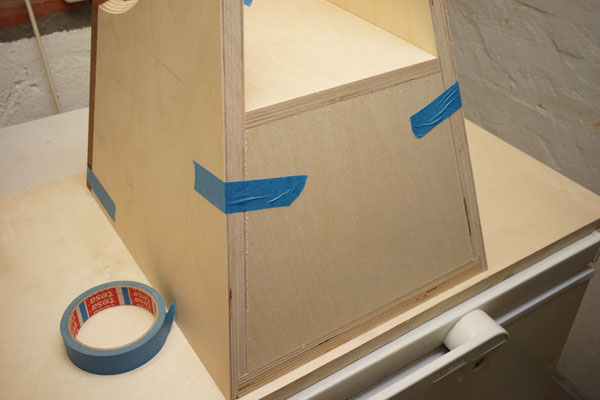
Time for bracing, rear and top panels.
Bracing holes. Right: Add fillets to support top and rear panel.
I usually never use screws for assembling cabinets, but here I
make an exception. Based on experience with pyramids, adding a few
screws to keep the bottom panel i place helps enormously. They can be
removed after the glued has dried.
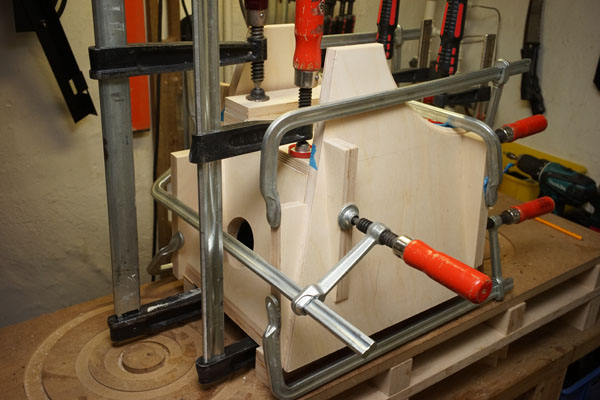
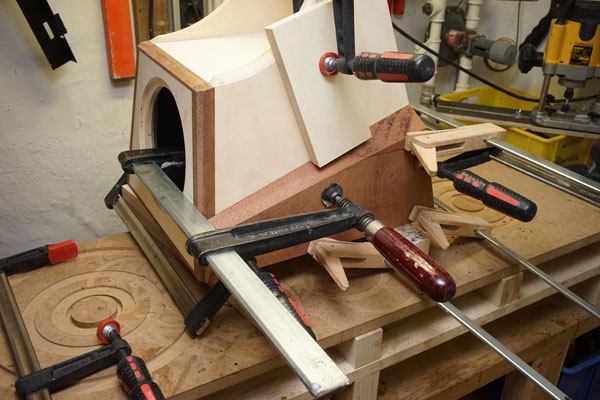
Adding bitumen pads and starting mid cab assembly. Cut wedges to prevent
clamps from sliding.
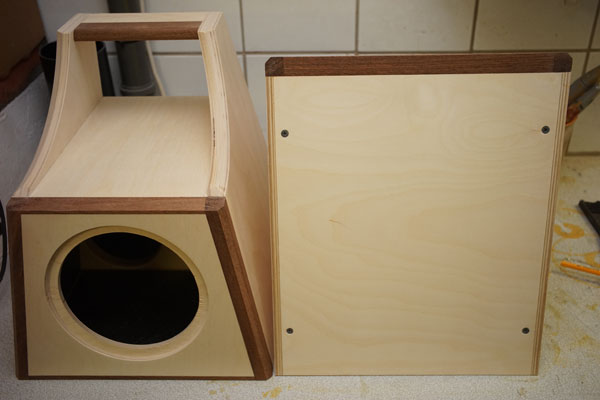
Tweeter cabs
It's the fourth time (Jenzen-ATS, ATS-4, Illuminator-5) I do tweeter cabs like these and from the beginning it's been almost the same procedure. Making the rounded cut-out towards the rear is actually quite easy and I've tried to document better this time I think. Take a look at images below. The most tricky part is the mid cab side panel wedges not having a band saw, but I think I found a better way next time.


Left: Routing for 7100 tweeters. Click image to view large.

Tweeter cabs ready for the top routing. Click right image to view large.
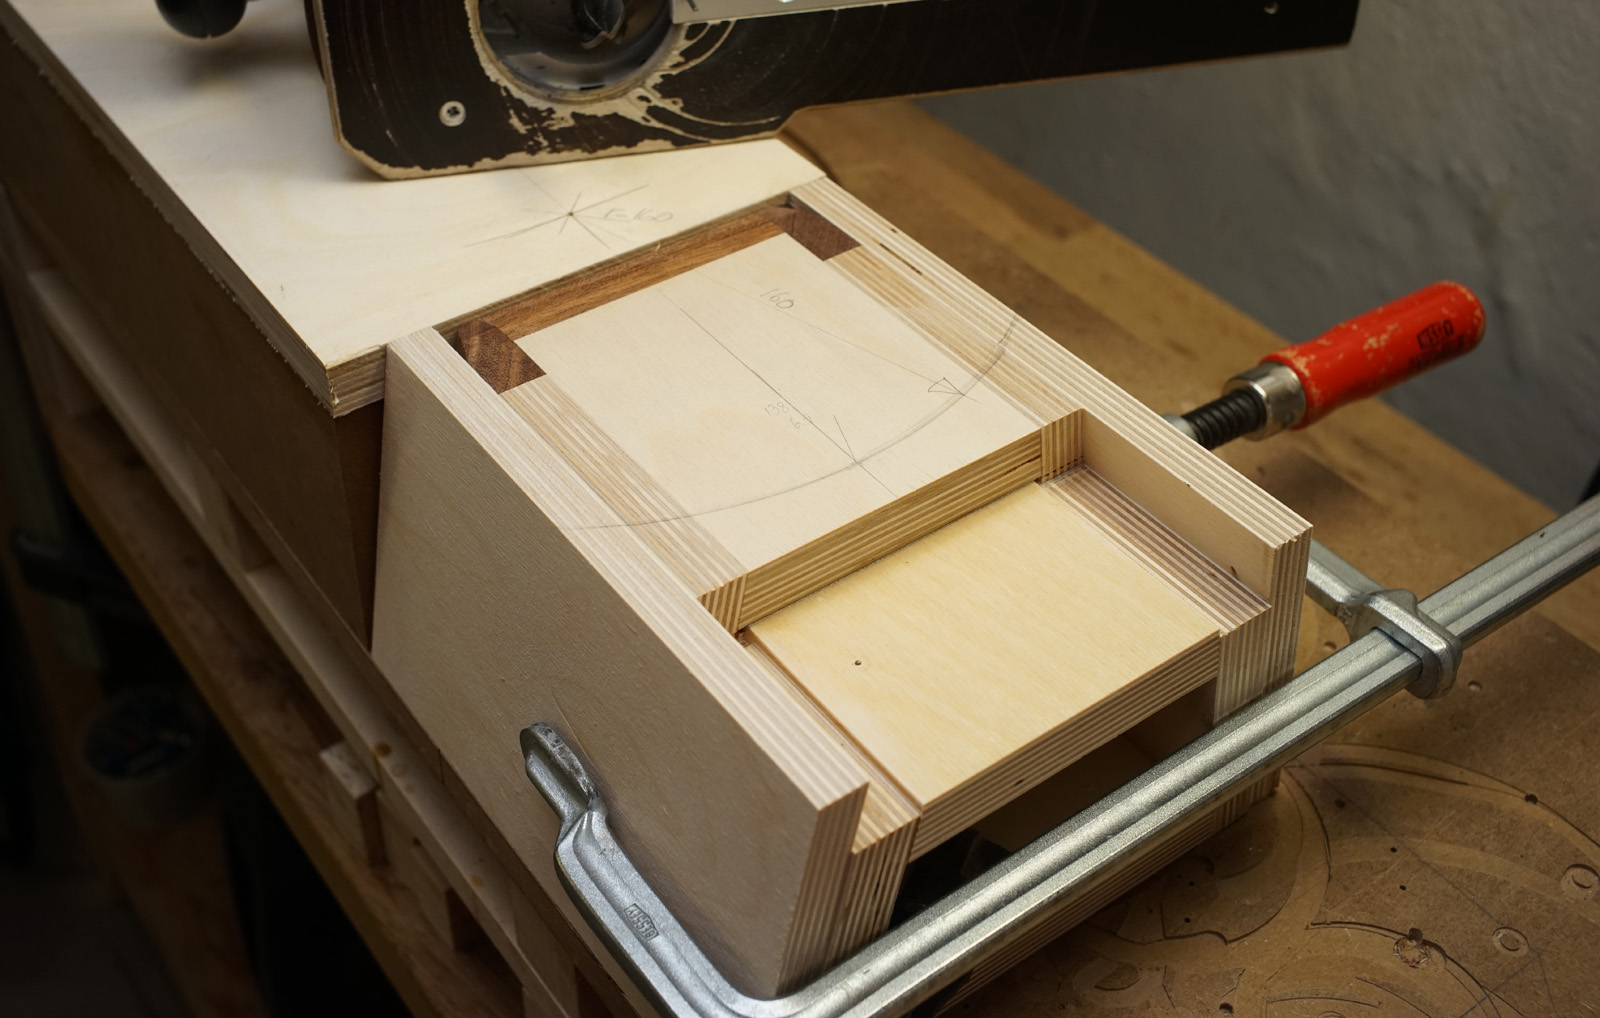
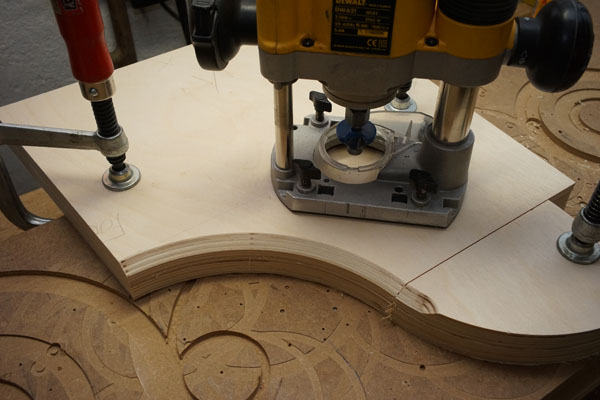
Making of the top routing. Add sides to the tweeter cabinet and keep in
place by clamps. This prevent the BB from serious edge ripping. The
support panels must be exact height of tweeter cab and cut 10 deg. to be
flush with tweeter cab to allow the router to slide over the top.
Make support for the router - same height as tweeter cab. Click right
image to view large.
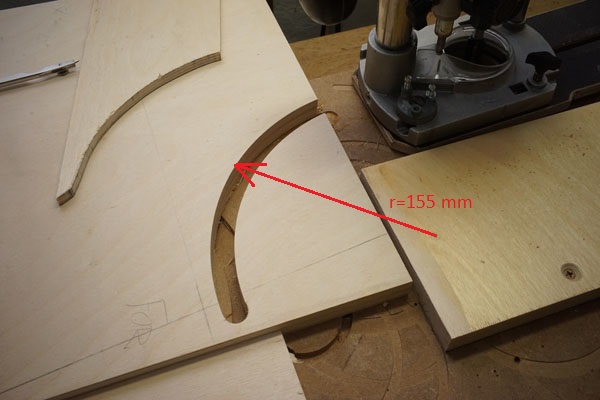
I used a radius of 160 mm and made a groove to around 25 mm depth and
used a 15 mm round nose bit.
The edge was rounded by using a rounding-over bit.
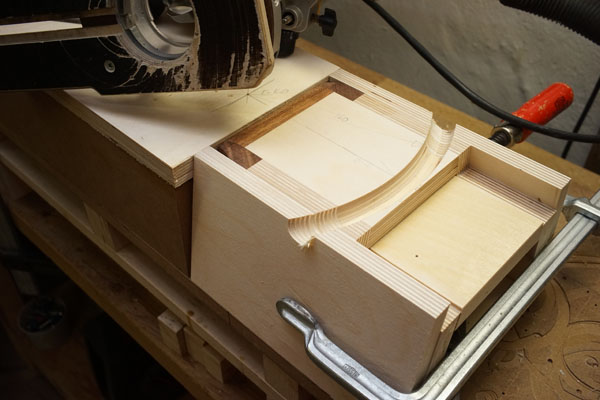
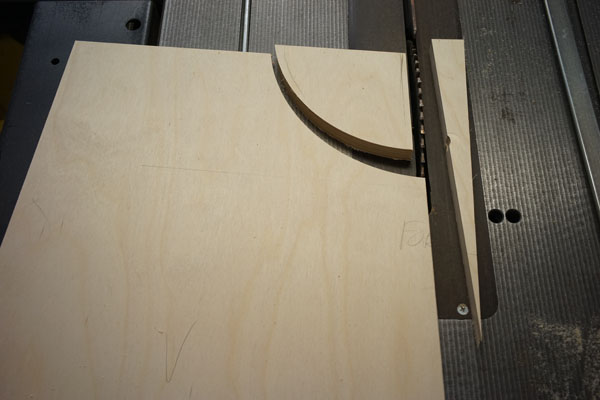
After finishing with the round nose bit, I used a straight bit for the
rest and finished off by using the table saw. This allows some 0-7 deg.
tilt of tweeter front panel.
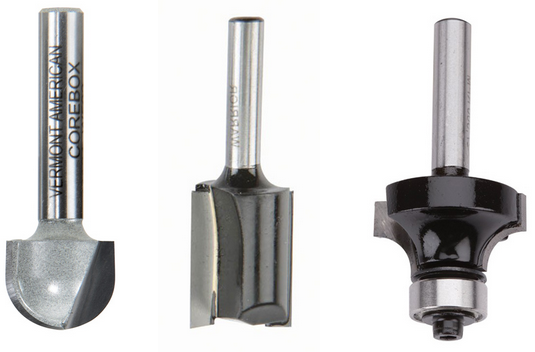
Router bits used.
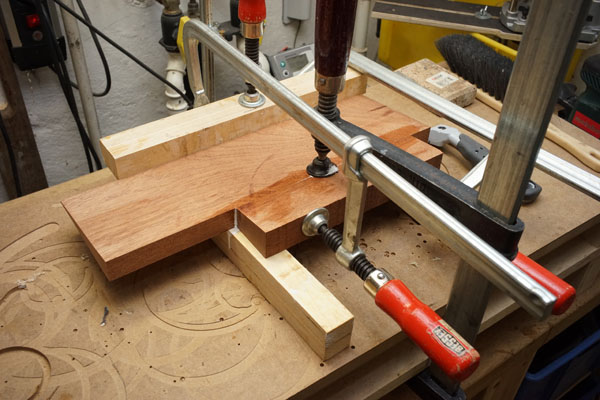
Mid cabs side panels
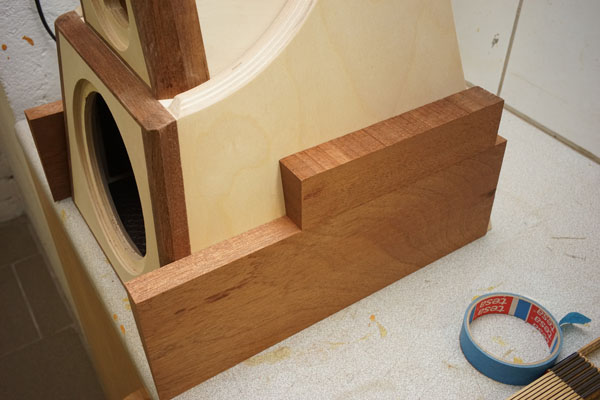
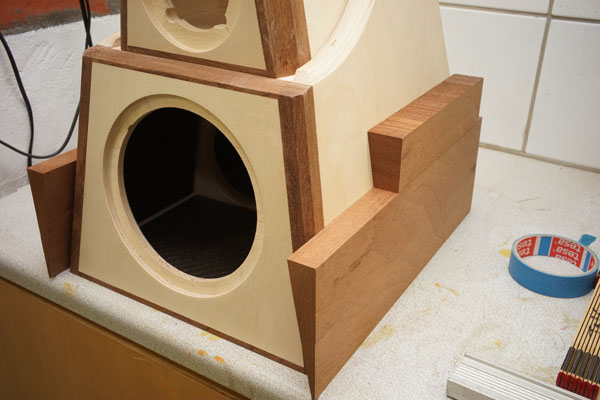
Preparing for the side reinforcement bars. This is not an easy task
unless you have a band-saw, which I don't, hence use my table saw and
cut from both sides and hopefully follow the cutting line exactly. The side bars
add to the rigidity of the mid cab and well, look nice too. Making it
all from MDF and doing spray paint is quite a lot easier.
Gluing the side bars. No dimensions given here, really up to you how you
make them, or if you want them at all.
Right: Gluing side bars.
Side bars ready for gluing to cabs. The side bars were cut 38 deg. with
reference to outer side.
What height front and rear you want is up to you.
'
Right: Next is some hours of tedious sanding, a little filler here
and there and they are ready for lacquer.
I use grade 120 and 180 before lacquer. Lacquer is applied with a
roller. First coating is dried 48 hours before sanding with grade 180
and second coating applied. I use semi-gloss synthetic lacquer. See
tips
file.
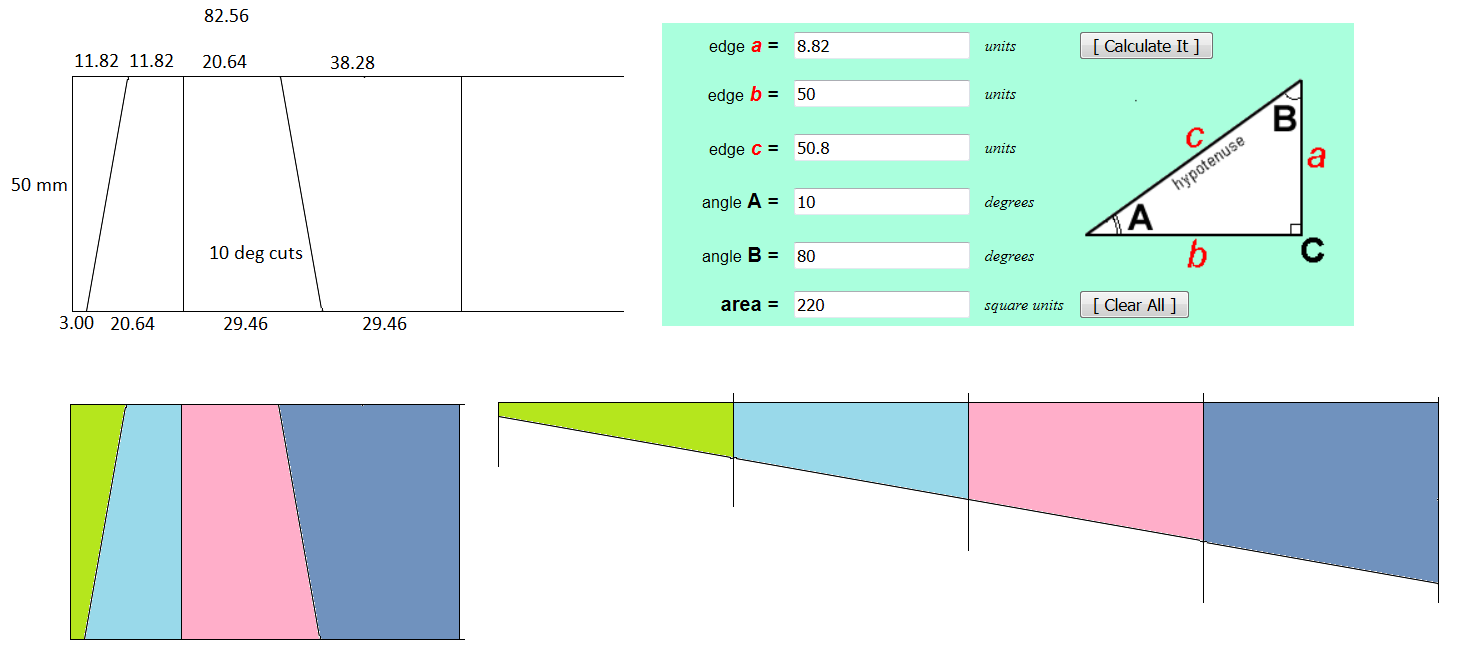
Next time I have to make side panels for a mid cabinet, I'll do like above: Make a 50 mm plank of solid wood and cut it in sections 0 or 10 deg. and glue it together. Assuming 3 mm at bottom we have with a 50 mm thickness a top width of 11.82 mm. Next you cut vertical to make 11.82 mm at top, etc. I haven't tried it, but I will. Click image to view large.
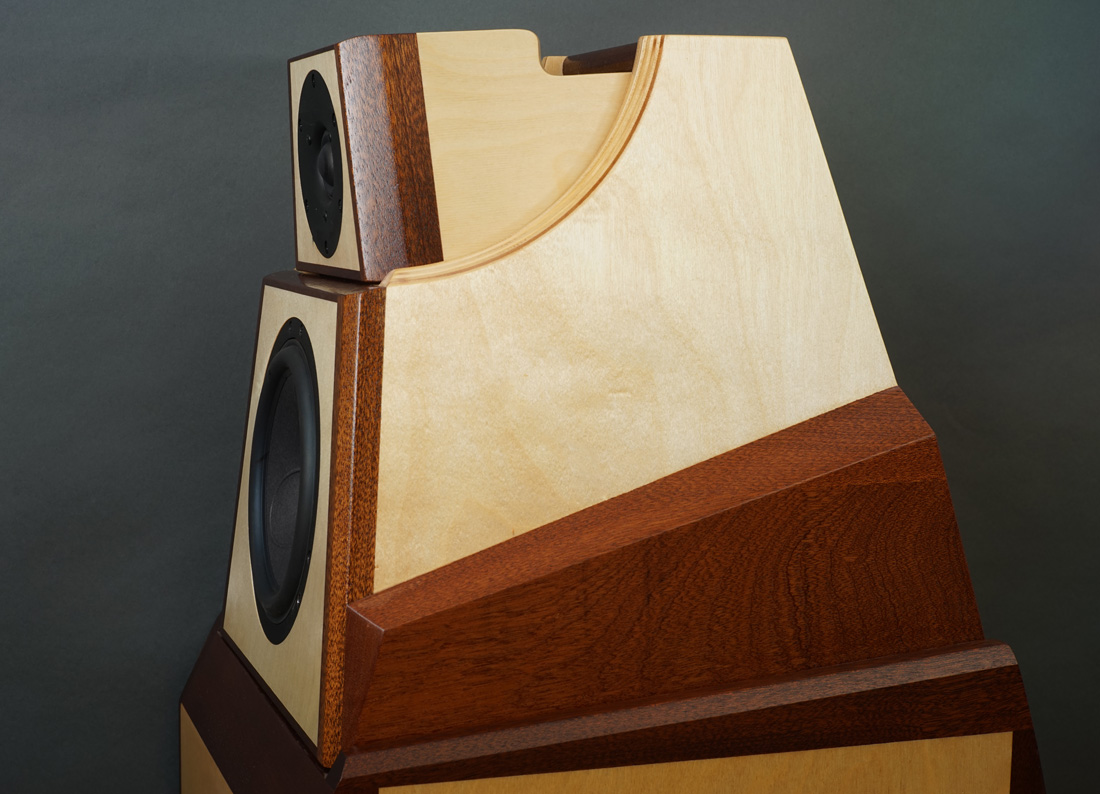
Tilt of mid and tweeter cabs
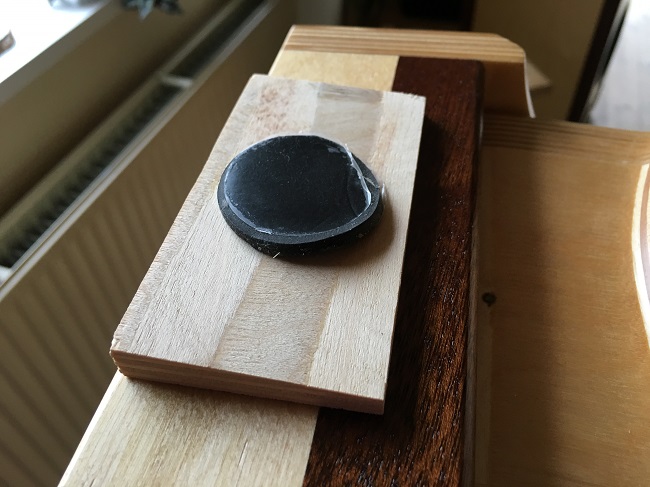
I've made two wedges for the tweeter and mid-cab, 10 mm high and I use some sorbotane pads to reduce vibration from the bass cabinet. The max height of the wedges obviously depends on you listening distance, but try out various positions to make the best integration of sound from the various cabinets. Normally the tweeter takes some tilt to make the best integration of sound.
Everything that can be counted does not
necessarily count; everything that counts cannot necessarily be counted".
Albert Einstein.
A few comments on MEASUREMENTS before you start
interpreting all the readings below.
First of all, if we think measurements will tell us how a speaker
sounds, we're wrong. The perception of sound is way too subjective to be
reflected in any measurements we can perform. A loudspeaker system is
meant to give us a satisfying idea of an acoustic event and for some
people a pair of 5 USD ear-plugs are enough, others spend 200 kUSD on a
truly full-range pair of speakers - and the latter may not be happier
than the former.
Measurements may give us an idea of tonal balance of a system, i.e. too
much or too little energy in certain areas. Measurements may tell us
about bass extension if far-field measurements are merged with
near-field measurements. In addition to this, ports may contribute to
bass extension. Most of us diy'ers do not have access to an anechoic
room for full-range measurements from 20-20000 Hz.
What cannot be seen is what kind of bass performance we get in a given
room. Bass performance is highly dependent on in-room placement of your
speaker and the same speaker can be boomy in one place and lean in
another. Actual SPL level at 1 meter distance and 2.8V input is useful
for en estimate of system sensitivity and combined with the impedance
profile may give an idea of how powerful an amplifier is needed to drive
the speaker to adequate levels.
What measurements do not tell is the very sound of the speaker unless
displaying serious linear distortion. The level of transparency, the
ability to resolve micro-details, the "speed" of the bass, etc., cannot
be derived from these data. Distortion measurements rarely tell much
unless seriously bad, and most modern drivers display low distortion
within their specified operating range.
Many people put way too much into these graphs and my comments here are
only meant as warning against over-interpretation. There are more to
good sound than what can be extracted from a few graphs. Every graph
needs interpretation in terms of what it means sonically and how it
impacts our choice of mating drivers, cabinet and crossover design.
What measurements certainly do not tell is the sonic signature of the
speaker, because speaker cones made from polypropylene, aluminum, Kevlar, paper, glass
fiber, carbon fiber, magnesium, ceramics or even diamonds all have their
way of adding spices to the stew. Nor do measurements tell what
impact the quality of the crossover components add to the sound, from
state of the art components to the cheapest of coils and caps, they all
measure the same if values are correct.
Here are a few measurements:
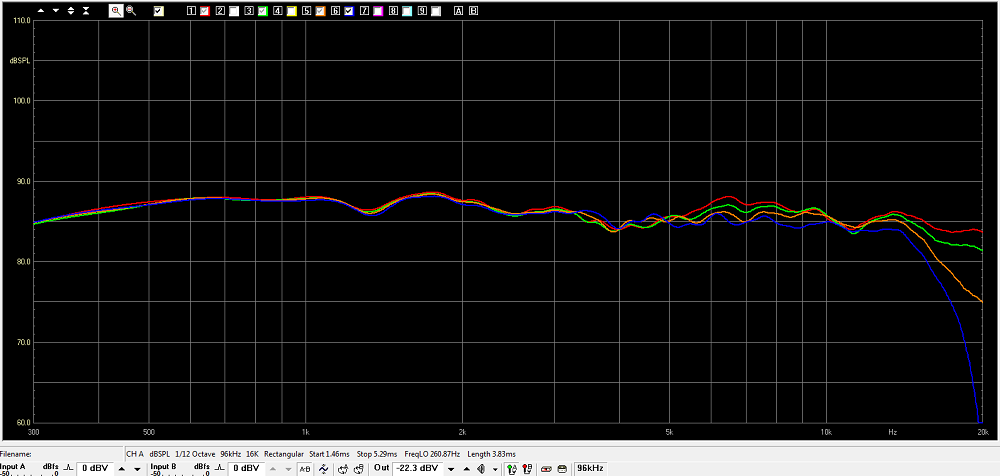
I've chosen a measurement here of the
midrange-tweeter section @ 0, 10, 20 and 30 deg, off-axis
(red/green/orange/blue). This shows a very even power response in all of
the midrange and treble range up to 15 kHz. There's not hot seat here.
Overall sensitivity is around 88 dB/2.8V/1 meter.
I won't show the full-range profile as this has to be composed from
merging near-field response of upper bass, lower bass and ports - and in
any case is highly manipulated and can look like anything depending on
how it is done. Looking at the simulation above gives a better idea of
bass extension. Feel sure this speaker goes deep!
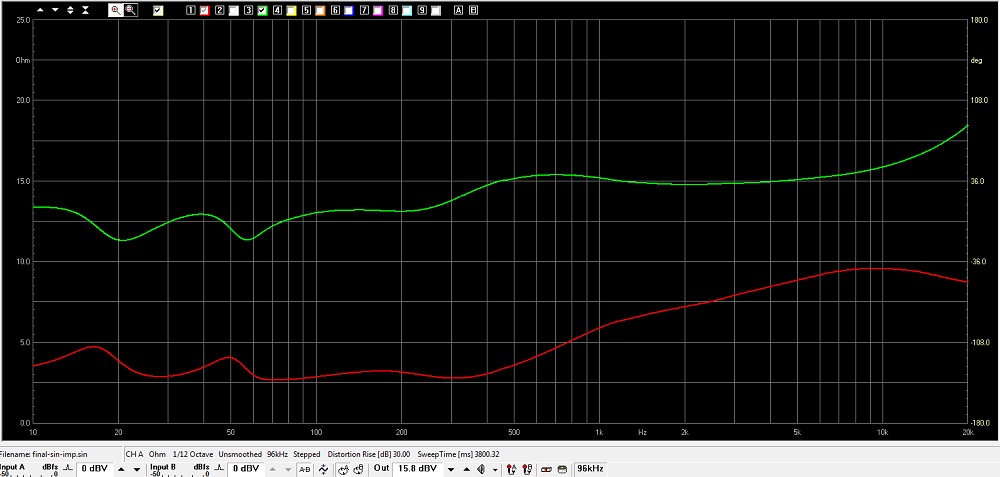
Above the final system impedance displaying an
unusual smooth result with no sharp phase angles - and easy load on any
amplifier - although not suitable for tube amps with a minimum impedance
of 3 Ohms. As said elsewhere, my workshop Jungson 80 wpc solid state as
well as my living room GlowMaster/Hypex combo both loves this speaker
and runs it to thunderous levels without problems.
Port tuning can be read to a little below 30 Hz. The mid-tweeter section
is an easy load on any tube amp.
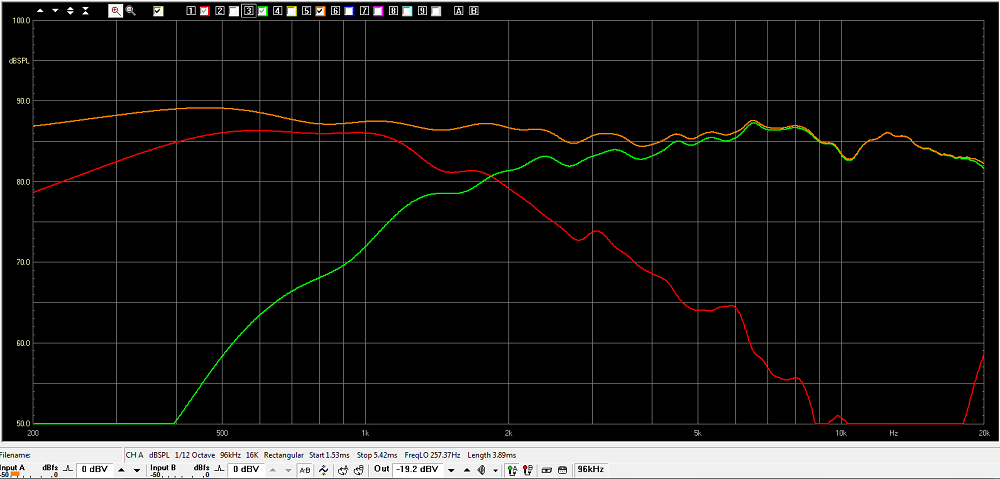
Finally the response of mid and tweeter driven from the crossover. The point of crossover may seem a little higher than specified, but the middle of the suck-out when I reverse tweeter polarity is around 1.7 kHz. Note smooth roll-off of both tweeter and midrange.
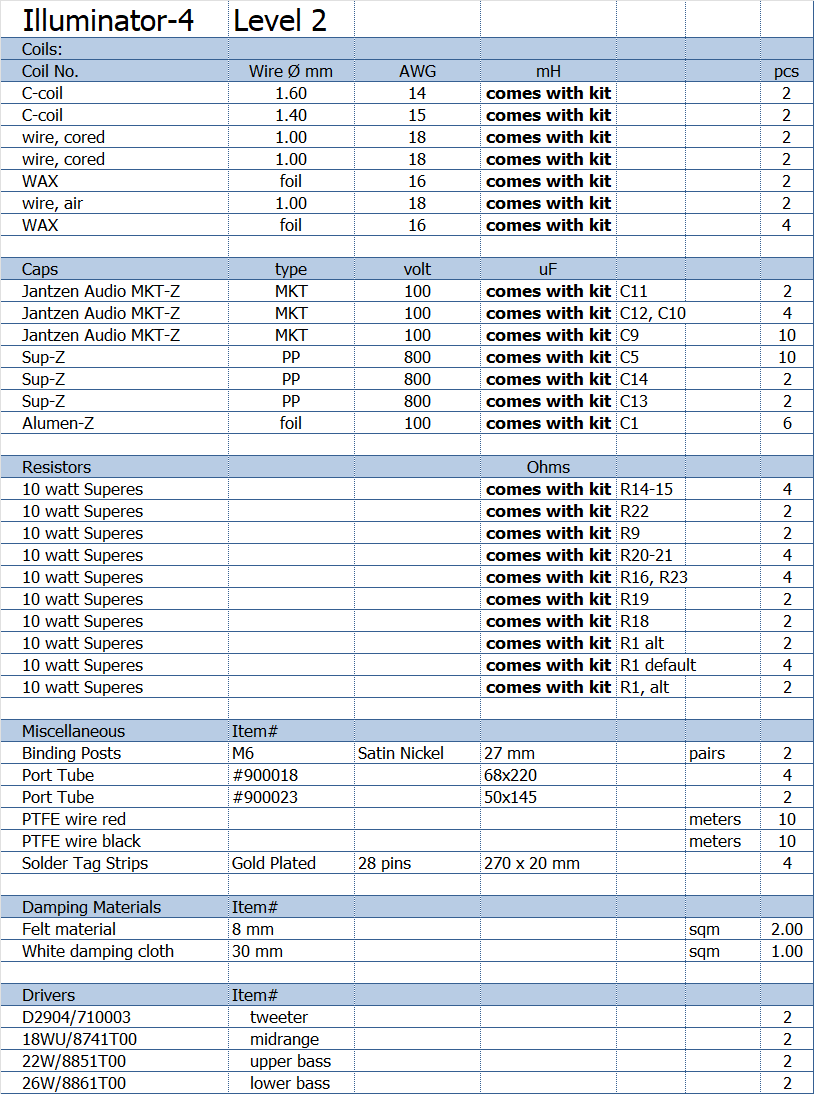
Two Kit Levels
Above the level 2 kit with Alumen-Z for tweeter as shown on
pictures below.
In level 1, C1 is replaced by Amber-Z and you have to expand the board
and also the crossover compartment. Mail for advise.
You can buy the kit with or without the drivers - or some of the drivers
if you already have some.
All kit and component prices may be subject to change and are always to be confirmed by Jantzen Audio Denmark.
Download Kit
Sale Presentations

All technical questions to troels.gravesen@hotmail.com
All questions regarding purchase of kits, please mail Jantzen Audio at contact@jantzen-audio.com
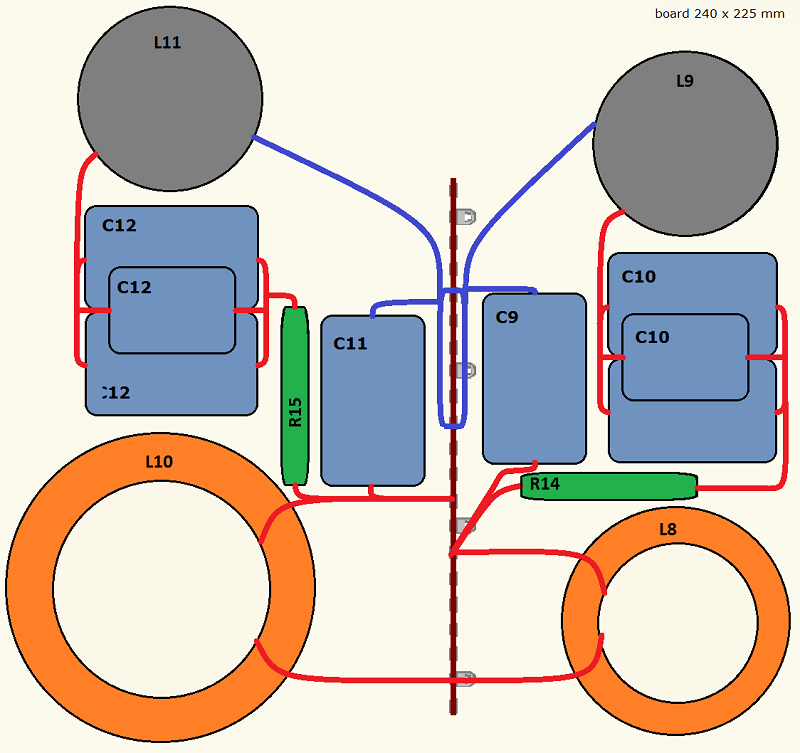
CROSSOVER-LAYOUT
BACK TO INDEX
Check this out before start making crossovers:
http://www.troelsgravesen.dk/tips.htm#CONSTRUCTION_OF_CROSSOVERS
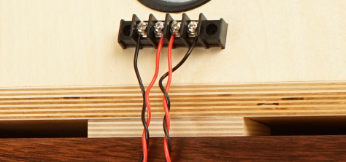
Mid-tweeter layout and wiring
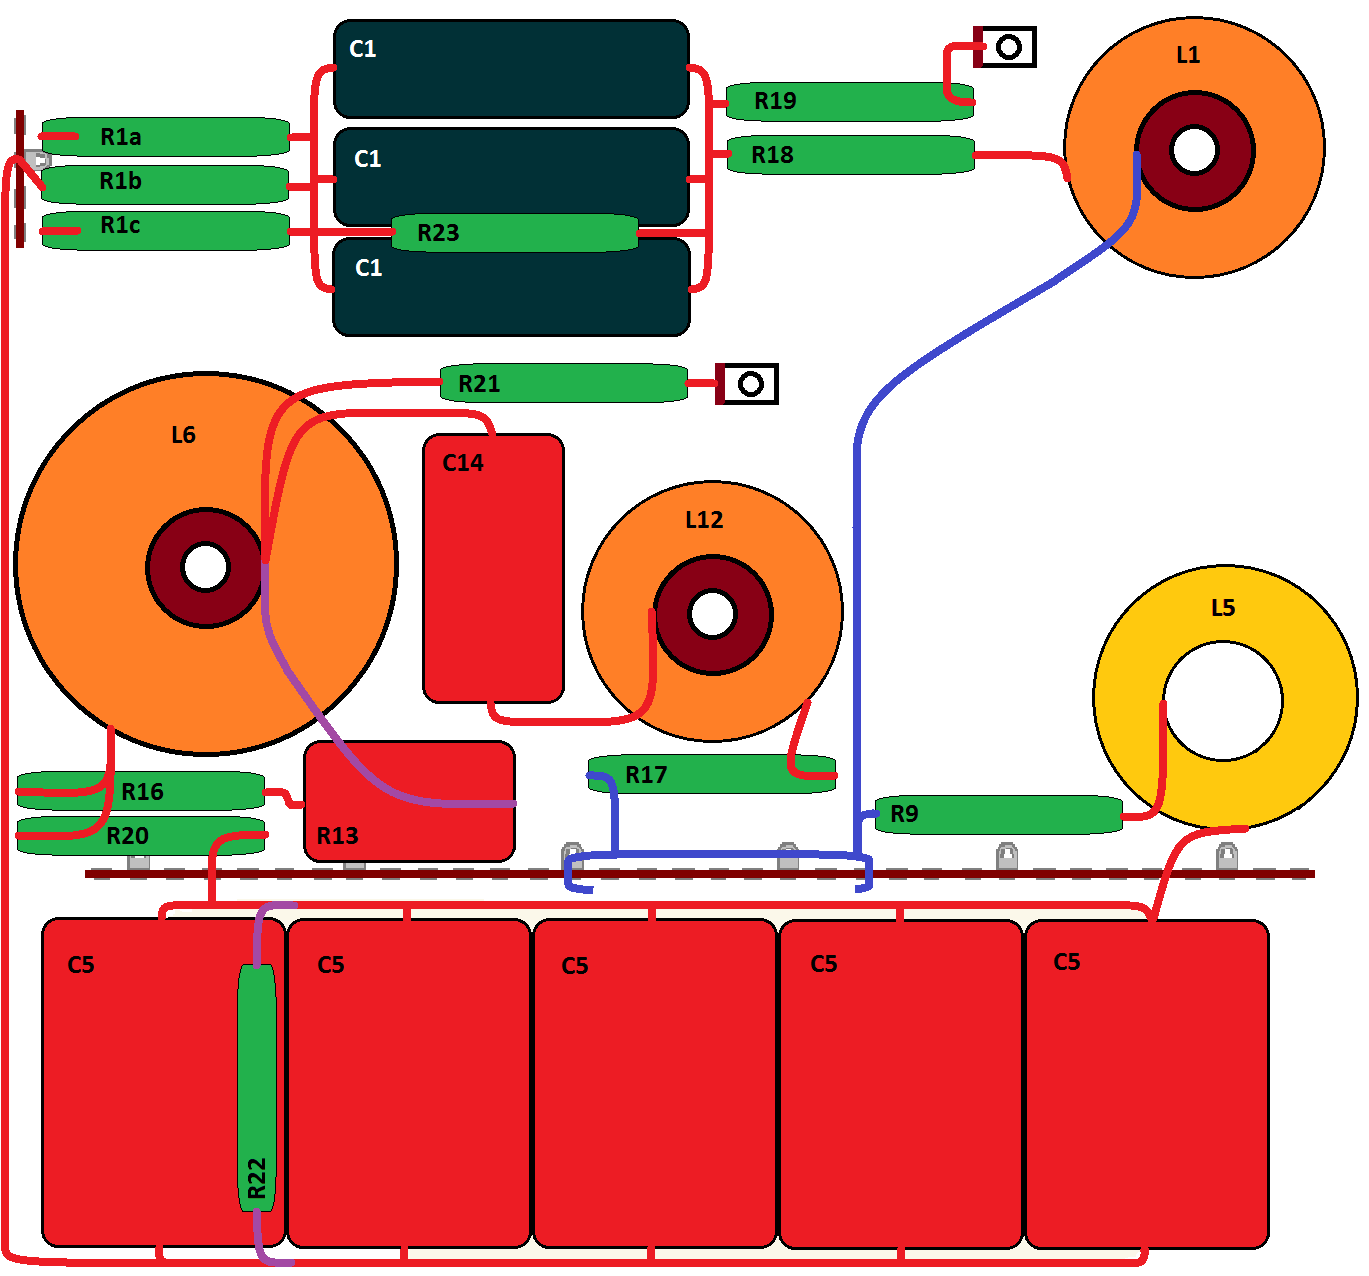
Click image to view large
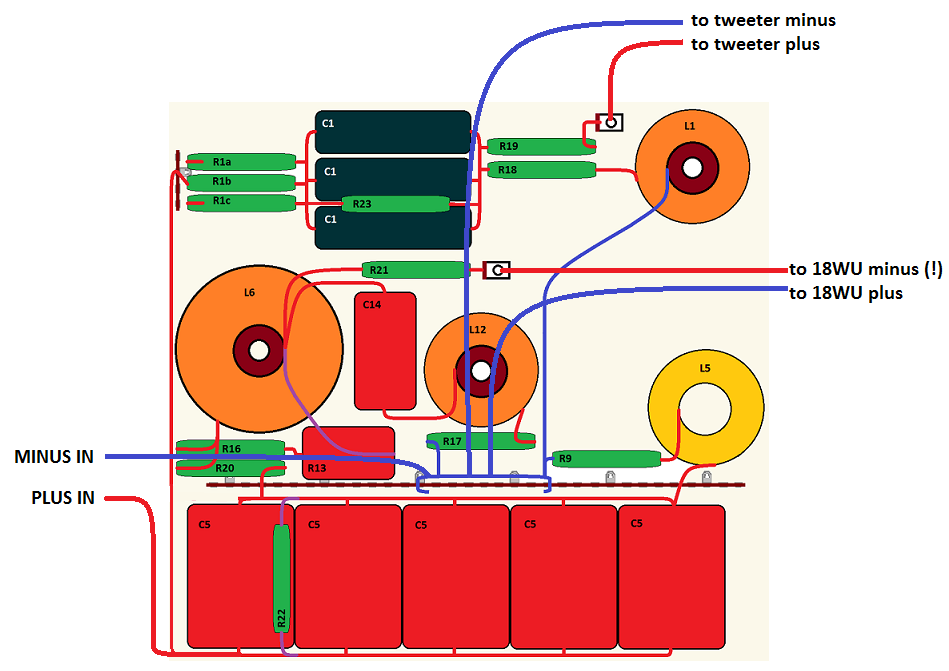
Please not the 18WU driver must be connected with inverted polarity.
Plus from the crossover goes to minus terminal on driver.
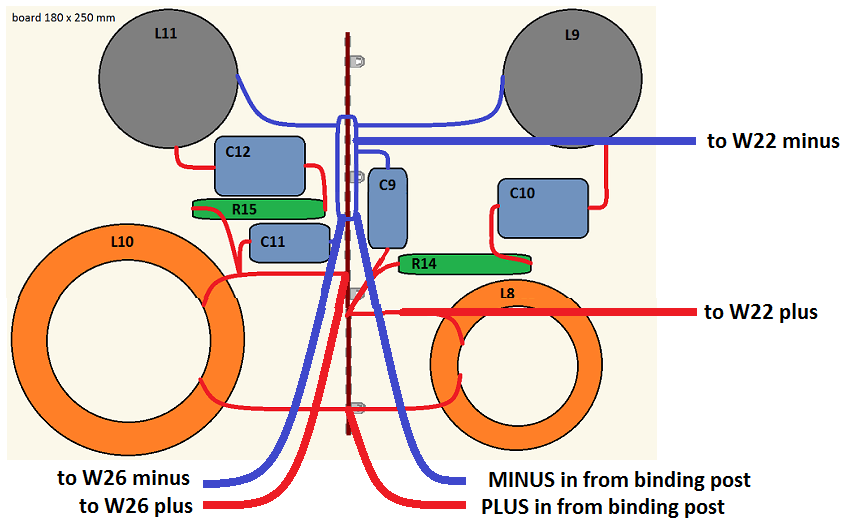
Bass section layout and wiring
Bass crossover. Wiring the
same as seen below.
All electrolytics now replaced by Jantzen Audio MKT-Z caps.
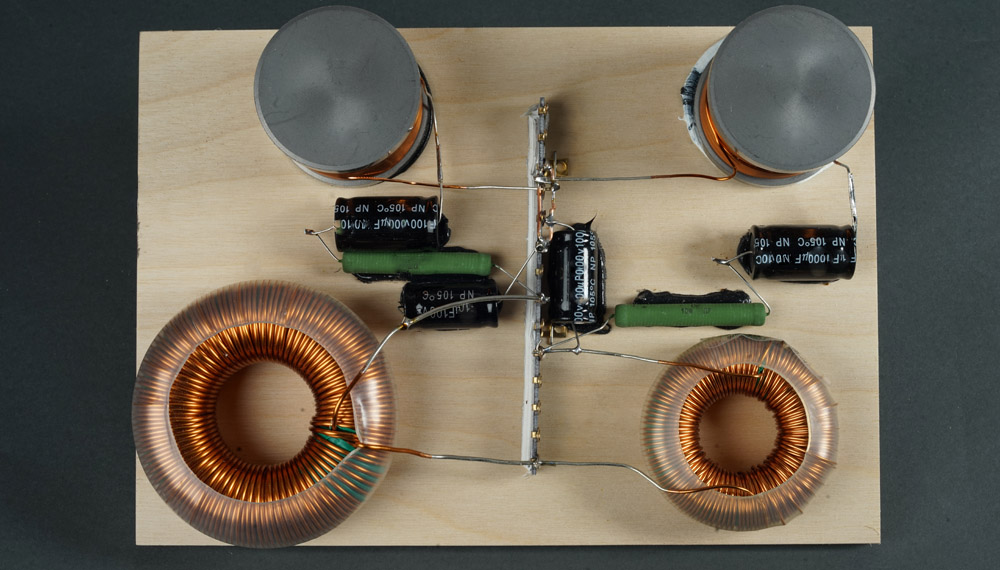
Bass section crossover. Same as for Illuminator-5.
All electrolytics now replaced by Jantzen Audio MKT-Z caps.
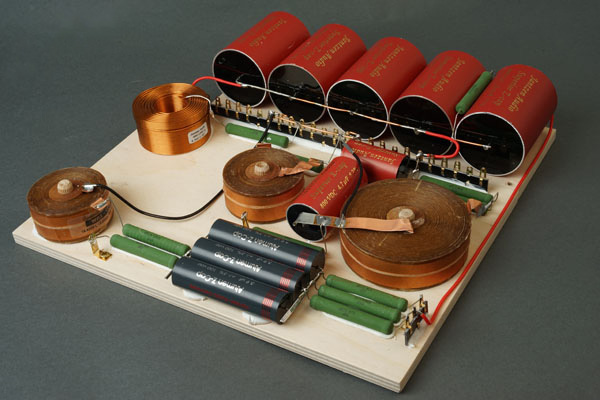
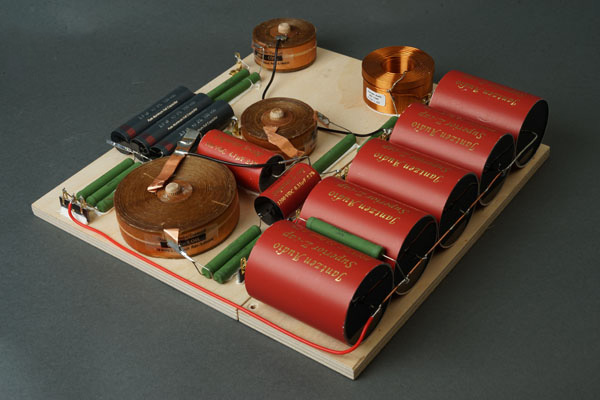
Crossover from four angles. Make the board in one. I have this bank of
large caps for midrange used for prototypes, hence two boards.
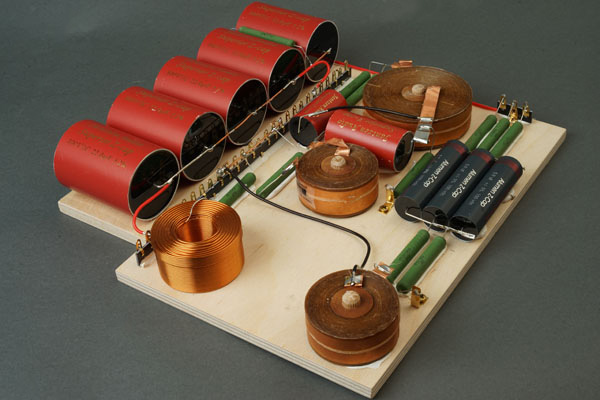
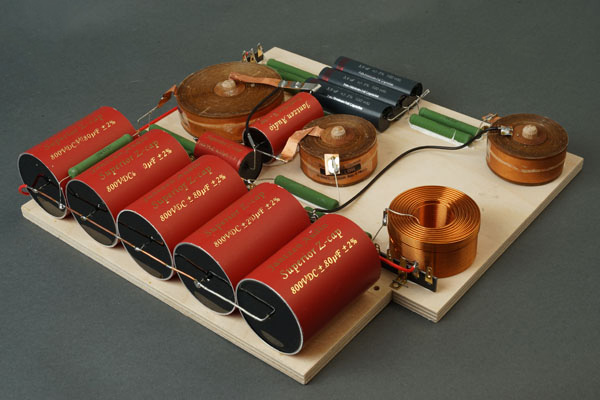

Click image to view large.
There's no point in trying to describe the sound. Some like Brussels
sprouts, some don't. Same thing with speakers. What flavour is to taste,
appearance is to speakers. This speaker does it all, from deep bass to
shimmering highs. The overall voicing is very similar to the
Illuminator-5. The Illuminator-5 may have a little extra in dynamic
headroom due to the small 4" handling upper mid, but having the 7100
tweeter doing it all down to 1.7 kHz makes a truly coherent overtone
structure. In its range, it's one of the top three speakers I've ever
made and I can only say ENJOY! I do.
BTW: My workshop 80 wpc Jungson loves this speaker as does my living
room GlowMaster KT88/Hypex combo. It's an easy load.
click images to view large