DIY Loudspeakers: HOME INDEX UPDATES RESPONSE WHAT'S NEW
SBAcoustics
SBA MW19 Monitor
TW29BN Beryllium dome optional
Copyright 2016 © Troels Gravesen
Go to on this page:
DRIVERS
CROSSOVER
CABINET
MEASUREMENTS
SPEAKER-KIT
CROSSOVER LAYOUT
SOUND
There is no specific feature that would make a given speaker a "studio
monitor" and another not. Manufacturers may design speakers specifically
for studio monitoring by using a low-cost finish on the cabinet, but
otherwise a
"studio monitor" may just as well be used for domestic
reproduction.
Studio monitors may have adjustments for midrange and
treble level, something that would come handy to many domestic
loudspeakers. They may also be have in-built power amplifiers allowing
them to be driven by a line signal coming from the mixing console.
Studio Monitors usually fall into two categories, smaller speakers used
for near-field monitoring and larger speakers for evaluation of the
final mix. This speaker is designed for near-field monitoring and my
main objectives here are flat frequency response and an even power
response, as we may have more people sitting at the desk, and they
should preferably hear the same from the monitors.
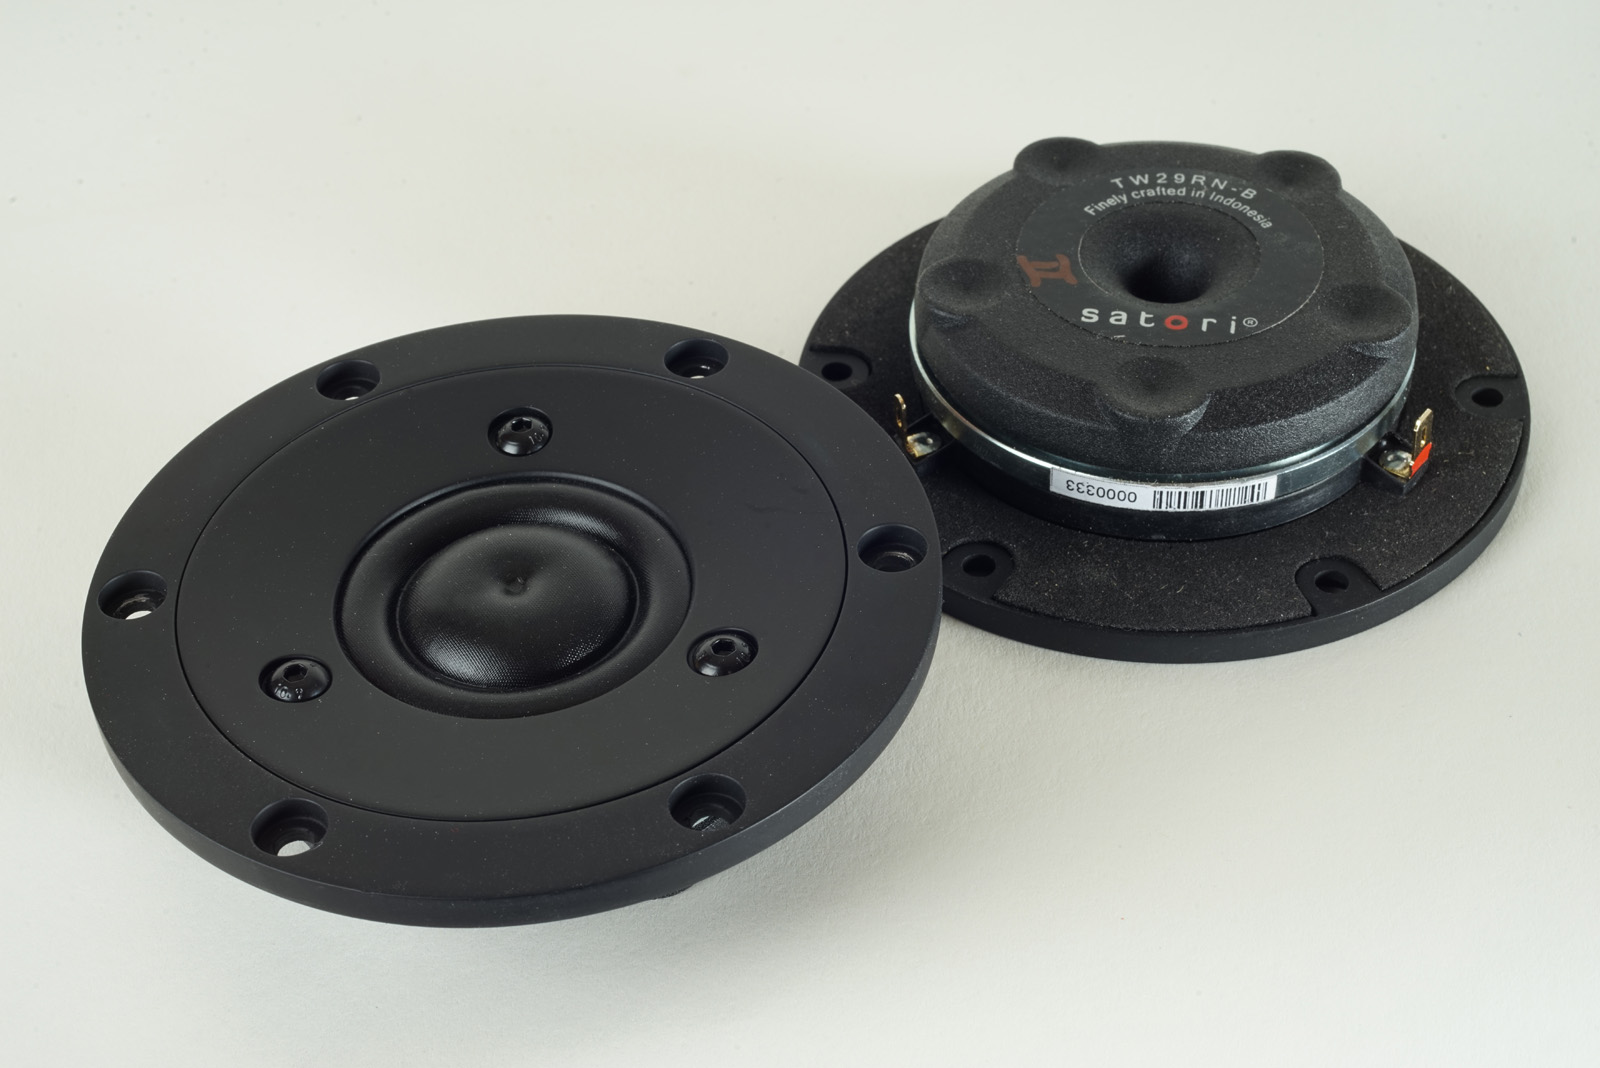
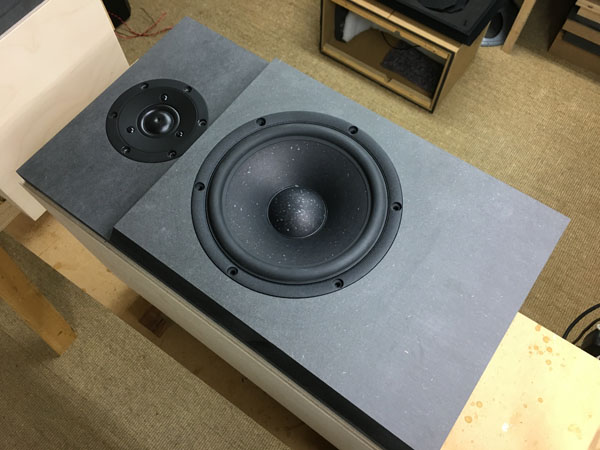
The MW19P-8 midbass driver used here is
a rather large driver having a radiating area of 158 cm^2, a little
bigger than the ScanSpeak 18WU drivers. Due to size of the midbass we
need a low point of crossover to the tweeter, and from my SBA-10
construction I learned the TW29RN can go really low without problems.
Here we go with a point of crossover at 1700 Hz providing the best
possible frequency response and we use an LR4 filter providing some
added presence in upper mid/lower treble despite the large cone area of
the midbass. The sonic signature of LR2 and LR4 filters are discussed
here. By using a steep filter we reduce the "echo" of the midbass
beaming.

Click images to view large
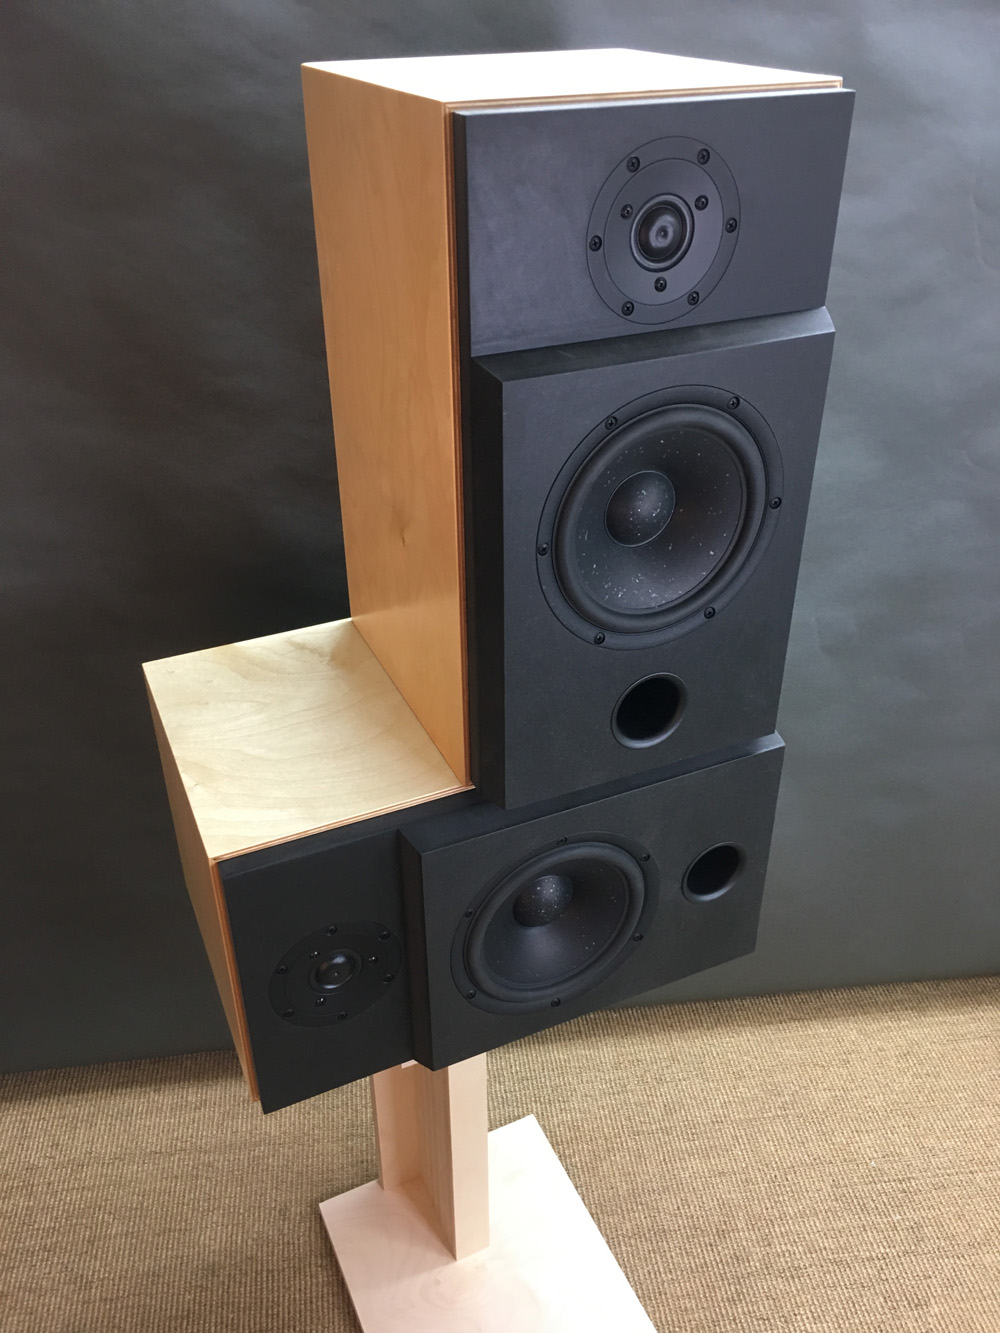
So, this is called a studio monitor, but is equality suited for domestic use providing a potent bass for the size, an even balanced voicing and exceptional transparency from the magnificent Satori drivers.
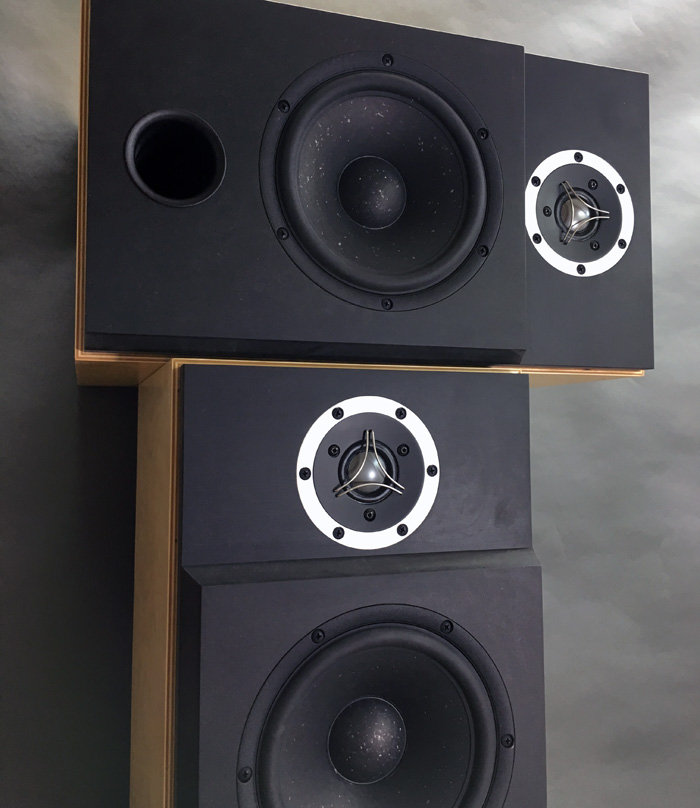
Cabinet is straight forward with a stepped baffle providing time-alignment of the drivers and an optimal listening height somewhere between midbass and tweeter. The crossover does not work from a flat or sloped baffle! Let's get that straight. We could make a 4th order crossover work from a flat baffle, but it wouldn't sound as good as this.
I highly recommend making a pair of stands for this speaker and I found the best result from 58-60 cm height. Toeing in is not critical due to the even dispersion from the drivers and the chosen crossover topology. If you place the speakers horizontally, toe in until you're listening on-axis at a point between MW19 and tweeter. This makes the most even frequency response.
Basics:
2-way speaker in a 24 litre vented cabinet.
System sensitivity: 88 dB/2.8V, 1 meter.
Impedance: 8 Ohms, minimum 6.2 Ohms @ 150 Hz.
Crossover: High-order LR4 filter, 1.7 kHz.
Power requirement: 20+ wpc.
Power handling: 70 watts, but please
also read this:
http://www.troelsgravesen.dk/power-handling.htm,
and remember any burned driver is a misused driver.
Useful links (Please follow all links before e-mailing!):
http://www.troelsgravesen.dk/tips.htm
http://www.troelsgravesen.dk/tips.htm#CONSTRUCTION_OF_CROSSOVERS
http://www.troelsgravesen.dk/crossovers.htm
http://www.troelsgravesen.dk/LCR-RC.htm
http://www.troelsgravesen.dk/Inverted-Polarity.htm
http://www.troelsgravesen.dk/choices.htm
http://www.troelsgravesen.dk/power-handling.htm
Be-dome version

Click images to view large
Download specs here: MW19P-8 TW29RN-B (4 Ohms)
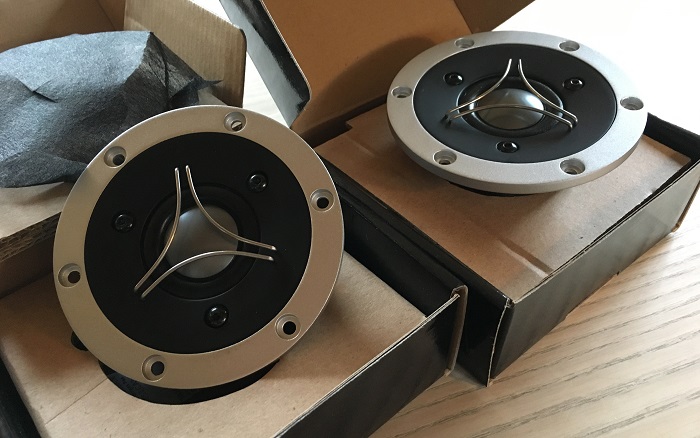
TW29BN Beryllium domes
Download specs here: TW29BN (4 Ohms)
Crossover
values only comes from purchase of the kit from Jantzen Audio.
The crossover for the fabric and Be-domes is the same.
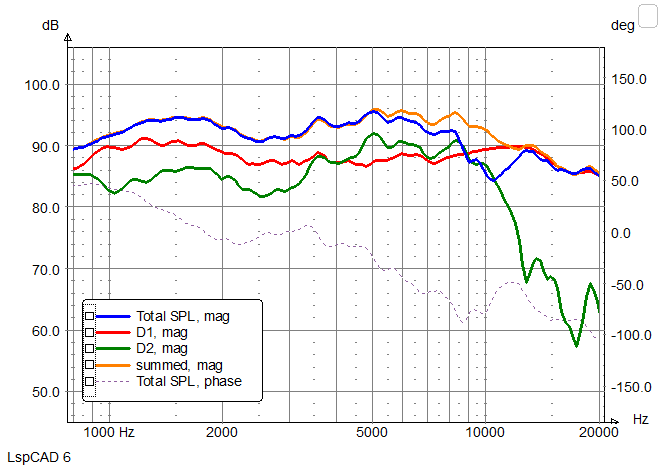
With a tweeter offset of 25 mm and dZ = 0, we get the above picture, showing a perfect summation over a wide range, actually from 800 Hz all the way to 5 kHz. Not often we see that. To know more about dZ, read here. D1 = tweeter, D2 = MW19. This was measured with the microphone some 75 cm from the front panel and pointing in between midbass and tweeter.
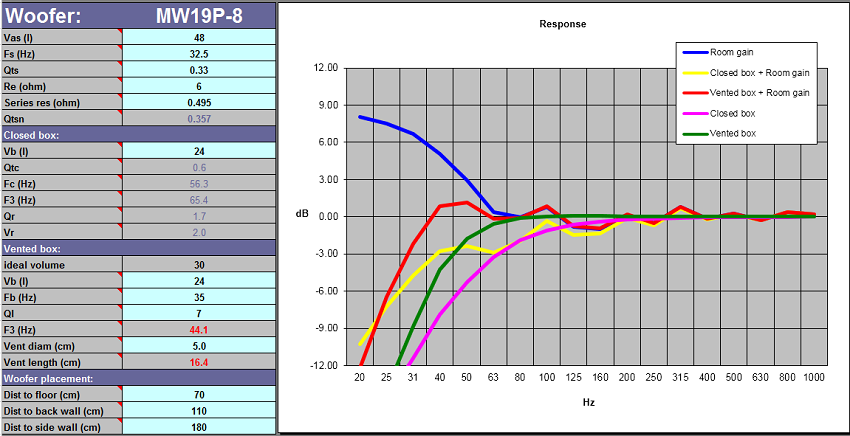
The MW19P-8 comes with a Qt = 0.33 and adding 0.5 Ohms series resistance increase this value to 0.36, close to perfect for vented box simulation. Read here and here. Adding a little series resistance adds to the response in the 50-80 Hz range, not much has to be said. The final result is F3 = 44 Hz, not bad for such small speaker.
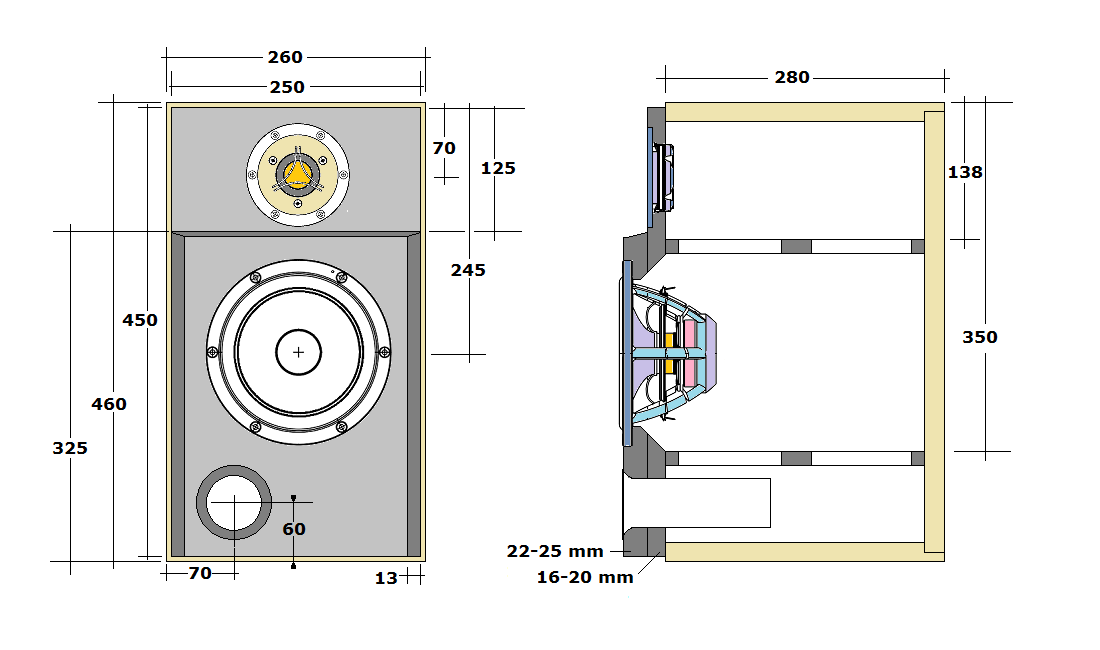
The box is made from 20 mm Baltic birch and the front panels from 19 and
25 mm black MDF making a net cabinet volume of 24 litres. Alternatively use
19 mm MDF for cabinet and 16+9 mm or 16+10 mm for front panel. If your
cabinet is 23 or 25 litre doesn't make any audible difference, so don't
be too nitpicking. Braces are made from 15 mm Baltic birch.
Alternatively 16 mm MDF. If you use 22 mm MDF for cabinet increase depth
from 280 mm to 290 mm. If you use 20 mm BB and 4 mm bitumen
pads on all internal panels except front panel, increase depth to 280 mm
to 300 mm to maintain volume. Damping material will add to the virtual
volume, possibly around 1 litre, read
here.
The 145 mm port length is the total length of the
tube.
Useful links (Please
follow all links before e-mailing!):
http://www.troelsgravesen.dk/tips.htm
http://www.troelsgravesen.dk/tips.htm#CONSTRUCTION_OF_CROSSOVERS
http://www.troelsgravesen.dk/crossovers.htm
http://www.troelsgravesen.dk/LCR-RC.htm
http://www.troelsgravesen.dk/Inverted-Polarity.htm
http://www.troelsgravesen.dk/choices.htm
http://www.troelsgravesen.dk/power-handling.htm
From the workshop
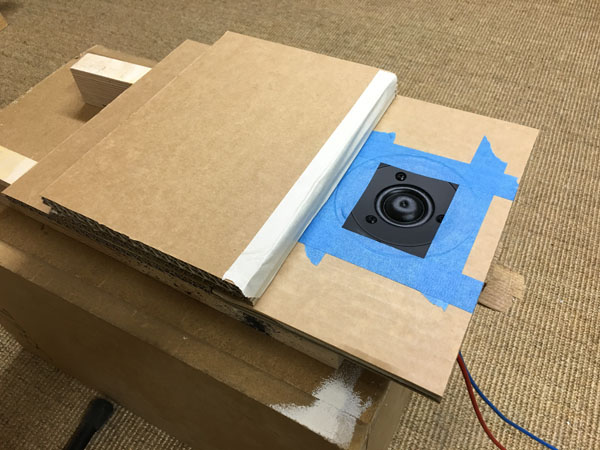

All cabinet designs starts with pieces of cardboard to make the best
environment for the tweeter allowing simplest possible crossover.
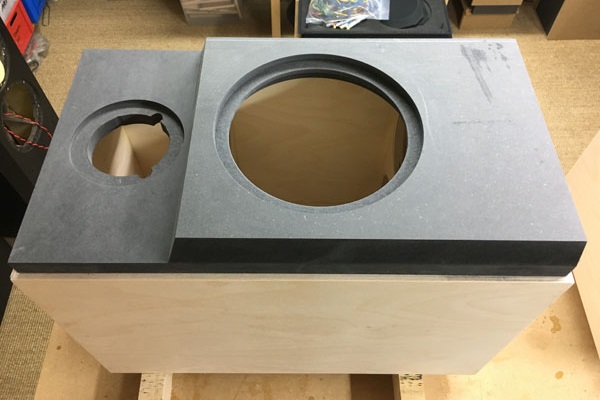
More solid test front panels. Remember to chamfer driver hole to allow
free air flow from rear radiation.

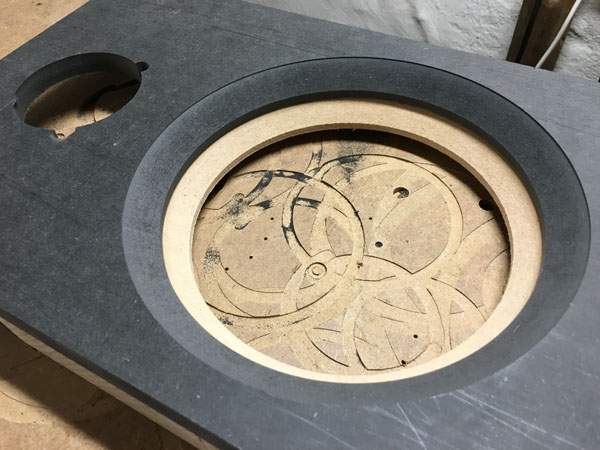
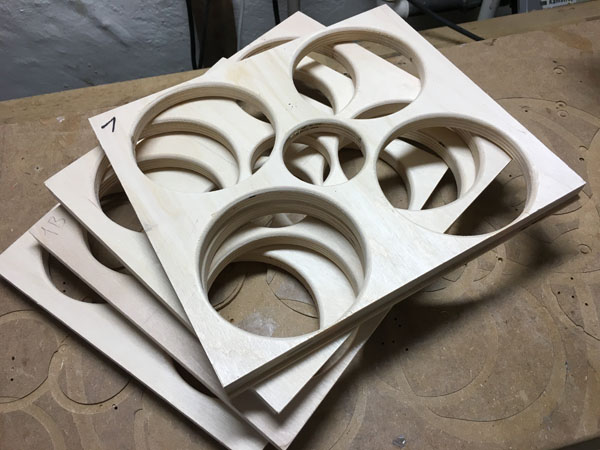
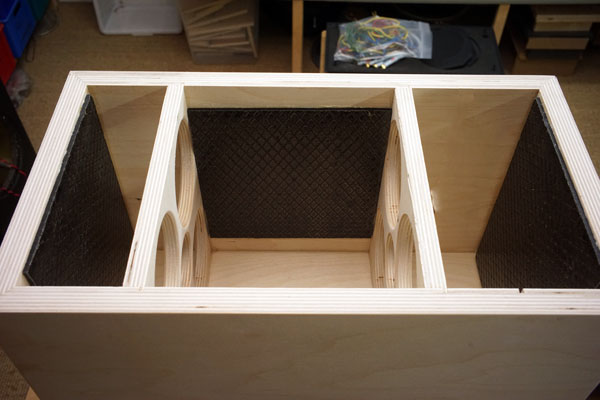
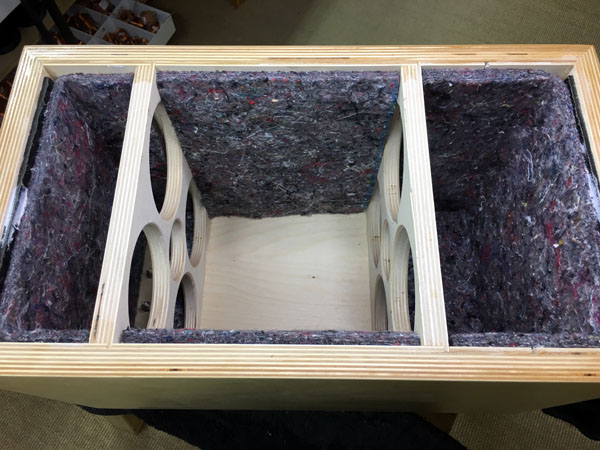
Cabs and bracings in preparation. Diameters of holes in bracings are 100
and 55 mm.
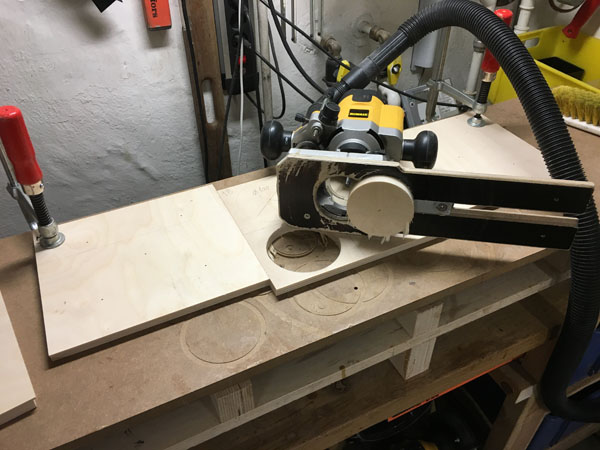
Smooth the hole edges by an edge rounding bit.
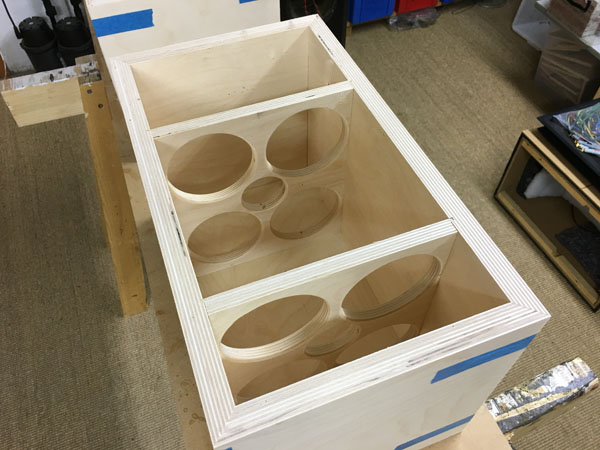
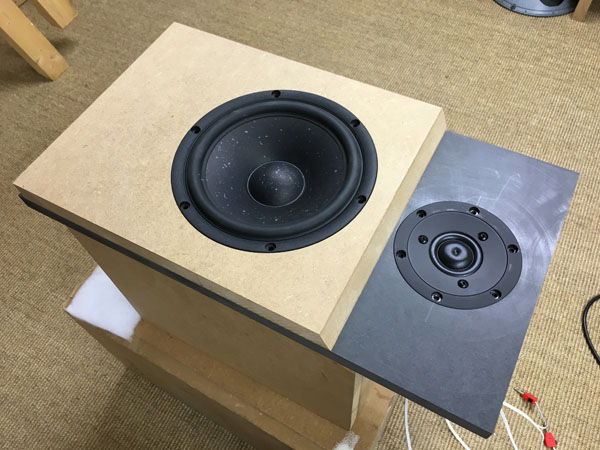
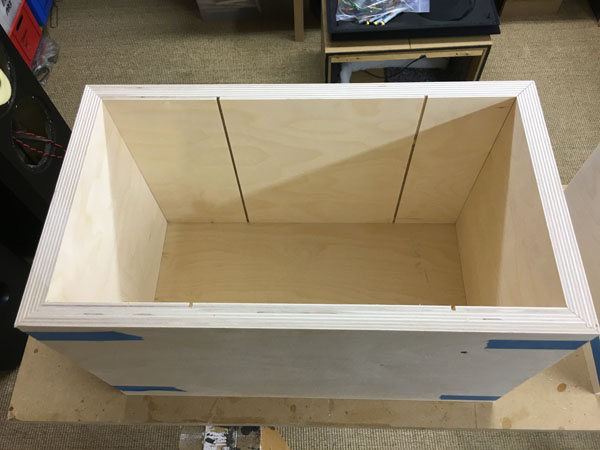
Bracings inserted. Time for gluing. Front panels ready.
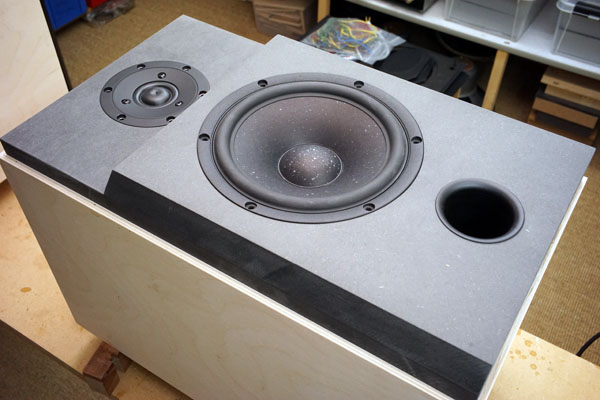
Port in place.
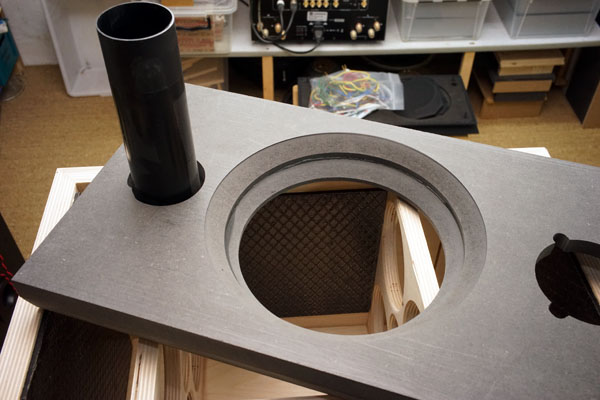
I added 4 mm bitumen pads (optional) to middle sections, top and bottom,
the largest areas.
Ask Jantzen Audio for ½ sqm, 4 mm bitumen pad if you follow this route.
Bitumen is optional and not included in kit.
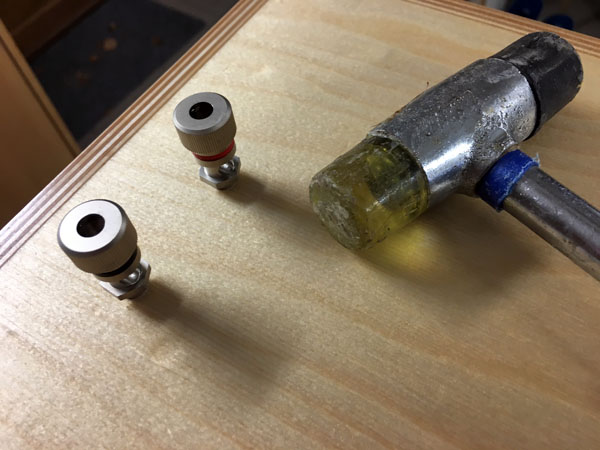
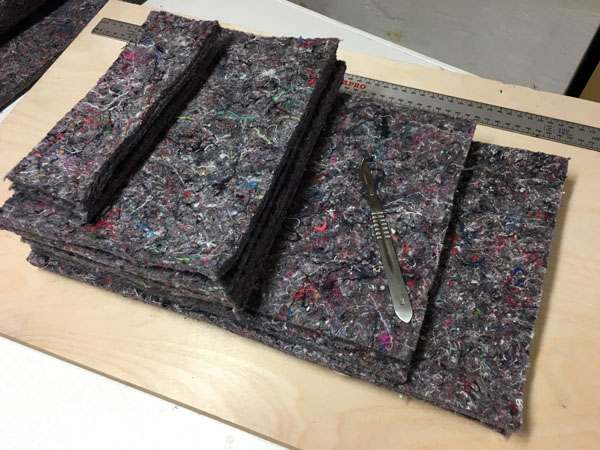
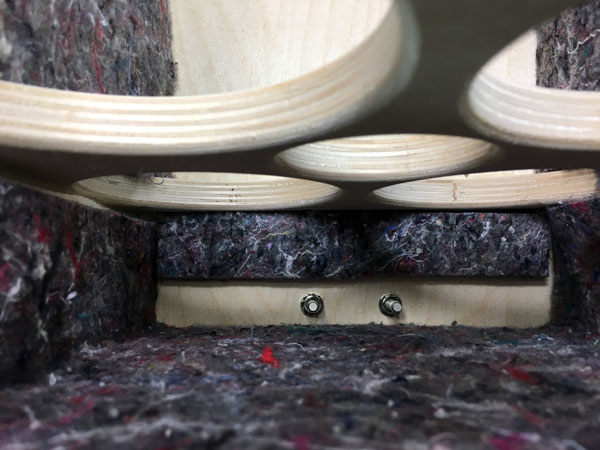
Mount terminals abot 4 cm from the bottom. Right: Most felt materials
ready for mounting.
8 mm felt:
2 pcs 25 x 40 cm (top-side panel)
2 pcs 25 x 32 cm (bottom-side panel
4 pcs 20 x 19 cm (middle side panels), wait adding these till crossover
is in place.
2 pcs 20 x 10 cm (top rear panel)
2 pcs 20 x 3 cm (bottom rear panel - above terminals, see image below)
Fasten felt material with superfix or similar, read
here. Also read this
page.
30 mm acoustilux
4 pcs 22 x 20 cm (place 3 layers of acoustilux above crossover on rear
panel)
4 pcs 25 x 20 cm (top and bottom, 1 layer)
Everything that
can be counted does not necessarily count; everything that counts cannot
necessarily be counted". Albert
Einstein.
A few
comments on MEASUREMENTS before you start interpreting all the readings
below.
First of all, if we think measurements will tell us how a speaker
sounds, we're wrong. The perception of sound is way too subjective to be
reflected in any measurements we can perform. A loudspeaker system is
meant to give us a satisfying idea of an acoustic event and for some
people a pair of 5 USD ear-plugs are enough, others spend 200 kUSD on a
truly full-range pair of speakers - and the latter may not be happier
than the former.
Measurements may give us an idea of tonal balance of a system, i.e. too
much or too little energy in certain areas. Measurements may tell us
about bass extension if far-field measurements are merged with
near-field measurements. In addition to this, ports may contribute to
bass extension. Most of us diy'ers do not have access to an anechoic
room for full-range measurements from 20-20000 Hz.
What cannot be seen is what kind of bass performance we get in a given
room. Bass performance is highly dependent on in-room placement of your
speaker and the same speaker can be boomy in one place and lean in
another. Actual SPL level at 1 meter distance and 2.8V input is useful
for en estimate of system sensitivity and combined with the impedance
profile may give an idea of how powerful an amplifier is needed to drive
the speaker to adequate levels.
What measurements do not tell is the very sound of the speaker unless
displaying serious linear distortion. The level of transparency, the
ability to resolve micro-details, the "speed" of the bass, etc., cannot
be derived from these data. Distortion measurements rarely tell much
unless seriously bad, and most modern drivers display low distortion
within their specified operating range.
Many people put way too much into these graphs and my comments here are
only meant as warning against over-interpretation. There are more to
good sound than what can be extracted from a few graphs. Every graph
needs interpretation in terms of what it means sonically and how it
impacts our choice of mating drivers, cabinet and crossover design.
What measurements certainly do not tell is the sonic signature of the
speaker, because speaker cones made from polypropylene, aluminum,
Kevlar, paper, glass fiber, carbon fiber, magnesium, ceramics or even
diamonds all have their way of adding spices to the stew. Nor do
measurements tell what impact the quality of the crossover components
add to the sound, from state of the art components to the cheapest of
coils and caps, they all measure the same if values are correct.
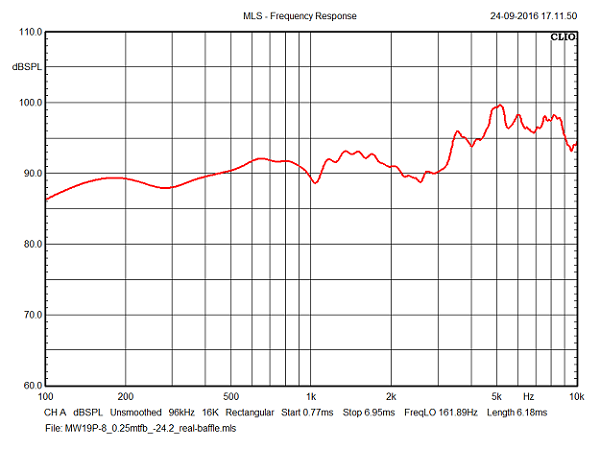
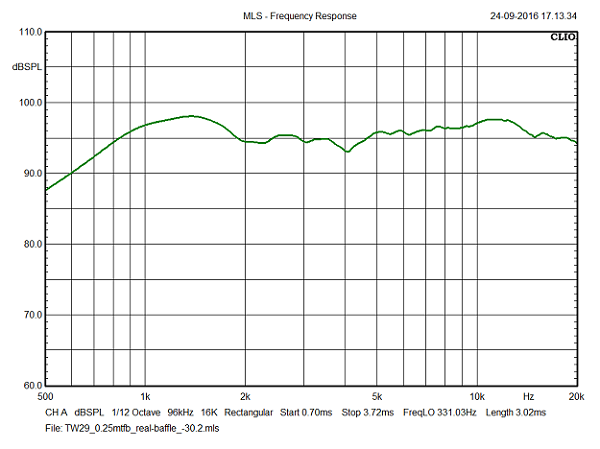
Above left: SPL from MW19P-8 on actual baffle without crossover. Right:
Same for tweeter TW29RN-B.
Mid-bass response suggest a possible system tuning of 88 dB/2.8V/1 meter.
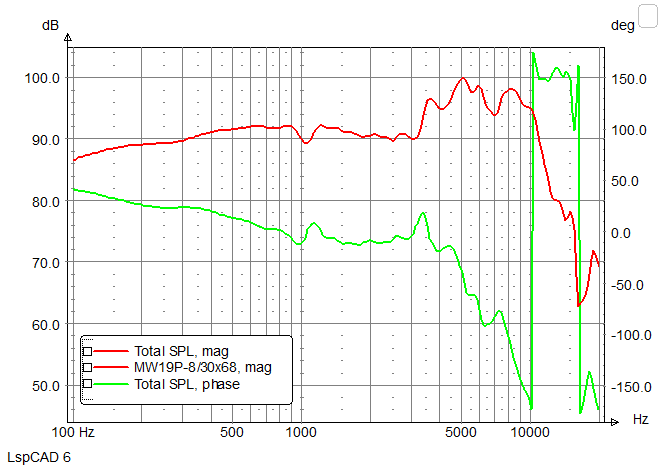
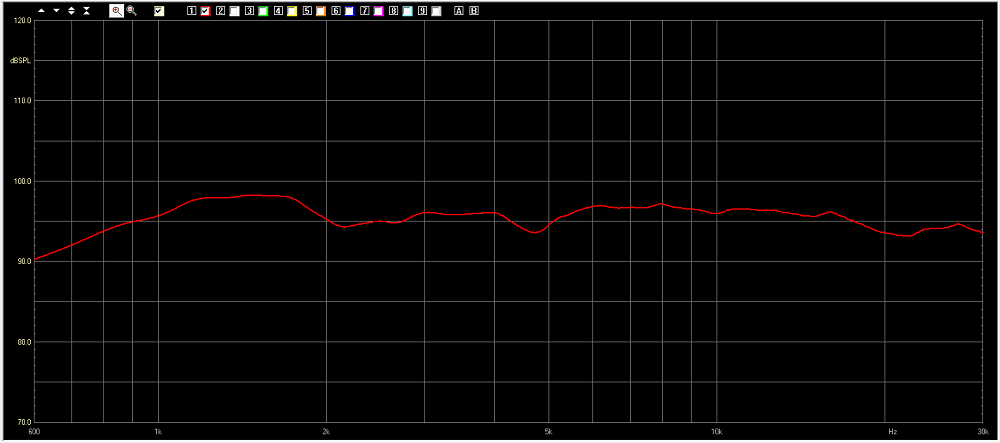
Above the MW19P-8 on a larger baffle, not infinite, but 30 x 68 cm, mounted 29 cm from the top. Making small speakers calls for compromised, but as can be seen from simulation we have something manageable from the given front panel. Basically the MW19 display an even mid-band all the way to 3 kHz with the all too common rubber resonance, here at 1050 Hz, but not something that disturb my peace. Above 3 kHz we see some elevated response, much like the ScanSpeak 18WU drivers, the price to pay for rigid cones and better transparency in the midrange. With an LR4 filter at 1.7 kHz, this is way down and we don't need any notch filter to cope with the issue.
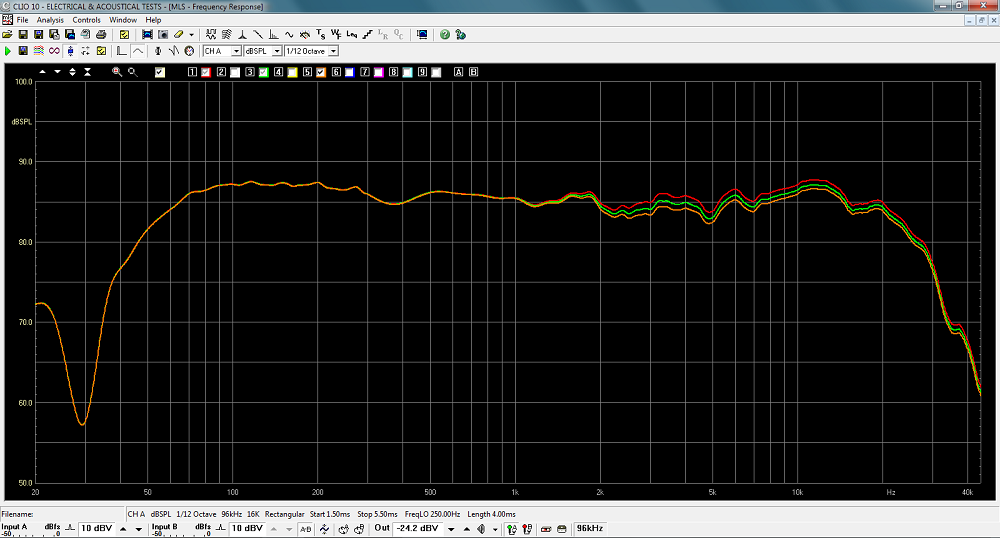
Here the most important measurements
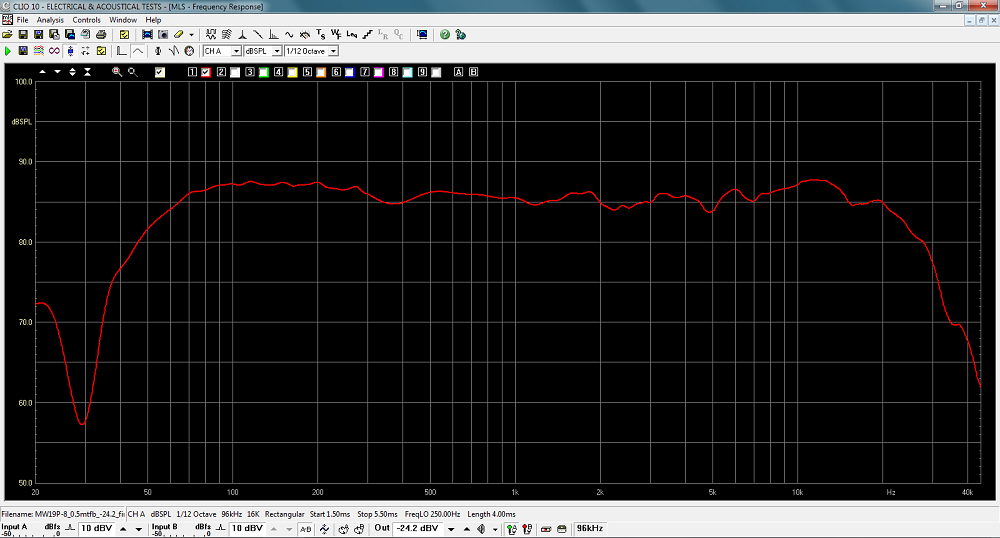
SPL measured at 0.5 meter distance, microphone between MW19 and tweeter,
input normalised for 2.8V/1 meter.
As can be seen we have a system sensitivity of 86-87 dB/2.8V.
Generally a very flat frequency response. R1 = 1R5 Ohm.
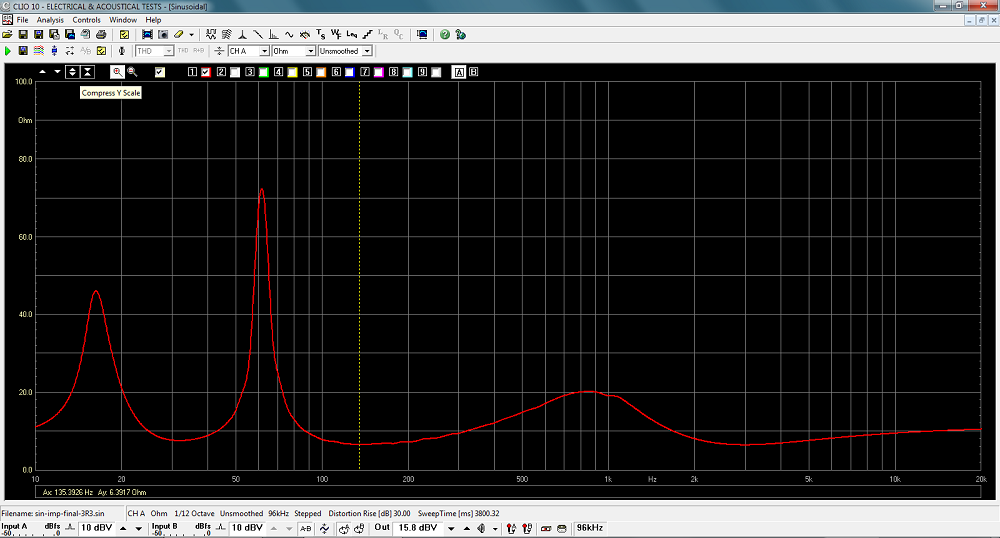
Impedance of final system. Minimum 6.3 Ohms. Good for tube lovers!
Tweeter attenuation from R1 = 1R5, 2R2 and 2R7. My preference is 2R7
(2.7 Ohm).
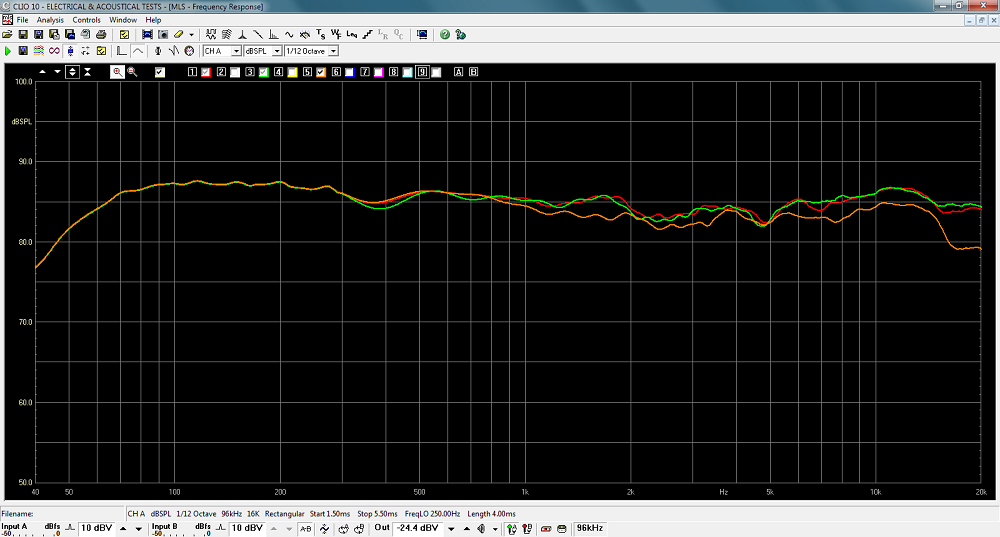
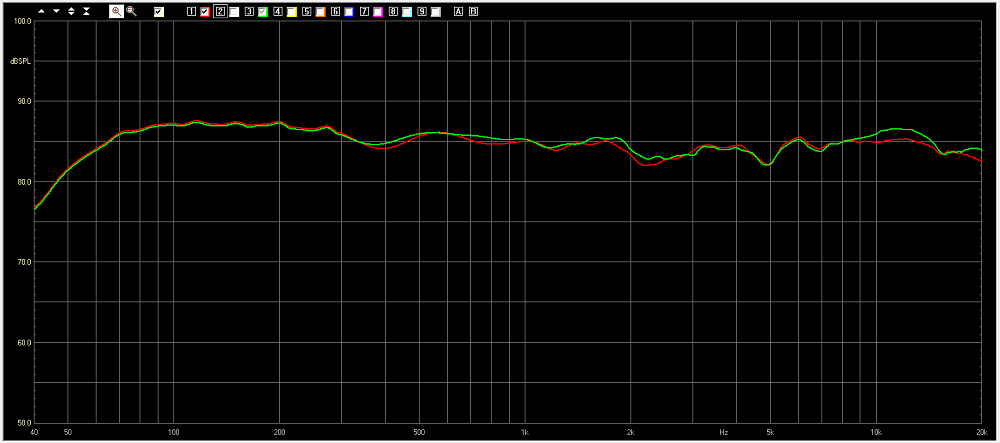
Vertical dispersion measured at 0.5 m distance and at tweeter height
(red), between MW19 and tweeter (green) and t MW19 height (orange).
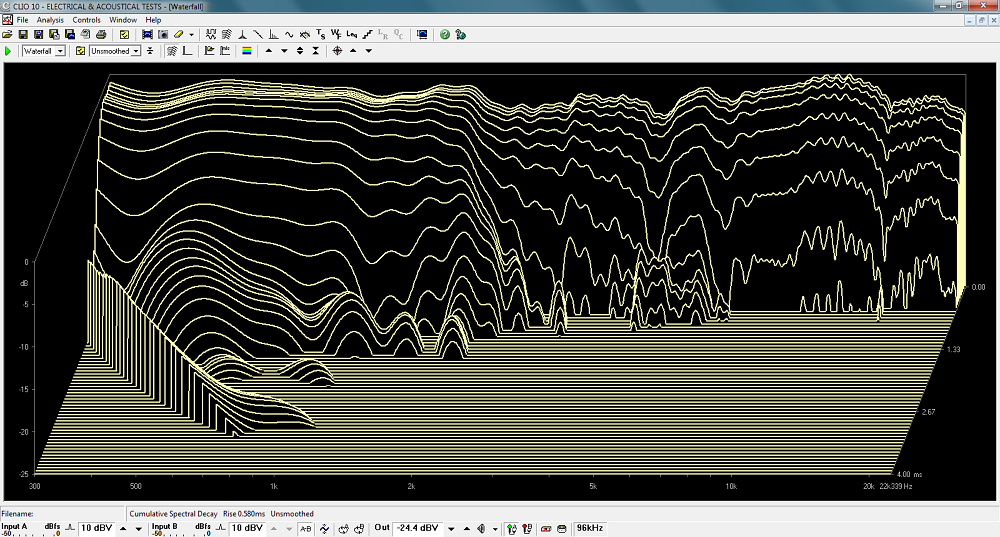
Cumulative spectral decay.
Here the raw response of the Be dome on the baffle. No crossover. Quite
nice and easy implementation.
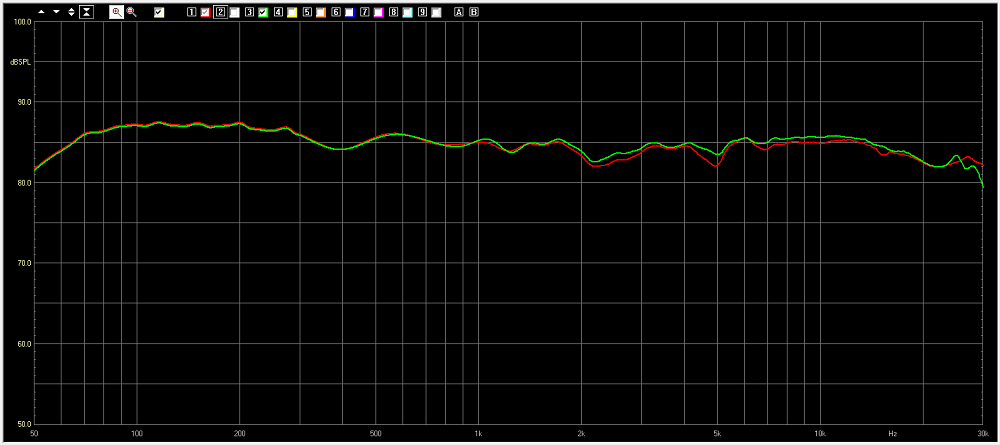
Fabric dome (green) vs. Be-dome version (red).
Be-dome version, L & R speaker.
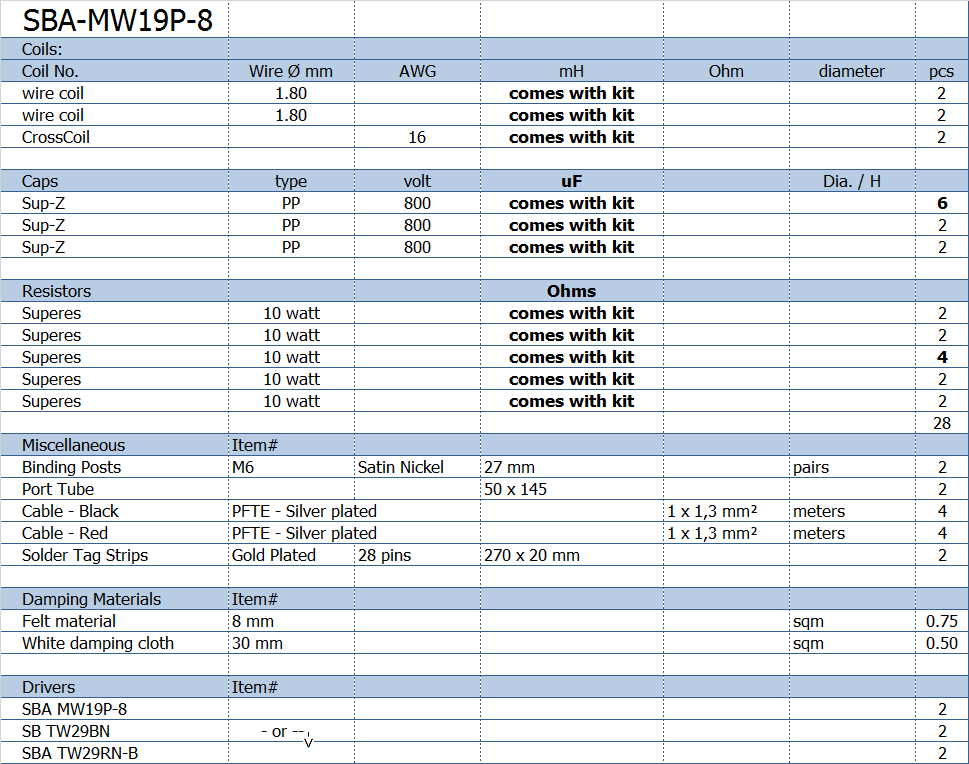
Crossover components' values only come from purchase of the kit.
All kit and component prices may be subject to change and are always to be confirmed by Jantzen Audio Denmark.
Download Kit Sale
Presentations:

All technical questions to troels.gravesen@hotmail.com
All questions regarding purchase of kits, please mail Jantzen Audio at contact@jantzen-audio.com
CROSSOVER-LAYOUT
BACK TO INDEX
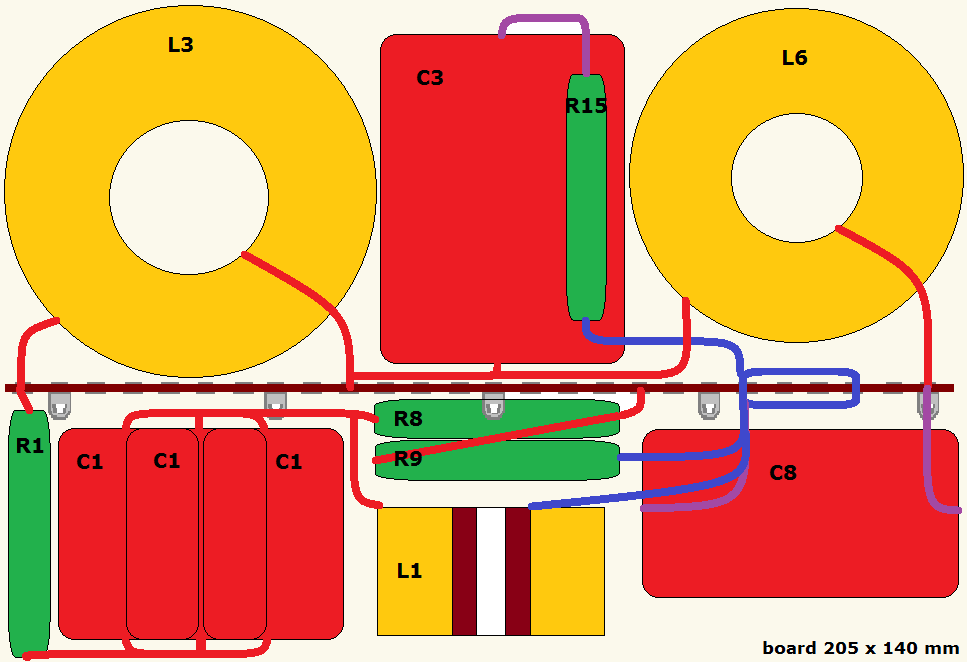
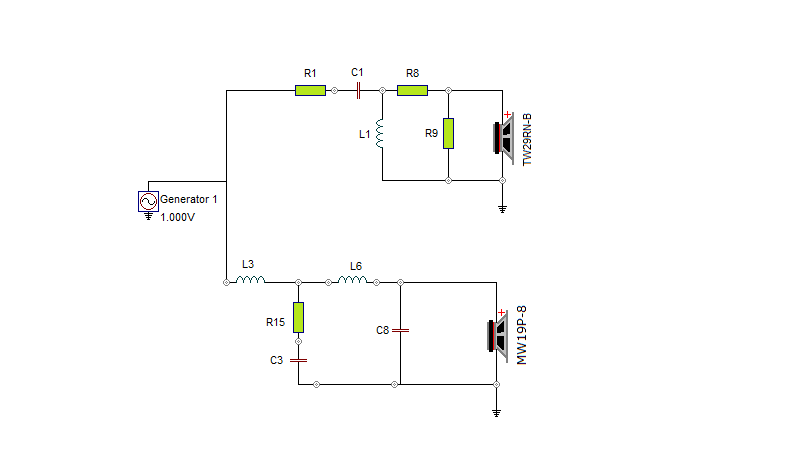
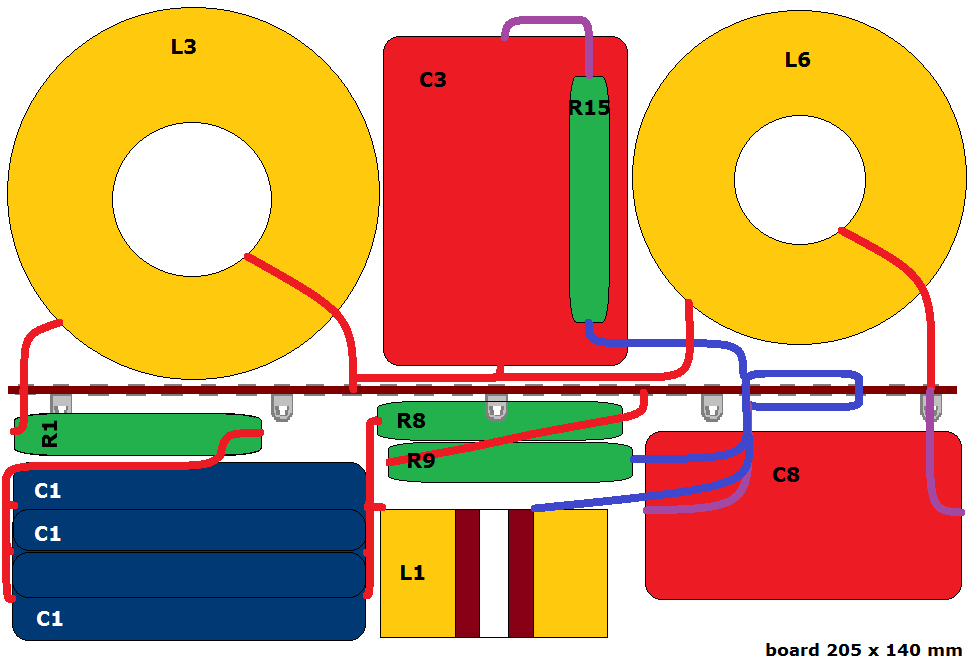
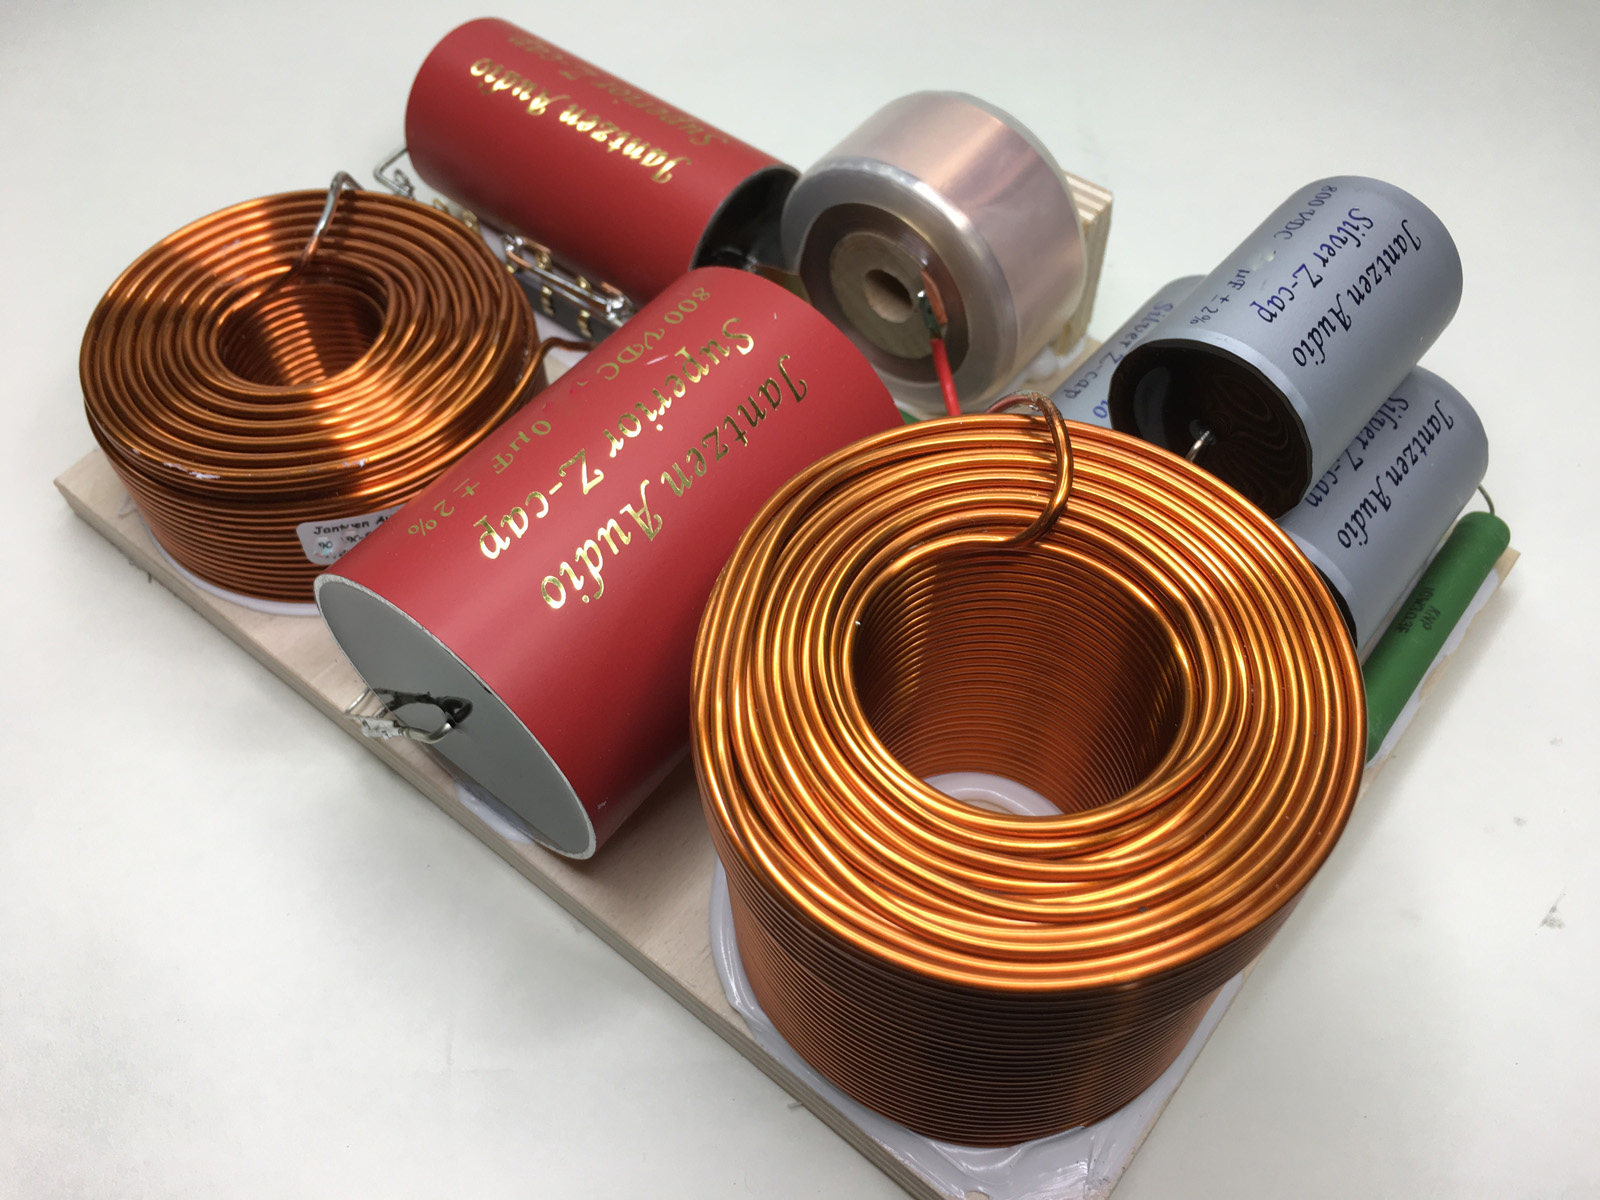
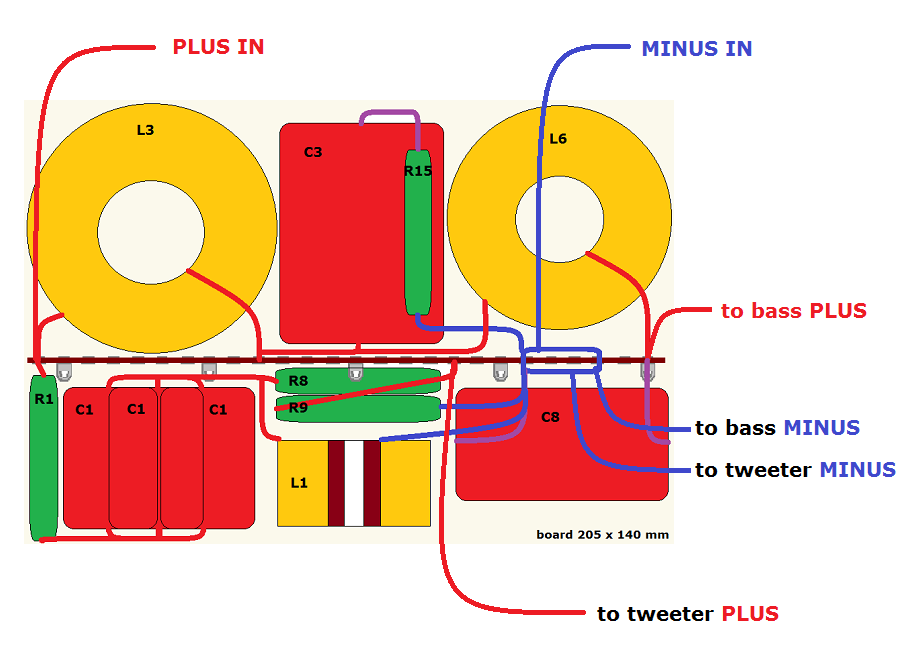
Above the layout for the entire crossover, fairly compact. C1 consists of three stacked smaller capacitors in parallel to make target capacitance. L1 is placed upright to allow the compact design and the crossover can be inserted through the midbass hole and placed on rear panel behind midbass driver. If you want to bi-wire the construction you need an extra pair of terminals and you need to make two ground connections, one for the bass and one for the tweeter. They can be placed side by side where the ground loop is placed.
If you want to use the Alumen-Z for the tweeter, it looks like this.
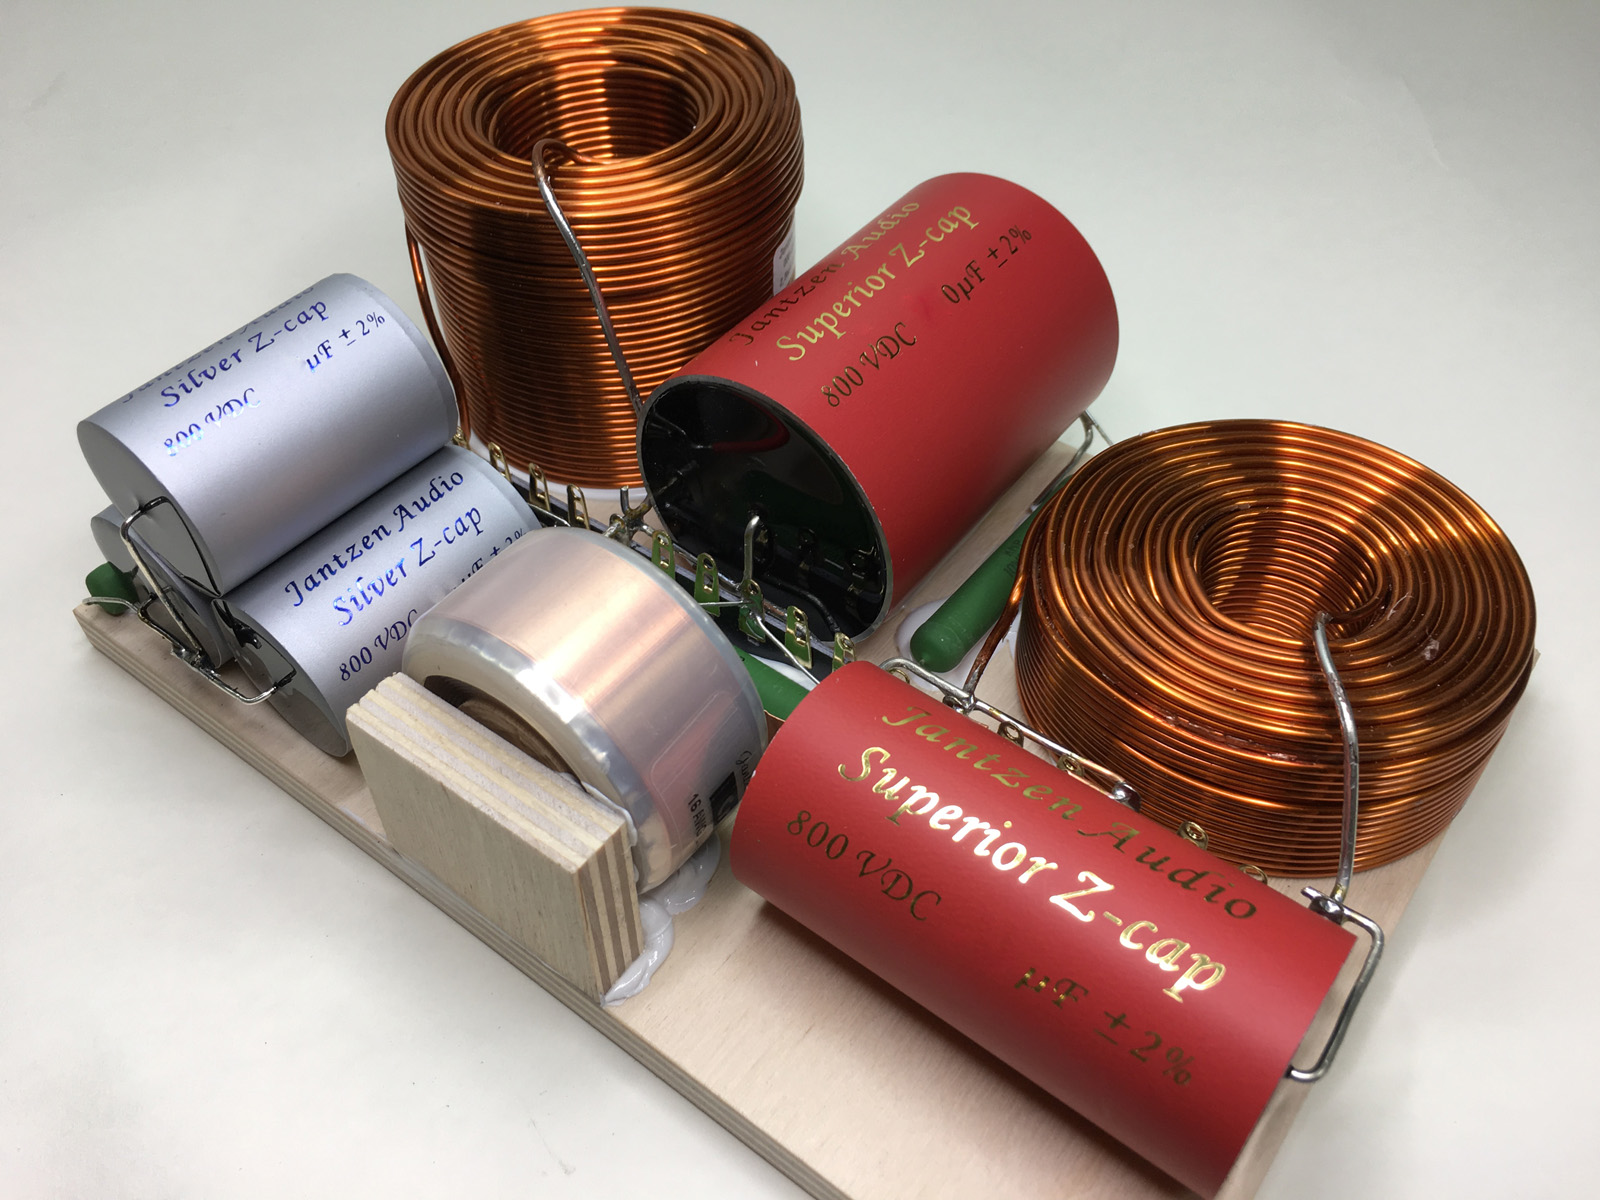
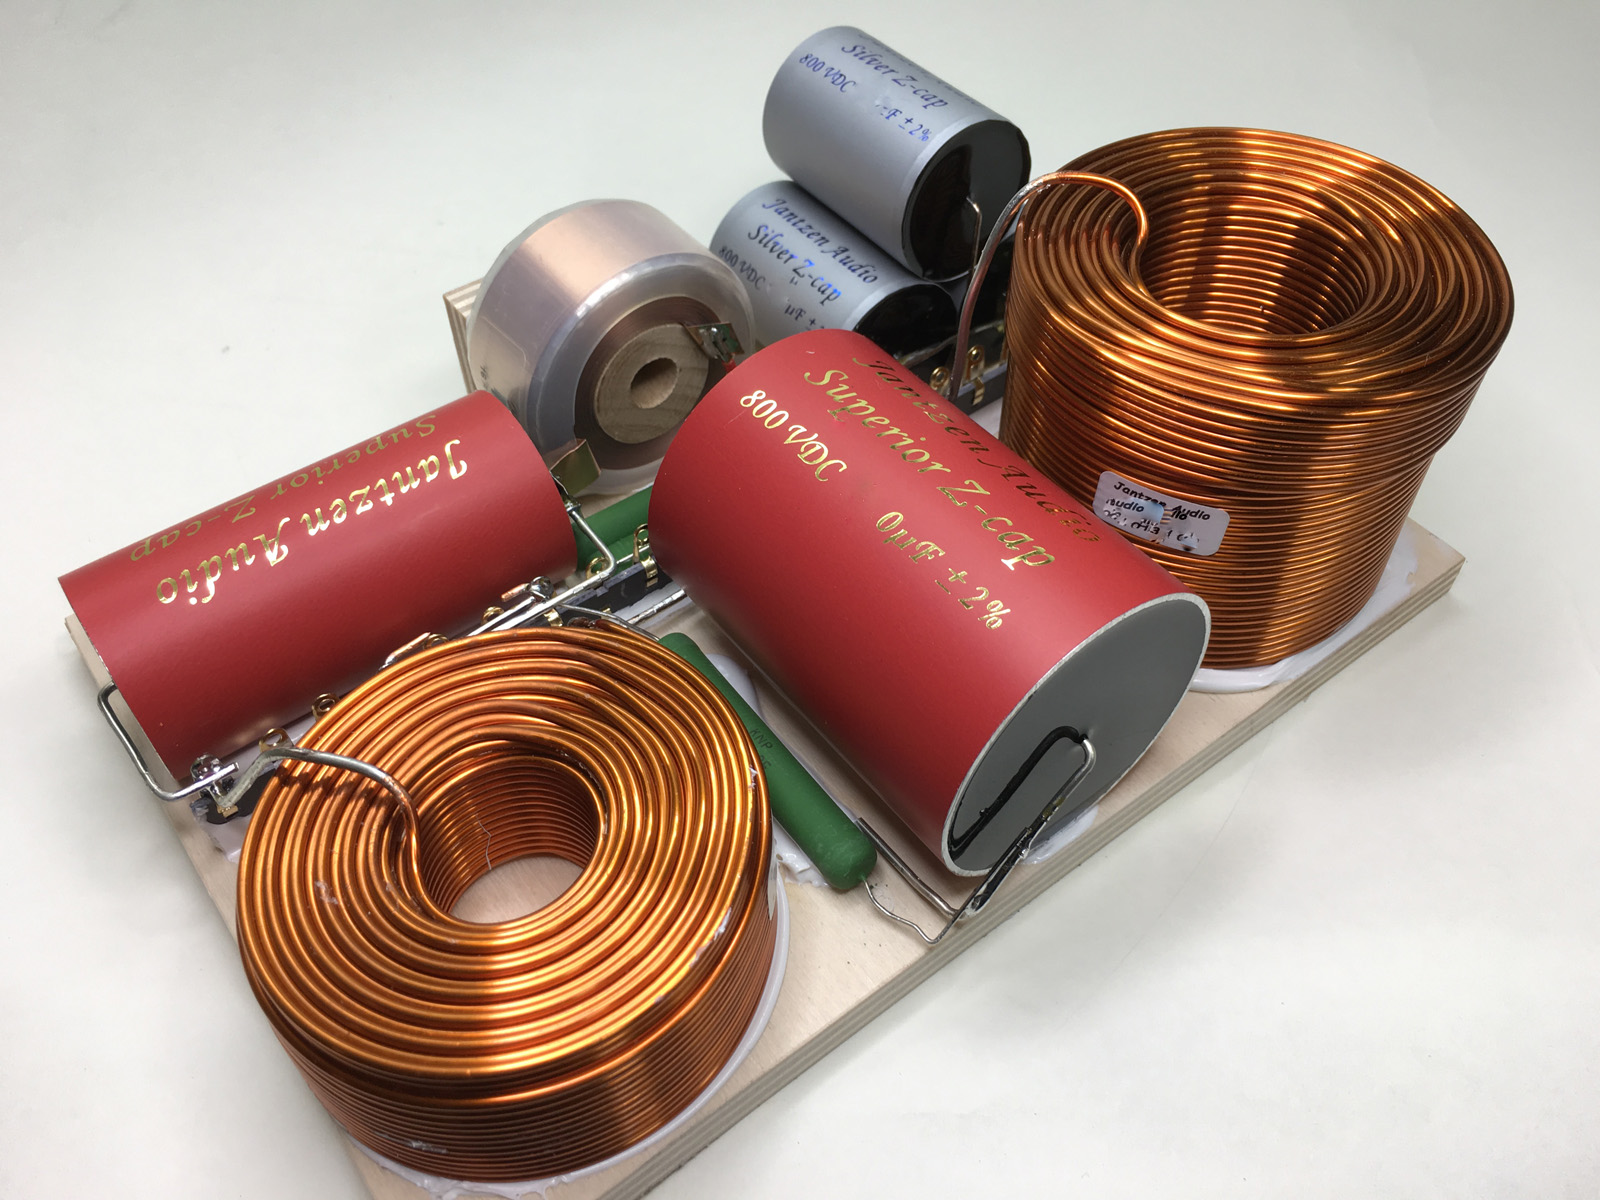
Images below show a version with Silver-Z caps. I tried them all, and I
must say I strongly recommend the Alumen-Z version giving a smooth
treble that match the midrange so well. Don't even think of standard PP
caps for the tweeter or anywhere else, or you'll never hear the
potential of these great drivers.

Click images to view large.
The small piece of plywood next to the foil coil is just for support.
Glue it well and the foil coil will stay in place.
Read here about suitable glues:
http://www.troelsgravesen.dk/tips.htm
Fasten the crossover board on the rear panel behind the MW19 driver and
cover with 3 layers of acoustilux.
The MW19 likes a well-damped cabinet, a little more than I use to do.
The MW19 monitor first impression is the bass. This is a potent 7" driver and delivers and firm and solid bass performance. Midrange is smooth and extremely transparent without accentuation or depression of any midrange area. Due to the low point of crossover dispersion in upper-mid/lower-treble is excellent and provides a wide listening window. As for the SBA-10, the TW29 tweeter delivers an astonishing treble. This tweeter has become one of my favorites and seems capable of mating any high-quality midrange driver. In particular with the Alumen-Z for C1, I couldn't ask for more.
The latest addition is the Be dome and from good fortune, no changes to
the crossover was needed, none whatsoever. This is rarely the case, but
these two tweeters are - from this construction - interchangeable.
Don't ask what difference in sound we have, because I can't tell as I do
not have two pair of speakers side by side for comparison. Only thing I
can say is that if
you want the best dome treble money can buy, you won't be disappointed
from these magnificent Be domes.
You may think good Be domes - haven't seen any bad yet, by the way -
have some kind of sound. They kind of haven't. Like good diamond domes
they truthfully reproduce what you feed them. No more, no less.
At a little less than 300 EUR/ea these domes should have a bright
future.