DIY Loudspeakers: HOME INDEX UPDATES RESPONSE WHAT'S NEW
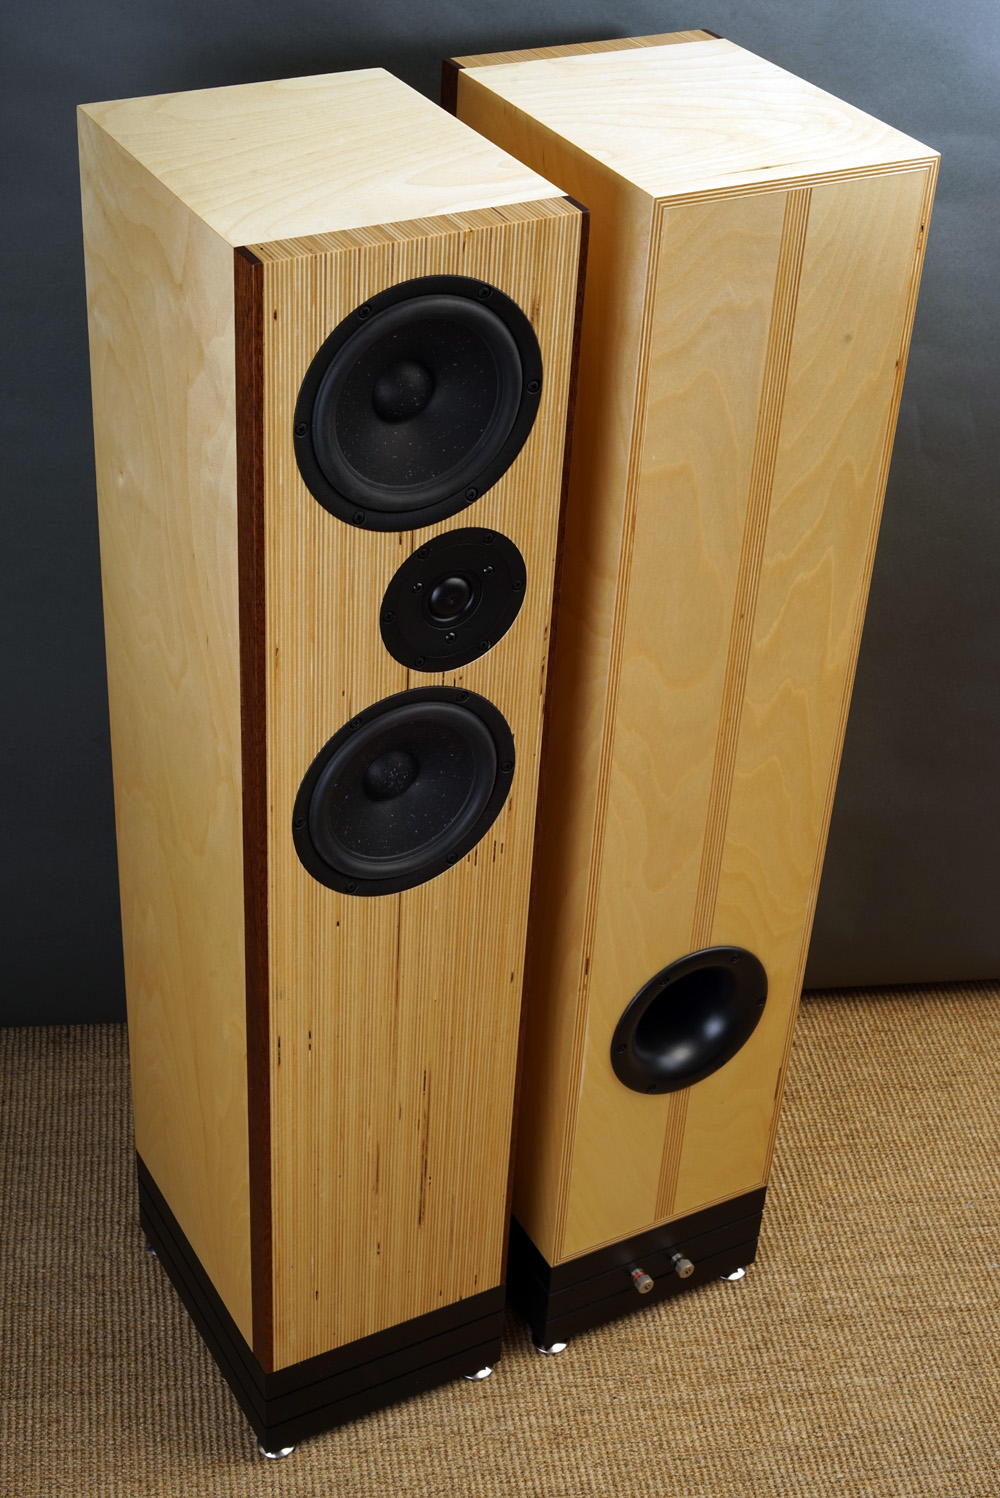
SBA 16 MTM
Satori TW29BN Be dome optional
Copyright 2017-21 © Troels Gravesen
Go to on this page:
DRIVERS
CROSSOVER
CABINET
MEASUREMENTS
SPEAKER-KIT
CROSSOVER LAYOUT
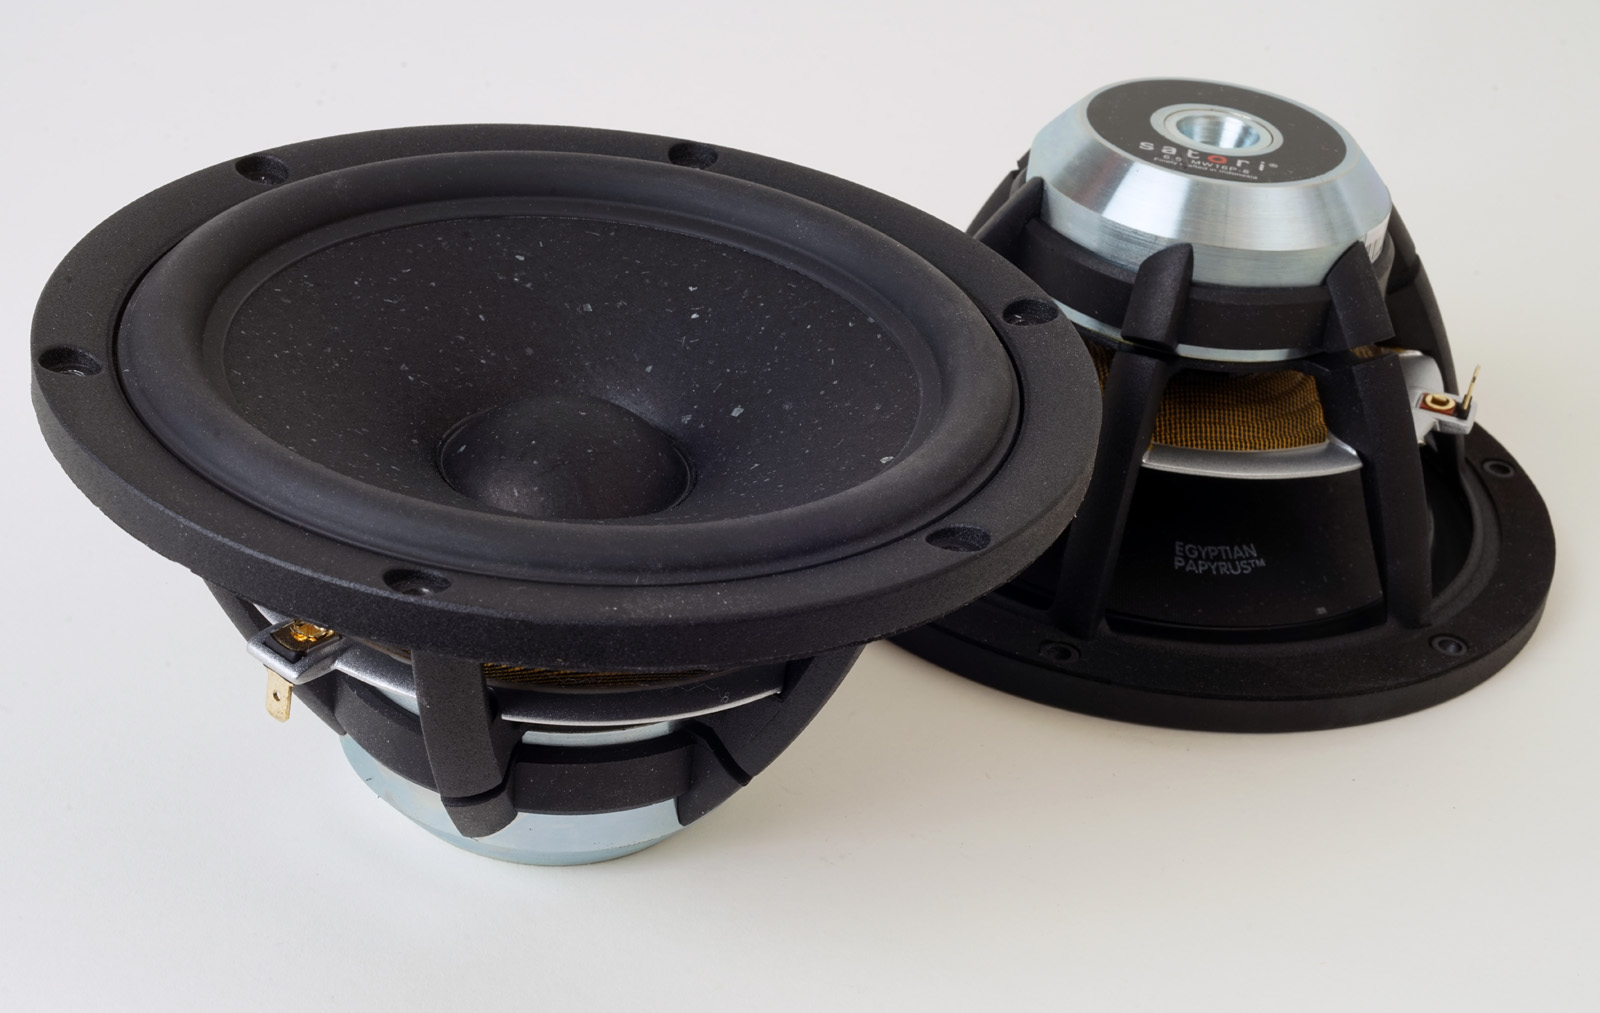
It's a bold choice of the SBA people to call a loudspeaker driver
Satori. According to Merriam-Webster: "Sudden enlightenment and a
state of consciousness attained by intuitive illumination representing
the spiritual goal of Zen Buddhism". Let's stick to Sudden
Enlightenment or just Enlightenment. This is probably what they had in mind. Now, there
are certainly a lot of things behind the driver that will add or detract
from that enlightenment, but let's say the Satori MW16 driver is not the
bottleneck in reaching that goal. Add the best in front of it, and it
delivers. This doesn't mean it doesn't leave a sonic fingerprint, but so
does any other cone material available for dynamic drivers.
Like the name Satori, Egyptian Papyrus adds to the myth we try
to build around drivers to catch attention from our customers. Organic
fibers vary in chemical composition and subsequent physical properties
depending on how it is isolated and incorporated into the basic paper
pulp mix. So does the resin used, the pulp pressing as well as shape and
size. It's all OK, as long as the product delivers something good. The
Satori cones are rather rigid, promising a transparent midrange and
what's unusual is the lack of conspicuous cone break-up. It's a delicate
balance as we can see from the MW19 driver, where high order filters are
needed to suppress cone-break-up due to increased diameter.
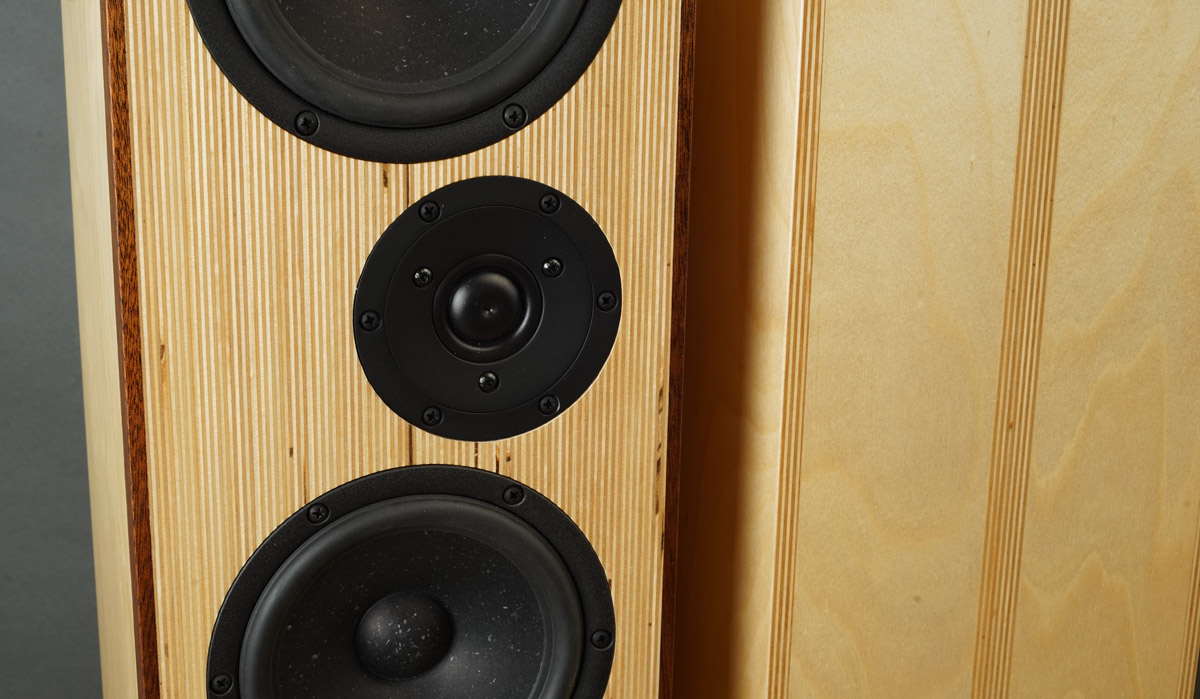
During set-up of the SBA-10 construction I initially tested the midrange and tweeter as stand-alone 2-way and was mighty impressed with what I heard, not least the bass performance from this relatively small 6" driver, 119 cm^2. How about two drivers doing 238 cm^2, more than an average 8" driver? The MW19P is similar in size to the venerable Vifa C17 and it also features the ability to be run full range without distressing the ear noticeable. This is also where comparison stops. MW16 is not as efficient as Vifa C17 but it features almost everything drivers of the 80'ies doesn't when it comes to overall construction. Download spec below to read what under Features. Even the frequency response of the MW16 is flatter and more extended than the C17. With two drivers in parallel we can tune the system to a healthy 91-92 dB sensitivity. Not bad at all. 38 litre net volume for two drivers provide an F3 of 44 Hz, not bad either. The nice basic behaviour of the drivers allows a simple 2nd order filter at 1.7 kHz, ensuring excellent dispersion in upper-mid/lower-treble.
Now, getting 238 cm^2 midrange membrane area does its thing! From the
SBA-10 I knew the MW16 has a significant dynamic head-room. Like the
AudioTechnology 18H52, the MW16 can play loud before sounding bad. This
probably mostly due to proper symmetric drive. This is the copper sleeve
on the center pole piece manufacturers are talking about. Symmetric
drive means the inductance caused by the voice coil moving in the
magnetic gap is the same whether the coil is moving inwards or outwards.
It goes without saying the sound generated by a cone that doesn't move
symmetrically in the magnetic gap will be somewhat distorted. Hence,
well engineered drivers can play bass and still maintain resolution in
upper-mid and lower-treble. They have a dynamic headroom and can be
played louder compared to conventional drivers. That said, I was really
surprised to hear how loud this MTM could play before sounding
compressed. Having a low point of crossover obviously helps too, not
having the midbass beaming in upper-mid/lower-treble.
Beaming is to my mind a serious issue as discussed on several
occasions. Not least when we're dealing with fairly rigid cones like the
one used on this MW16. For soft cones we may get away with higher points
of crossover as the effective radiating area is reduced towards higher
frequencies.
So, all in all a firm and potent bass for the size, ultra transparent midrange and
treble as good as it gets these days from this doped soft-dome. I'll
stick my neck out and say any
other tweeter is a matter of taste, not quality. Last, but not least, we
don't need to crank up the volume control a whole lot to make these
speakers sing. Overall system sensitivity is immediately felt.
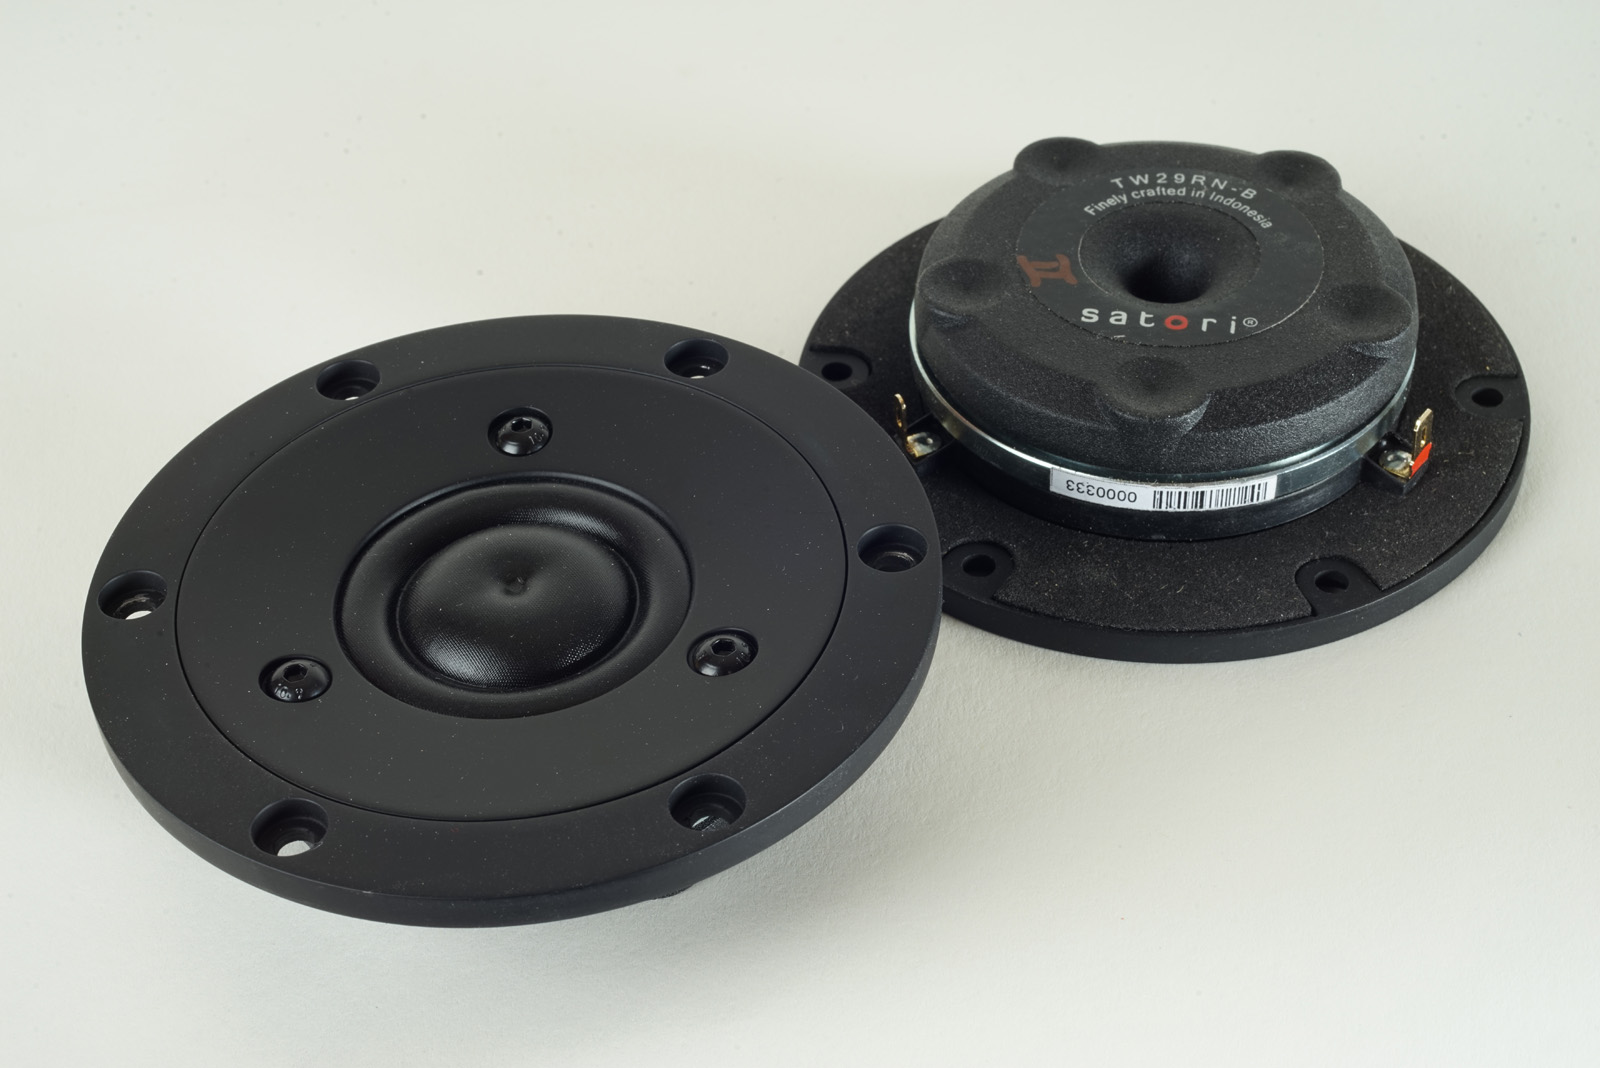
Latest addition to this construction is the TW29BN Beryllium dome
tweeter. No changes to the crossover, but do experiment with R1 being by
default 2R2. Try out 2.7 Ohm for the Be-dome tweeter. It's a matter of
taste and what you add in front of the speakers.
In short: More clarity in all of the treble range.

Click images to view large.
Basics:
2-way d'Appolito speaker in a 38 litre vented cabinet.
System sensitivity: 91 dB/2.8V, 1 meter.
Impedance: 4 Ohms, minimum 3.6 Ohms @ 150 Hz.
Point of crossover: ~1.7 kHz.
Power requirement: 10+ wpc.
Power handling:
100 watts, but please
also read this:
http://www.troelsgravesen.dk/power-handling.htm,
and remember any burned driver is a misused driver.
Useful links (Please
follow all links before e-mailing!):
http://www.troelsgravesen.dk/tips.htm
http://www.troelsgravesen.dk/tips.htm#CONSTRUCTION_OF_CROSSOVERS
http://www.troelsgravesen.dk/crossovers.htm
http://www.troelsgravesen.dk/LCR-RC.htm
http://www.troelsgravesen.dk/Inverted-Polarity.htm
http://www.troelsgravesen.dk/choices.htm
http://www.troelsgravesen.dk/power-handling.htm

Be domes.
Click images to view large
Download specs here: MW16P-8 TW29RN-B TW29BN
Both tweeters are 4 Ohms!
Beryllium dome tweeter
Setting up drivers on a fairly narrow baffle poses some problems due to
baffle step loss, that is, at lower frequencies sound becomes
omnidirectional where at higher frequencies sound becomes more and more
directional. Sound will decrease 3 dB at a frequency calculated from
11500/baffle width in cm, thus 11500/21.5 = 534 Hz. How this emerge in
real life depends on the drivers intrinsic performance on an infinite
baffle, which we usually find in manufacturers specs. Download MW16P-8
data sheet
here. Quite a flat response from this driver on an infinite baffle.
Now, this "problem" usually doesn't present any major problem except for
very narrow baffles where the loss may start so high we from have a
depression in the middle midrange in order to decrease response around 1
kHz, where many 5-7" inch drivers have their maximum output. From a
proper value of L2 we tilt the drivers response to make the best
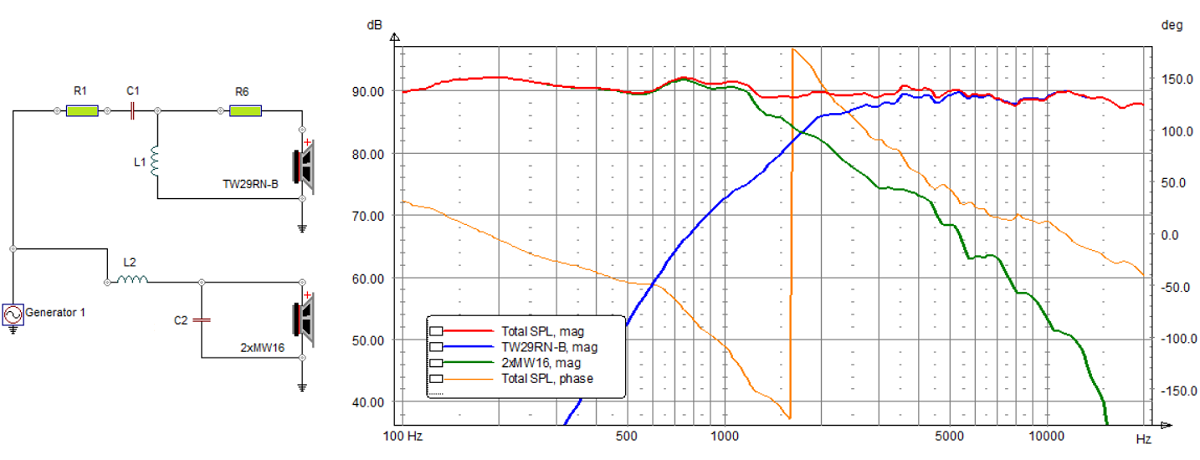
possible response in all of the midrange, 160-1280 Hz. From the simple
crossover seen above we have a +/- 1 dB from 100-1500 Hz, not bad at all
and the actual measurements even looks better. Simulation doesn't tell
everything.
From the crossover seen below we're more nitpicking and target a ruler
flat response in all of the midrange by using a smaller coil for L2 and
insert an LCR circuit to tame the response around 700-1500 Hz. So, which
sounds the best?
Both crossover were set up during testing and although the difference
was audible, the simple solution, due to a slightly elevated response
around 1 kHz, had a very nice presence to the sound delivering a little
more
detail and engagement without ever being aggressive or too much
right-in-your-face. The two tweeter crossovers were exactly the same
during tests and to be honest, this comparison turned out more tricky
than anticipated and lasted for several weeks because both had qualities
and we need to get past any bias due to knowledge of what is going on.
The latter is very difficult. The flat response is kind of what it
should be, but it had a slightly flat presentation, where the
simple crossover had slightly more depth to the soundstage. From opera
to hard rock the simple crossover was preferred, which was a bit
annoying as the flat should be more correct. The long and the short of
it is that simple wins. Tuning a speaker system is all about compromises
- and taste not to forget.
So, two resistors, two caps and two coils does it! Very simple indeed -
and a lot cheaper also, because there were quite a few uF in low-pass
section of the "flat" version.
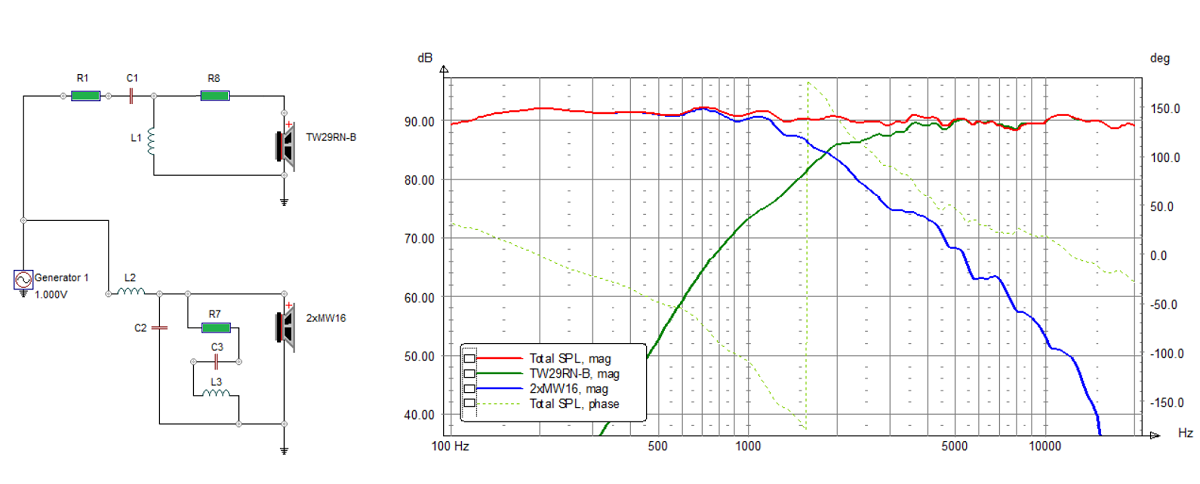
Above the actual response from the two crossovers. Green is"flat".
Basically the simple crossover is wobbling around the "flat" at only +/-
1 dB.
We wouldn't think this could make any significant difference, but it
does. Red just sounds better, which shows that
at the end of the day, speaker tuning is all a matter of taste and
choices.
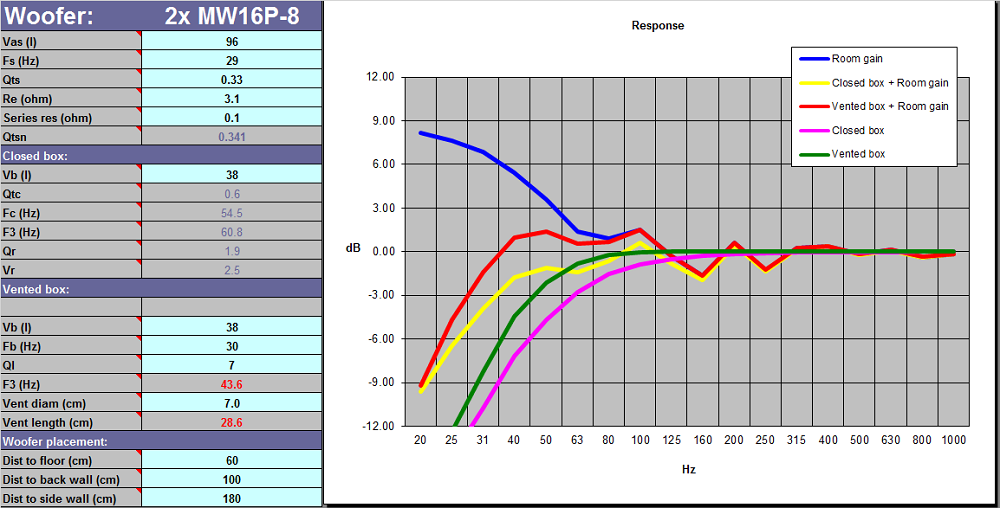
Using two drivers doubles Vas and reduce Re to half, all other parametres stay the same. Around 20 litres seems appropriate for a single MW18 driver, hence some 38 litres here as damping materials will increase virtual volume a little.
As always: Any change to front panel design and drivers' placement and you need and new crossover and I can't help. Please read: http://www.troelsgravesen.dk/crossovers.htm
Check out this file regarding construction tips: http://www.troelsgravesen.dk/tips.htm
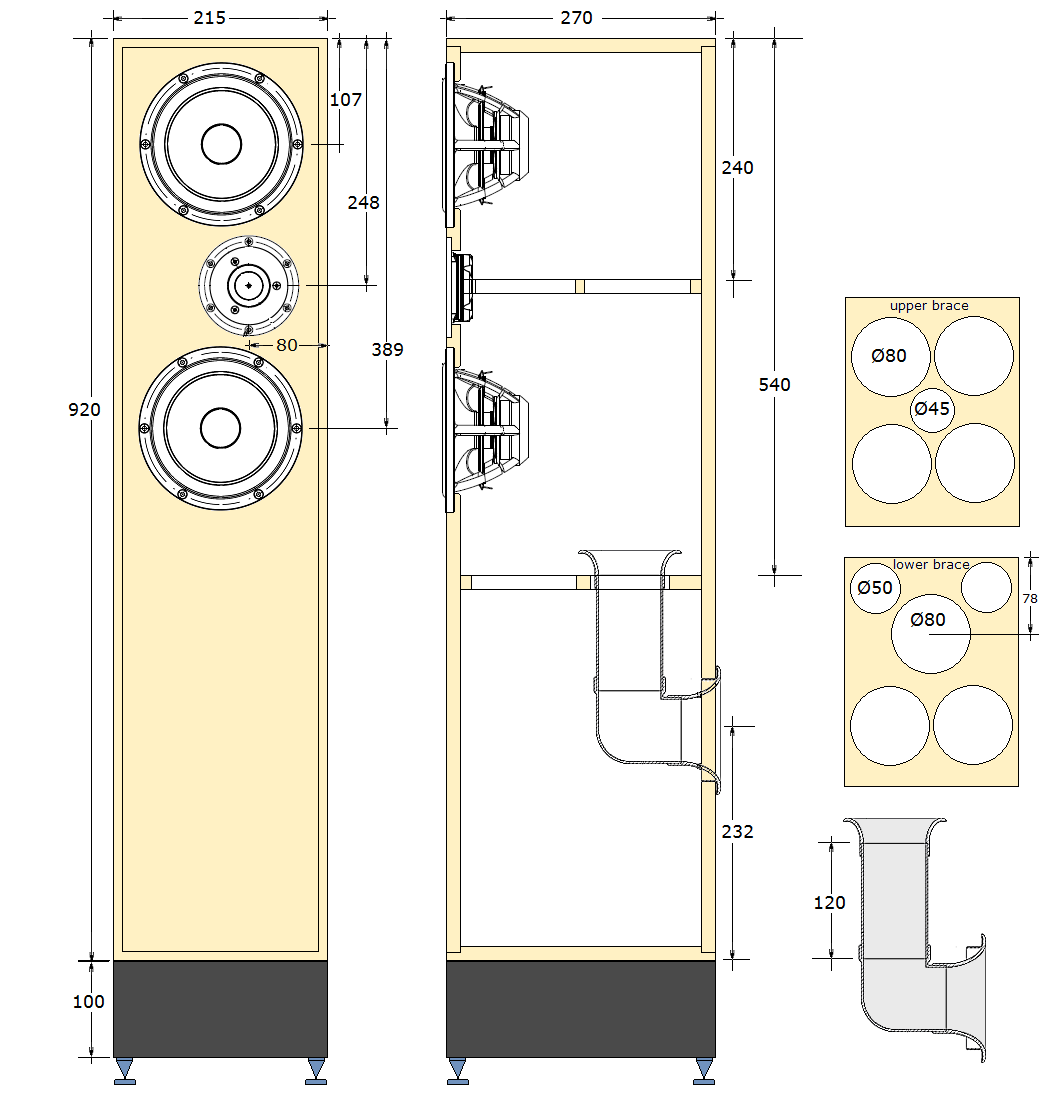
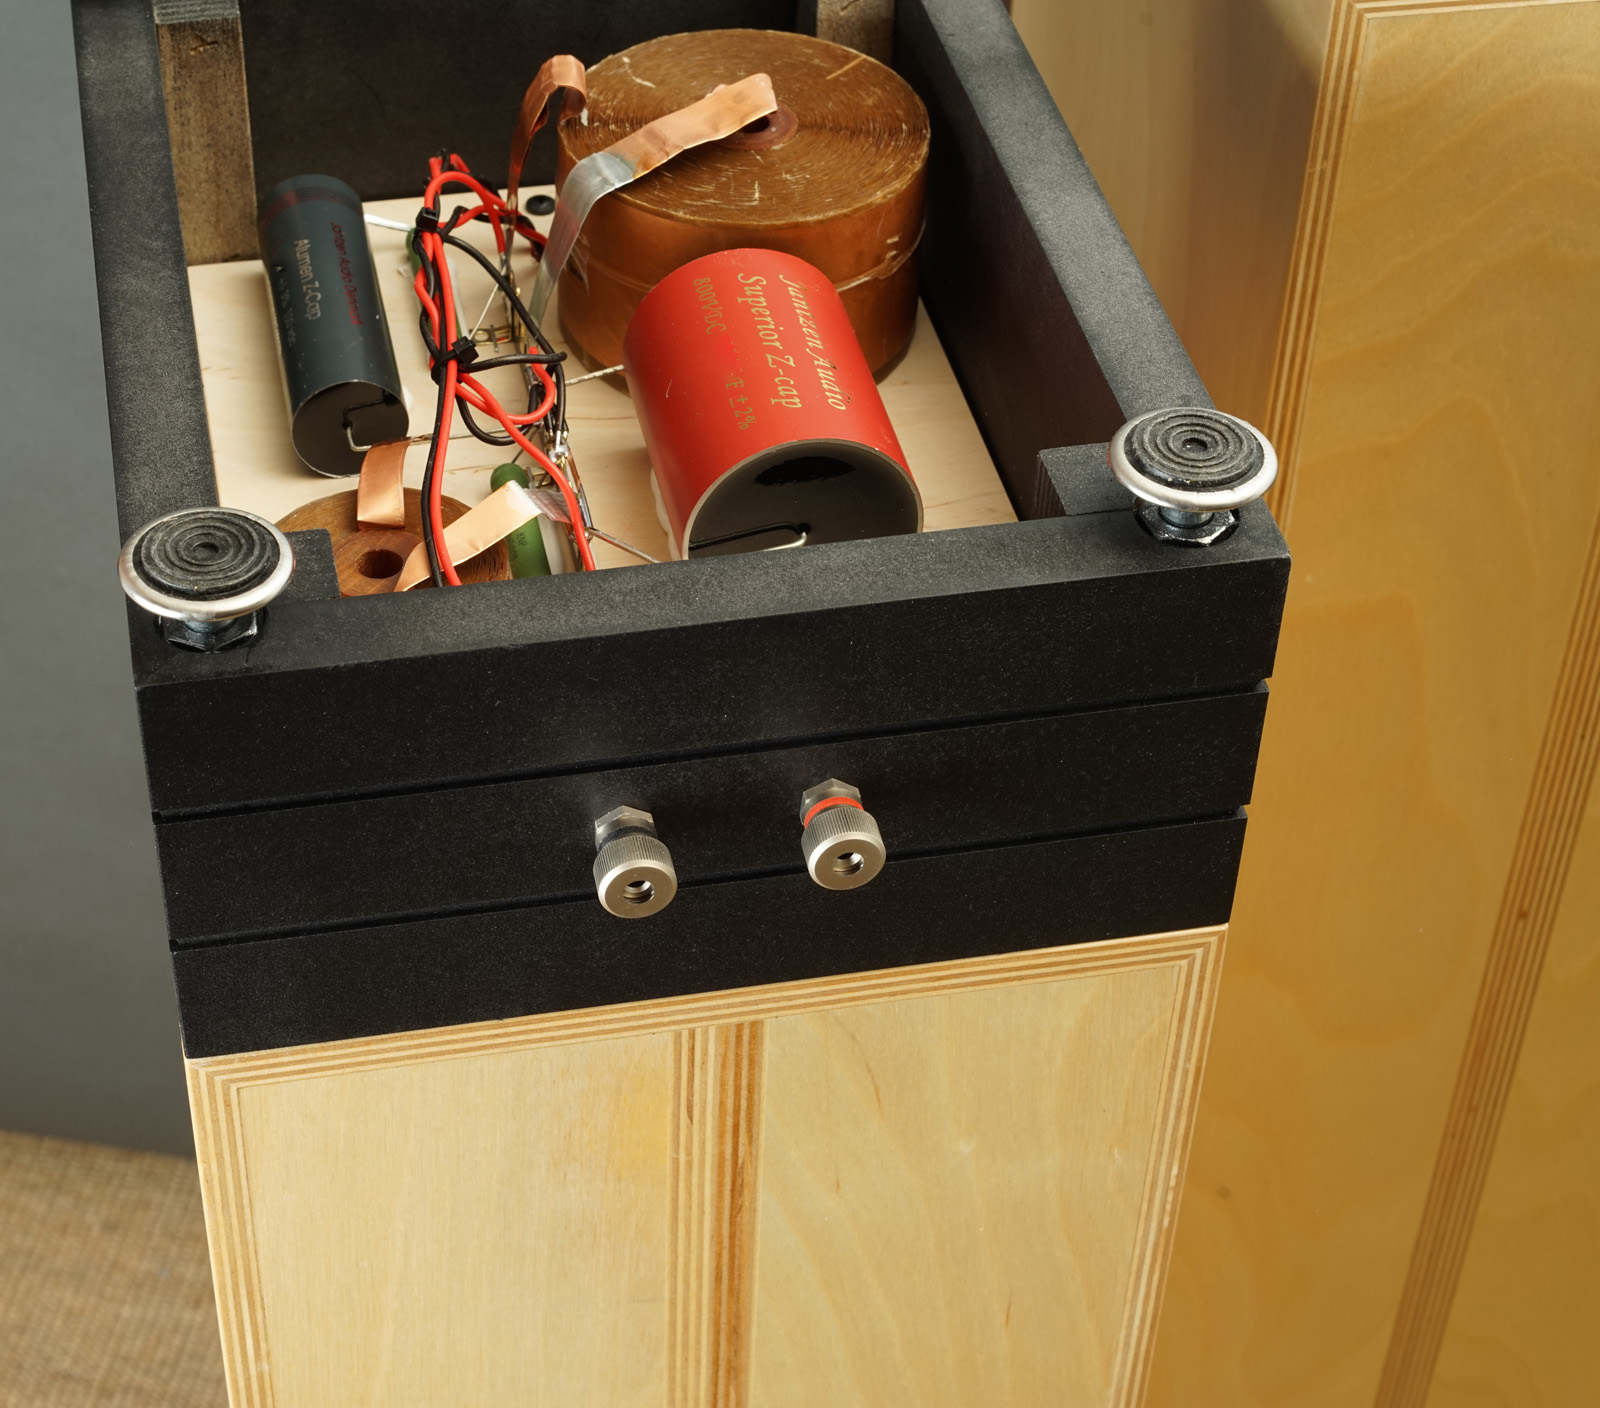
Target here is to make the simplest possible cabinet, thus a straight
forward rectangular box of 215 x 270 x 920 mm, placed on a 100 mm stand
where we conveniently can place the crossover for easy access and keep
it away from any vibration coming from the bass drivers. If you want to
add spikes, pads or whatever is fully to your preference.
The cabinet is constructed from 20 mm Baltic birch and you can use 19 mm
MDF if BB is not available. Do not use light-weight plywood ("Eastern").
High density solid wood is fine if this is what you like.
The only critical dimension for the two braces is the 80 mm middle hole
of the lower brace. Center should be 78 mm from the side to the rear to
fit the angled port.
Obviously you can make the cabinet i one piece and place the bottom to make 880 mm internal height. The bottom cavity is very convenient for housing the crossover. Both for keeping crossover away from resonances and for easy tweaking of crossover.
I never provide cutting plans as this will depend on materials available
locally. Baltic birch varies in thickness and any fixed cutting plans
are
likely to fail. It also depends on how you are going to assemble the
cabinet, having sides and top/bottom cut 45 deg., or just simple assembly
adding veneer at the very end. All methods go.
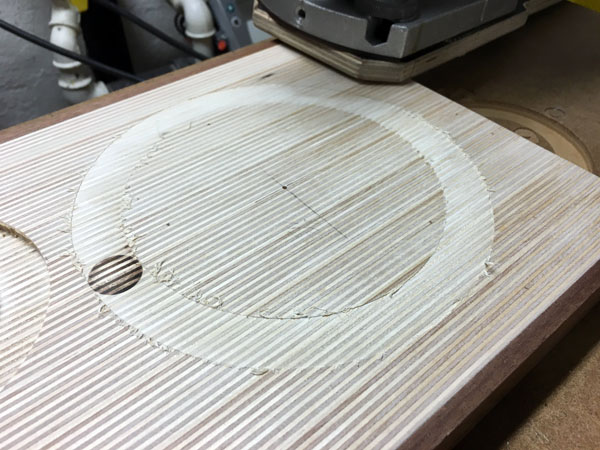
Never route for drivers before you have them at hand and can measure
exact diameter. These things have tolerances as can be seen from specs,
e.g. MW16 states 165 mm +/- 0.5 mm diameter. It's a real pain having to
increase a driver hole
diameter.
Please check my "tips" page for additional info:
http://www.troelsgravesen.dk/tips.htm
You can place the port to the front or to the rear to your liking. As we
have a decent bass response from these drivers I decided to use a 70 mm
angled port as seen on drawing. No port chuffing here!
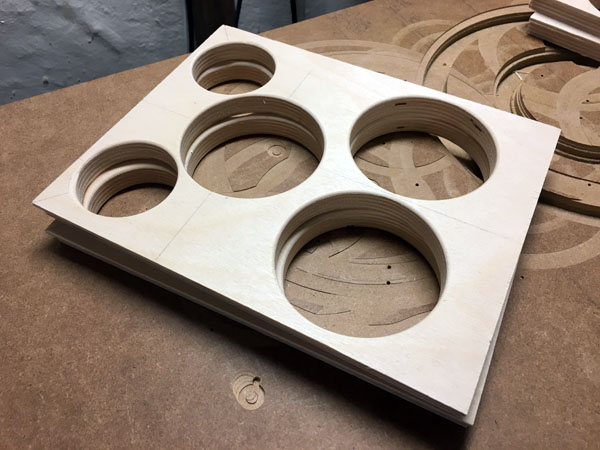
Workshop images
For front panels I cut 25 mm sticks of 20 mm Baltic birch and glued 10
pcs + some mahogany fillets to make 215 mm total width.
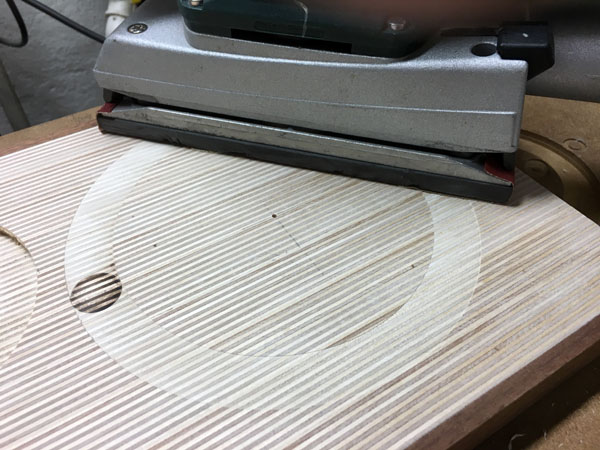
Now, routing such laminate takes some precaution not getting severe edge
ripping. Start lowering the router some 0.2 mm and sand the
surface. Repeat by lowering another 0.2-0.3 mm and repeat sanding. Now
you can start digging deeper for each turn, but watch out and rotate the
router slowly!
Never route for drivers before you have them at hand and can measure
actual diameter!
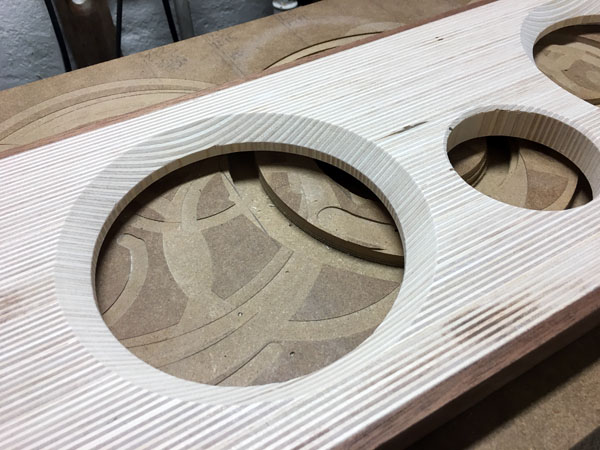
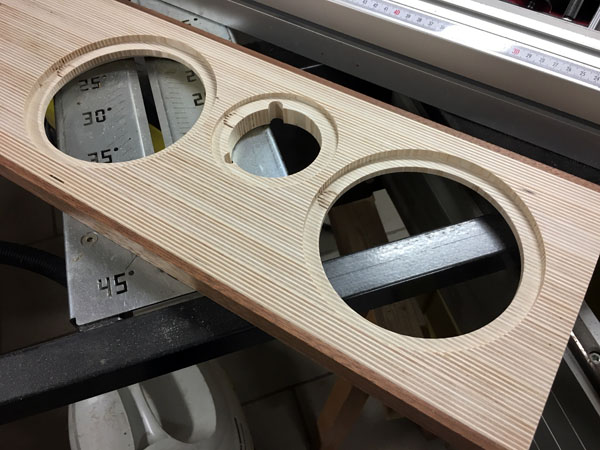
Chamfer bass driver holes as seen on image, approx. 15 mm, 45 deg., for
a 25 mm front. 10 mm for a 20 mm front is OK.
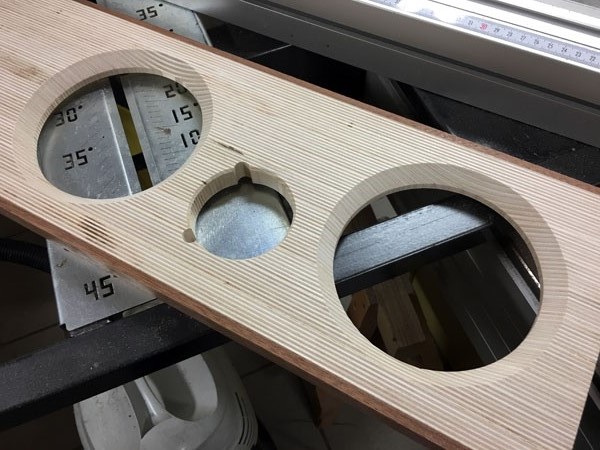
Trying out the drivers.
The laminated front panels had quite a surprise in store. The panels
were made some 3 weeks ahead of final assembly and at that time I found
the driver rebates 165 mm width vertical but only 164 mm horizontally!
Drivers couldn't go in! Hmm.. Cutting BB in strips and turning them
around 90 deg. all of a sudden exposes an enormous evaporating area and
the panel width shrinks. So, I placed the panels 48 hours in our attic
(winter time and high humidity) and the panels were back in shape. Pfeww...
So, if you make your panels like this, either wait trimming side fillets
and driver routing until width doesn't change any more - and this may
take weeks!
Top brace to the left and bottom brace to the right.
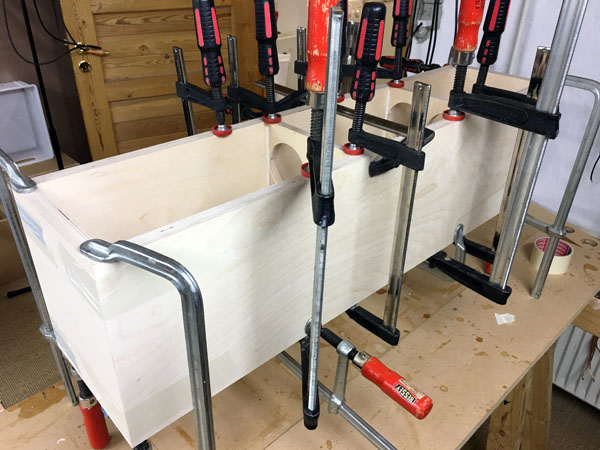
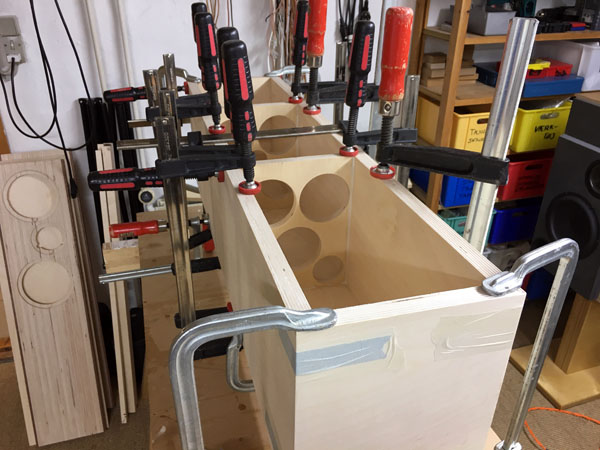
Cabinet assembly. Tape and a few clamps.
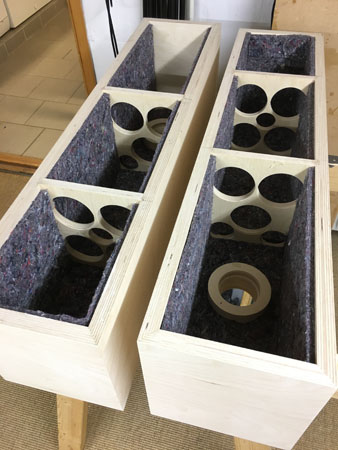
Damping: Add 8 mm felt to all internal panels except front panel. Ad one layer of 30 mm acoustilux on top and two layers behind bass drivers on rear panel. Add 4 layers of acoustilux at bottom to prevent any internal standing waves between top and bottom. That's all.
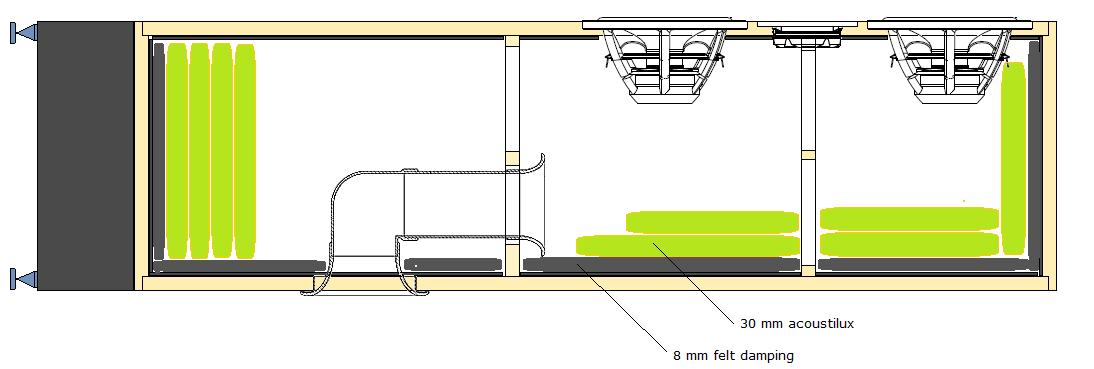
With the kit follows 1.3 sqm 8 mm felt and 0.8 sqm 30 mm acoustilux
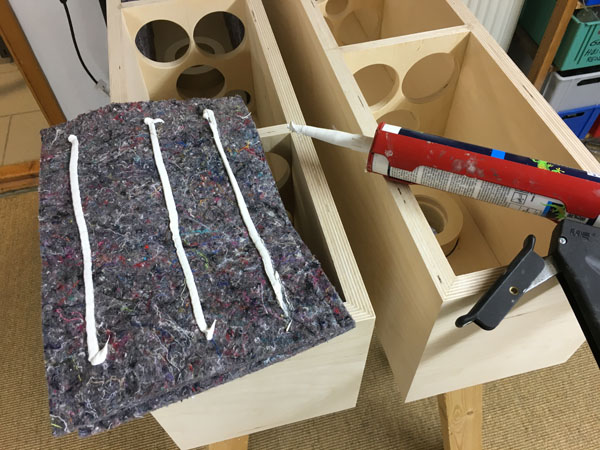
Cabinet damping. I used cheap acrylic pro filler for gluing.
Felt:
4 pcs 22 x 34 cm: bottom section, side panels
4 pcs 22 x 28 cm: middle section, side panels
2 pcs 22 x 58 cm: top section, top and side panels
2 pcs 20 x 15 cm: top rear panel
2 pcs 28 x 15 cm: middle section, rear panel
2 pcs 36 x 15 cm: bottom section, rear panel
2 pcs 22 x 15 cm: bottom panel
Total 1.12 m^2. (1.3 sqm provided)
Acoustilux:
Follow drawing. (0.8 m^2 provided)
I cut 8 pcs 50 x 15 cm and folded the strips.
Everything that
can be counted does not necessarily count; everything that counts cannot
necessarily be counted". Albert
Einstein.
A few
comments on MEASUREMENTS before you start interpreting all the readings
below.
First of all, if we think measurements will tell us how a speaker
sounds, we're wrong. The perception of sound is way too subjective to be
reflected in any measurements we can perform. A loudspeaker system is
meant to give us a satisfying idea of an acoustic event and for some
people a pair of 5 USD ear-plugs are enough, others spend 200 kUSD on a
truly full-range pair of speakers - and the latter may not be happier
than the former.
Measurements may give us an idea of tonal balance of a system, i.e. too
much or too little energy in certain areas. Measurements may tell us
about bass extension if far-field measurements are merged with
near-field measurements. In addition to this, ports may contribute to
bass extension. Most of us diy'ers do not have access to an anechoic
room for full-range measurements down to 20 Hz.
What cannot be seen is what kind of bass performance we get in a given
room. Bass performance is highly dependent on in-room placement of your
speaker and the same speaker can be boomy in one place and lean in
another. Actual SPL level at 1 meter distance and 2.8V input is useful
for en estimate of system sensitivity and combined with the impedance
profile may give an idea of how powerful an amplifier is needed to drive
the speaker to adequate levels.
What measurements do not tell is the very sound of the speaker unless
displaying serious linear distortion. The level of transparency, the
ability to resolve micro-details, the "speed" of the bass, etc., cannot
be derived from these data. Distortion measurements rarely tell much
unless seriously bad, and most modern drivers display low distortion
within their specified operating range.
Many people put way too much into these graphs and my comments here are
only meant as warning against over-interpretation. There are more to
good sound than what can be extracted from a few graphs. Every graph
needs interpretation in terms of what it means sonically and how it
impacts our choice of mating drivers, cabinet and crossover design.
What measurements certainly do not tell is the sonic signature of the
speaker, because speaker cones made from polypropylene, aluminum,
Kevlar, paper, glass fiber, carbon fiber, magnesium, ceramics or even
diamonds all have their way of adding spices to the stew. Nor do
measurements tell what impact the quality of the crossover components
add to the sound, from state of the art components to the cheapest of
coils and caps, they all measure the same if values are correct.
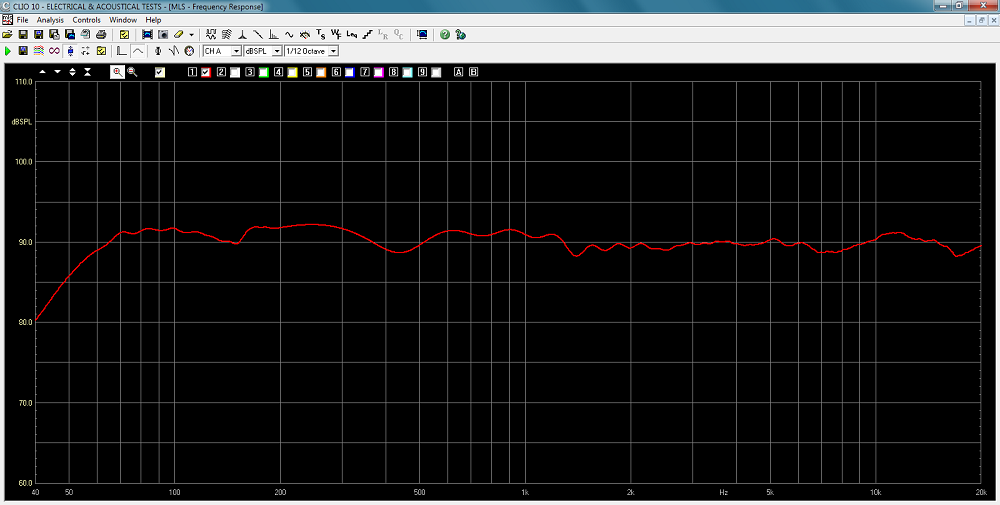
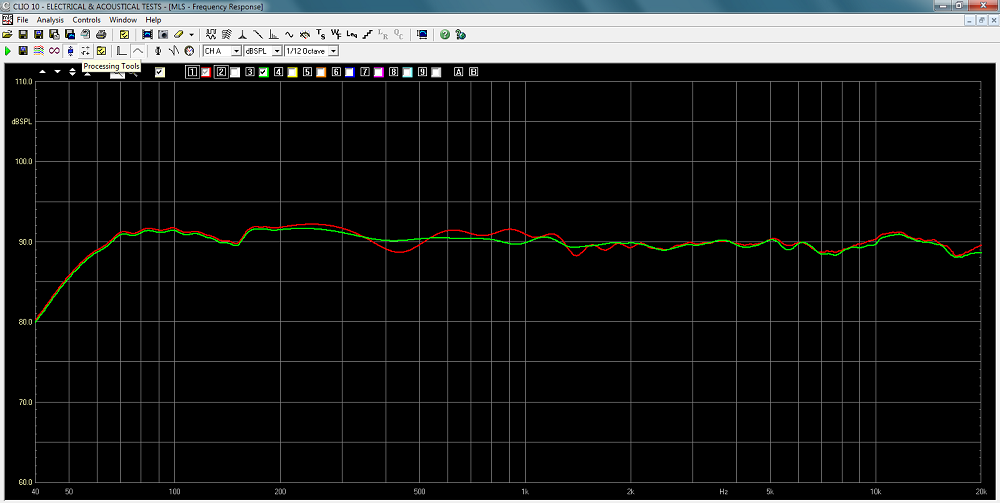
Above the response @ 1 meter, 2.8 volts,
merged with near-field response at 200 Hz. System sensitivity ~91 dB/2.8
V, 1 meter.
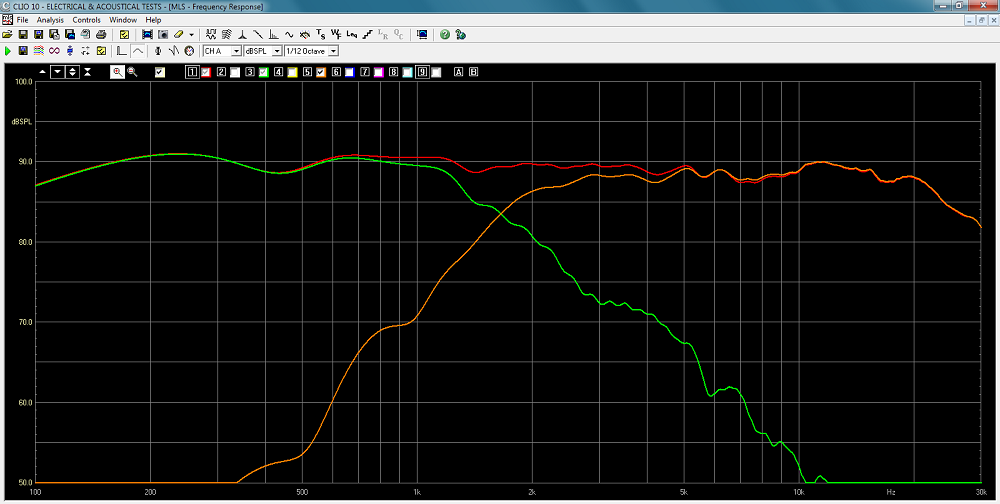
Above individual and summed response of drivers. Point of crossover
~1,700 Hz.
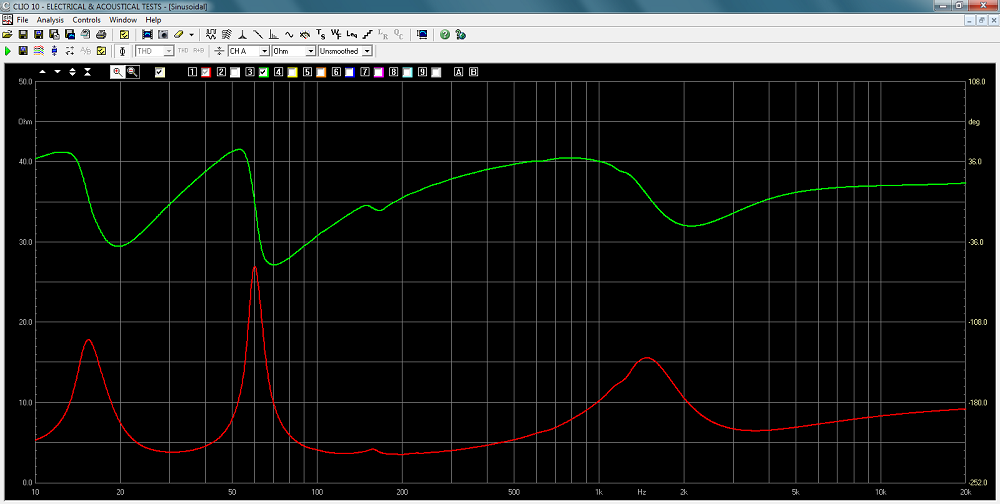
Final system impedance. This is a 4 Ohm
speaker with a minimum of 3.6 Ohm @ 125 Hz.
TW29BN Beryllium dome tweeter
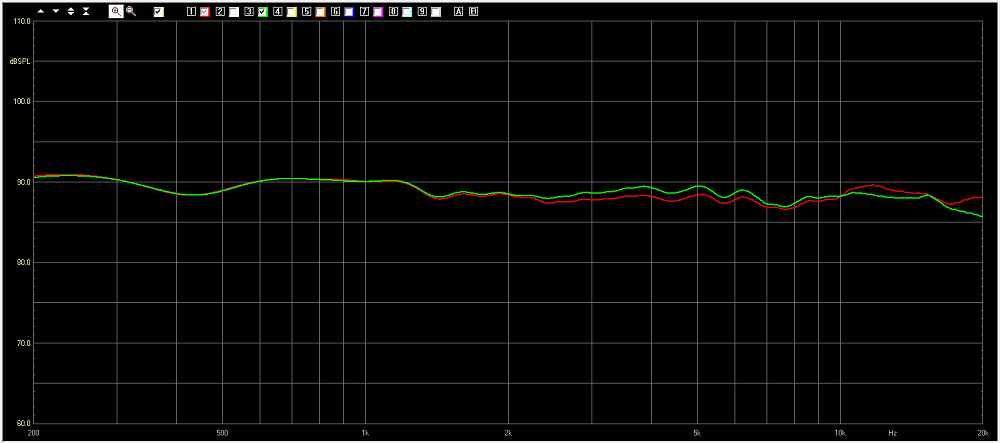
Response of Be dome (green) compared to
TW29RN (red)
Overall a slightly flatter response from the Be dome.
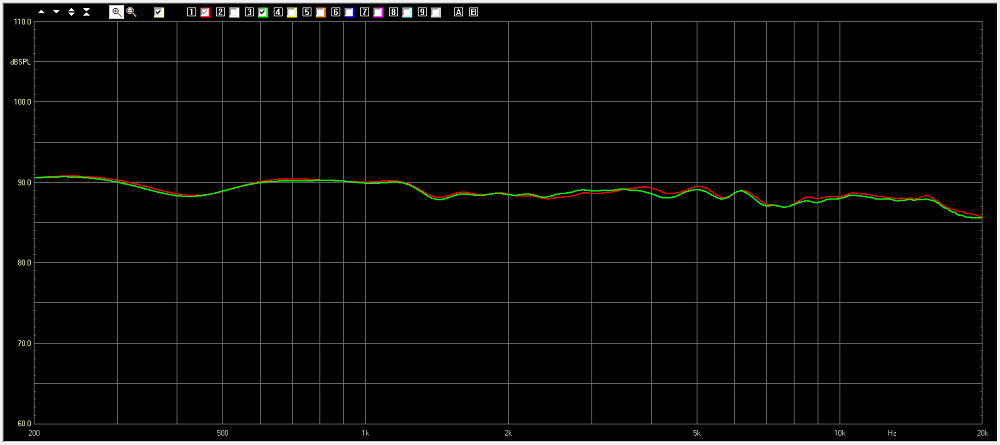
Be dome, response of left and right speaker.
Quite a matched pair.

For level 2, Silver-Z is used for tweeter and STANDARD-Z for the bass
section.
Both coils are air-cored wire coils with the same series resistance as
the WAX coils in level 1.
You can buy the kit with or without the drivers - or some of the drivers
if you already have some.
Please ask Jantzen Audio
for options and include your zip code for transport cost.
Feel sure prices are competitive!
All kit and component prices may be subject to change and are always to be confirmed by Jantzen Audio Denmark.
Download Kit
Sale Presentations:

All technical questions to troels.gravesen@hotmail.com
All questions regarding purchase of kits, please mail Jantzen Audio at contact@jantzen-audio.com
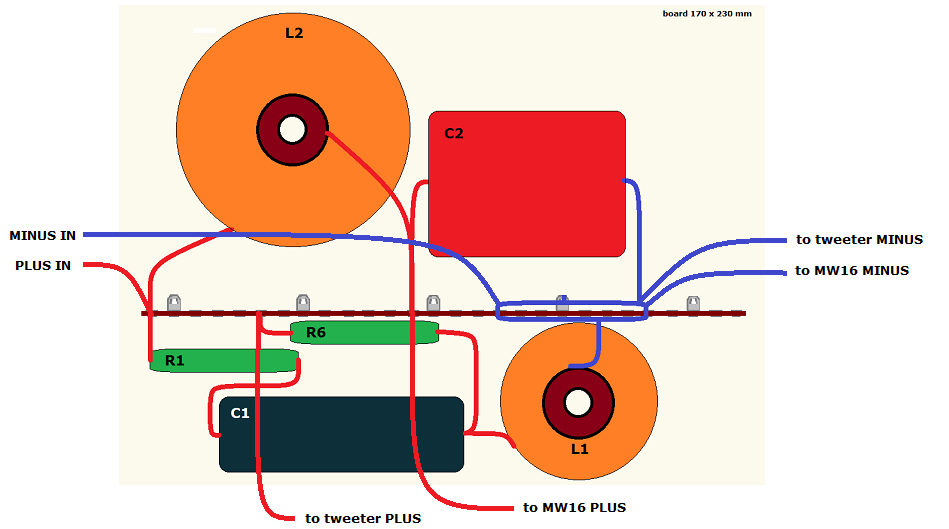
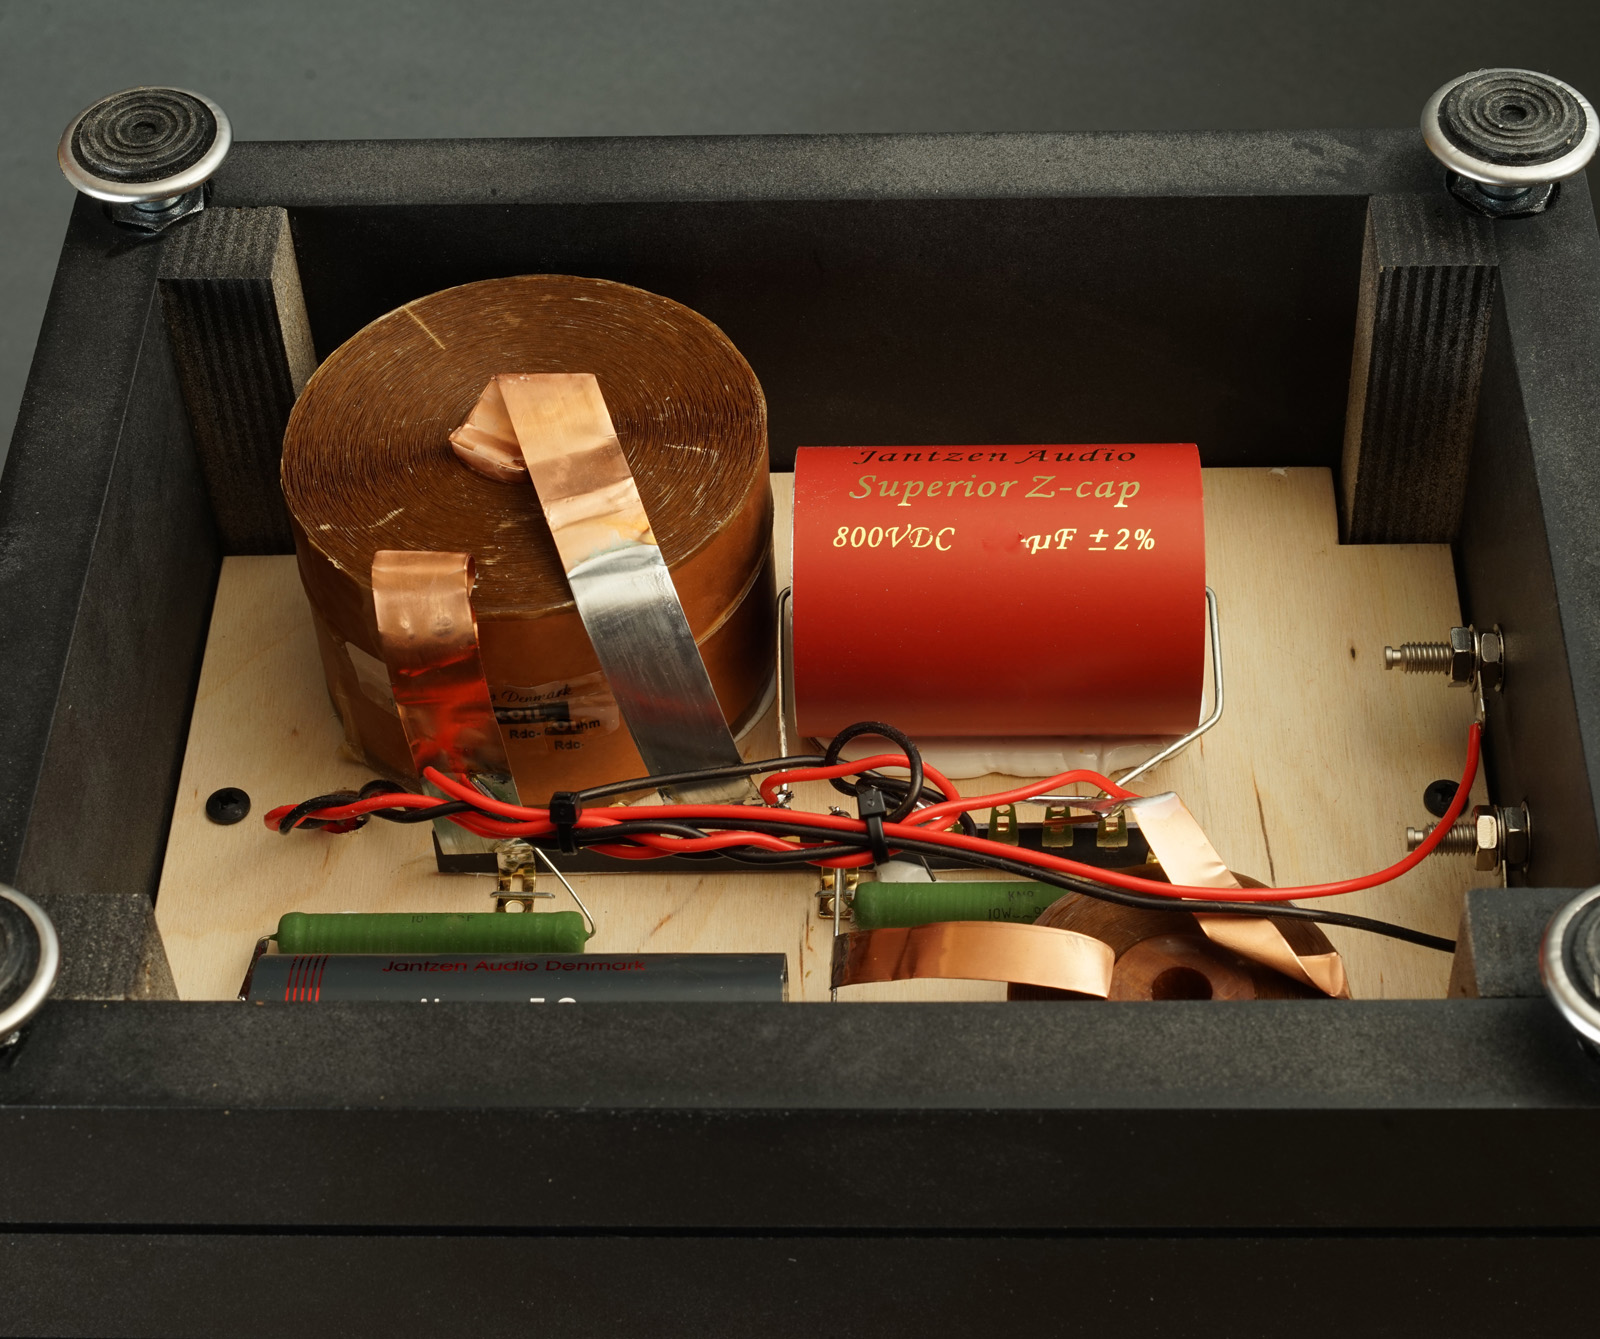
CROSSOVER-LAYOUT
BACK TO INDEX

Hard to make it simpler than this!
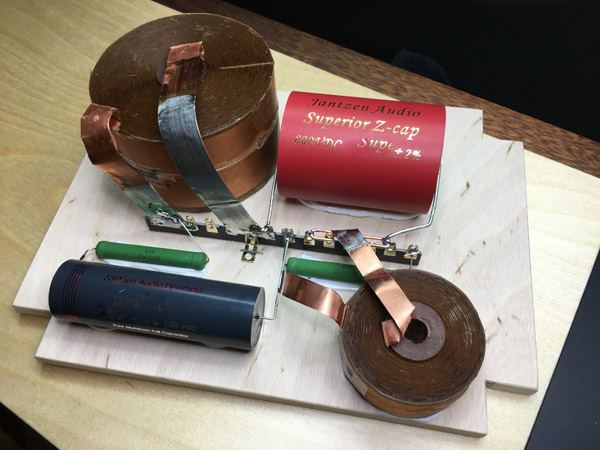
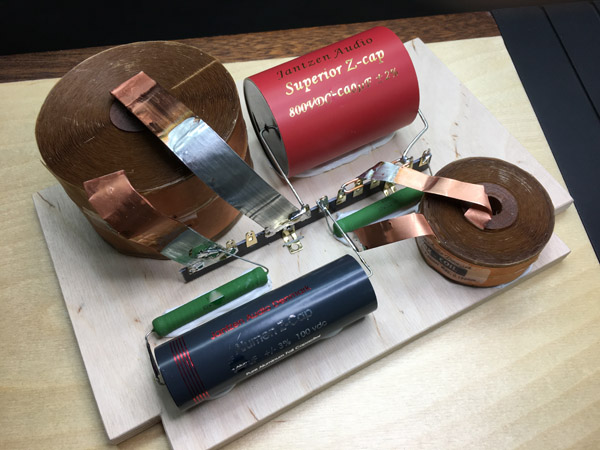
I used the WAX coil terminations directly, hence moved R9 to the other
end.
The large WAX coil is secured by two stainless steel screws. View images
here.
Drill two 3 mm holes in the wood plug at 17 mm distance and secure by
screws, brass or stainless steel.
Wiring
Click images to view large