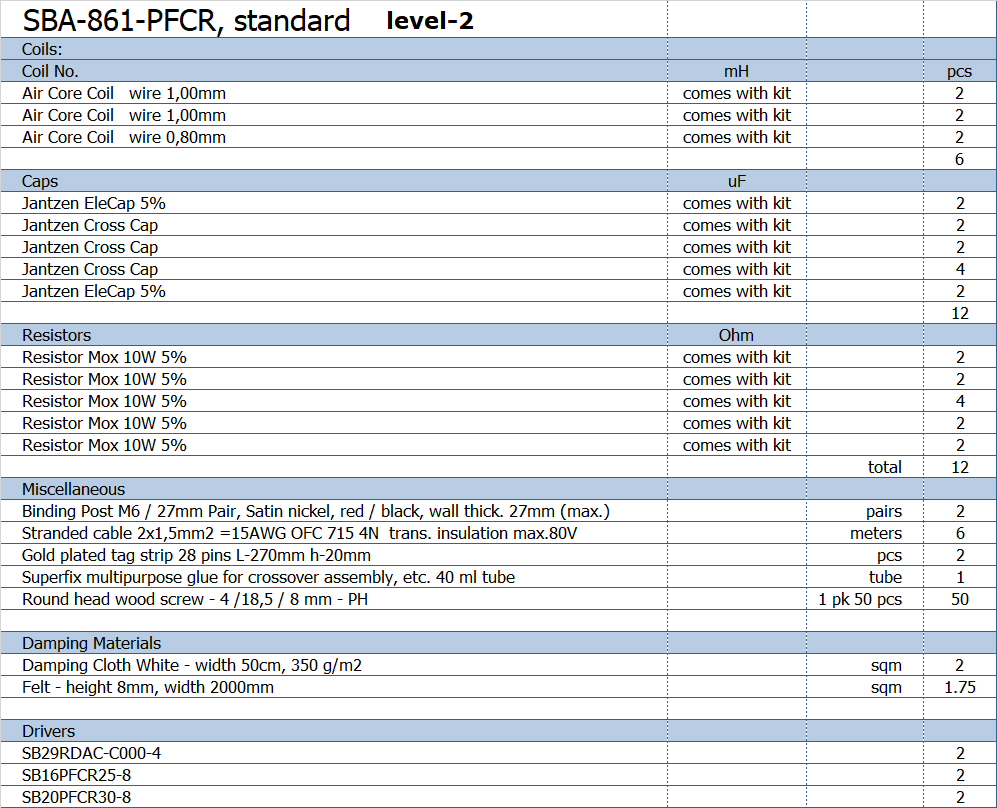
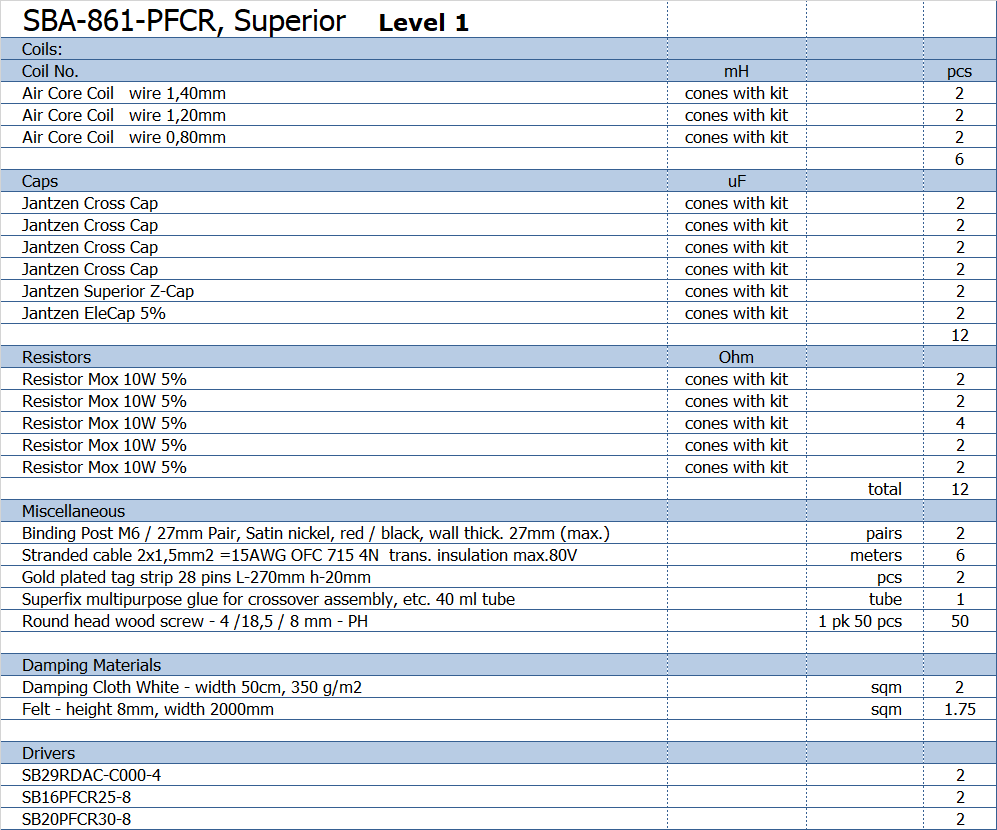
SBA-861-PFCR
Copyright 2021 © Troels Gravesen
Go to on this page:
DRIVERS
CROSSOVER
CABINET
WORKSHOP PICS
MEASUREMENTS
SPEAKER-KIT
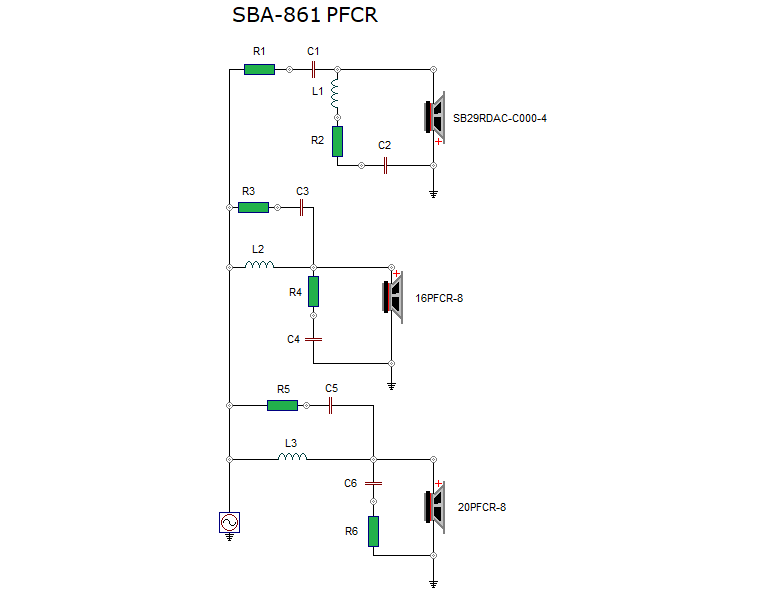
CROSSOVER LAYOUT
There are customers who don't want more for less. Loudspeakers are not
only for music, rather often a statement of quality conscience. Speakers
must look expensive and for sure we often get very good looking drivers
when price in not an issue.
However, as a designer, there is always the challenge of making more for
less - and had all speakers front grill, I guess there would be sold
more speakers with not so expensive drivers. Looks can be deceiving and
something that looks good just must be good. A lot of people
listen too much with their eyes rather than ears. I've had visitors
distracted by The Loudspeaker-3 due to its front grill. It may leave us
confused as we have to rely solely on our ears. It's like my QUADs as
they're really just a panel of fabric. Vision rules so much of what we
make of the world.
Anyway, the issue here is not the front grill, rather cost-performance.
What I would like to do is a speaker capable of quite some sound stage -
for less than 400 EUR/pair + cabinet materials. Actually the kit price
landed at 280 EUR excl. VAT. 387 EUR + VAT when you want better caps for
the tweeter.
The role model for this
is my
Discovery-861. To my ears it offers significant value for less than
800 EUR + cabinet materials. But this also includes high-quality
crossover capacitors, which makes up much of the kit price. There is a
significant gap between standard PP capacitors and
super-caps. Larger gauge wire coils also adds to overall cost. To
hit a <400 EUR target, we just must use standard PP capacitors. Would
the construction here do better with super caps? Indeed so - and the
crossover layout will be prepared for doing so, because the drivers more
than deliver from such measures.
Searching for suitable drivers took quite some time. Monacor and Dayton
are typical brands for low cost drivers. I actually bought a pair of 2"
mid-domes from Dayton for another project only to find out their
specified frequency response graphs were pure phantasy. On paper it
looked like a dream - reality not so much.
I've been aware of the low-cost drivers from SBAcoustics for a long time,
but never really studied the data sheets properly. Usually what is shown
on data sheets is fact when it comes to SBAcoustics, and all three
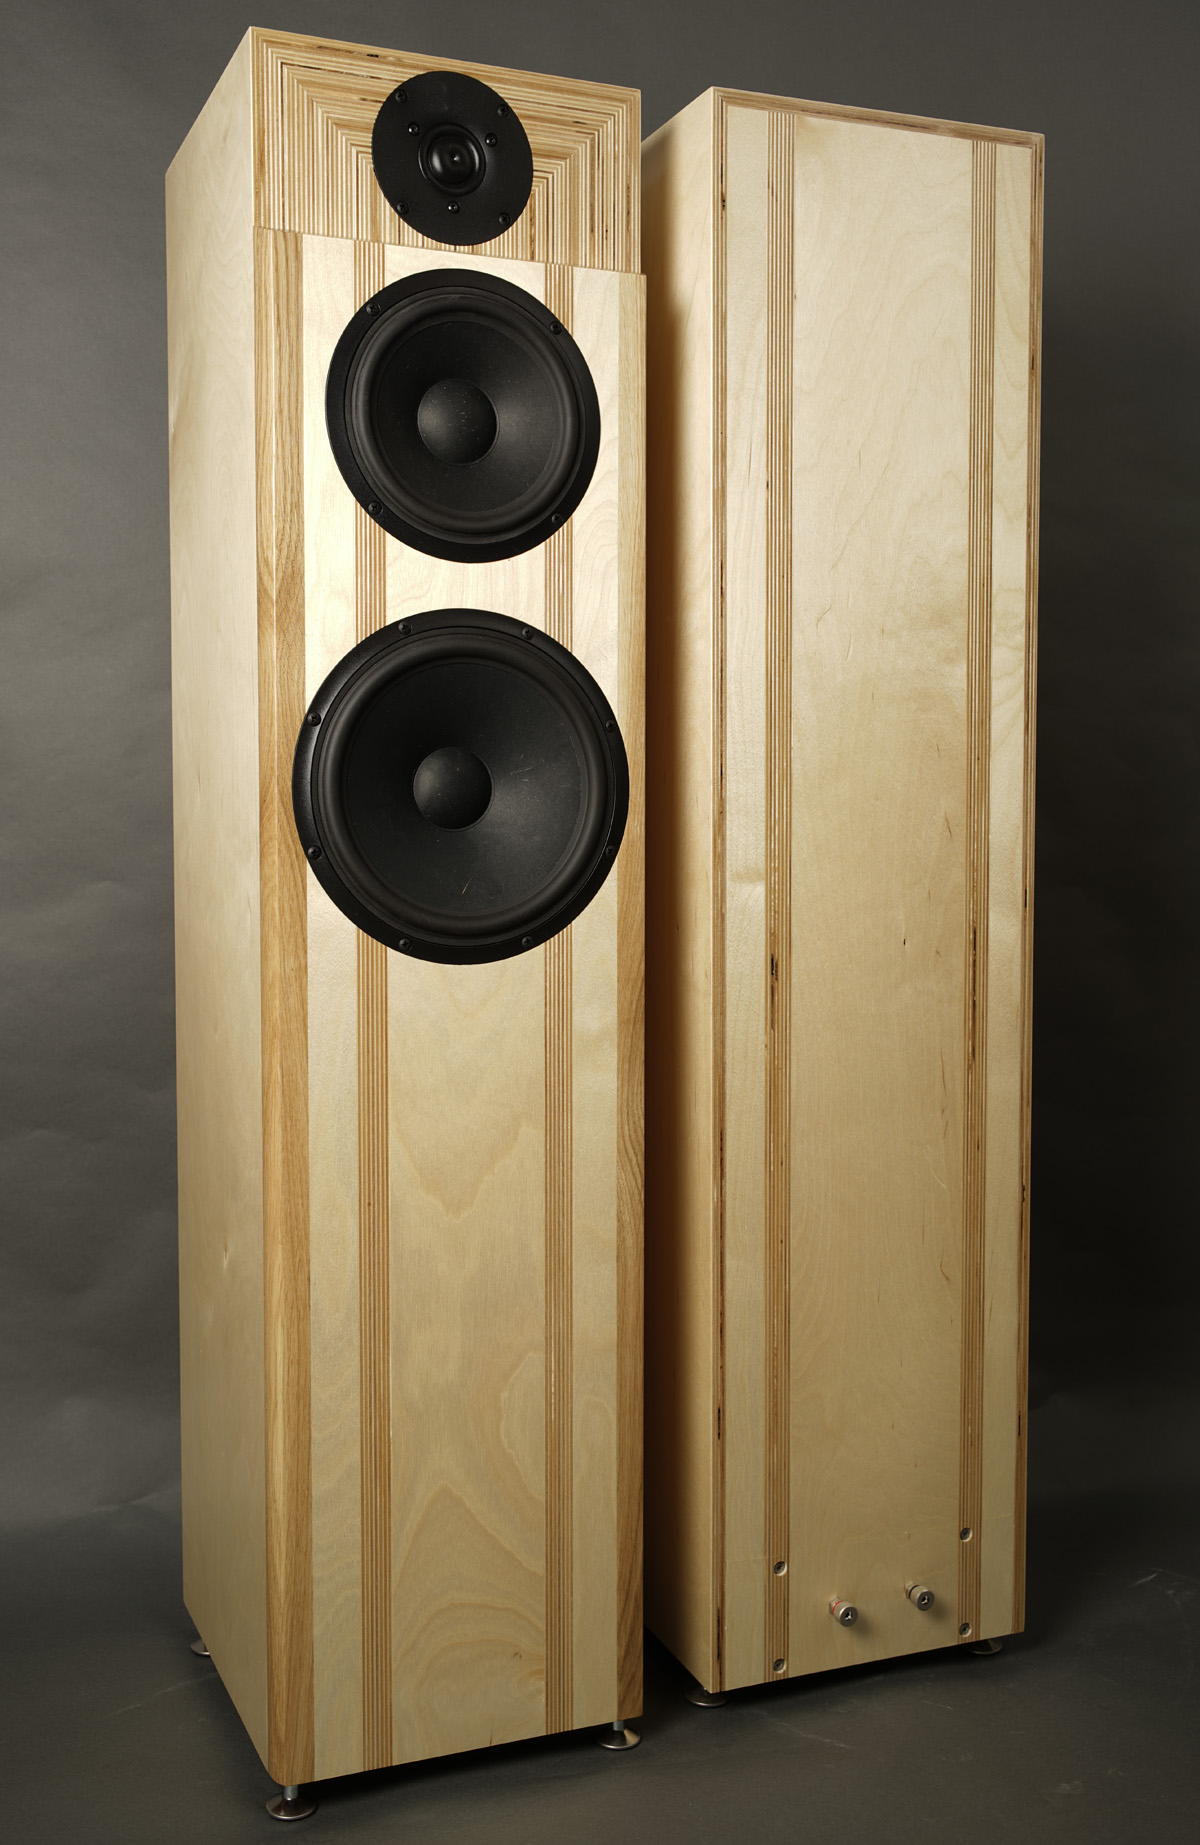
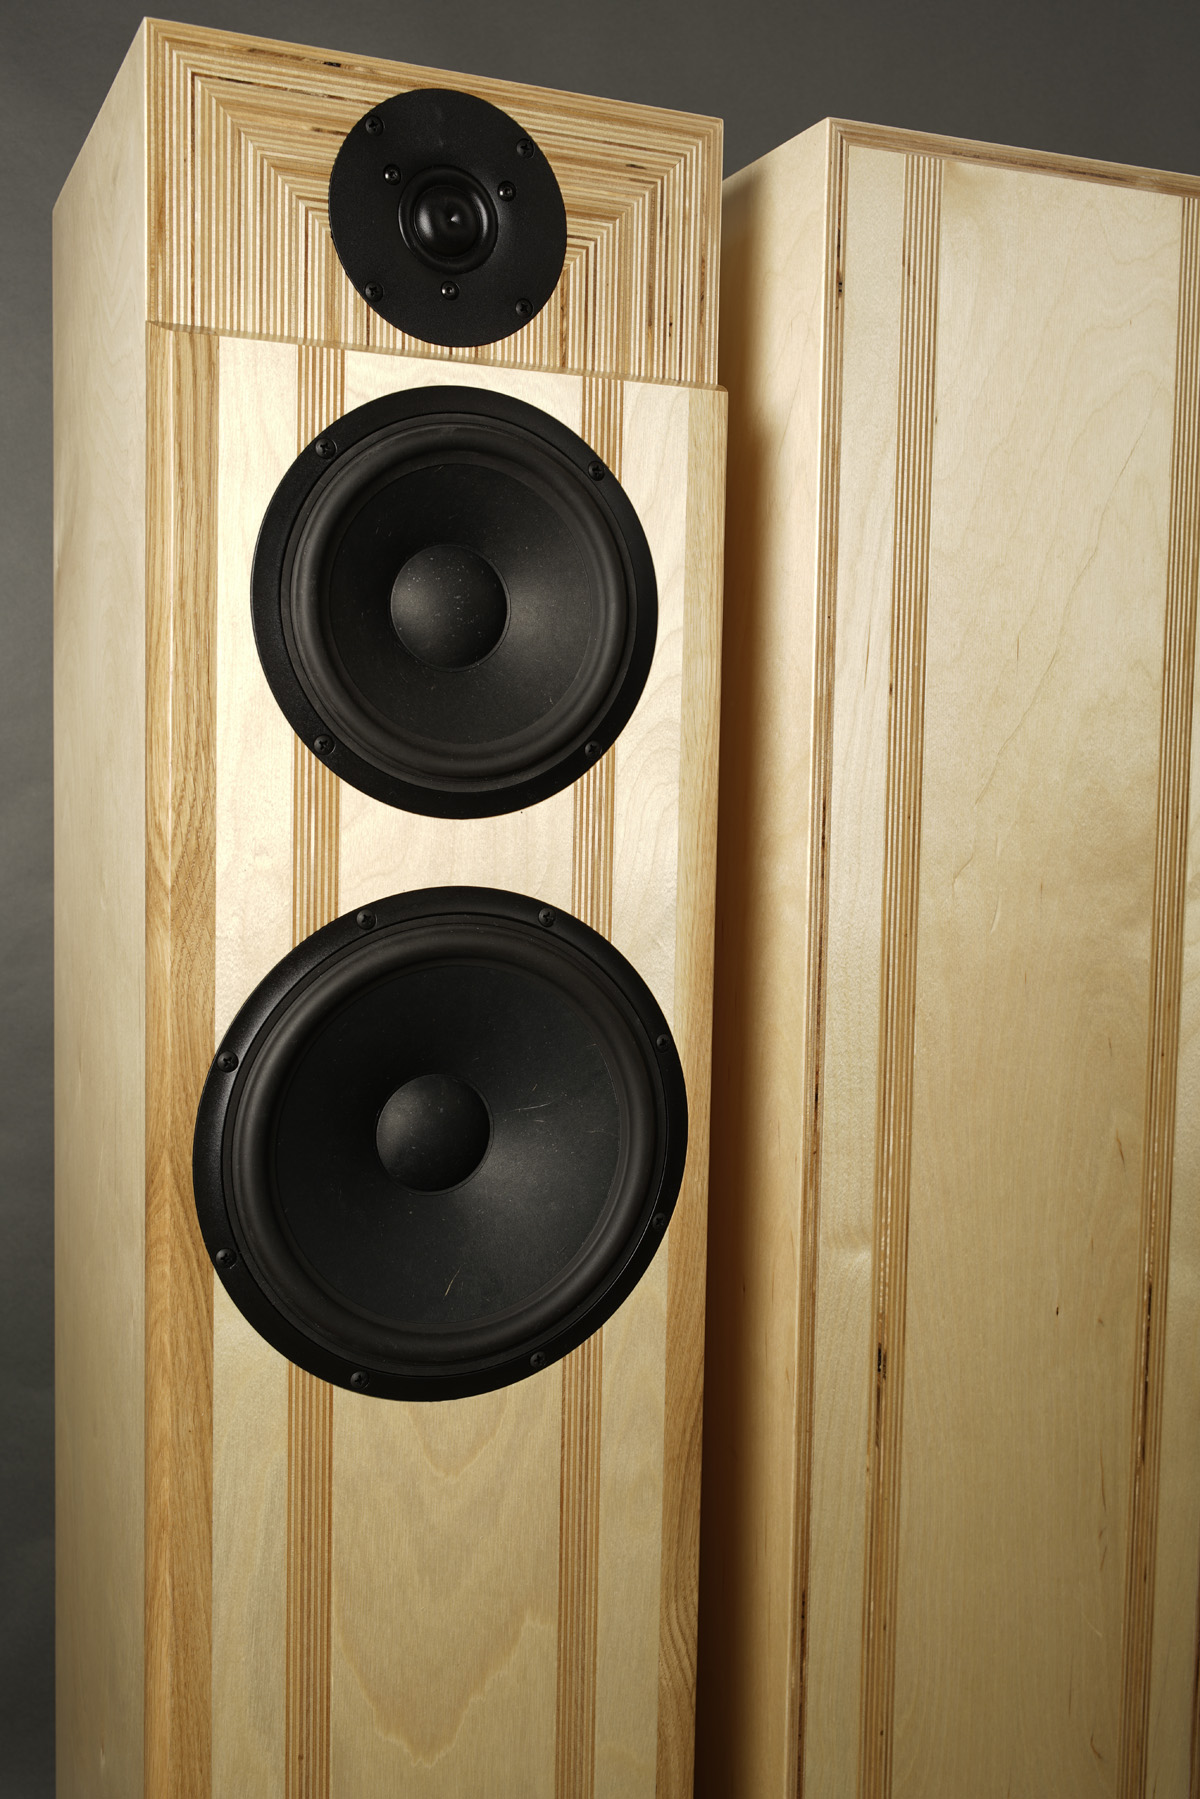
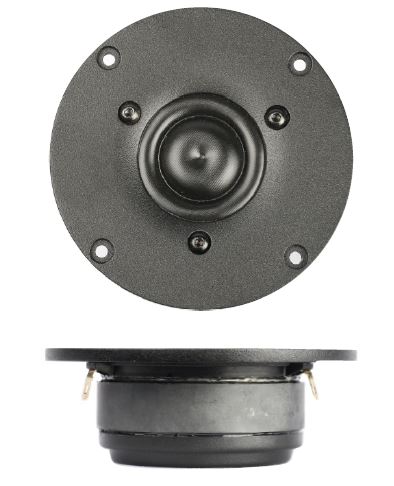
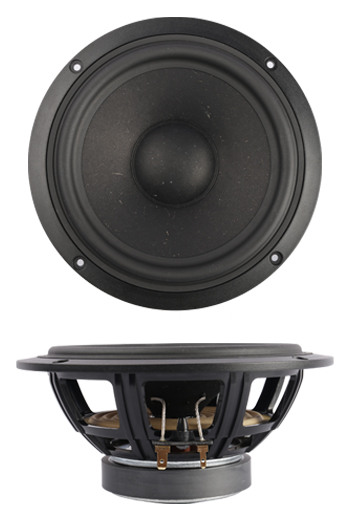
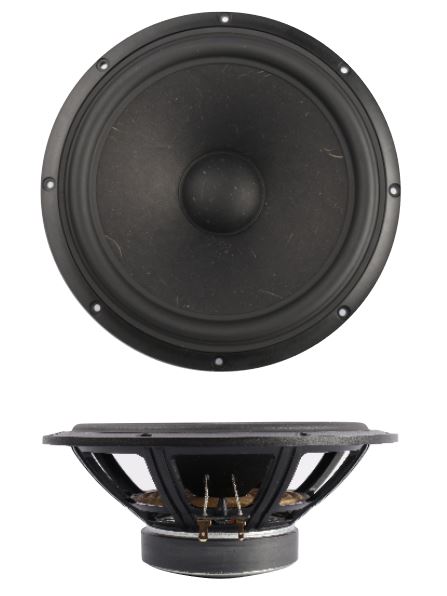
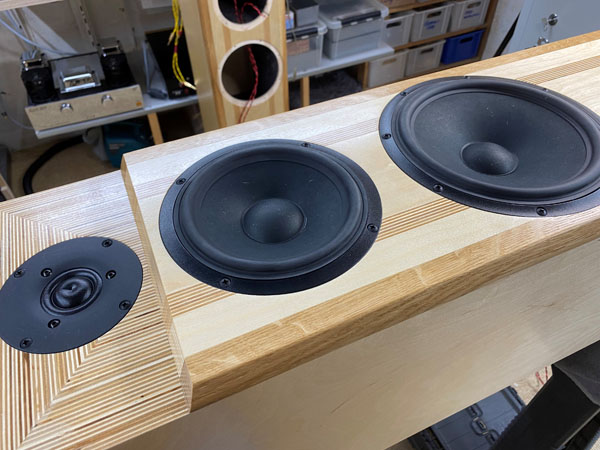
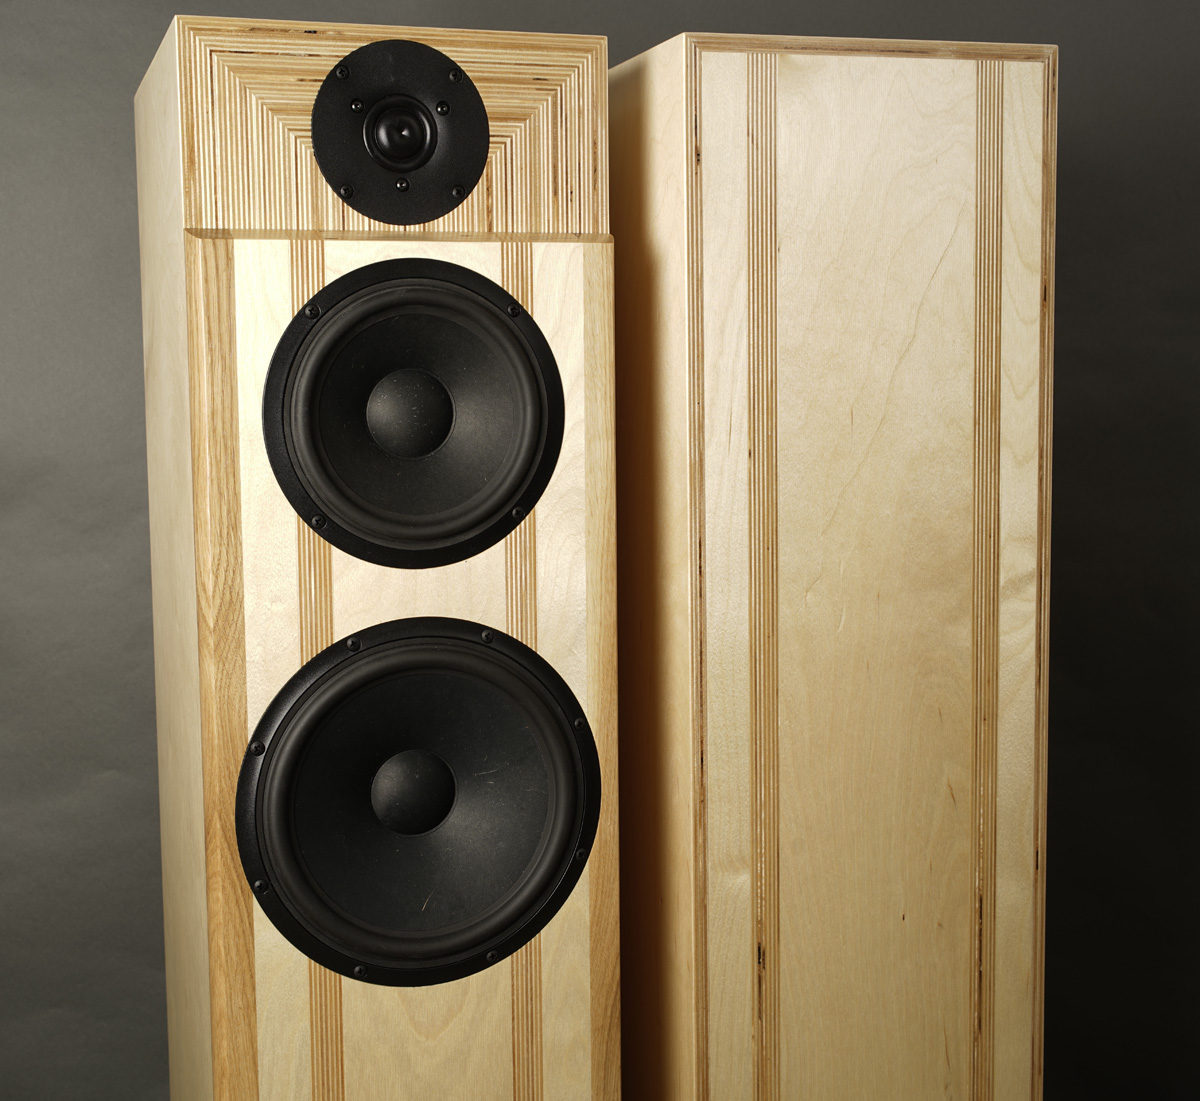
drivers here were no exception. Thus, 8" and a 6" drivers were requested from SBAcoustics and I also picked the SB29RDAC-C000-4 tweeter as I've used
it before and it offers phenomenal performance for less than 50 EUR. And
since last time it has gotten an aluminum face plate. Nice! The 8" and
6" drivers actually look really nice and only thing that tell us this is
a low-cost driver is the use of plastic chassis. What pleased me the most was the 6"
driver having a ruler flat response up to some 4.5 kHz. No sign of any
rubber resonances in the 800-1600 Hz area. The all too common problem
for many drivers with rubber surrounds. See measurements below. This 6"
will carry most of the ever so important midrange.
What we also usually don't get from low-cost drivers is excessive power
handling. The 6" has a 1" voice coil and handles 40 watts - but run in
parallel with the 8" driver, this speaker can play loud - and I mean
really loud - without
distortion.
After measuring frequency response and impedance on a mockup cabinet,
many, many simulations were done. The 6" causing the most trouble due to
its fairly small magnet (relatively high Qt) and ruler flat response. We may think
this is a good thing, but having a very small series coil only rises
impedance slightly and we need some rise in impedance in shaping the
upper roll-off. Eventually I found a way helped by the fact that the 5
kHz peak is good natured and being some 12 dB below average amplitude.
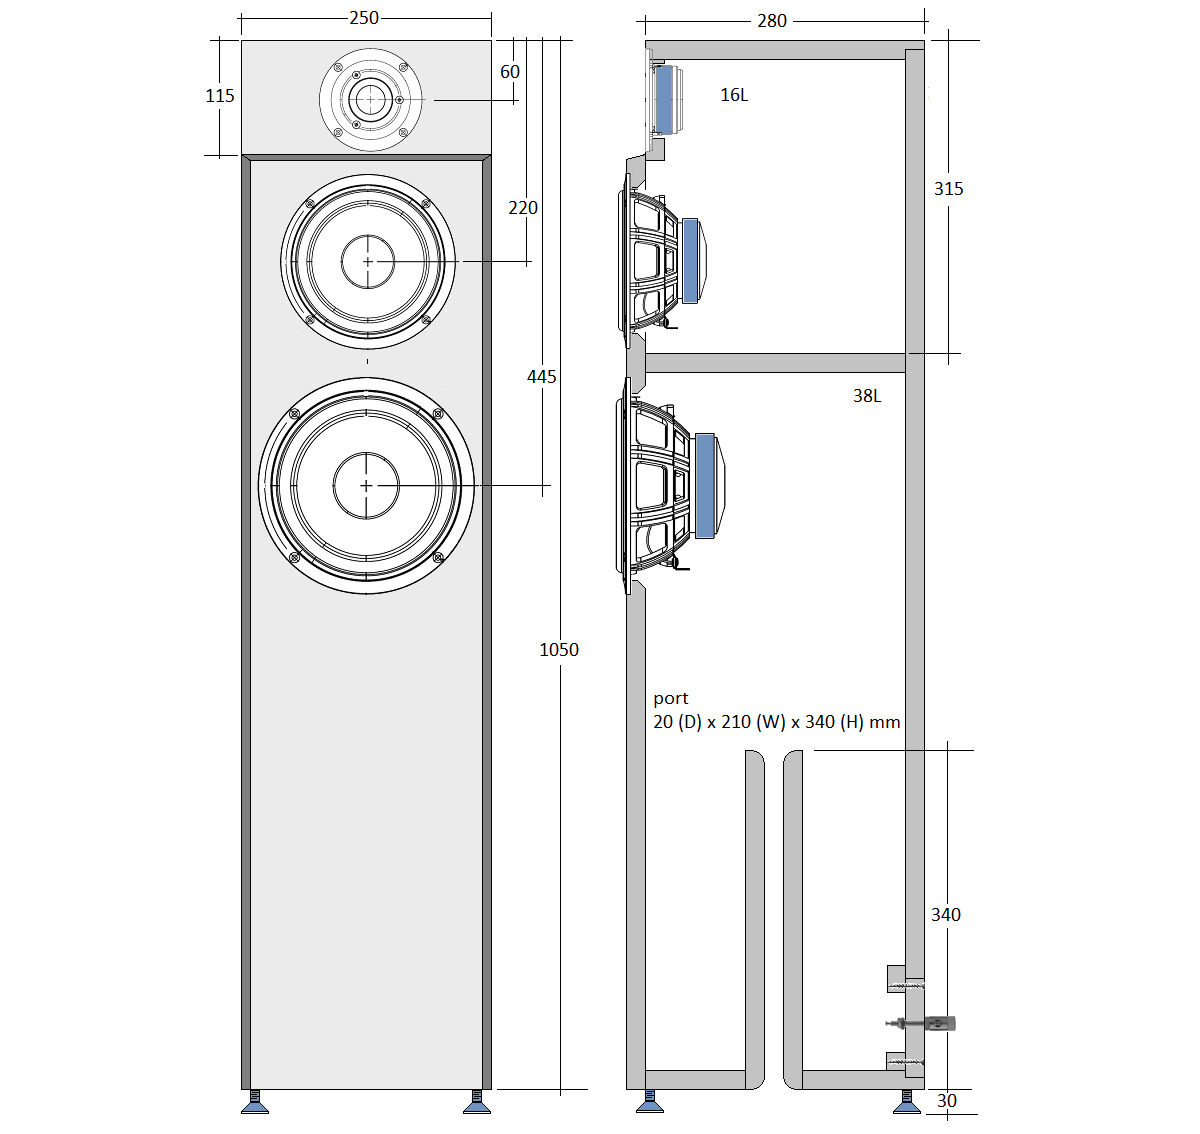
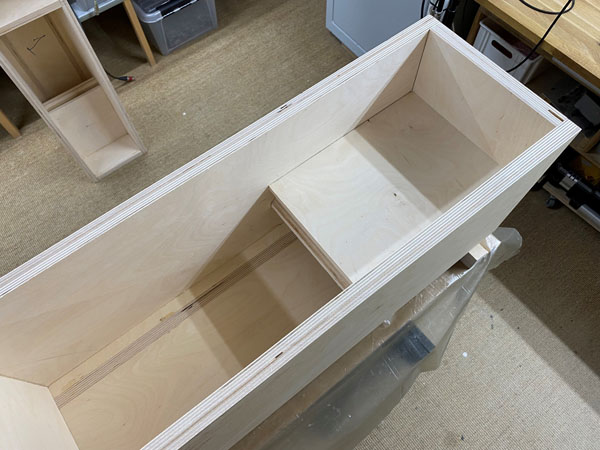
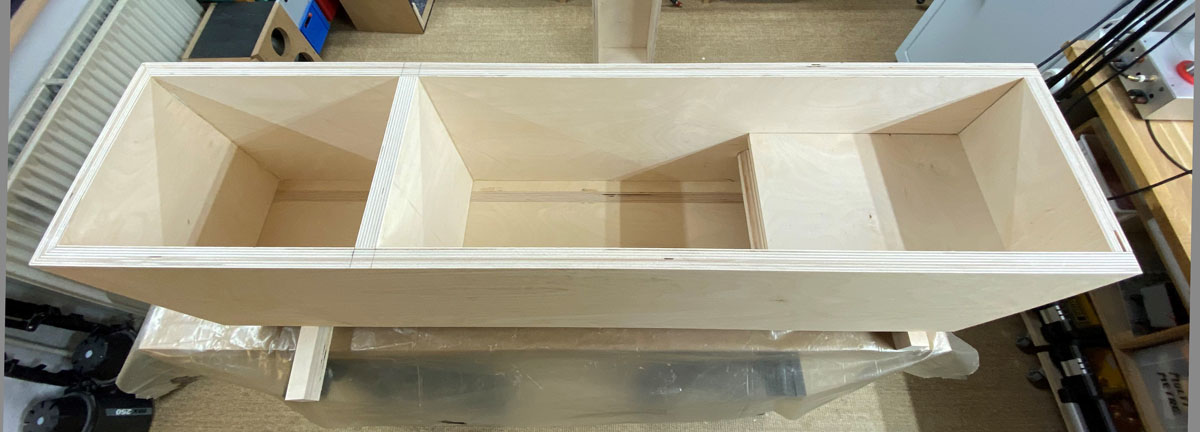
The cabinet is exactly the same as for Discovery-861 and by using a slotted port we save money on plastic ports. Actually a long slotted port is better and it also provides structural benefits to the cabinets. Cabinets can be made from 16-19 mm MDF or similar.
Click images to view large.
Firing up the speakers for the first time was - to be honest - a bit of
a shock. Well behaved drivers having an overall smooth midrange and only
modest break-up in the high-frequency range can do stuff. The cones of
these drivers are fairly rigid, hard pressed paper, and they deliver a
level of transparency as good as any driver you can find. More expensive
drivers may have more dynamic headroom, but here in this 2½-way the
sheer size of the combined membrane area makes up for this. I'd say the
only true bottleneck in this construction is C1. That capacitor defines
the level of refinement. Using a standard PP capacitors the treble
becomes noticeable rough and it will colour the timbre of the clarinet
and obo. It's not sounding bad, only not right. We have had kit buyers
missing the distortion of their Bennic capacitors, saying super-caps
took away the "transient edge" of high-frequency material. Well, it may
take time to get used to undistorted treble! For all of the other
capacitors I have tried it all, from electrolytic caps to standard PP
and super caps. It just did not make any significant difference.
Maybe a little for C4 when replaced by an electrolytic cap, but it was
really, really hard to tell. And as always, the problem is when we know
things. We're all masters of fooling ourselves.
Also noticeable was the more than average high sensitivity of the
speakers. These run loud from an only 30 wpc PP tube amp. And the
SB20PFCR goes deep in its ~45 litre cabinet (adding the volume given by
the damping materials).
I honestly don't think you'll find a kit giving more value for money.
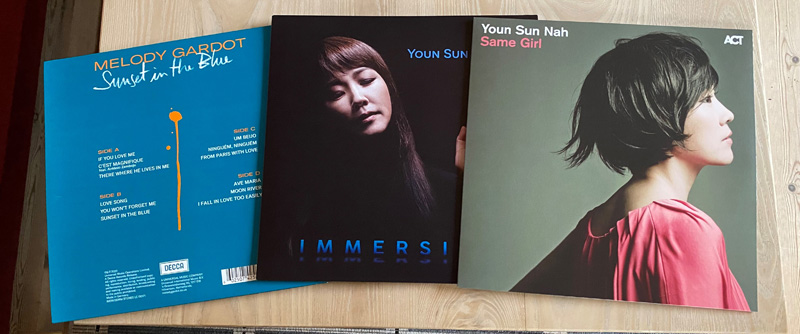
Above most recent vinyl harvest. A friend pointed me to a South Korean
singer, Youn Sun Nah. Never heard of her, but he played a tune from the
Same Girl LP and well, I went home and ordered two albums.
Very, very good recordings that for sure will tell you if your speakers
- and cartridge - will handle demanding female vocals. The SBA-861PFCR
does it. My wife came in and asked: "What is this? This kind of music?".
Hmm.. I couldn't tell. Well, just music. I mean, with a repertoire from
"My Favorite Things" to "Breakfast in Baghdad"! Hello! I was brought up
on Rodgers & Hammerstein! One of my parents' less than a handful of LPs.
BTW: When my friend played the record he handed me the sleeve and
reading Ulf Wakenius and Leif Danielsen, I was sold. I love these guys.
Whatever material I played on the SBA-861PFCR it presented a dynamic and
not least ultra-transparent soundstage. This from the SUPERIOR version.
Having a standard-PP capacitors to the tweeter made the treble slightly
more rough, not a lot, but noticeable. The bass goes deep and does the
Tin Pan Ally track very well.
So, what do the drivers of the SBA-861PFCR not do that more
costly drivers will do? Well, that was a question I tried to be
prepared for even before I started the project. The 8+6" drivers have a
combined membrane area of no less than 340 cm^2. This is more than many
10" drivers and given the speakers 91+ dB sensitivity, they don't move
much. Limited discursion = low distortion + minimum break-up. One thing
you want from expensive drivers is dynamic headroom. This means the
driver can be run really hard before we measure serious distortion. This
problem can be overcome by membrane area - if we have the space for it!
If we made a line source from say eight SB16PFCR drivers they would
hardly move at all - even for thunderous SPL levels. Here we have 340
cm^2 - and I'm sure it will do for most.

Basics:
3-driver speaker.
Dimensions: 25 x 28 x 105 cm, WxDxH (H+30 mm for feet to allow free
ventilation from port).
System sensitivity: 91-92 dB/2.8V/1 meter.
Impedance: 4-8 Ohms.
Power requirement: 20+ watts/channel.
Power handling: 100 watts.
Please
also read:
http://www.troelsgravesen.dk/power-handling.htm,
and remember any burned driver is a misused driver.
Useful links (Please follow all links
before emailing!)
http://www.troelsgravesen.dk/tips.htm
http://www.troelsgravesen.dk/tips.htm#CONSTRUCTION_OF_CROSSOVERS
http://www.troelsgravesen.dk/crossovers.htm
http://www.troelsgravesen.dk/LCR-RC.htm
http://www.troelsgravesen.dk/Inverted-Polarity.htm
http://www.troelsgravesen.dk/choices.htm
http://www.troelsgravesen.dk/power-handling.htm
Download specs here: SB29RDAC-C000-4 SB16PFCR25-8 SB20PFCR30-8
I built my cabinets from 20 mm Baltic birch - which cost-wise is
overkill, but this is what I have at hand. I suggest 19 mm MDF. If you
use 16 mm MDF, add a brace below tweeter and below 8" driver and maybe
also bitumen pads. Up to you.
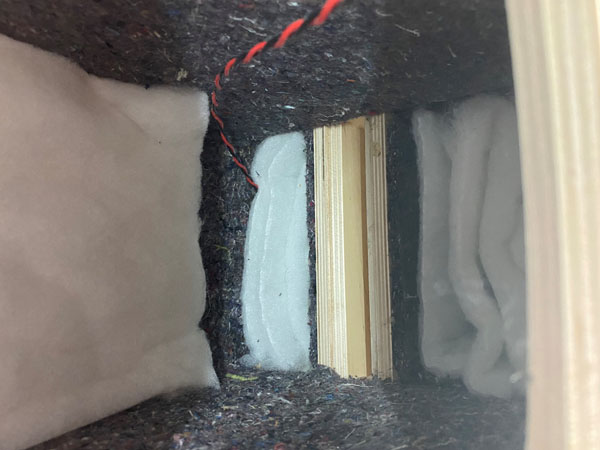
Add felt damping to all internal panels except behind 8" driver on rear panel.
This is where the crossover will be.
Fold 3 pcs of 20 x 50 cm acoustilux and place behind upper woofer.
Fold 4 pcs of 20 x 50 cm acoustilux and place 2 pcs in front section
next to the port and 2 pcs in rear section next to port.
Cut 2 pcs 22 x 50 cm acoustilux to cover crossover/rear panel behind 8"
driver.
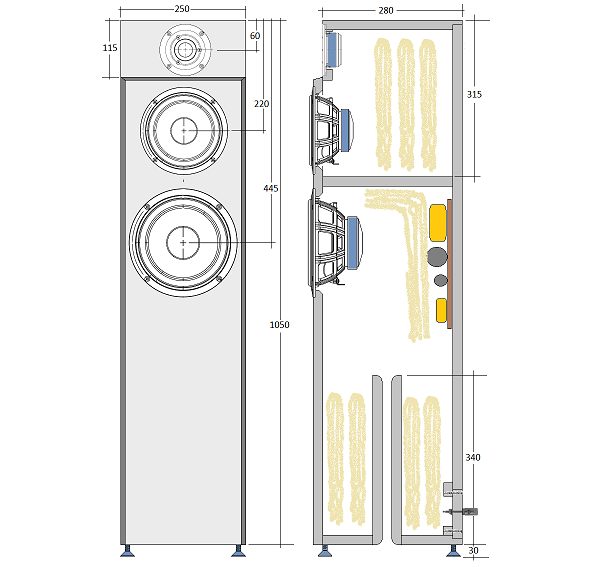
Placement of acoustilux.
Cabinets were made from overkill 20 mm Baltic birch - but this was what I had at hand. I suggest 16-19 mm MDF unless you want to treat your drivers really well. Click image above to see all parts cut to +5 mm on all dimensions and added one coat of lacquer. This prevents edge ripping and glue penetrating the veneer and making light spots of final coats.
The making of the cabinet is similar to Discovery-861. Look for more pics and suggestions here.
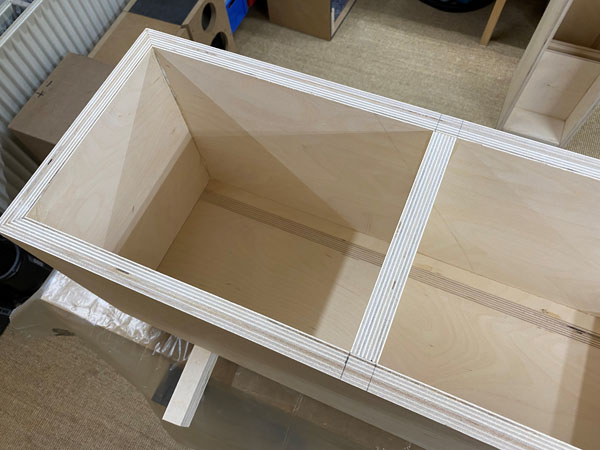
It doesn't get much simpler than this!
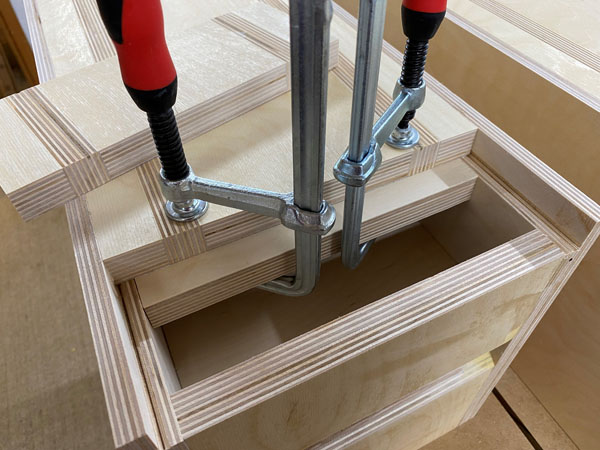
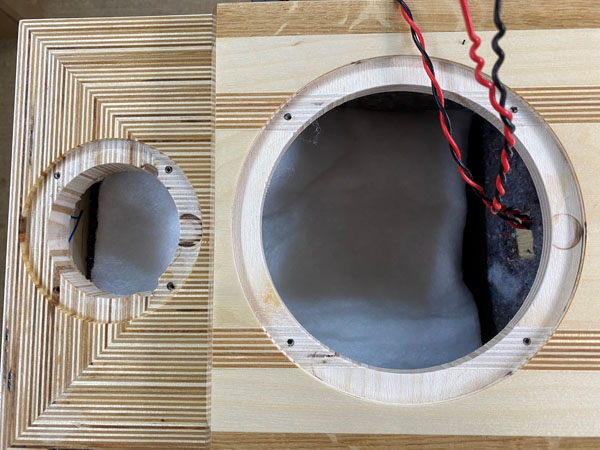
Left: Gluing the terminal panel support. Right: Don't forget to chamfer
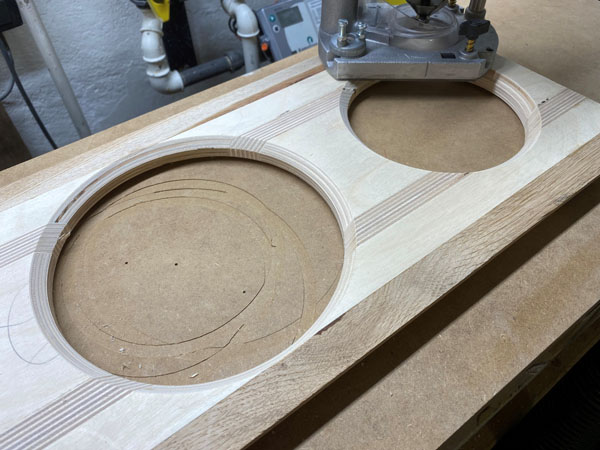
driver holes for 8" and 6". Route 45 deg. some 10 mm depth.
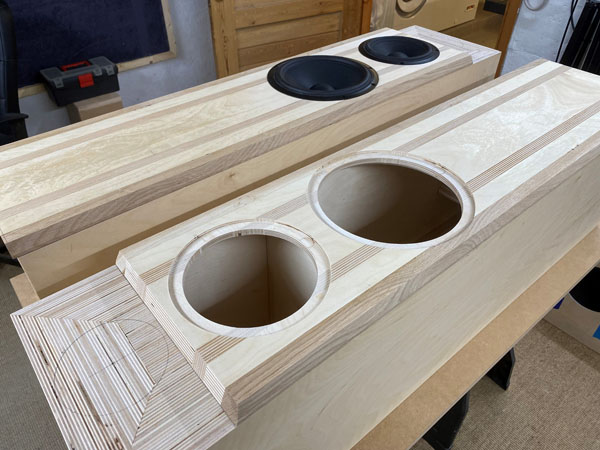
Testing driver rebates. For the 6" driver I made a 4 mm rebate, for the
8" driver ~4.8 mm.
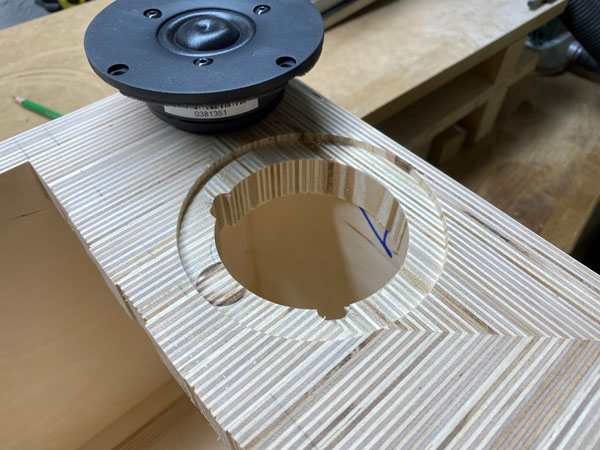
Left: Routing the tweeter rebate and slots for terminals.
Right: Before gluing the front panel I added two coats of lacquer to the
tweeter panel. Easier to do on a stepped baffle than after gluing the
front panel. Add a strip of tape to leave some gluing area for the front
panel.
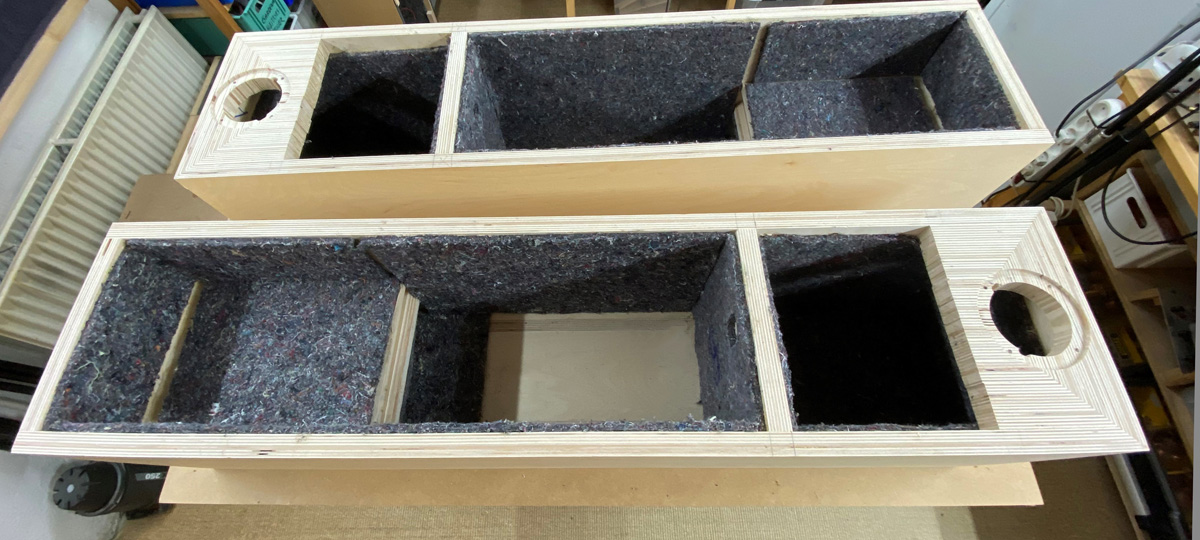
All felt damping in place.
Left: Acoustilux, 2 layers, above crossover. Right: The acoustilux next
to the port.
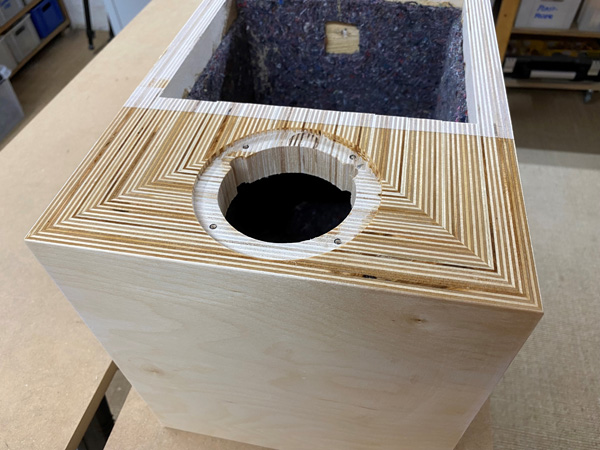
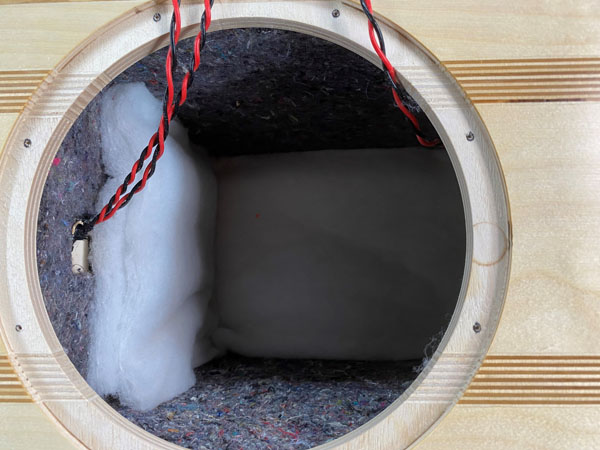
DO NOT forget to seal the wire hole with Superfix. The upper compartment
must be absolutely air-tight.
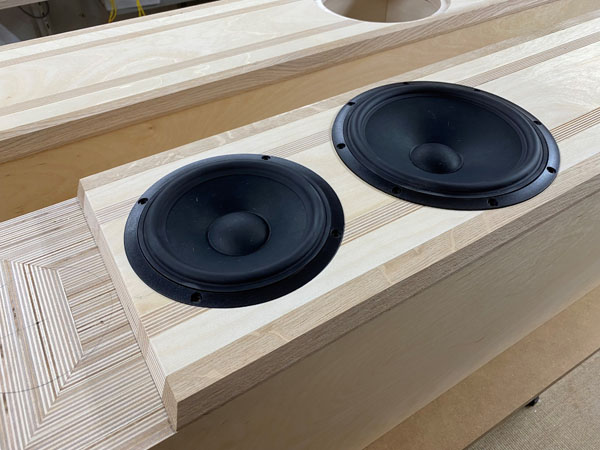
Left: Acoustilux in upper midbass compartment. Right: Finally the
drivers is place.
Workshop setup during crossover development.
A few comments on
MEASUREMENTS before you start interpreting the readings below.
First of all, if we think measurements will
tell us how a speaker sounds, we're wrong. The perception of sound is
way too subjective to be reflected in any measurements we can perform. A
loudspeaker system is meant to give us a satisfying idea of an acoustic
event and for some people a pair of 5 USD ear-plugs are enough, others
spend 200 kUSD on a truly full-range pair of speakers - and the latter
may not be happier than the former.
Measurements may give us an idea of tonal balance of a system, i.e. too
much or too little energy in certain areas, although dispersion
characteristics play a vital role here. A two-way 7+1 and a three-way
7+4+1 may display similar horizontal dispersion, yet sound very
different. Measurements may tell us about bass extension if far-field
measurements are merged with near-field measurements. In addition to
this, ports may contribute to bass extension. Most of we diy'ers do not
have access to an anechoic room for full-range measurements from
20-20000 Hz.
What cannot be seen is what kind of bass performance we get in a given
room. Bass performance is highly dependent on in-room placement of your
speaker and the same speaker can be boomy in one place and lean in
another. Actual SPL level at 1 meter distance and 2.8V input is useful
for en estimate of system sensitivity and combined with the impedance
profile may give an idea of how powerful an amplifier is needed to drive
the speaker to adequate levels.
What measurements do not tell is the very sound of the speaker unless
displaying serious linear distortion. The level of transparency, the
ability to resolve micro-details, the "speed" of the bass, etc., cannot
be derived from these data. Distortion measurements rarely tell much
unless seriously bad, and most modern drivers display low distortion
within their specified operating range.
Many people put way too much into these graphs and my comments here are
only meant as warning against over-interpretation. There are more to
good sound than what can be extracted from a few graphs. Every graph
needs interpretation in terms of what it means sonically and how it
impacts our choice of mating drivers, cabinet and crossover design.
What measurements certainly do not tell is the sonic signature of the
speaker, because speaker cones made from polypropylene, aluminum,
Kevlar, paper, glass fiber, carbon fiber, magnesium, ceramics or even
diamonds all have their way of adding spices to the stew. Nor do
measurements tell what impact the quality of the crossover components
add to the sound, from state of the art components to the cheapest of
coils and caps, they all measure the same if values are correct, yet
sound very different.
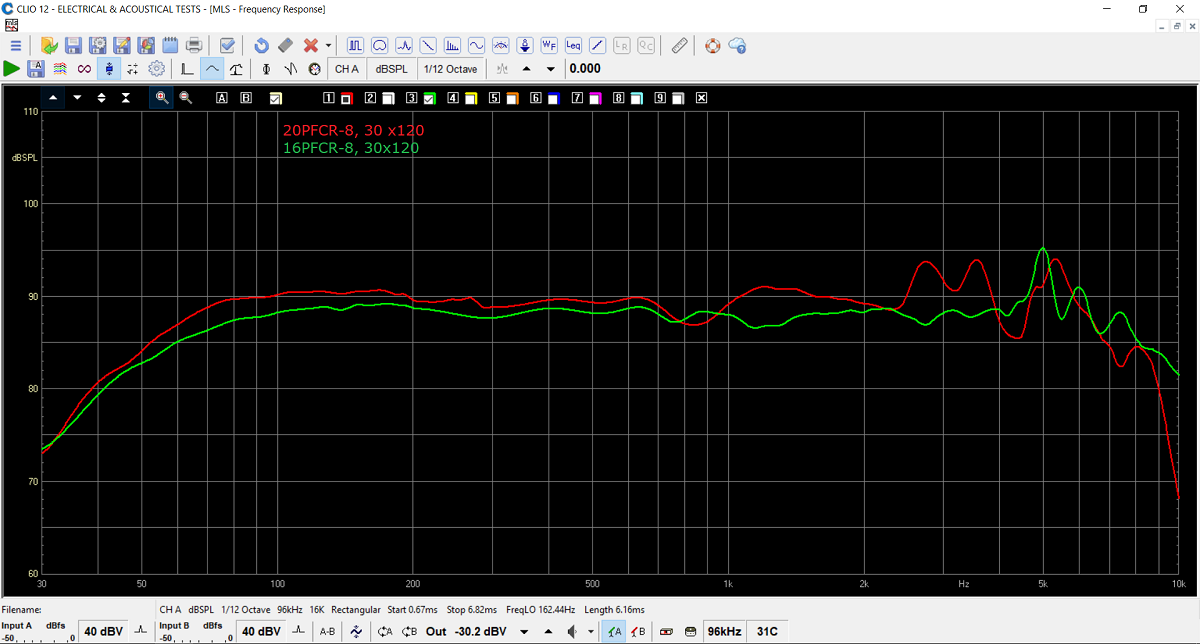
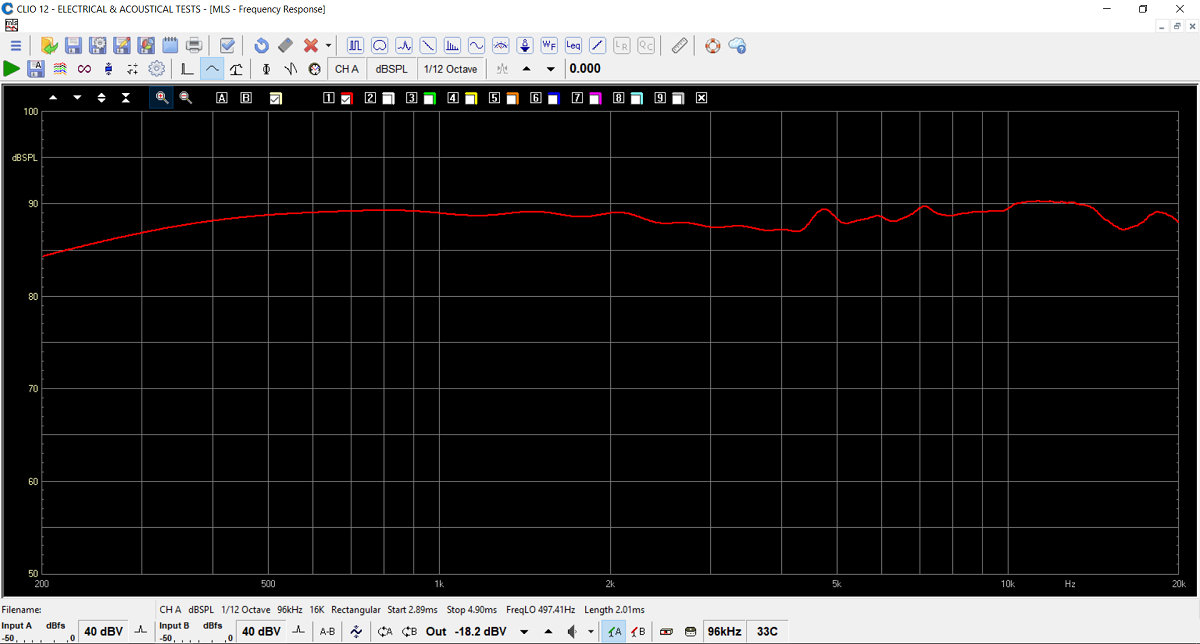
Frequency response of 16PFCR25-8 (green) and 20PFCR30-8 on test baffle,
30 x 120 cm, mounted 30 cm from one end.
What pleased me the most was an exceptional smooth response of the
16PFCR25-8 all the way to above 4 kHz. No sign of the all too familiar
rubber resonances around 1 kHz. A lucky combination of mass and
elasticity/resilience of suspensions.
SB16- merged with nearfield response at 200 Hz. SB20- merged with nearfield
response at 300 Hz.
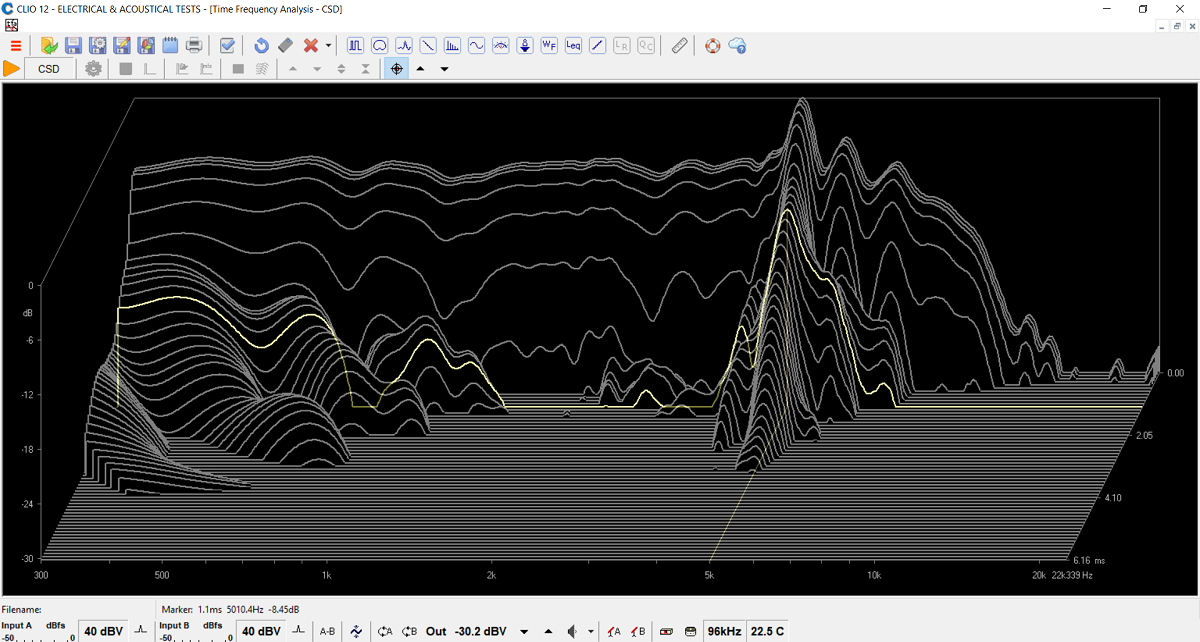
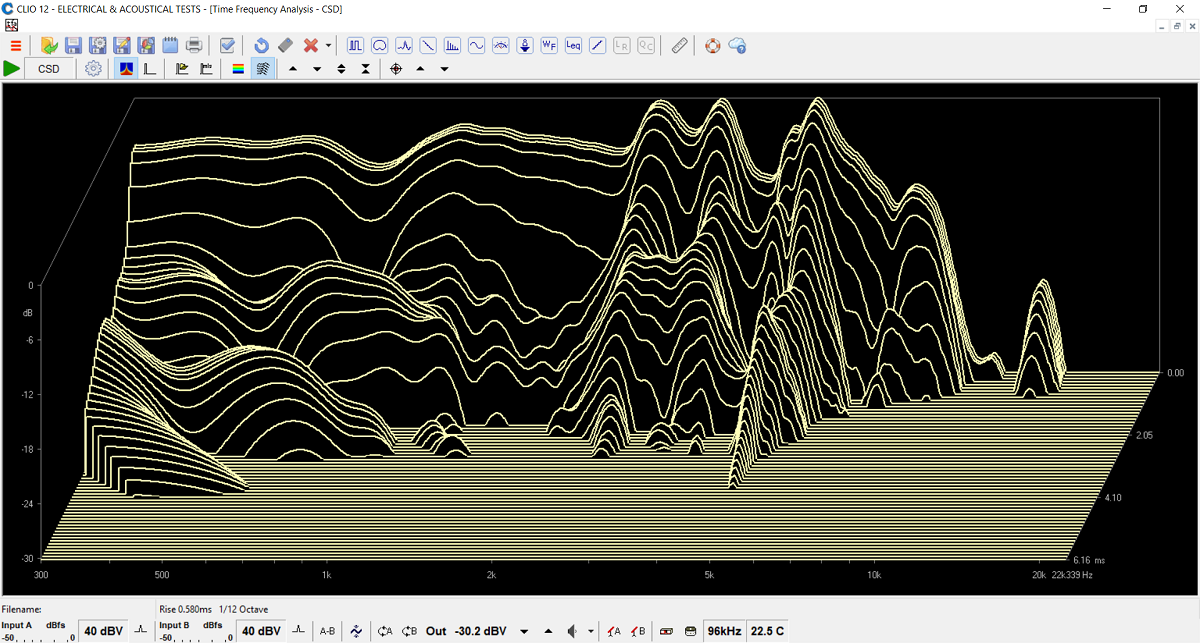
CSD of 16PFCR25-8.
We notice of peak a 5 kHz, but it dies out quickly. Being accustomed to
listening to the MLS signal, you become aware of anything distressful to
the ear. No such thing occurred during measurements of
the 16PFCR25-8. Smooth on the ear, which suggests that we don't have to
pay particularly attention of this peak.
CSD of 20PFCR30-8. Some ripples from 2.5 - 5 kHz, but again, they die
out quickly and was not distressful to the ear.
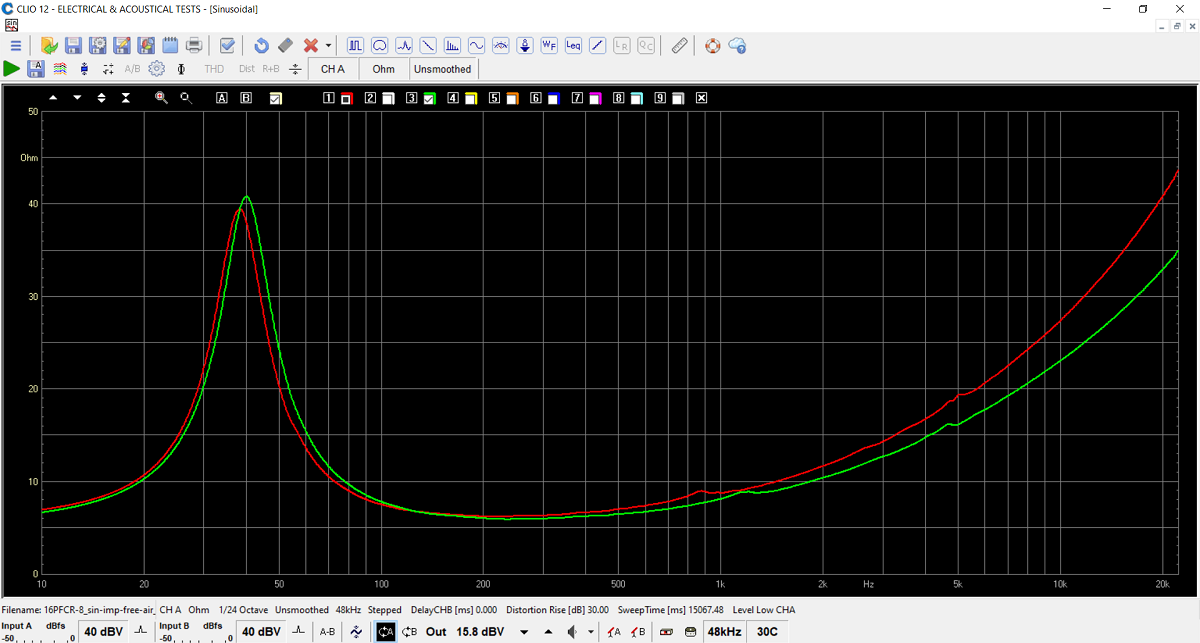
Impedance, free air, of bass (red) and mid-bass (green) drivers.
Response of MT section at 1 meter distance.
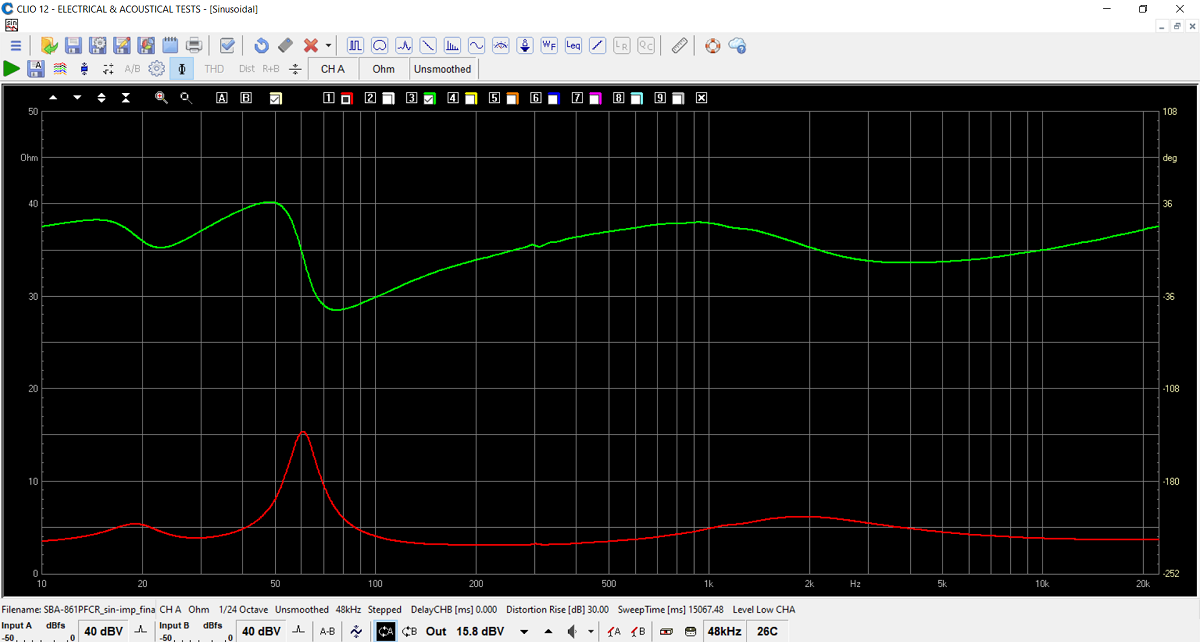
Final system impedance. An overall very easy load.
What's not included in kit is the feet.
You can make them from wood and rubber pads - or buy some spikes from
Jantzen Audio.
See "optional accessories" in the Jantzen link.
Remember 30 mm clearance between cabinet and floor.
All kit and component prices may be subject to change and are always to be confirmed by Jantzen Audio Denmark.
Download Complete Kit Sale Presentations:
![]()
All technical questions to troels.gravesen@hotmail.com
All questions regarding purchase of kits, please mail Jantzen Audio at contact@jantzen-audio.com
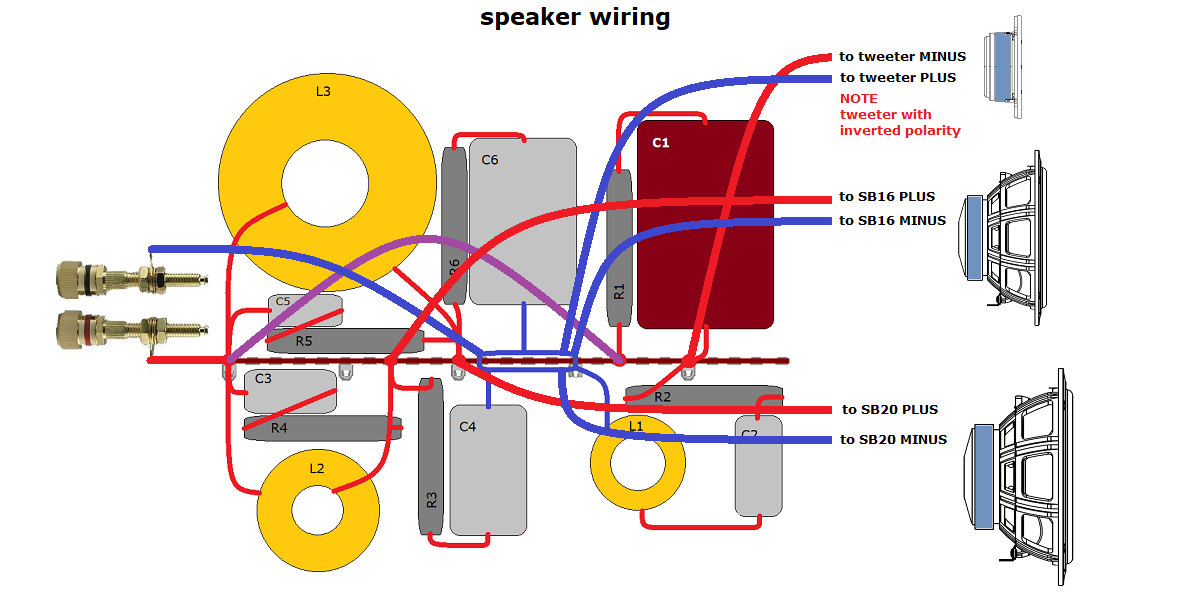
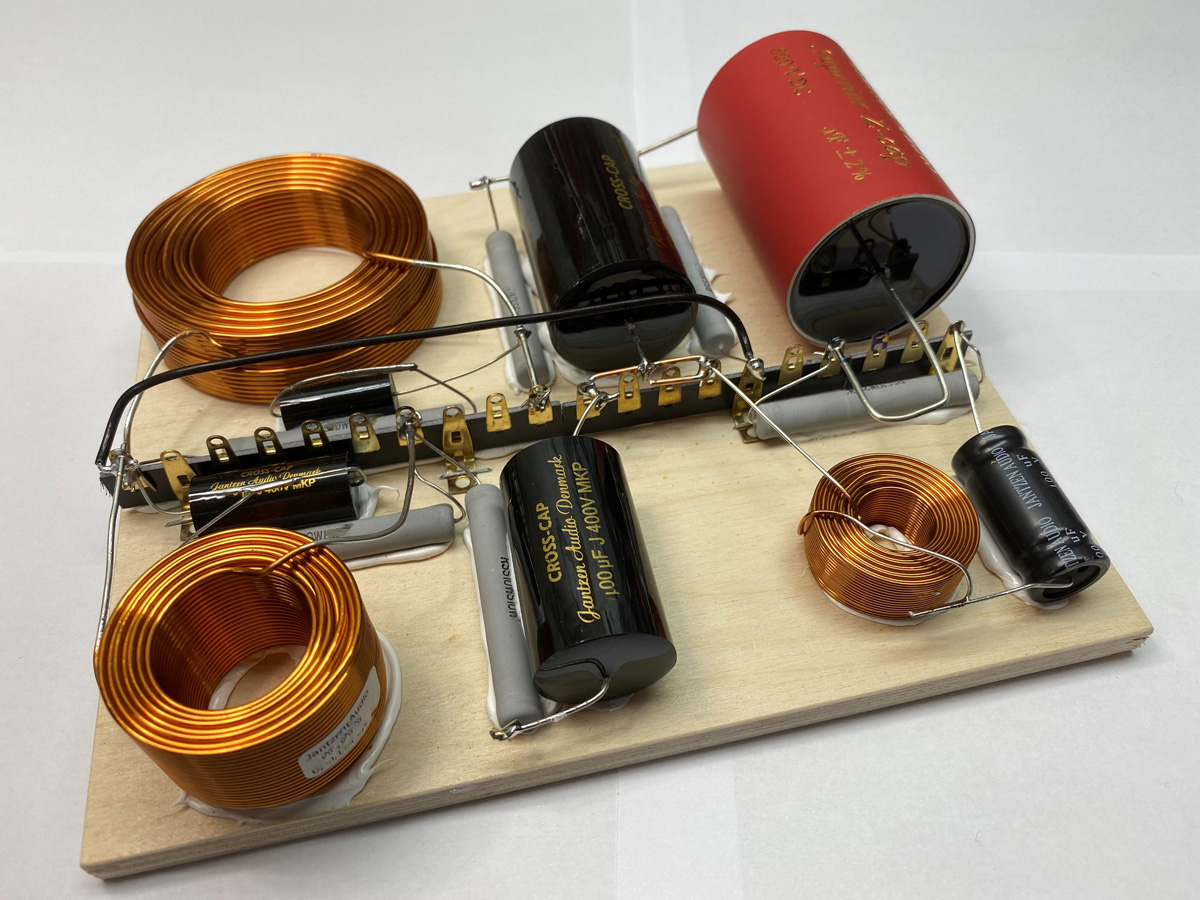
CROSSOVER-LAYOUT
BACK TO INDEX
Please read these files:
http://www.troelsgravesen.dk/tips.htm#Glue
http://www.troelsgravesen.dk/tips.htm#CONSTRUCTION_OF_CROSSOVERS
http://www.troelsgravesen.dk/LCR-RC.htm
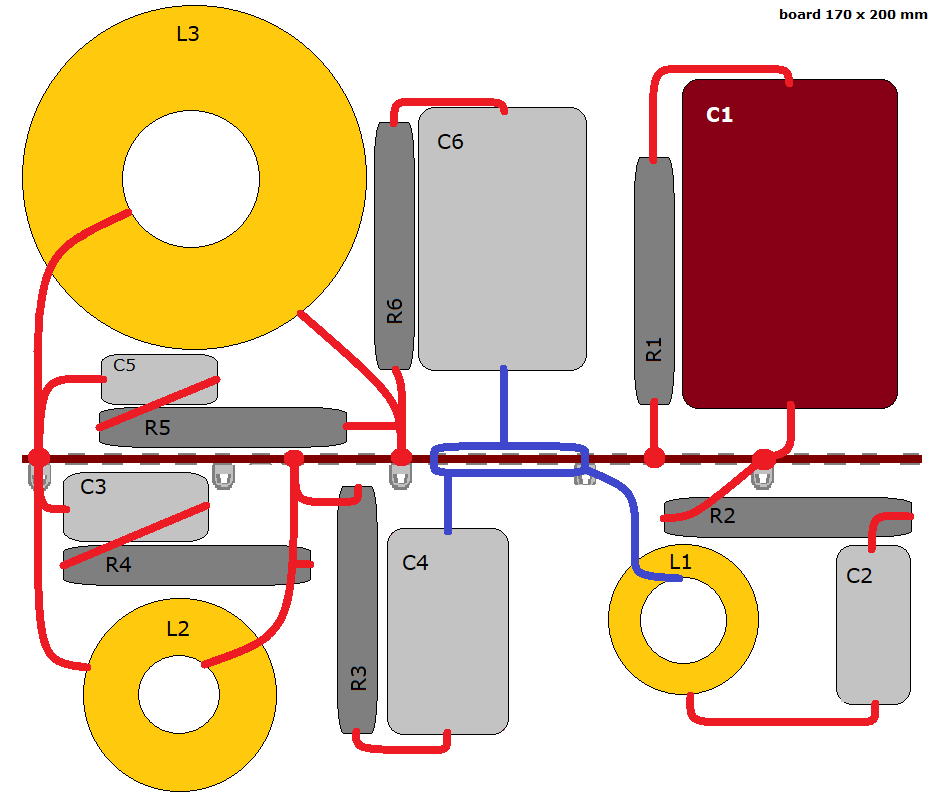
Crossover layout for the Superior-Z version.
This version has CrossCap for the two midbass drivers and Superior-Z for
the tweeter.
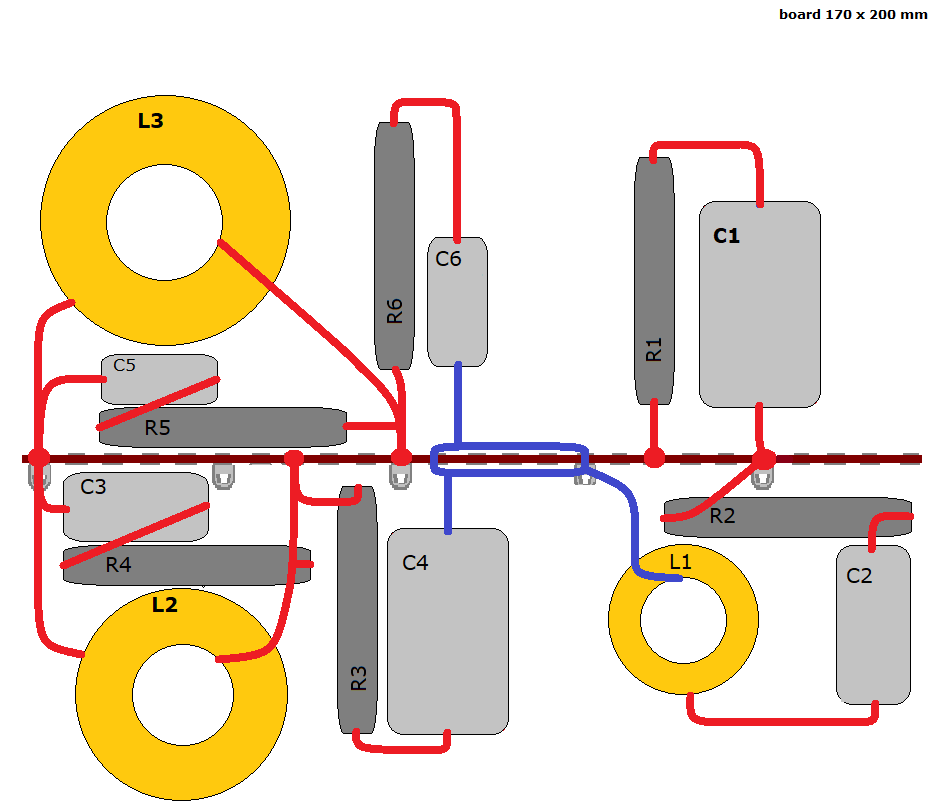
Crossover layout for the STANDARD version.
This has slightly smaller gauge wire air core coils and a mix of
CrossCap and Jantzen EleCap.
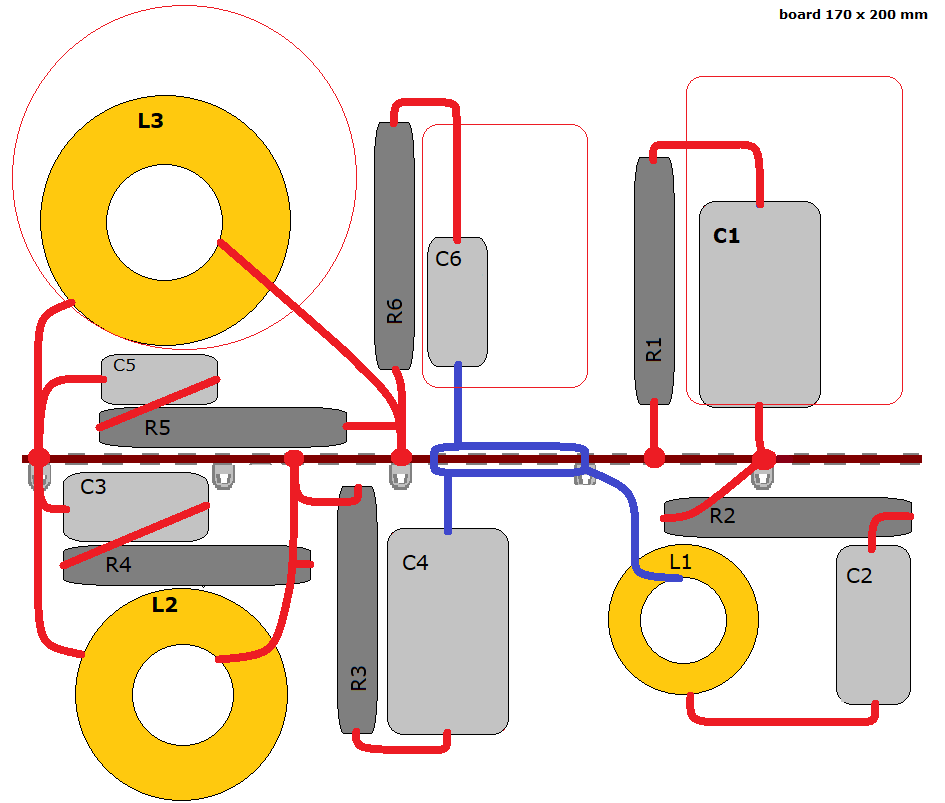
Should you at a later stage want to upgrade, the red marking above tell
the size of C1 and C6.
L3 in the Superior version has thicker wire lowering the DCR, giving a
fraction of a dB more response, but hardly worthwhile.
Layout for SUPERIOR version.
Disregard the long leads (loop) of the large Superior-Z capacitor.
The capacitor here was fastened lightly to allow other caps to be tried,
e.g. the CrossCap in the STANDARD version. Follow the layout drawing.
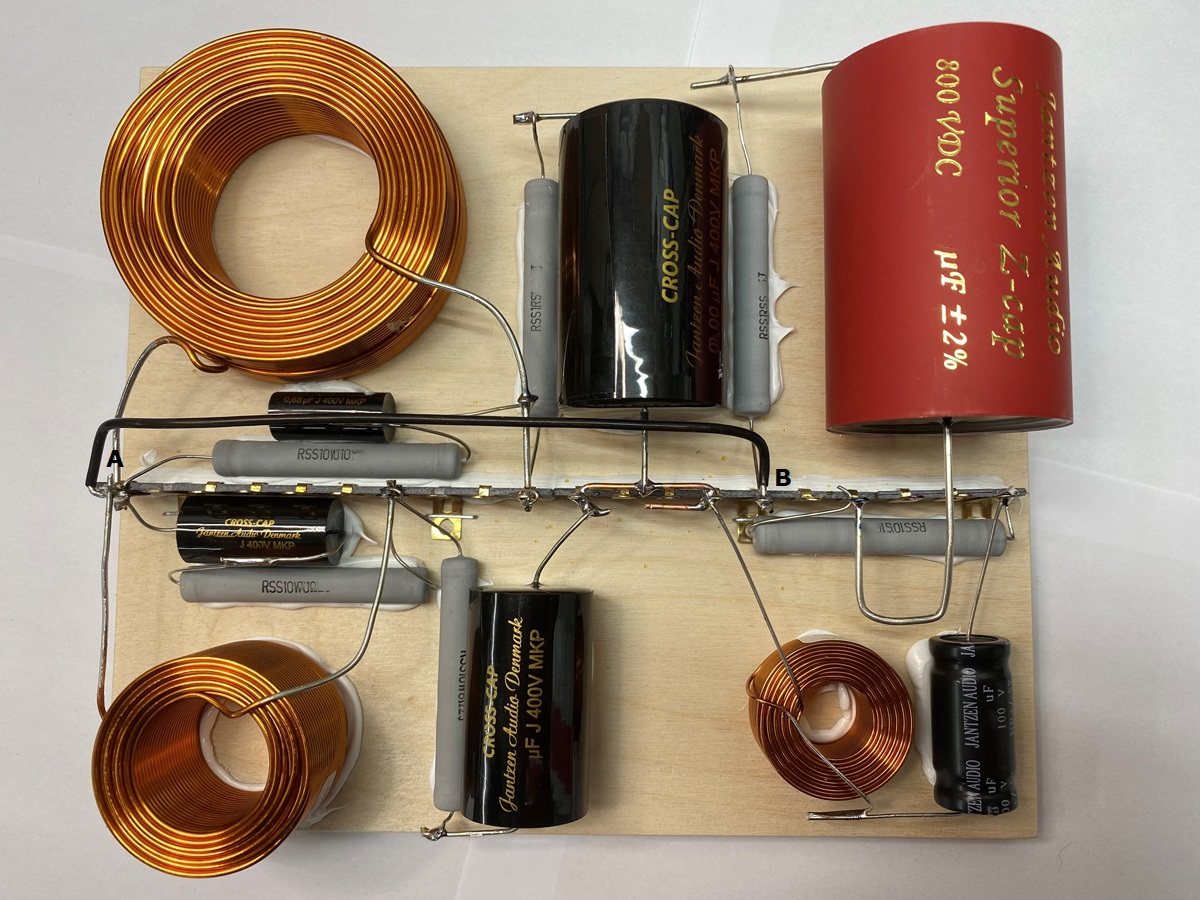
Pay notice to the wire going from A to B for connecting the tweeter
circuit.
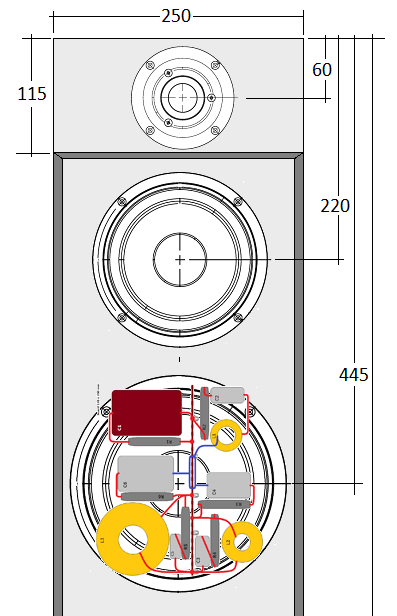
Place crossover on rear panel behind the 8" driver.