DIY Loudspeakers: HOME INDEX UPDATES RESPONSE WHAT'S NEW
SBA 941
Copyright 2018-21 © Troels Gravesen
Go to on this page:
DRIVERS
CROSSOVER
CABINET WORKSHOP
IMAGES
MEASUREMENTS
SPEAKER-KIT
CROSSOVER LAYOUT
SOUND
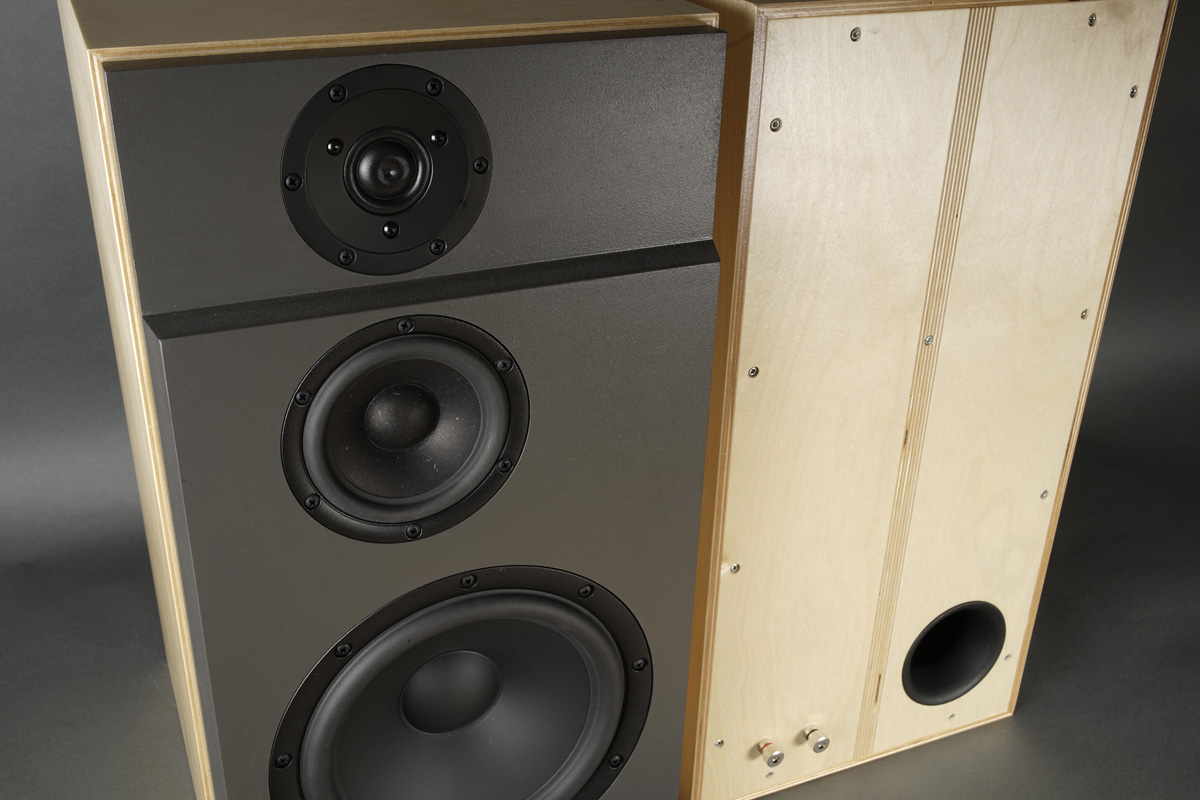
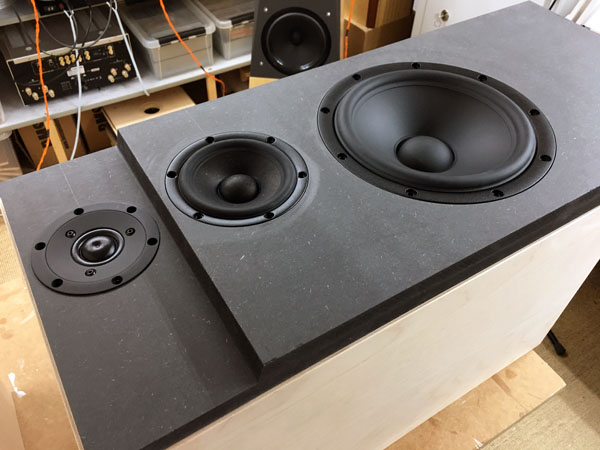
The range of 3-way classics found on my website are among the
most popular kits of all. Featuring 8" bass drivers, 4" midrange drivers
and tweeter they deliver an awful lot of good sound for the money. From
fairly simple crossovers and simple rectangular cabinets, they are within reach of most DIY'ers, both financially and practically.
As said many times before, having a small 4" driver bridging the gap between bass
and treble is a good idea. The reason we do not see this more
often is price. For a manufacturer it does add significantly to
production costs, not so much for DIY'ers. Having recently visited a
hifi show in China, I noticed a lot of smaller low-price speakers
featuring 3-4" midrange drivers. Apparently not a big deal over there,
so they do the right thing.
To me the transition from a 6-7" mid-bass driver to a 1" dome is a bigger
compromise compared to the extra complexity of having a dedicated driver
for upper-mid/lower-treble.
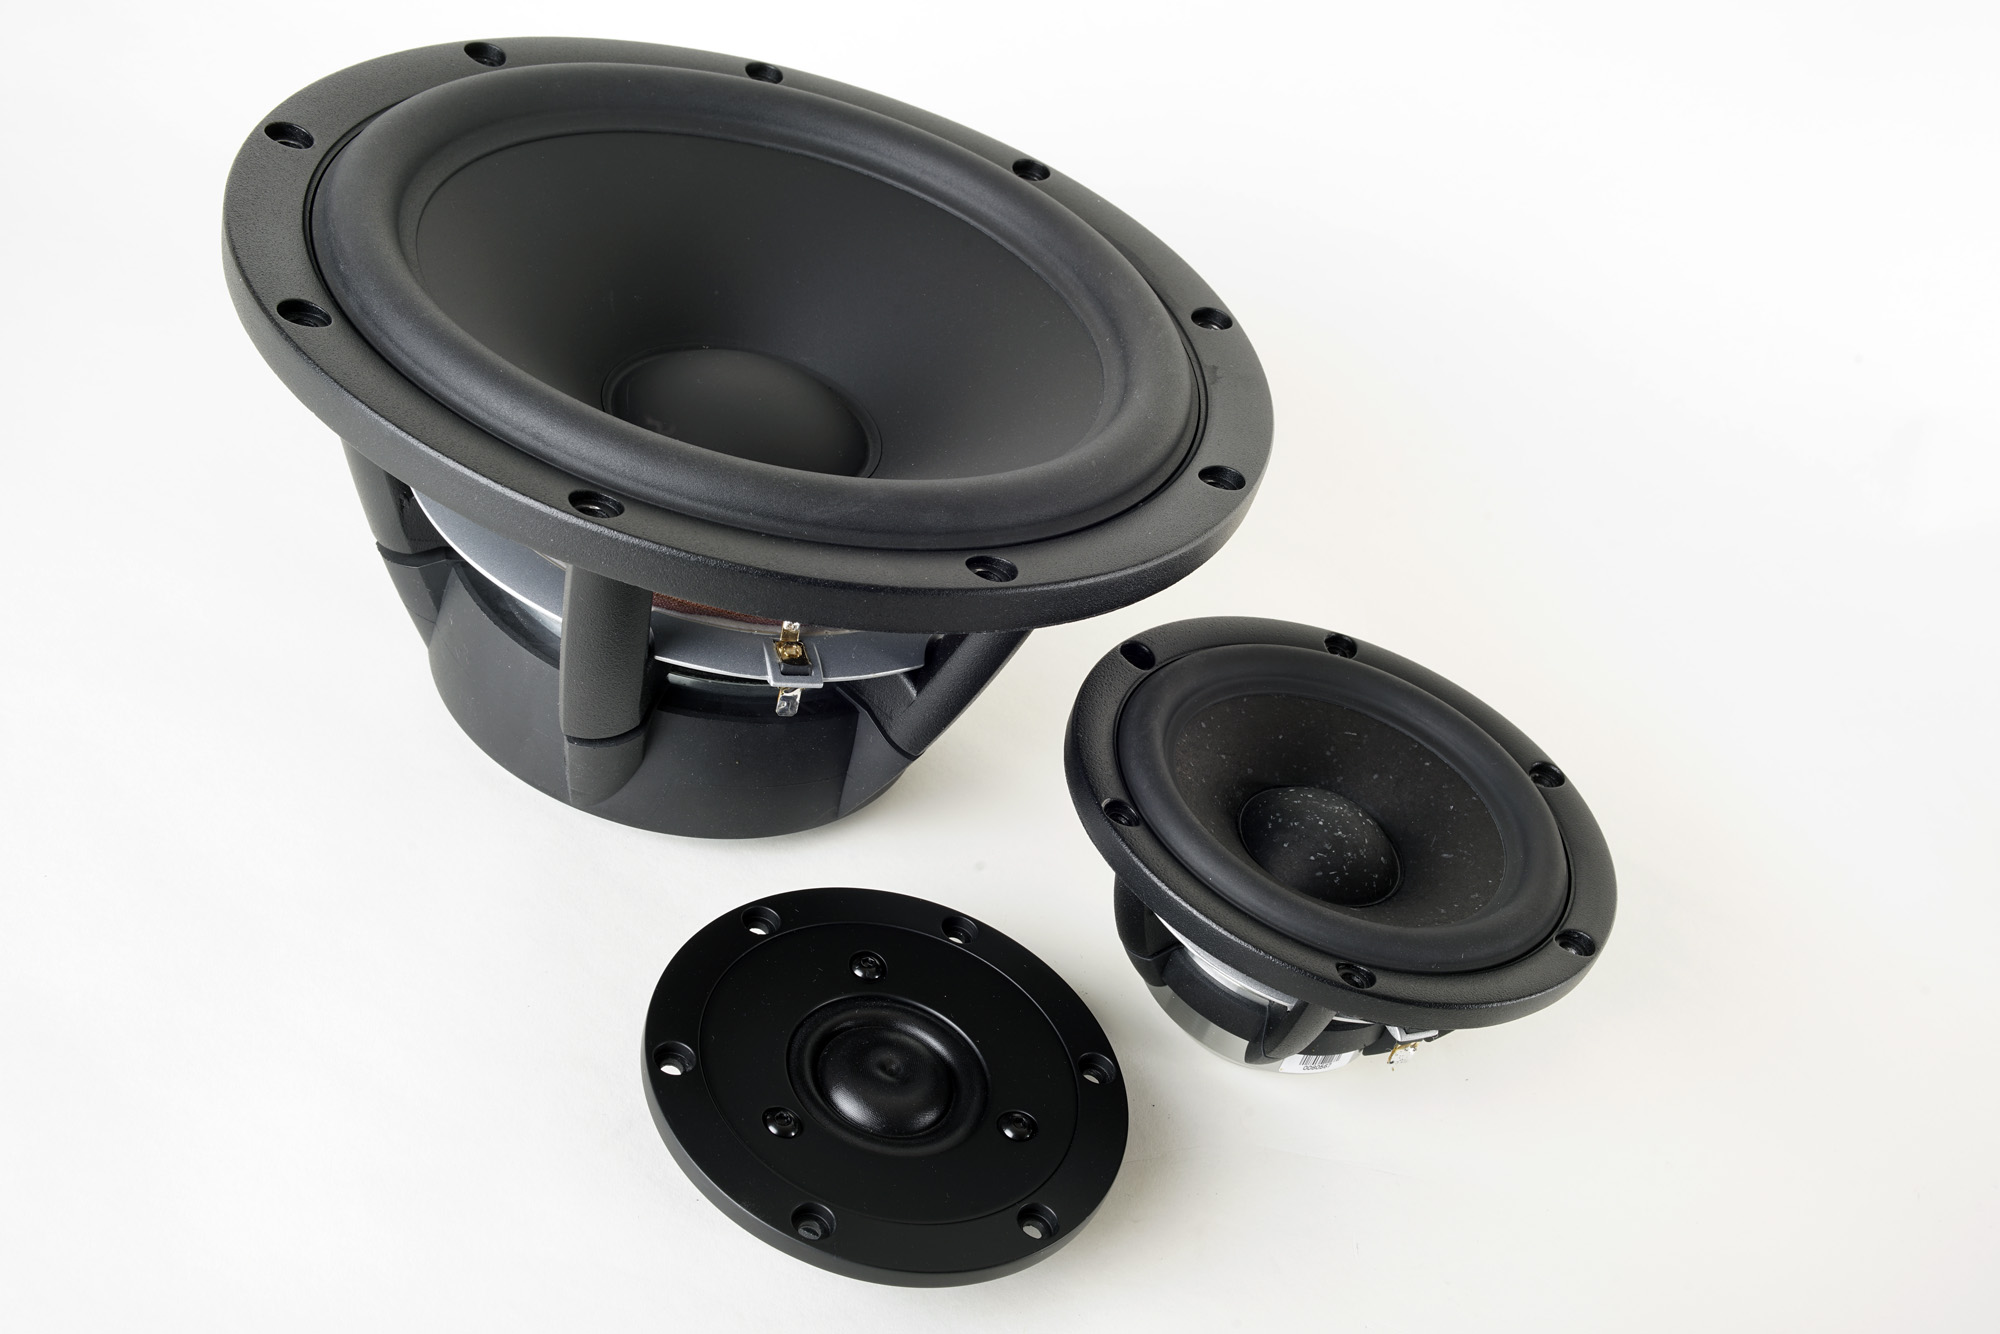
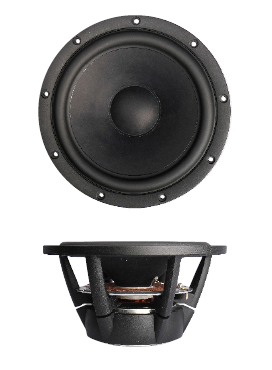
Here we aim at some more power handling and low-end extension from
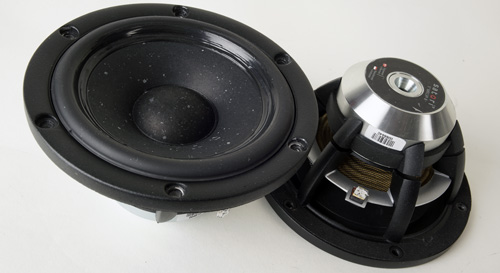
the use of the magnificent SBAcoustics Satori 9½" WO24P-8 bas driver,
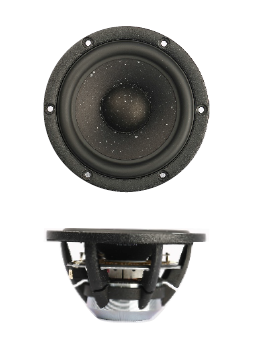
the no less magnificent midrange driver MR13P-8 and not least my
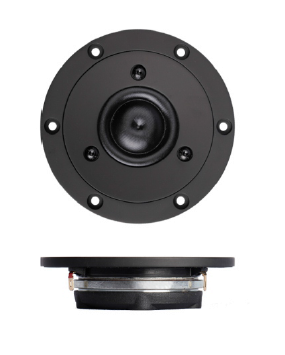
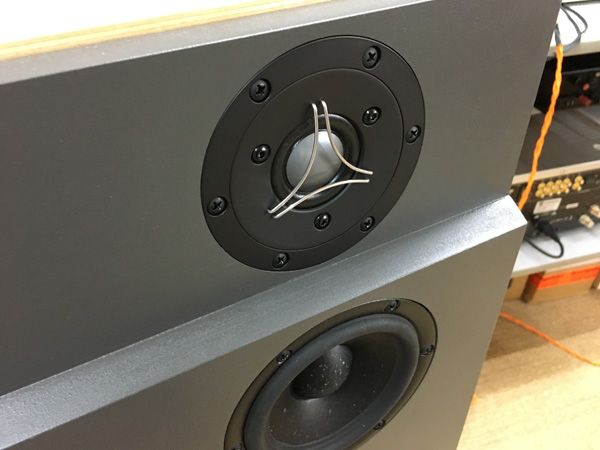
favorite fabric dome tweeter, the TW29RN-B. Should you want to upgrade
to the Be dome, the TW29BN-B can be used without changes to the
crossover.
Cabinet is slightly larger than the other 3WCs, but most of the extra
volume needed comes from extending cabinet depth some 5 cm.

Basics:
3-way speaker from 9½" bass driver, 4½" midrange driver and
1" dome tweeter, either fabric or beryllium.
Dimensions: 31 x 38.5 x 60 cm, WxDxH.
System sensitivity: 87 dB/2.8V/1 meter.
Impedance: 8 Ohms, minimum 4.0 Ohm @ 150 Hz.
Point of crossover: 580 Hz and 2700 Hz, LR2 and 1st order filter topology.
Power requirement: 20+ watts/channel.
Power handling: 100 watts. Please
also read:
http://www.troelsgravesen.dk/power-handling.htm,
and remember any burned driver is a misused driver.
Useful links (Please read before writing!):
http://www.troelsgravesen.dk/tips.htm
http://www.troelsgravesen.dk/crossovers.htm
http://www.troelsgravesen.dk/LCR-RC.htm
FAQ (Please read before writing!):
You cannot change cabinet front panel dimensions and drivers' placement
without needing a new crossover - and I cannot help.
You cannot use any other drivers with the crossover shown here.
Please read these files before e-maling:
http://www.troelsgravesen.dk/crossovers.htm
http://www.troelsgravesen.dk/choices.htm

Click images above to view large
Download data sheets:
Satori WO24P-8
Satori
MR13P-8
TW29RN-B-8
TW29BN-B-8
Please note we here use 8 Ohm tweeters. This saves uF in the crossover.
For an even smoother midrange you can have your MR13P drivers edge
coated for 100 EUR + shipping back.
Read here: http://www.troelsgravesen.dk/W12CY003.htm
Contact me at
troels.gravesen@hotmail.com
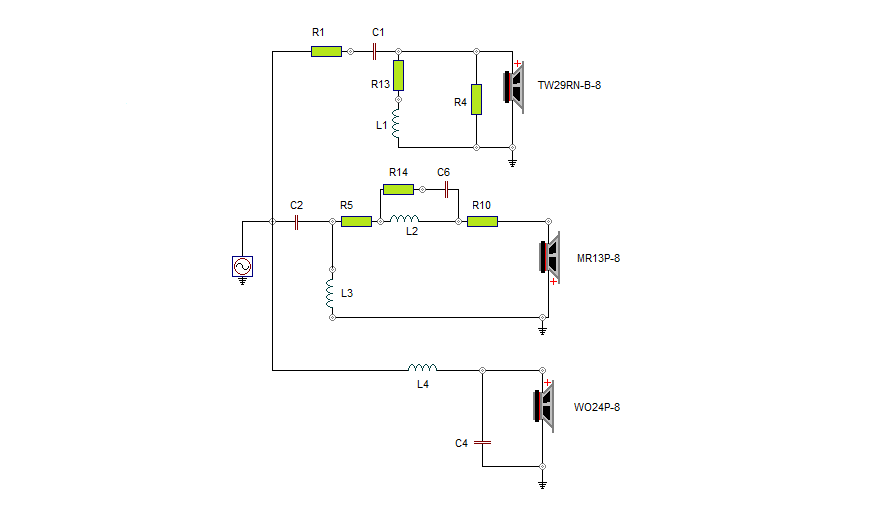
The crossover features a simple 2nd order topology, LR2, for the bass low-pass section and midrange high-pass section. The midrange low-pass and tweeter high-pass sections feature 1st order filters. Some attenuation of the midrange and tweeter is needed to match the bass driver response. I deliberately picked the 8 Ohm version of the bass driver to better suit tube amplification. Higher sensitivity could have been had from the 4 Ohm bass driver, but it in end it only draws more current from your amplifier. Box simulation predicts -3dB @ 33 Hz. This bass driver goes low.

Click image to view large.
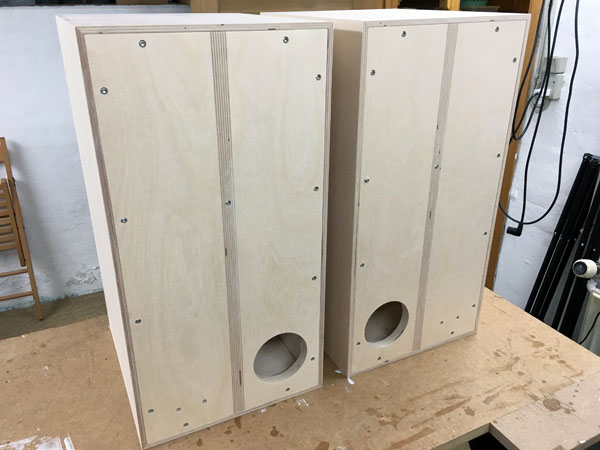
Do not forget to mirror cabinets and front panels!
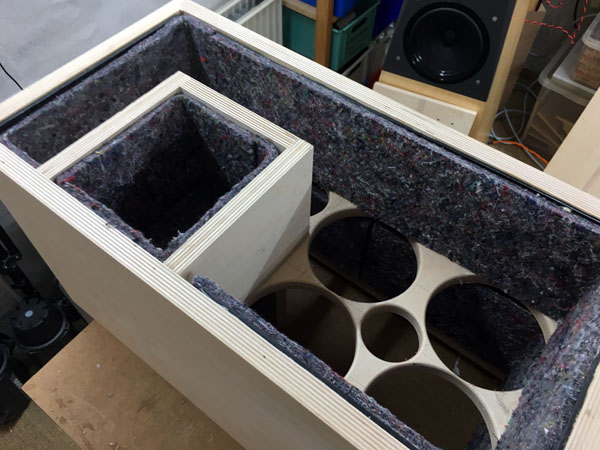
Cabinets were made from 20 mm Baltic birch and 15 mm for the midrange cabinet. Cabs were further damped by adding bitumen pads as can be seen from pictures below. I had the rear panel made detachable, as this will ease crossover placement and tweaking during development, but can obviously be glued in place should you prefer this.
Cabinet damping:
All internal panels were added 8 mm felt material except rear panel
where crossovers are placed.
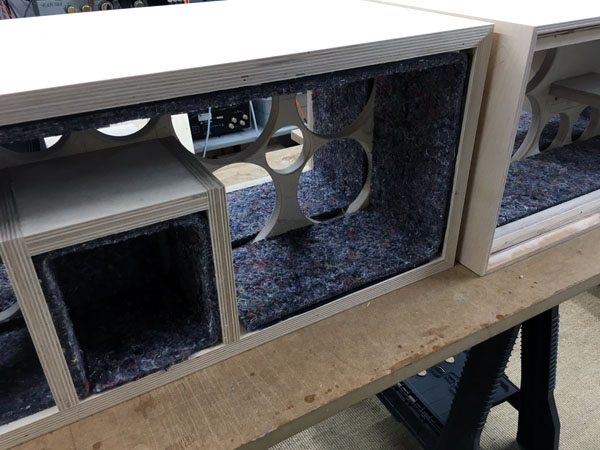
The midrange cabinet is damped with felt and filled with 25 grams wool.
Cut 2 pcs of 15 x 50 cm acoustilux and place round midrange cabinet
towards front, see image X below.
Cut 4 pcs 15 x 50 cm acoustilux and add double layer on top/rear and
bottom/front, see image Y below.
Cut 4 pcs 25 x 50 cm acoustilux, slice halfway in the middle and place
on top of crossover on rear panel. Image Z below.
As always: Do not change the front panel design or drivers'
placement or you'll need a new crossover - and I can't help.
Please read here:
http://www.troelsgravesen.dk/crossovers.htm
Ready made cab kit available from:
https://www.ebelholztechnik.de/galerien/index.php/category/354-sba_941
I suggest taking a look at all the other 3-way classic to get more ideas of construction. This speaker follows the same routines.
http://www.troelsgravesen.dk/Diy_Loudspeaker_Projects.htm#3-WAY_CLASSICS
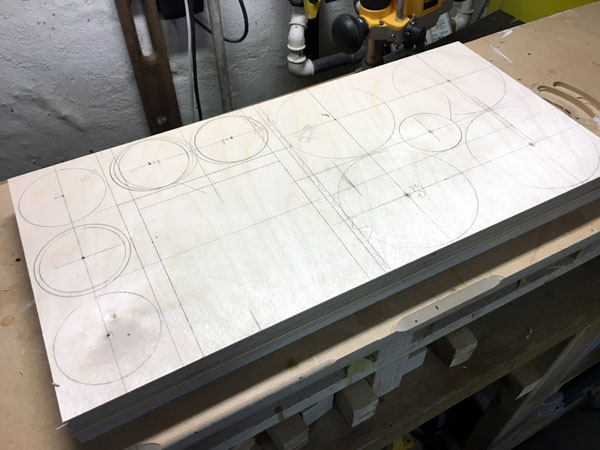
Mark up the panels for the midrange cabinet and distribute the holes
evenly.
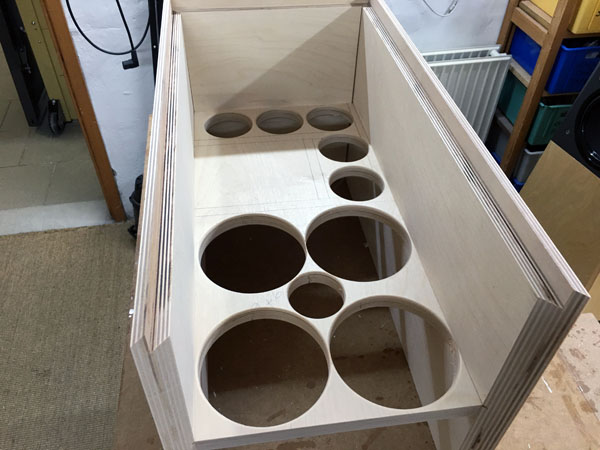
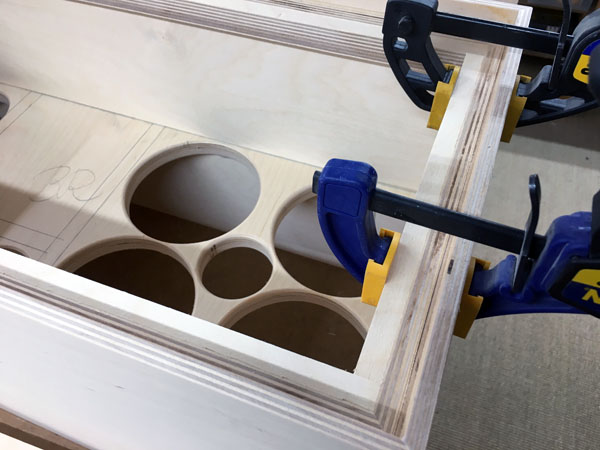
My rear panel is attached by screws, thus the fillets. This is something
you may choose not to do, but make sure you can pass the crossover
boards through the holes in the vertical brace to be placed on rear
panel.


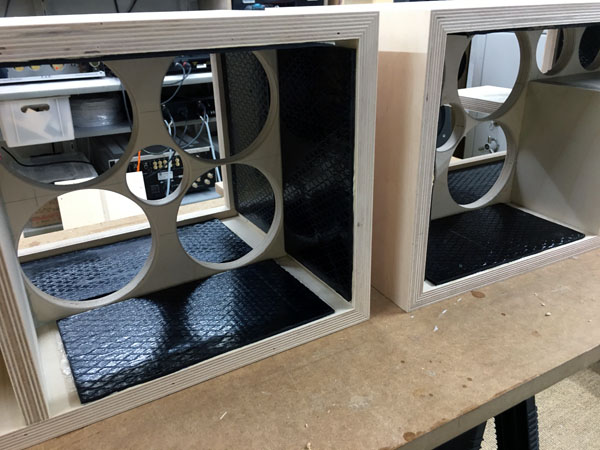
Bitumen pads in place.
The bitumen pads are optional and
must be added to your order.
All interior panels covered by felt damping. No felt on front panel and
no felt on rear panel where crossover boards are placed.
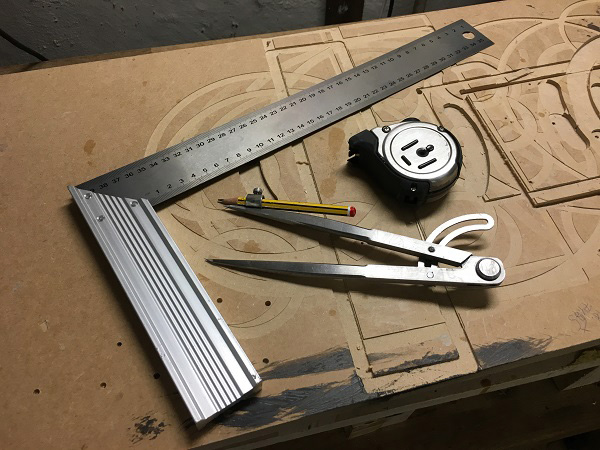
Before routing for the drivers, draw up the driver placements on the panels to see if everything adds up.
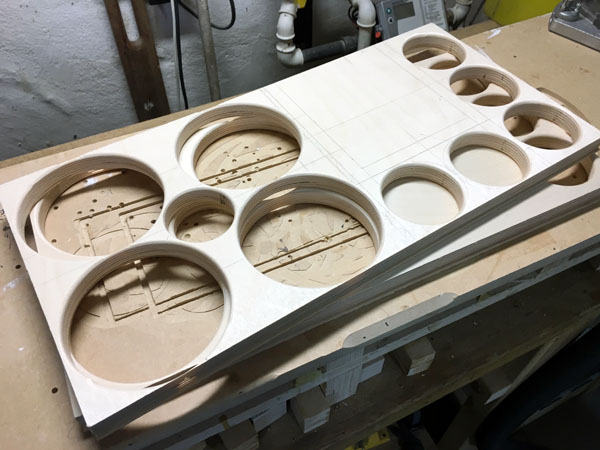
I usually start cutting top of the inner panel as final. The sides I cut
+1 mm to both sides.
Next I cut the outer panel top 15 deg.
Mark all drivers in accordance with the drawing.
Mark center of drivers and start routing.
Glue outer front panel in place and trim sides to exact width (the
surplus 1 mm).
Chamfer outer front panel sides 15 deg (not mandatory, but it looks
nice).

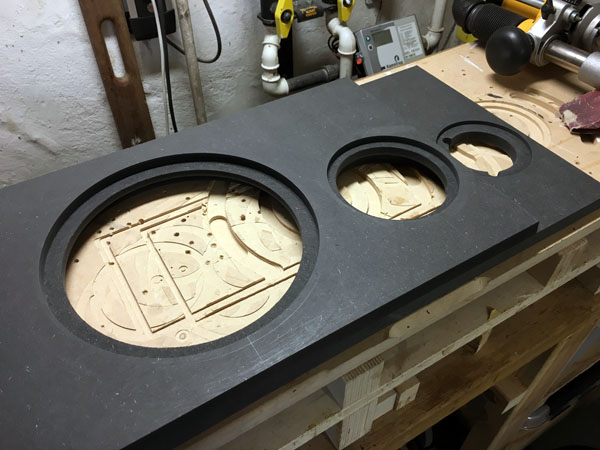
Routing of the front panels.
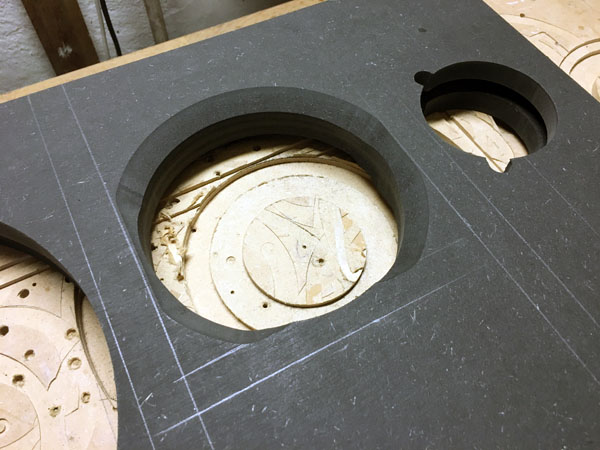
Chamfer inner front panel midrange driver hole as seen. Mark the
midrange cabinet to get the boundaries.
No need to chamfer bass driver hole due to large diameter.

Left: Here with the Be dome. Right:
Add 25 grams wool to midrange cabinet.
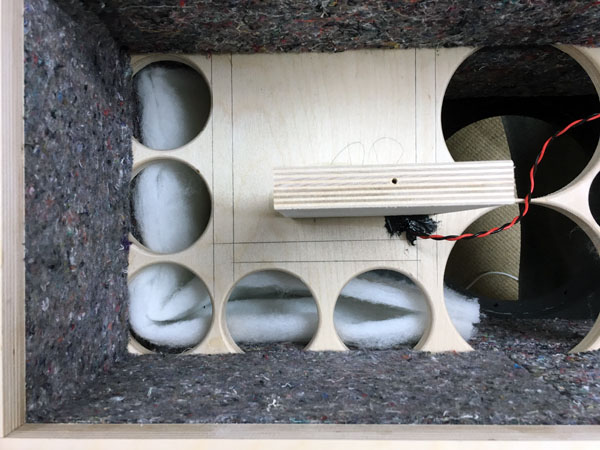
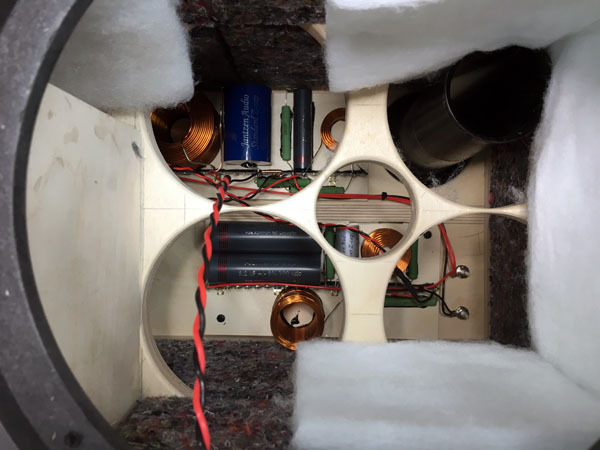
Left: Image X, damping around midrange cabinet. Right: Image Y. Damping
front bottom and top rear.

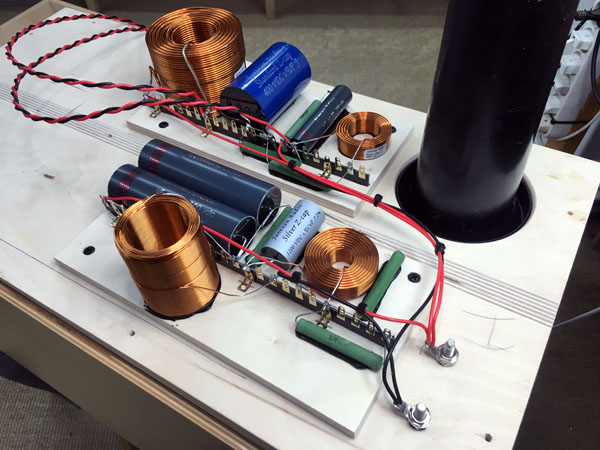
Left: Image Z. Make sure port has proper ventilation. Right: Crossovers
mounted on rear panel.
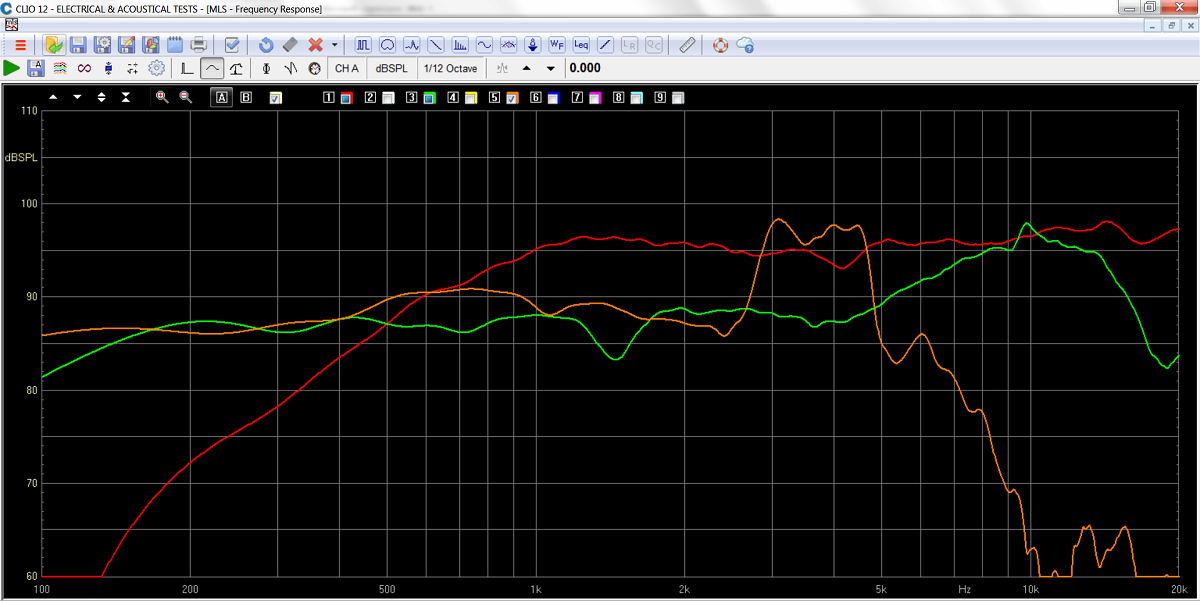
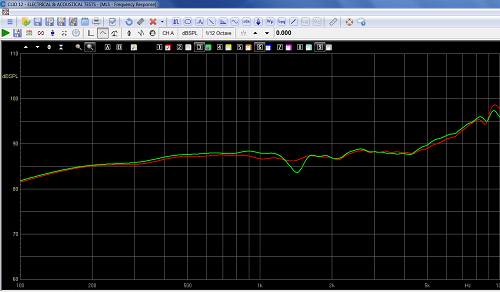
SPL from drivers normalised for 2.8V/1 meter. Red = tweeter, green =
midrange, orange = bass.
SPL of speaker merged with near-field bass response. The dip around 1.5
kHz is to my best inaudible.
Generally narrow notches are inaudible. Peaks are another matter, but no
such thing here.
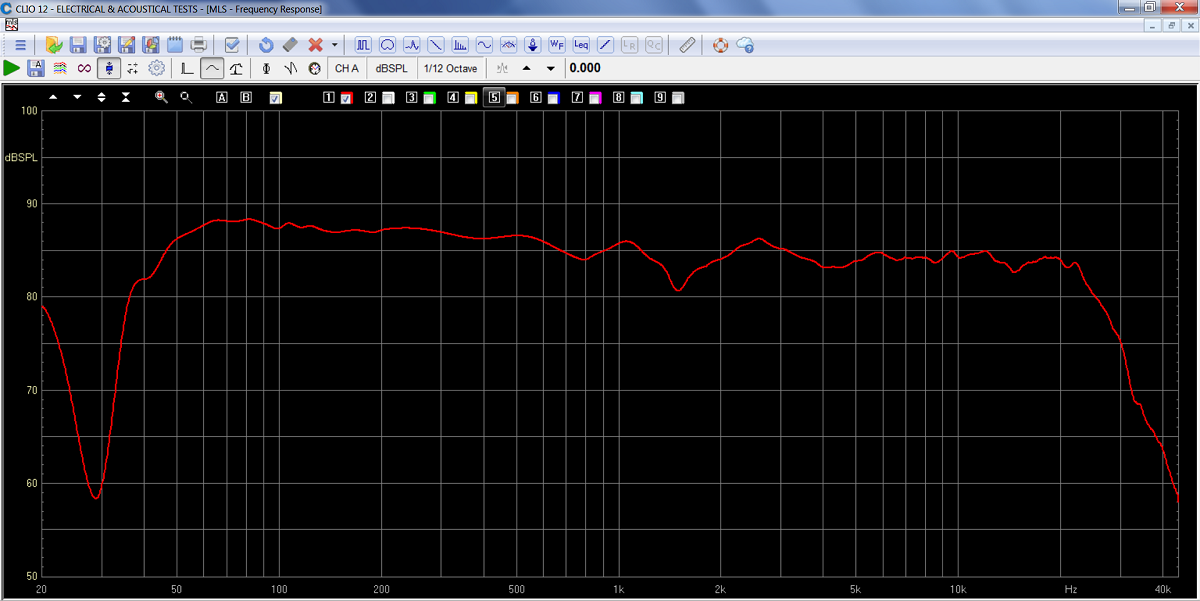
If we make and average of horizontal dispersion, the overall power
response is fairly flat. See below.
Horizontal dispersion @ 0, 10, 20, 30 and 40 deg. off-axis.
The irregularities around 1.5 kHz can be smoothed by edge-coating of the
MR13P driver. Go to drivers on this page.
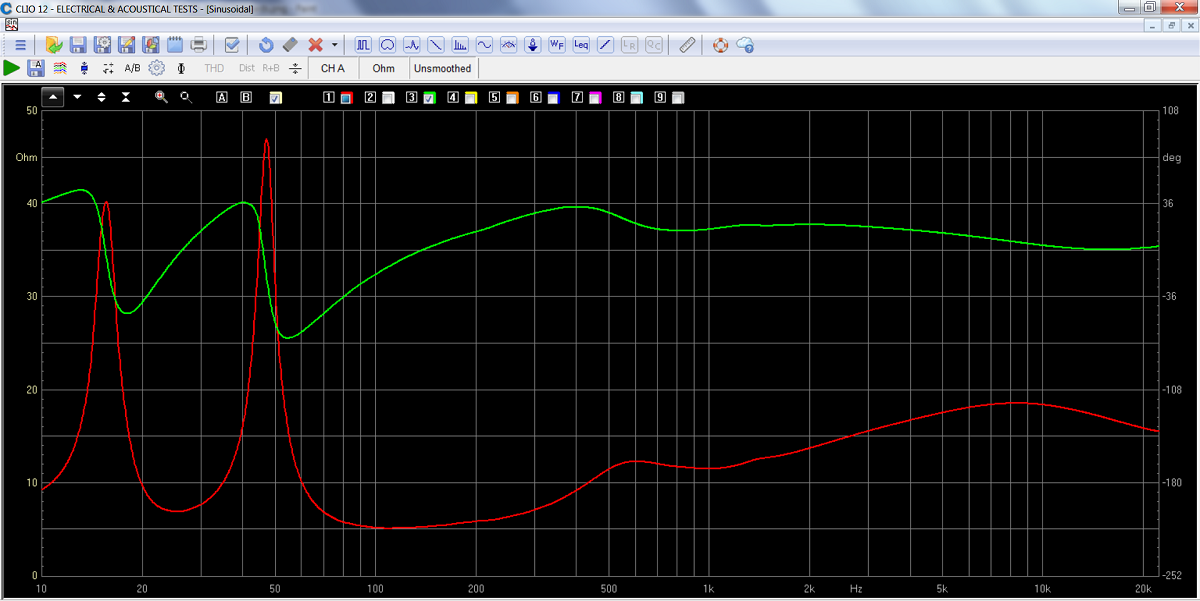
Final system impedance. Minimum 5 Ohms @ 125 Hz.
Remember to state tweeter option!
The bitumen pads are optional and must be added to your order.
All kit and component prices may be subject to change and are always to be confirmed by Jantzen Audio Denmark.
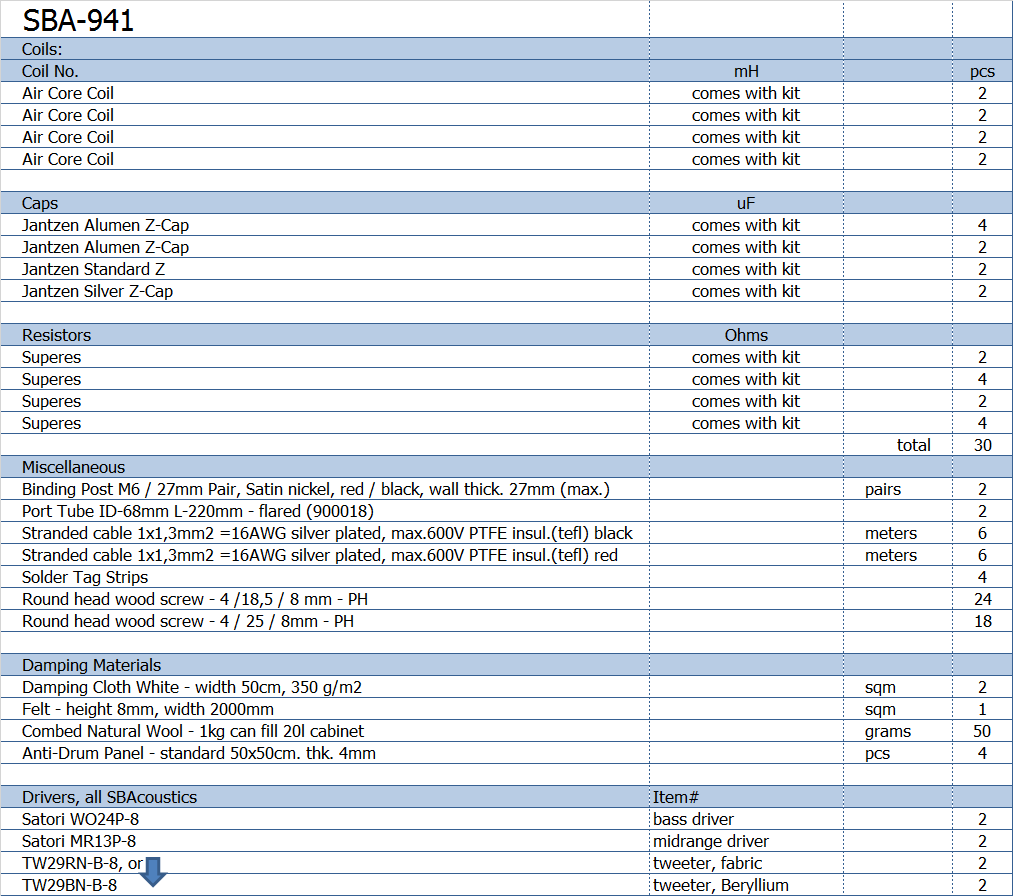
Download Kit
Sale Presentations:
![]()
All technical questions to troels.gravesen@hotmail.com
All questions regarding purchase of kits, please mail Jantzen Audio at contact@jantzen-audio.com
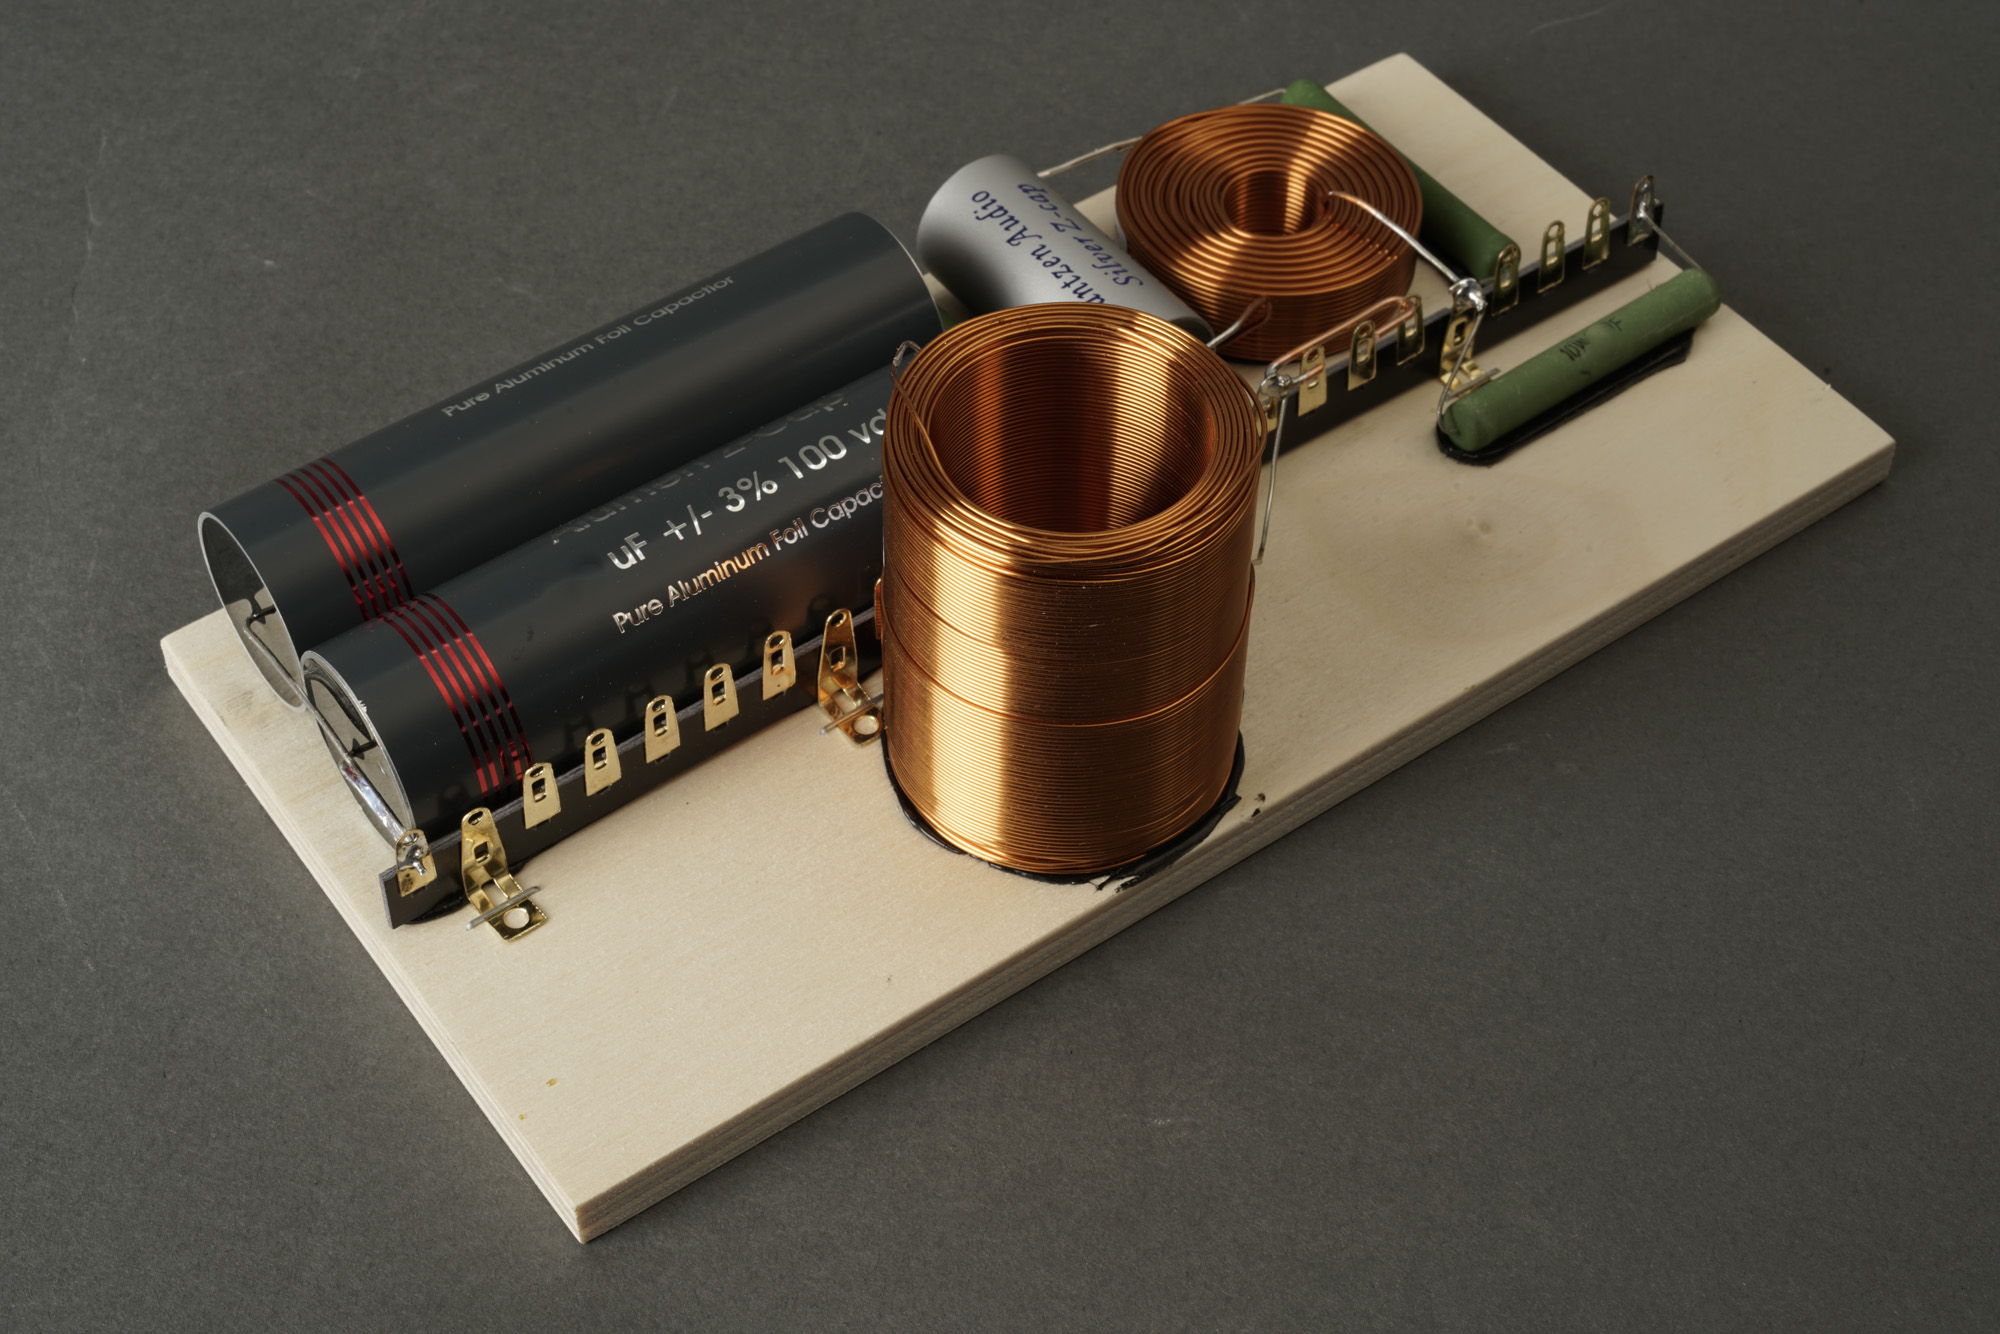
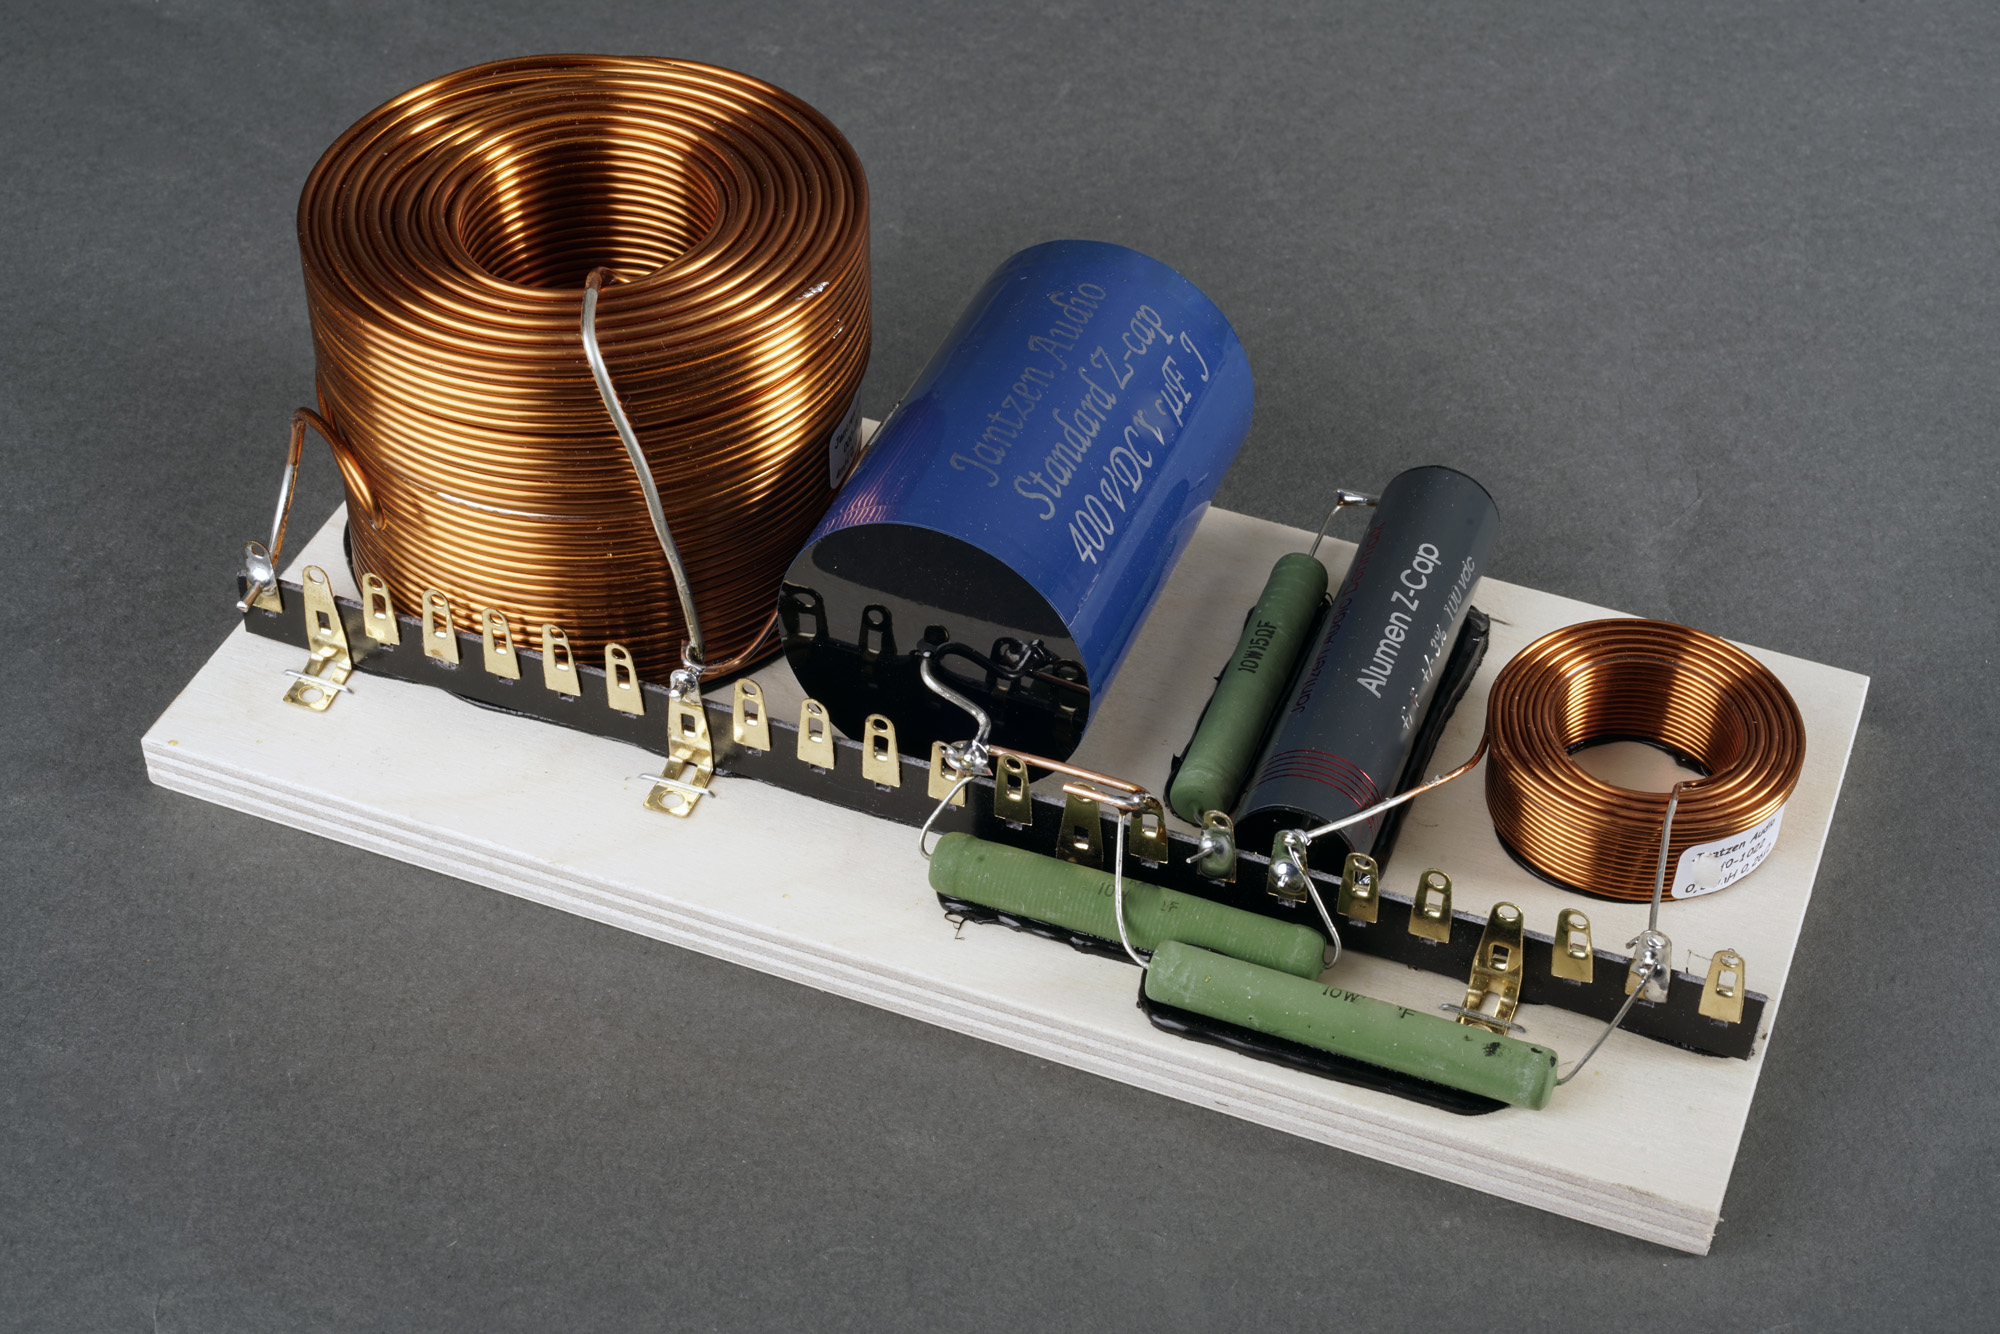
CROSSOVER-LAYOUT
BACK TO INDEX
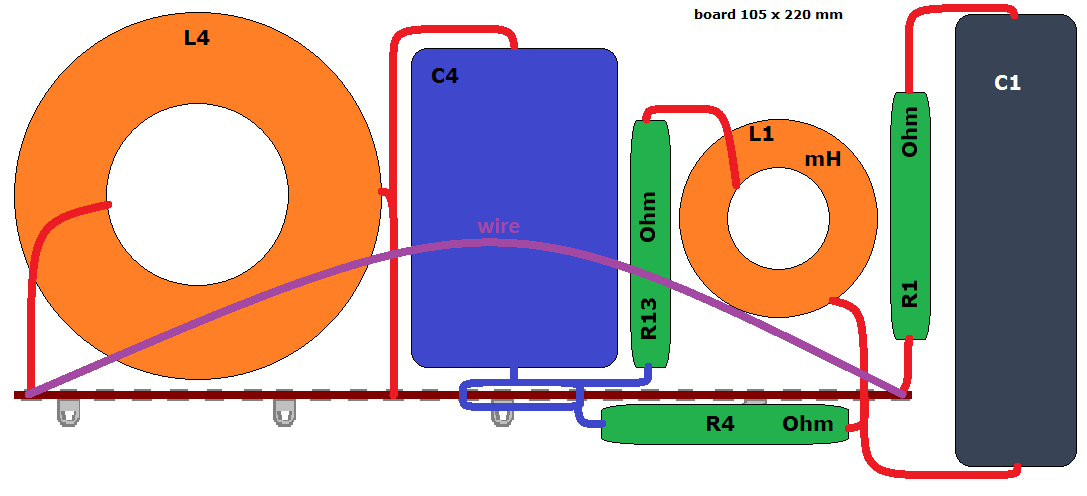
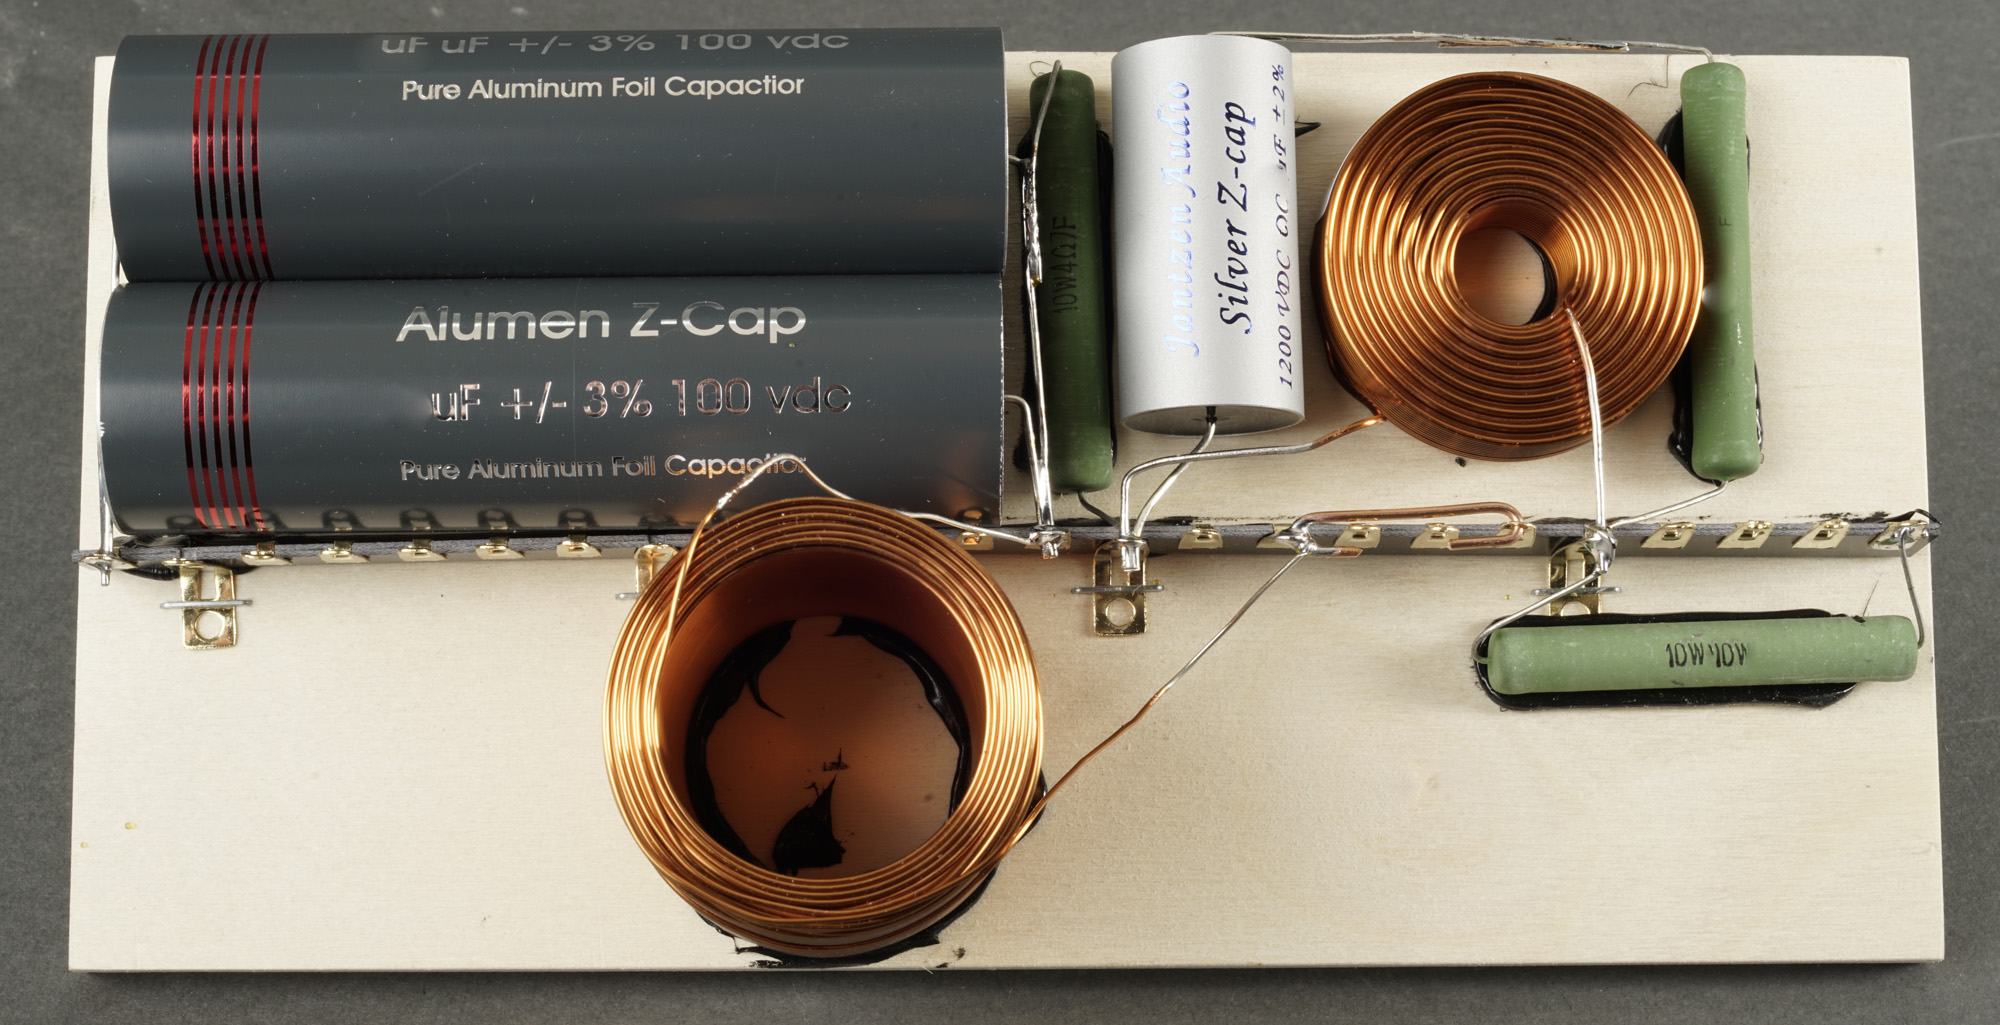
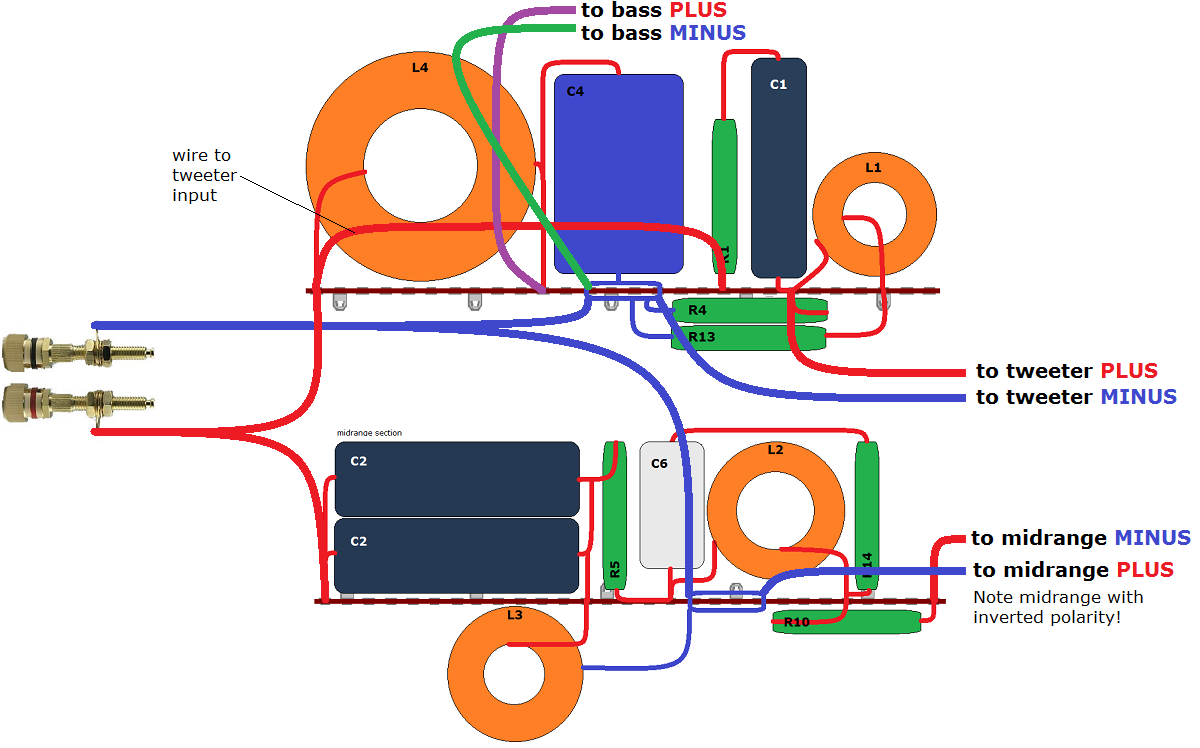
Above the crossover for bass and tweeter.
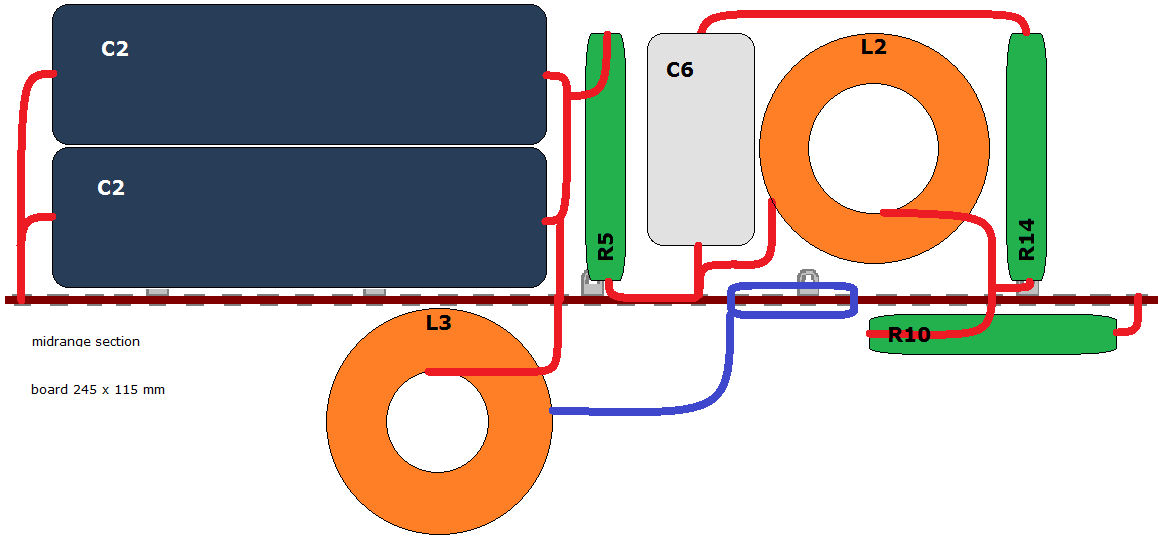
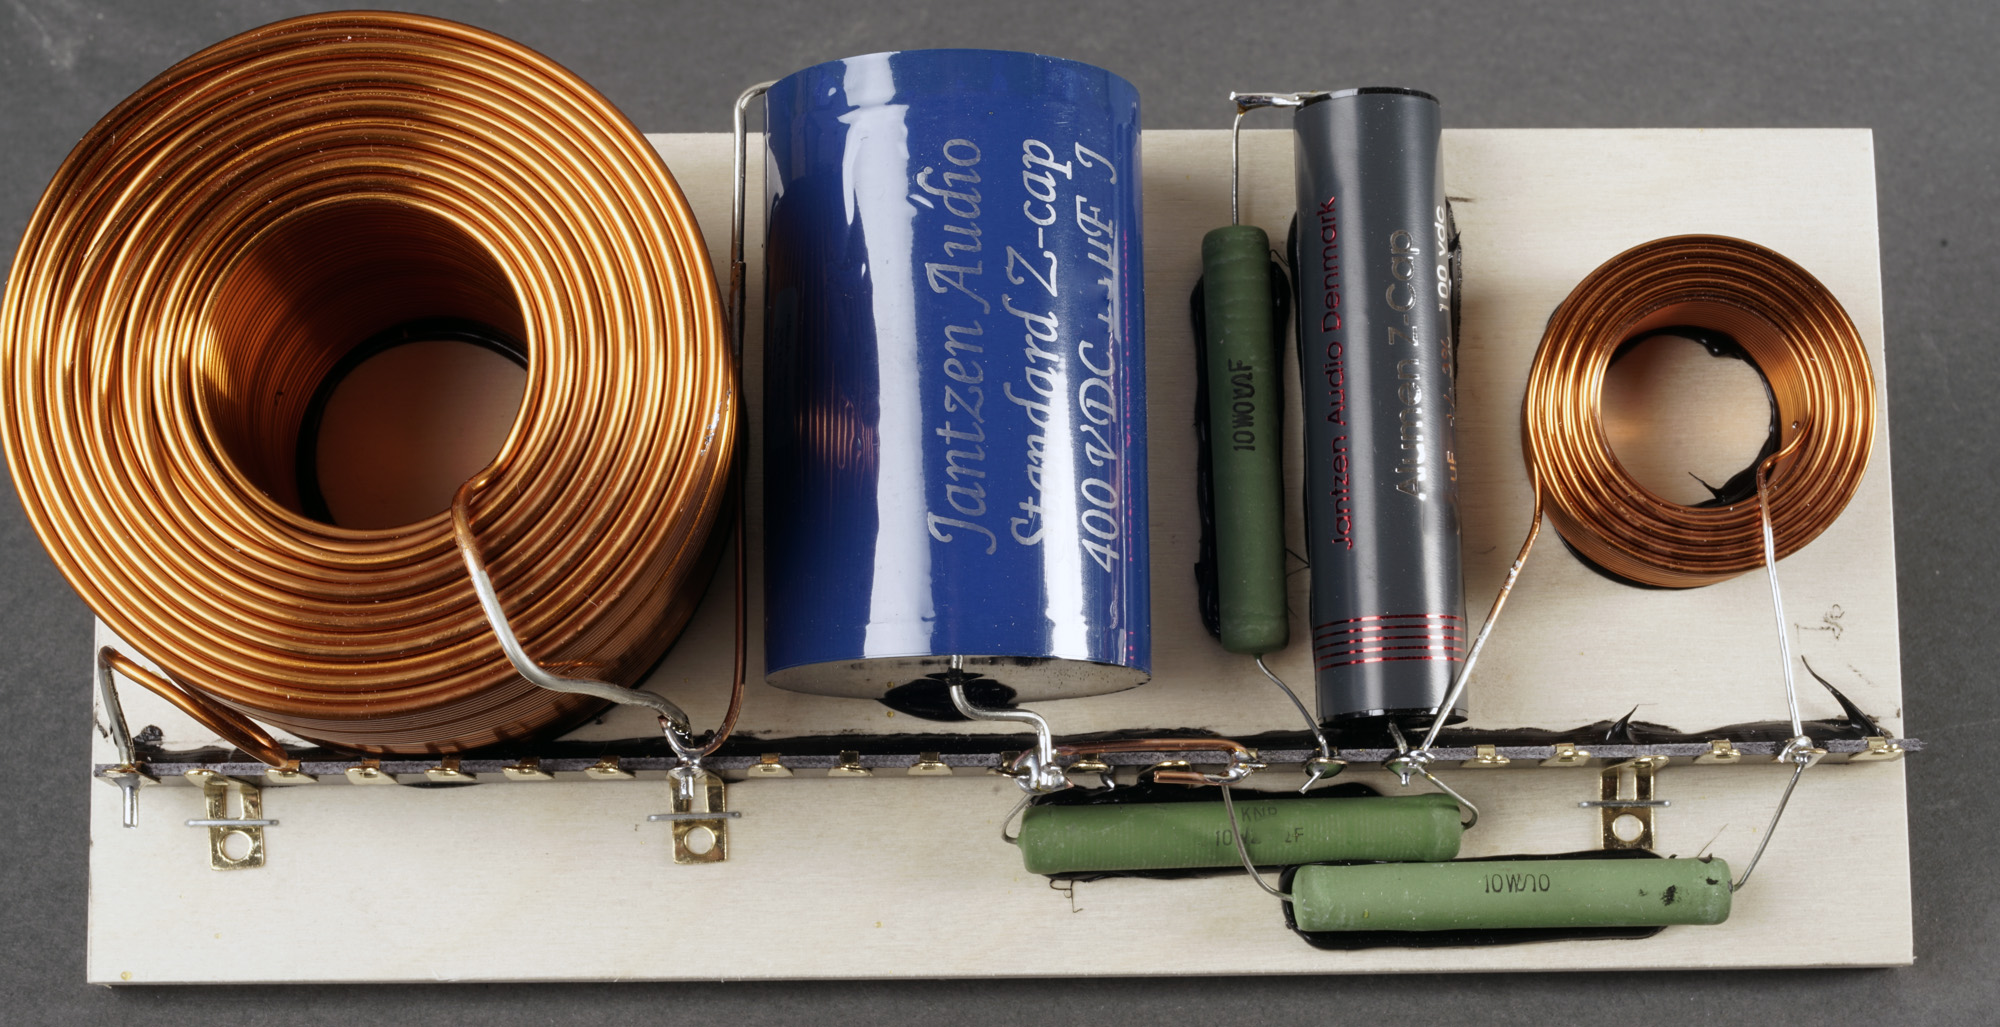
Above the crossover layout for midrange.
Click images to view large


The tweeter layout here differs due to using old Alumen-Z without
aluminum tube.
Wiring
Moving the speakers around it becomes immediately clear it's a bit
bigger than most of my other 3-way classics. Heavy! So is the bass
response from the 9½" bass driver. It goes deep.
What took the most time was the point of crossover between bass and mid.
400 Hz, 500 Hz, 600 Hz, etc. Starting at 400 Hz made the middle midrange
a bit weak on vocals, lacking the fullness and warmth I wanted. Thus,
gradually the point of crossover was moved upwards and ended at 580 Hz
making the best blend of lower-mid and middle-mid. Lower-mid does take
some membrane area to give the fullness of vocals and instruments. The
distance to the floor becomes a factor here too in making the best
bass-mid integration. I found 50 cm stands ideal, but try it out. It can
have a significant impact on sound how high your midrange are above
floor level.
What thrilled me the most was the seamless integration of upper-mid and
treble from its 1. order crossover and the smooth - and utterly dynamic
- presentation of e.g. cymbals and other instruments with high-frequency
content. This speaker surely rivals the AT-3WC and also the PRELUDE
speakers - and at a much lower price. Not since the PRELUDE had I done a
1st order crossover, but I remember what it did. And this all thanks to
the MR13 midrange drivers, which is not necessarily flat, but smooth all
the way to 14 kHz without any excessive dips or peaks. It takes
equalisation, but only from an RC circuit across the series coil.
I sometimes have mails asking for a construction giving "dynamic deep
bass, smooth and transparent midrange and silky treble". Well, we all
want that. Only way to find out if we can have it is building
loudspeakers. Enjoy!