DIY Loudspeakers: HOME INDEX UPDATES RESPONSE WHAT'S NEW
SBAcoustics, 3-Way
Classic
Copyright 2016-20 © Troels Gravesen
DRIVERS CROSSOVER CABINET MEASUREMENTS SPEAKER-KIT CROSSOVER LAYOUT SOUND
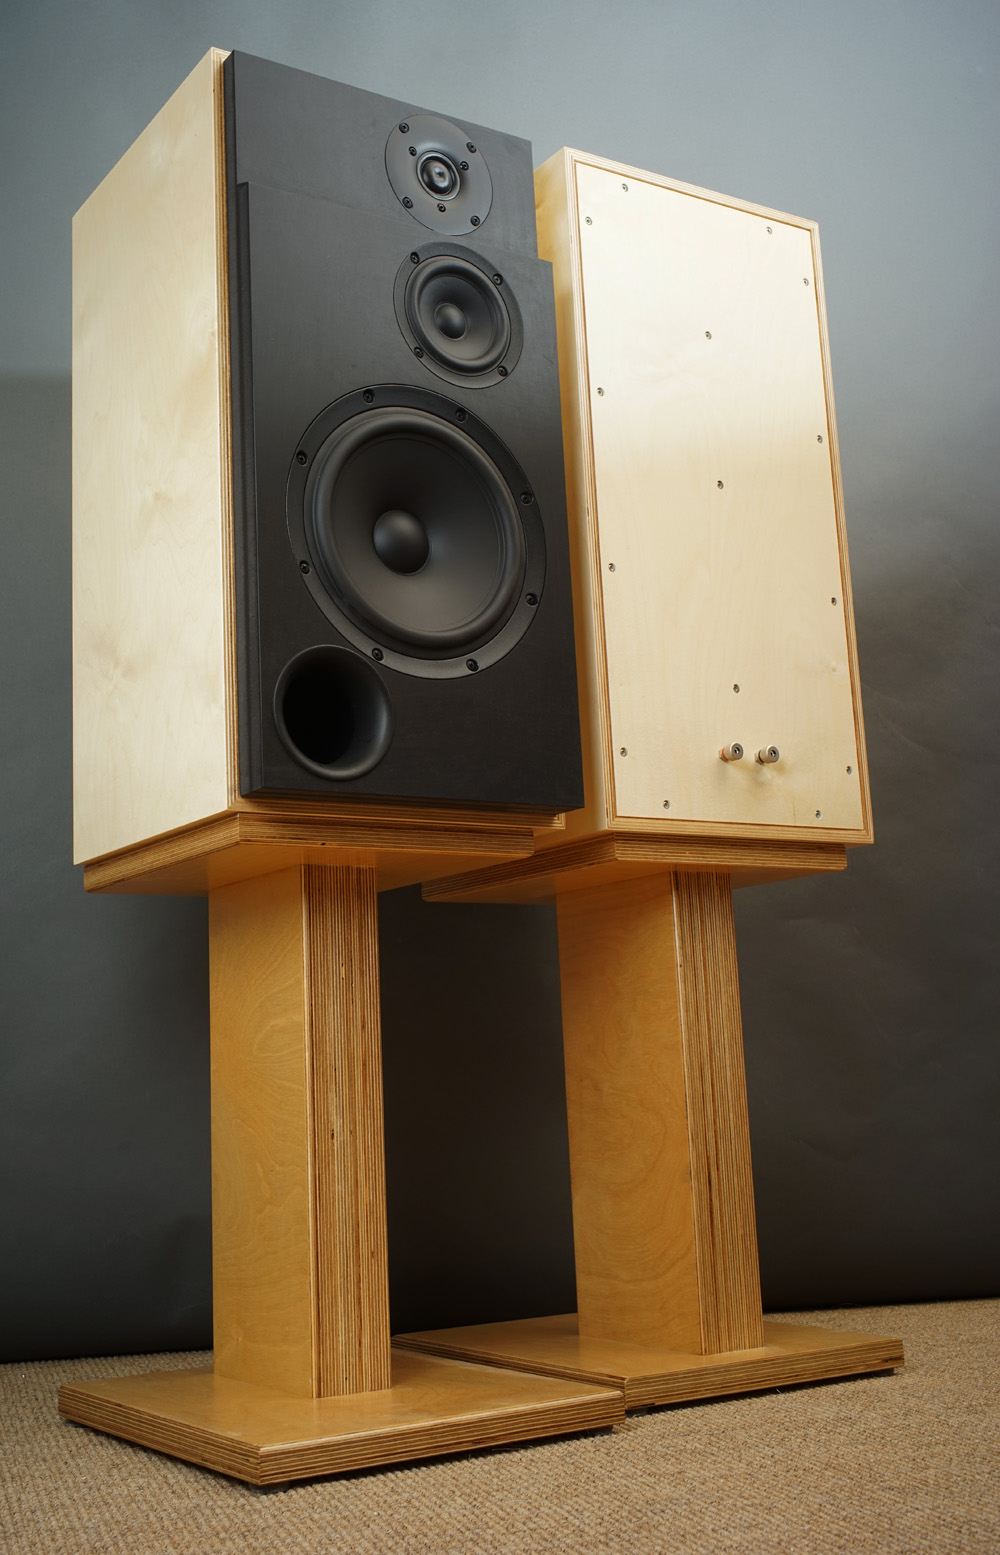
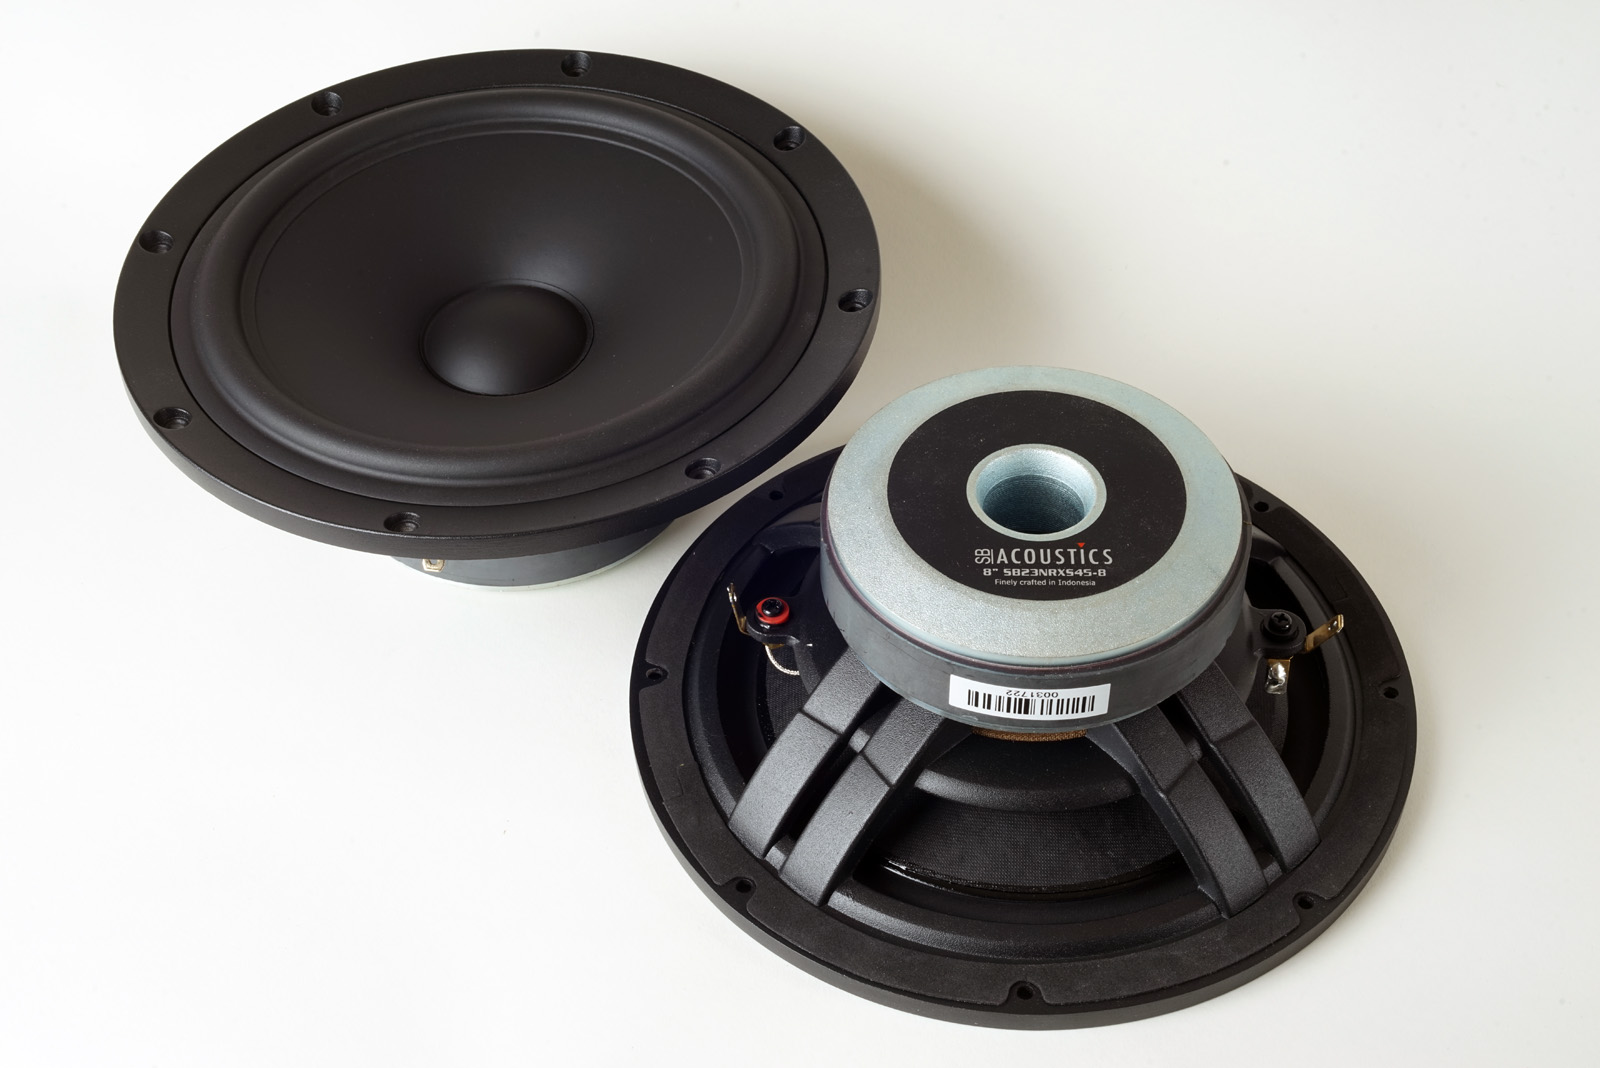
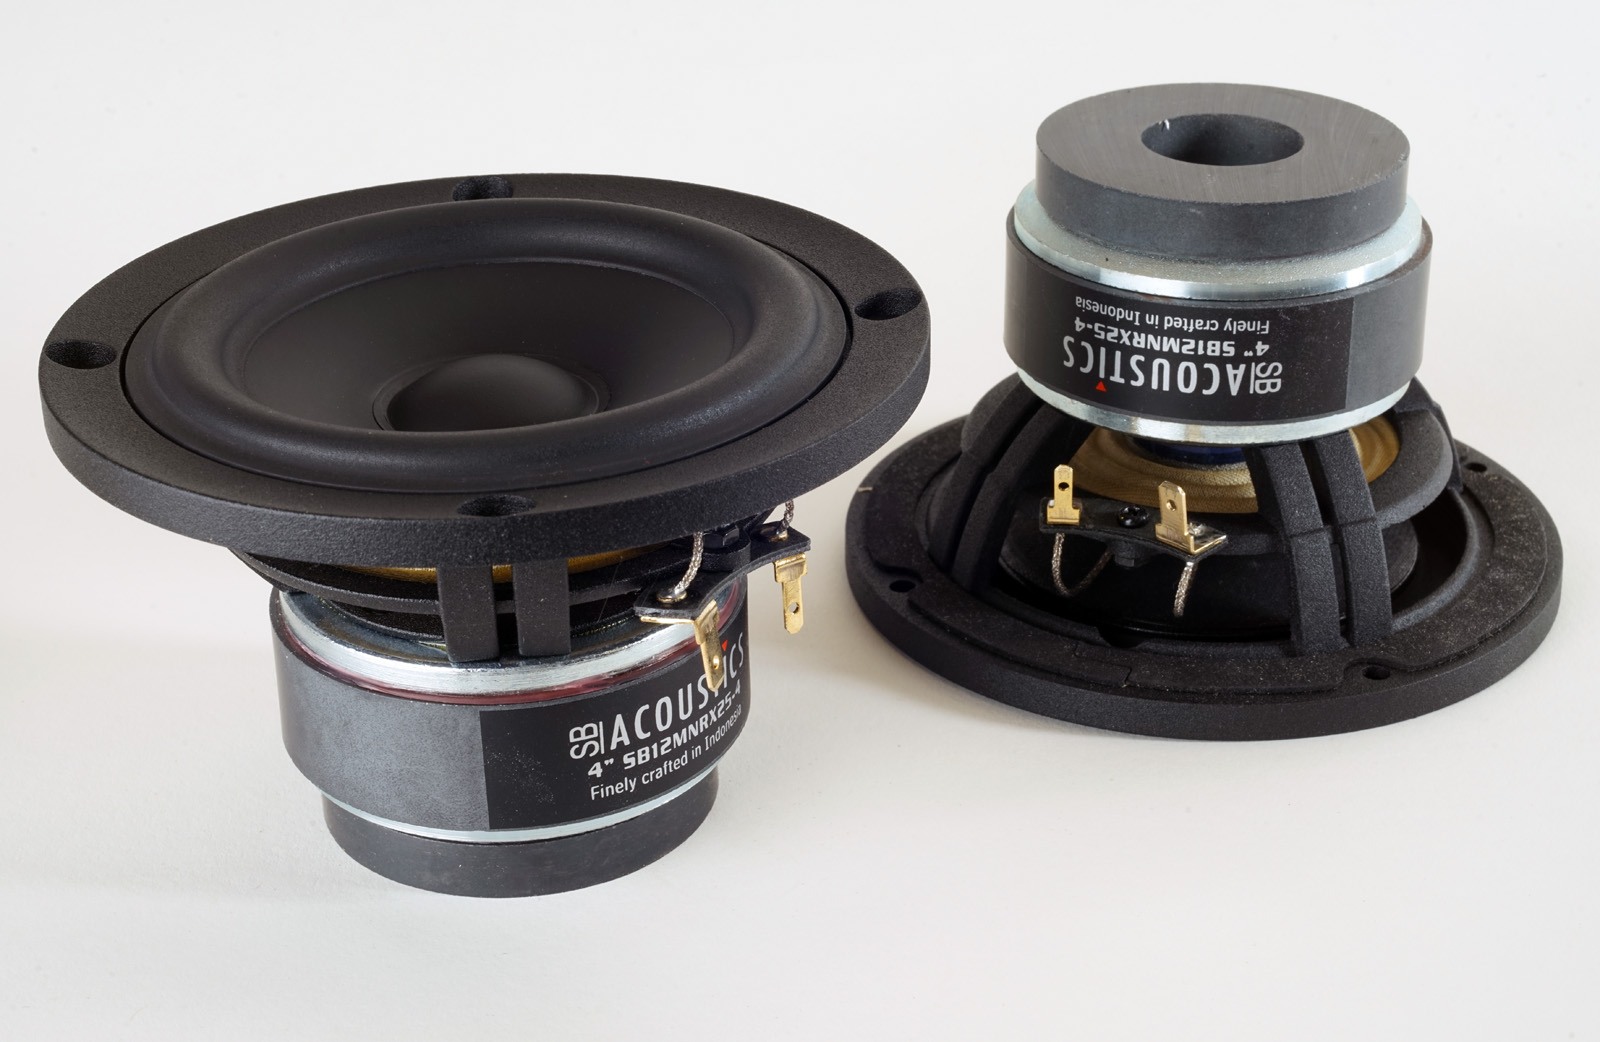
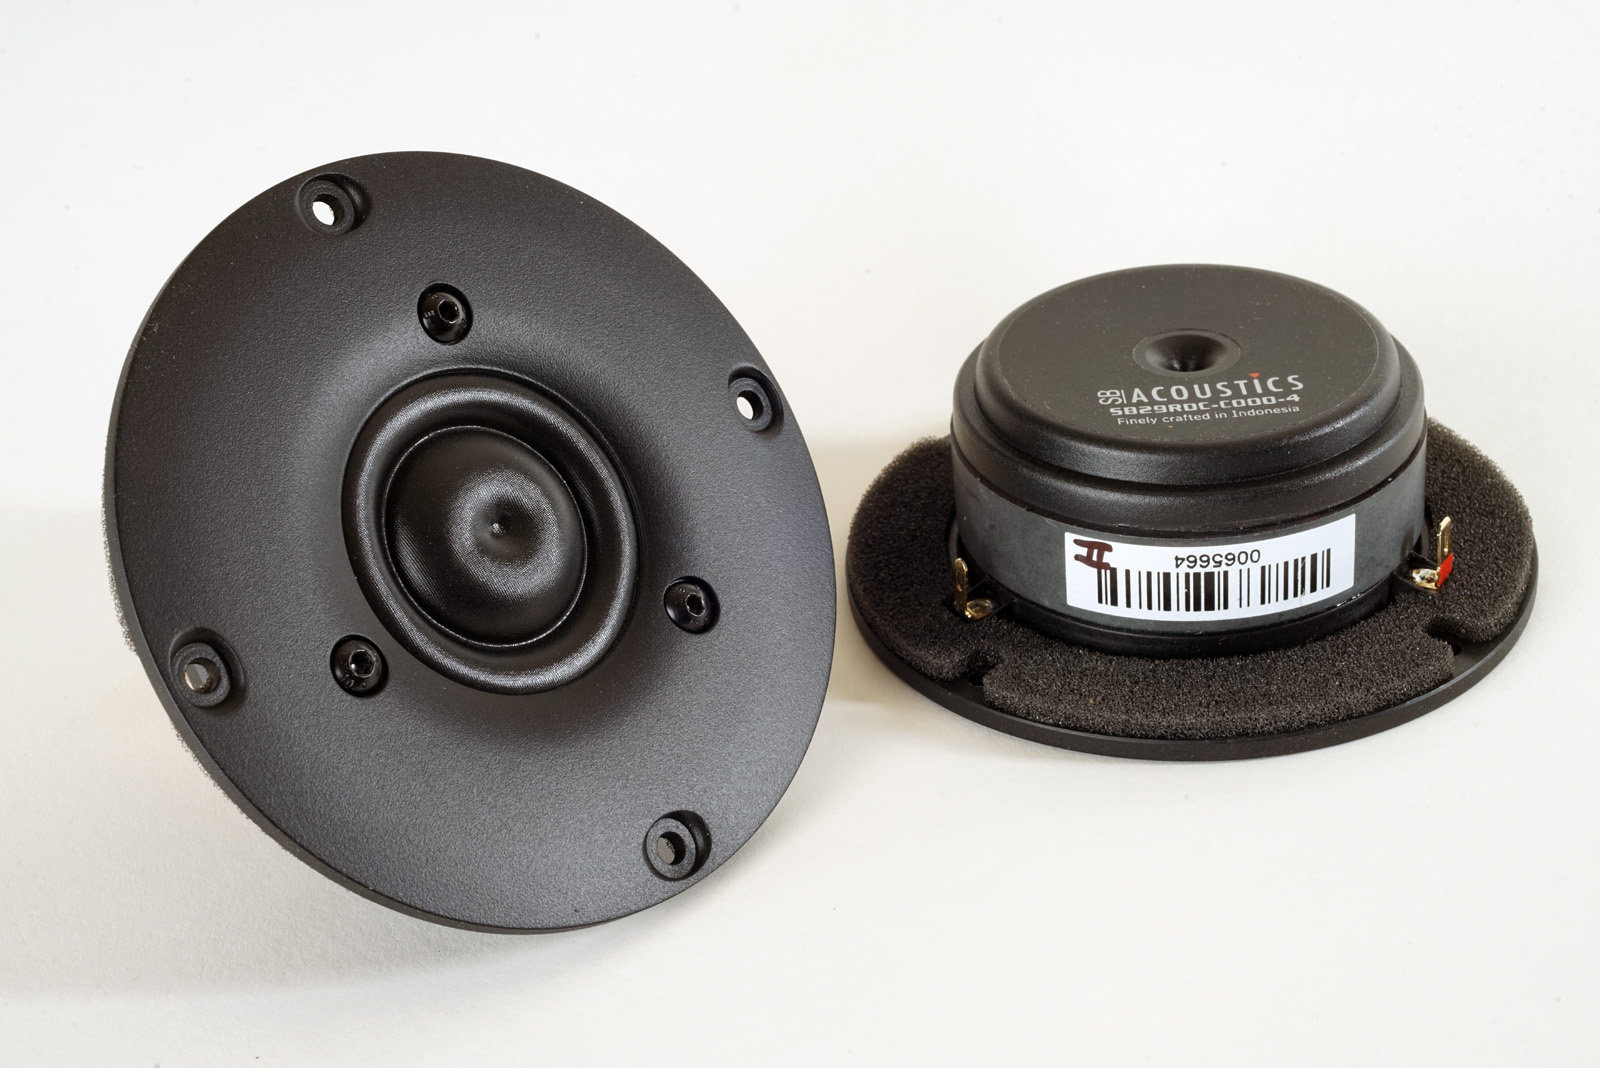
There's no point in denying! I love the concept of a 3-way classic from an 8" bass driver, a 4" midrange and a 1" tweeter. We can get an awful lot of good sound from a modest investment. Searching the web for suppliers I find all six SBA drivers for 328 EUR incl VAT. This may be realised from other brands as well, but here we get proper voice coil formers and suspensions ensuring high mechanical Q and on top of this symmetric drive (SD), something we - to my knowledge - do not find from any other manufacturer at this price level. Furthermore very rigid baskets - even for the midrange - and proper ventilated magnet systems (view bass driver below), hard-pressed paper cones and a tweeter that may well compete with the very best. Hmm...if the sound is also good, we're in for a treat.

Basics:
3-way speaker system
Points of crossover: 600 and 3700 Hz
Crossover: 2nd order LR
Power handling: 60 watts (SBA rating of bass driver), read here: http://www.troelsgravesen.dk/power-handling.htm
Recommended amplifier: 20 wpc minimum
Impedance: 4-8 Ohms
System sensitivity: 88 dB, 1 meter, 2.8 volts input.
Useful links (Please follow all links before e-mailing!):
http://www.troelsgravesen.dk/tips.htm
http://www.troelsgravesen.dk/tips.htm#CONSTRUCTION_OF_CROSSOVERS
http://www.troelsgravesen.dk/crossovers.htm
http://www.troelsgravesen.dk/LCR-RC.htm
http://www.troelsgravesen.dk/Inverted-Polarity.htm
http://www.troelsgravesen.dk/choices.htm
http://www.troelsgravesen.dk/power-handling.htm
Click images to view large
Download specs: SB23NRXS45-8 SB12MNRX25-4 SB29RDC-C000-4 or SB29RDAC-C000-4
Tweeter SB29RDC-C000-4 can be replaced by SB29RDAC-C000-4, the latter
with aluminum faceplate.
No change to crossover.
Also the updated midrange 4” SB12MNRX2-25-4/Norex can be used without
changes to crossover.
Download specs: 4”
SB12MNRX2-25-4/Norex
Doing simulation takes a few precautions when it comes to the actual
response of the bass driver. Usually we measure at 0.5-1 meter distance
and in a normal living room we get readings valid down to around 250 Hz.
This reading we may merge with a nearfield response and get the full
response of the driver. However, this is quite similar to a 2pi
environment, not the narrow baffle we intend to place our driver on.
Thus, we have bafflestep loss and the bass may be some 6 dB down at the
lower end. Next we have to assume a certain amount of room-gain, but
this depends on the actual placement of the speaker in the room - and
this can vary enormously! Assumed room-gain is something the designer has to
do. Placing the speaker some 60 cm above floor level, 80 cm from front wall
and 150-180 cm from side walls, we're in for some 2-3 dB room-gain.
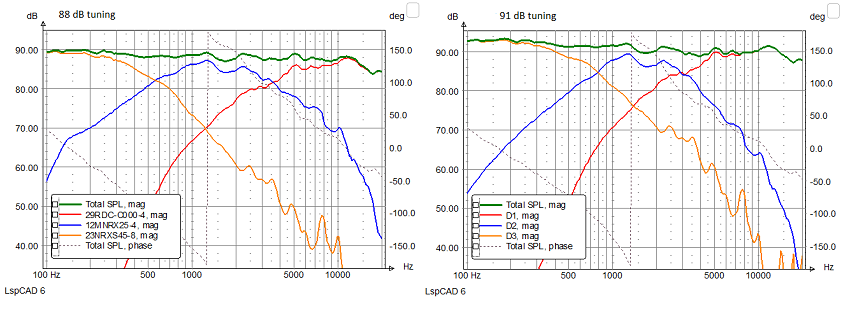
Above you can see two simulations where this is not taken into account
(right) and one where 4 dB has been subtracted from the bass driver
response (left) and mid-tweeter tuned accordingly. 91-92 dB system
sensitivity would certainly be really nice, but this is not what we get
when we place our driver on a 30 x 60 cm baffle and put it into a room
at suggested distances to nearest boundaries. 88 dB is more like it, and
this it what it will be.
When reading manufacturers recommendations on their speakers we rarely -
if ever - read something like "this speaker should not be placed near
corners" or "don't place this speaker too far out into the room". One
manufacturer sends a qualified person to the customer to suggest proper
placement for optimum performance - but the customer pays dearly for
this service. It goes without saying that this is not possible for a 1000
USD pair of speakers, or the manufacturer would soon be bankrupt.
![]()
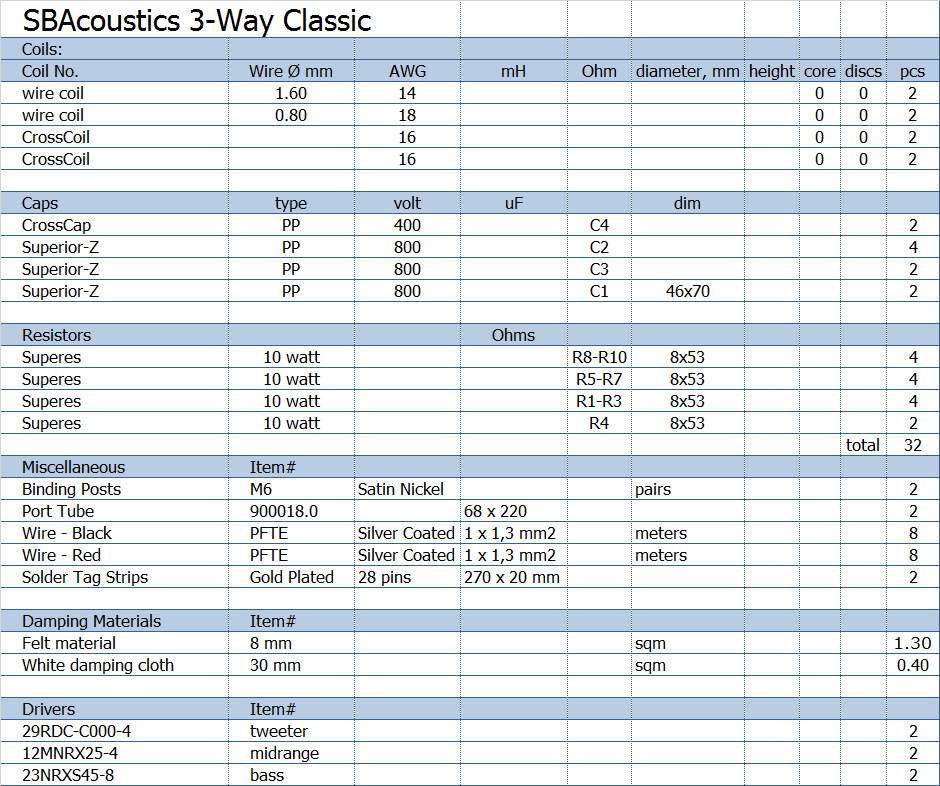
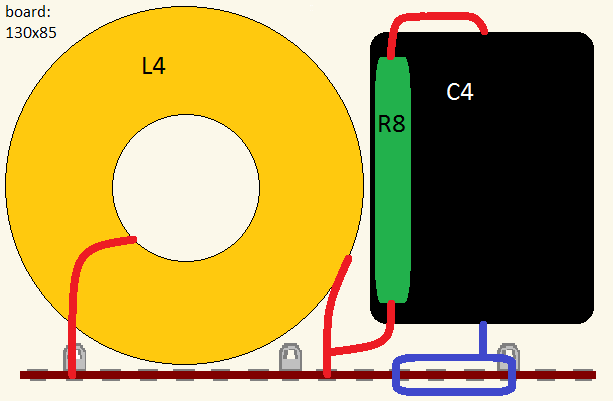
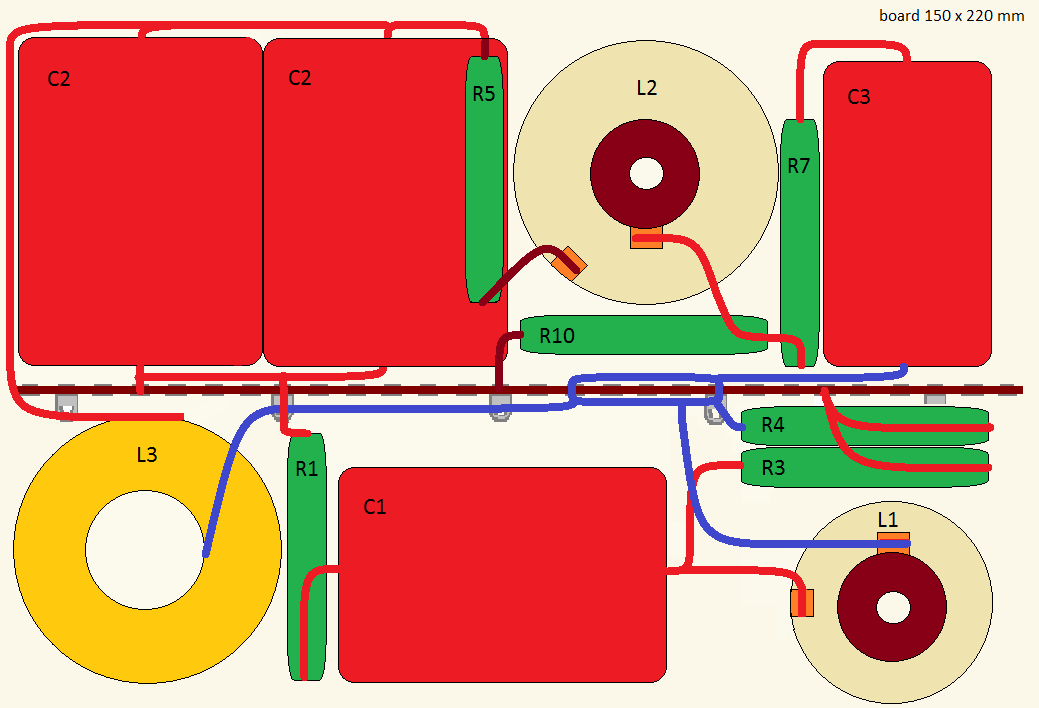
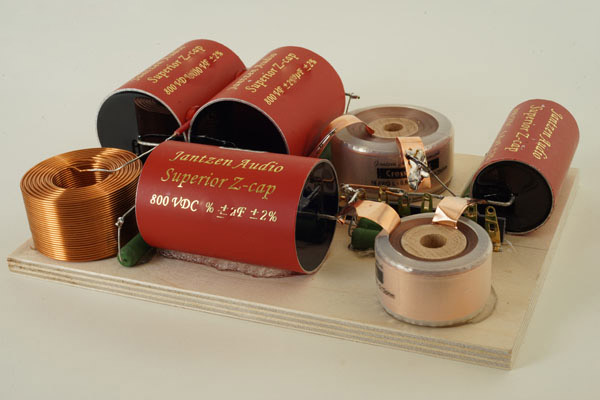
Crossover components' values come with the kit.
The SBA drivers used here perform really well (see measurements
below) and we can get away with a very
simple LR2 filter due to the stepped baffle.
The "problem" with these SBA drivers is that they can really cope with
the very best of components. C1 and C2 takes some 40 uF in total and
they better be highest quality to deliver all the goodies. Obviously
there will be an all-STANDARD-Z Cap version with standard PP capacitors
if it has to be as cheap as possible.
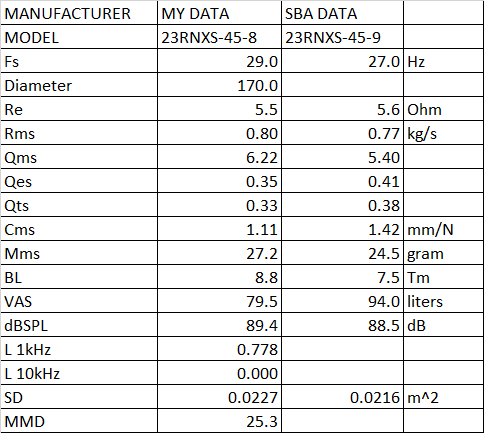
TS data, SB data compared to my own measurements.
Looking at SBAcoustics TS data on the 23NRXS-45-8 made me a bit uneasy as it might not fit in with my 2 cubic feet standard 3-way classic cabinets and I wanted to stick to the design. However, doing my own TS measurements produced a few differences from the SB data - and quite opposite to what I usually experience. I don't measure at a particular high voltage, usually delivering higher Qt and lower Vas. Here I get a lower Qt - and slightly lower Vas, but still better suited for a 40 liter vented cabinet. Fs and Mms are quite similar. I'm not claiming my date better than the SB data as TS data can take a lot of values depending on voltage applied. My drivers were broken in according to SB recommendations. So, nothing beats experience and I tested the driver in my 33.4 liter test cabinet with the port tuned to ~32 Hz and from measurements and listening, this performs perfectly well with no boominess or lack of precision.
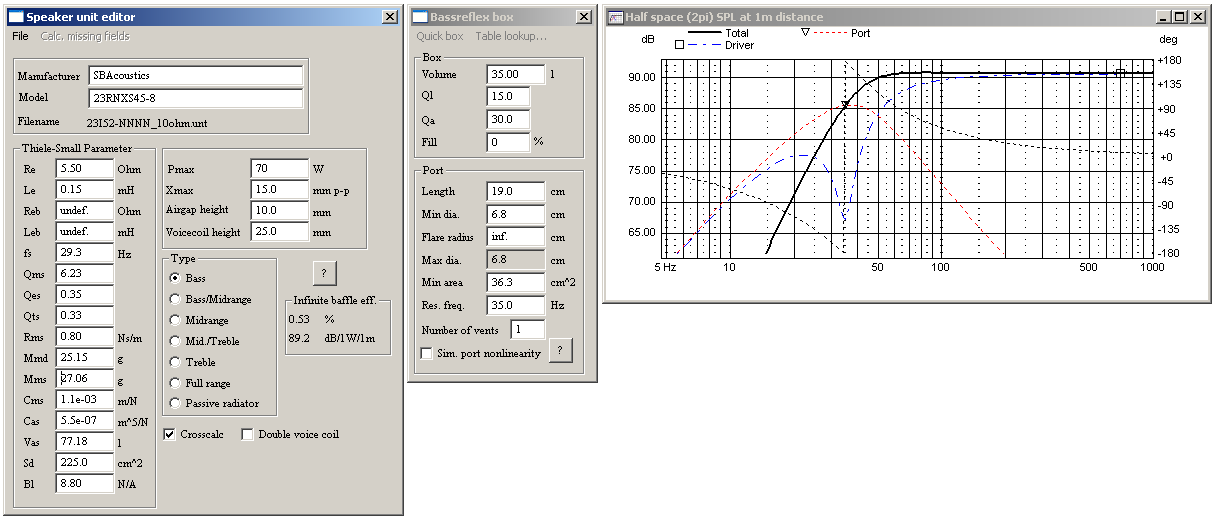
Click image to view large (box volume an
example)
To further investigate the bass driver I made some cross-calculation in LspCad to see what happens. My measured data fits quite well with data produced from doing cross-calculation. A critical parametre here is BL and it may just be a bit higher than suggested in the SBA file. The calculated efficiency also fits well with the actual measurements done by SBA. Now, no need for being nit-picking here, I just wanted to make sure this bass driver would do what I wanted from a 40 litre vented design.
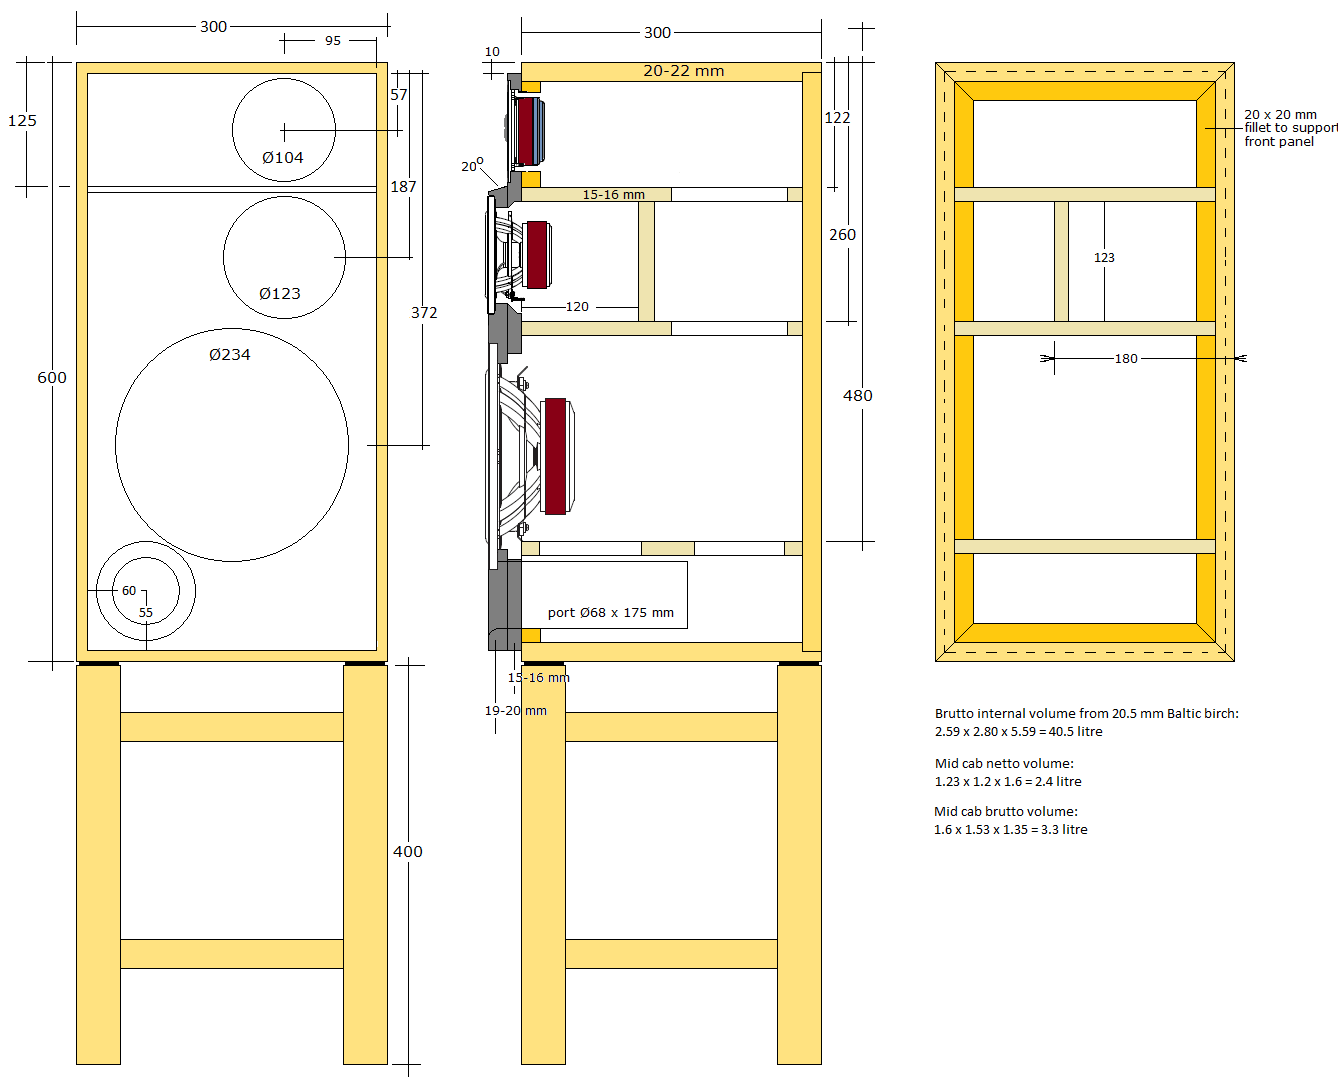
Click image to view large
Brace based on 20 mm panels. Adjust to actual situation.
Don't forget to mirror braces for left and right!
For the bottom brace, make 4 x 120 mm holes.
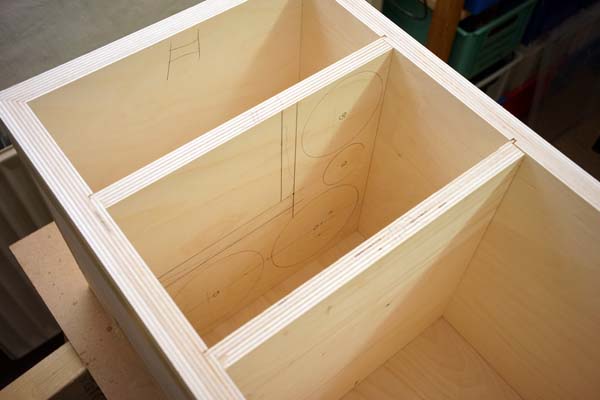
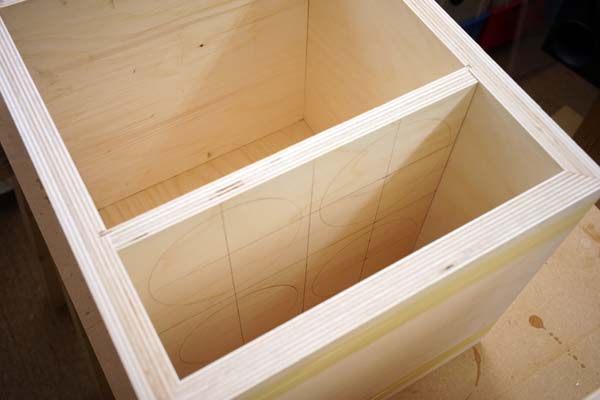
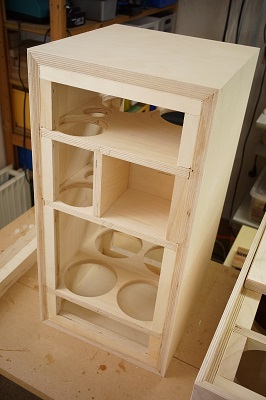
Construction pics
I strongly suggest taking a look at SEAS 3WC, ScanSpeak 3WC and AT-3WC construction pics as this will be nothing more than repeating what has been made 4 times before. Even the QUATTRO mkII has similar features.
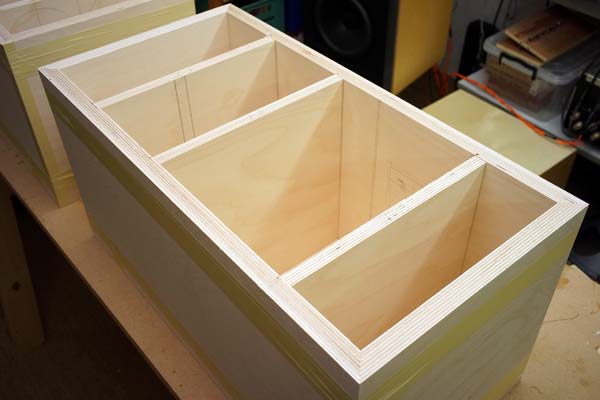
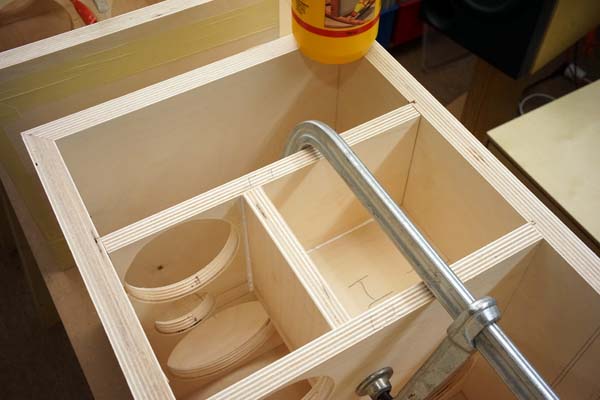
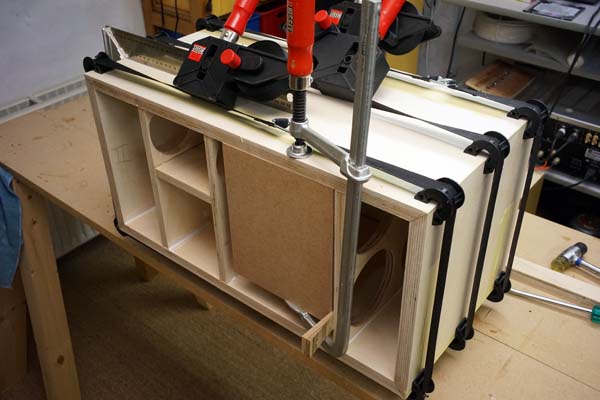

Sometimes it may be needed to apply a force between two opposite corners
to pull the cabinet into a perfect rectangular shape.
I attached a piece of MDF to one of the sides and inserted a wedge
between the MDF and a bracing until aligned.
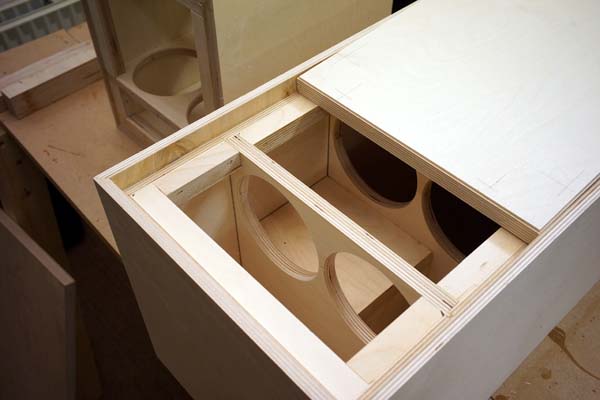
My cabinets here are experimental and will house a wide range of drivers, hence all the fillets for attaching the rear panel by screws and the front panels will be attached by screws from the inside. Now, if your 3-ways are one-timers, you can of coarse skip all the fillets and just glue front and rear in place. Much easier than what is shown here.
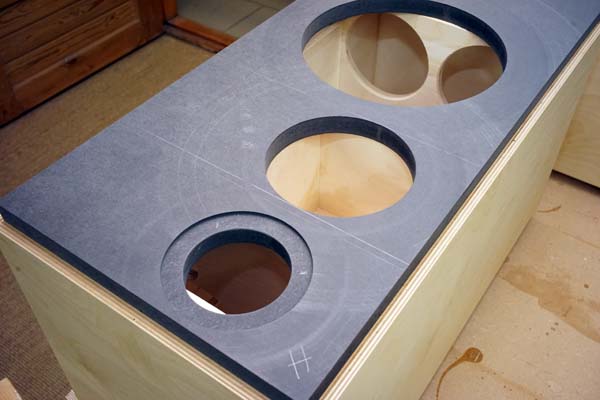
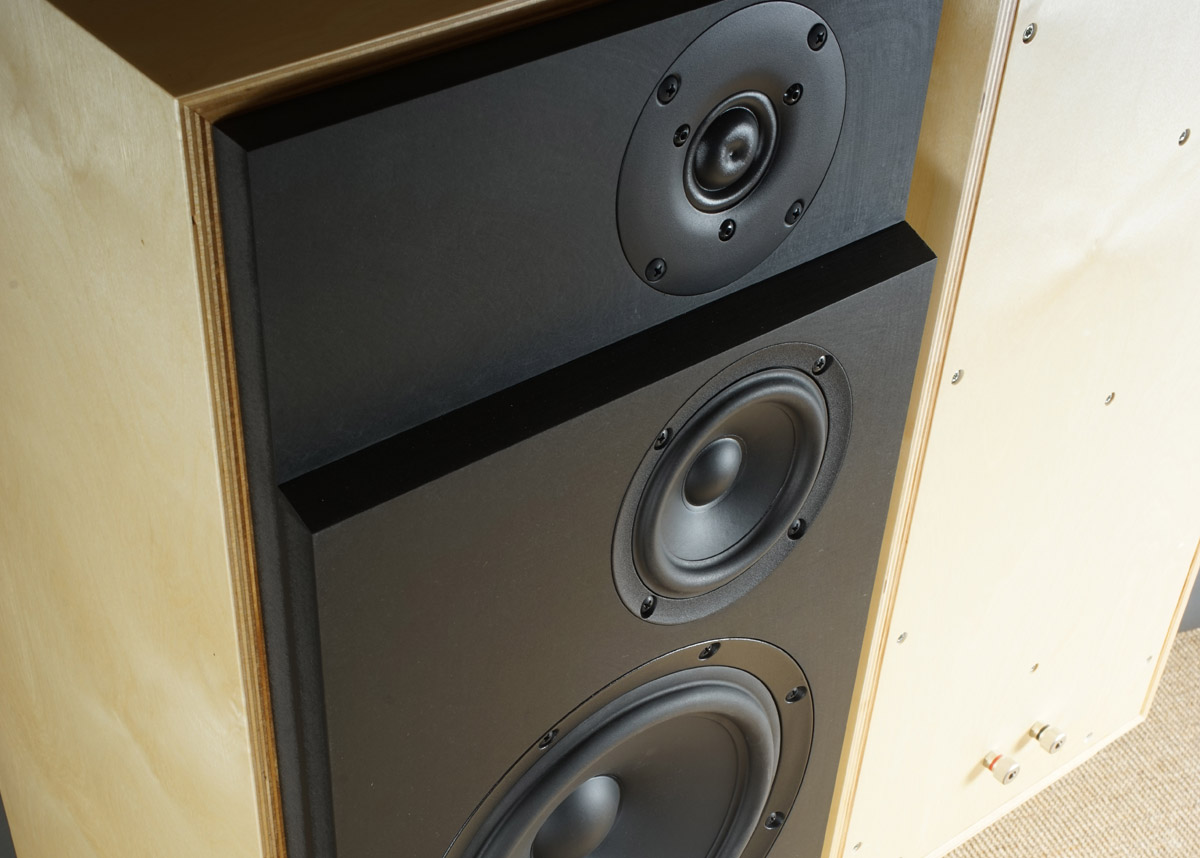
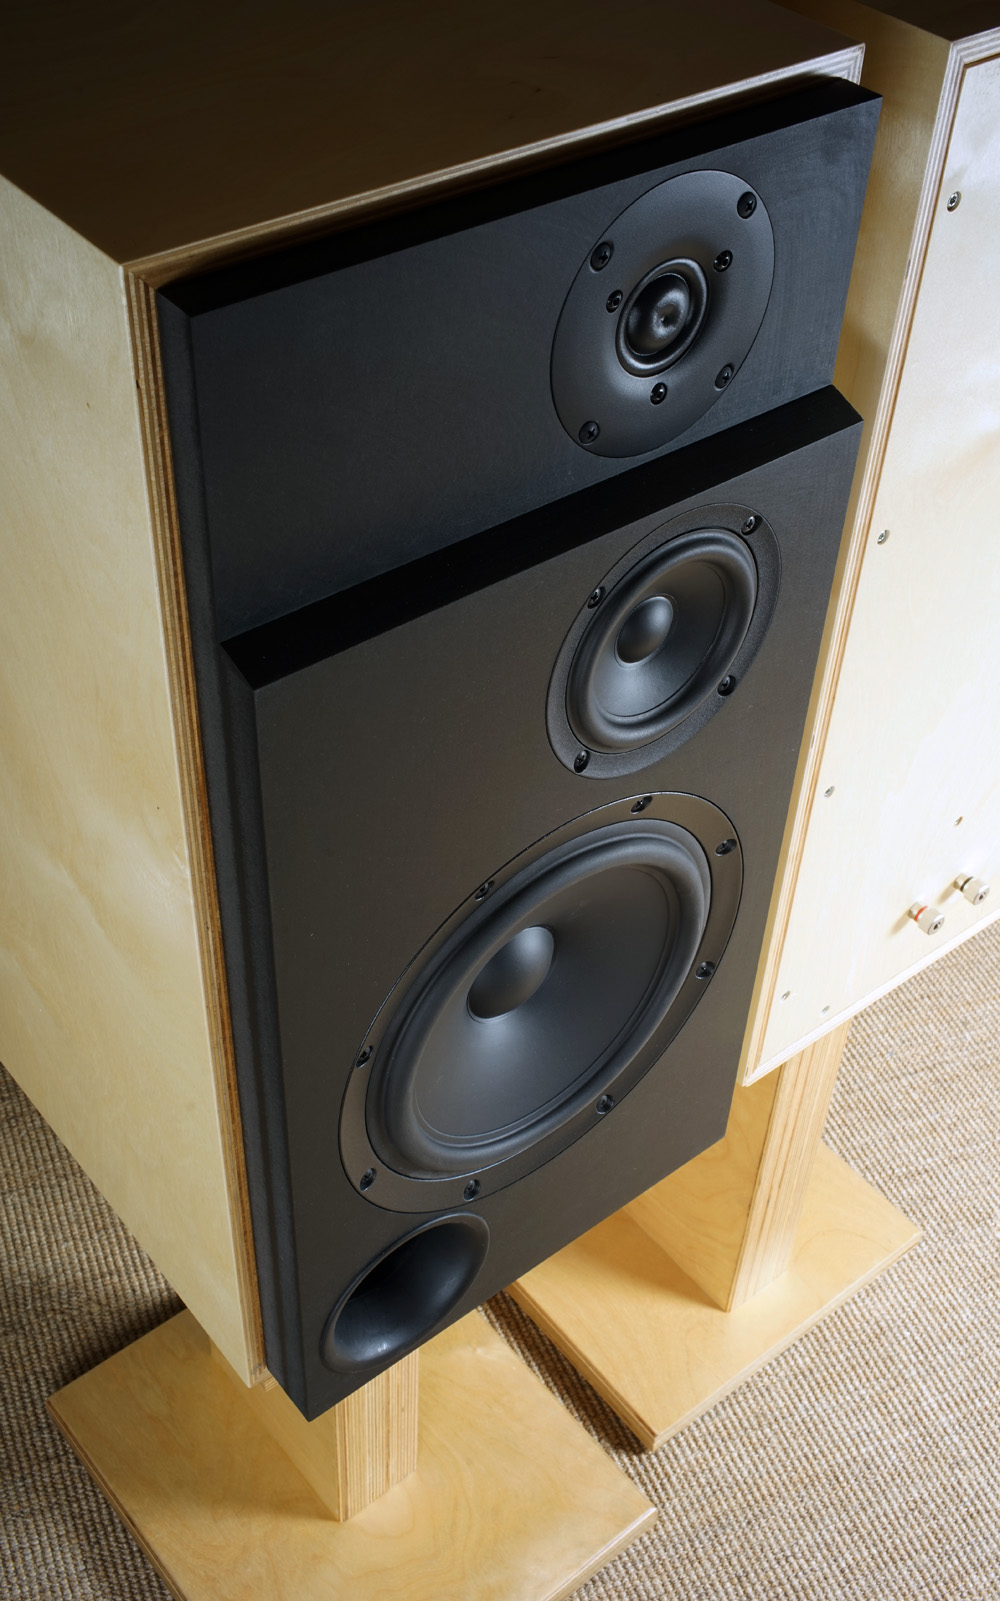
Making the front panels. Left: Inner panel. Right: Plus outer panel.
As always: It's important not to obstruct the rear airflow from the
midrange driver, hence proper chamfering is needed.
The bass driver is so large that only modest chamfering is necessary.
The tweeter obviously doesn't need chamfering not having any rear
radiation (I have this question regularly).
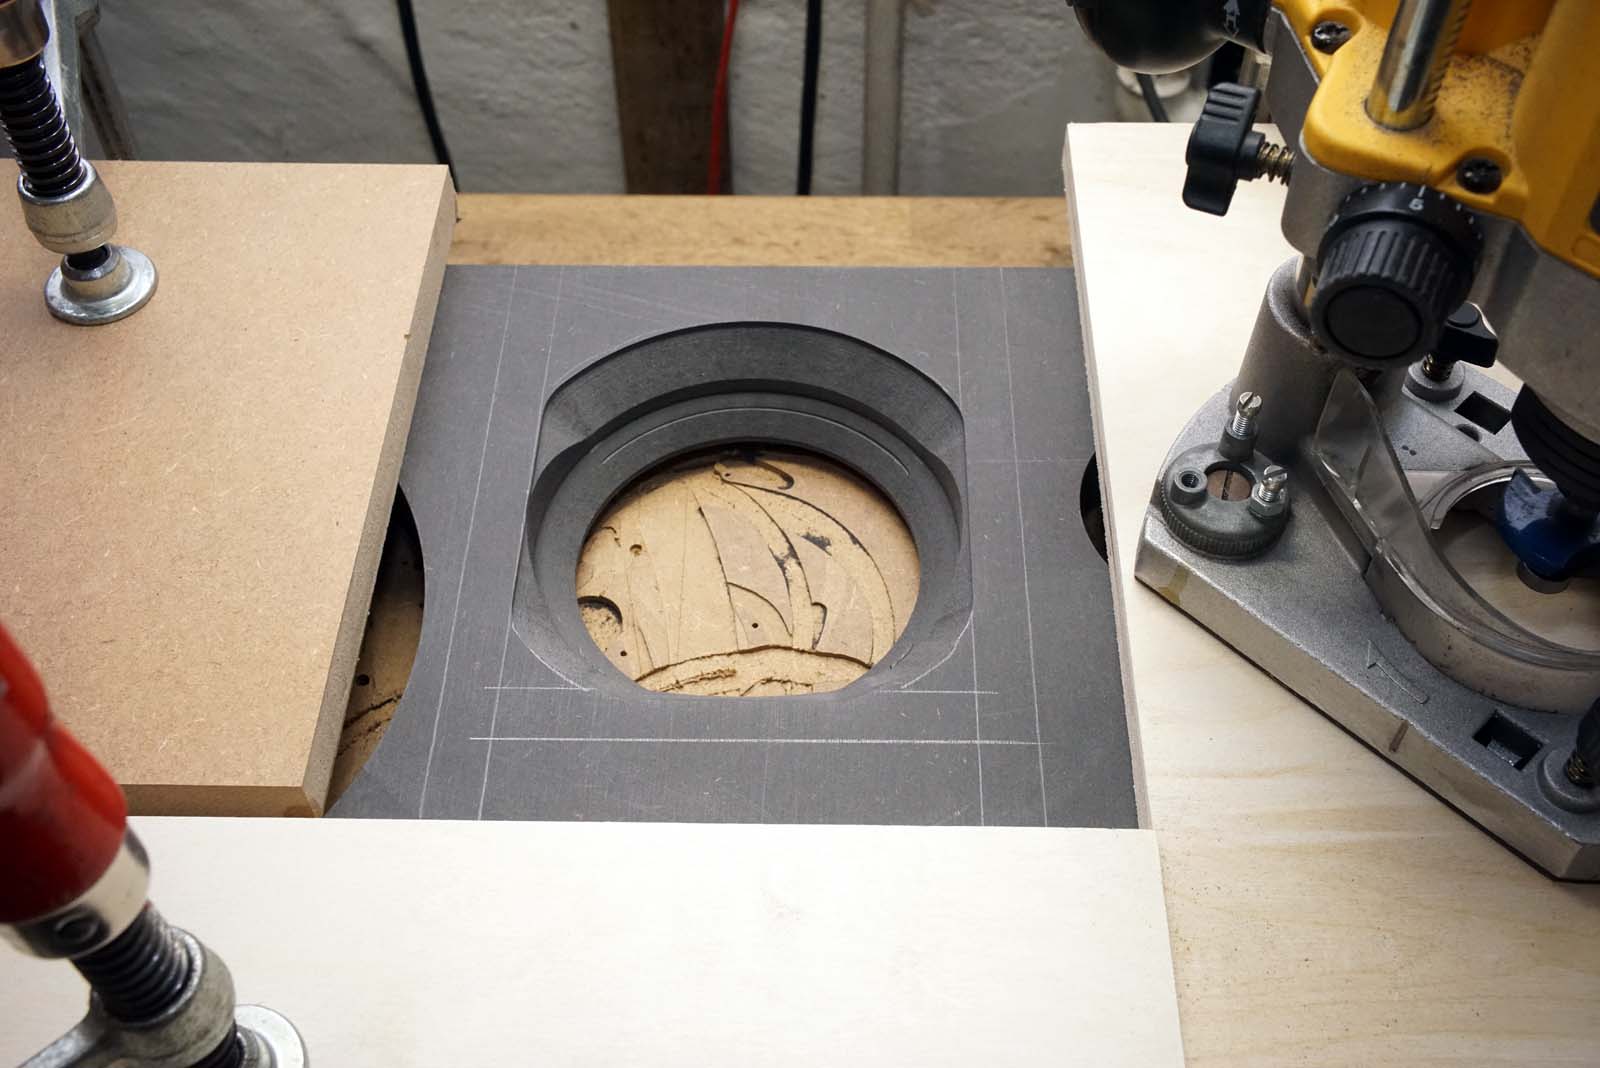

Click images above to view large.
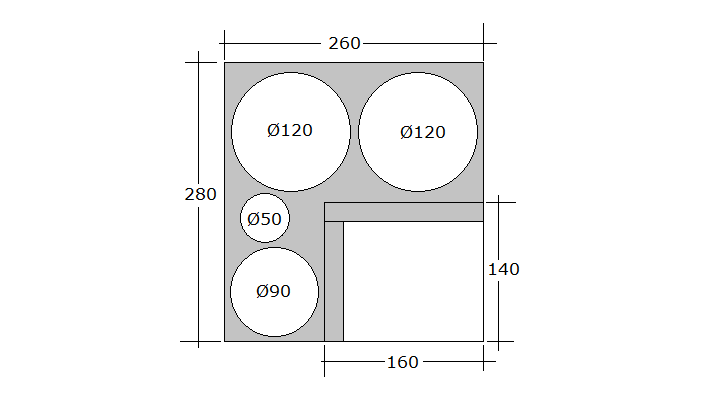
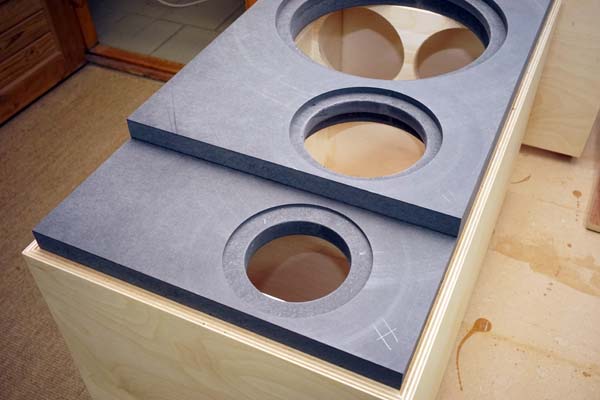
Mark the mid cab panels on the rear side of the inner front panel.
I made a frame for chamfering the inner front panel without going into
the area of the mid cab panels.
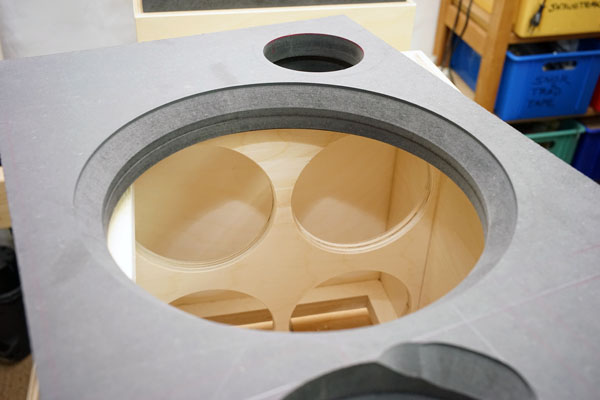
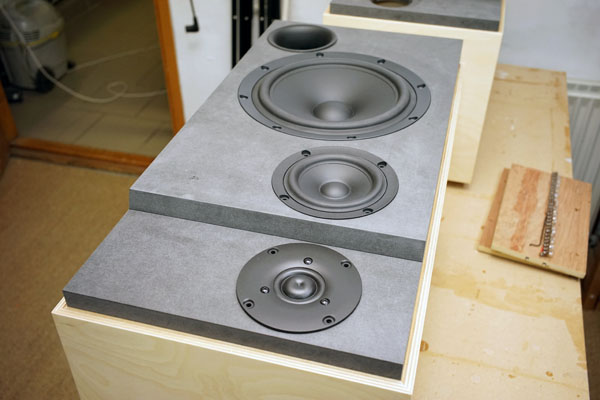
Left: Bass driver chamfering, only inner panel. Right:
Testing finished front panels with drivers and port in place.
Make sure the midrange is fully isolated from the bass driver! Stuff the
port hard and press the bass cone.
The midrange cone must not move! When you push the midrange cone it
should move out again slowly.
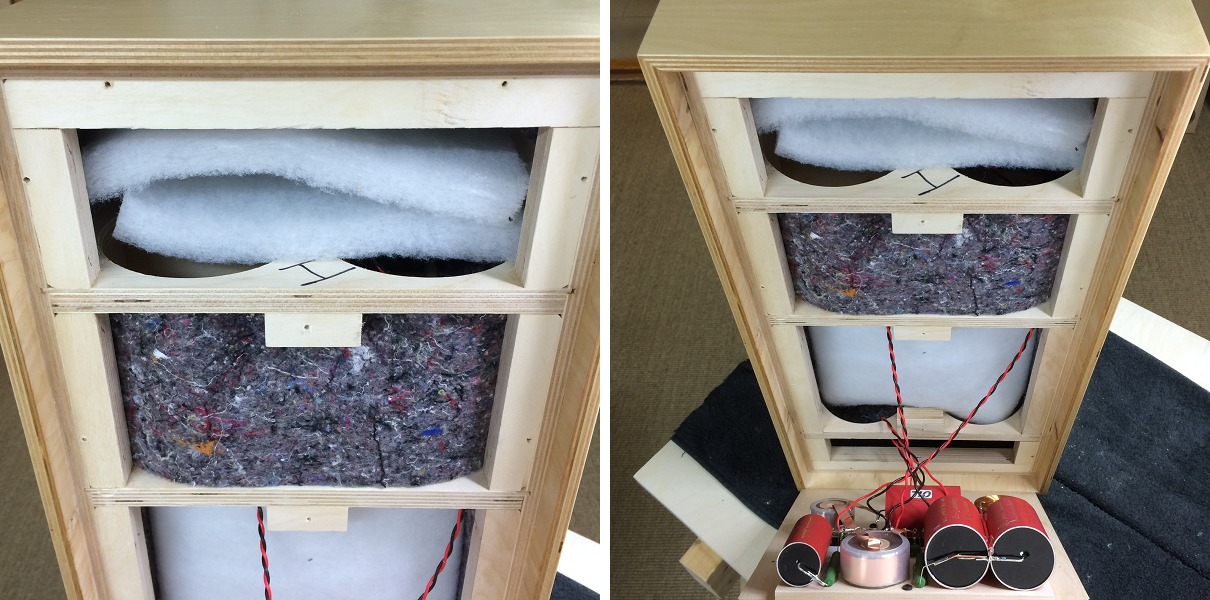
Damping material seen from rear.
Add felt sheets to all internal panels except the
(1) small area for the terminals, (2) rear
panel behind bass driver, (3) front panel and (4)
outside of midcab.
Fold a 25 x 50 cm piece of acoustilux and place in upper chamber.
Add a 25 x 50 cm piece of acoustilux on top of crossover and up half
side panel next to bassdriver. See images below.
Add a piece of 12 x 14 cm acoustilux behind middriver.
Everything that can be counted does not necessarily count; everything that counts cannot necessarily be counted". Albert Einstein.
A few comments on MEASUREMENTS before you start
interpreting all the readings below.
First of all, if we think measurements will tell us how a speaker
sounds, we're wrong. The perception of sound is way too subjective to be
reflected in any measurements we can perform. A loudspeaker system is
meant to give us a satisfying idea of an acoustic event and for some
people a pair of 5 USD ear-plugs are enough, others spend 200 kUSD on a
truly full-range pair of speakers - and the latter may not be happier
than the former.
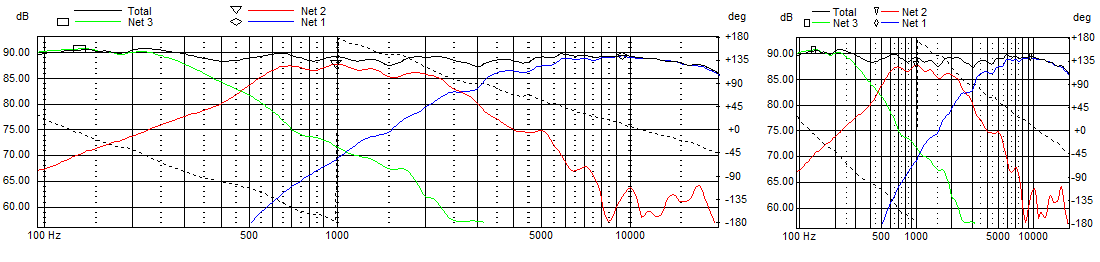
Above you see the same graph presented in different width. Now, we may think the graph to the right looks rather rugged, but if we stretch out the presentation (left) it suddenly look rather smooth. The left presentation is often used by Chinese manufacturers to make their frequency response graphs look better. No smoothing was used on the above measurements, but if we apply e.g. 1/6 or 1/3 octave smoothing things look even better. Just this to display how easily measurements can be manipulated to look nice.
Measurements may give us an idea of tonal balance of a system, i.e. too
much or too little energy in certain areas. Measurements may tell us
about bass extension if far-field measurements are merged with
near-field measurements. In addition to this, ports may contribute to
bass extension. Most of us diy'ers do not have access to an anechoic
room for full-range measurements from 20-20000 Hz, nor do manufacturers
for that matter.
What cannot be seen is what kind of bass performance we get in a given
room. Bass performance is highly dependent on in-room placement of your
speaker and the same speaker can be boomy in one place and lean in
another.
Actual SPL level at 1 meter distance and 2.8V input is useful for en
estimate of system sensitivity and combined with the impedance profile
may give an idea of how powerful an amplifier is needed to drive the
speaker to adequate levels.
What measurements do not tell is the very sound of the speaker unless
displaying serious linear distortion. The level of transparency, the
ability to resolve micro-details, the "speed" of the bass, etc., cannot
be derived from these data. Distortion measurements rarely tell much
unless seriously bad, and most modern drivers display low distortion
within their specified operating range.
Many people put way too much into these graphs and my comments here are
only meant as warning against over-interpretation. There are more to
good sound than what can be extracted from a few graphs. Every graph
needs interpretation in terms of what it means sonically and how it
impacts our choice of mating drivers, cabinet and crossover design.
What measurements certainly do not tell is the sonic signature of the
drivers, because cones made from polyprop, alu, Kevlar, paper, glass
fiber, carbon fiber, magnesium, ceramics or even diamonds all have their
way of colouring the sound.
The choice of crossover topology has a huge impact on the sound
we get. We may produce the same frequency response from 1st, 2nd or 4th
order filters and they may be Butterworth, Linkwitz-Riley, Bessel and
others and they all sound different, very different indeed, so take
care!
SBA 3-Way Classic measurements
Left: SPL from tweeter equivalent to 2.8V, 1 meter. Right: Same for
woofer.
Left: SPL from midrange @ 2.8V, 1 meter.
Quite flat response with a minor dip around 1700 Hz.
Right: Free-air impedance of the
12MNRX25-4 driver show no sign of any disturbance in the all to
common 800-1500 Hz area.
Left: Reverse tweeter polarity displaying
point of crossover between mid and tweeter at some 3700 Hz.
Right: Horizontal dispersion at 0, 10, 20 and 30 deg. off axis. Within
40 deg. this speaker is remarkably uniform.
Left: Overall response from merging response @ 200 Hz.
Right: Final system impedance. Minimum is 4.5 Ohms from 100-400 Hz.
Crossover components' values to come with the kit.
You can buy the kit with or without the
drivers - or some of the drivers if you already have some.
Please ask
Jantzen Audio for
options.
All kit and component prices may be subject to change and are always to be confirmed by Jantzen Audio Denmark.
Download Kit Sale
Presentations:

All technical questions to troels.gravesen@hotmail.com
All questions regarding purchase of kits, please mail Jantzen Audio at contact@jantzen-audio.com
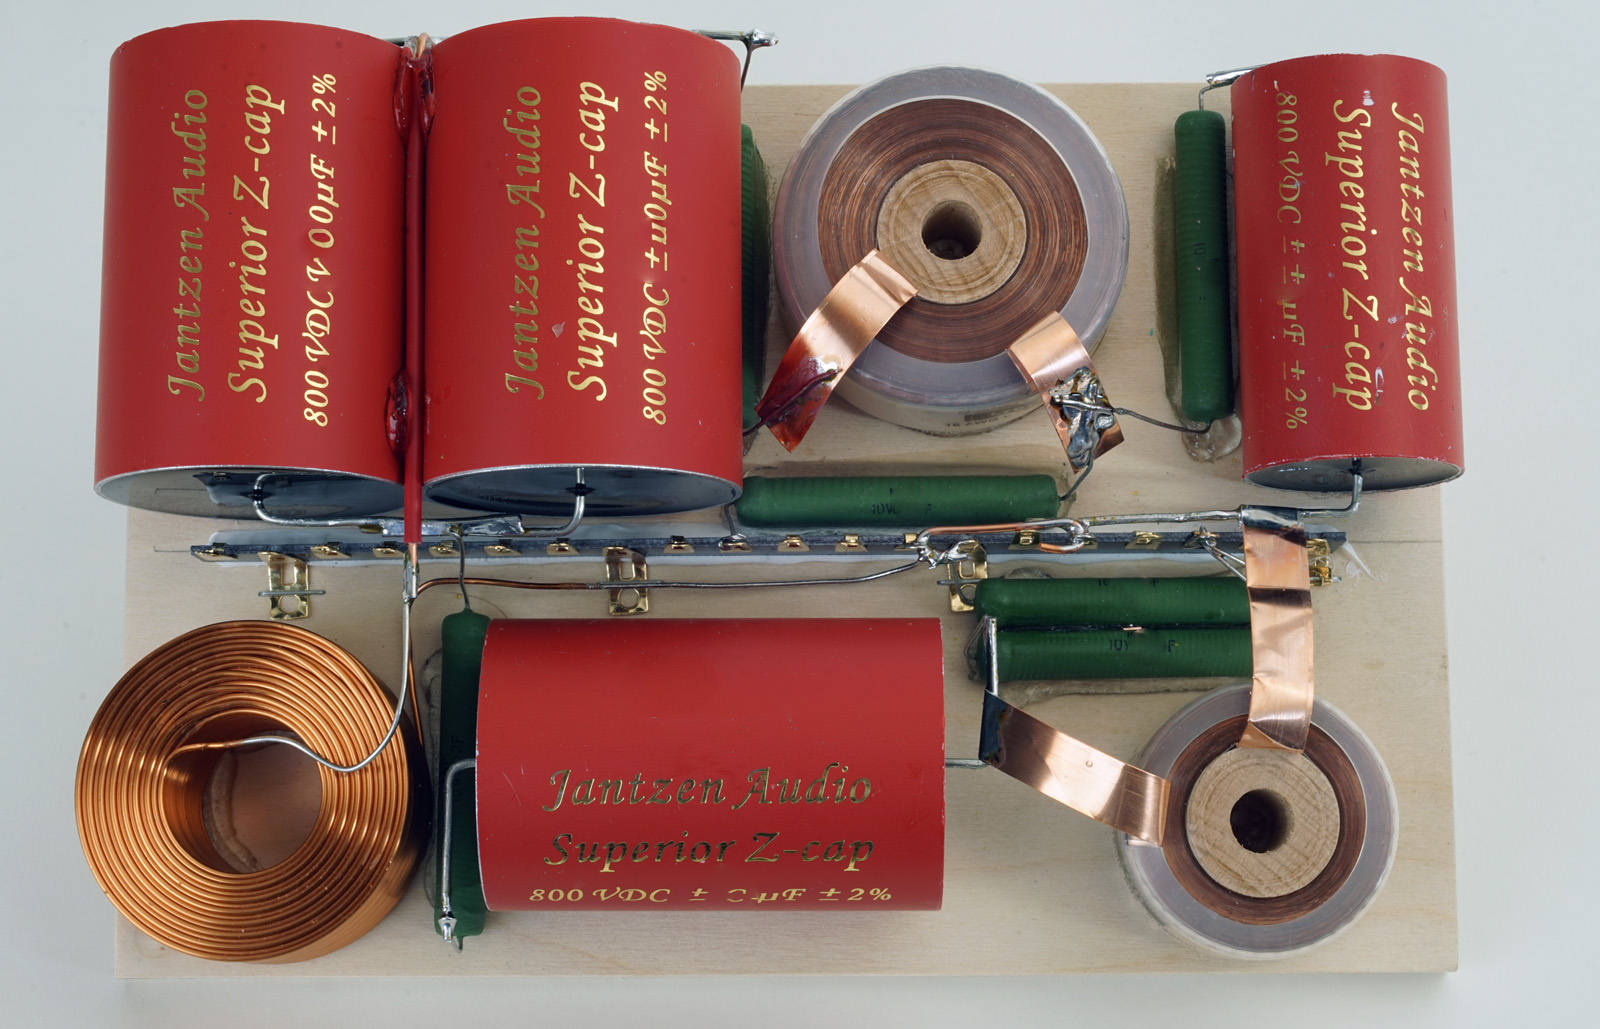
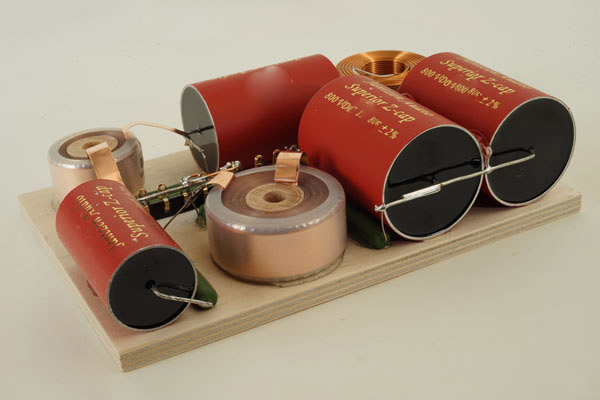
CROSSOVER-LAYOUT
BACK TO INDEX
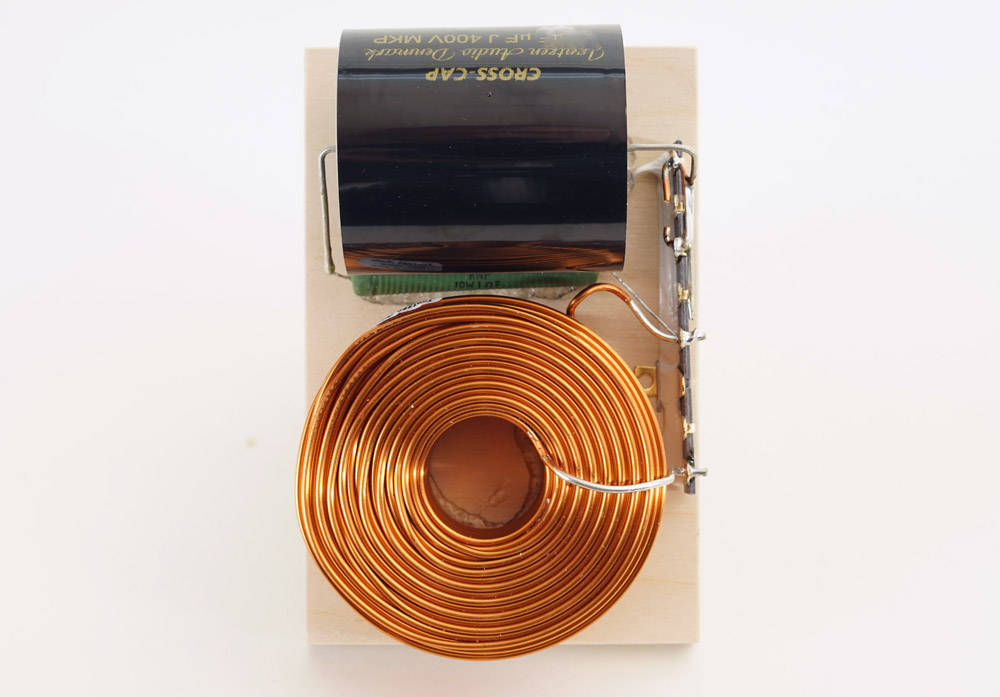
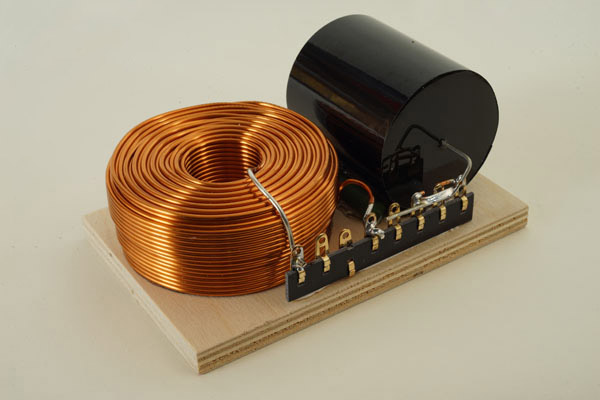
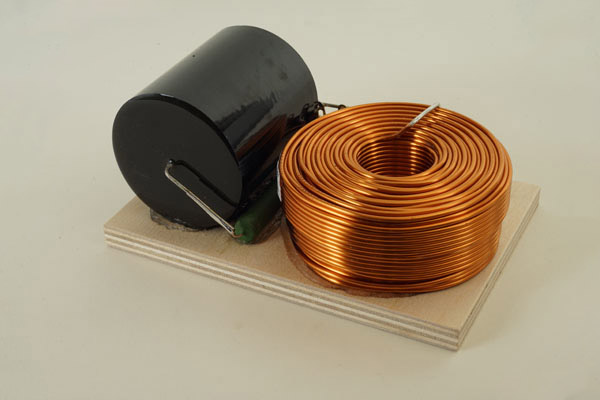
Bass crossover layout
Mid-tweeter crossover layout.
Kit Instruction following the kit contains all information on components' values.
Wiring
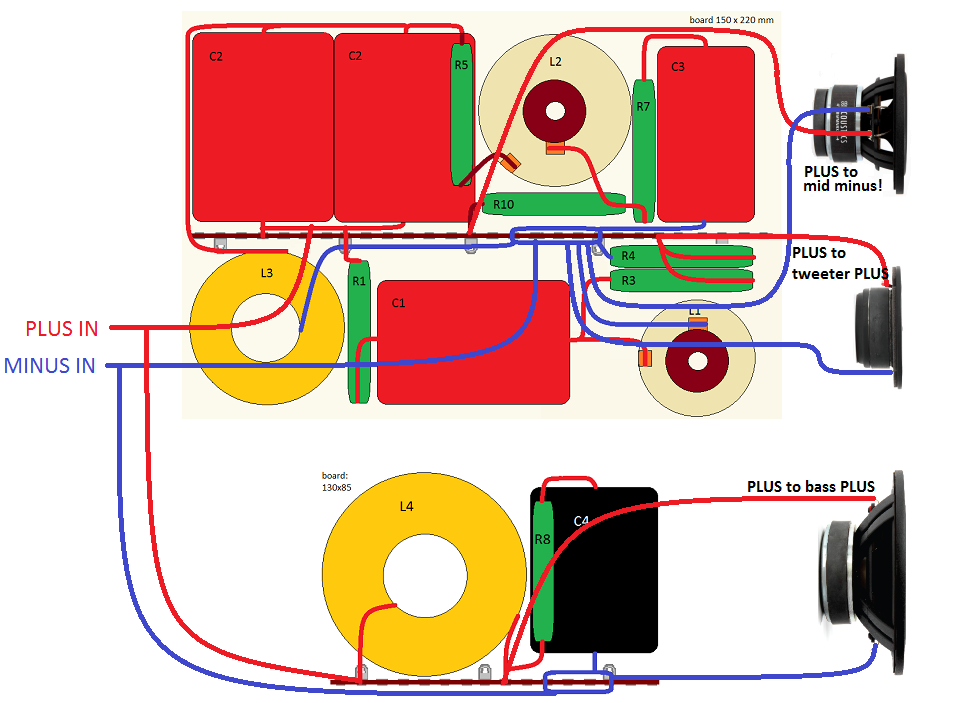
You can obviously make the speaker for bi-wiring by ordering a second
pair of binding posts.
Click image to view large.
I place the MT section on rear panel behind bass driver.
Bass crossover section is placed on bottom panel.
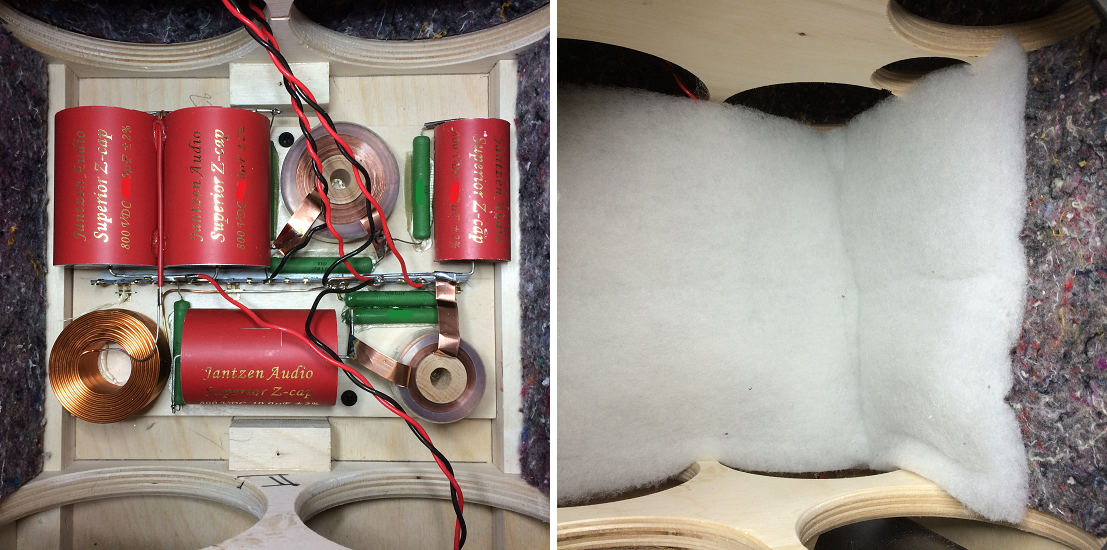
Above mounting the mid-tweeter crossover on the rear panel behind bass
driver.
Place a piece of 50 x 25 cm acoustilux on top of crossover and half up
the side panels.
The bass crossover is mounted on the bottom panel next to the port.
These speakers will seriously challenge any similar equipped
constructions! The 12MNRX midrange delivers detail in spades and is
gently supported by a clean, neutral and extended treble. Bass is
surprisingly deep and on par or better than any of my other 3-Way
Classis. The rigid paper cone does its thing and provides an articulate
bass.
Is it overall lush? No! Is it overall laid-back? No! Is it... I could go
on. I can't find anything negative for the size and cost. On the
contrary, these drivers deliver qualities we're used to pay seriously
more money for.