The Loudspeaker 2
Copyright 2020-22 © Troels Gravesen
Go to on this page:
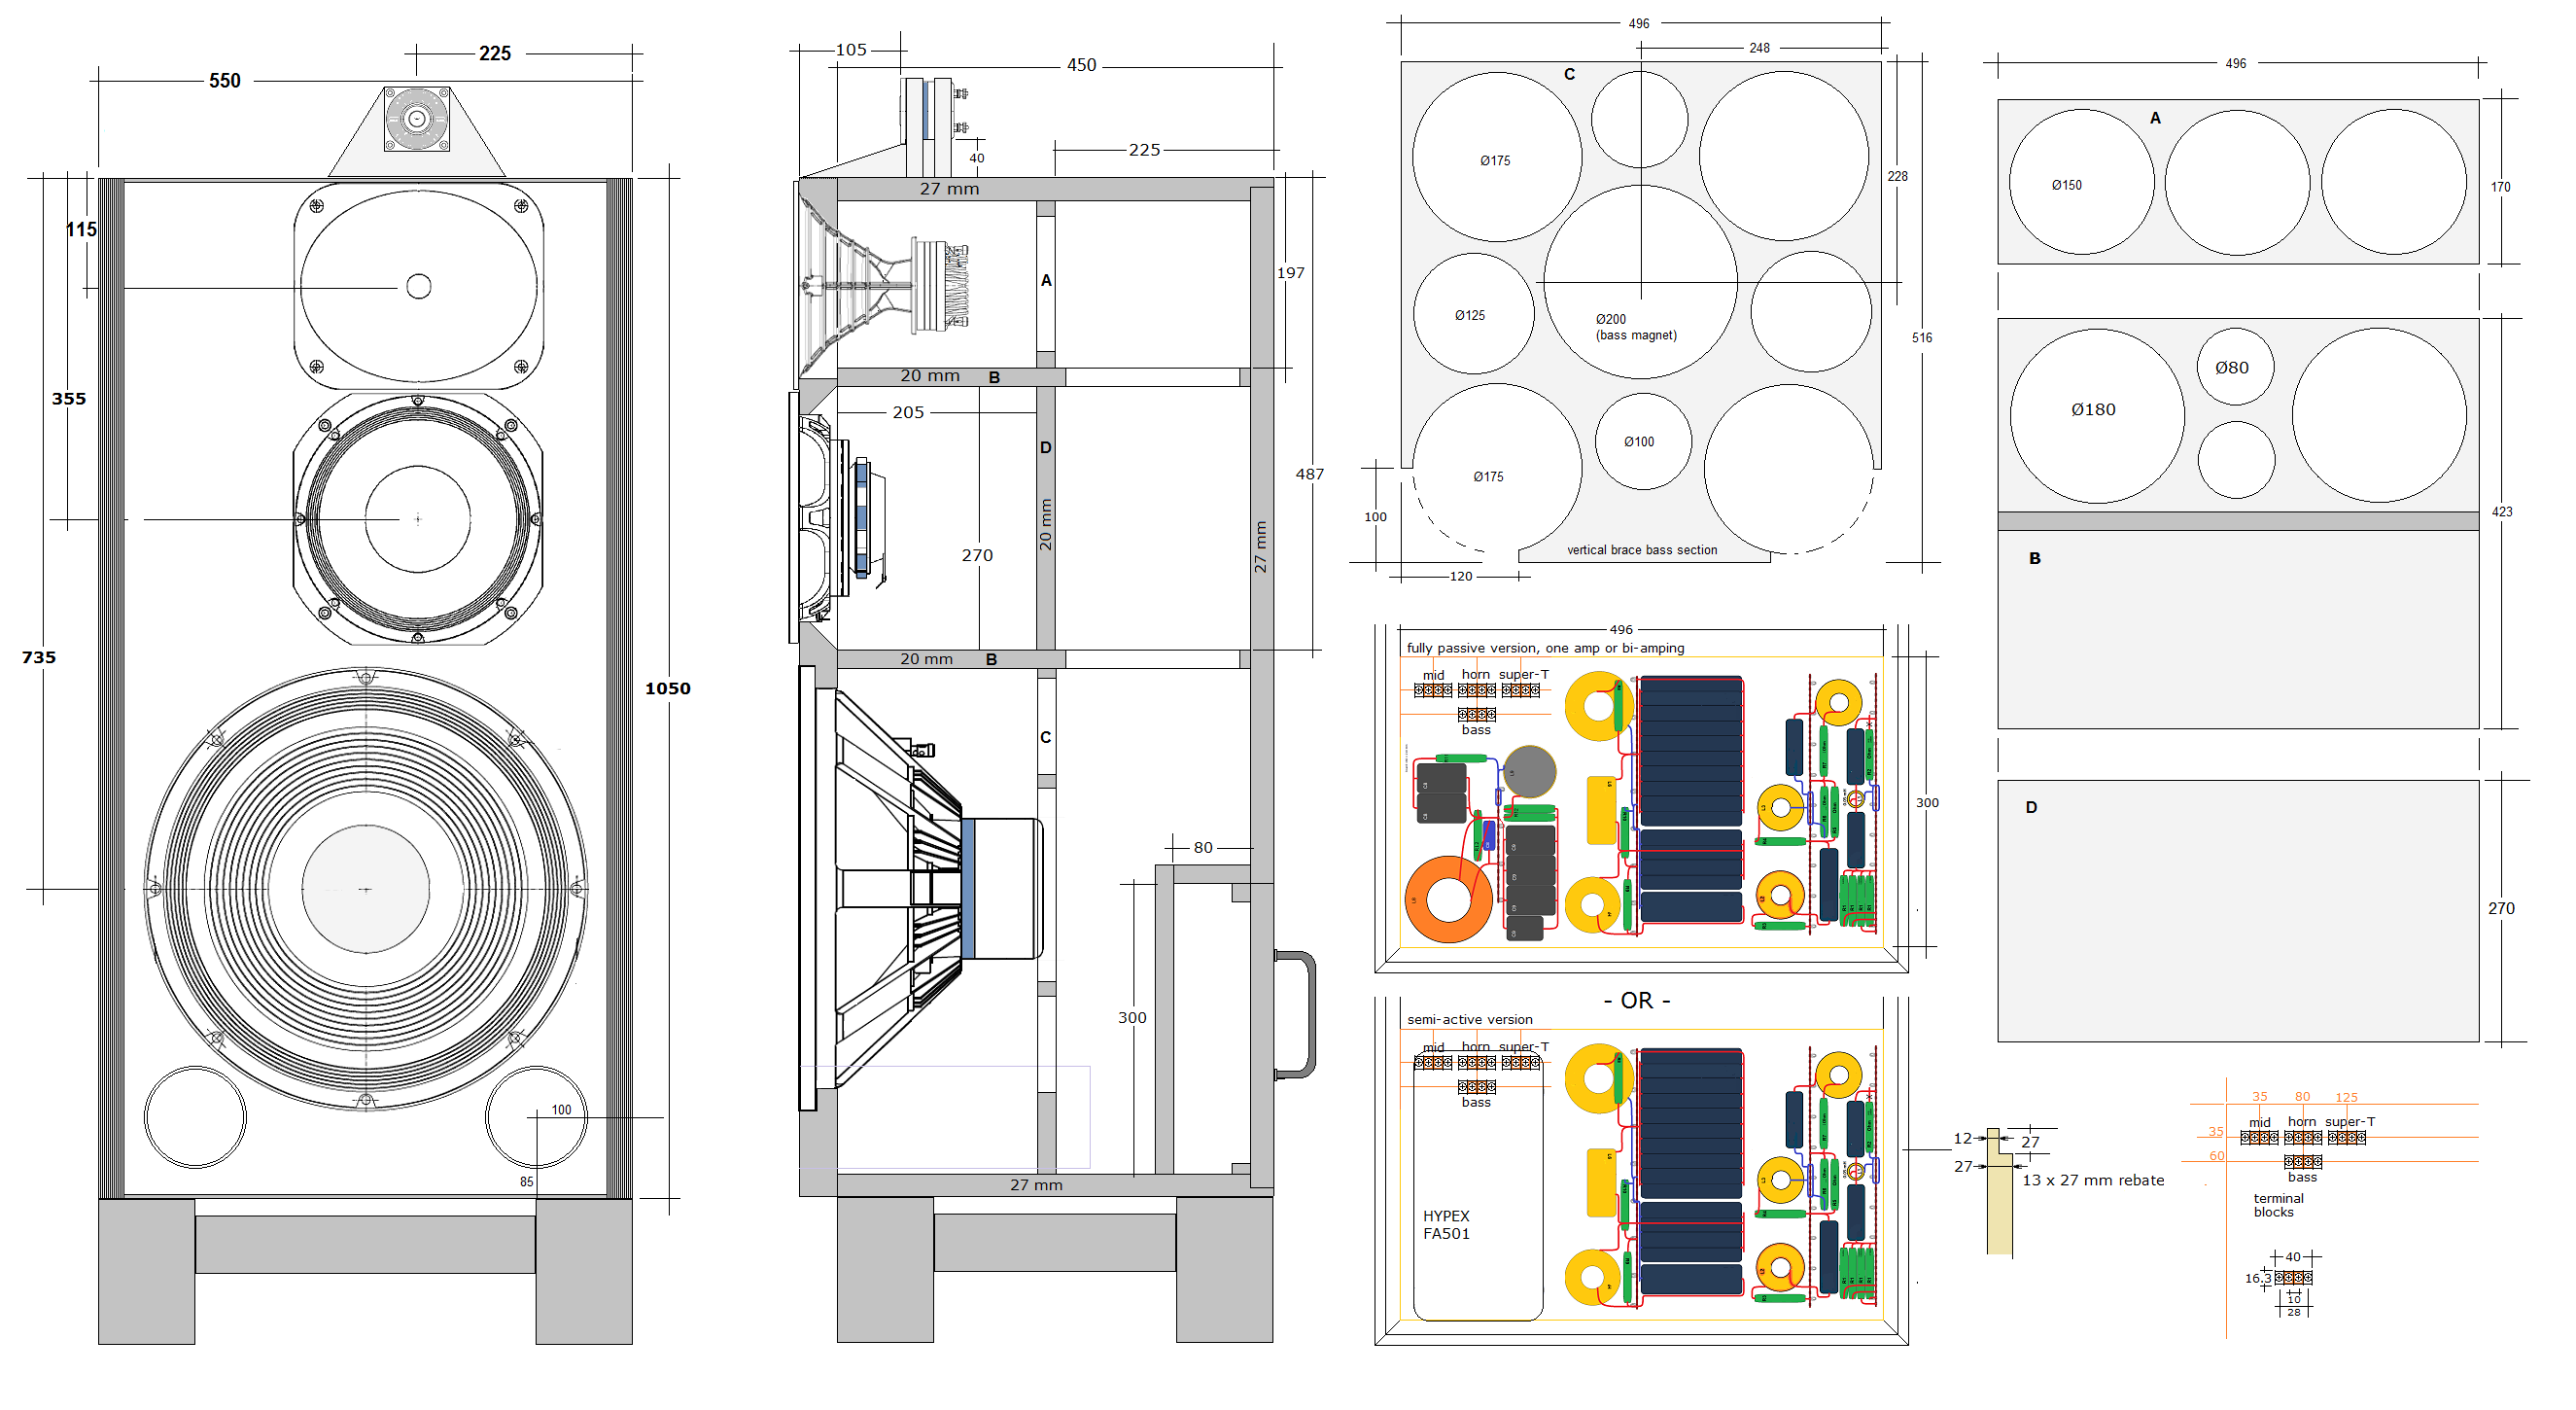
DRIVERS
CROSSOVER
CABINET
WORKSHOP IMAGES
MEASUREMENTS
SPEAKER-KIT
CROSSOVER LAYOUT
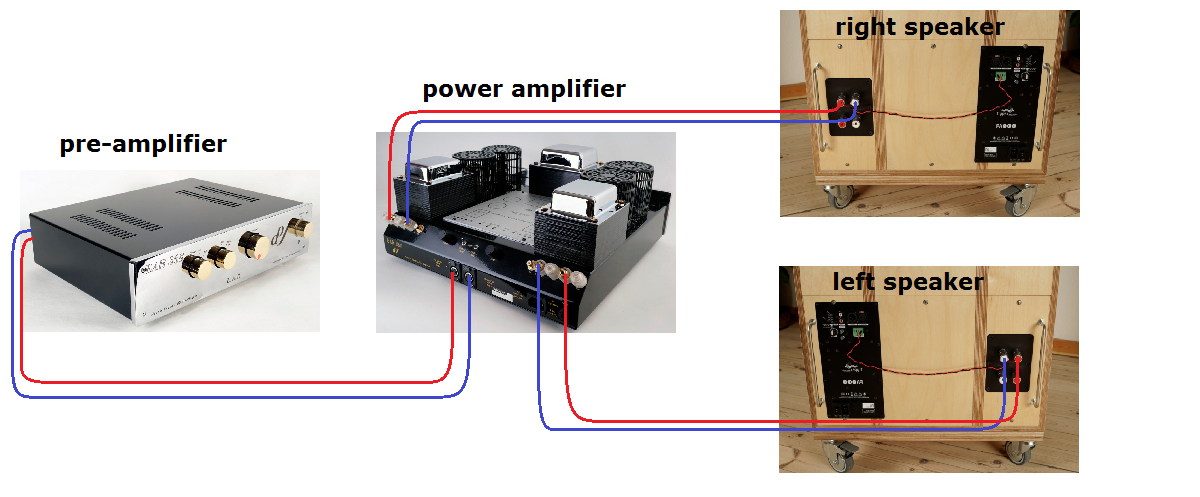
There has been quite a few requests for a smaller version of The Loudspeaker-1 delivering at least the same midrange and treble as my first version and my initial thinking was based on a 15" bass driver allowing a smaller cabinet. Modeling a range of 15" bass drivers that would deliver 95 dB would come at quite some low-end sacrifice, which could be compensated by the plate amp running +2-3 dB relative to the main amplifier running the MTT section. But ideally the possibility of a fully passive version would be my preferred option, although for myself I shall probably use a Hypex plate-amp/DSP FUSION FA501 to run the bass driver and my pet tube amps to run the MTT section. For me this makes the best of both worlds - and provides infinite adaption of bass response to any living room.
There has also been quite a few mails on the use of PA drivers for hifi. Can this really go well? We may all have "disco" experiences with cheap 15" bass drivers, very cheap compression drivers with resonant horns and piezo treble units shredding our ears. It could go loud, but that was about it. Now, PA drivers these days can be found in all quality ranges and quite a few of these are indeed very, very good - and not cheap at all. What you may not get from PA drivers are luxurious speaker baskets meant for front mounting and meant to be seen - and admired for their exquisite design. We can't have it all. But to answer the question, yes, yes, yes! With the right drivers and proper crossovers we can have qualities we just can't find in the traditional "hifi" business.
Eventually it turned out that reducing the volume for the bass driver
some 30 litres would only increase F3* from 31.2 Hz to 33.7 Hz - for... yes,
the BMS 18N862 driver. Hmm... I love this bass driver! 18" bass drivers
can do stuff smaller drivers just do not, so I decided to stick to the
magnificent BMS bass driver. Not cheap, but cheap is not the target of
this speaker, rather as good as can be from ~283 brutto litres volume
compared to ~307 litres for the mkI.
In addition to this I shall use Alumen-Z for the midrange driver and Amber-Z copper foil caps for the
horn and super-tweeter. But don't worry, there will be sensible Superior-Z/Alumen-Z
versions to suit a lower budget and you'll get 99% of what's possible.
Getting the final 1% cost a minor fortune and you should only do this if
you feel your front end, from power chords to power amps, are the best
possible - to your ears. Talking percentages really doesn't make sense. We
can't say one driver is 90% of another, it doesn't make sense as
perception of sound is highly subjective. My 99% above may be 100% to
your ears. There is no such thing as an absolute level of quality in
sound reproduction. It is very common that we appreciate a certain level
of distortion and colouration that may suit out personal taste in music
- and that's perfectly OK. As someone put it: "Pick your poison".
* In
reality, the damping materials add to the virtual volume, thus we have
more like 175 litre and F3 = 32 Hz. Anyway, plus/minus a couple of
litres just doesn't matter. This bass driver goes deep by all means.
Changing the baffle width takes a redesigned crossover for the midrange
driver, and subsequently minor adjustments to crossover for bass and horn.
Super-tweeter crossover stays
the same.
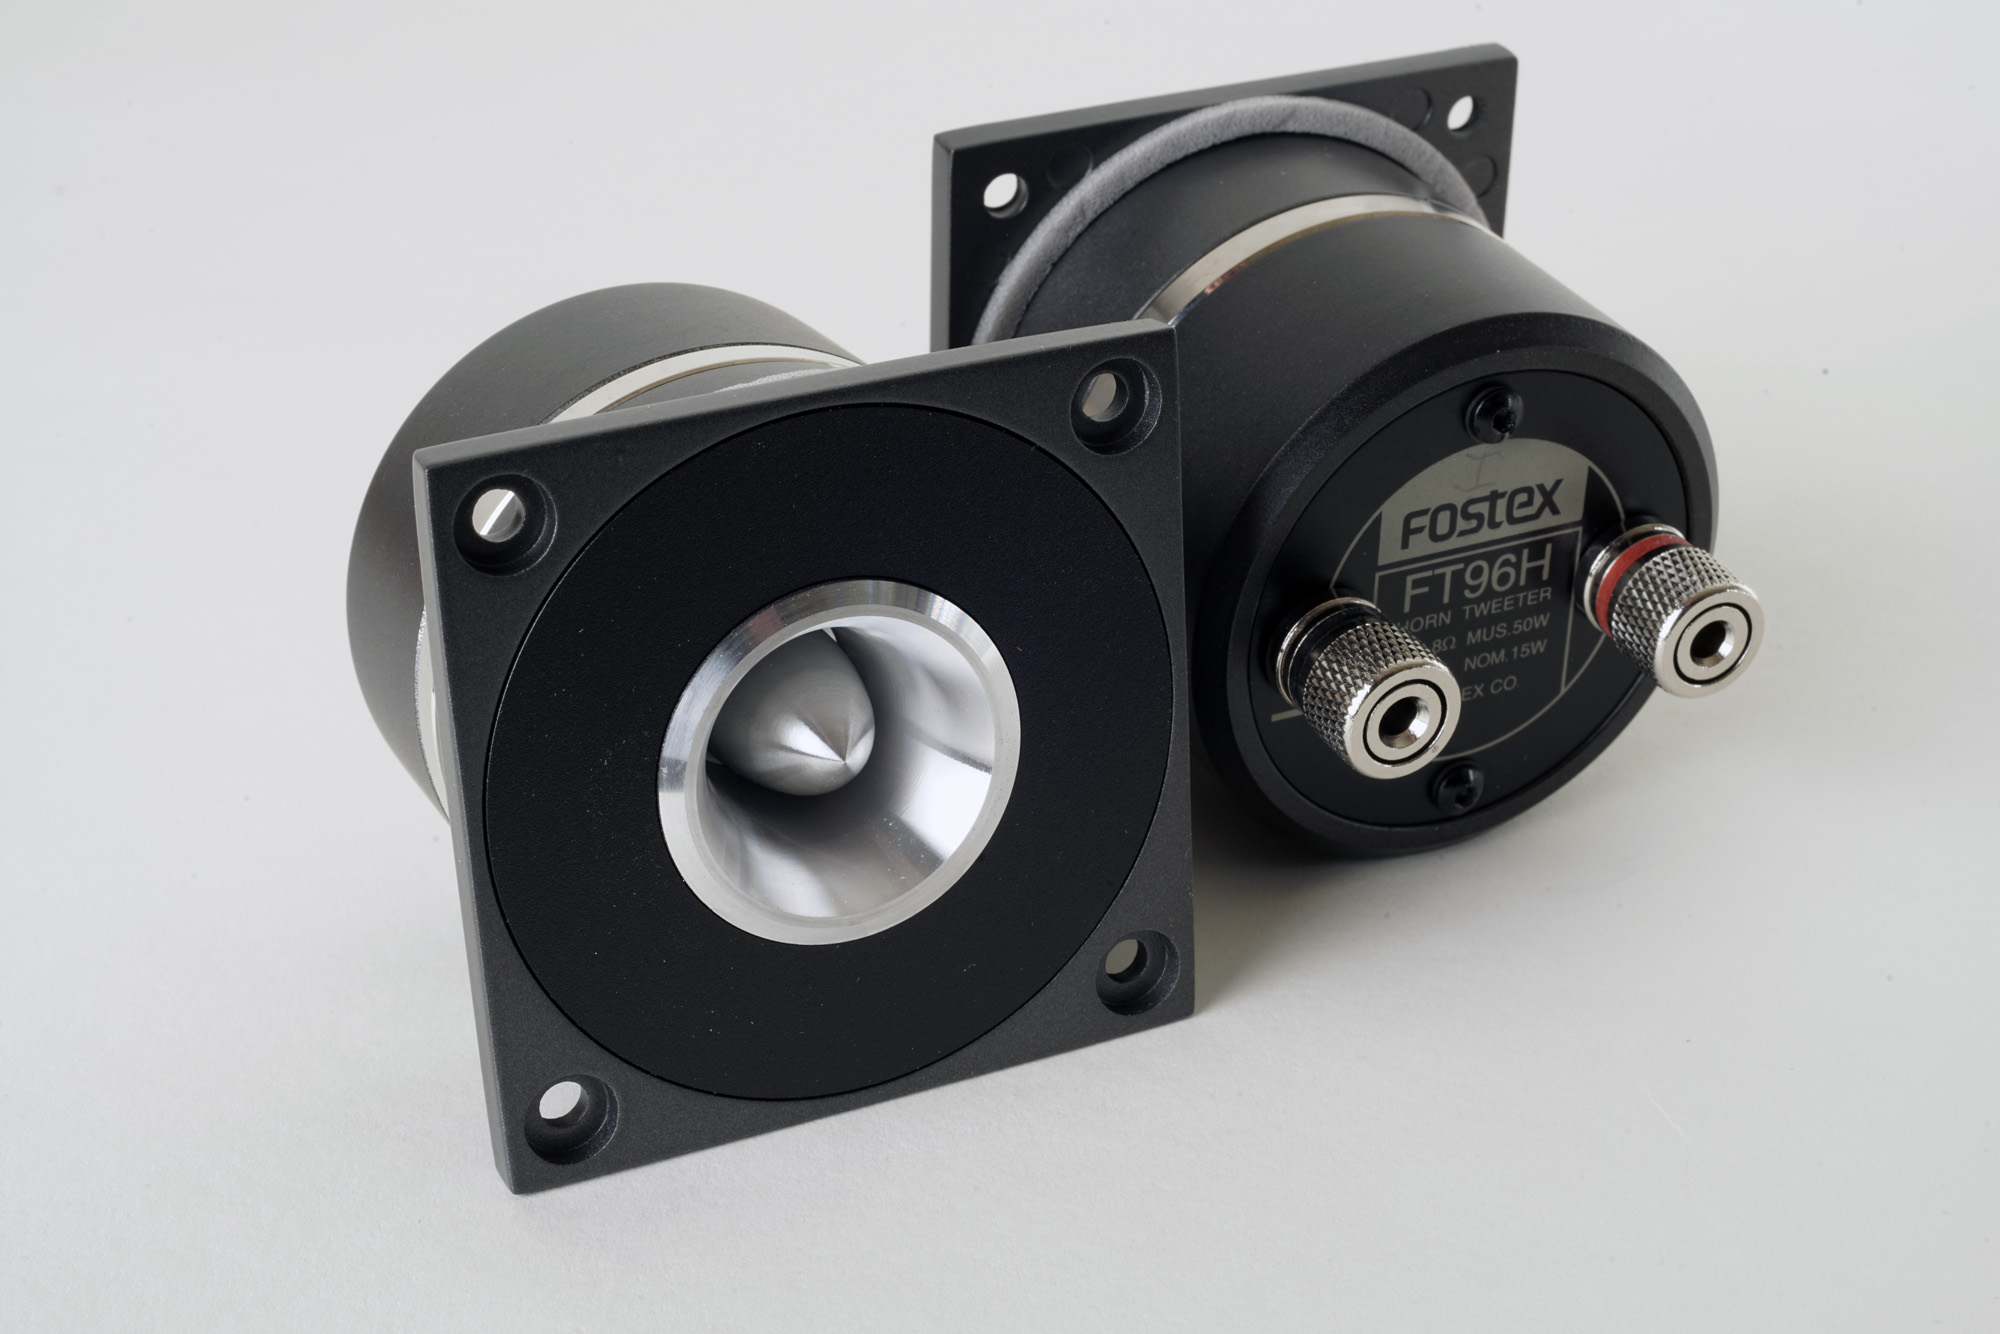
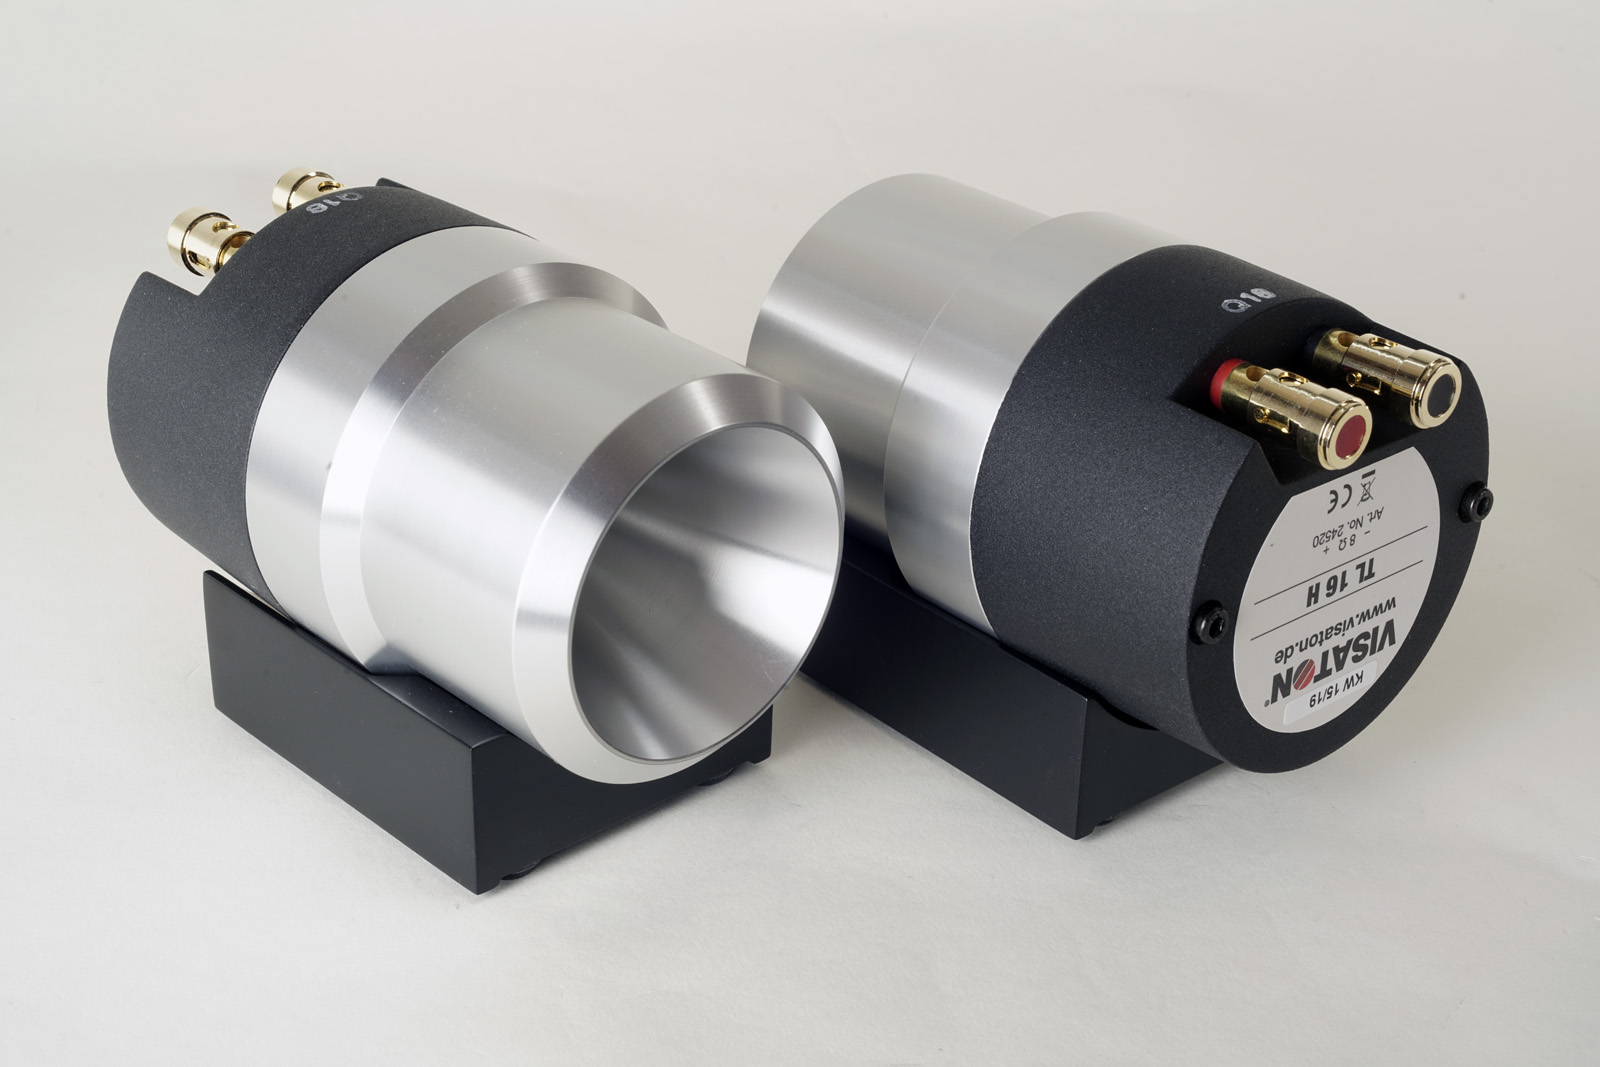
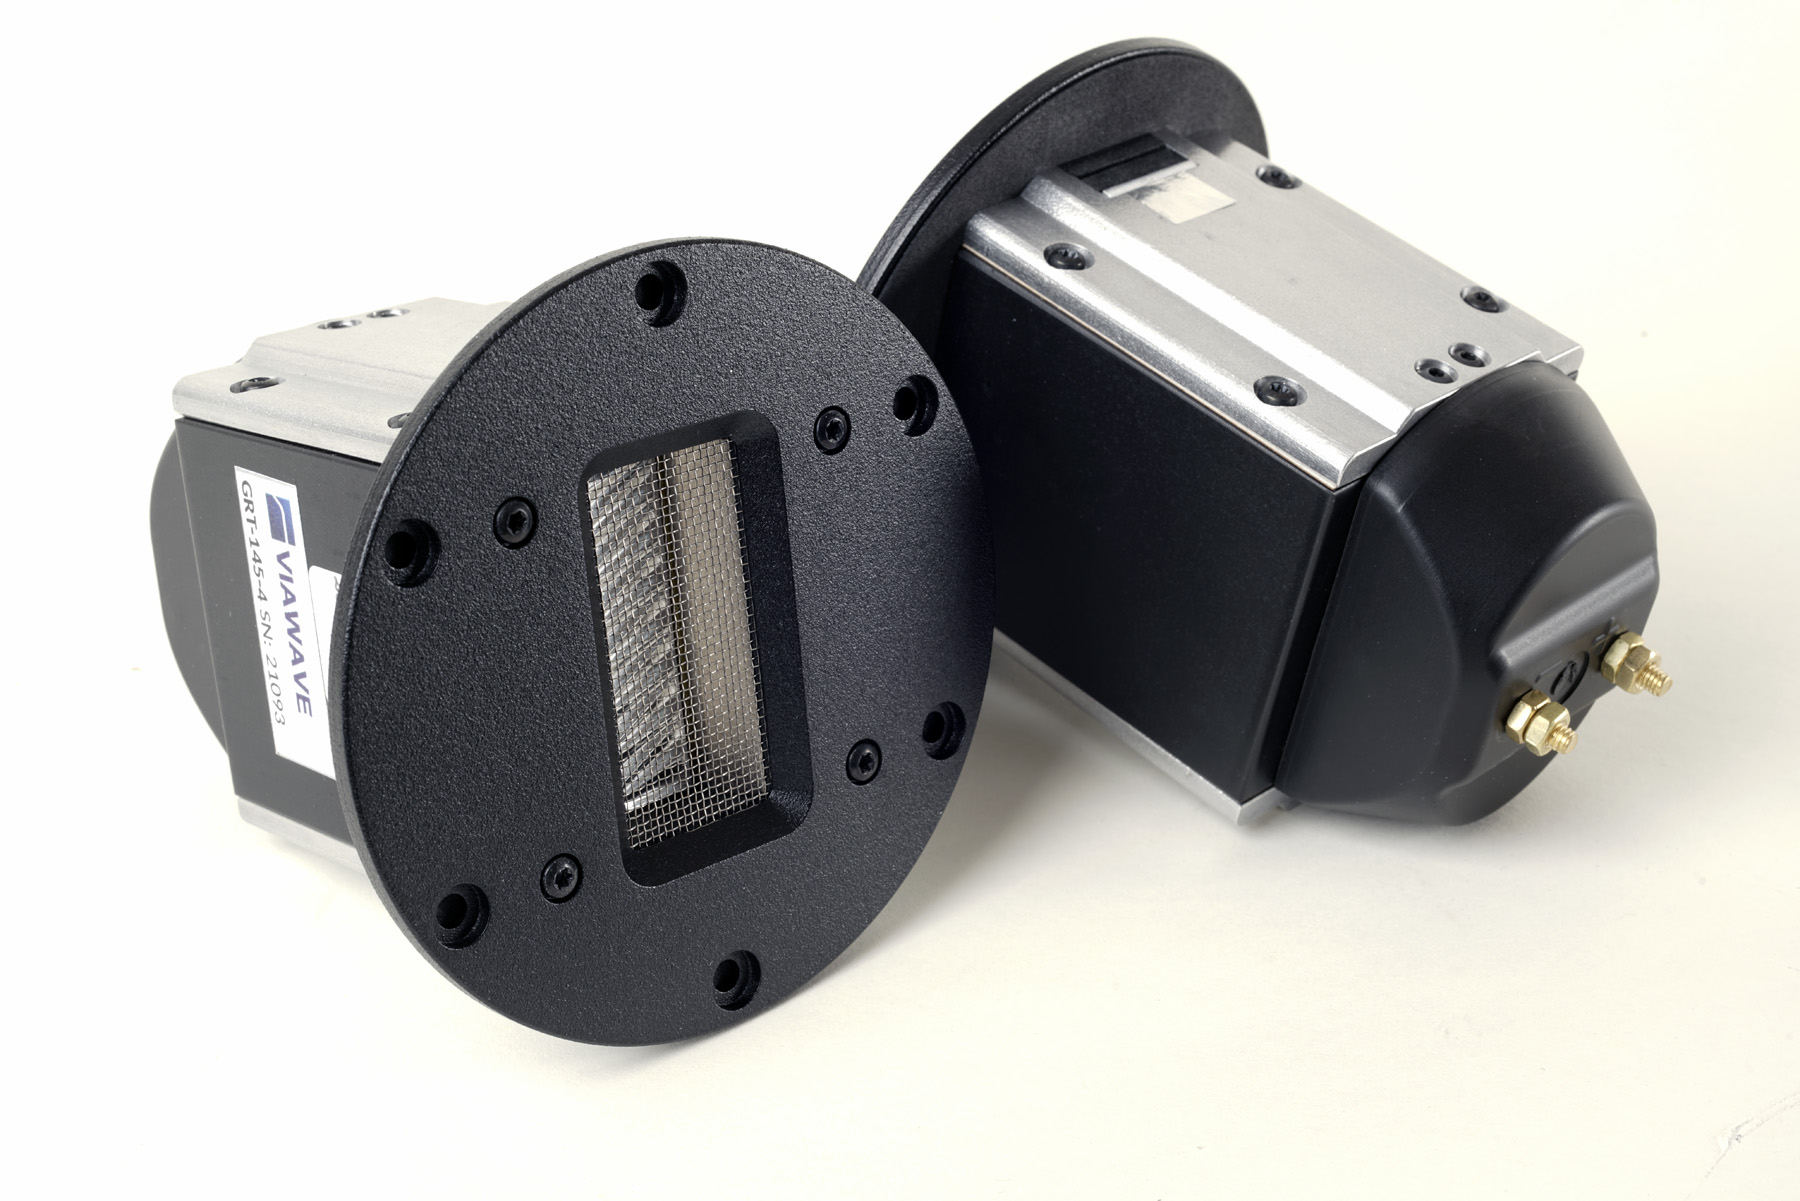
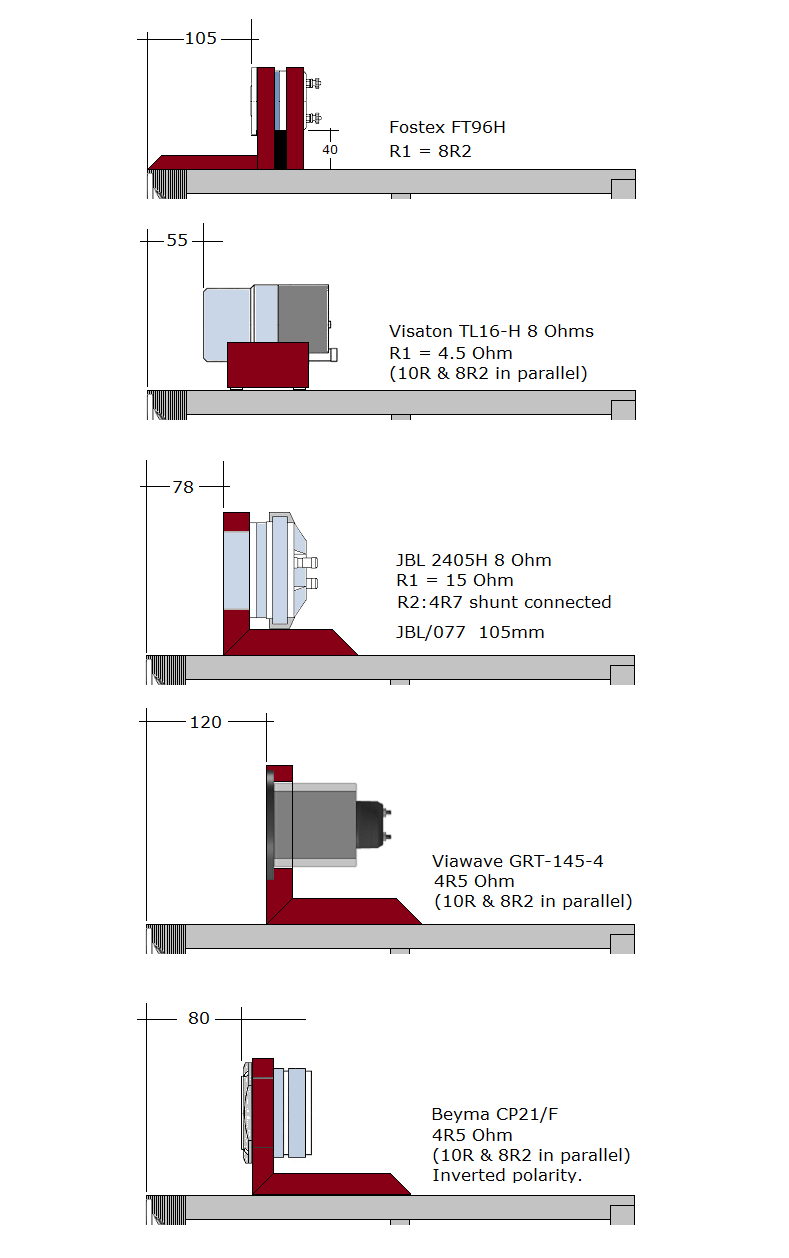
There are now no less than six options for super-tweeter as the Fostex FT96H has proven
increasingly difficult to find. Searching for alternatives I came across the Visaton TL16H, which is essentially the same as the Fostex,
only featuring a longer horn and better low-end extension, which is really
not needed here, but it runs from the same crossover only with a minor
increase in attenuation (R1). The Viawave ribbon does everything just as
well as any of the horns, actually better than any other, but from the kits sold I
can tell people find the horns sexier. (GRT-145-4 no
longer available for TL-1/2). I've looked at the Fostex T90A,
which is a very nice looking alnico super-tweeter, but it measures
really bad. See below. Not exactly what Fostex promises on their data sheet. Don't buy
this rubbish. My 400£ was money down the drain. Furthermore the JBL
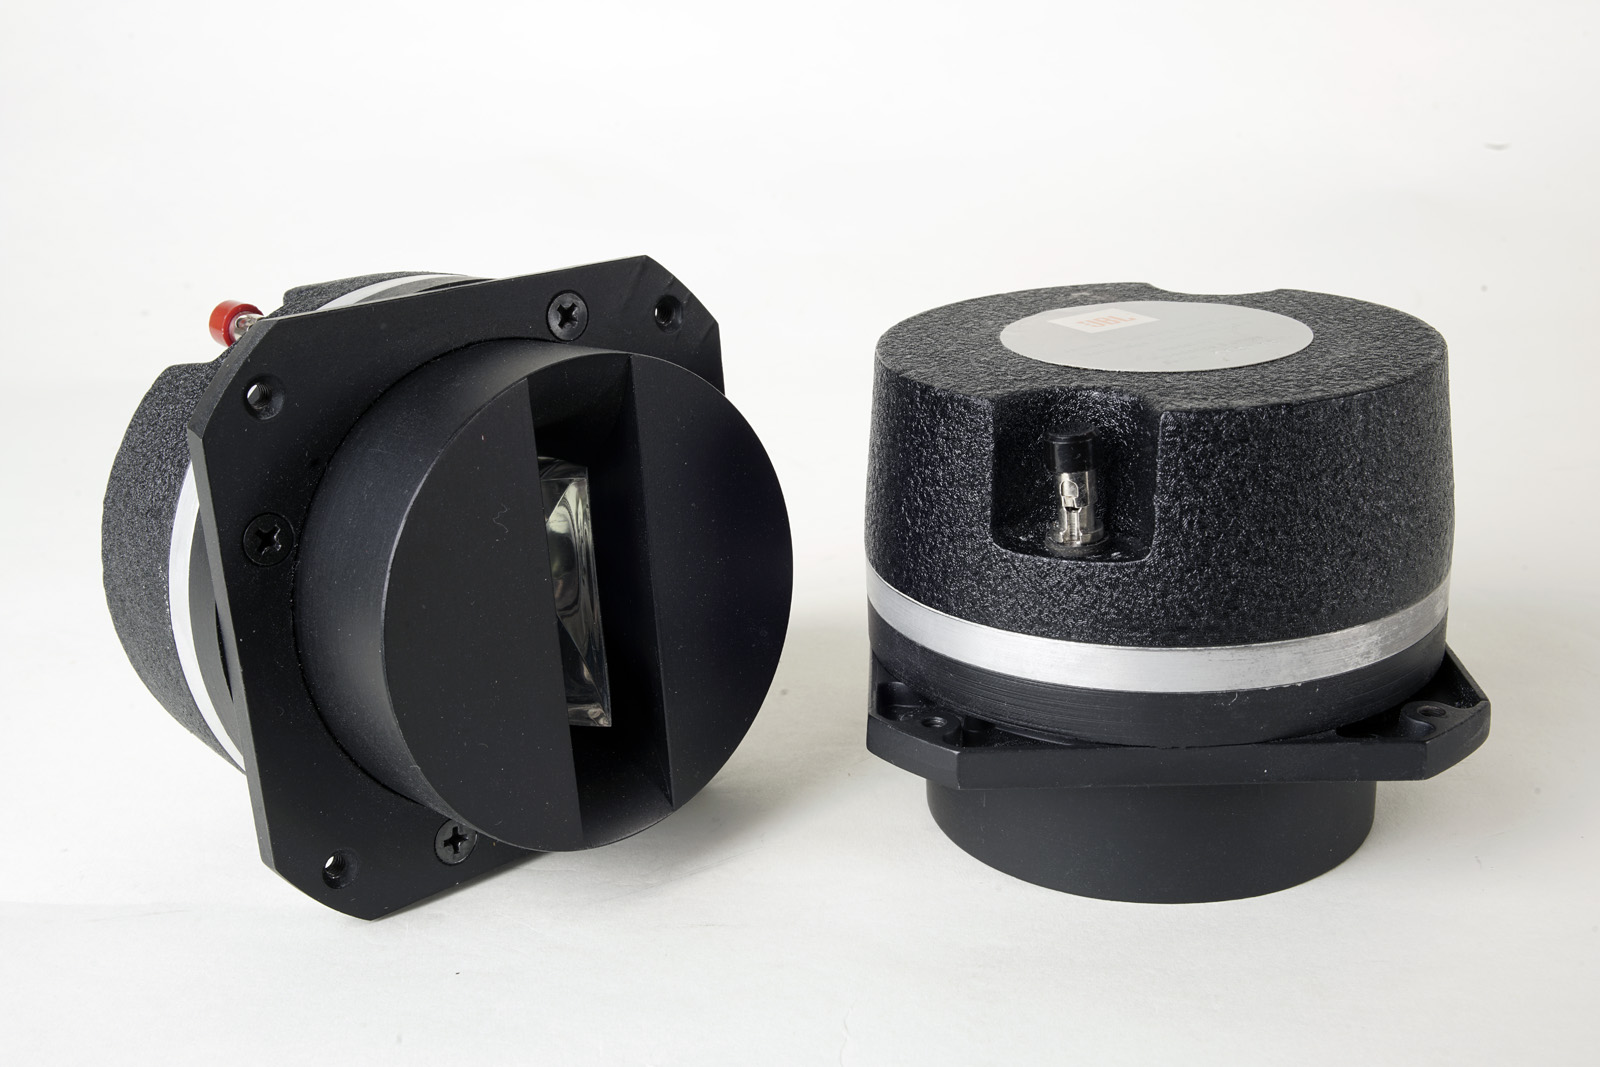
2405H and 077-alnico slot tweeters are suitable. My default will be the
2405H - just because I like having it in. I can't tell it sounds better
than any of the other drivers, so take your pick. The Beyma CP21/F needs
some tweaking, but does well. More below on the Beyma option.
OK, I can hear it! "Hey pal! You talk about TL mkII and the only thing
you've done is changing the front panel from 65 to 55 cm and a few mods
to the mid crossover!" I know, I know, but the TL-1 just works so
very, very well I don't want to change anything! I don't want a 15" bass
driver because the 18" BMS just does stuff like I've never had bass
before. And to have a 15" doing 95 dB for a fully passive version would
compromise the low-end extension too much.
The change in front panel width does indeed make the TL-2 less
obtrusive once placed in a living room, although we certainly can't deny
the TL-2 is a big speaker. We just don't get what The Loudspeaker can do
for nothing.
The actual reason for exactly 55 cm width is that we have a guest room
where we have just enough space for storage when not in our living room,
because most of the time they'll be in storage - but I need to have
these speaker permanently and roll them in from time to time. I just can't
live without'em.
There won't be a lot of writing or workshop images this time because I
can't show you something not already present in the first version.
Please see it all here:
http://www.troelsgravesen.dk/The-Loudspeaker.htm
And should you wonder about building the #1 or #2, if you have room for
#1, build this with maybe some of the modifications presented here. And
you can use the FA501 for #1 with the same software.
Summary of changes:
Overall width reduced from 65 to 55 cm.
Hypex FA501 for bass, signal comes from speaker cables. No need for a
line signal (this can very much be applied to the first version too).
Option for passive crossover for bass allowing the speaker to be driven
from one (really good) solid state amp - or my preferred option, bi-amping.
Easier construction of midrange cabinet due to ports being located at
bottom.
Simpler cabinet for Hypex and passive crossover.
Extra internal bracing of bass cabinet section - and more on mid-cab if
wanted - and also a small cab for the horn if wanted. The two latter measures are
optional.
New crossover for 10" midrange driver and minor change to the horn's
high-pass filter. For the fully passive version also changes to the bass
crossover.
Six super tweeter options.
40 mm front panel.
Alumen-Z for midrange and copper foil caps, Amber-Z, for horns.
Yes, costs a fortune, but don't worry, there will be sensible options too :-)
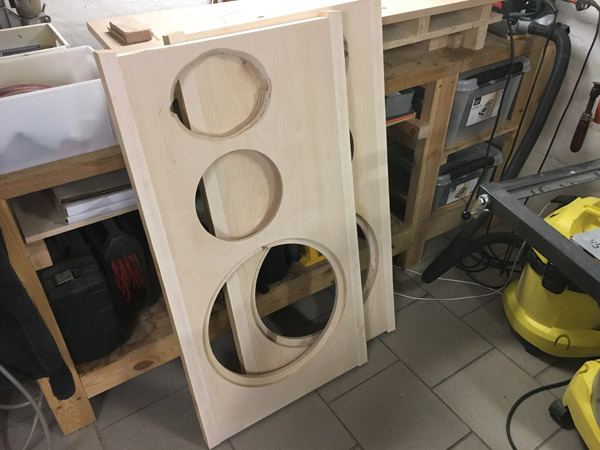
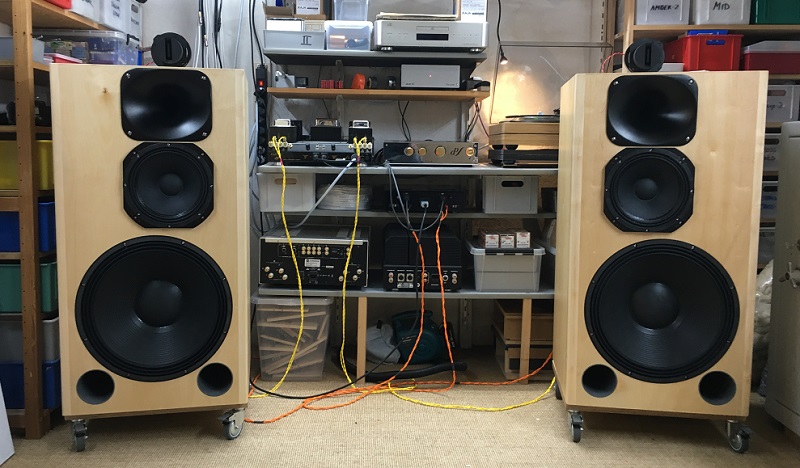
Basics:
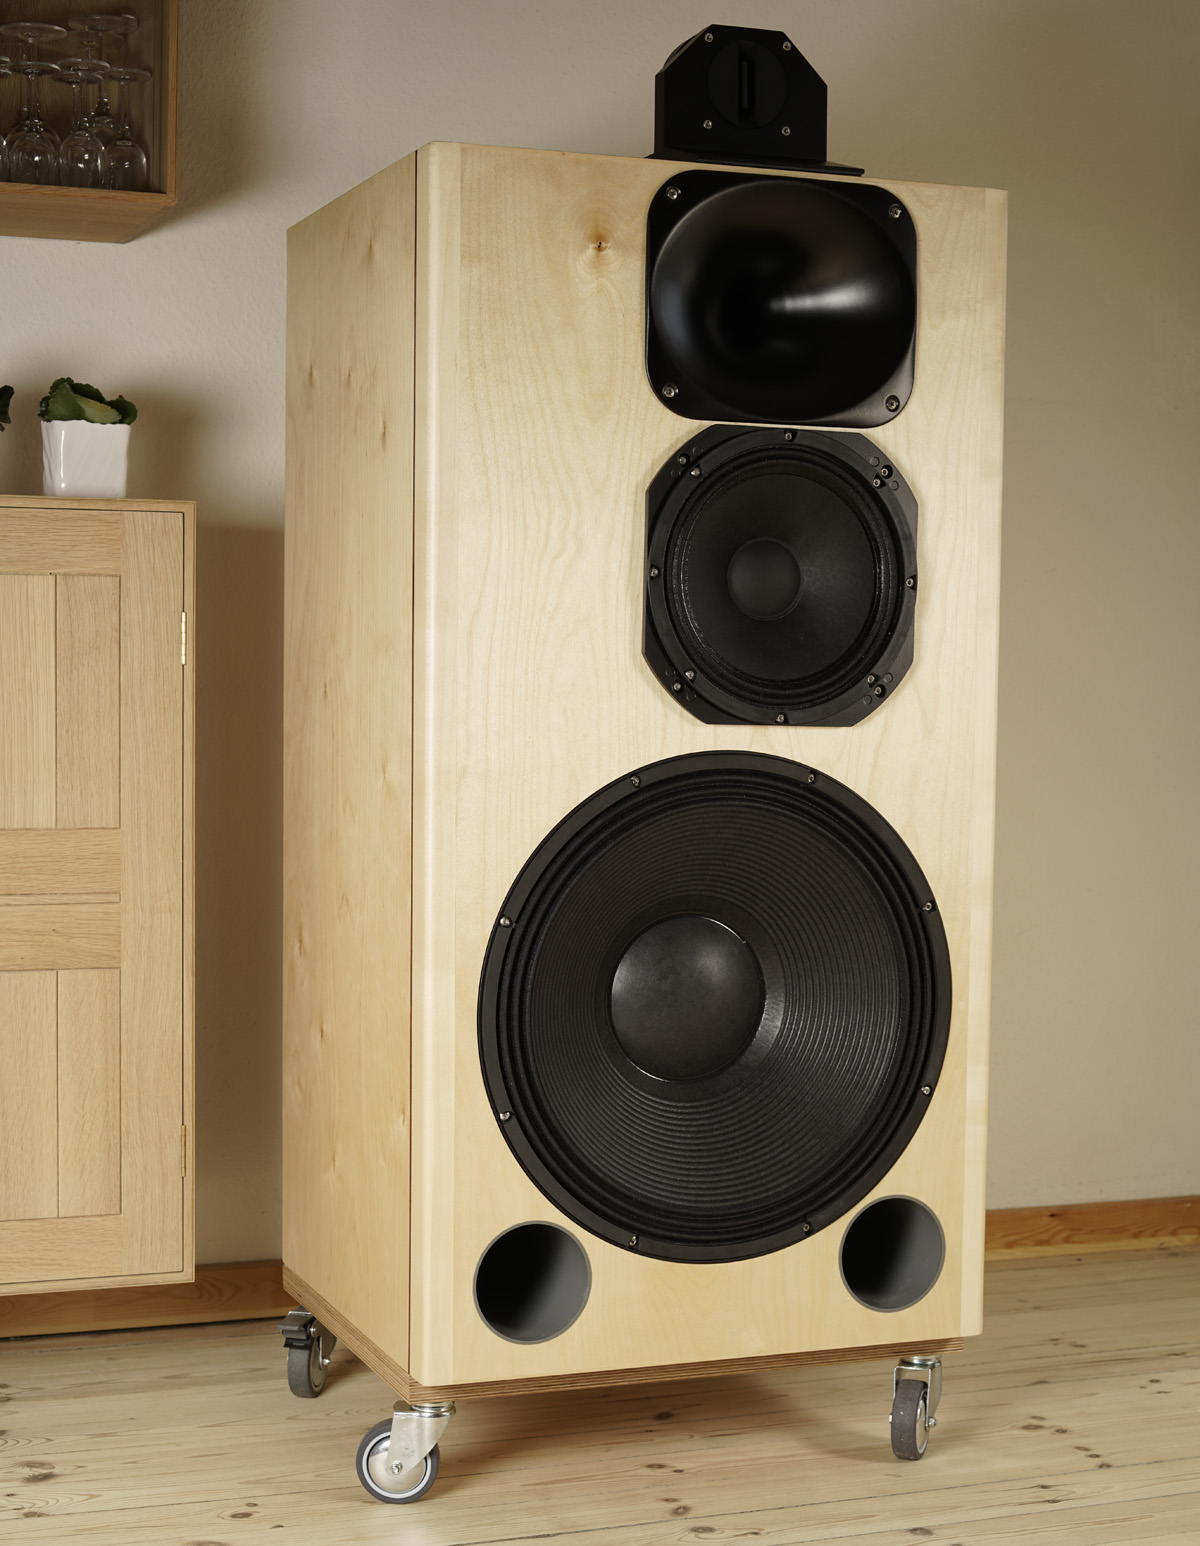
4-driver speaker, 18" bass, 10" midrange, 1" comp. driver +
horn, super-tweeter of your choice.
Dimensions: 55 x 49 x 105 cm, WxDxH. Depth depends on thickness of
front panel. I use 2 x 20 mm BB laminate.
System sensitivity: 95 dB/2.8V/1 meter.
Impedance: 8 Ohms, minimum 5 Ohms for MMT section @ 500 Hz. 5 Ohms for
bass alone with passive crossover. Minimum 3.5 Ohms for fully
passive/one amp solution, really not that bad if you have a monster amp.
Points of crossover: 200, 1300 and 9000 Hz.
Power requirement: 20+ watts/channel for MTT section. If run fully
passive I recommend minimum 100 wpc, the more the better.
Power handling: A lot! Please
also read:
http://www.troelsgravesen.dk/power-handling.htm,
and remember any burned driver is a misused driver. I take no
responsibility for ruptured eardrums or tinnitus!
http://www.troelsgravesen.dk/tips.htm
http://www.troelsgravesen.dk/tips.htm#CONSTRUCTION_OF_CROSSOVERS
http://www.troelsgravesen.dk/crossovers.htm
http://www.troelsgravesen.dk/LCR-RC.htm
http://www.troelsgravesen.dk/Inverted-Polarity.htm
http://www.troelsgravesen.dk/choices.htm
http://www.troelsgravesen.dk/power-handling.htm
Click images to view large
The Music
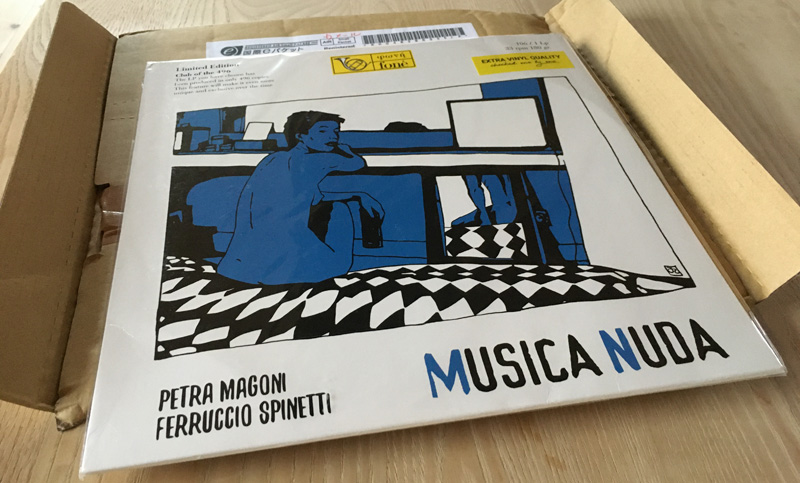
A friend played me this record. I just had to have it. Limited edition.
Found on Amazon, paid in Canadian Dollans - and received from Tokyo -
after two months. Strange
world! Italian recording, ½ inch master tape, 76 cm/sec. The Loudspeaker
II does it like I never heard it before, not least from MSL
Eminent Ex and Ortofon Anna D cartridges.
I can't say anything about the sound I didn't say already in the TL-I
file, so please go
there.
Fresh out of the box, these drivers need some break-in, as is a usual
thing for PA drivers due to rigid suspensions. Punch it hard for some 20
hours and you're there. I can't tell what difference the Alumen-Z and
Amber-Z does as I don't have the TL-1 for comparison, but my Goodness,
this midrange and treble is smooth. The dynamics are phenomenal, even at
very low level you can hear something extraordinary is going on. I think
it was Dave Wilson who introduced the term "dynamic contrast". I fact,
he was pretty good at inventing new ways of expressing sound quality,
like "harmonic expression", etc. Words that have made their way into the
general vocabulary of hifi writers. Well, from this speaker you have it
all - and way more than any other conventional speaker can do and it
nails the "6+1" to the wall from its inability to express the basic
qualities of reproduced music.
This is
not the most expensive speaker I've made, but certainly the very, very
best, even by a comfortable margin.
I like this 2.3 kgs chunky beast doing almost nothing. Exuberant!
Click images to view large.
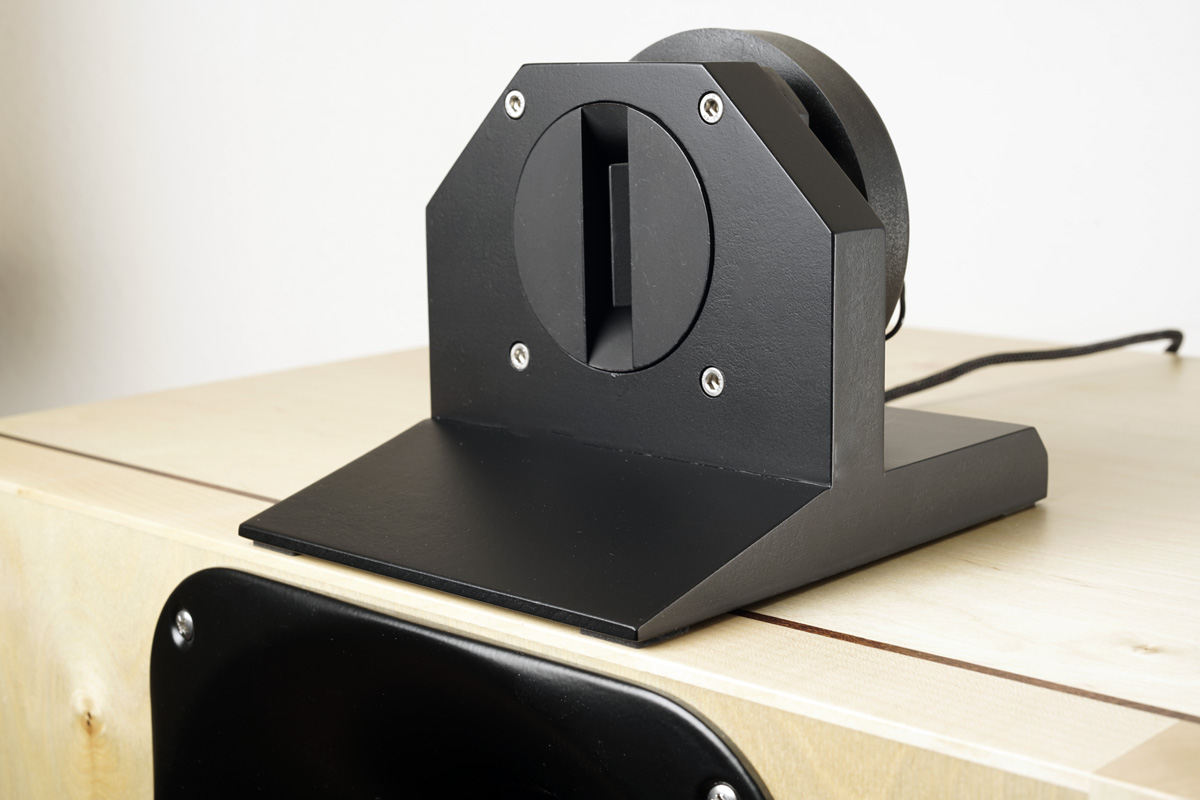
Six options for super-tweeter: Fostex FT96H, Visaton TL16H,
Viawave
ribbon GRT-145-4
(GRT-145-4 no
longer available for TL-1/2), JBL 2405H/077 Alnico and Beyma CP21/F.

Left:
JBL 2405H. Black terminal is PLUS!
Middle JBL 077 ALNICO. Right: Beyma CP21/F.
Check measurements of super-tweeters here.
Check out Beyma mods
here.
PLEASE DO NOT ASK WHICH SUPER-TWEETER IS BEST!
It has come as a surprise to quite a few TL-1-2 builders that they can't
hear the super-tweeter. I've had numerous pictures of crossovers to look
for anything wrong in layout and wiring - and they all looked OK.
What is going on here is that you - mostly - due to age really do not
hear much - if anything - above 9 kHz!
Surprise? Well, not much we can do about age, but try disconnecting all
drivers except super-tweeter, play at normal level and put your ear to
the super-tweeter. Maybe you'll be able to hear a faint response. The
super-tweeter adds "airiness" to the overall sound, but really doesn't
contain much energy.
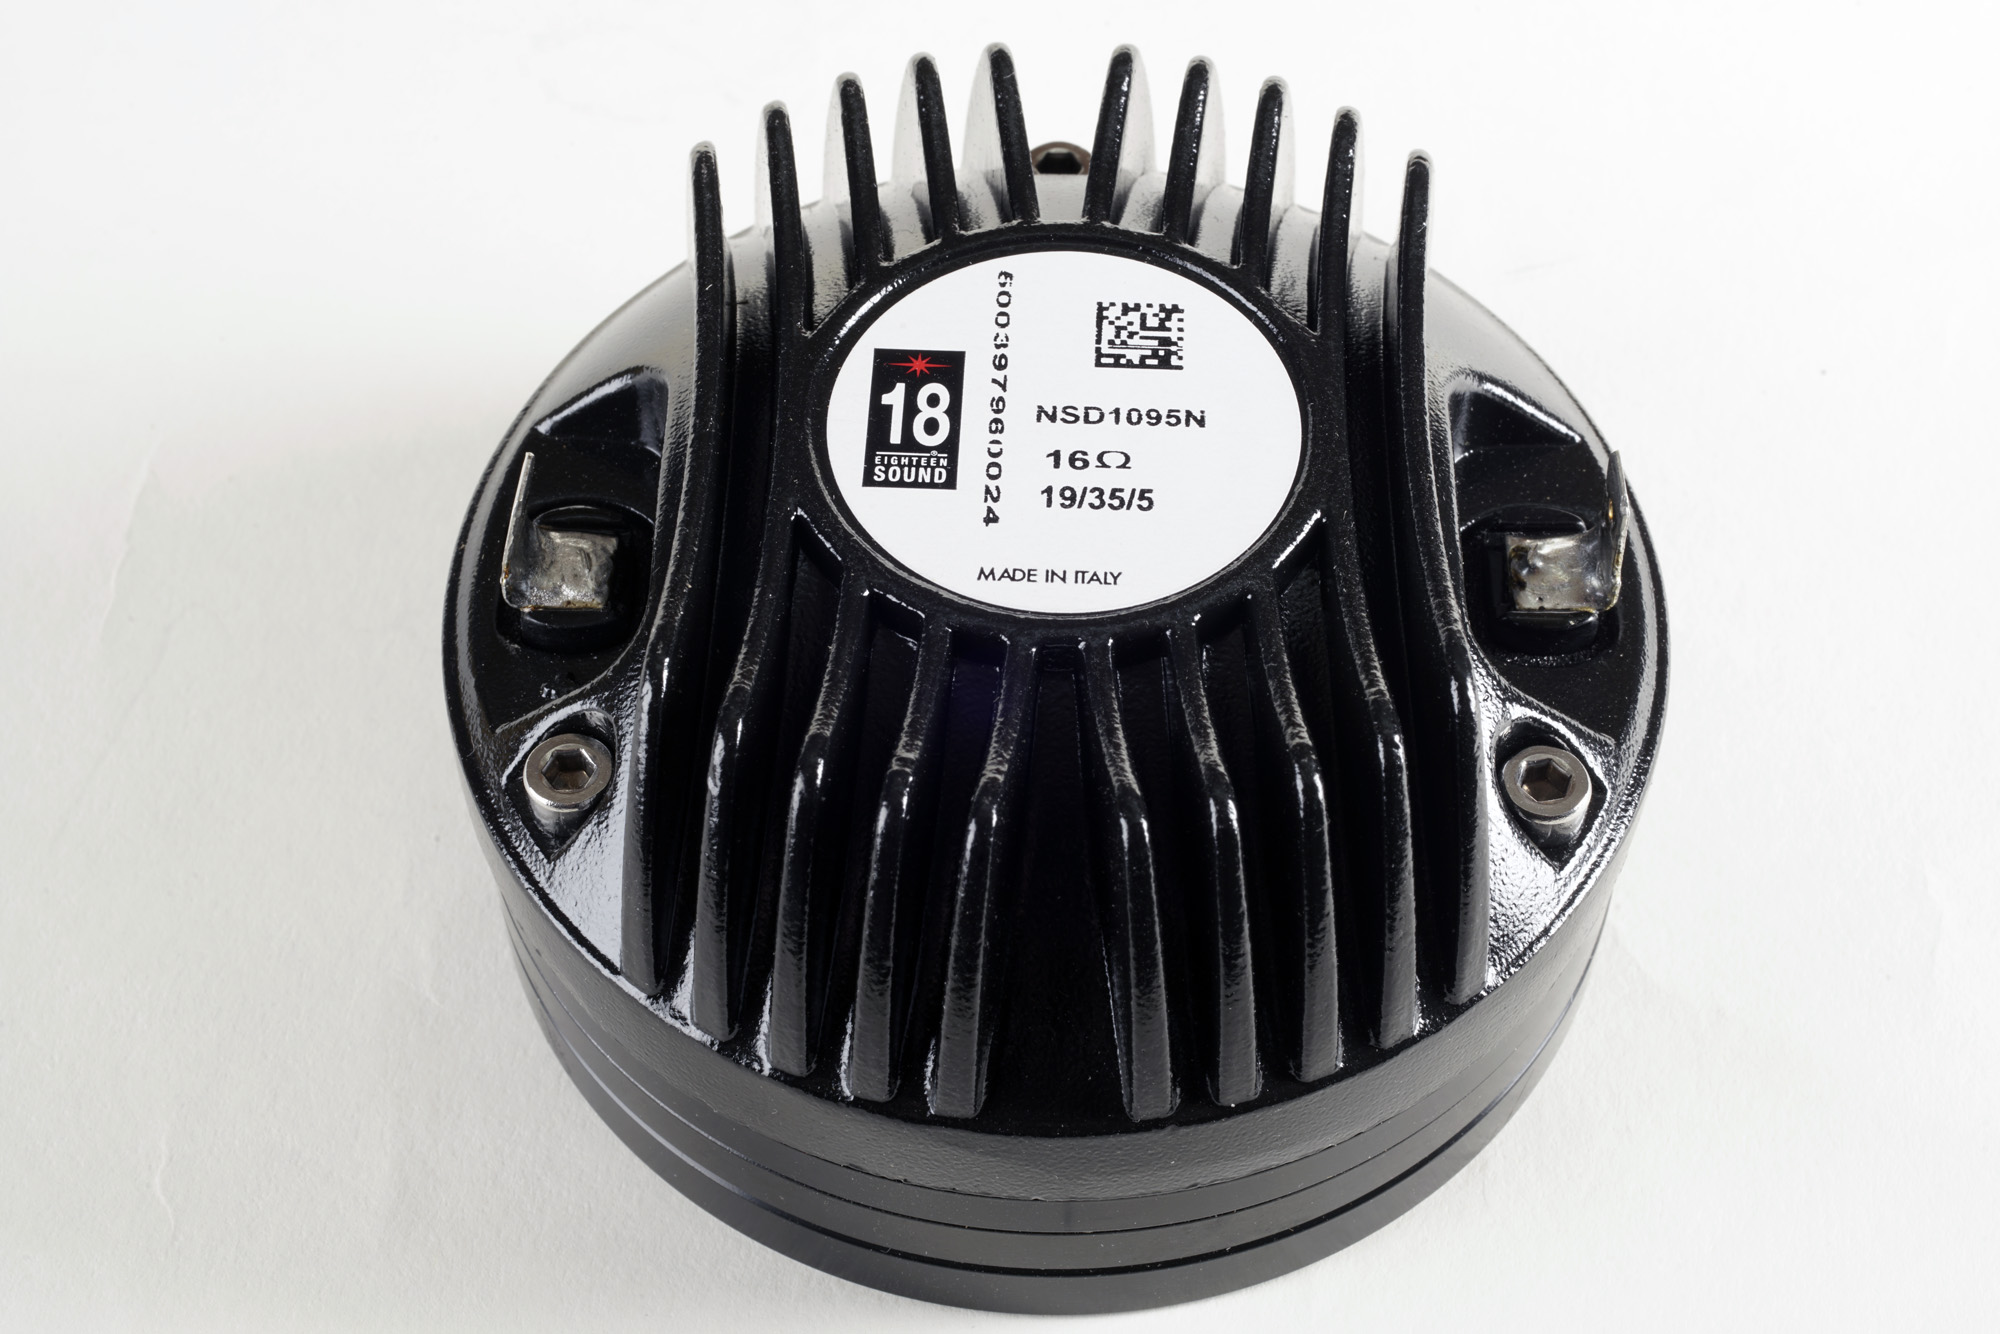
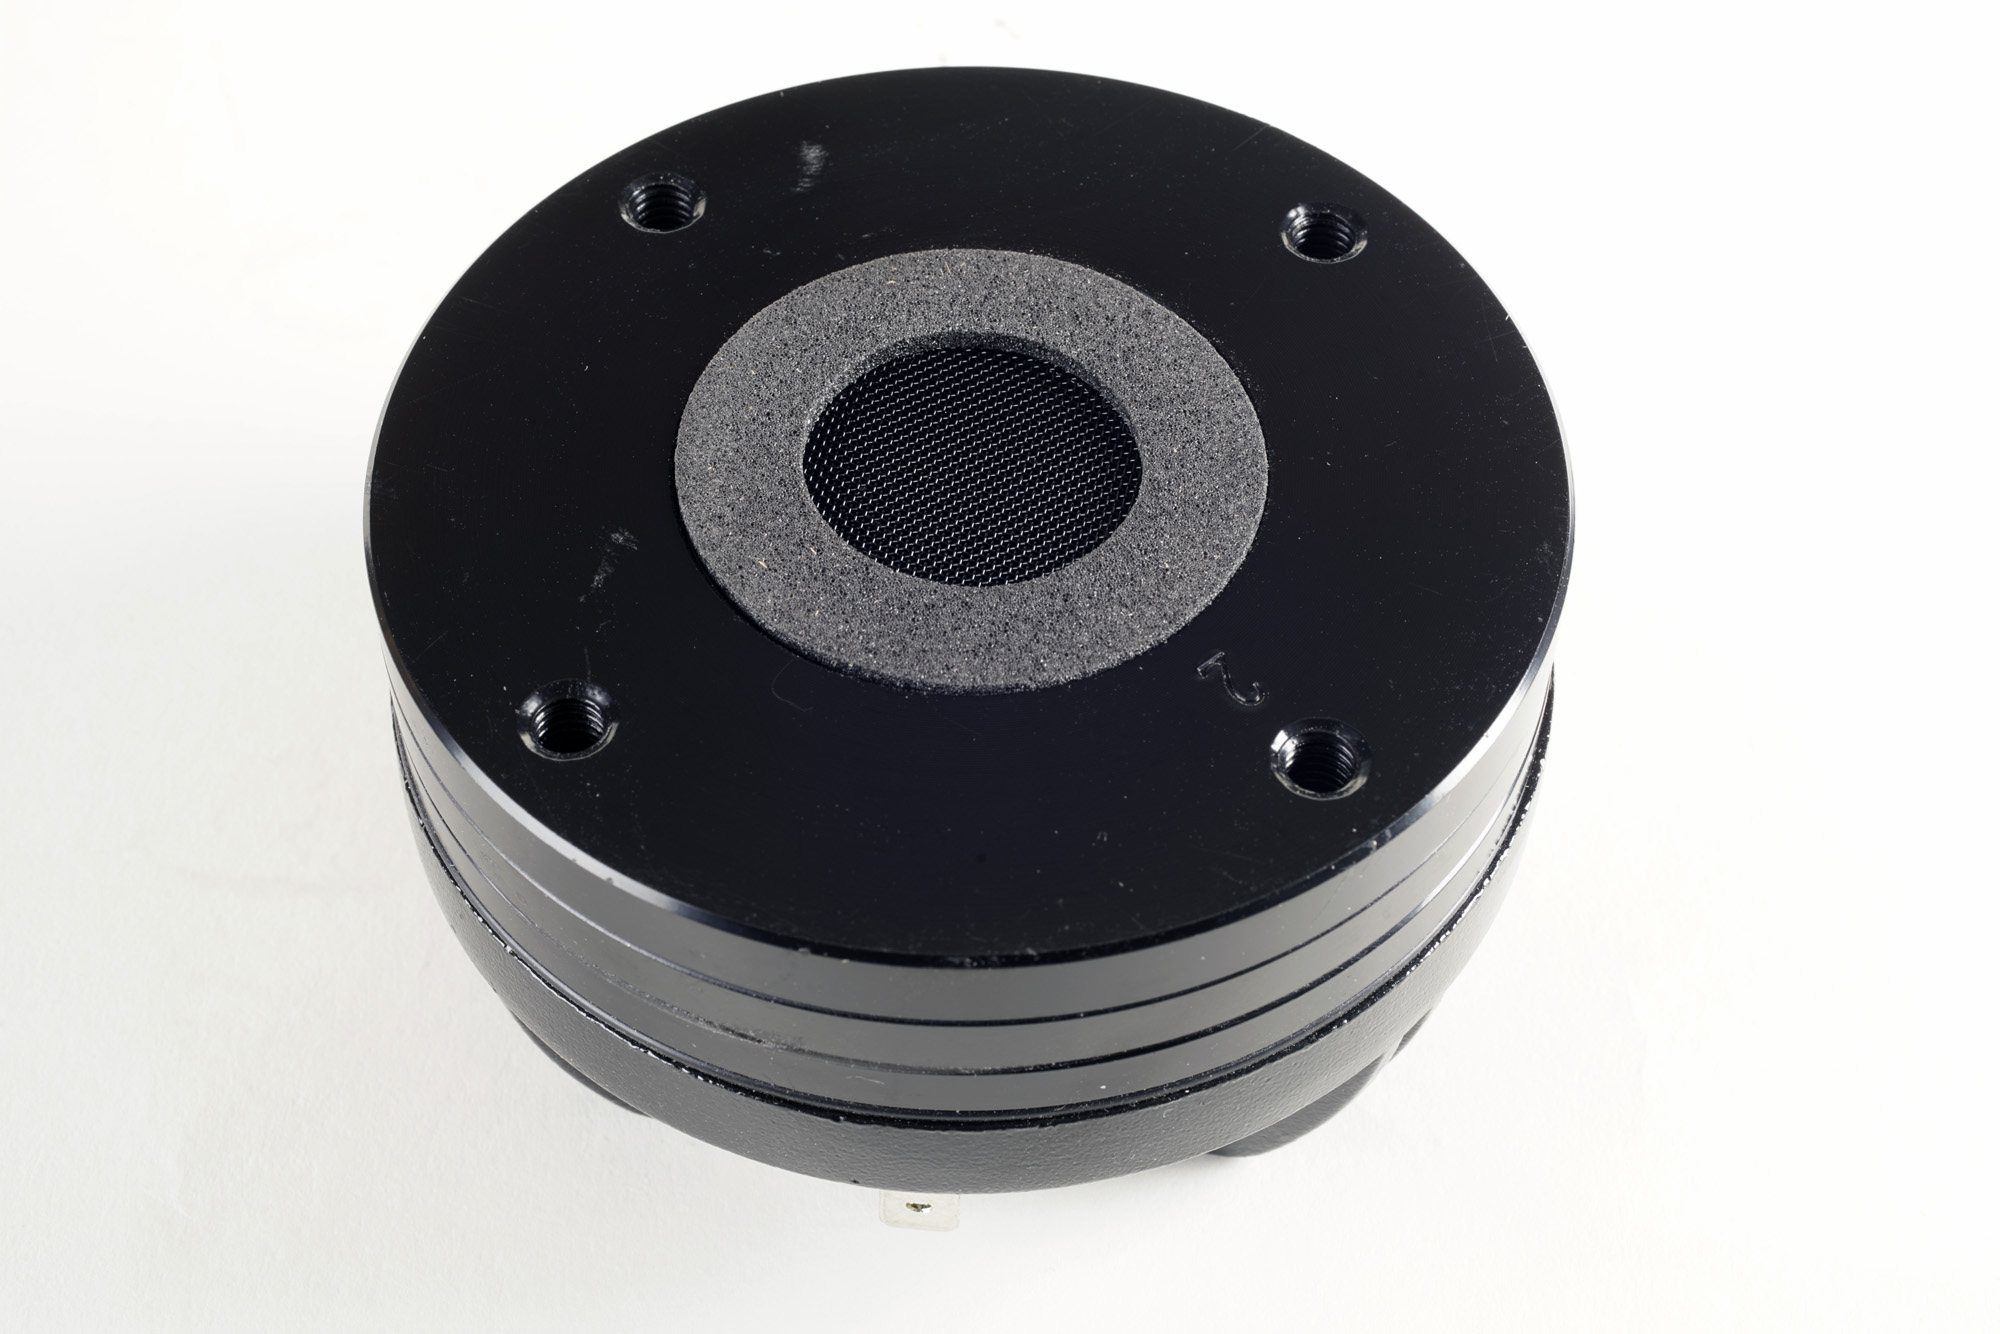
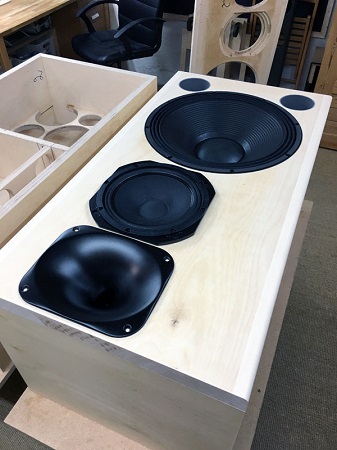
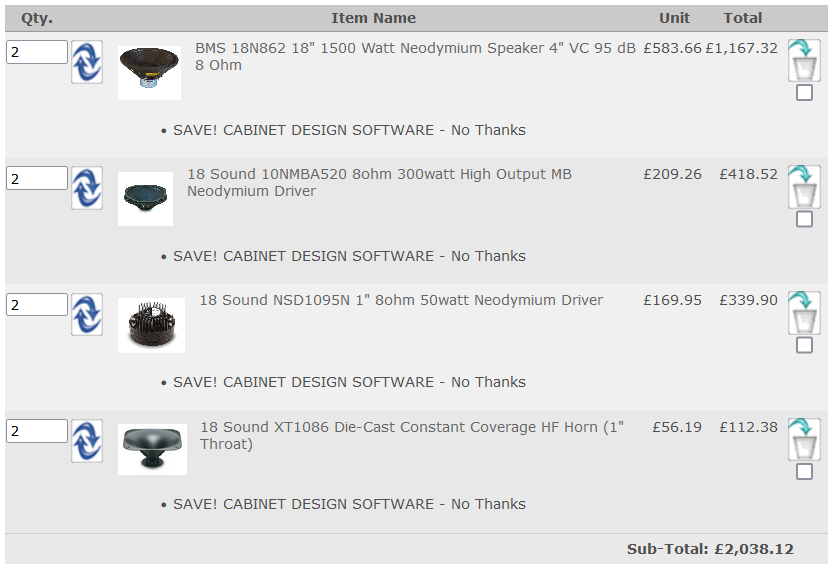
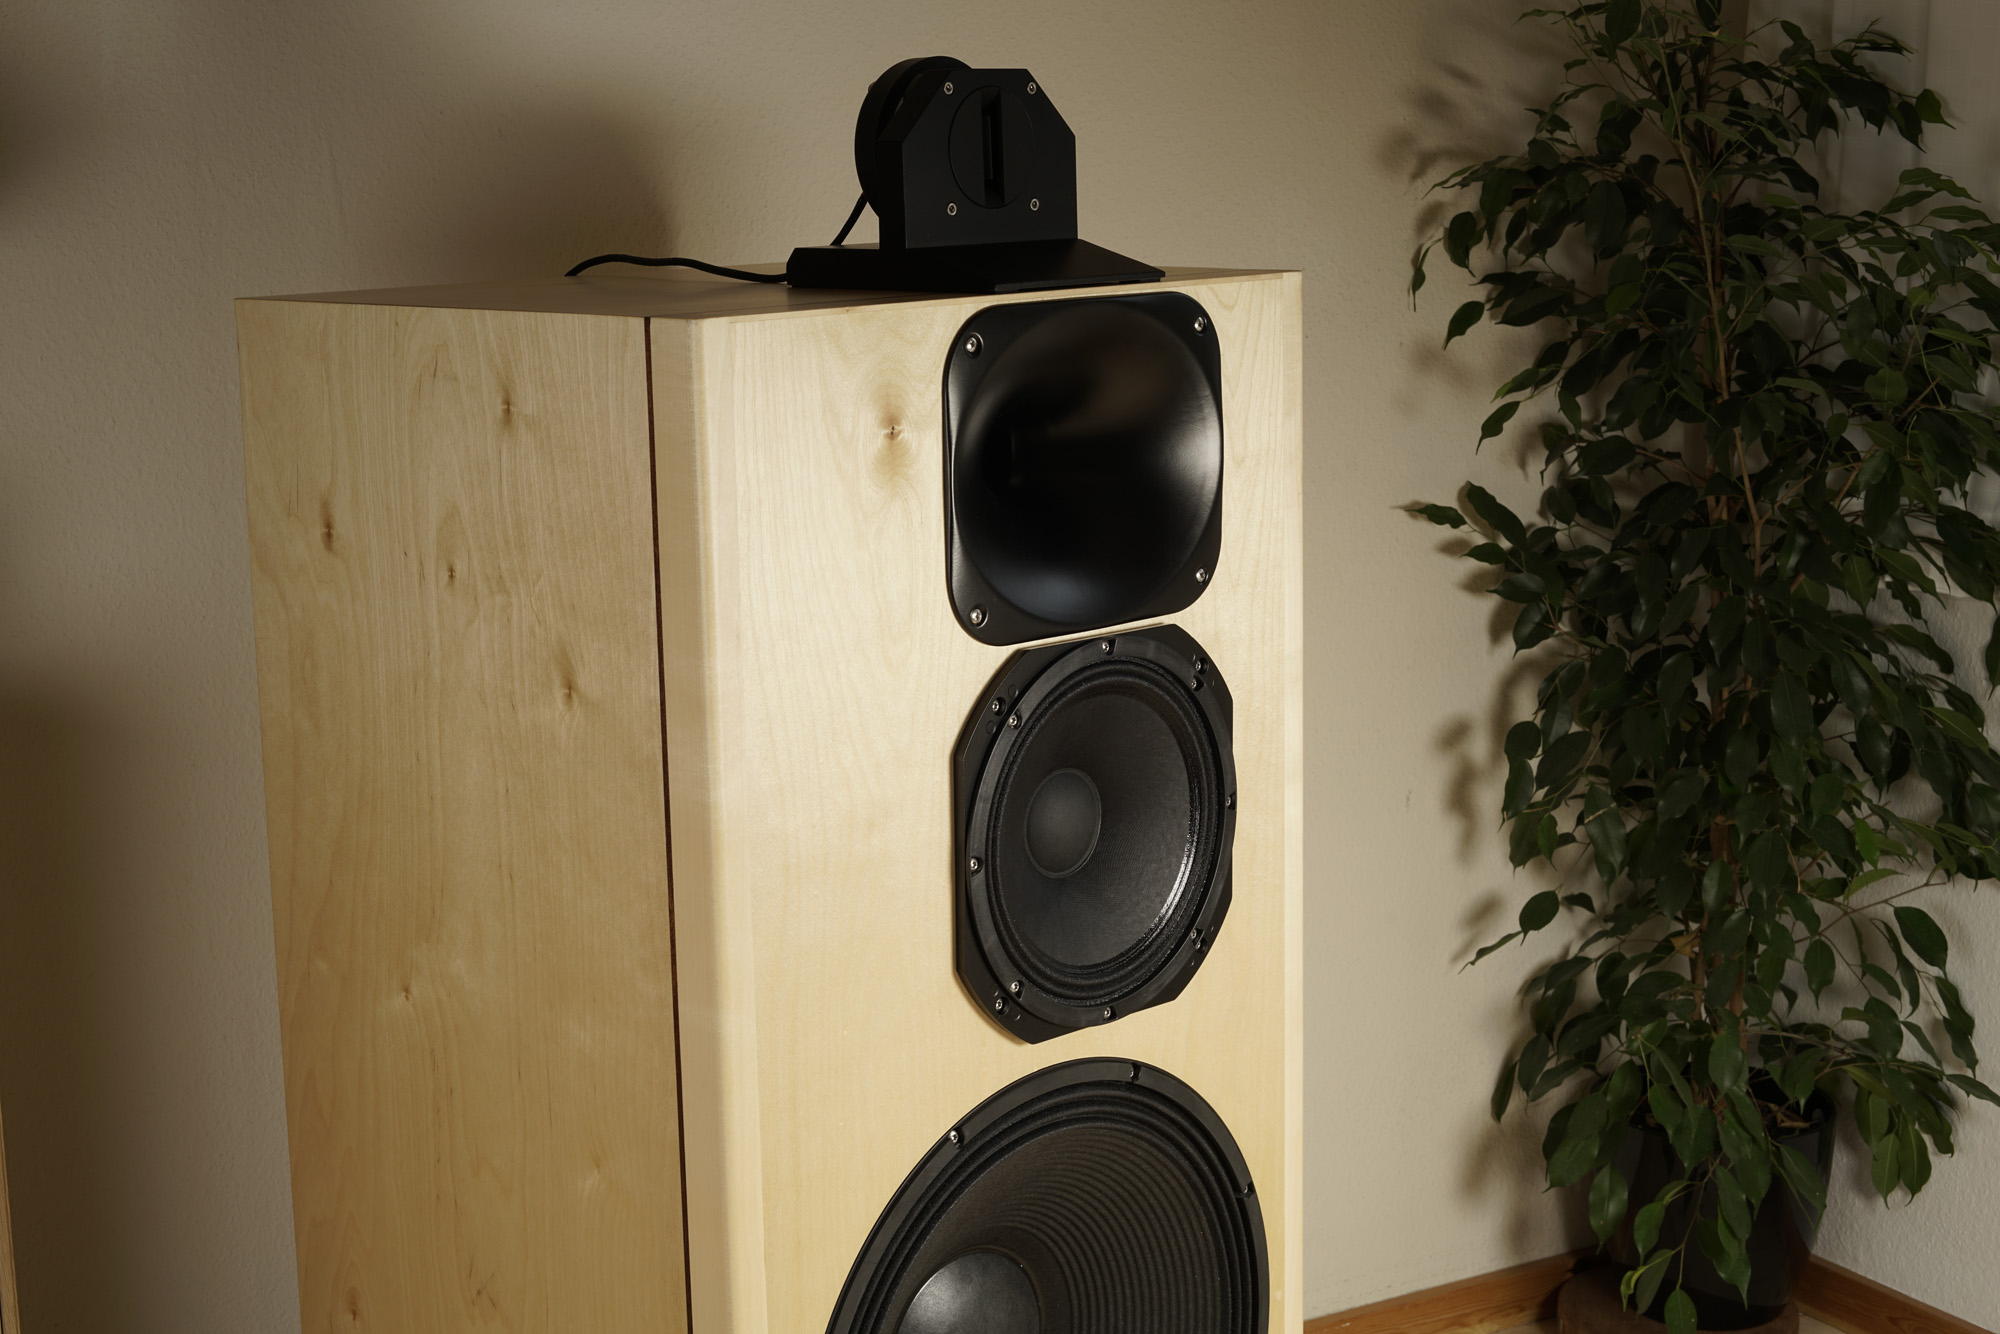
18 Sound compression driver NSD1095N (Must be 8 Ohm, 16 Ohm shown here)
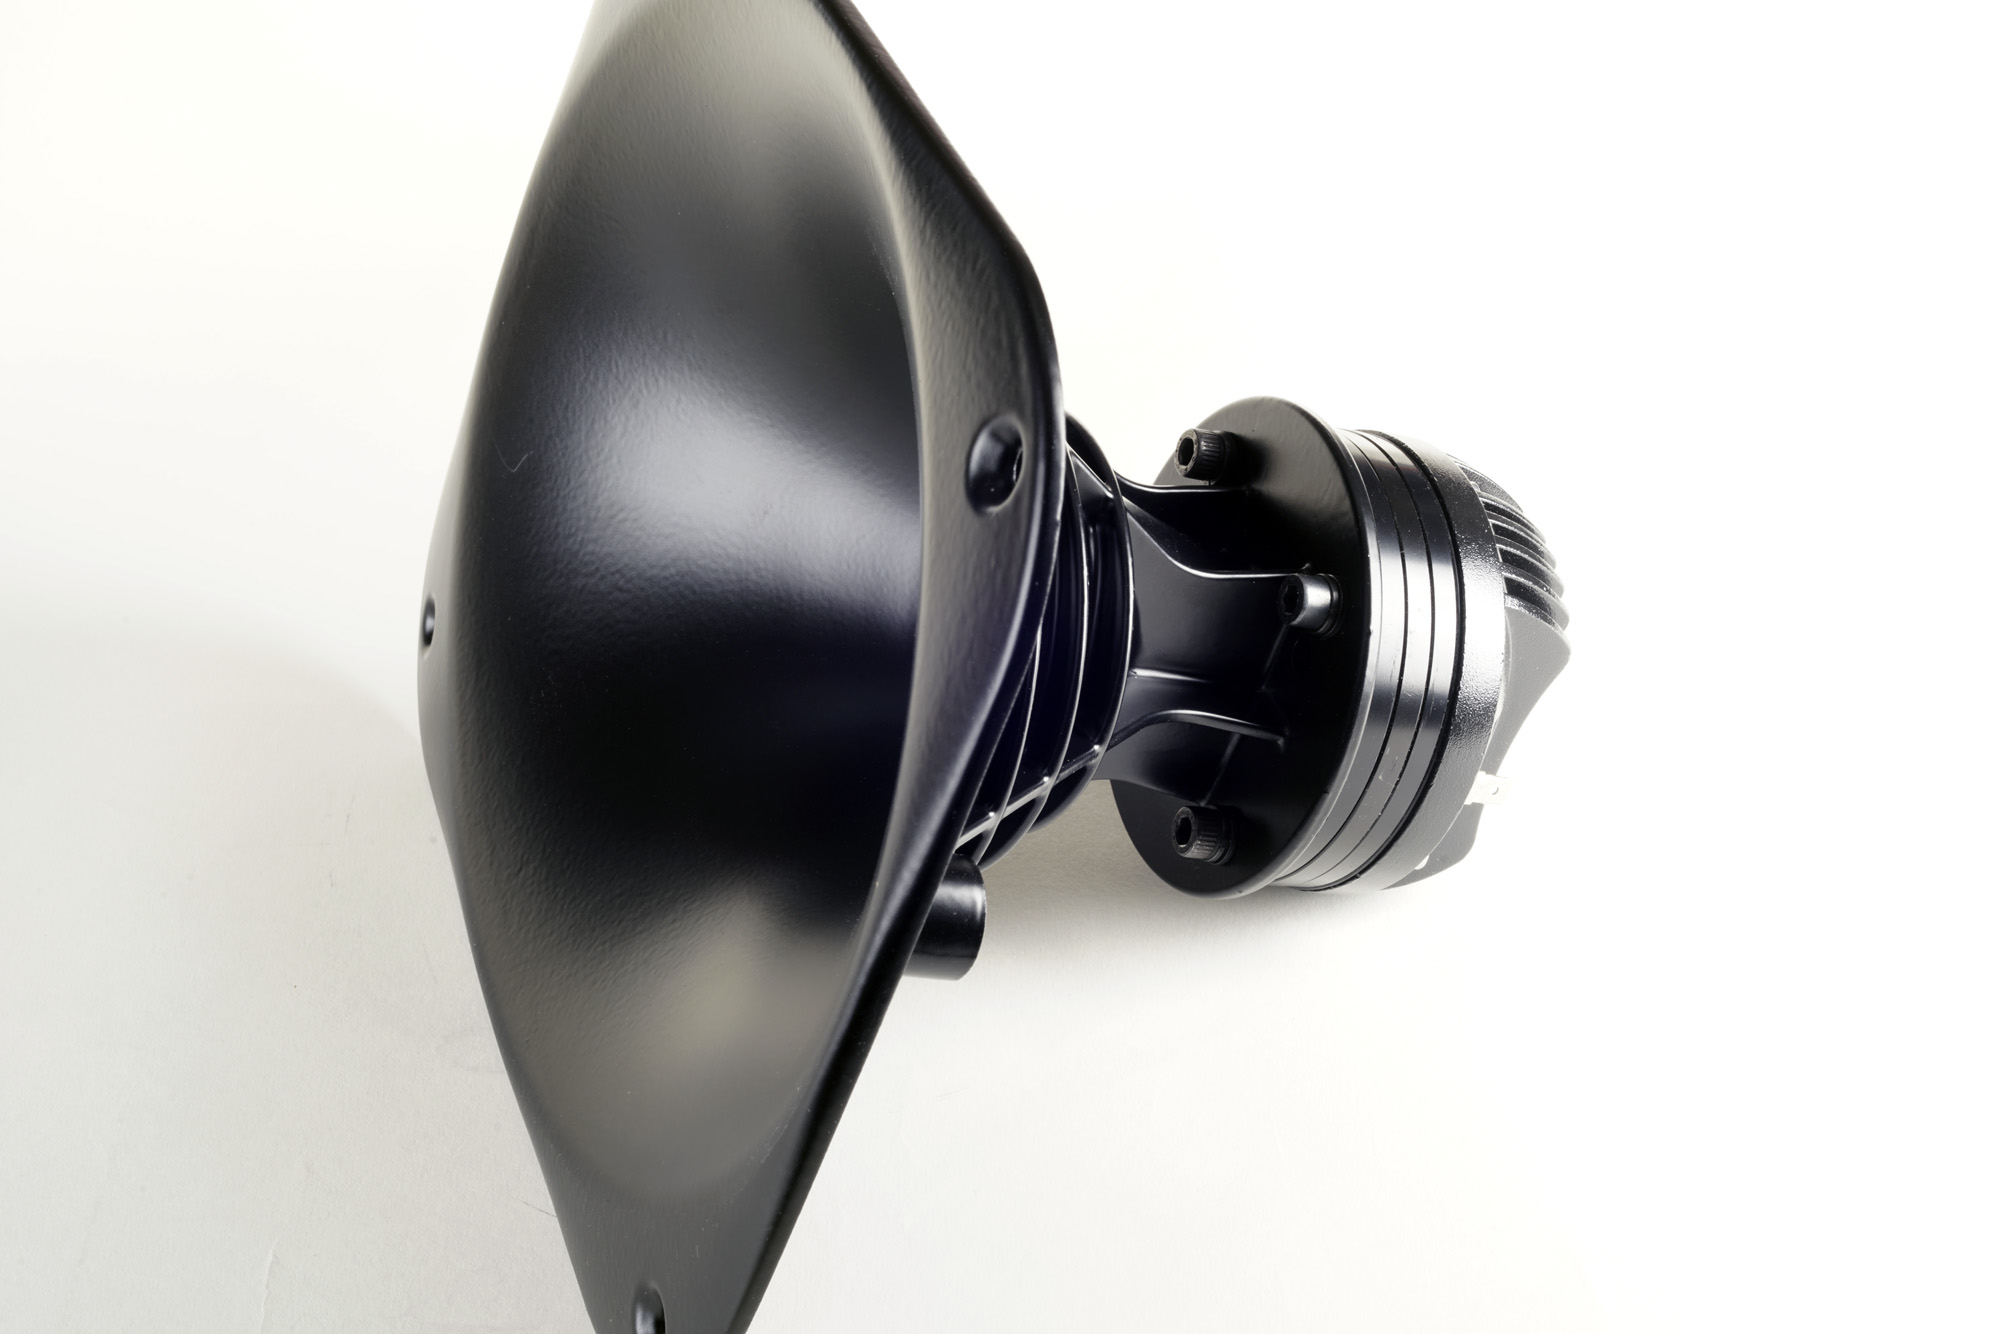
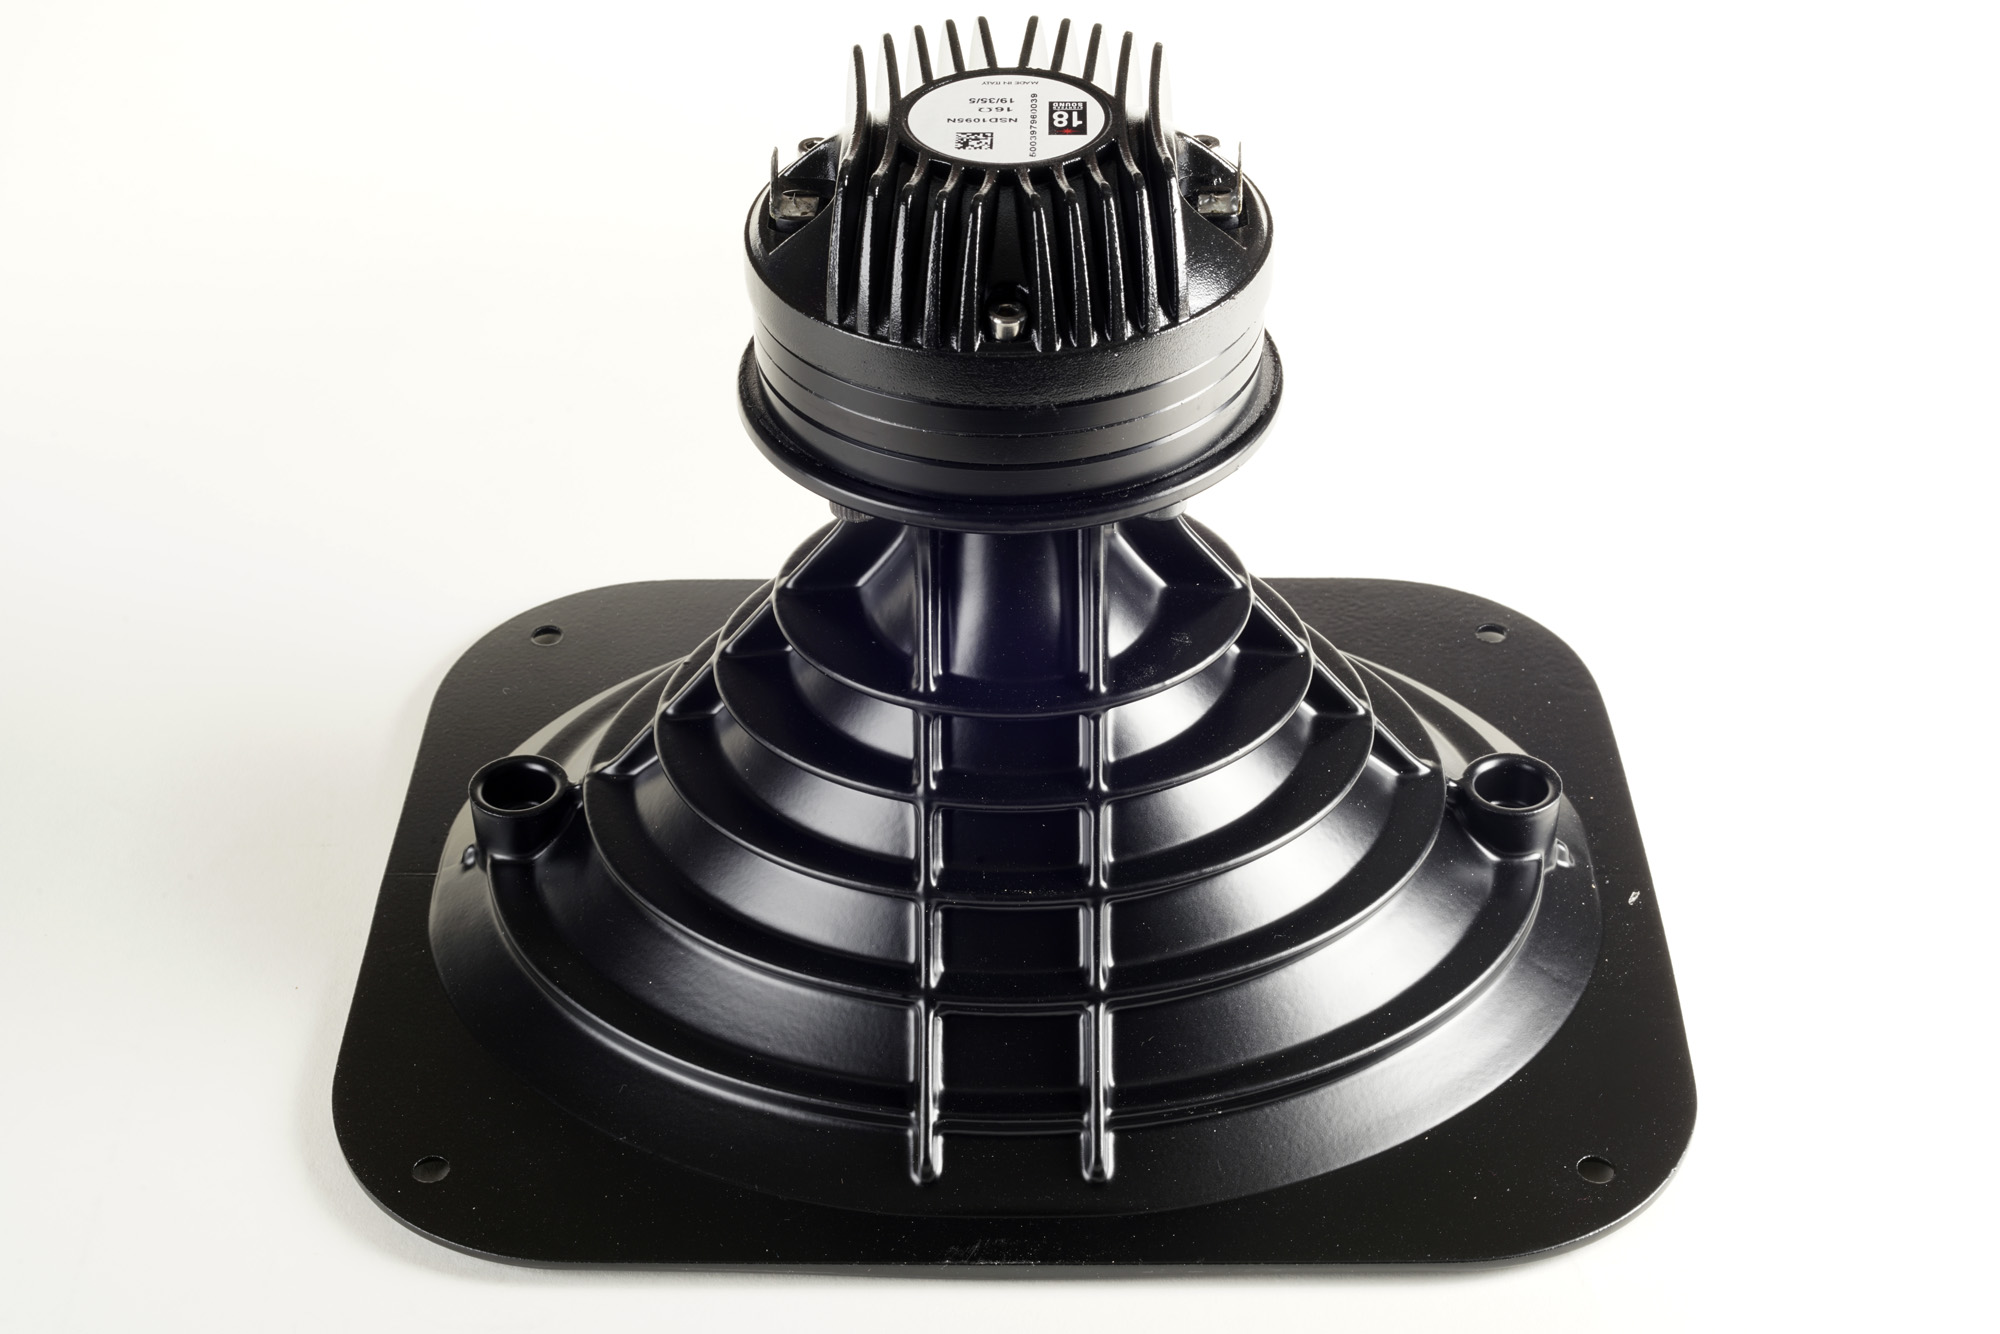
18 Sound horn XT1086.
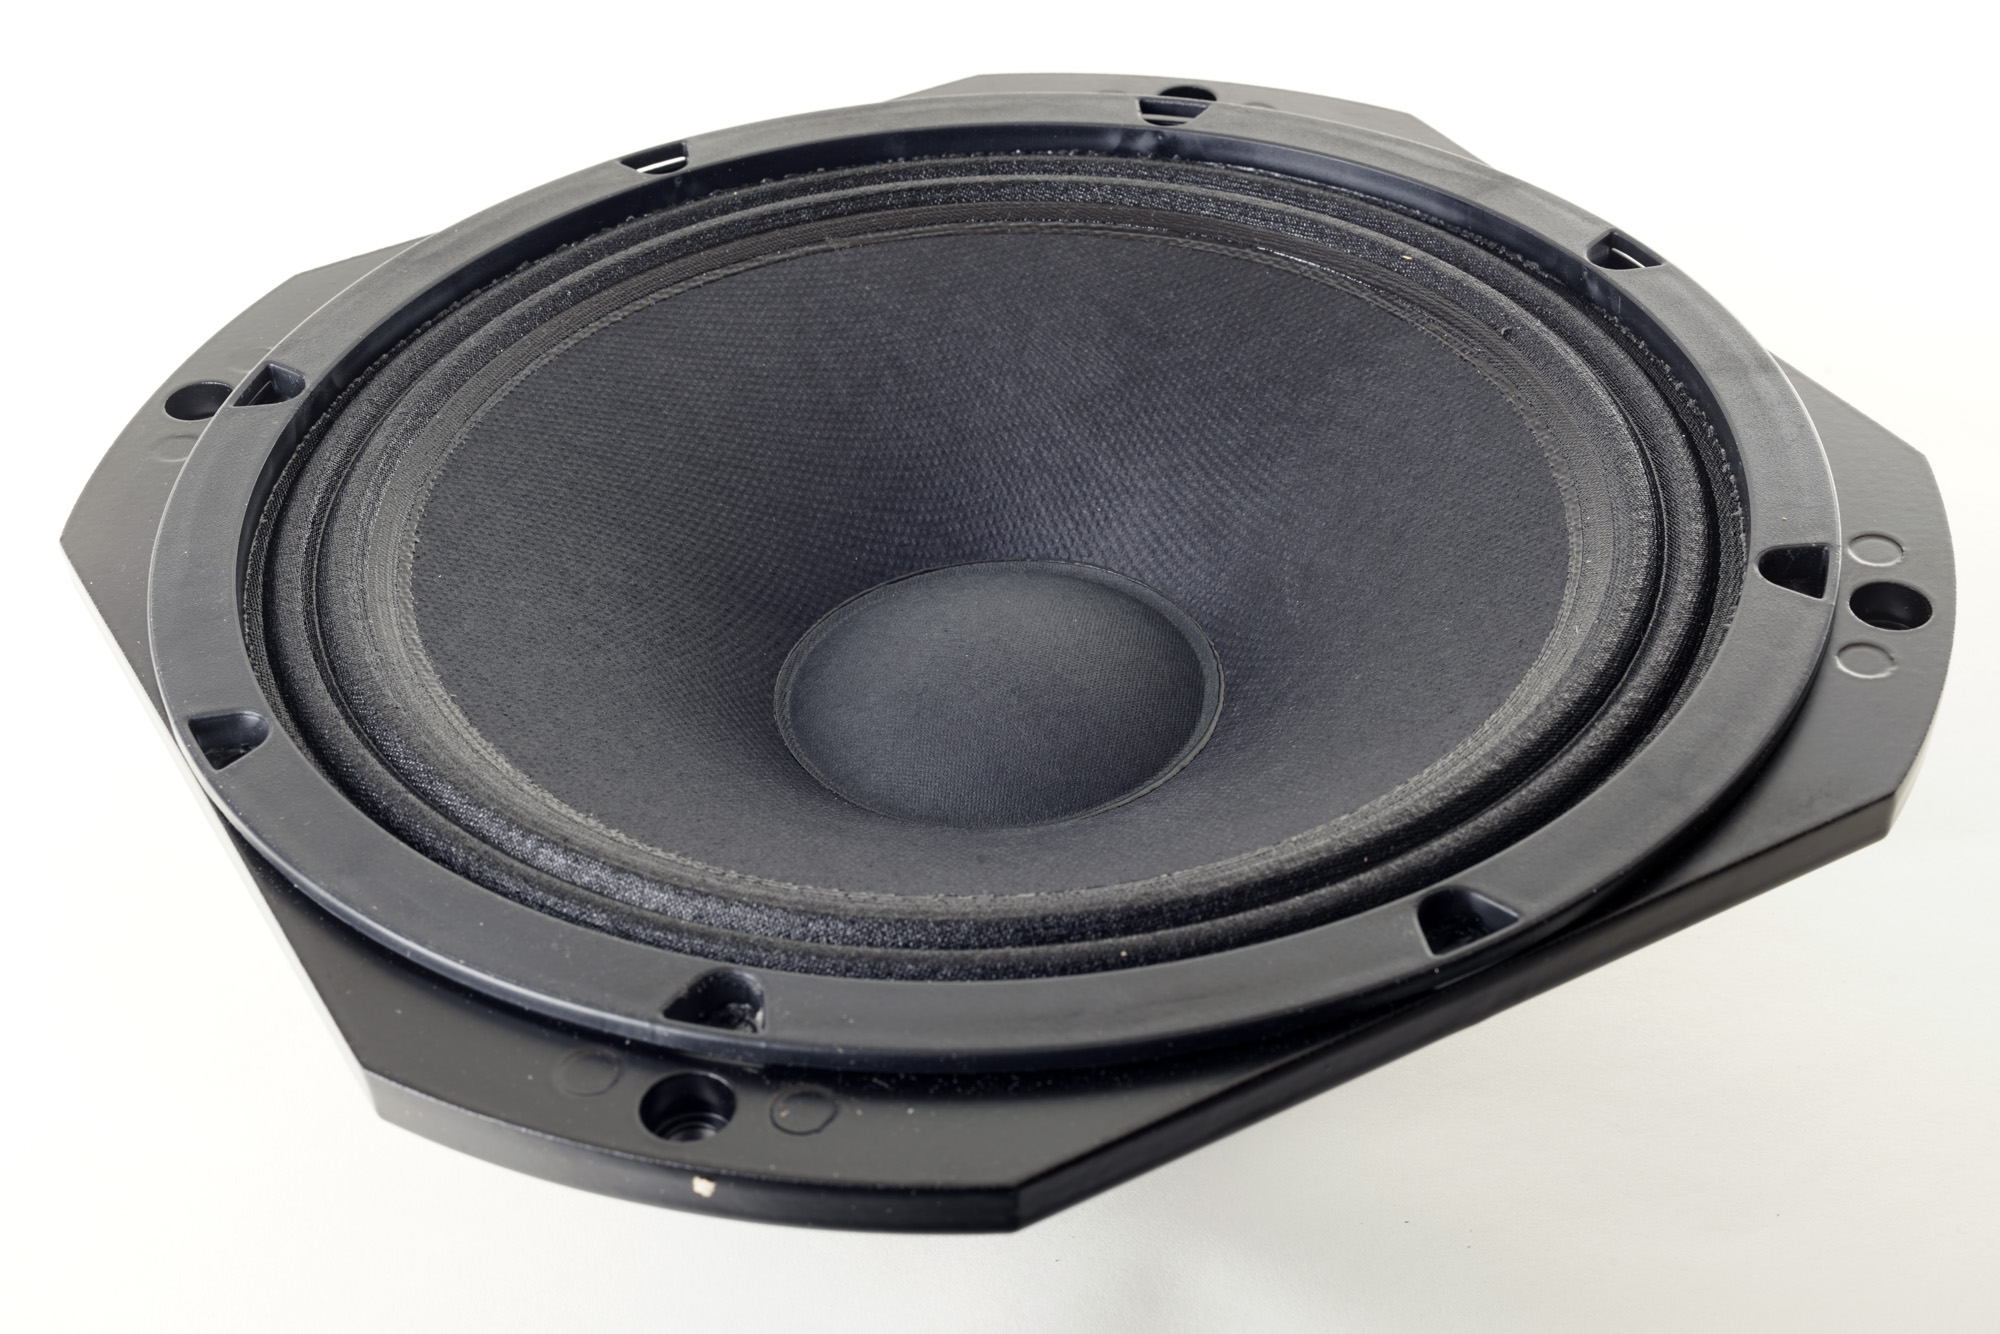
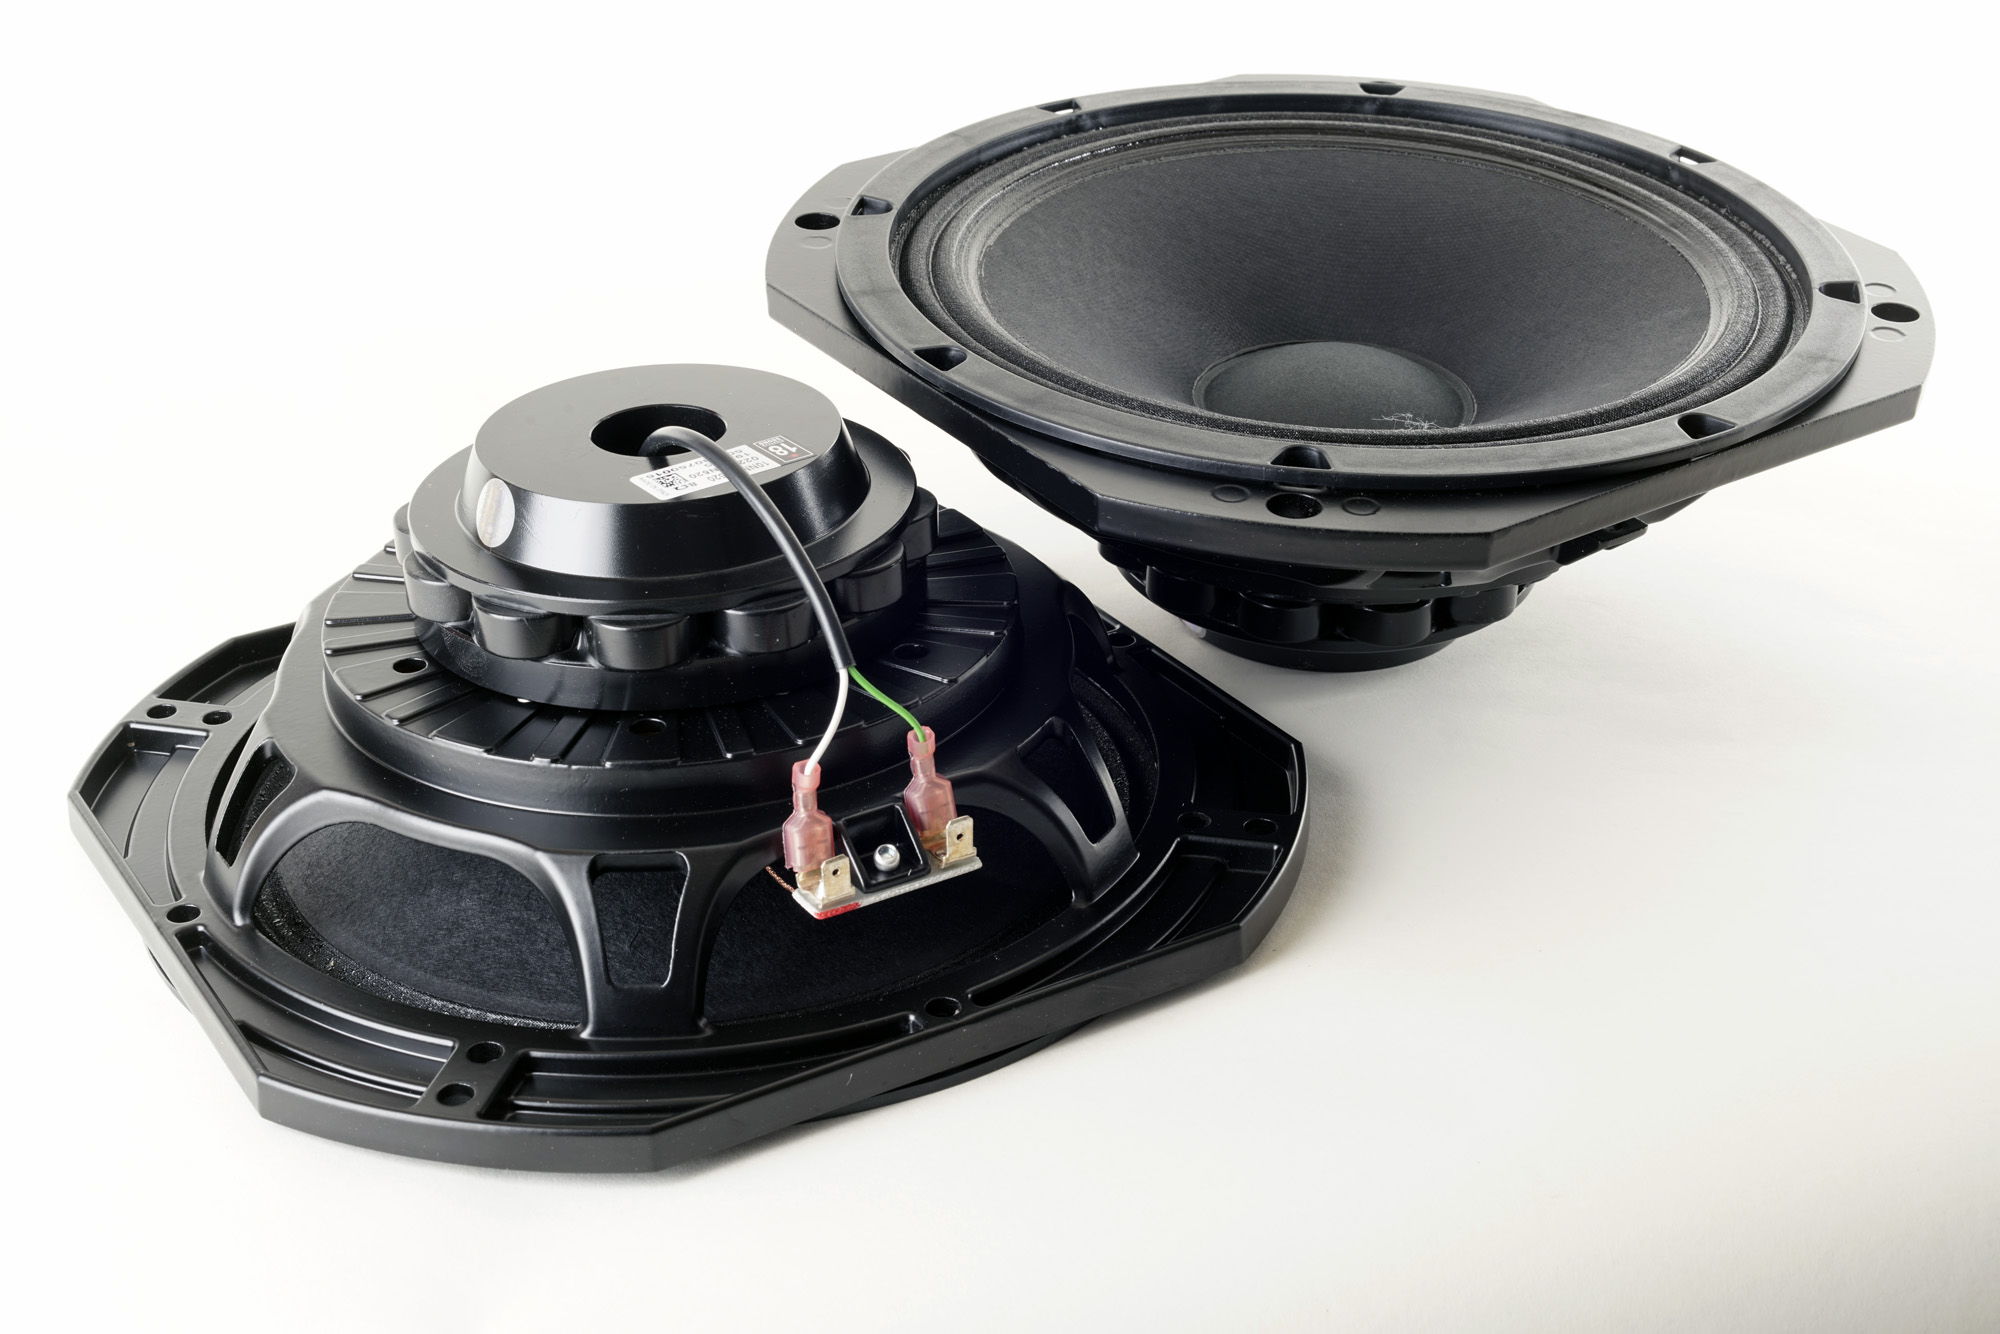
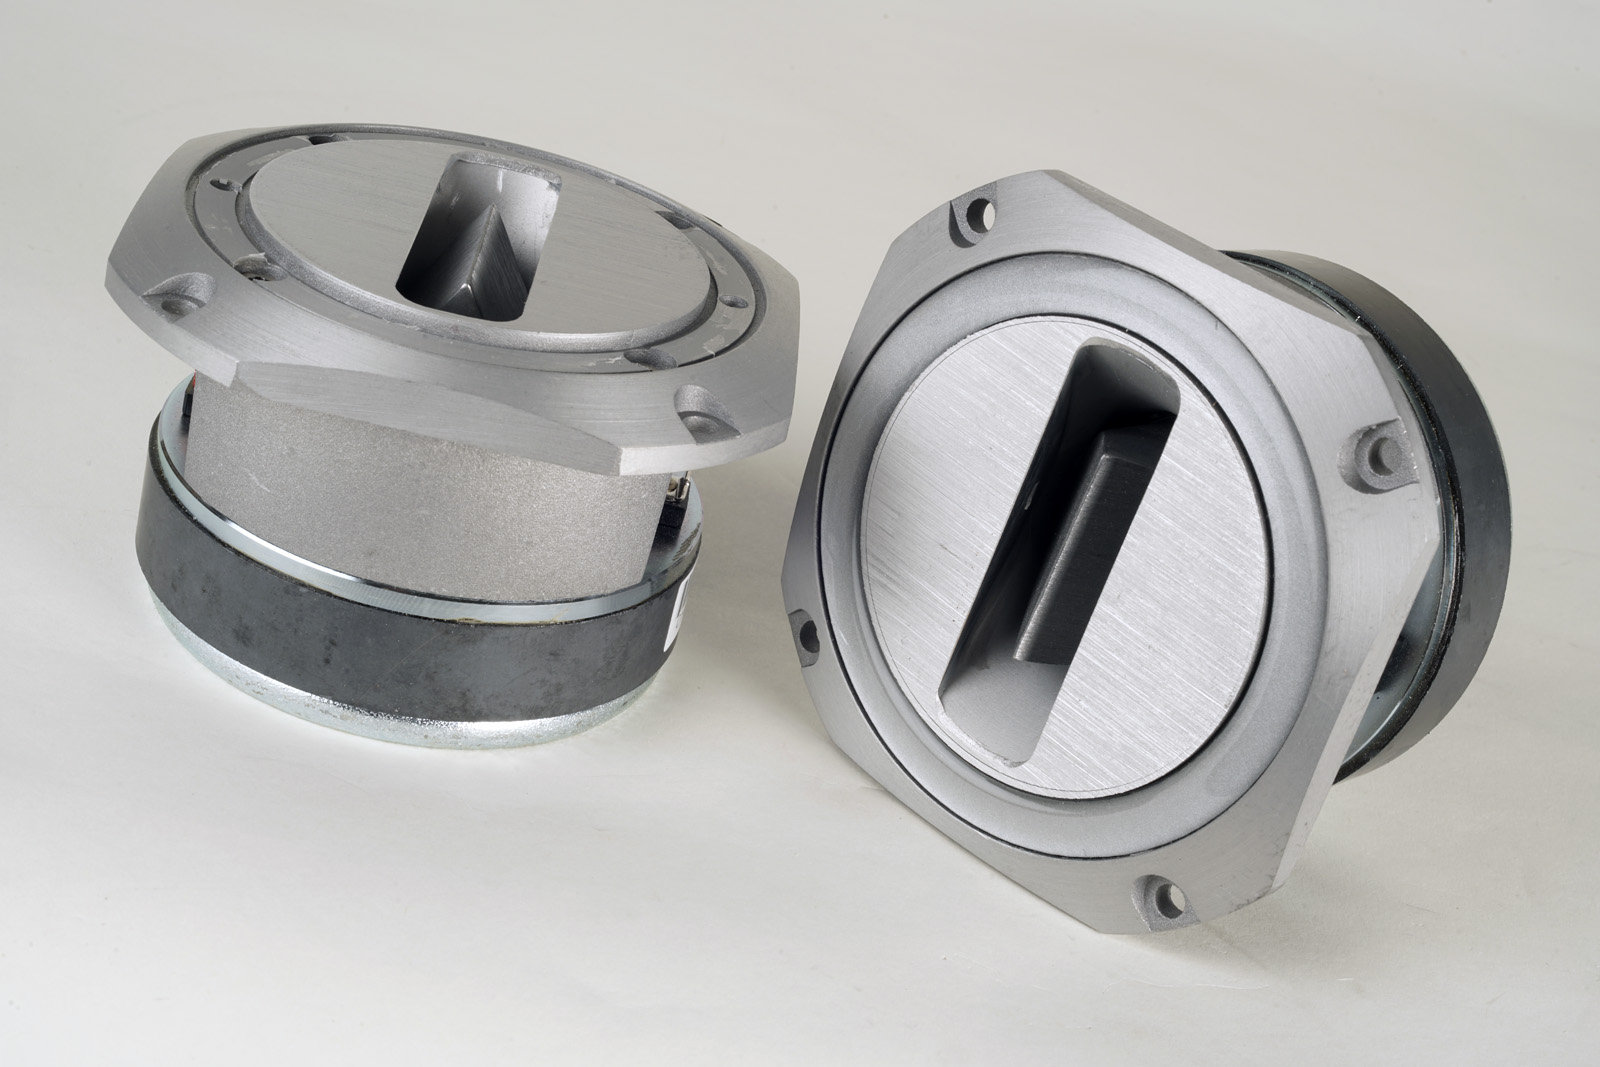
18 Sound midrange driver 10NMBA520
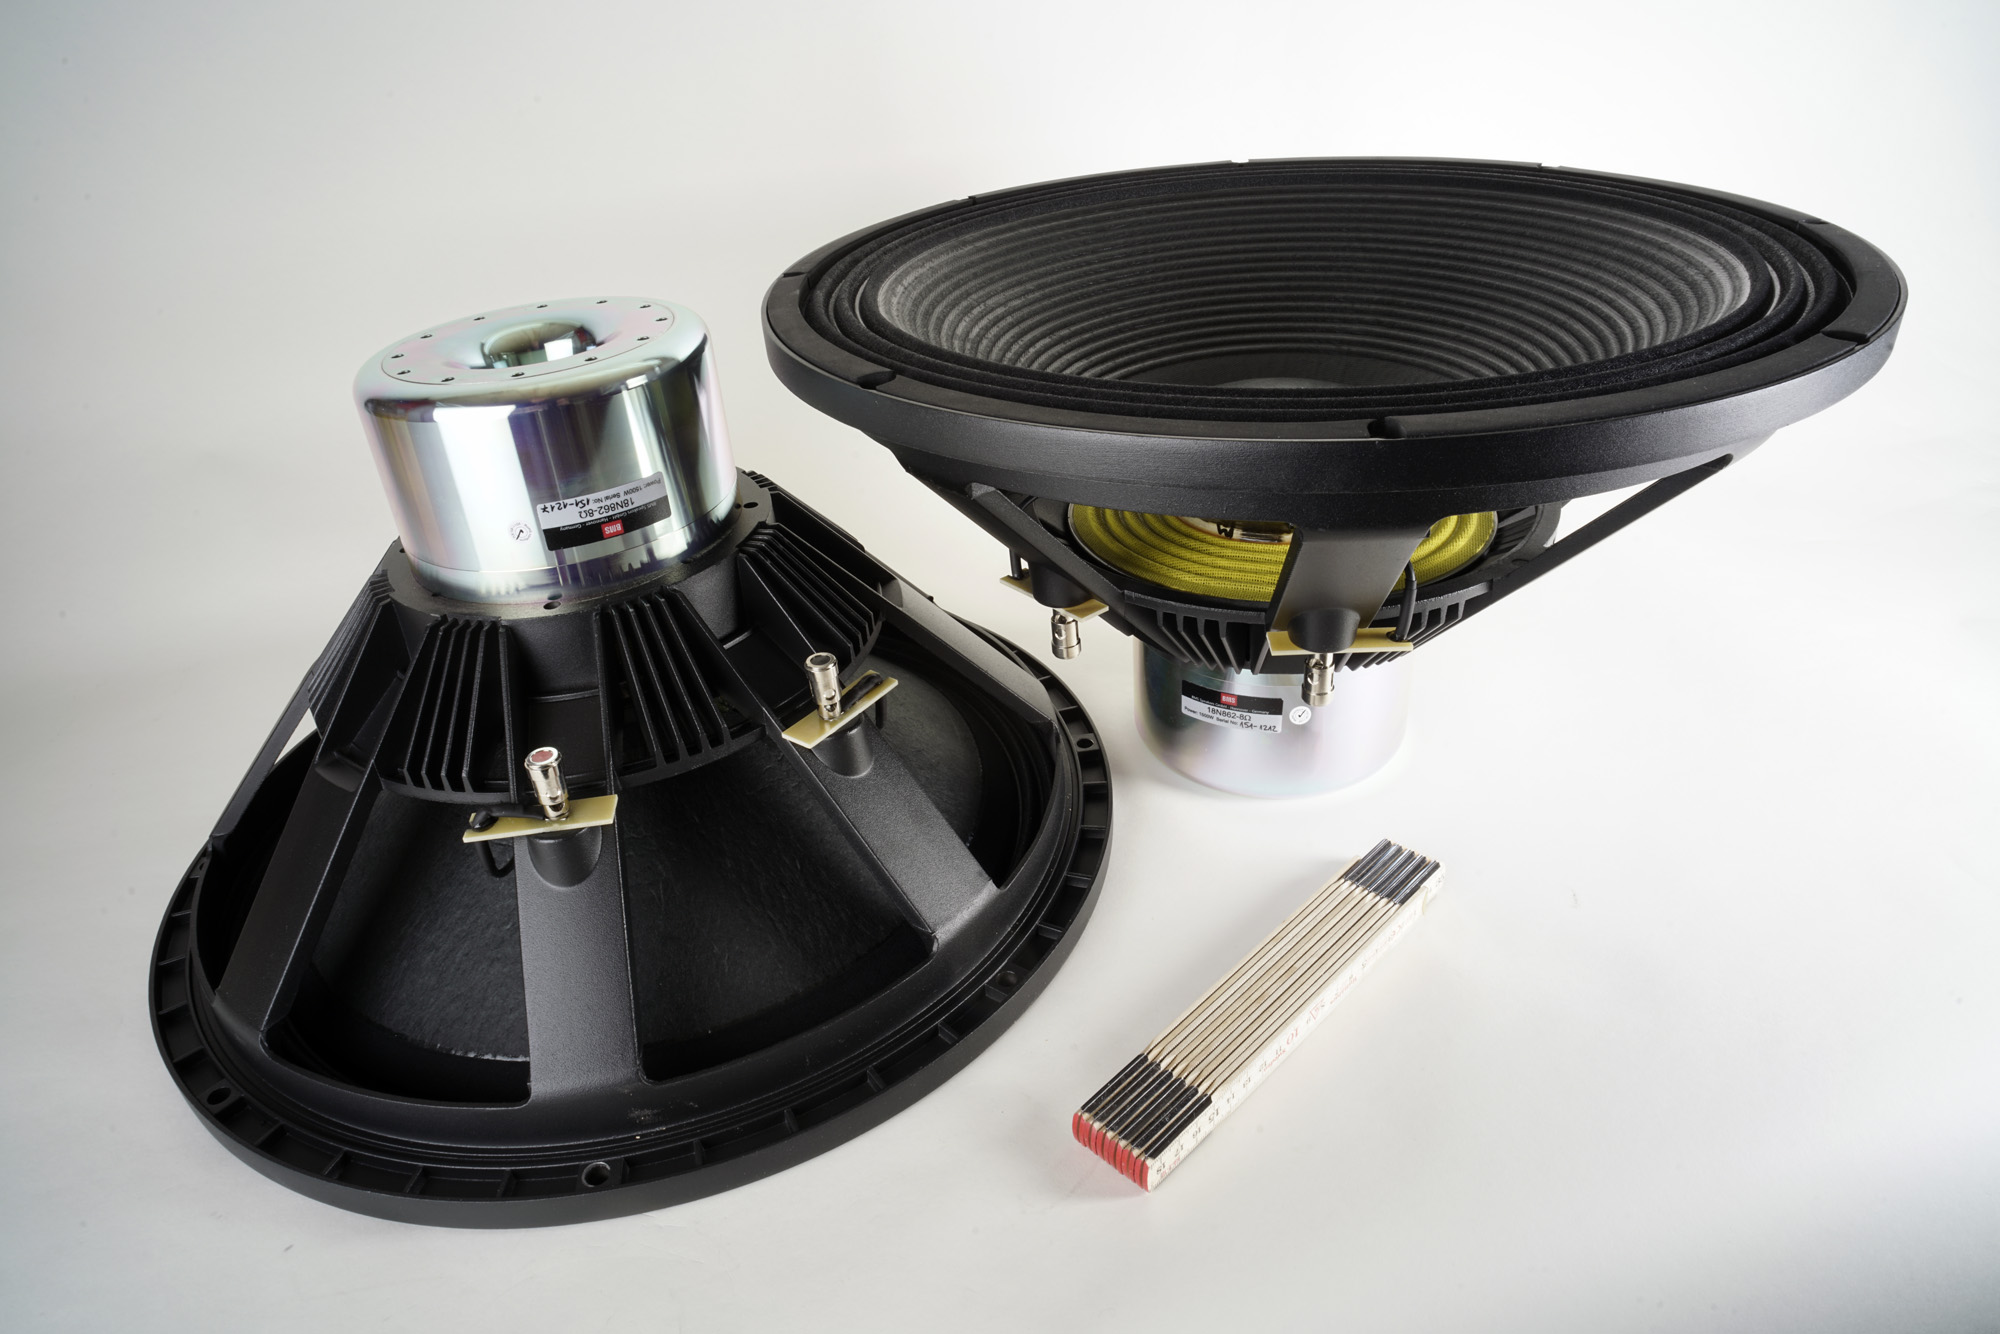

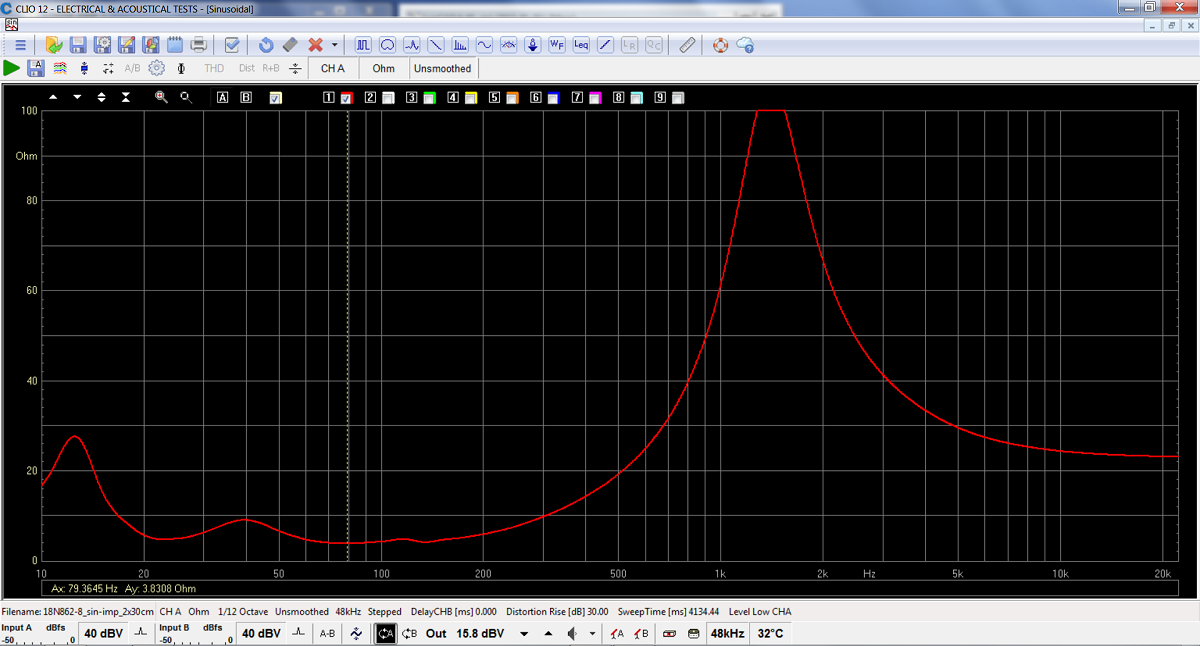
18" BMS bass driver, 18N862, 8 Ohm.
Click images to view large
Download specs:
Tweeter 1:
Fostex FT96H
Tweeter 2:
GRT-145-4
(GRT-145-4 no
longer available for TL-1/2)
Tweeter 3:
Visaton TL16H
Tweeter 4:
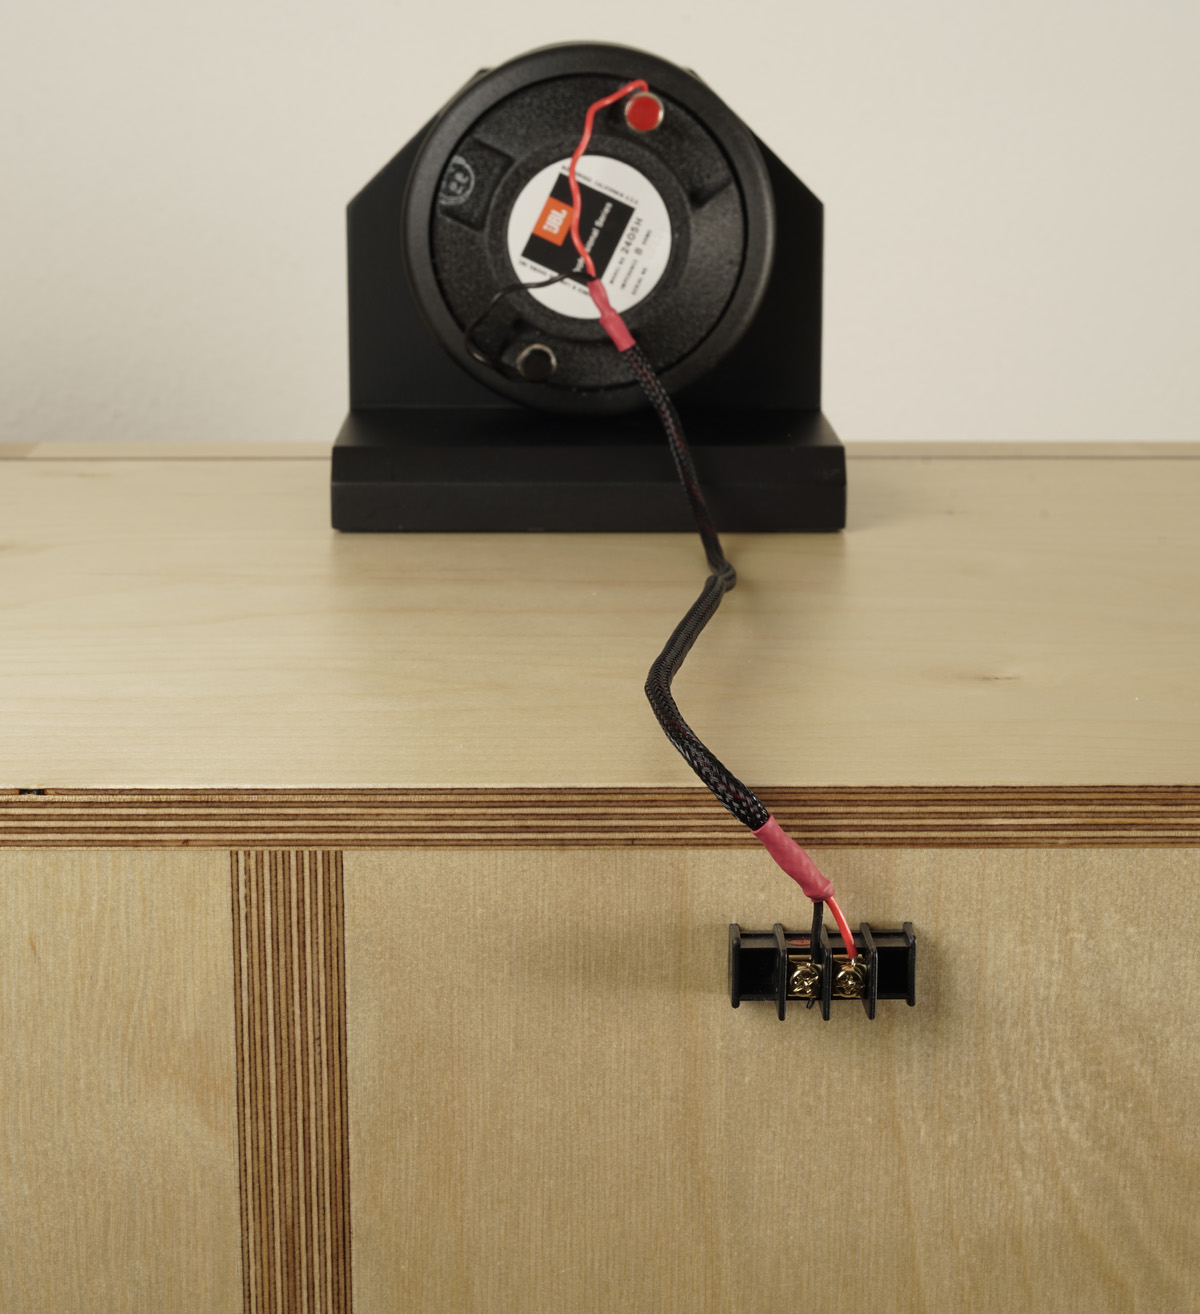
JBL 2405H (pay notice black terminal is PLUS)
Tweeter 5:
JBL 077 (2405) alnico (pay notice black terminal is PLUS)
Tweeter 6:
Beyma CP21/F
Compression driver: 18 Sound
NSD1095N, 8 Ohm
Horn: 18 Sound
XT1086
Midrange: 18 Sound
10NMBA520,
8 Ohm
Bass driver: BMS
18N862, 8 Ohm
The BMS and 18 Sound drivers were bought from
LEAN/UK.
1717£ ~2000 EUR (2020)

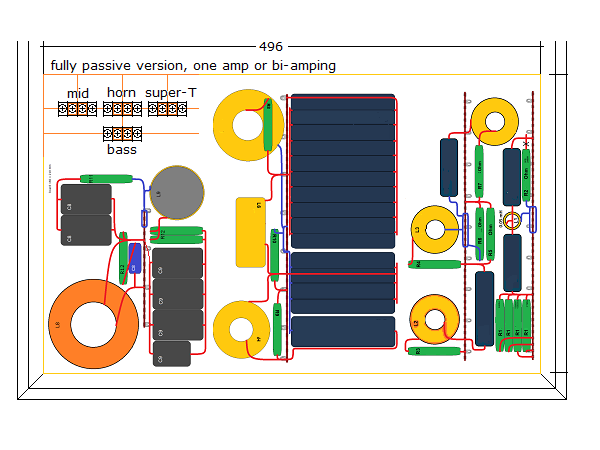
Above the fully passive and semi-active version. For
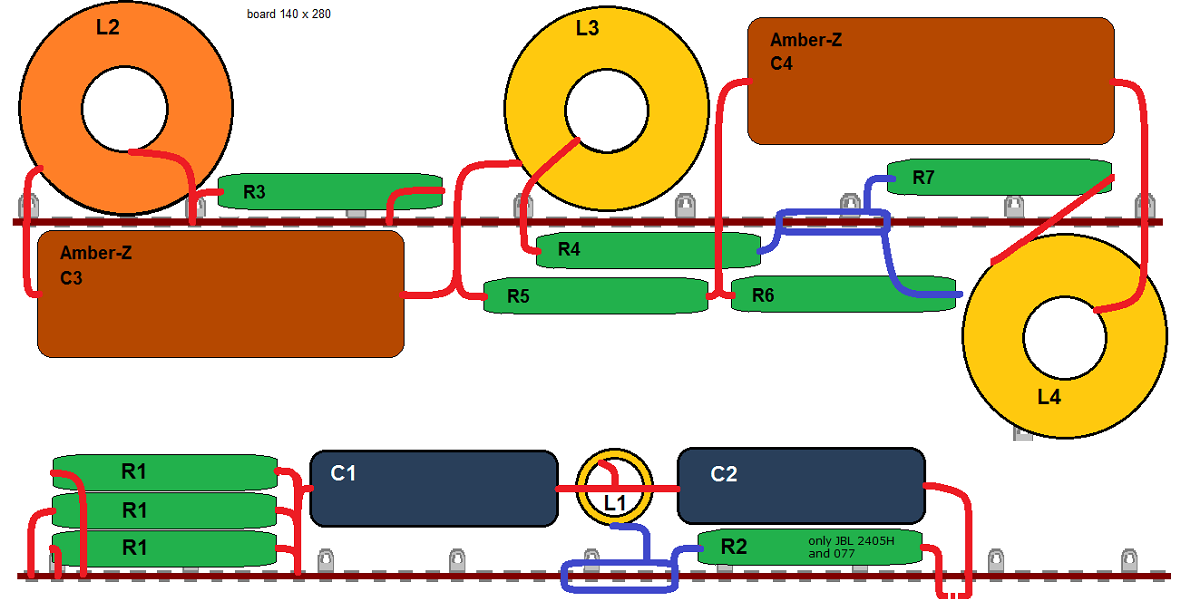
the various super-tweeter options, we have to adjust R1 and R2.
See tweeter alignment drawing for info on proper attenuation of the
various tweeters.
The bass LCR circuit linearise the upper bass impedance peak and makes the
impedance stay at 4 Ohms, minimum 3.5 Ohm, which is also the minimum
impedance when the two sections are run together from one amplifier.
Quite nice I should say!
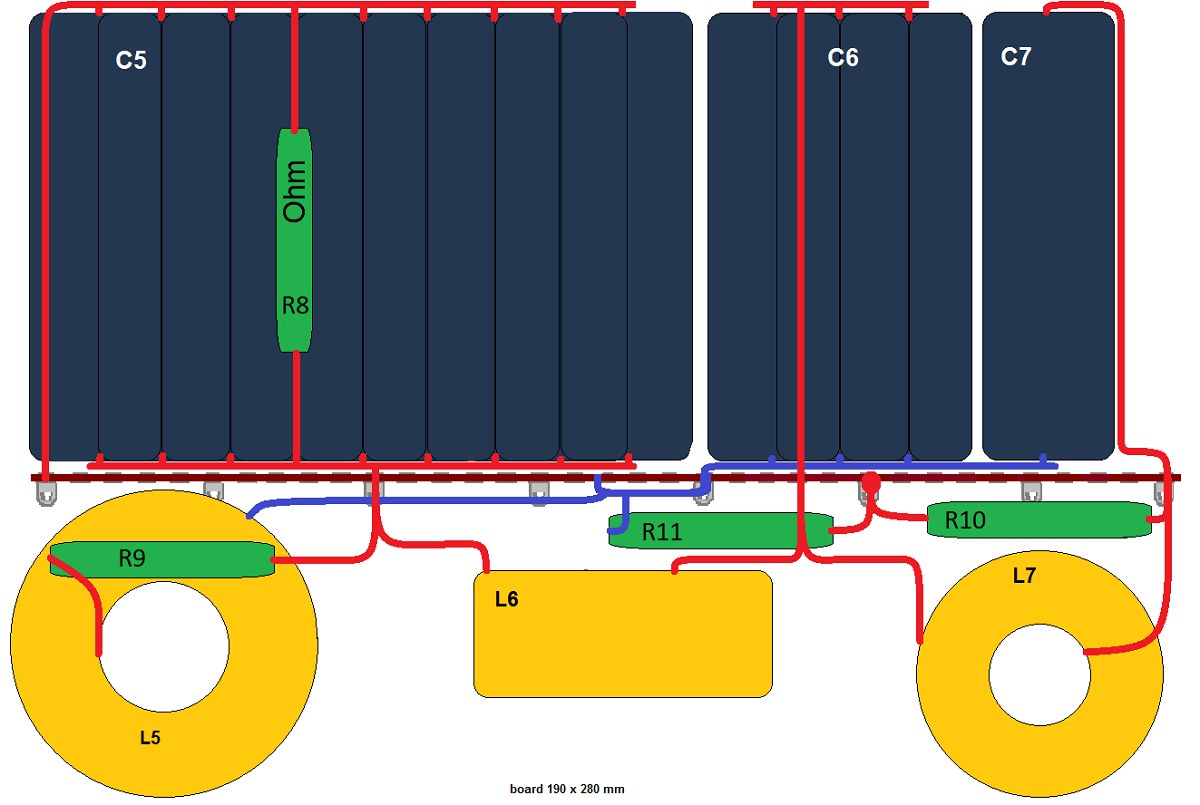
There will be different layouts as the size of capacitors varies
depending on choice.
R8 is a high-value by-pass resistor making sure the connected (valve) amp always
sees a resistive load.
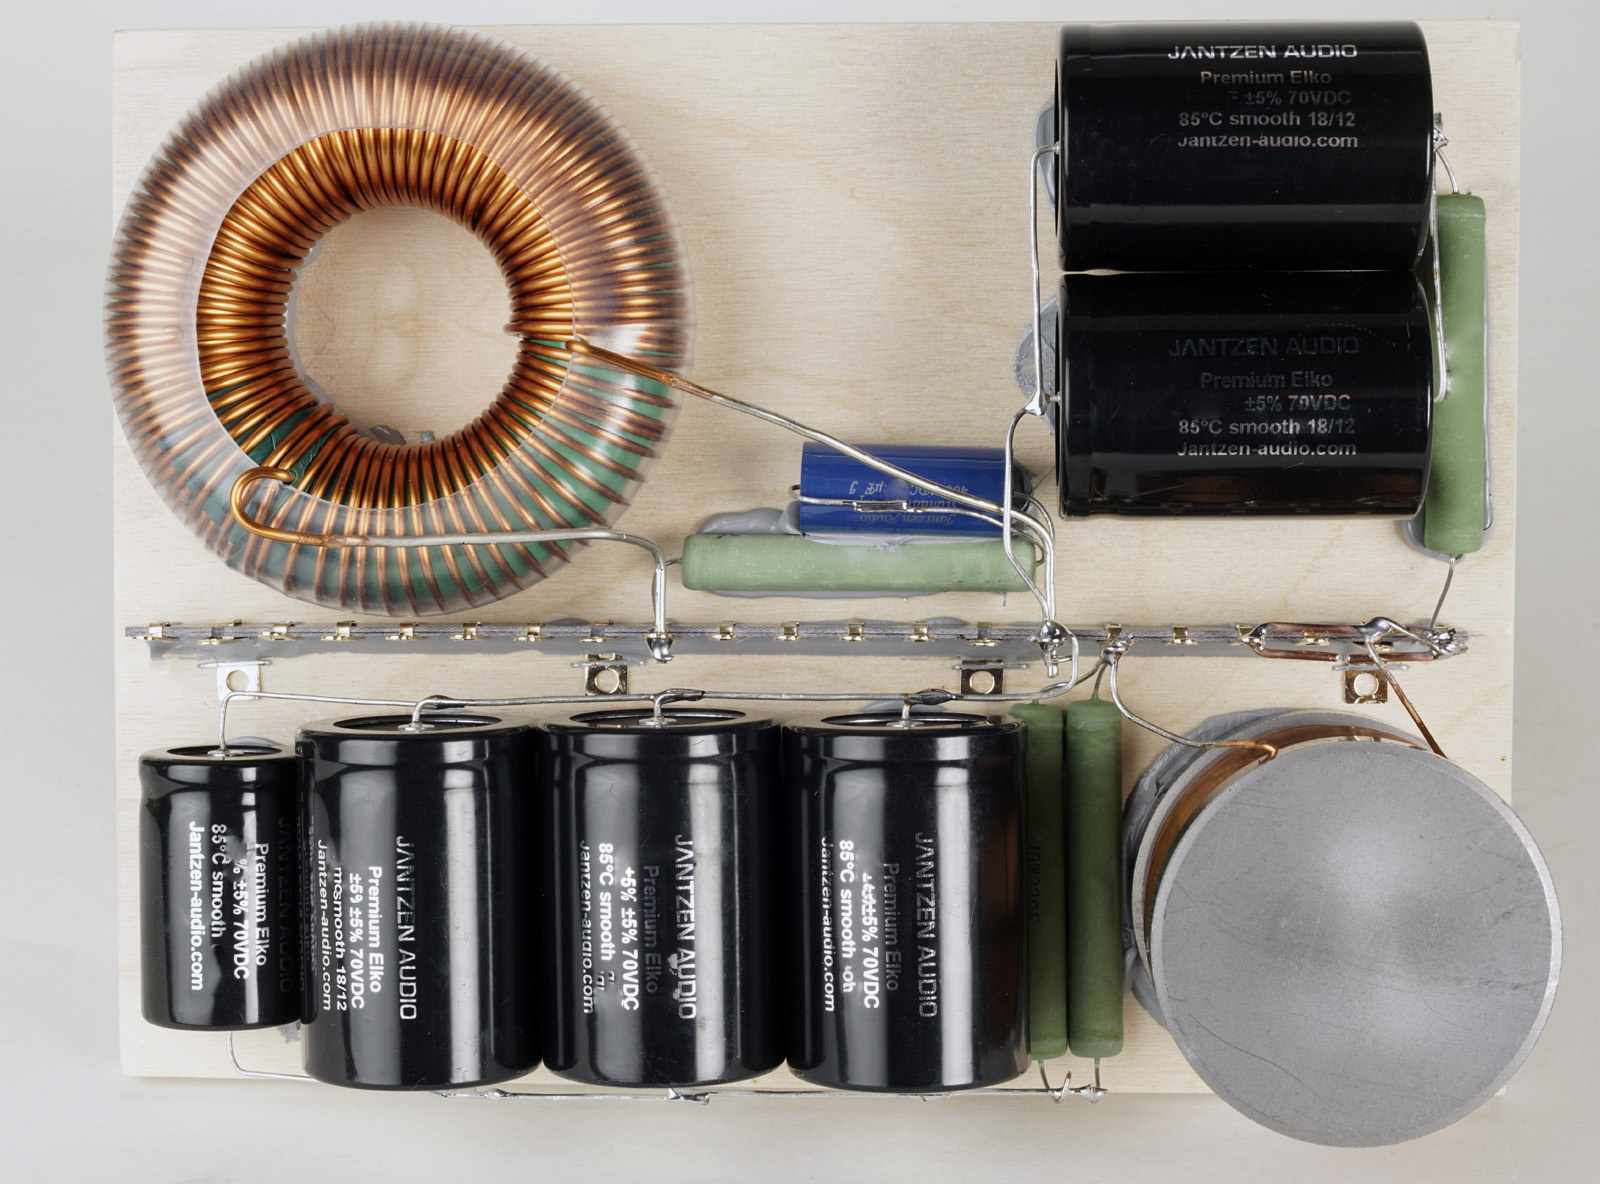
Click image to view large.
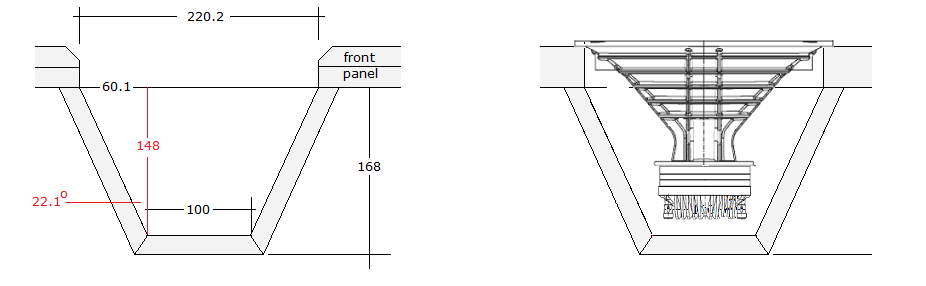
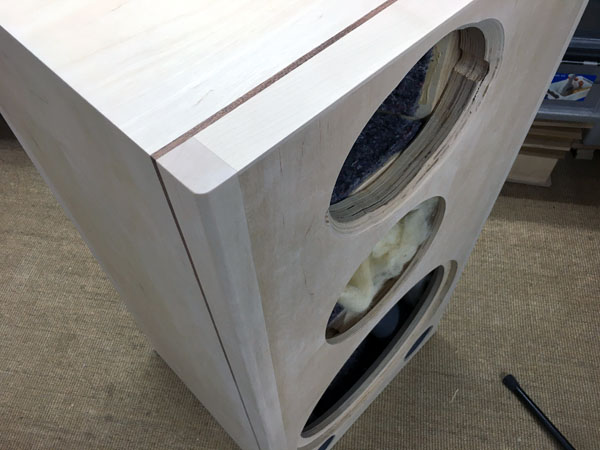
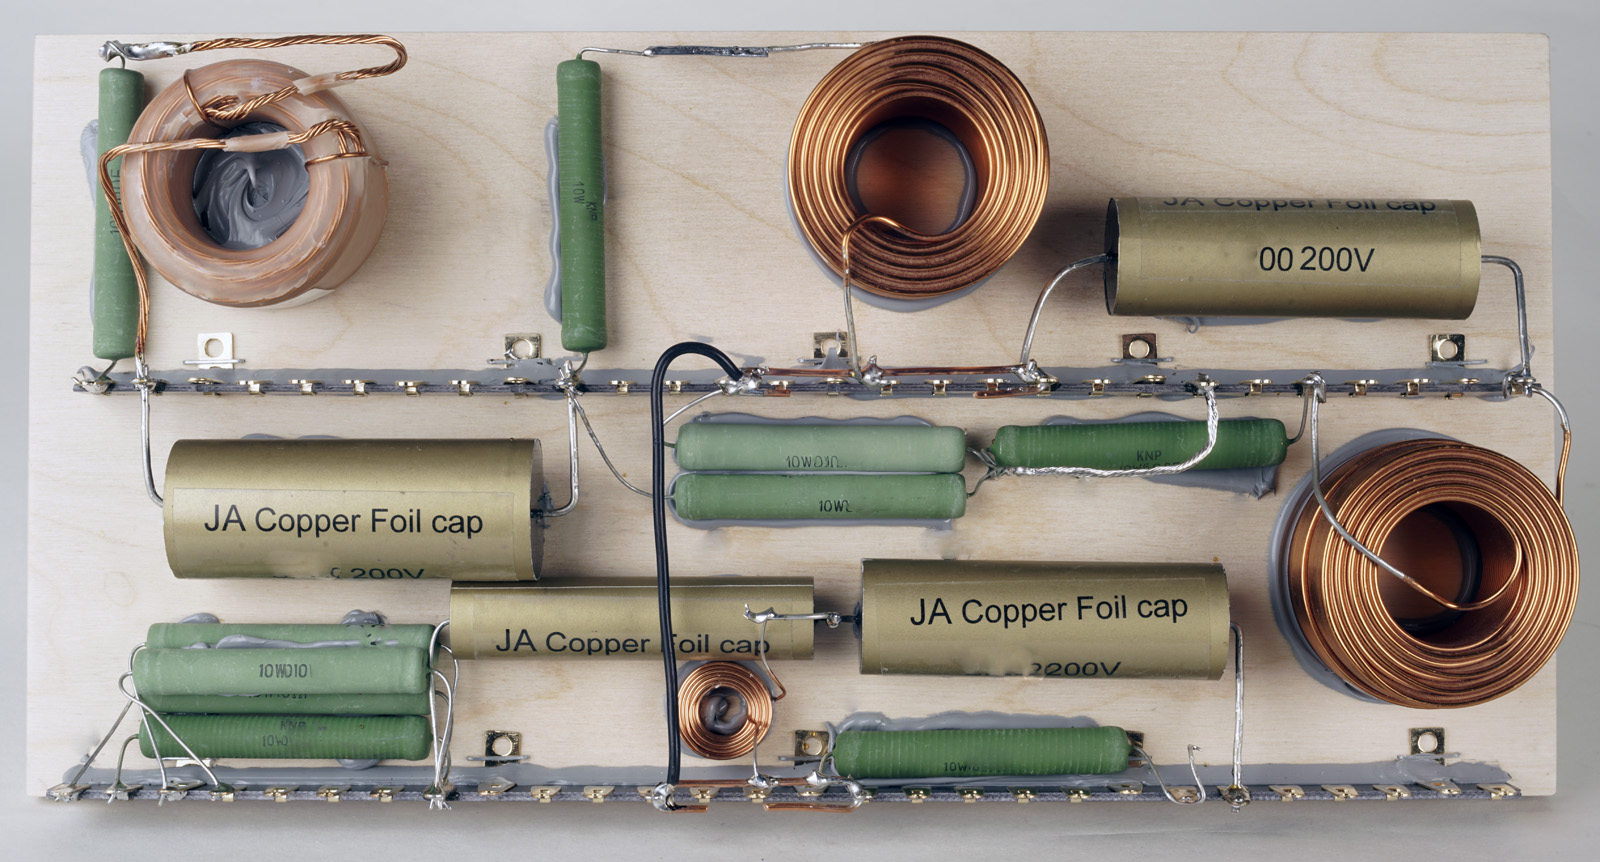
Cabinet was made from 27 mm Baltic birch with all interior structures
from 20 mm Baltic birch. Front panels were made from laminate of 2 x 20
mm Baltic birch. You don't have to flush mount the bass driver as seen
here, but I think it looks nice.
The dimensions of the bracings are based on outer panels being exactly
27 mm. Adjust to actual conditions. The exact location of holes in
braces are not critical. Just spread them evenly as seen on drawings.
For the ports I used Ø103 mm (internal diameter, 110 mm outer diameter)
sewage pipes. 300 mm length. This is by far the best and most rugged
solution for these ports - and cost very little. Alternatively you may
add 4 pcs #900050 100 mm
tubes (page 42) from Jantzen Audio to your purchasing list and cut
them to 300 mm length.
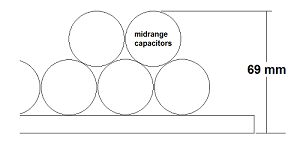
The depth of the crossover compartment is set to 80 mm. Stacking the
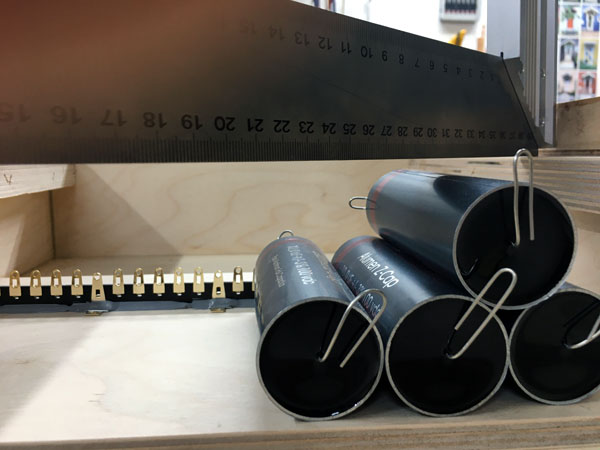
capacitors for the midrange driver yields a height of ~69 mm when
mounted on a 10 mm board, so this should do. The capacitors are 31 mm
diameter.
(GRT-145-4 no
longer available for TL-1/2)
Above the alignment of various super-tweeters and attenuation resistors
required to produce the flattest response from 10-20 kHz. The Visaton
comes with a mounting stand, where all others require some sort of
baffle. See below for my solutions. The size of the baffle and actual
height of the super-tweeter is not of paramount importance, so some
freedom here.
I have tried placing the JBL 2405H tweeter flush mounted on the front
baffle as was the usual JBL approach, but as predicted by simulation,
this makes horrific crossover lobing - really, really terrible. Not an
option to my thinking - although I admit it can be tough to hear.
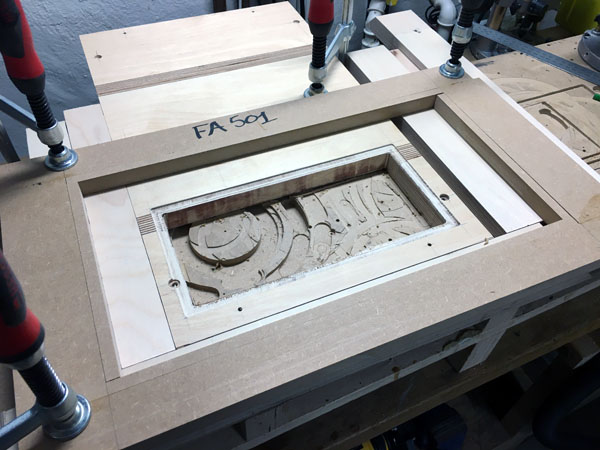
Hypex FUSION FA501 module for TL-1 and TL-2
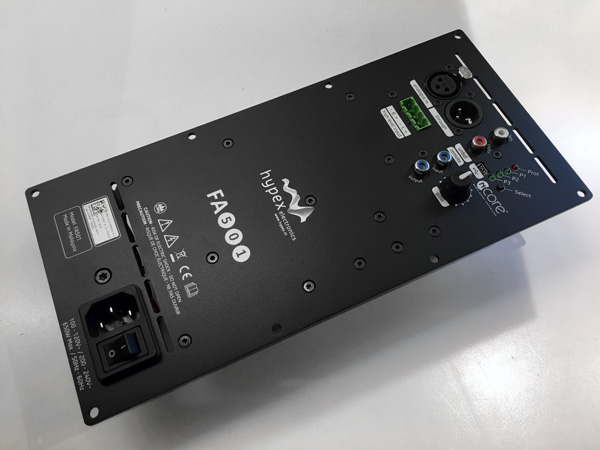
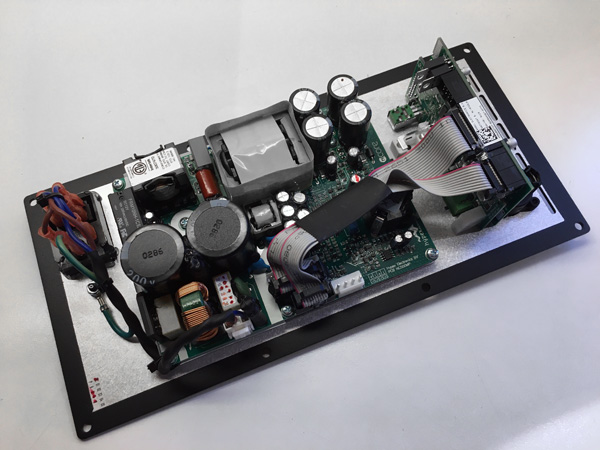
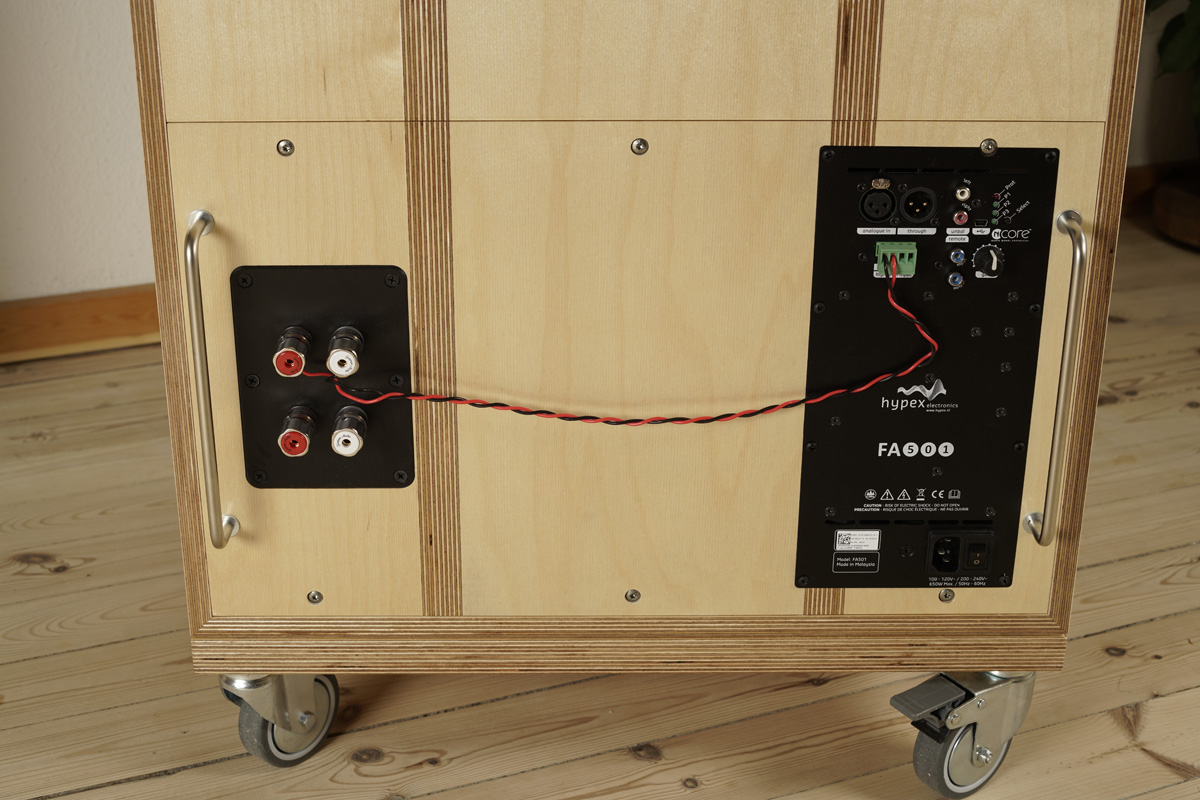
Connect Hypex module with wires from input binding posts, set Hypex
volume to "12".
Choose preset 1-2-3 for additional bass-boost @ 30 Hz. That's it.
Above the simple Hypex set-up.
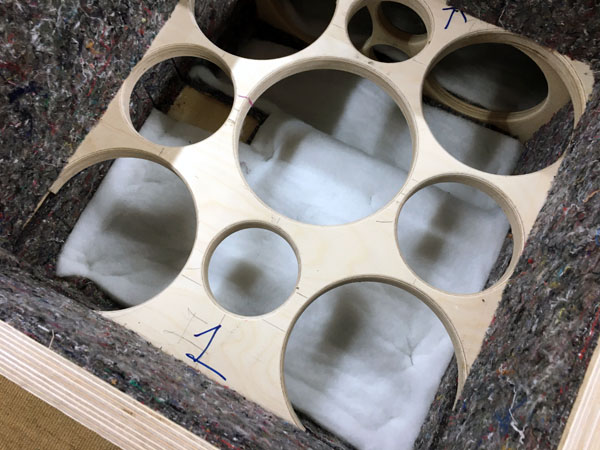
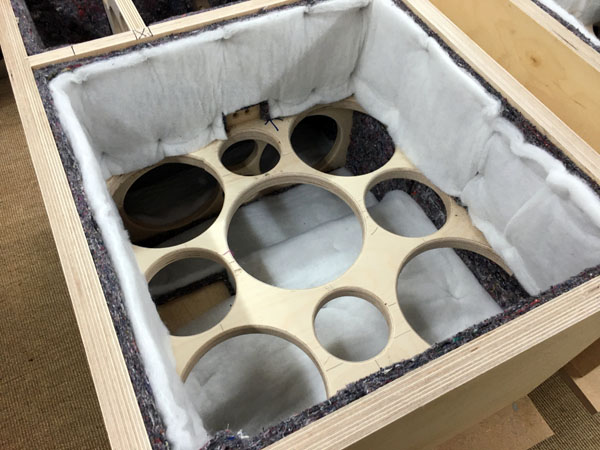
Workshop images and notes
BACK TO INDEX

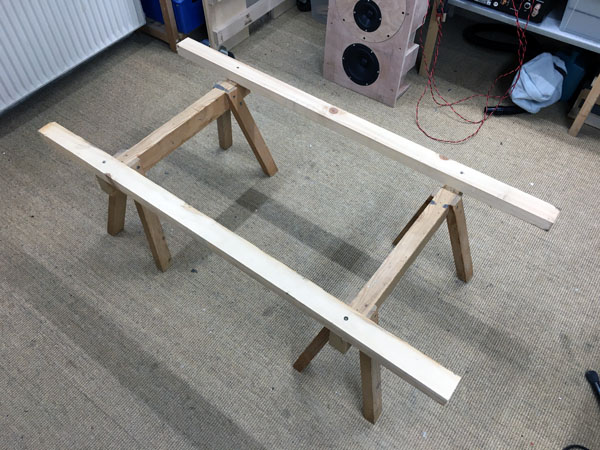
Left: I usually start cutting all panels + 5 mm
and sand them with grade 180. Next a good coat of lacquer making BB
less prone to edge ripping and also not susceptible to glue
residues. If the outer veneer is saturated with glue it will make
light spots when applying the final lacquer.
Right: This time I was a bit more organised in cabinet assembly,
preparing a special working table. See the following images.
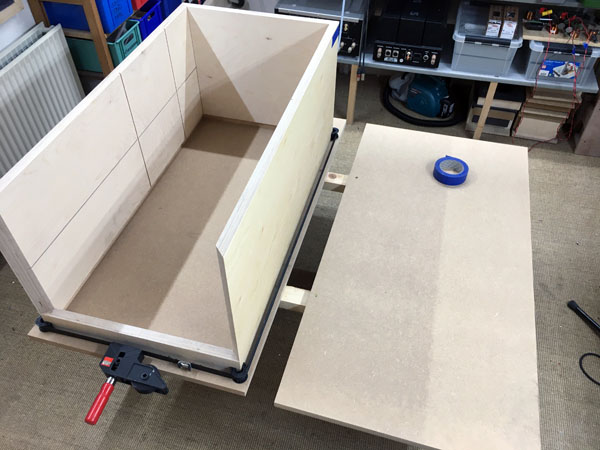
I made a small bottom "panel" to keep side panels in place and allowing
me to slide in braces and panels for midrange cabinet.
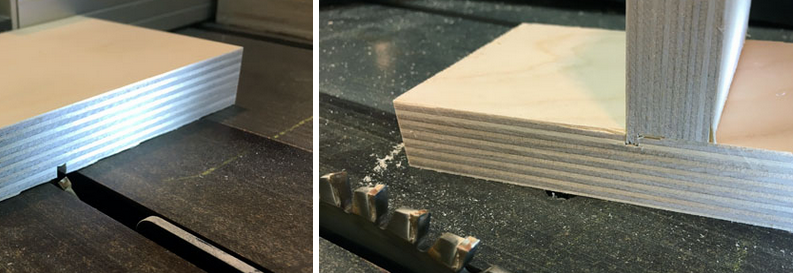
I started making slots in the side panels for the braces to
slide in. See
here.
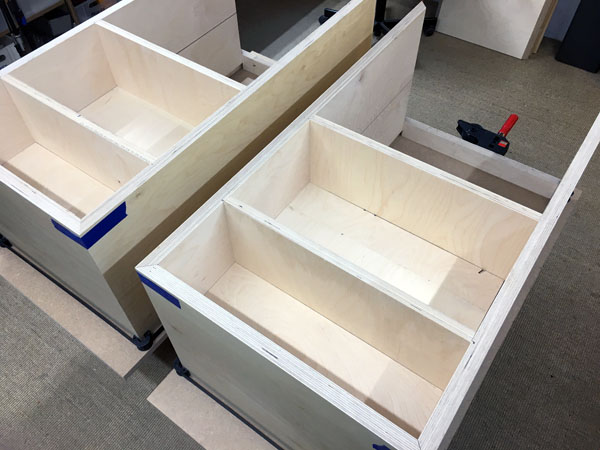
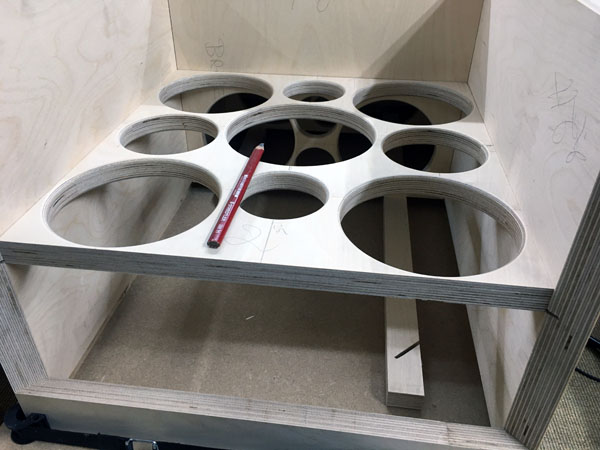
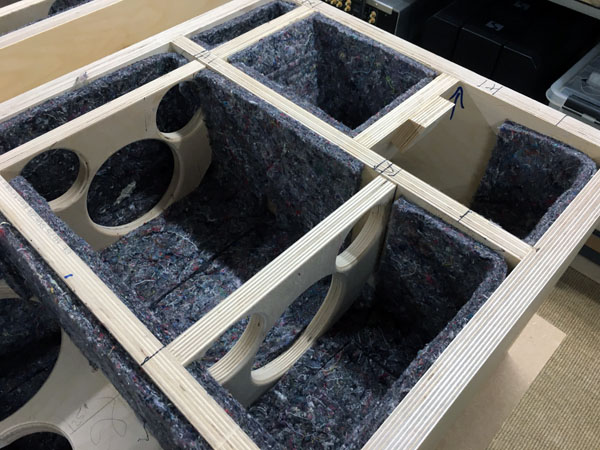
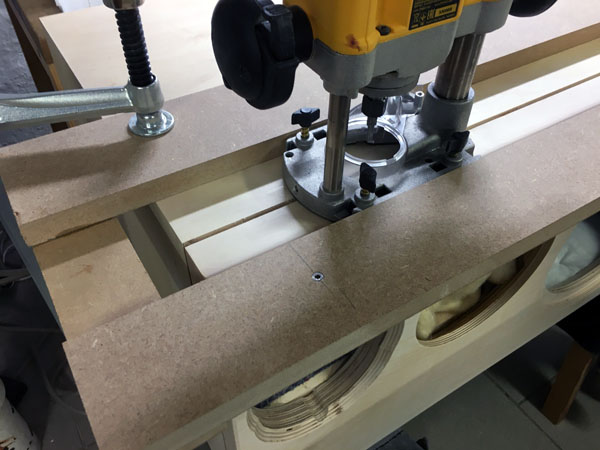
So, all internal panels in place. Time to route a LOT of holes.
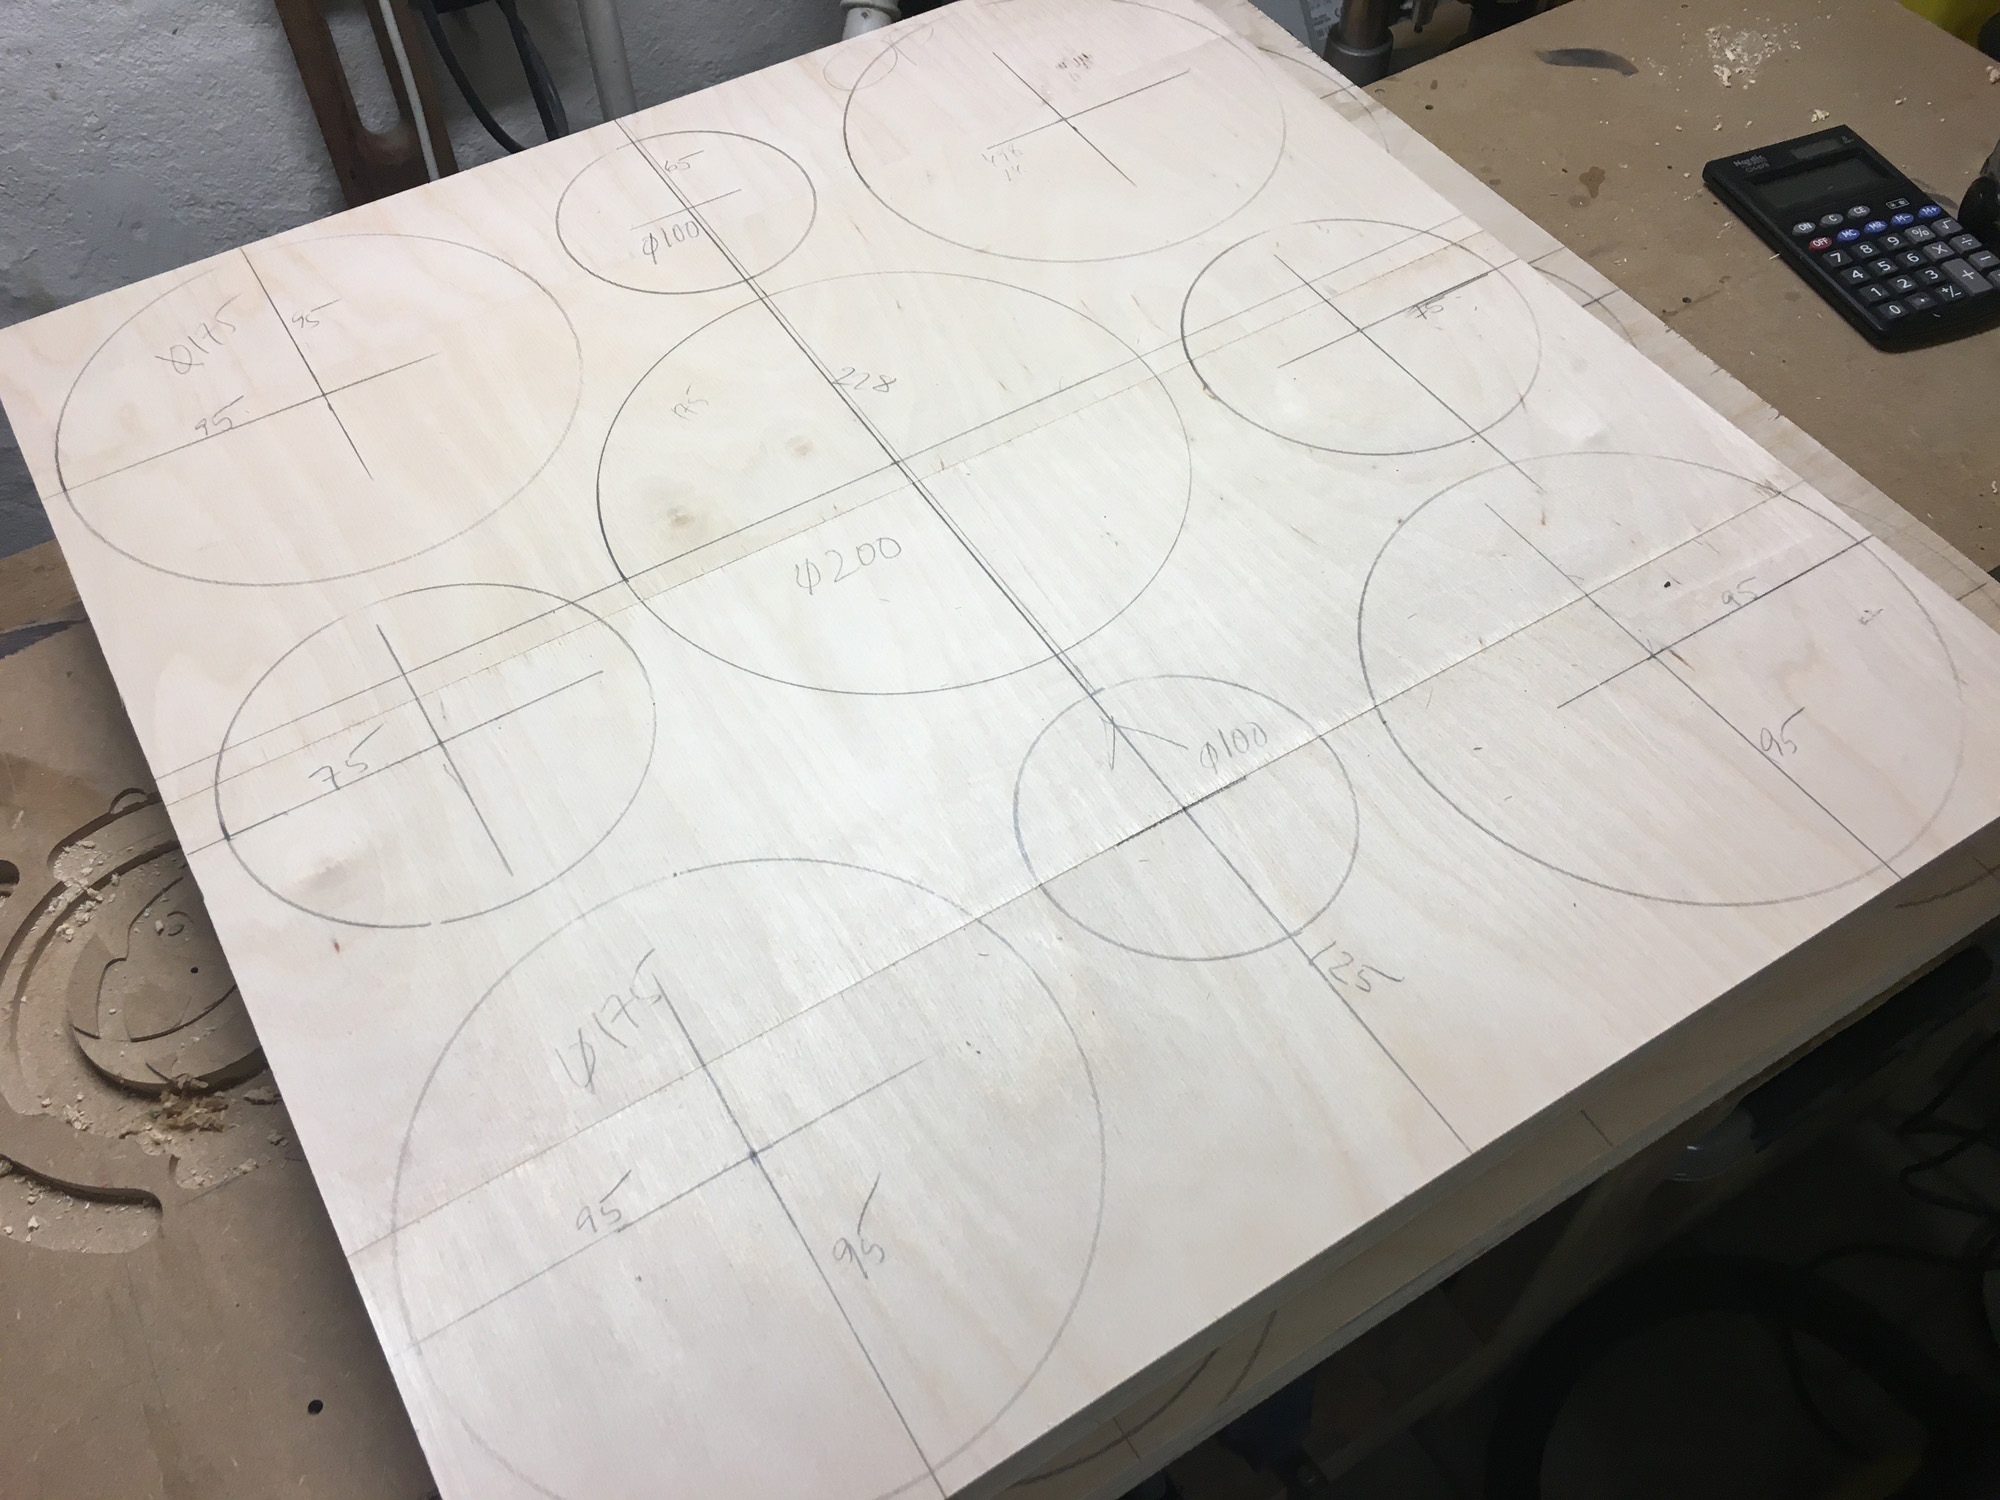
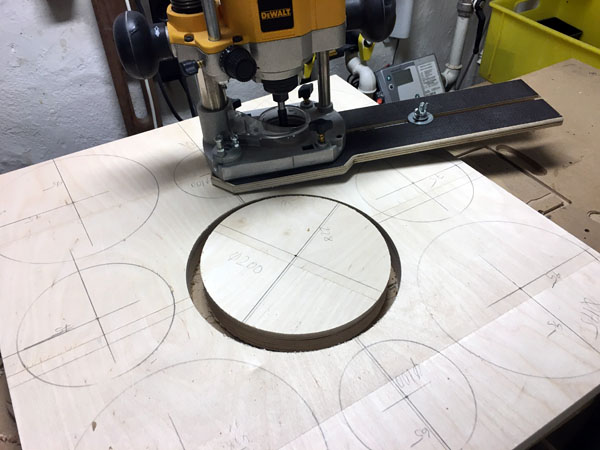
Click left image to view large. This is bracing C.
People ask if I really do all the holes by routing - and I do. The
mid hole here took 80 sec. Show me a non-CNC way of doing this
faster!
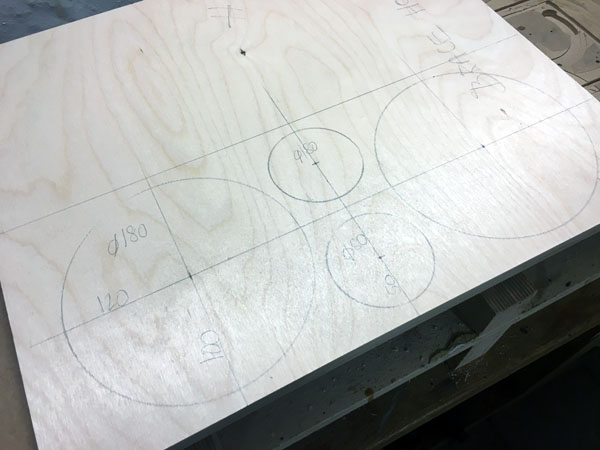

Bracing B.
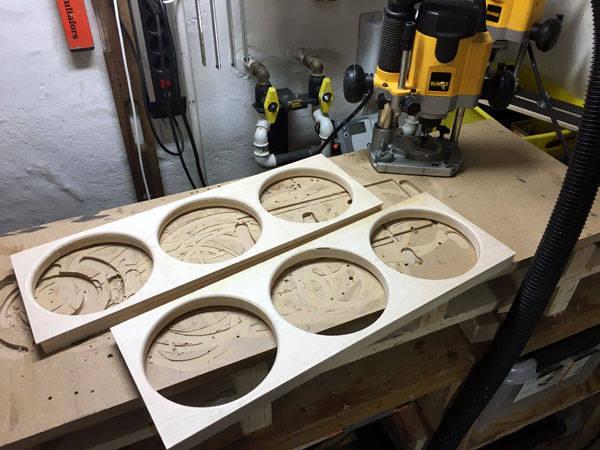
Left: Bracing C in place. Right: Bracing A.

Bracing A in place from two angles.


Left: Bracing C in place before cutting lower corners (right image)
to make room for the ports. See drawing.


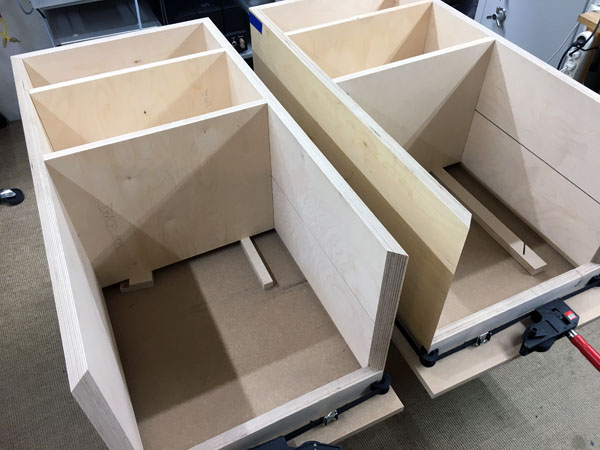
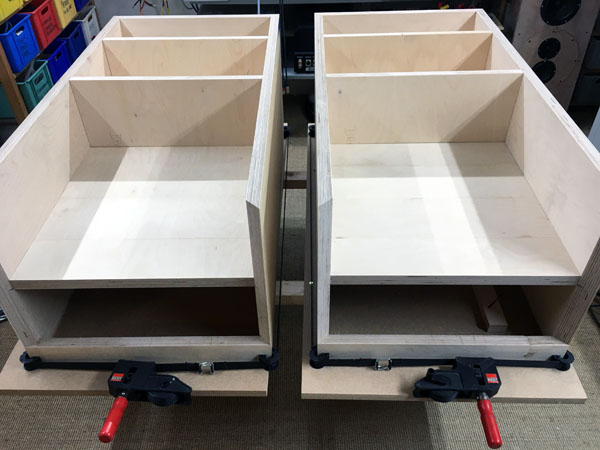
Gluing cabs and inserting crossover box.
Make sure the cabs keep the same width in its entire height.
Applying pressure like I do with the three straps makes the sides
bulge out.
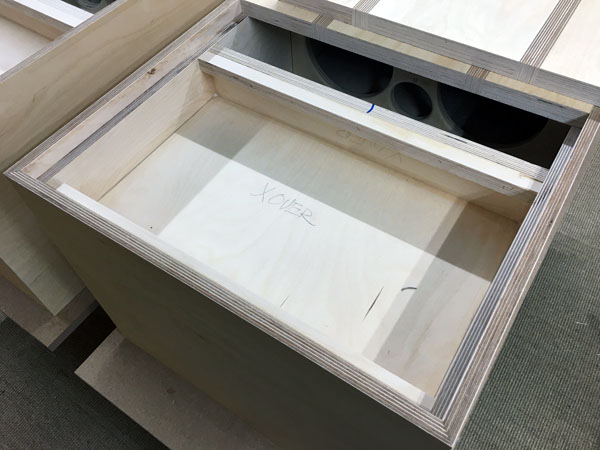
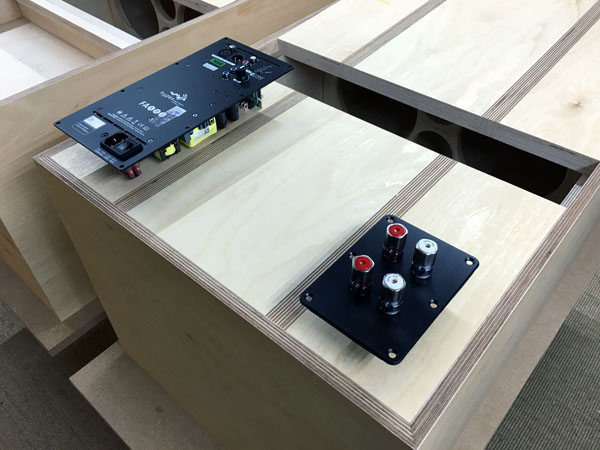
Crossover box and preparing for terminals and Hypex. These do not
need to be flush mounted - but it looks nice.
I added a 20 mm fillet on top of crossover box and a 12 mm at bottom
for the screws holding the cover panel - and forgot the height of
the Hypex module. See ooops below.
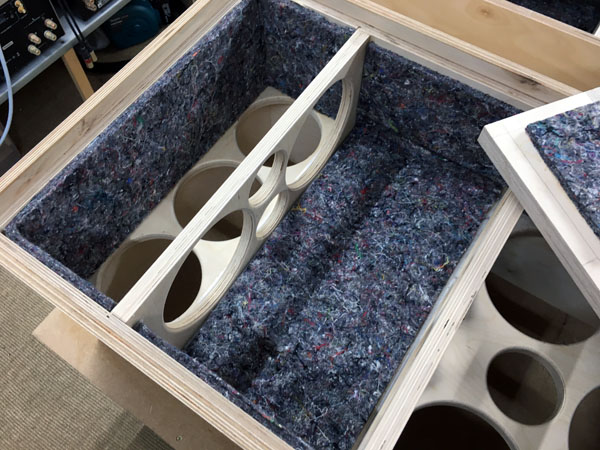
Before gluing the rear panel - add felt damping! Much easier to do
before gluing. And don't forget the rear panel itself.
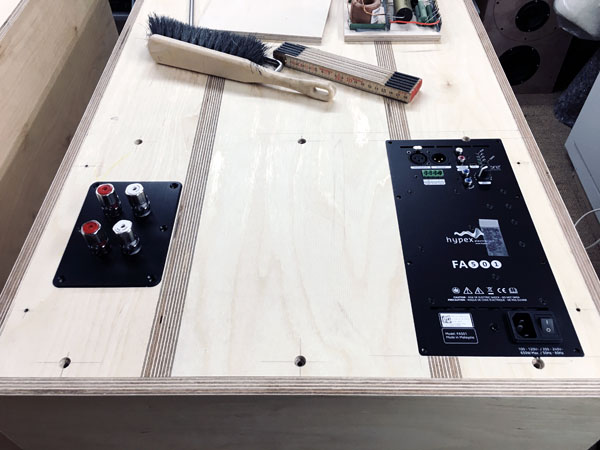
Routing for the Hypex module and routing for the binding post plate.
Both of these do not need to be flush mounted - it takes a lot of
time making frames for the routing - but it looks pro when done.

This time I made mirrored rear panels because when symmetry exists,
why not use it. It looks and feels nice.
Believe me, the handles come very handy when operating the crossover
cover. And it protects the Hypex module as well.

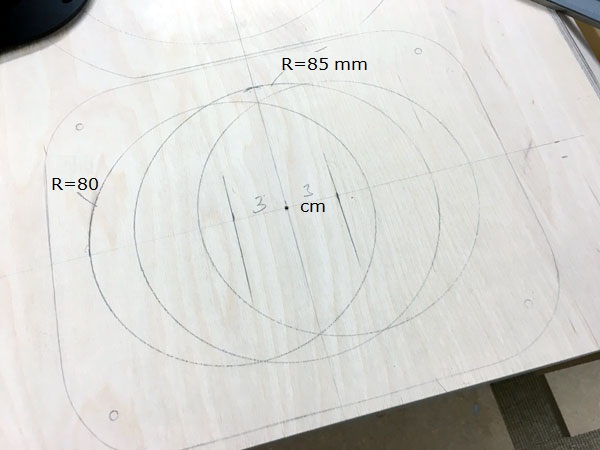
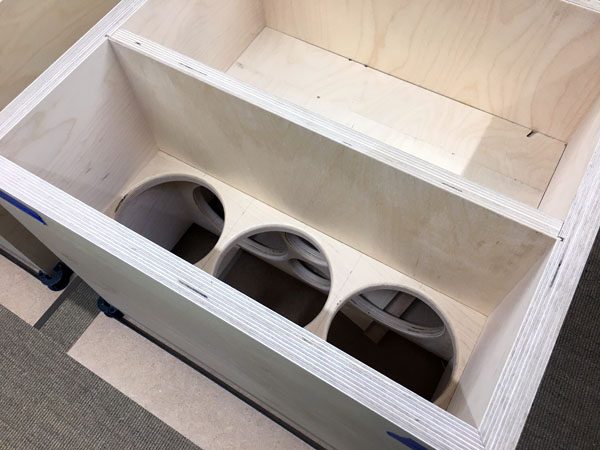
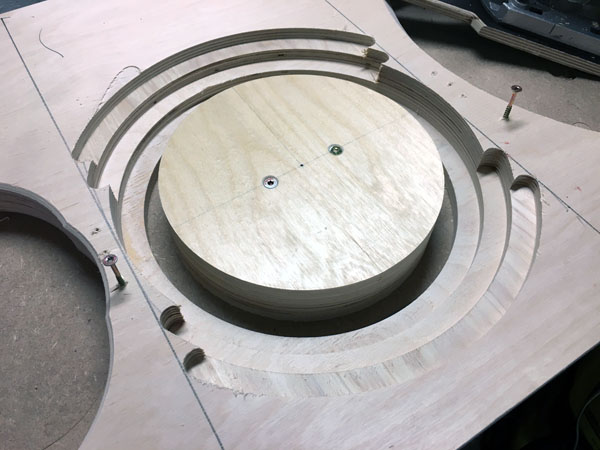
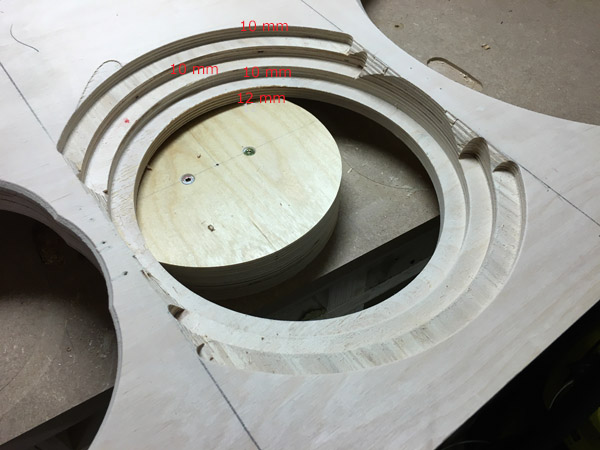
Right: Routing for the horn I did three circles as seen on image
with some additional chamfering.
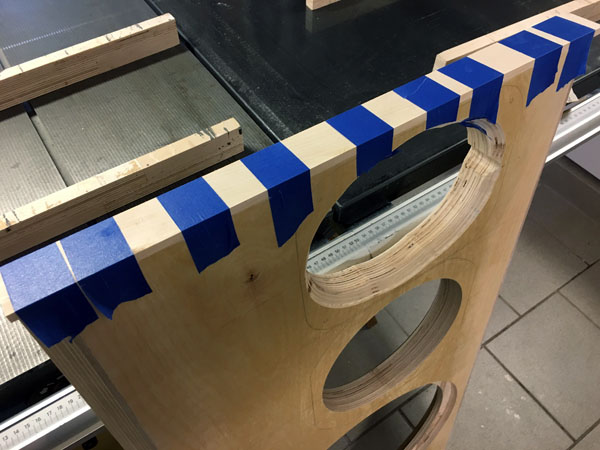
Adding fillets to front panel. I used solid maple wood for top, bottom
and sides. Side fillets were ~27 mm, here not trimmed yet.
Now, having a 42 mm front panel calls for some serious chamfering
for the midrange driver.
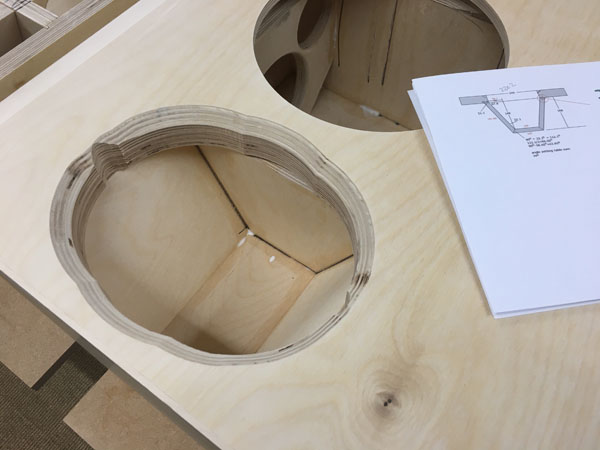
Mark midrange cabinet panels and route like seen above.
The thing is the midrange driver needs free air movement from the
rear side. Any acoustic resistance will impact frequency response.
Please check
this page on the importance of chamfering
driver holes. Obviously not needed for bass due to size and horns
not having any rear radiation.

Before adding felt material and gluing the front panels, I started
thinking of more things to do that cannot be done once all glued.
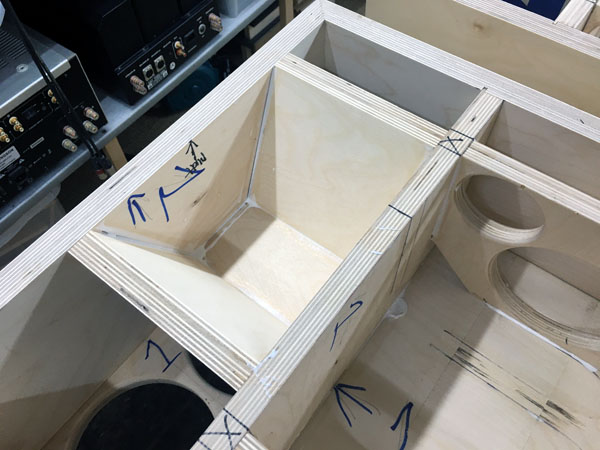
So, I added additional bracing to the midrange cabinet around the
driver (left image) and I made a small cabinet for the
horn/compression driver to protect the horn from the forceful
woofer.
The horn cabinet goes something like this. How you make it is not
critical as long as it is air-tight.
Some chamfering necessary to make the horn fit in.

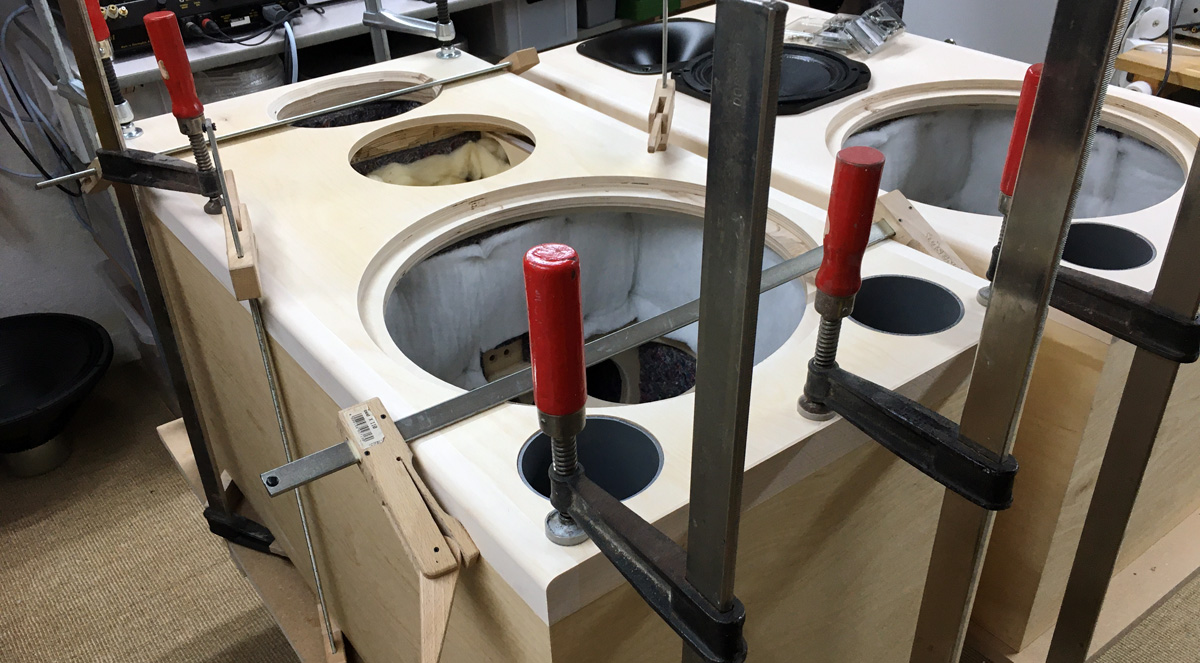
From time to time I add the front panels and drivers to get an
impression of final appearance.
To the right stainless steel
mounting screws for the drivers.
Also checking if there will be enough space for the midrange
capacitors. It works, 5 mm clearance.
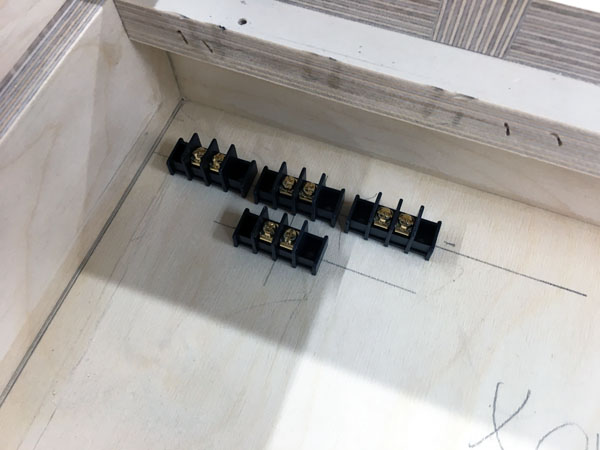
Also at this point time to make holes for wires and prepare terminal
blocks for connecting drivers to crossovers.
If you mirror the back crossover cover, make sure also to mirror
terminal blocks.
So, time to the final damping materials in front section of cabinet.

Basically clad all internal panels with felt damping.


Left: Wire holes from midrange and horn.
DO NOT forget to seal the wire holes once wires in place. Look
here.
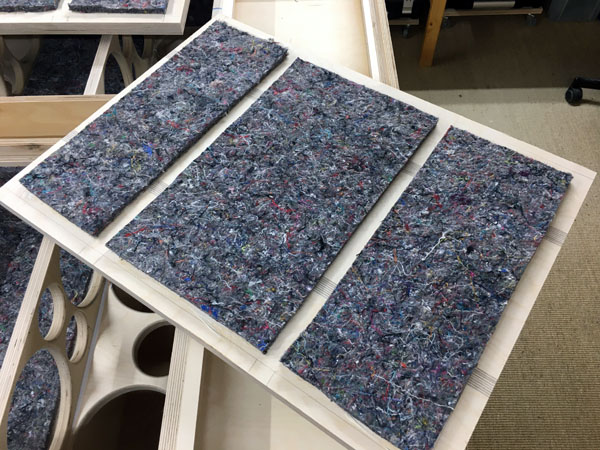
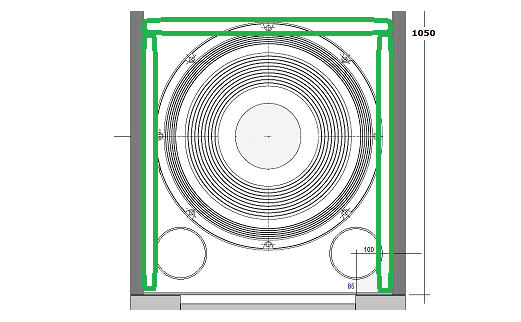
The acoustilux goes like this:
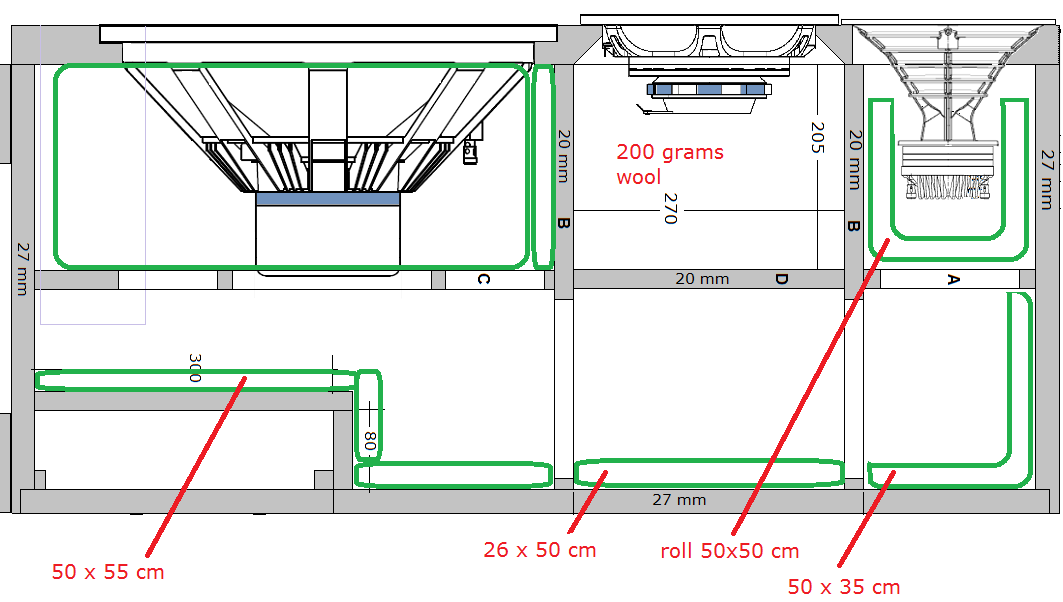
I addition to this acoustilux on sides and top of bass compartment.
See images below.
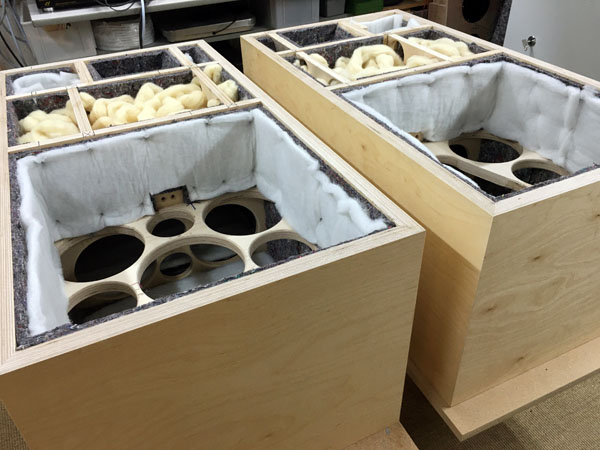
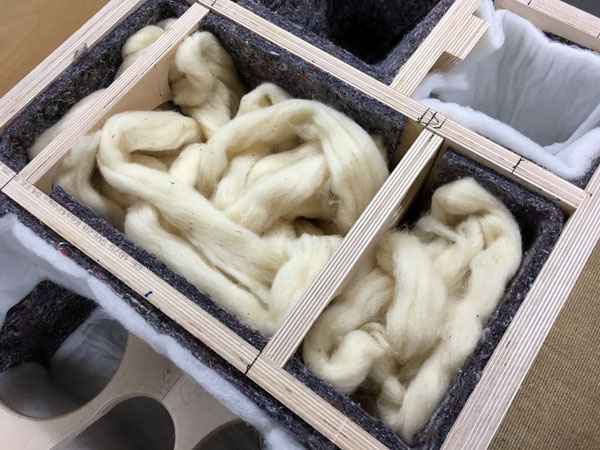
200 grams wool for the midrange cabinet.
Finally! Everything ready for gluing front panels.
BTW: When you have exceeded 150 work hours on a project and start seeing the end, you may want to slow down a bit, because what's next? The project has become your fulltime job and there's both a fulfillment and a loss in finishing a project. We may look forward to hearing the result of all the working hours, but a significant part of the joy of building your own speakers is the process itself. From response to my projects I find two typical customers, those who build a pair of speakers - and if they're satisfied, that's it. The other group will start thinking of the next project as soon as they've finished the project - and usually a bigger speaker. I may be a pathological example of the latter group. If I had the space I would start thinking of twin 18" bass drivers... Anyway -
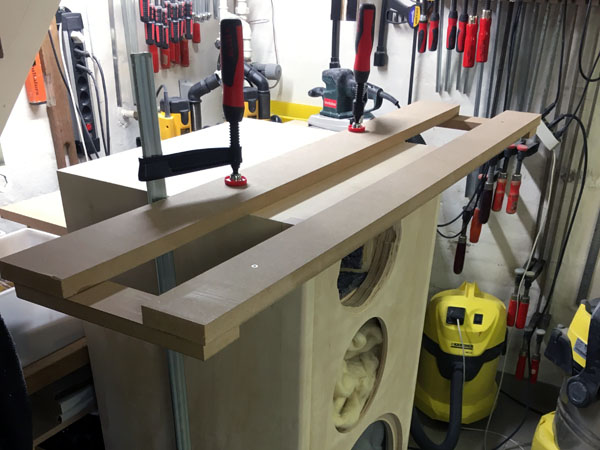
Making a perfect joint of the front panel and cabinet is almost
impossible. Thus, I made a guide allowing me to slide the router and
make a perfect 4(D)x5(W) mm groove. On the table saw I made some 5 x
5 mm mahogany fillets and glued them in and sanded them down.
Left: Cabs finally ready for final sanding and 2-3 coats of lacquer.
I think I said I wouldn't bring too many workshop images, but I got
carried away in the process and wanted to show as many details as
possible. Hope some of the images are useful in your
construction.
The version here with the Alumen-Z for midrange has been deleted as
no-one builds it - and admittedly it is extremely expensive and
benefits are moderate.
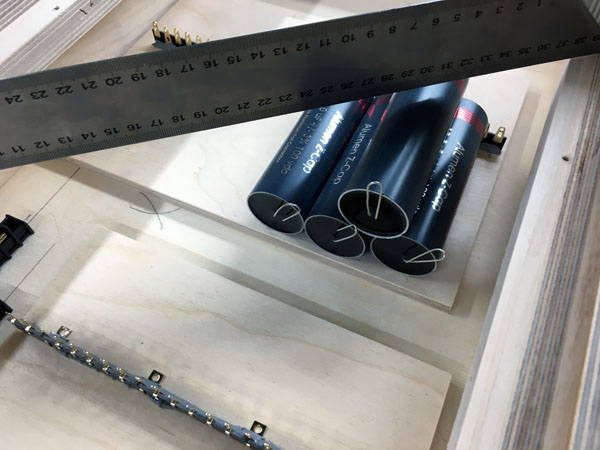
I use the Superfix to attach the waxed litze coils. Adding Superfix
to heavy wax coils isn't exactly ideal, but I've found a way by
filling up half the center hole with Superfix - and they stay firmly in
place.

Finally, mounting and wiring the crossovers. Here the fully passive
version.
Can't wait...
Workshop setup. I need to make some nice stands
for the 2405H super-tweeters.
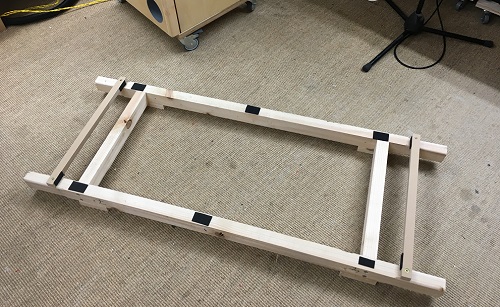
Getting the speakers from the workshop to our living room took two of my
hifi-bodies and a special built stretcher for lifting the 60+ kgs
(without the bass drivers) up to our back yard and through the garden to
our terrace and into our living room. I'll keep the stretcher for other
speaker. Better not strain your back!
A few comments on
MEASUREMENTS before you start interpreting the readings below.
First of all, if we think measurements will
tell us how a speaker sounds, we're wrong. The perception of sound is
way too subjective to be reflected in any measurements we can perform. A
loudspeaker system is meant to give us a satisfying idea of an acoustic
event and for some people a pair of 5 USD ear-plugs are enough, others
spend 200 kUSD on a truly full-range pair of speakers - and the latter
may not be happier than the former.
Measurements may give us an idea of tonal balance of a system, i.e. too
much or too little energy in certain areas, although dispersion
characteristics play a vital role here. A two-way 7+1 and a three-way
7+4+1 may display similar horizontal dispersion, yet sound very
different. Measurements may tell us about bass extension if far-field
measurements are merged with near-field measurements. In addition to
this, ports may contribute to bass extension. Most of we diy'ers do not
have access to an anechoic room for full-range measurements from
20-20000 Hz.
What cannot be seen is what kind of bass performance we get in a given
room. Bass performance is highly dependent on in-room placement of your
speaker and the same speaker can be boomy in one place and lean in
another. Actual SPL level at 1 meter distance and 2.8V input is useful
for en estimate of system sensitivity and combined with the impedance
profile may give an idea of how powerful an amplifier is needed to drive
the speaker to adequate levels.
What measurements do not tell is the very sound of the speaker unless
displaying serious linear distortion. The level of transparency, the
ability to resolve micro-details, the "speed" of the bass, etc., cannot
be derived from these data. Distortion measurements rarely tell much
unless seriously bad, and most modern drivers display low distortion
within their specified operating range.
Many people put way too much into these graphs and my comments here are
only meant as warning against over-interpretation. There are more to
good sound than what can be extracted from a few graphs. Every graph
needs interpretation in terms of what it means sonically and how it
impacts our choice of mating drivers, cabinet and crossover design.
What measurements certainly do not tell is the sonic signature of the
speaker, because speaker cones made from polypropylene, aluminum,
Kevlar, paper, glass fiber, carbon fiber, magnesium, ceramics or even
diamonds all have their way of adding spices to the stew. Nor do
measurements tell what impact the quality of the crossover components
add to the sound, from state of the art components to the cheapest of
coils and caps, they all measure the same if values are correct, yet
sound very different.

Measurement of all super-tweeters tested. Click image to view extra
large.
Now, the Fostex FT96H is discontinued (communication with Fostex
marketing). It performs really well and is still recommended if you can
find them 2nd hand.
The Fostex T90A is a really, really nice looking tweeter,
impeccable finish - but measures miserable. 10 dB dip at 10.5 kHz and a
25 dB dip at 22.5 kHz, the first dip right where it should not be in
this application. Fostex should have ditched this tweeter and kept the
FT96H!!
Visaton TL16H is the smoothest horn-loaded tweeter of them all and very
suitable indeed, only takes minor adjustment of attenuation.
Viawave GRT-145-4: Well, beats them all when it comes to frequency
extension and an overall smooth response. The "problem" with the Viawave
is that customers find the horns sexier - but the Viawave is really the
very best you can get here.
I was a bit disappointed by the very nice pair of JBL 077 alnico
tweeters I have, despite original blue diaphragms and everything. I'd
done the later version 2405H in a client set-up and found a much better
response - and so did the 2405H pair I found on eBay. Very expensive
compared to a pair of Viawave. The thing about these slot loaded
tweeters are their exceptional horizontal dispersion, and I mean really
exceptional. These deliver on a 100º wide angle.
If we leave out the Fostex T90A, they all go with the same crossover
except for attenuation resistors and C1 for 077, so for the sake of
ease, extra resistors will be included in the kit allowing all viable
options, FT96H, TL16H, 077, 2405H and Viawave and you have tell Jantzen
Audio you want to use 077 and another value of C1.
The Beyma was brought in later and you can see measurements
here.
Go to The Loudspeaker I for further measurements. They're the same for this TL-2.
Here some measurements from my folder:
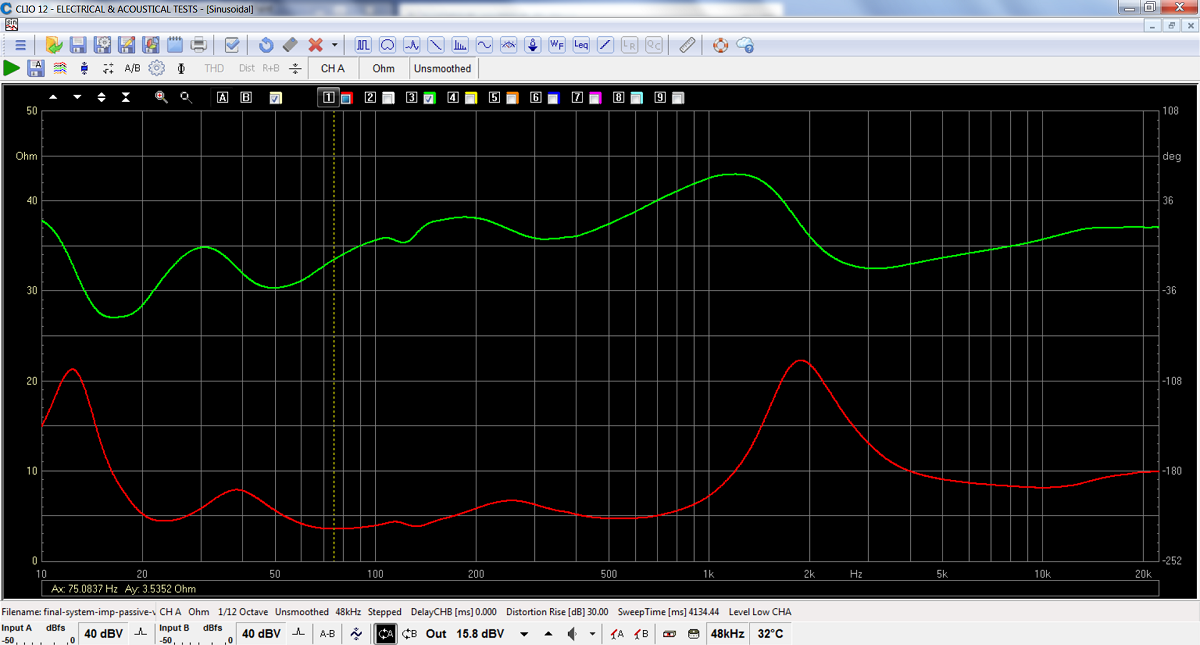
Impedance of fully passive system. Not a difficult load at all.
Impedance of bass section alone driven from passive crossover.
The decline above 1.5 kHz is due to the RC circuit across L8.
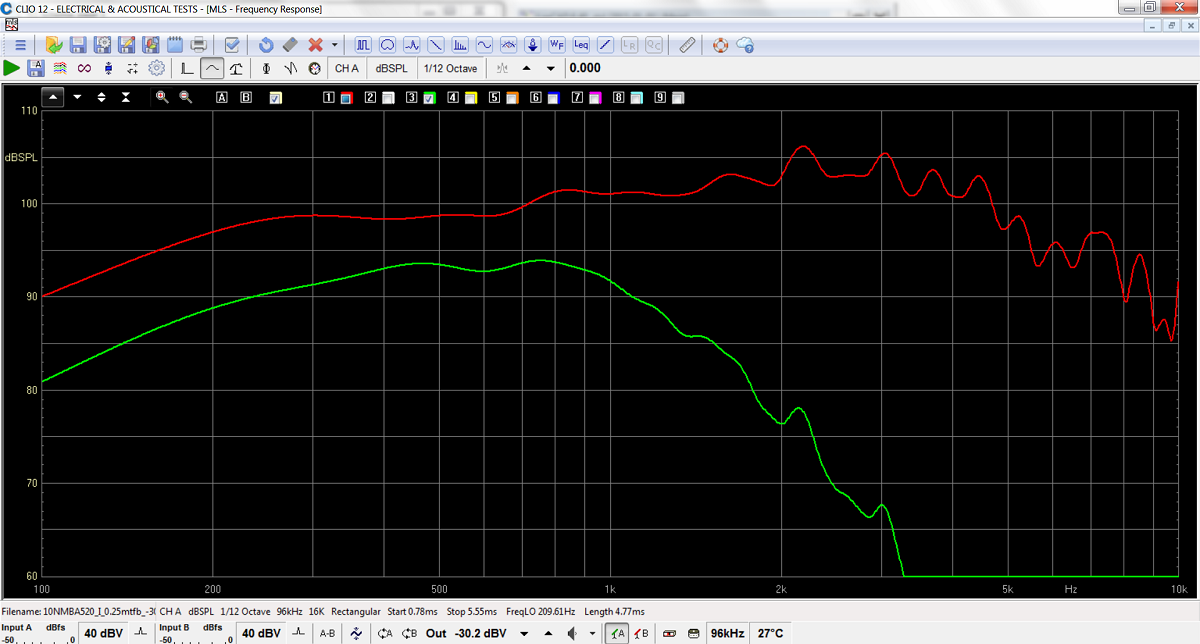
The midrange driver is extremely efficient, doing some 98 dB alone
(red). We only need some 93-94 dB (green) as seen driven from crossover.
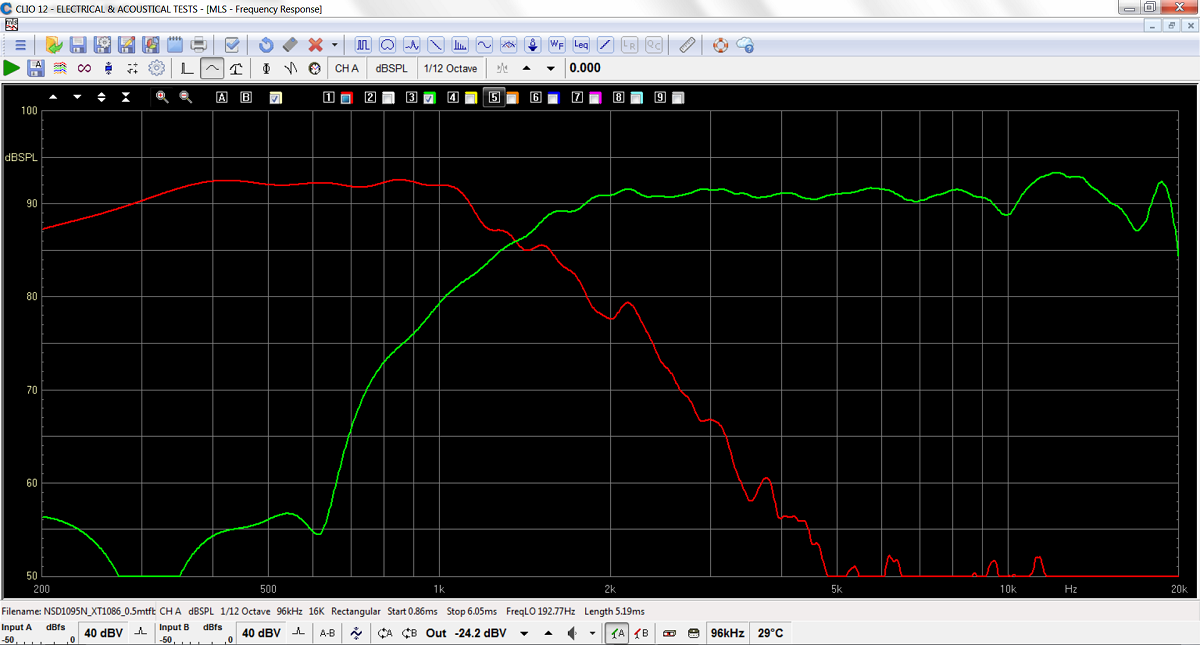
Response of midrange and horn+super-tweeter. Point of crossover around
1300 Hz.
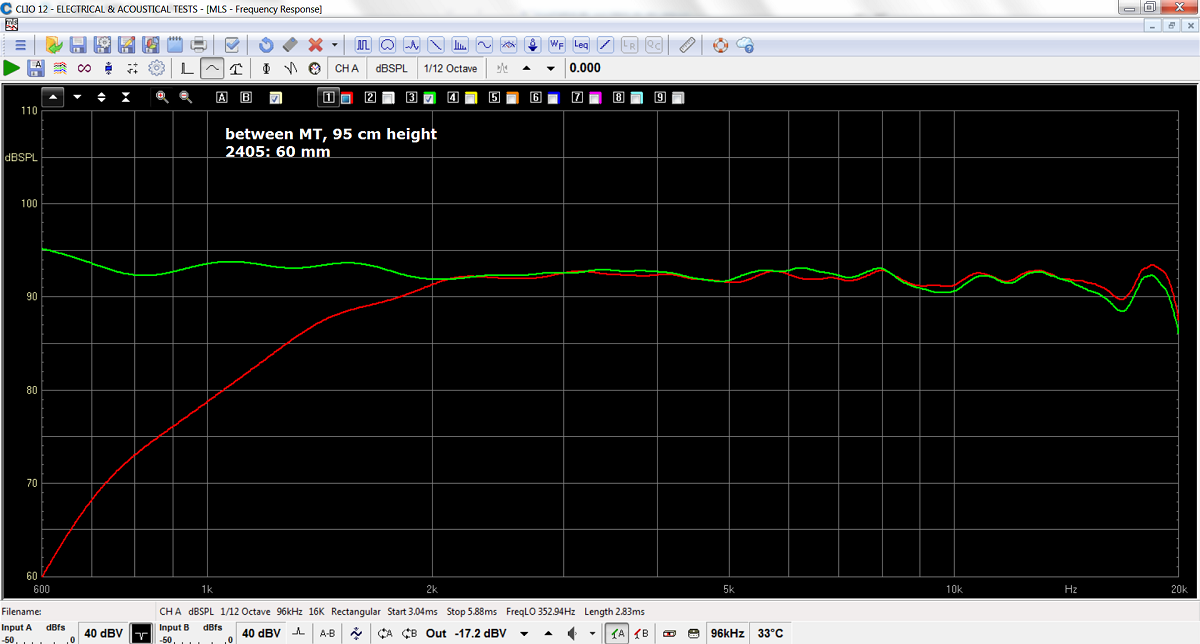
Response of MTT section with JBL 2405H tweeter in place.
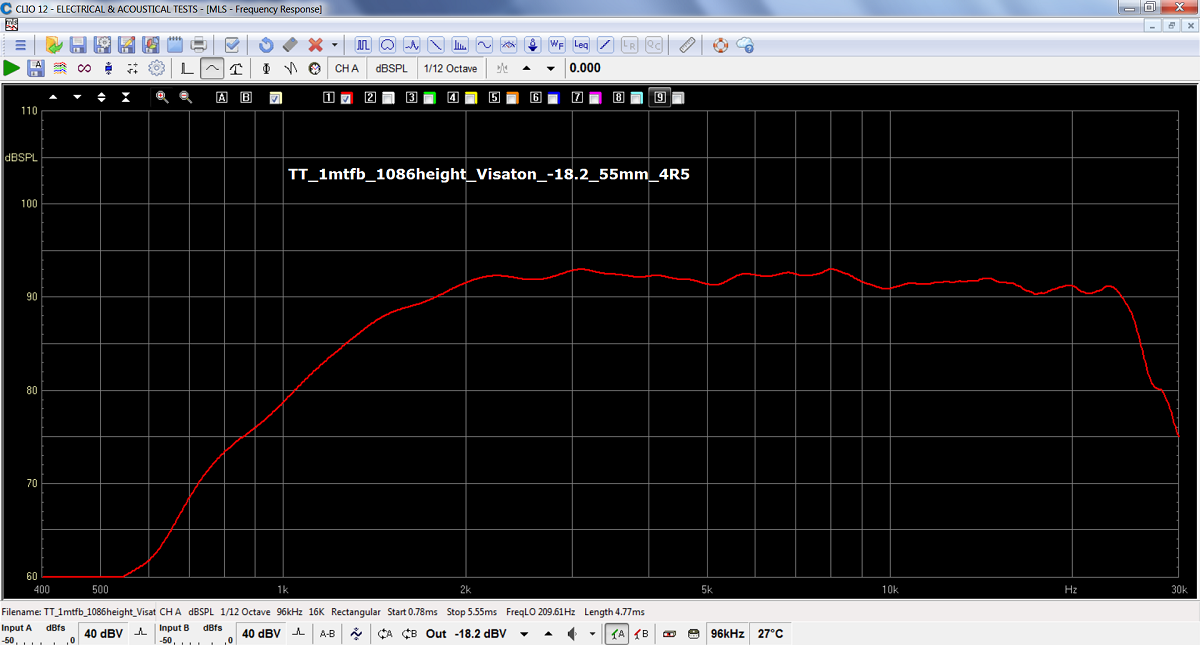
Here the TT section with the Visaton super-tweeter, actually the most
linear and extended response.
Download Complete Kit Sale Presentations:

Six options:
TL-2, fully passive level 1
TL-2, fully passive level 2
TL-2, semi-active, level 1, no Hypex included
TL-2, semi-active, level 1, with Hypex included
TL-2, semi-active, level 2, no Hypex included
TL-2, semi-active, level 2, with Hypex included
BMS and 18 Sound components can be bought from
LEAN, UK
Visaton super-tweeter from e.g.
hifisound, Germany
LEAN 2023 prices.
All kit and component prices may be subject to change and are always to be confirmed by Jantzen Audio Denmark.
2023: Having been around for some time
now, it has been decided to launch the TL-1 and TL-2 in two versions,
where:
Version 1 comes with Superior-Z for midrange, Amber-Z for horn and
Alumen-Z caps for super-tweeter.
Version 2 comes with Superior-Z for midrange and Alumen-Z for both horn
and super-tweeter.
Should you want Alumen-Z for also the midrange and Amber-Z for both horn
and super-tweeter, you have to make special request.
Download Complete Kit Sale Presentations:
All technical questions to troels.gravesen@hotmail.com
All questions regarding purchase of kits, please mail Jantzen Audio at contact@jantzen-audio.com
CROSSOVER-LAYOUT
BACK TO INDEX
Please read this file before engaging in crossover layout:
http://www.troelsgravesen.dk/LCR-RC.htm
Crossover layout for level-2 TT section with Alumen-Z capacitors.
If you use JBL 2405H/077 super-tweeters, connect R2 to C2.
Crossover layout for TT-section with Amber-Z
capacitors for horn and Alumen-Z for super-tweeter.
If you use JBL 2405H/077 super-tweeter, connect R2 to C2.
Should you want Amber-Z caps for the super-tweeter, level 1+, contact
Jantzen Audio.
To my ears, Amber-Z for the super-tweeter is a waste of money, but
decision is yours.
Click image to vie large
Should you decide on Amber-Z version, they'll look much nicer than these
prototypes.
I had some more resistors for R1 to try out various super-tweeter
options. Three in the final layout will do.
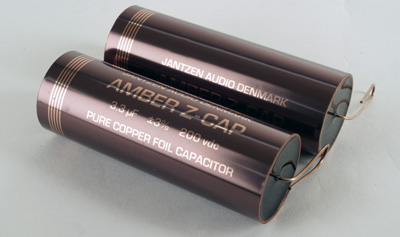
Amber-Z caps.
Layout for midrange section with Superior-Z capacitors.
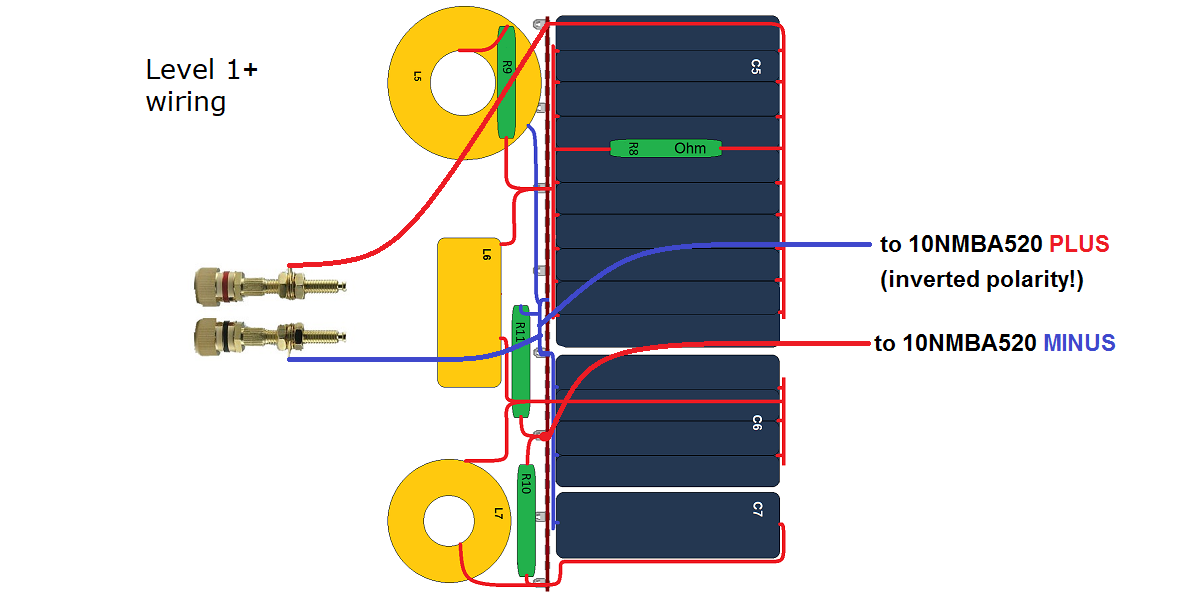
Layout for level 1+, midrange driver crossover.
The level 1+ in NOT a standard kit and you should contact Jantzen Audio,
should you want all-Alumen-Z for the midrange and Amber-Z for both horn
and super-tweeter.
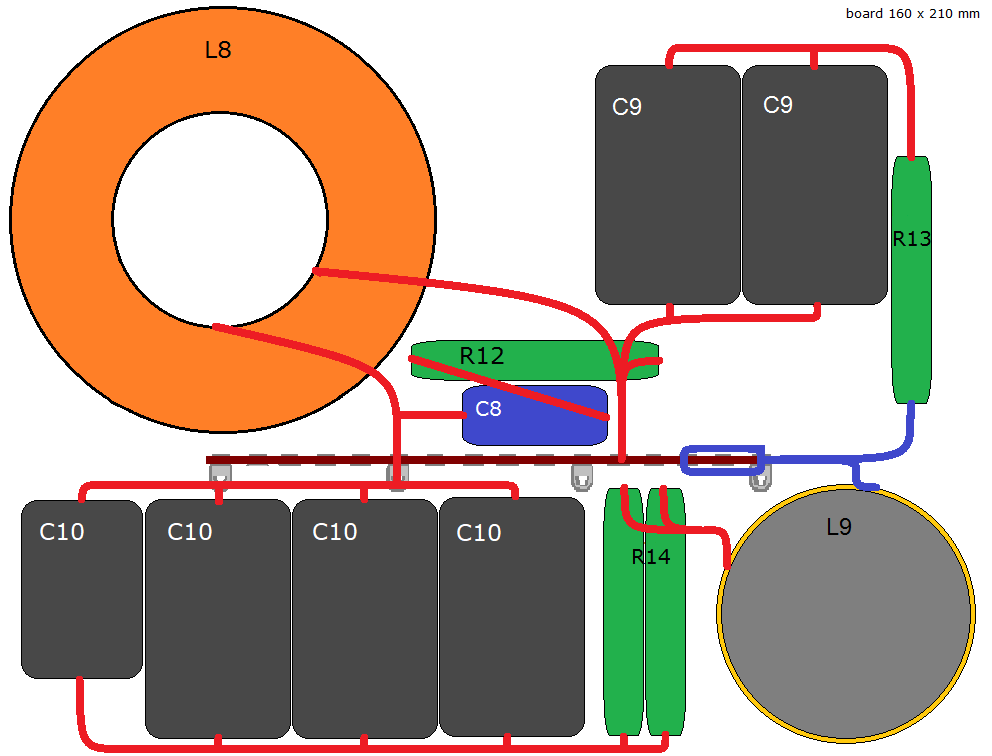
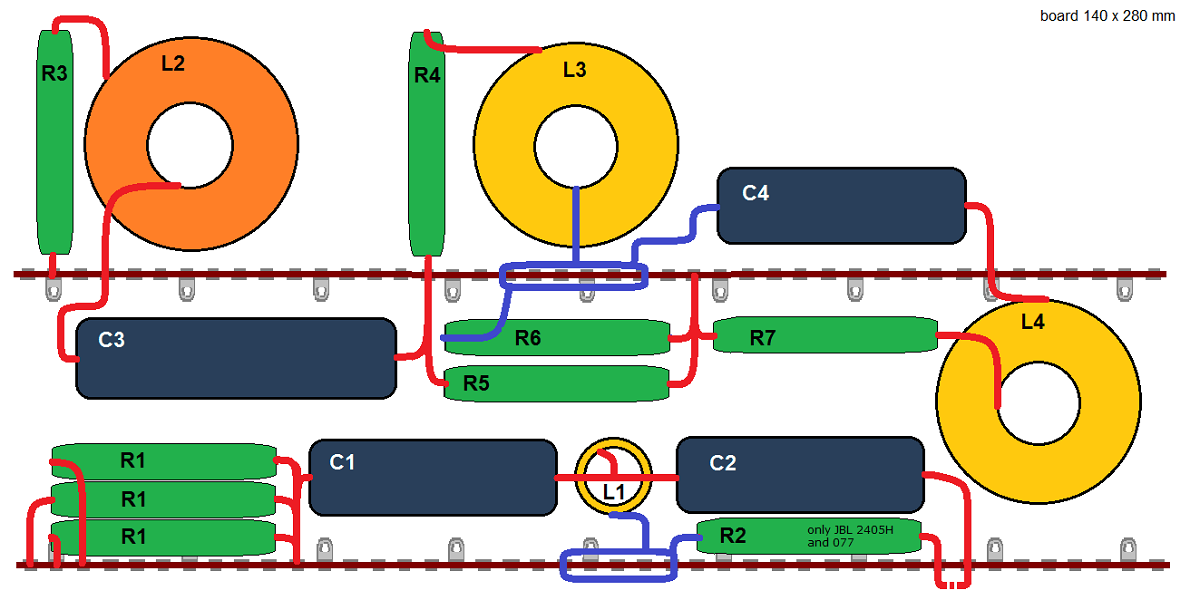
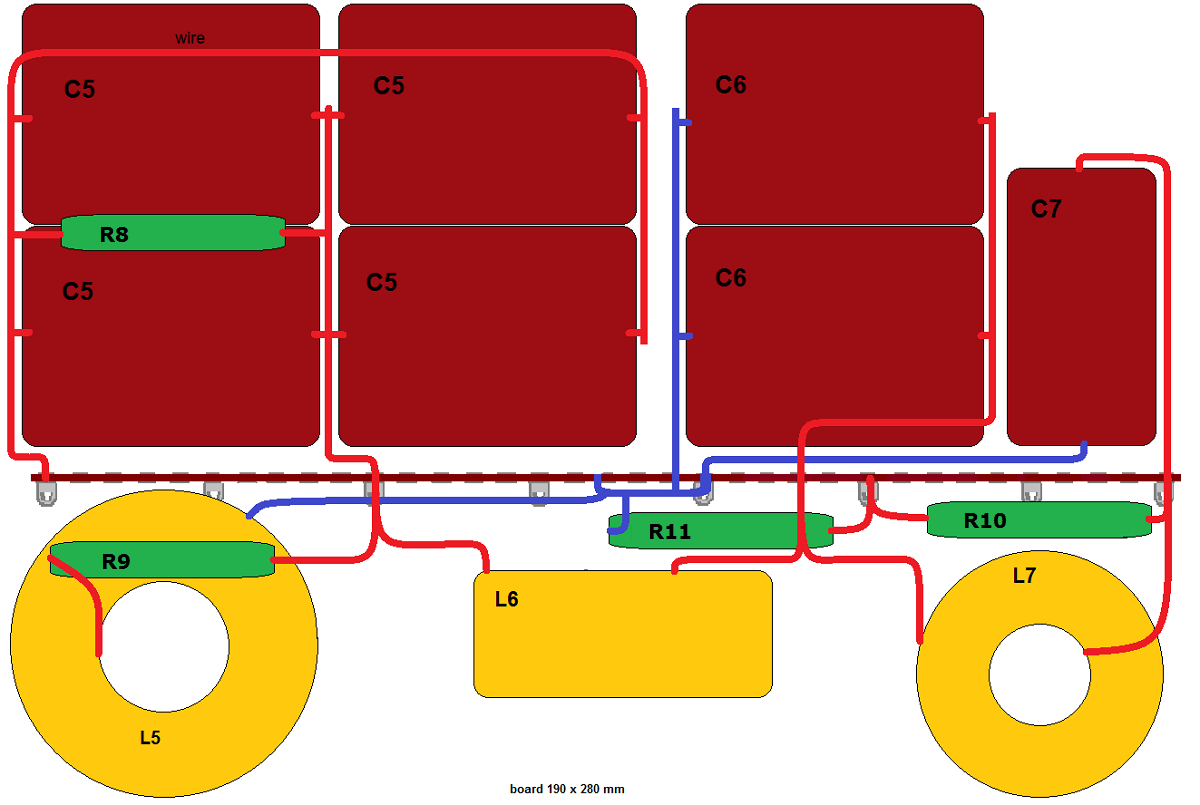
Crossover layout for bass section.
From Autumn 2022 the caps for the bass will
be Jantzen Audio MKT-Z caps as the Premium Elkos used here are
discontinued.
Click image to vie large
Wiring -
Let's go for one section at a time:
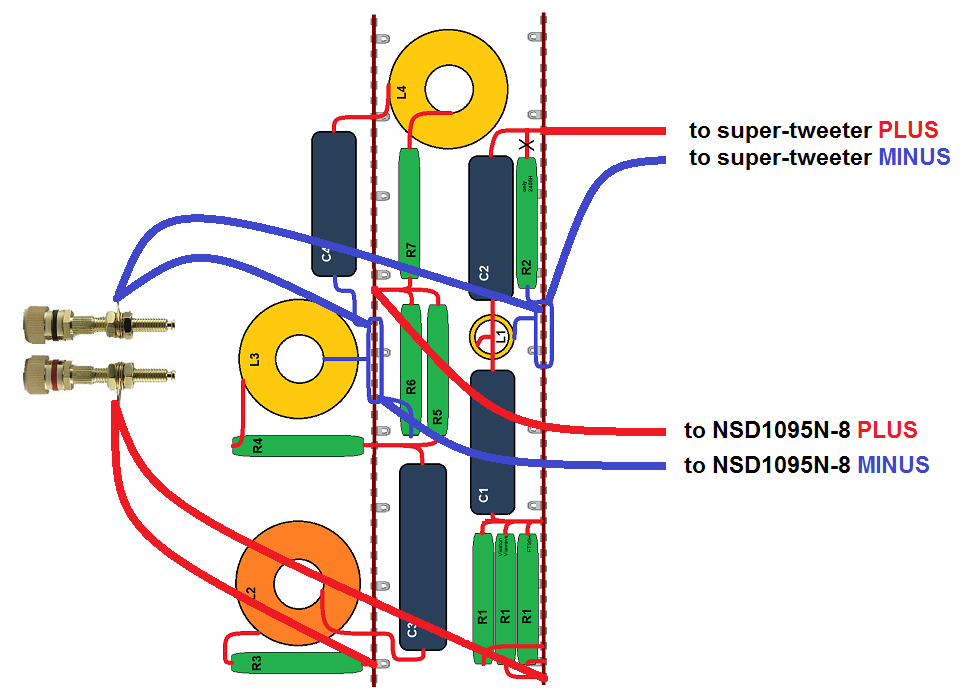
Both horns are connected with positive
polarity!
I had this question recently if this polarity thing really matters - and
- you bet it does!
Should you use vintage JBL tweeters, the black terminal is PLUS (YES!).
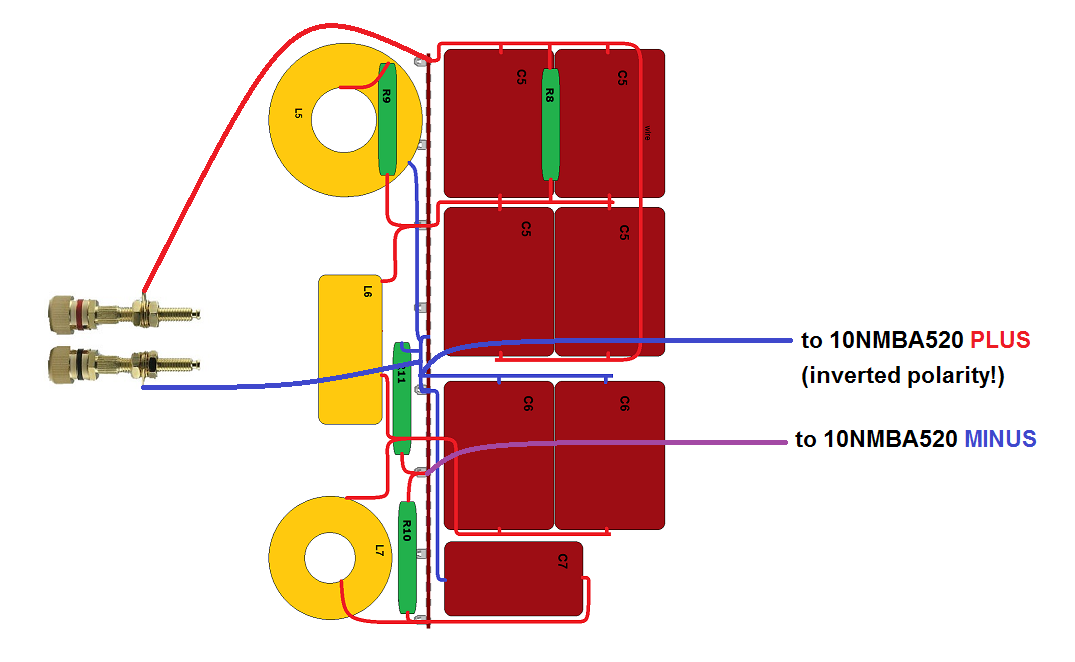
The midrange driver, 10NMBA520 is connected with inverted polarity, thus
the plus wire goes to minus on the 10NMBA520 driver.
I suggest you connect the IN wires for horns and midrange from the same
binding posts.
Obviously you can order more binding posts and tri-wire or quad-wire.
The kit comes with four pairs of binding post - for standard bi-wiring,
one pair for bass and one pair for MTT section.
If you want more fancy looking binding posts than those supplied, please
check the
Jantzen portfolio. They don't sound better, but look cool.
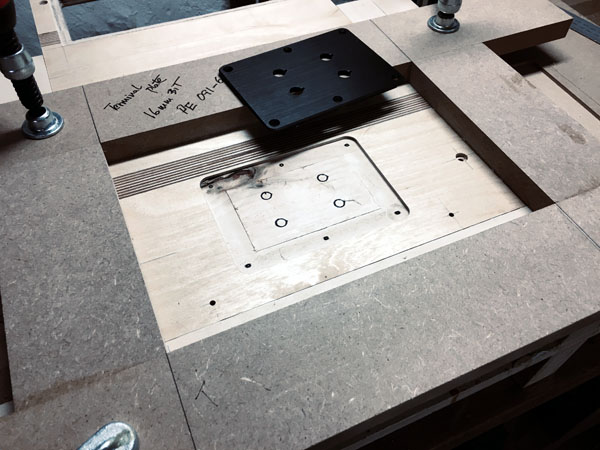
I used these: Anodised Double Binding Post Plate, Set M9 1 x PE 091-612
+ 2 x 012-0209. Product index: 012-0085
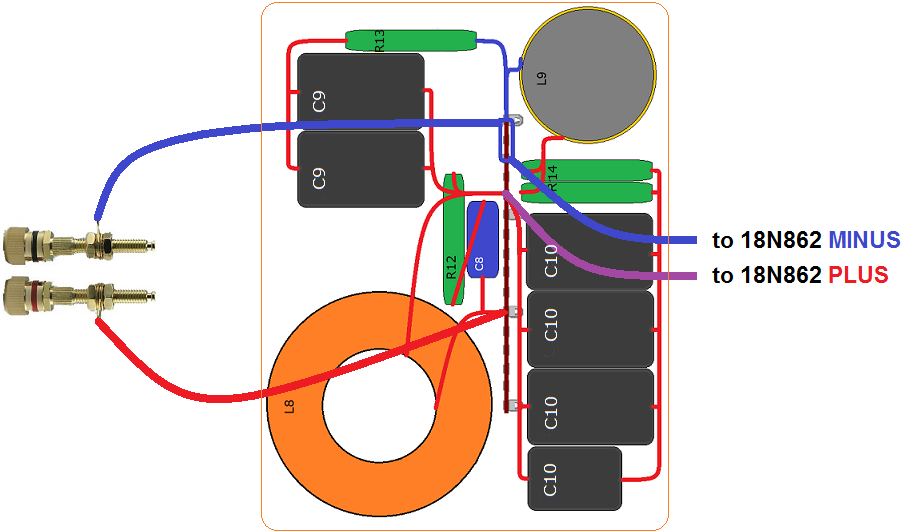
Bass driver connected with positive polarity.
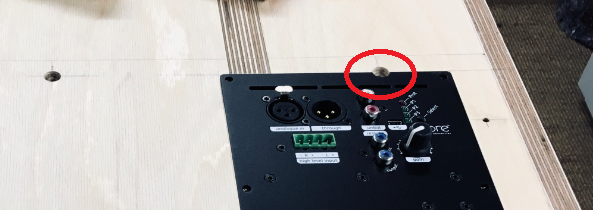
To me every speaker is a prototype as I always try out new ways of making the cabinets and one thing I didn't foresee was the vertical strips of Baltic birch applied to the rear panel. Looks very nice but makes the crossover cover very fragile where we have the cutout for the Hypex module.
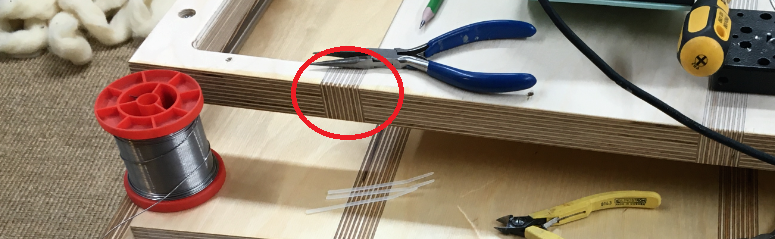
The joint encircled in read makes a very fragile spot and I broke it once - glued it in place - and broke it once more - and finally inserted a biscuit to strengthen the joint.
The cover panel proved one more surprise as I started making the six recessed screw holes for the panel - and didn't foresee the height of the Hypex module, thus had to make a small cutout in the Hypex module to make space for the screw.
That's about it.
Click image to view large