SEAS
W15CY001 + Hiquphon OWI
by Young/Korea
Hi Troels
How are you? Long time no talk. I am finally
finishing off the W15 Mini-Monitor. But as they
say, last 10% of a job takes up 90% of the
time. All I have left now is to finish one
last tweeter crossover and I should be done. I have
been listening to one complete unit just to hear how it
is. I have been very happy with the sound.
The only other reference I have now is my old B&W 802
series III (L100 is being worked on). Both sound
quite different. To me, B&W has a little boomy
base, nice and mellow mid and somewhat harsh top
end. But over all, the B&W sound is very well
balanced and neutral. The Mini-Monitor has more
direct and engaging bass/mid and transparent high.
Very revealing, and I am assuming it is the nature of the
Mini-Monitor. I have re-listened to my favorite
recordings and heard a lot of stuff I didn't notice
before. When I switch over to B&W, I now hear
them. Bass from W15 is much more than I
anticipated. When I ordered Hiquphon from Dave
Ellis who sells the OWI tweeters in the US, I
talked about my mini-monitor project. He
was very much sure I would listen to
the W15+OWI more than the B&W.
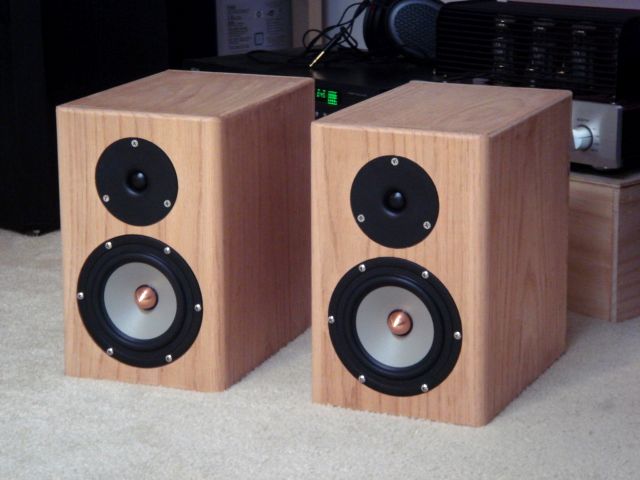
Yesterday I gave both enclosures good sanding job after
rounding over the edges. I gave them 1/4"
rounding-over on all edges. For front panel sides,
I gave them 1/2" rounding-over as you can see in the
picture. Looks very nice. Today is
Sunday and hope I can finish the tweeter crossover.
Thanks for all the help and my next step will be making a
proper stands that match the speaker. I will then
will be listening to the Mini-Monitor properly and
appreciate them even more.
I will send you more
pictures once speakers are al done.
Best regards
Young
 
 
.jpg) 
.jpg) .jpg)
.jpg) .jpg) .jpg)
.jpg)
06-07-2007:
I had a chance to assemble more pictures from the
construction of the mini-monitor. Here is how the
construction of mini-monitor went. For enclosures, I
chose 19mm thick red oak. As you have
commented, I understood choice of wood was not too
critical for a small monitor speakers.
As seen above, the circle jig came in very handy when
cutting openings for drivers. To be safe, I used a
brass screw to secure the baffle to a large panel of a
19mm thick plywood. The center piece was also
screwed down. When the router bit punches
through the baffle during last go around, the round
center piece will not move around. This was my
first router and I learned a lot during construction.
Even though the red oak was hard enough, I thought adding
a bracing wouldn't hurt as long as internal volume
doesn't change much. So I used the same 19mm oak and
cut out two large circular openings in the middle.
Internal edges were chamfered using a 45 deg. router
bit. I routed out 10mm wide grooves in the
side panels to accommodate the bracing as shown below.
Overall depth grew to 265mm. Other dimensions
remained the same. I estimated the internal volume
to be about 8 liters. I used concealed locking
45 deg. miter joints. It worked out very well and
clamping was relatively easy with locking miter
joint. I gave the joints 1/4 inch and 1/2 inch
rounding over later. I though about keeping the crossover
outside the enclosure, but decided to put them inside.
I split the crossovers into two. Jantzen coils
and capacitors are used except for one 5.6uF Solen. I
haven't glued down the components. All are still
fixed in place by tie-wraps. When I am absolutely
sure my crossovers are wired correctly, I will apply
silicon glue to keep them from vibrating. The two
crossovers came out quite compact. I mounted the two
crossovers vertically on the back of the side
panels away from each other. Bass crossover is
at the bottom of left side and the tweeter crossover is
at the top of right side. Hope this placement keeps
the interaction of the two crossovers small. Picture
above also shows removable back panel. I fastened
it using 10 stainless countersunk bolts. For
damping, I used 1 inch thick Whispermat I as shown
above. The back
panel shows the whispermat, port tubing and cut
outs for speaker terminals. The Whispermat turned
out to be very convenient. It has a bituman-like
damping sheet bonded to 1 inch thick foam. I
covered all internal panels with Whispermat except for
the baffle. I cut out large chunks of
foam around the mid-bass driver for better
breathing. For internal wiring, I used 13 gauge Supra
cable. From outside, the porting and speaker terminals
look like this:
There are still some more tasks to do.
1). Glue down all crossover components.
2). Cover the exposed crossover with damping
materials. 3) Add more damping to the back side of
the mid-woofer. It might not be necessary but I
want to experiment. 4) Find a way to measure frequency
response to be sure. 5) Make proper stands.
For now the mini-monitor is happily sitting on top
of a wine case next my B&W 802. Thank you very
much for such a fun project and I will be enjoying the
mini-monitor for a long time. My next project is
updating the L100 crossovers using Jantzen kits.
When I accumulate enough energy, I will re-start my Zahra
project. Hope I can apply the experience learned on
the mini-monitor construction. Best regards Young.
|