|
NOW OPEN KIT, DISCONTINUED
Go to on this page:
DRIVERS
CROSSOVER
CABINET
MEASUREMENTS
SPEAKER-KIT
CROSSOVER LAYOUT
SOUND
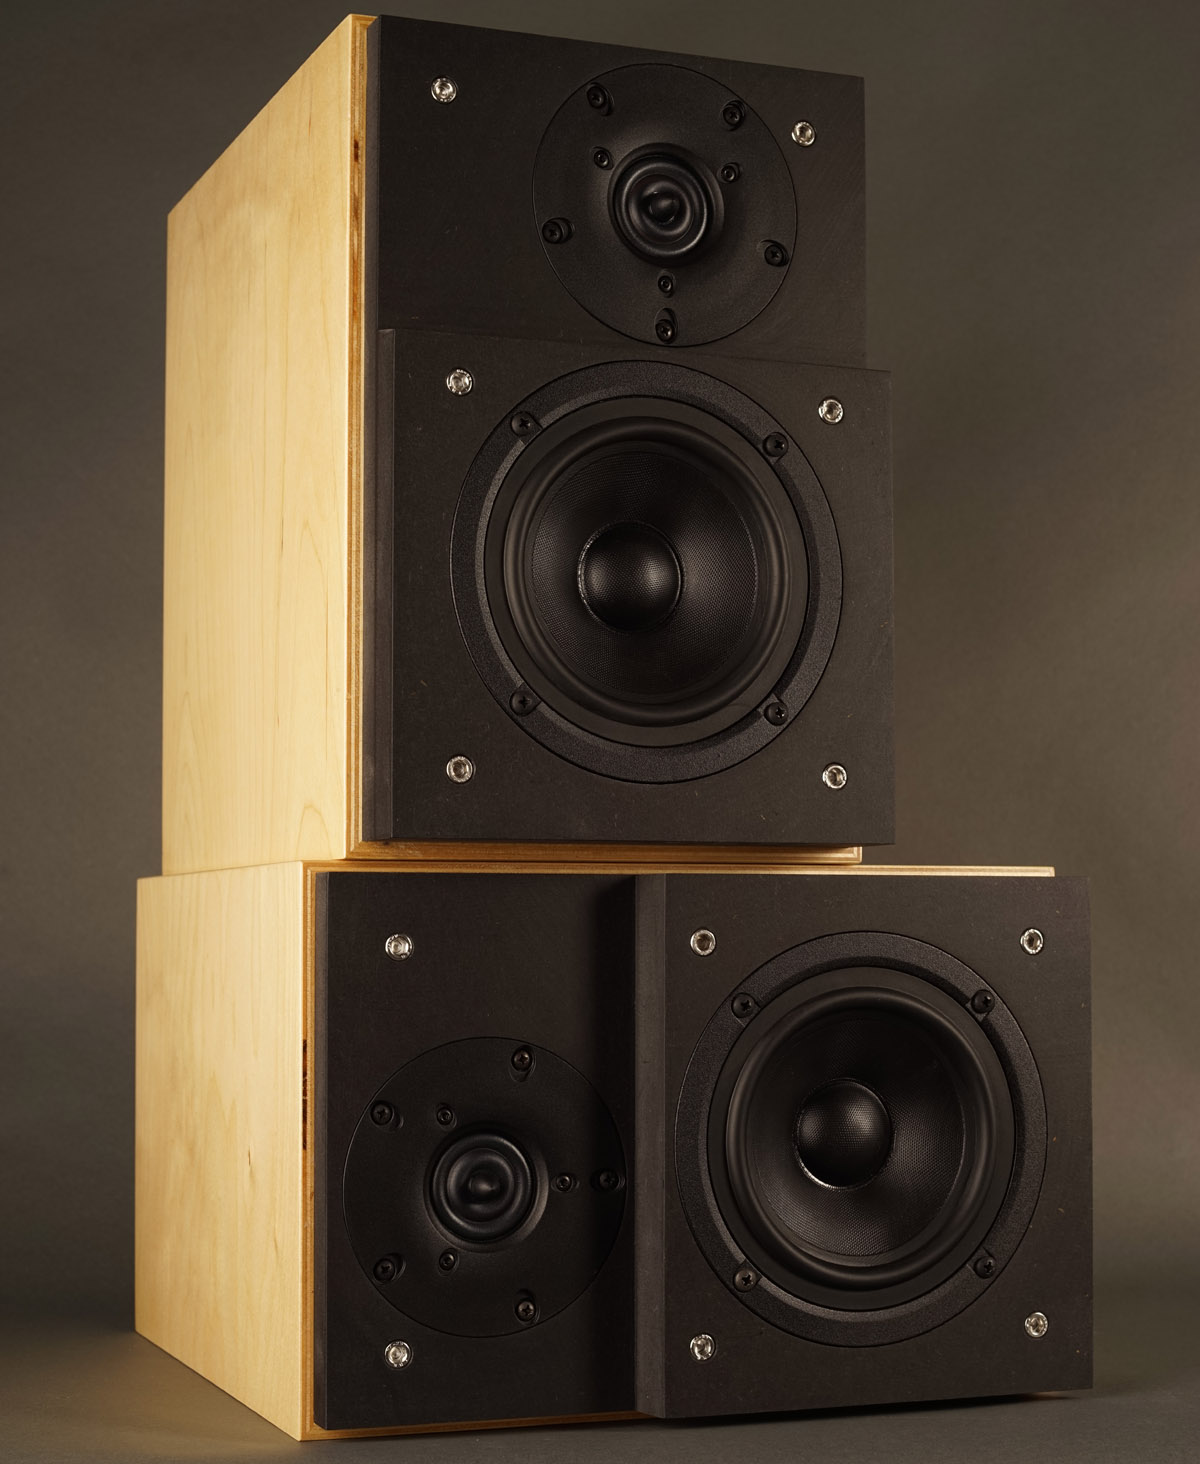
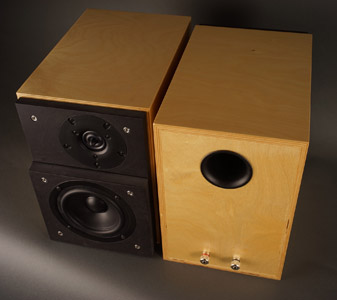
I had some black MDF leftovers. Enough for a pair of
Ellam-9800 front panels. And I had a pair of 5" Discovery midbass
drivers and the Discovery tweeters. It called for a moderately priced 5+1
monitor! All four drivers alone are 245 EUR.
I've come to really like the Discovery series of drivers. The 6" and the
8" are both easy when it comes to crossovers - and the sound is great
too. All of these Discovery drivers seem to perform equally well within
their intended operating range, even the 10" alu bass driver, which has
been tested in a possible new construction.
Whenever a speaker driver manufacturer decides on a new range of drivers
we usually see a 4, 5, 6, 8 and 10" range of drivers with more or less
the same cone material, same basket design, etc. Not all may perform
equally well. I have my favourite Revelator and Illuminator drivers from
ScanSpeak and I have my favourite SEAS drivers from their respective
range of drivers, Prestige or Excel.
Click images to view large
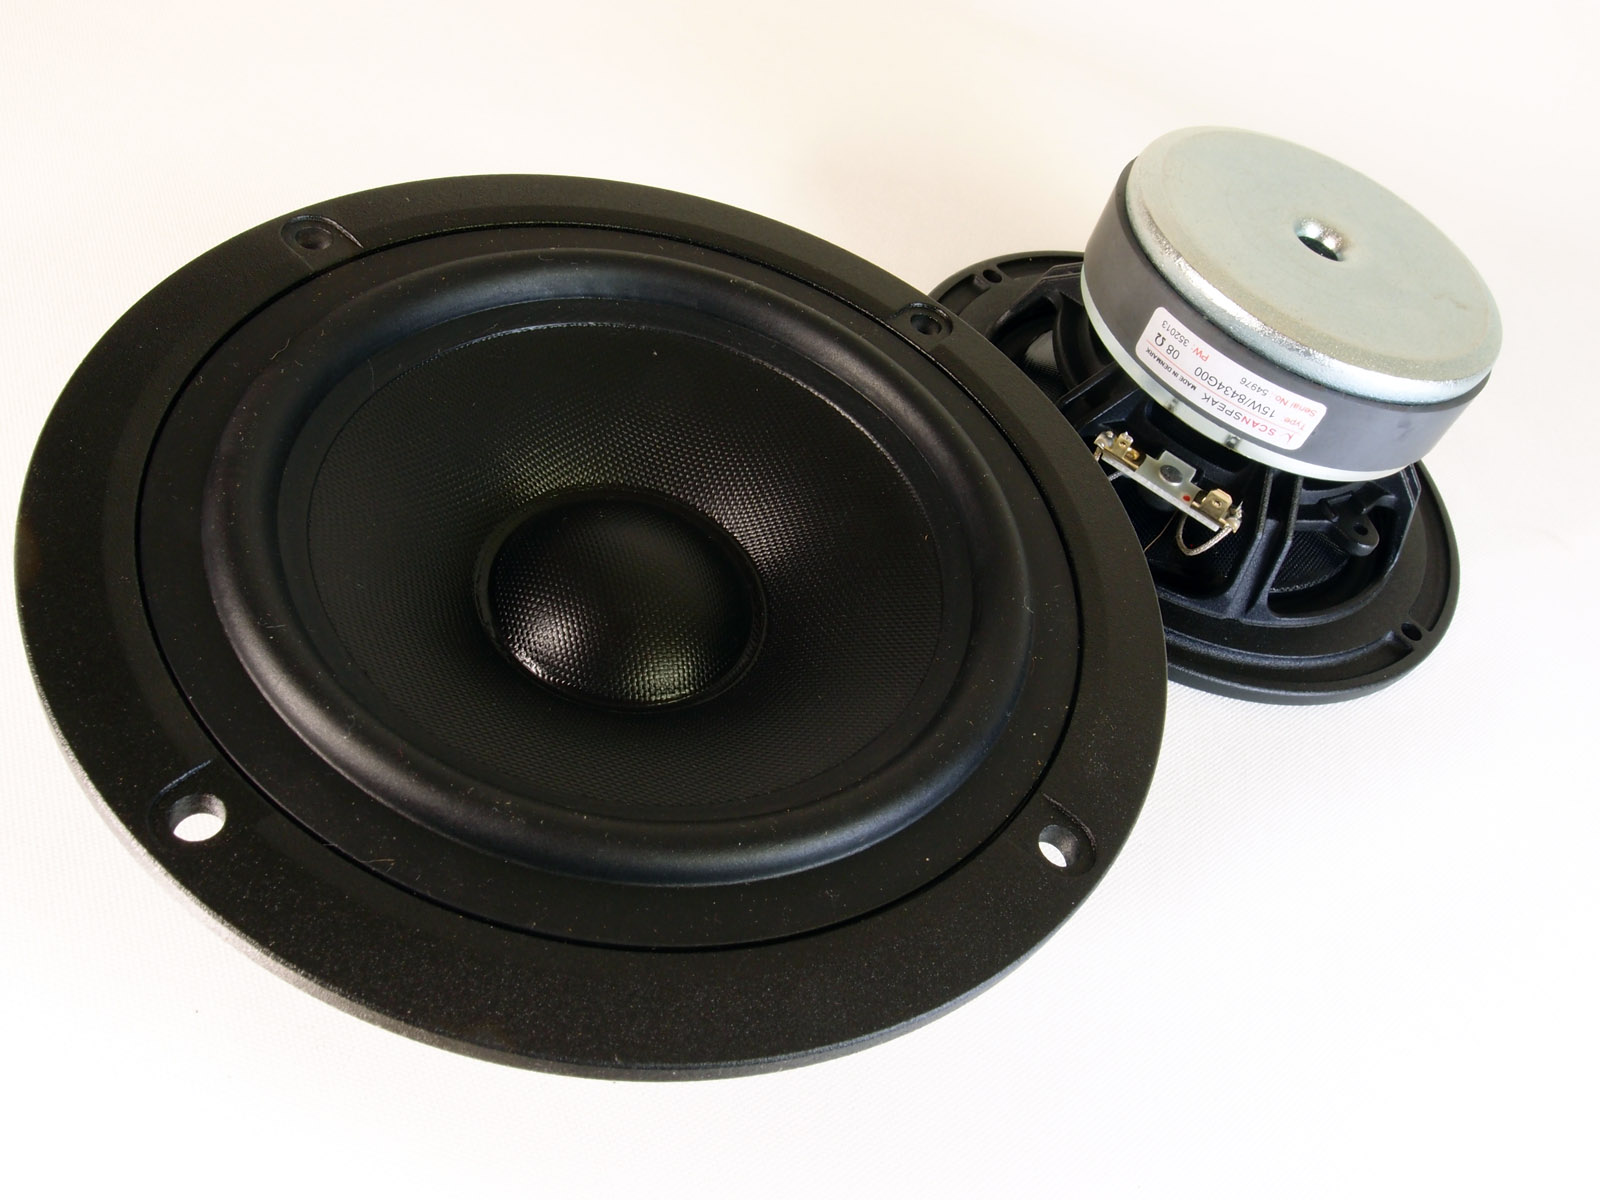
ScanSpeak DRIVERS
BACK TO INDEX
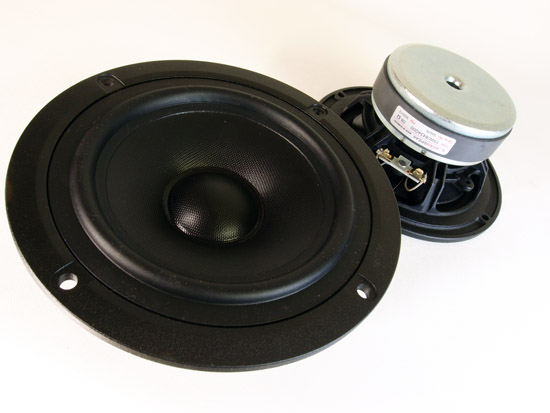
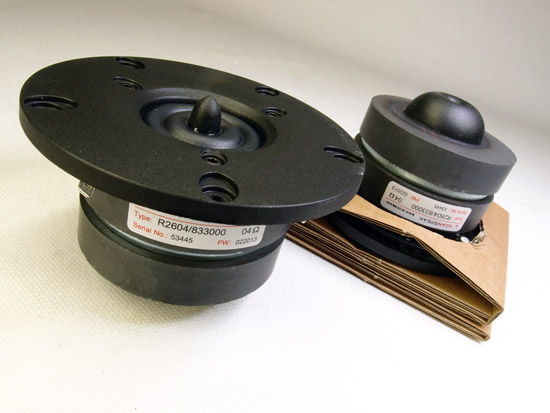
Midbass:
15W/8434G00 Tweeter:
R2604/833000
Download data files from links above.
Click images to view large
CROSSOVER
BACK TO INDEX
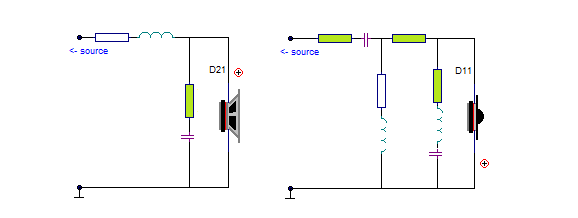
My expectation to the crossover work was that it would be easy. Not so.
Adding a standard coil and a cap to the midbass made a perfect LR4
roll-off. No more components needed. No midrange bump or anything.
Making the tweeter crossover fit the bass LR4 topology proved a
challenge and ended up like seen above. On paper this all works very
well with proper phase integration and fairly flat amplitude.
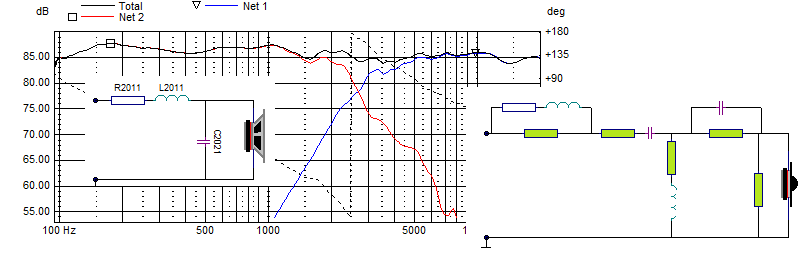
What I was looking for was an LR2 topology and for the bass this was
easy by adding a resistor in series with the shorting capacitor as seen
below. The tweeter section takes an LCR circuit to smooth/shape roll-off
towards lower frequences, otherwise quite standard. The placement and size
of attenuation resistors is a valuable tool in shaping the target
response profile.
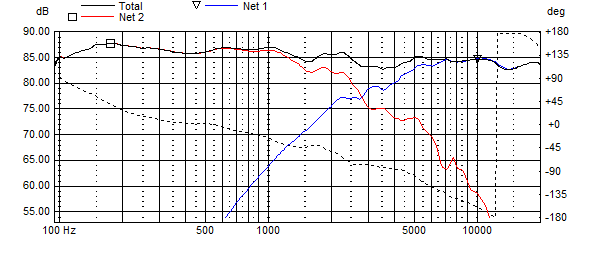
Above the simulated LR2 filter, quite nice too and usually sounds better
than LR4 - to my ears. Others will dissagree and taste cannot be argued.
The strange thing about LR2 vs LR4 crossovers is that we tend to tune
LR4 flatter than the LR2. To my exerience. Most often I prefer a slight
tilt from LR2 filters, something in the range of 2 dB from 100 to 10,000
Hz. This kind of evens the balance of basic notes and overtones from the
two topologies (not shown on simulation).
Only thing to do was setting up both crossovers and listen! Eventually I
decided on the LR2 filter for the lack of the dry presence of the LR4
filter.
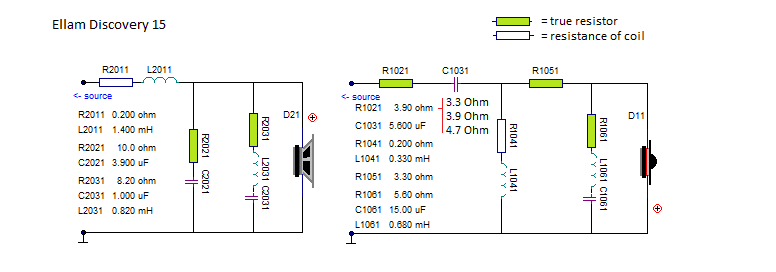
The bass section features an LCR circuit smoothing the rool-off around
5 kHz. A little too much energy here paid its visit in treble
performance. As can be seen in the measurements section we have no need
to equalise the midrange as is very often the case with small drivers on
a small front panel.
The tweeter section is fairly standard second order with some smooting
of response in the 1-2 kHz range. R1021 determines tweeter attenuation.
My default value is 4.7 Ohm. Full schematics comes with the kit incl.
instruction on crossover layout and wiring.
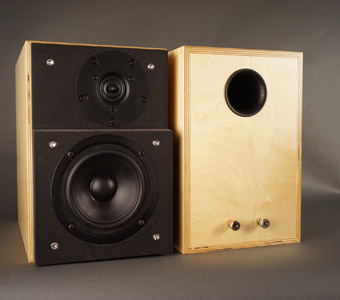
CABINET
BACK TO INDEX
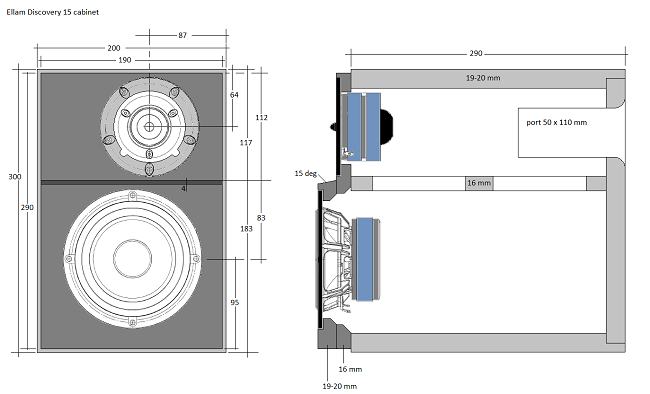
Box simulation suggest something in the range of 6-10 litre volume
making -3dB at 60 and 50 Hz respectively. Not too bad, but don't expect
earthquake performance from a 8.6 grams cone of 80 cm^2. With 10 litres
volume and a port of 50 x 110 cm (diameter x length) we get a port
tuning of 55 Hz. Make the port 40 x 110 mm and we get a port tuning of
45 Hz and bass response shelving down. Might do better for shelf
placement. Actually I stayed with the 50 x 145 mm port length preferring
the lower tuning of ~50 Hz port tuning.
Click image to view large.
Any change to front panel and drivers' placement and you need at new
crossover - and I can't help.
Please read here:
http://www.troelsgravesen.dk/crossovers.htm
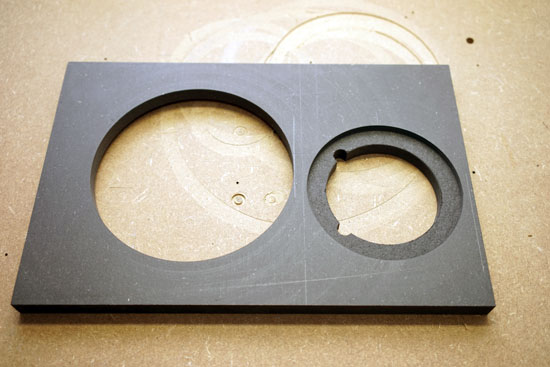
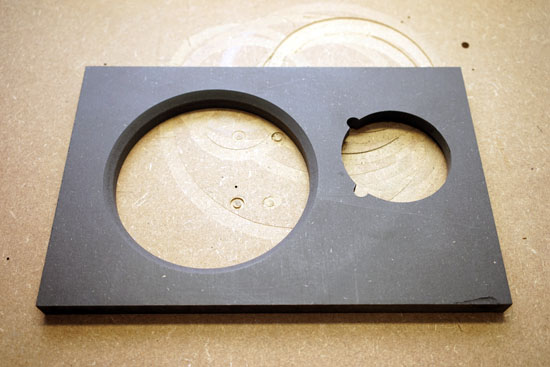
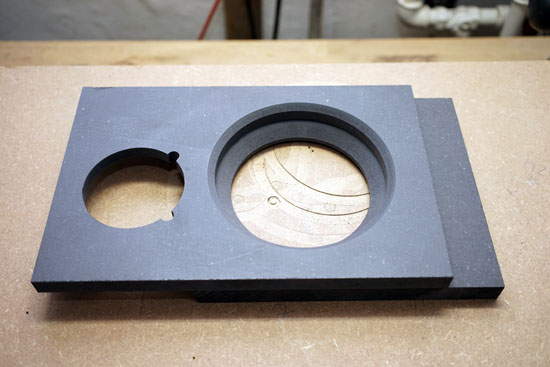
The lower front panel. Make bass driver hole same diameter as the
midbass, 150 mm and chamfer lightly.
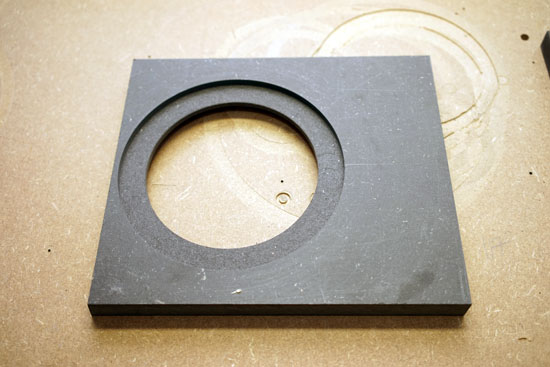
Outer midbass panel. Chamfer 45 deg down to 5 mm from driver rebate.

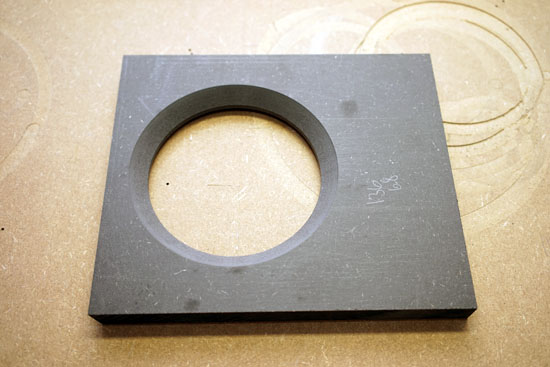
Both panels before gluring and cutting to final size. I make them +2 mm
length and width before final trimming.
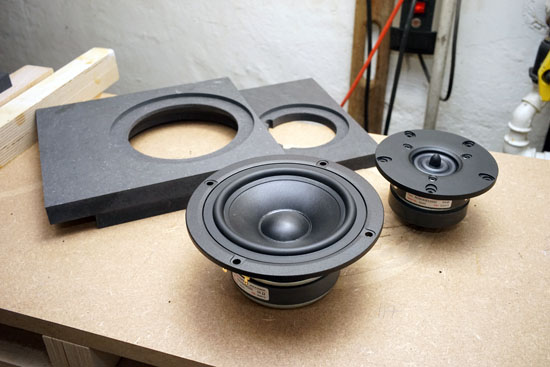
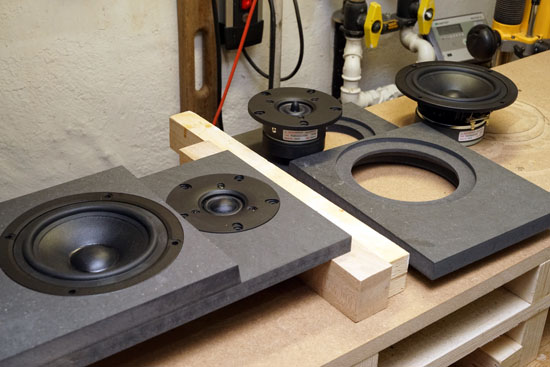
Testing drivers on front panels.
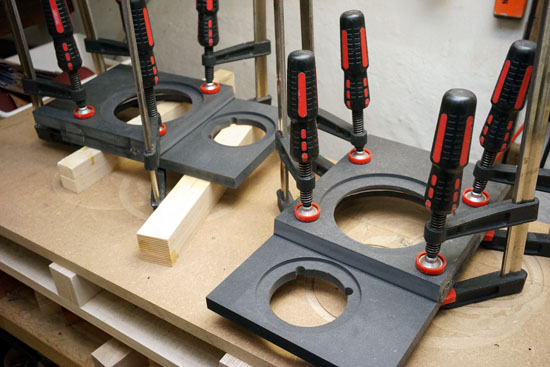
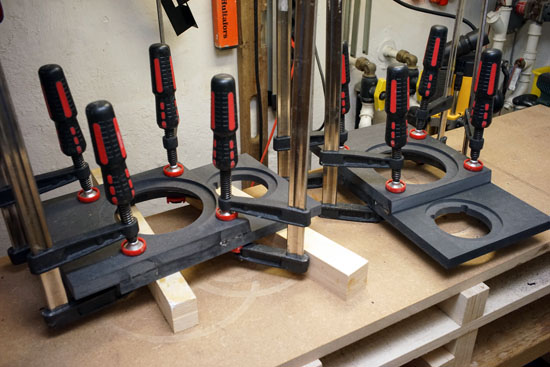
Gluing front panels. I make the front panels +2 mm before cutting to
final width.
Further cabinet constructions images:
Ellam-9800 mkII
MEASUREMENTS
BACK TO INDEX
A few comments on MEASUREMENTS before you start interpreting all the
readings below.
First of all, if we think measurements will tell us how a speaker
sounds, we're wrong. The perception of sound is way too subjective to be
reflected in any measurements we can perform. A loudspeaker system is
meant to give us a satisfying idea of an acoustic event and for some
people a pair of 5 USD ear-plugs are enough, others spend 200 kUSD on a
truly full-range pair of speakers - and the latter may not be happier
than the former.
Measurements may give us an idea of tonal balance of a system, i.e. too
much or too little energy in certain areas. Measurements may tell us
about bass extension if far-field measurements are merged with
near-field measurements. In addition to this, ports may contribute to
bass extension. Most of us diy'ers do not have access to an anechoic
room for full-range measurements from 20-20000 Hz.
What cannot be seen is what kind of bass performance we get in a given
room. Bass performance is highly dependent on in-room placement of your
speaker and the same speaker can be boomy in one place and lean in
another. Actual SPL level at 1 meter distance and 2.8V input is useful
for en estimate of system sensitivity and combined with the impedance
profile may give an idea of how powerful an amplifier is needed to drive
the speaker to adequate levels.
What measurements do not tell is the very sound of the speaker unless
displaying serious linear distortion. The level of transparency, the
ability to resolve micro-details, the "speed" of the bass, etc., cannot
be derived from these data. Distortion measurements rarely tell much
unless seriously bad, and most modern drivers display low distortion
within their specified operating range.
Many people put way too much into these graphs and my comments here are
only meant as warning against over-interpretation. There are more to
good sound than what can be extracted from a few graphs. Every graph
needs interpretation in terms of what it means sonically and how it
impacts our choice of mating drivers, cabinet and crossover design.
What measurements certainly do not tell is the sonic signature of the
drivers, because cones made from polyprop, alu, kevlar, paper, glass
fiber, carbon fiber, magnesium, ceramics or even diamonds all have their
way of colouring the sound.
SPL of drivers in cabinet. To the left the 15W and to the right the
R2604 ring radiator.
The two most important graphs. Left: SPL from final system. System
sensitivity around 85 dB/2.8V.
~85 dB sensitivity is not a whole lot and I suggest some
40-50 watts minimum to drive the speaker.
Right: Impedance of final system. Port tuning here ~55 Hz.
This is an 8 Ohms speaker displaying some 7.0 Ohm minimum at 55 Hz and
6.3 Ohm at 250 Hz.
Left: Response from inverted tweeter polarity (red) and same polarity
(green). Point of crossover is around 2.8 kHz.
Right: Tweeter level options. R1021 values with the kit.
Left: CSD.
Right: Step response displaying inverted tweeter polarity and tweeter
positive response coinsides with rise of midbass response.
SPEAKER-KIT
BACK TO INDEX
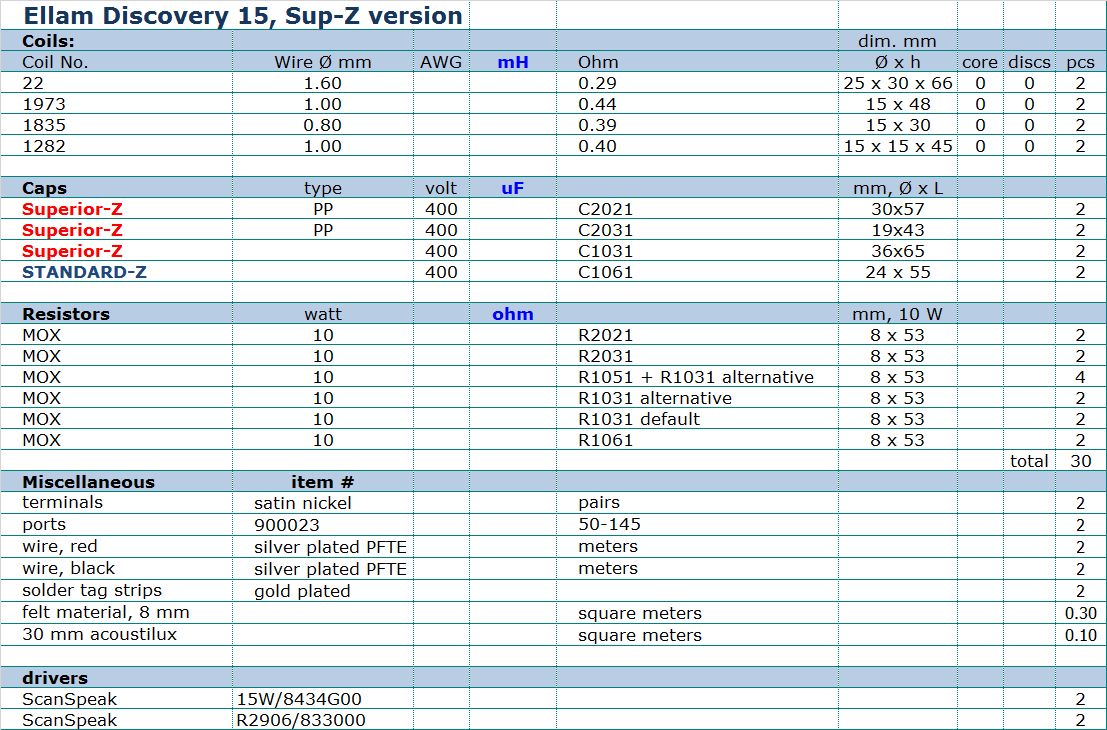
Download Complete Kit Sale Presentations here
DISCONTIUED
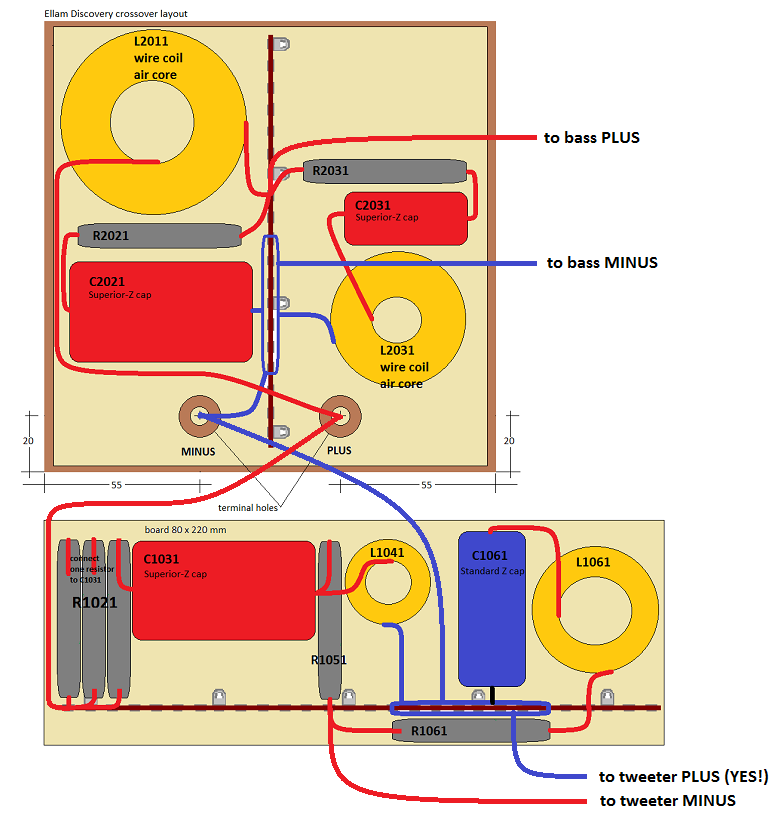
CROSSOVER-LAYOUT
BACK TO INDEX
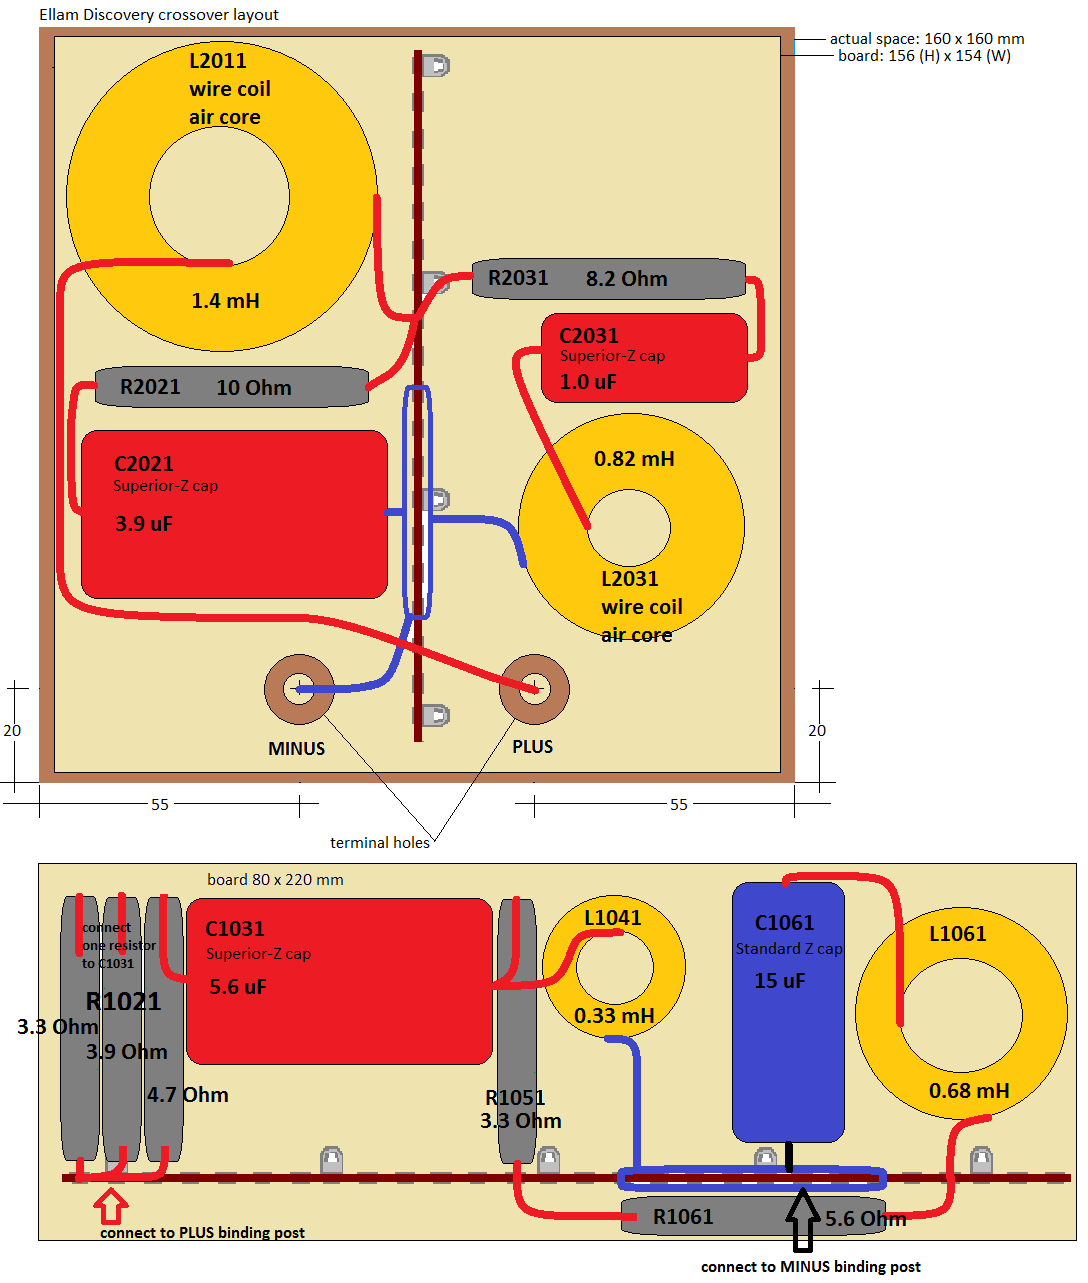
Click image to view large
SOUND
BACK TO INDEX
What surprised me first was the bass response. This small 5" doesn't go
particularly low, but what it does, it does very well indeed. Very
articulate (high Qm) and it doesn't die out at low levels as experienced
many times before with overly damped drivers.
The midbass' coated glass fiber cone is fairly rigid and has en
excellent midrange transparency and the minor equalisation around 5 kHz
provides a perfect LR2 roll-off profile. The midbass will play well up
into the treble area and it's better be good not to add any harshness to
the treble range. And it doesn't.
As always, the ScanSpeak ring radiator delivers a smooth treble with
lots of detail and low distortion. It has to be said I used Superior-Z
caps for all of the crossover in my test set-up and there's no doubt in
my mind that these drivers deserve he best of the best. Not cheap but it
pays off. Fall-back option is to use Standard-Z caps for bass section
and a single Superior-Z for the tweeter series capacitor, C1031.
Decision is yours.
I listened to jazz, classical and rock during development and didn't
find it favouring any particular genre. Vocals came through very well
from both jazz, rock and classical. These Discovery cones will not cover
up any poor recordings, rather tell you what you've got, for better or
for worse.
The final voicing of the speaker was done by connecting to my main
system: vdh Colibri/Moerch tonearm/Lenco deck/vdh
Grail phono stage/WOT linestage/GlowMaster power amp - and to honest I
was amazed from what even modest priced drivers fitted with the best of
crossover components and some great front-end can do. Even in a 25 sqm
room, these small speakers will fill the room from large scale
orchestral works. Yes, the deepest bottom end is missing, but the clean
un-distorted midrange more tha makes up for this. These drivers will
continue to excell the better things you put in front of them. Give them
a pair of solid stands and enjoy!
|