ScanSpeak
Illuminator-71
Copyright 2021 © Troels Gravesen
Go to on this page:
DRIVERS
CROSSOVER
CABINET
WORKSHOP PICS
MEASUREMENTS
SPEAKER-KIT
CROSSOVER LAYOUT
FLOOR-STANDER
The Illuminator 71 here is meant to replace the Illuminator Monitor
standmount and the Illumina 66 floor-stander, which will be discontinued as kits from Jantzen
Audio. The Illuminator Monitor
used a rather elaborate all-pass filter to time-align the drivers, and
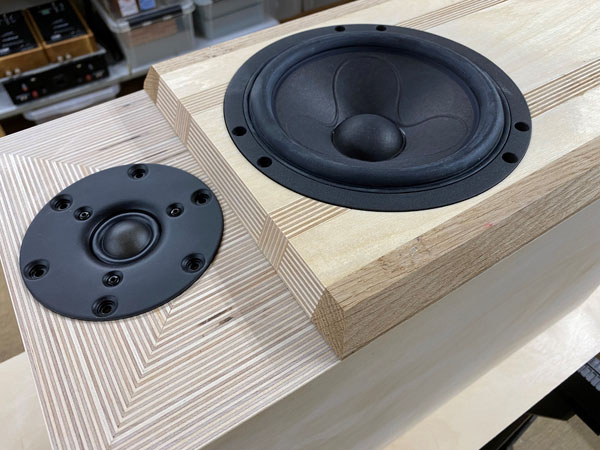
the Illumina 66 a tilted baffle. Here we use a stepped baffle allowing an
overall
simpler crossover. The Illuminator 71 can be made into a floorstander by
extending the cabinet and lifting the bottom panel like seen in the
Ekta mkII. You can use the Ekta mkII cabinet by eliminating the 12MU
midrange driver and midrange cabinet and make the front panel similar to
Illuminator-71 seen from top. I strongly suggest using the 70 mm port
used here. Cabinet
volume here is around 26 litres. The 7" 18WU has a cone area of no less
than 154 cm^2, so quite some bass capability from what would
traditionally be classified as a 6" driver, but really is a 7".
"18" comes from having a frame diameter of 184 mm.
I have also decided in incorporate two tweeters, the venerable
D3004/660000 and the R3004/662000. Being tuned to the same amplitude and
roll-off, they sound very much the same, the 6600 being the classic
fabric dome, the 6620 the grown up brother of the venerable
R2604/832000.
The dispersion of the two domes is different, which may count for some
of the minor difference in sound and the frequency response will always vary a
little. I like them equally well, but I have
friends who disagree. Matter of taste and habit. Some just don't like
the pointy center plug of the 6620.
I decided to use the large flanged 70 mm port - because this stand-mount can
play bass and we don't want any port noise. And it should be on the back
because port often leak midrange - and not the good part. Any port can
be close to the front wall without jeopardizing the port performance.
For some reason many think this is a no go. What near-wall placement
will do to the overall sound of the speaker is a completely
different matter, but it has nothing to do with placement of the port
but counts for all speakers (early reflections).
After finishing the the Illuminator-71 I quickly had an offer I couldn't resist, hence after some months I had to build a 2nd pair for my stock speakers, as an example of what a relatively simple 7+1 can do. Read here.
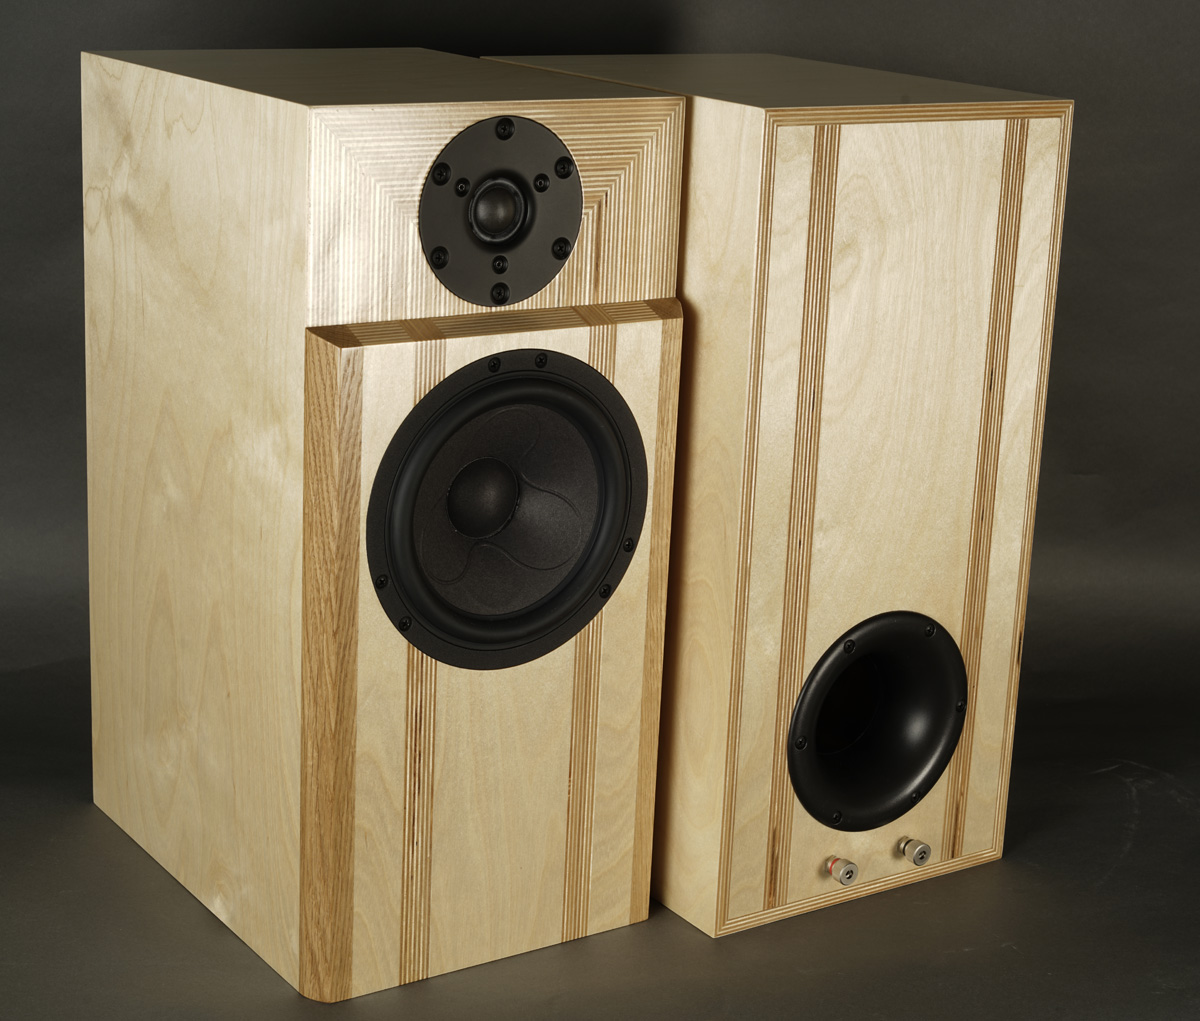
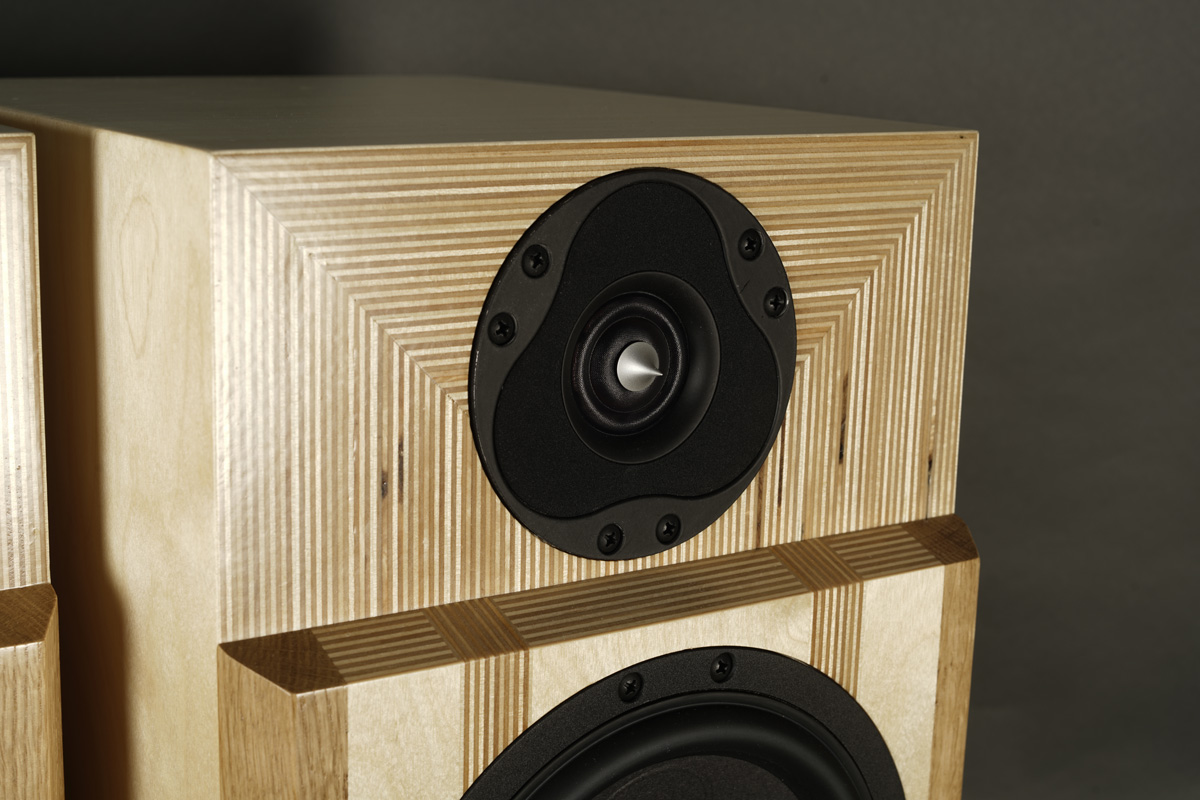
The finished speakers with the 6600 tweeter.

I wasn't quite prepared for getting the finished speakers into our
living room in front of my bridged EAR-861 amps - and the Anna-D
cartridge. Tin Pan Alley came through with a deep powerful bass - as
should. Vocals, cello and Vestbo Trio - all came trough with a credible
power and soundstage thanks to the 7" Illuminator bass driver. My
always-first-to-hear friend just couldn't believe the scale and power of
Tin Pan Alley when he sat down on the couch to have his first listen.
The vocal of Ingram Washington came through with a clear presence and
bottom weight his deep voice demands. Female vocals just as well, Diana
Krall, etc.
What these
sandwich cones also deliver is clean and transparent midrange and I
recall a situation at ScanSpeak factory some years ago and engineer
Birger Jorgensen asked me what I thought of the Illuminator drivers. I
scratched my head and said that my general impression was that I could
driver the Illuminator drivers harder than the Revelator drivers before
hearing any distortion. That the Illuminators had significantly
increased power handling. He smiled and looked happy. Mission
accomplished. Well, these paper sandwich cones and their ingenious
non-reflective magnet system and underhung voice coils do their thing.
As can be seen from the crossover and measurements, easy on crossovers.
The D3004/660000 tweeter? It had been some time since I last heard the
6600 tweeter - and.... like meeting a good old friend! No wonder this
tweeter is found in numerous constructions, often with a different
faceplate and sometimes with weird looking back chambers. It is hard to
find a tweeter with a
ruler flat frequency response from ~600 Hz to well above 20000 Hz,
very low distortion down to below 700 Hz, a clean waterfall profile,
etc. What's not to like? This tweeter does it and can be handled with
shallow sloped crossovers.
Basics:
2-driver speaker.
Dimensions: 24 x 33 x 50 cm, WxDxH.
System sensitivity: 87 dB/2.8V/1 meter.
Impedance: 4-8 Ohms, minimum 4.7 Ohms.
Power requirement: 30+ watts/channel. Depends on how loud you play. If
you play it loud - and this speakers can handle it - use 50+ wpc. This
speaker works well with my Hypex UcD power amp, 400 wpc (4 Ohms).
Power handling: 100 watts.
Please
also read:
http://www.troelsgravesen.dk/power-handling.htm,
and remember any burned driver is a misused driver.
Useful links (Please read before writing!):
http://www.troelsgravesen.dk/tips.htm
http://www.troelsgravesen.dk/crossovers.htm
http://www.troelsgravesen.dk/LCR-RC.htm
http://www.troelsgravesen.dk/Inverted-Polarity.htm
FAQ (Please read before writing!):
You cannot change cabinet front panel dimensions and drivers' placement
without needing a new crossover - and I cannot help.
You cannot use any other drivers with the crossover specified.
http://www.troelsgravesen.dk/crossovers.htm
http://www.troelsgravesen.dk/choices.htm
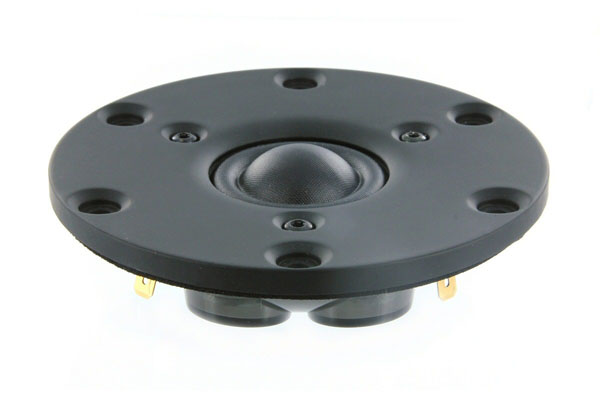
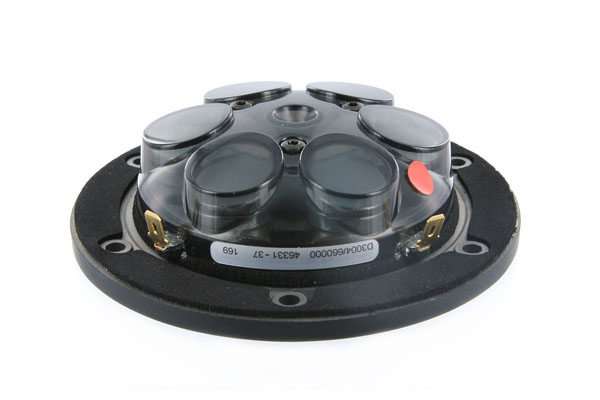
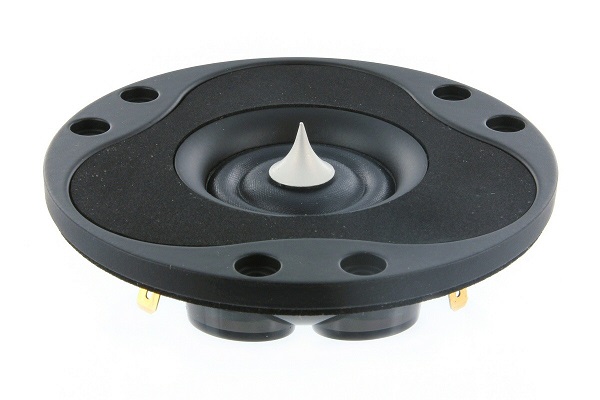
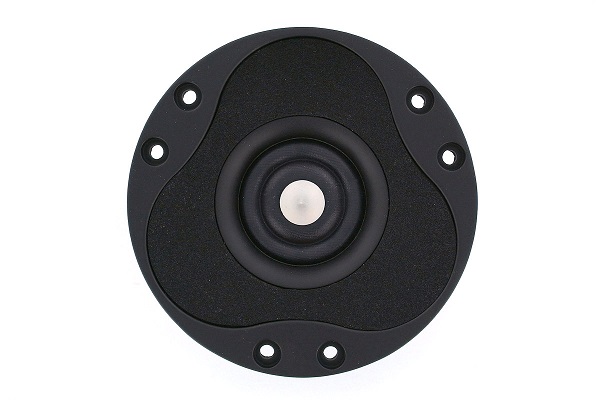
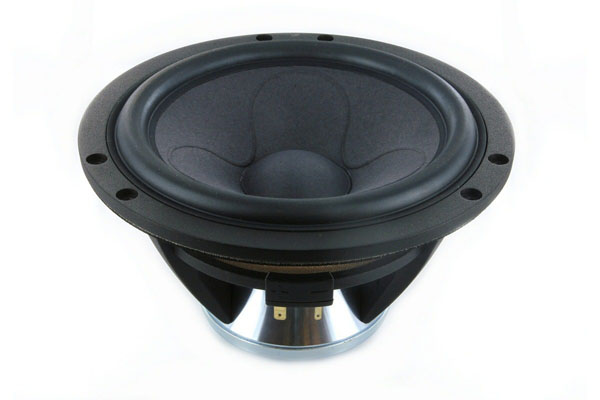
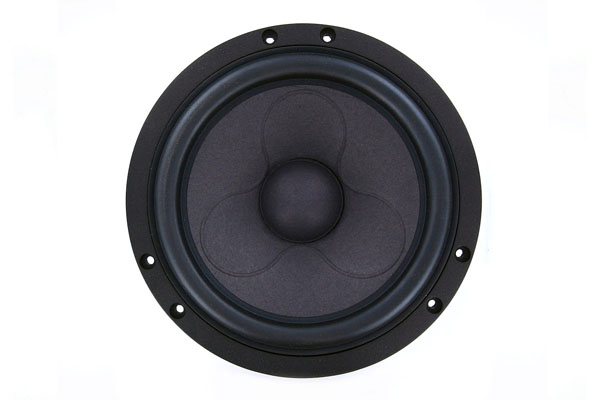
Download specs here: D3004/660000 R3004/662000 18WU/4741-T00
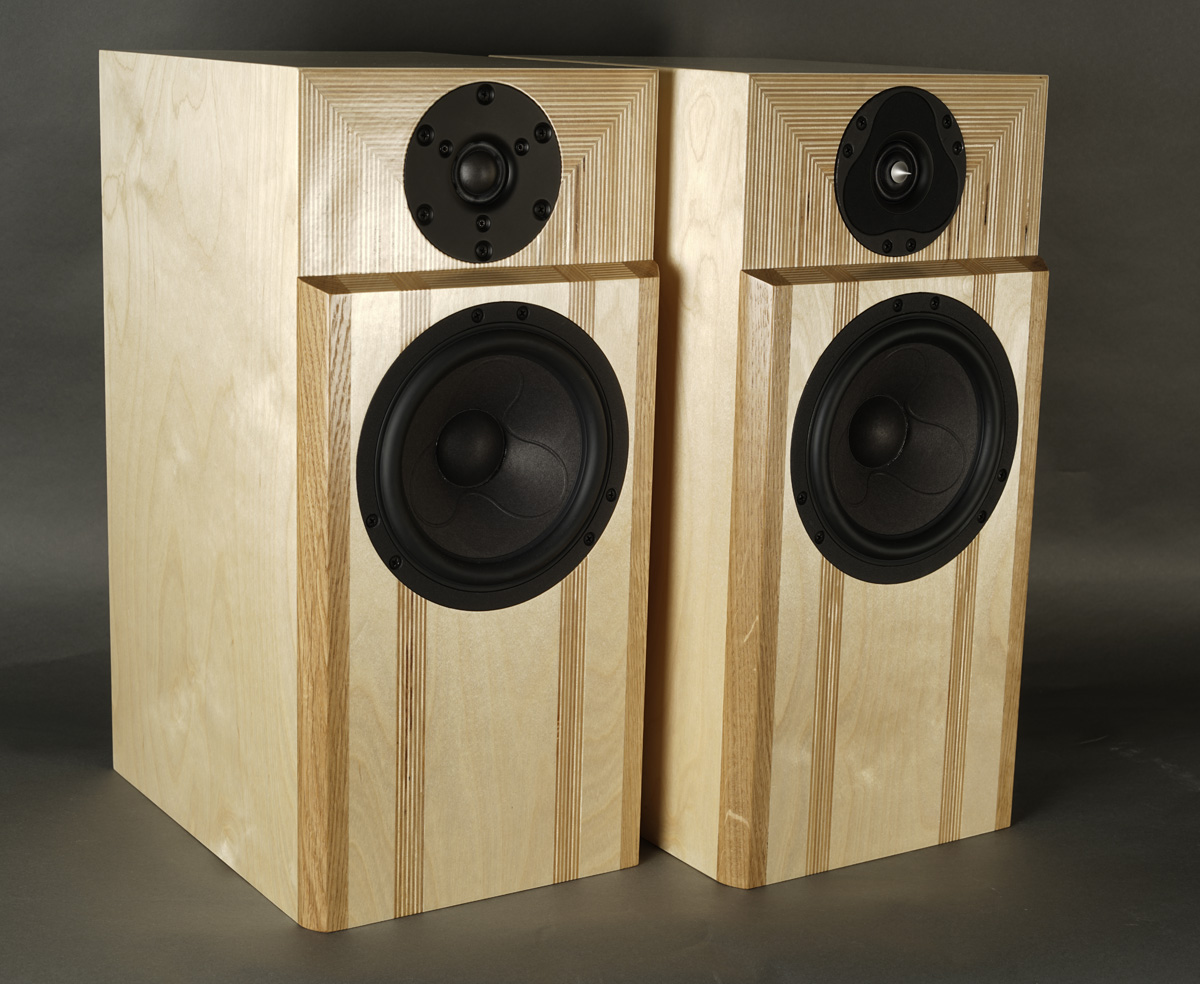
The two tweeter options.
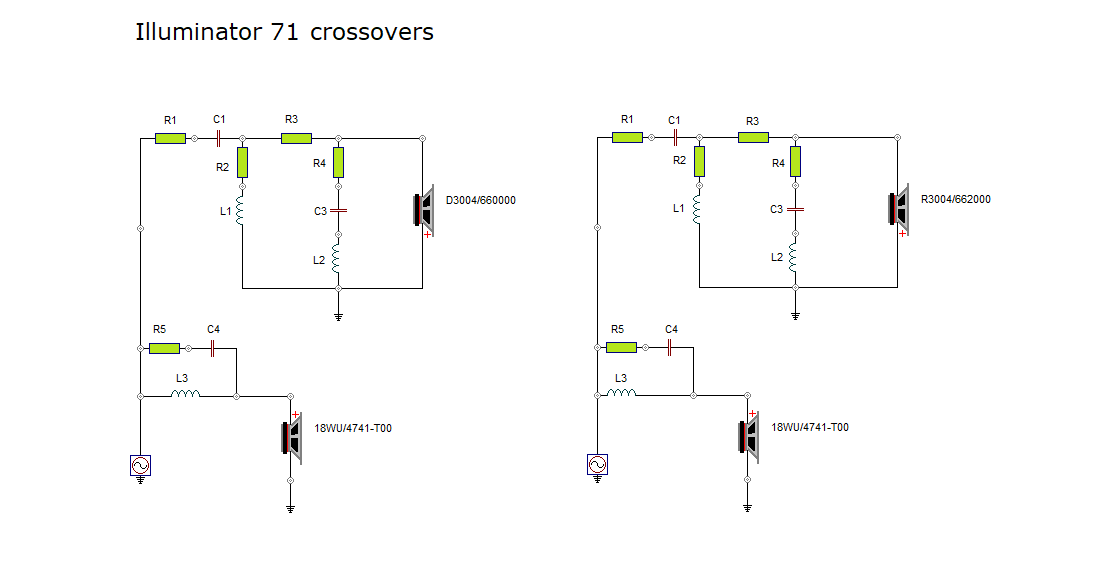
The crossovers for the two versions are identical except for value of
R1. The D3004/660000 is a little more sensitive than R3004/662000. The
crossover topology is LR2 with a point of crossover around 2.5 kHz.
R4/C2-3/L2 is impedance linearisation to make the high-pass filter work
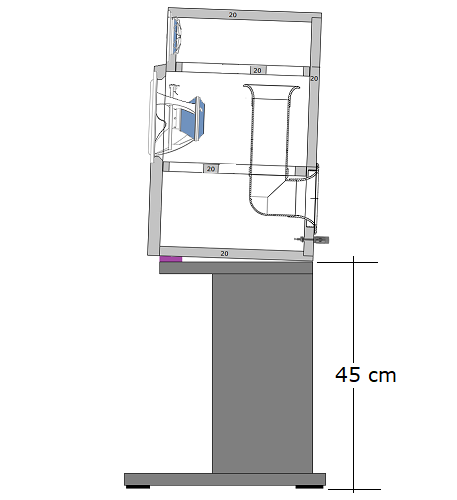
properly. Ideal listening height (most linear response) is between the
two drivers. I've use 45 cm stands and tilted the speakers a little to
listen on that axis from my favourite chair.
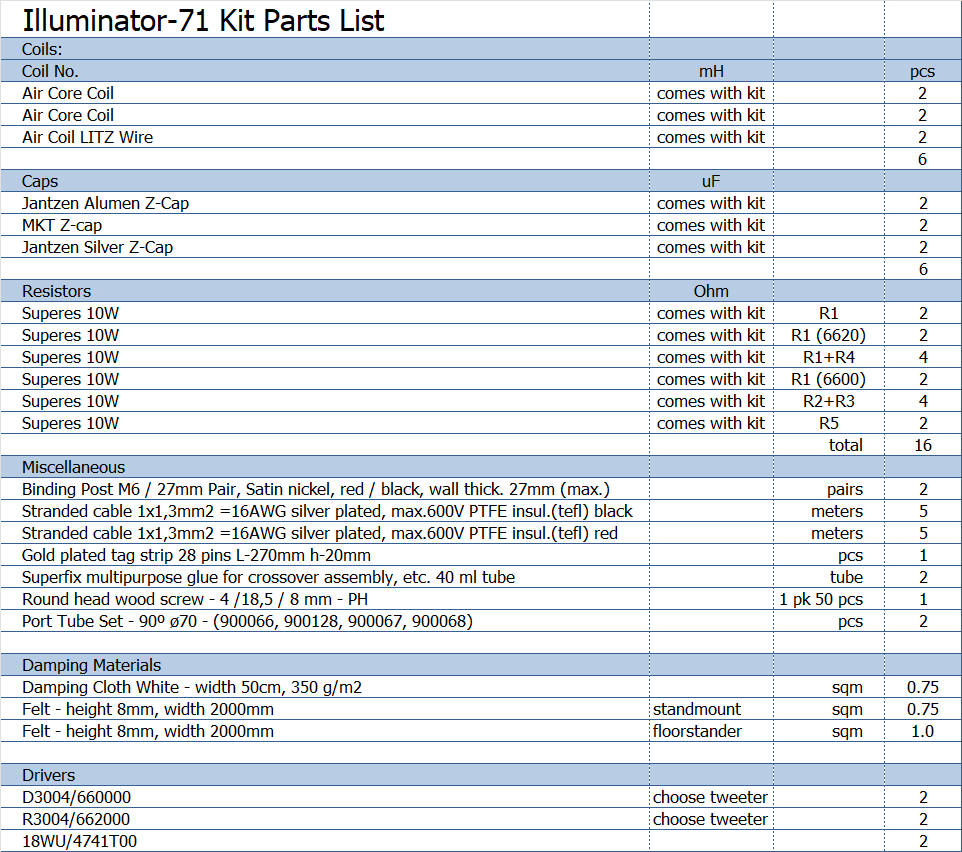
The kit will have resistors for both tweeter options, so "one-fits-all".
In the Kit Instruction following the kit, you will find what resistors
to use for R1. There will be two more resistors for your favourite
treble tuning.
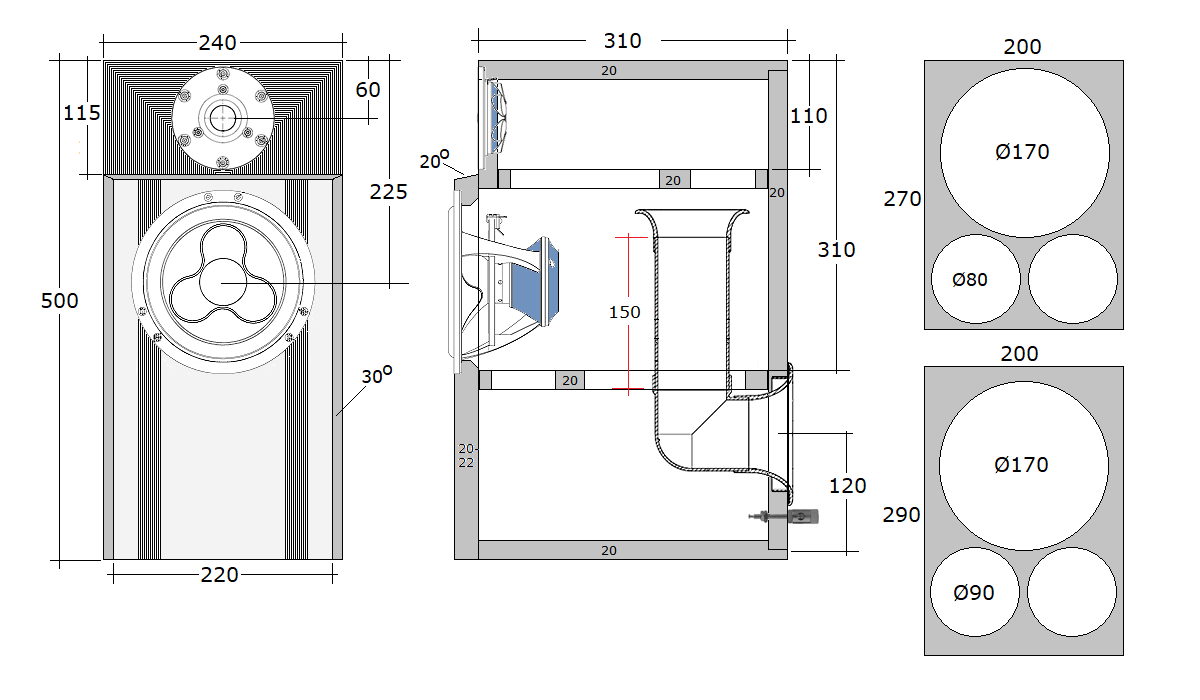
I used 20 mm Baltic birch throughout for the cabinets. Use 19-22 mm MDF
if only this is available.
If you use 18 mm BB, add 4 mm bitumen pads to your order.
Bitumen pads are optional. I used it. You don't have to adjust for
volume when using bitumen pads. Too little change in port tuning.
Should you prefer a floor-stander, look at bottom of page.
Setting up your speakers
"The room is half the system". An old hifi saying - and as true as the
very first time it was said. Room acoustics and speaker placements can
turn even the best speaker into mediocrity and visa versa.
In my room I found the speakers doing the best placed on my 45 cm stands
and tilted 2-3 deg. to have the on-axis between the two drivers pointing
towards my listening position (ear height). This also reduce floor
bouncing - good for midrange. The speakers are toed in so that I listen
approx. 5 deg. off-axis horizontally. The speakers are 90 cm from the
front wall and have 145 and 180 cm to end walls. I have speakers on the
long side of the room. See
here. Please also read this.
http://www.troelsgravesen.dk/tips.htm#Setting_up_speakers
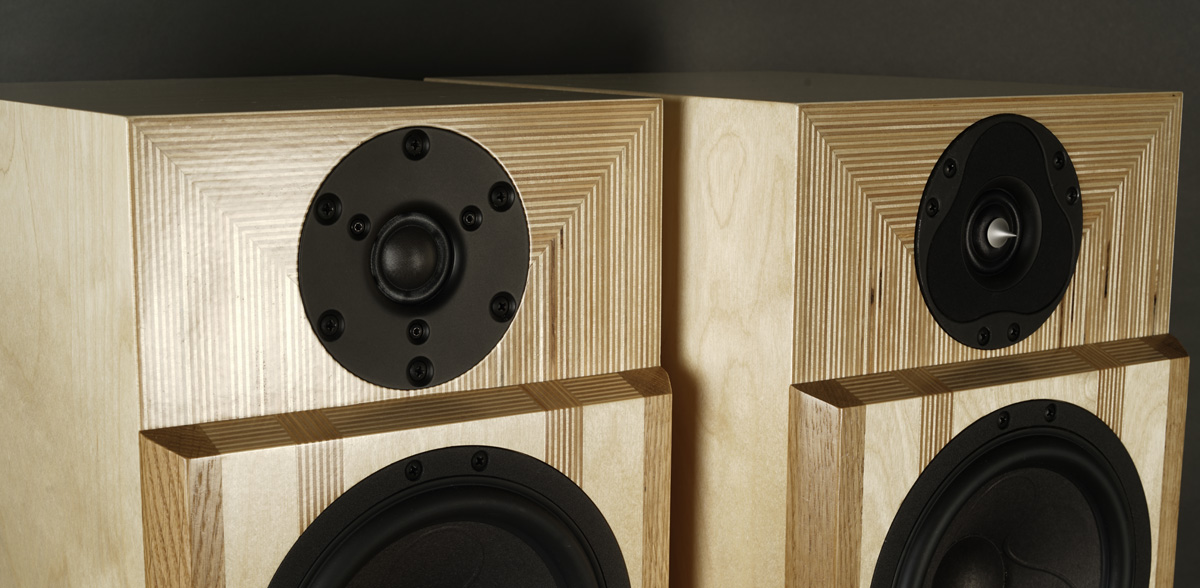
The two tweeter options.
The procedures here are the same as for the Purifi-6R, so please look here for more details.
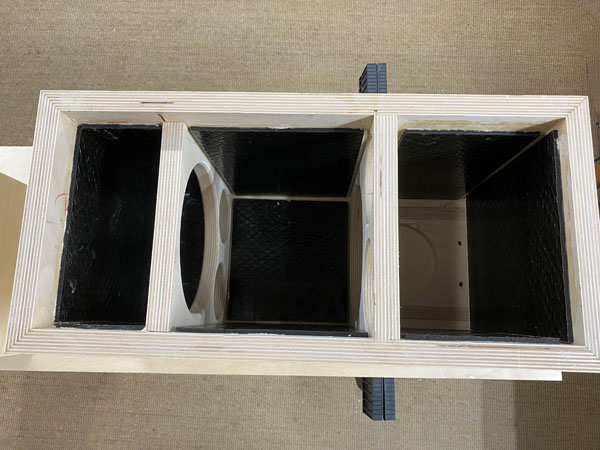
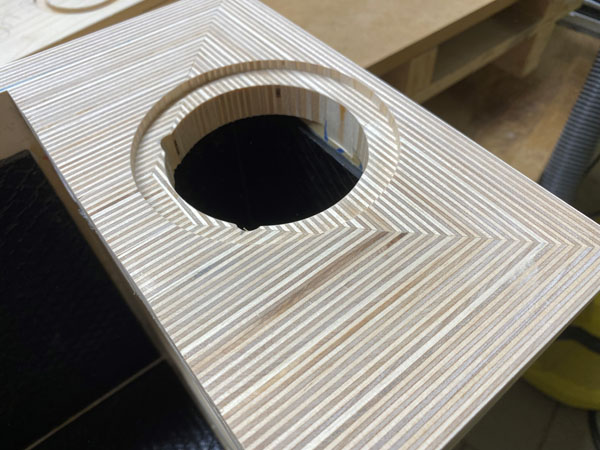
Bitumen is optional. If you want to do so, add 3 pcs 50 x 50 xm 4 mm
bitumen pads to your order.
Bitumen pads do not have to cover 100%. Make 5-10 mm to nearest edge.
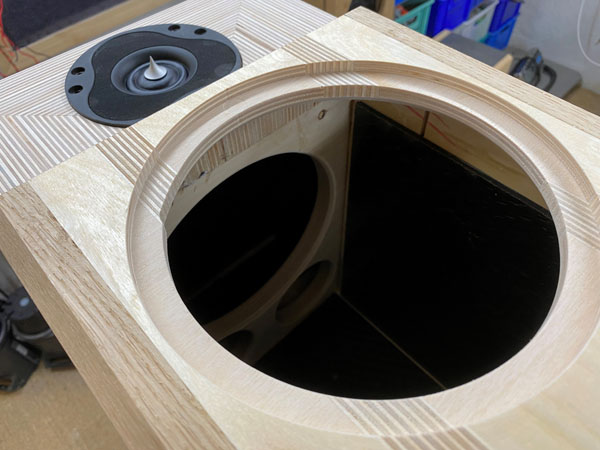
Add felt to the compartment behind tweeter. I forgot - and had more
trouble placing it through the large hole in the brace.
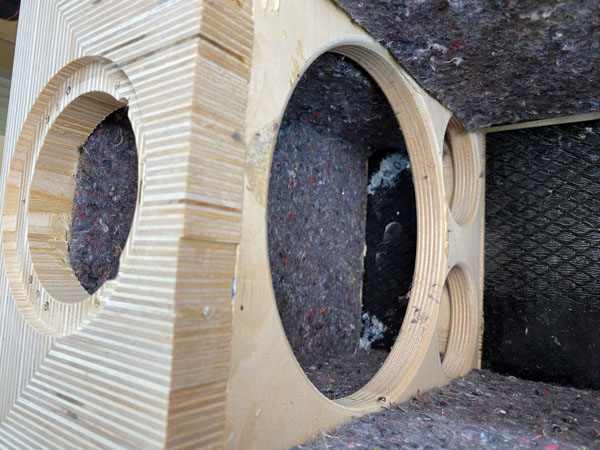
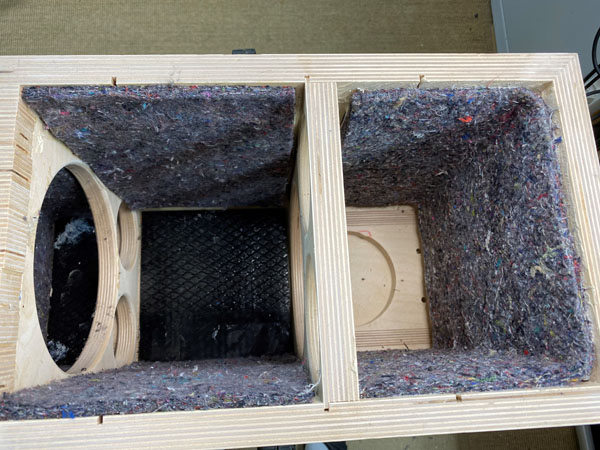
Ad felt as seen on photos. No felt on rear panel.
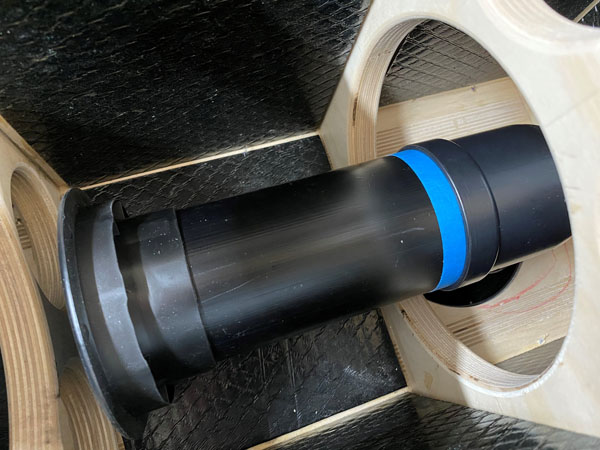
Left: The bass crossover is to be placed on rear panel behind the port.
Little space - and we need to be able to remove the straight port tube.
Ad two turns of painters' tape and it will fit tight and reasonably
secure. We can't remove the entire port by unscrewing the port flange.
Right: I did the lacquer work on tweeter panel and top of bass panel
before gluing the front panel. Use tape to mask off the lower part of
the tweeter panel to preserve a good gluing area. Adding lacquer to
these parts after gluing the front panel is not easy as I use a
roller.
Fold a piece of 23 x 50 cm acoustilux at place at bottom. Fold a piece
of 23 x 50 cm acoustilux and place behind tweeter in upper compartment.
Fold a piece of 20 x 50 cm acoustilux and place around the port covering
the crossover as seen on photo below.
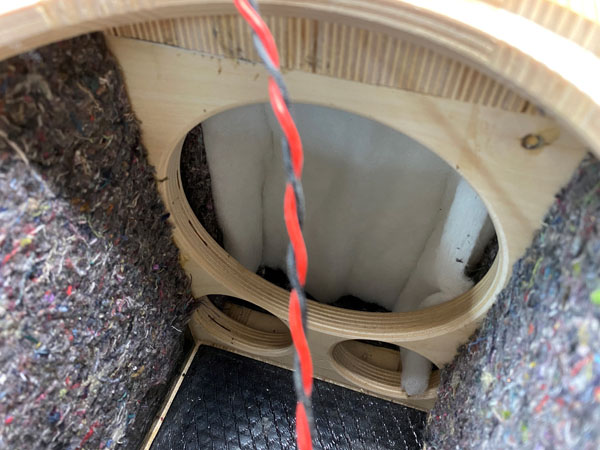
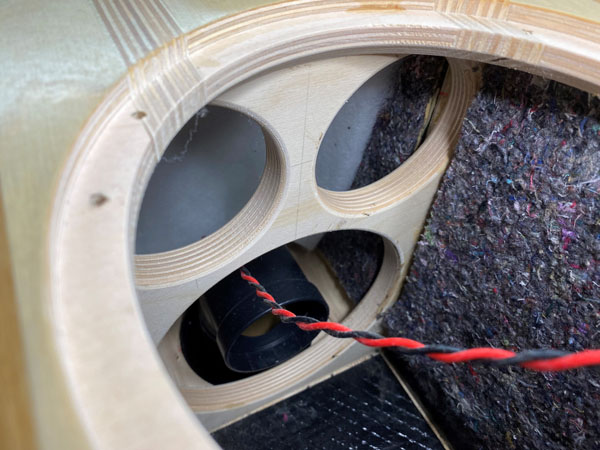
Acoustilux at top (left) and bottom (right).
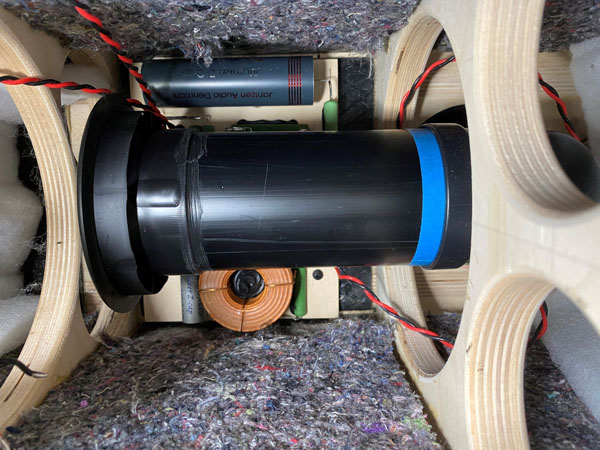
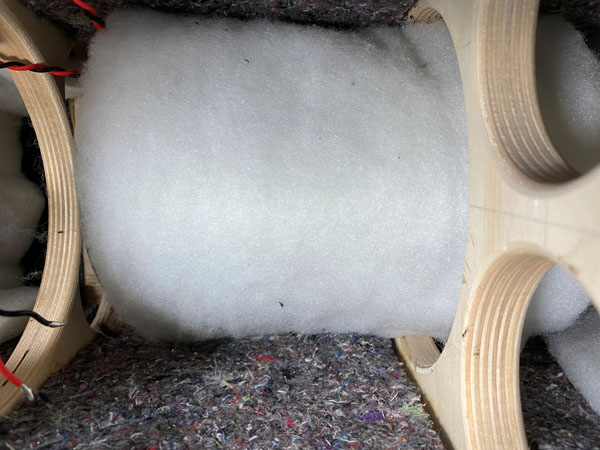
Place the crossover on the rear panel and fasten with screws. Fold a
piece of 20 x 50 cm acoustilux and place around the port covering the
crossover.
A few comments on
MEASUREMENTS before you start interpreting the readings below.
First of all, if we think measurements will
tell us how a speaker sounds, we're wrong. The perception of sound is
way too subjective to be reflected in any measurements we can perform. A
loudspeaker system is meant to give us a satisfying idea of an acoustic
event and for some people a pair of 5 USD ear-plugs are enough, others
spend 200 kUSD on a truly full-range pair of speakers - and the latter
may not be happier than the former.
Measurements may give us an idea of tonal balance of a system, i.e. too
much or too little energy in certain areas, although dispersion
characteristics play a vital role here. A two-way 7+1 and a three-way
7+4+1 may display similar horizontal dispersion, yet sound very
different. Measurements may tell us about bass extension if far-field
measurements are merged with near-field measurements. In addition to
this, ports may contribute to bass extension. Most of we diy'ers do not
have access to an anechoic room for full-range measurements from
20-20000 Hz.
What cannot be seen is what kind of bass performance we get in a given
room. Bass performance is highly dependent on in-room placement of your
speaker and the same speaker can be boomy in one place and lean in
another. Actual SPL level at 1 meter distance and 2.8V input is useful
for en estimate of system sensitivity and combined with the impedance
profile may give an idea of how powerful an amplifier is needed to drive
the speaker to adequate levels.
What measurements do not tell is the very sound of the speaker unless
displaying serious linear distortion. The level of transparency, the
ability to resolve micro-details, the "speed" of the bass, etc., cannot
be derived from these data. Distortion measurements rarely tell much
unless seriously bad, and most modern drivers display low distortion
within their specified operating range.
Many people put way too much into these graphs and my comments here are
only meant as warning against over-interpretation. There are more to
good sound than what can be extracted from a few graphs. Every graph
needs interpretation in terms of what it means sonically and how it
impacts our choice of mating drivers, cabinet and crossover design.
What measurements certainly do not tell is the sonic signature of the
speaker, because speaker cones made from polypropylene, aluminum,
Kevlar, paper, glass fiber, carbon fiber, magnesium, ceramics or even
diamonds all have their way of adding spices to the stew. Nor do
measurements tell what impact the quality of the crossover components
add to the sound, from state of the art components to the cheapest of
coils and caps, they all measure the same if values are correct, yet
sound very different.
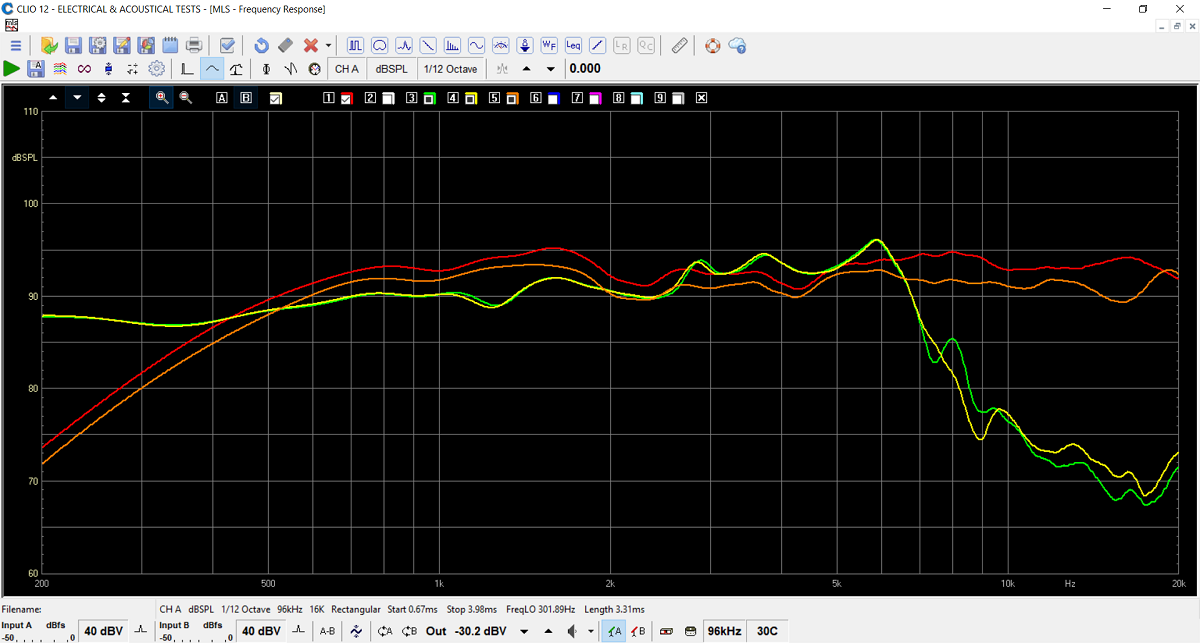
Intrinsic response of drivers on actual baffle. Red = 6600 tweeter.
Orange = 6620 tweeter.
Green and yellow the two 18WU drivers.
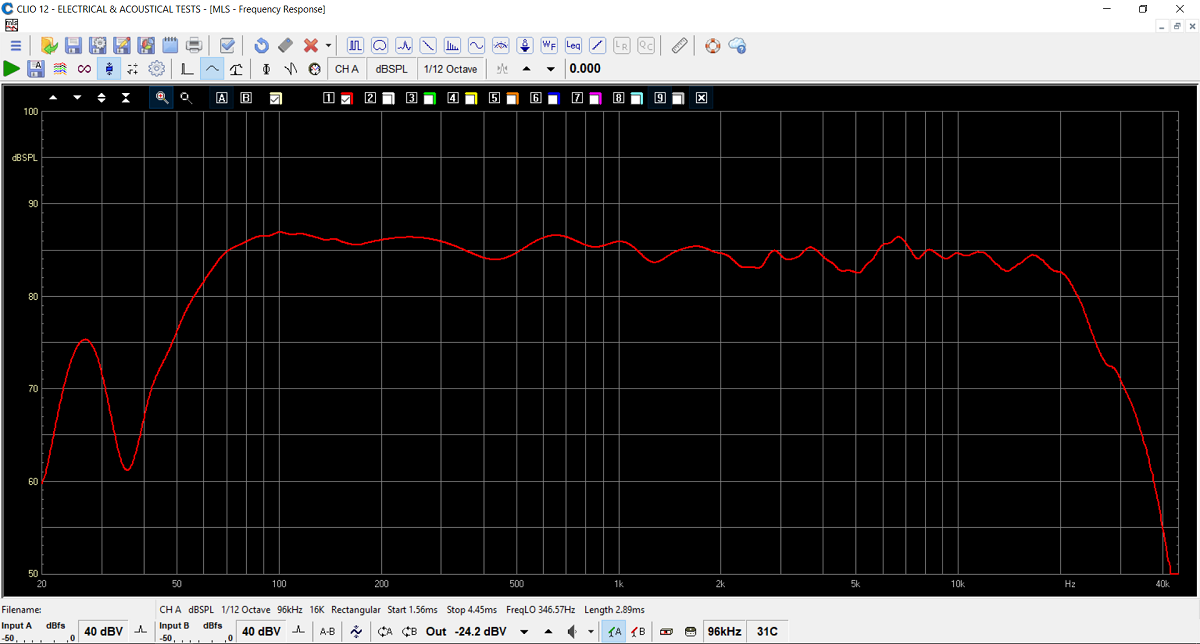
An example of final system response with 6600 tweeter taken at 0.5 meter
distance and merged with near-field response of midbass at 175 Hz. In
addition to this comes the port response centered around 37 Hz.
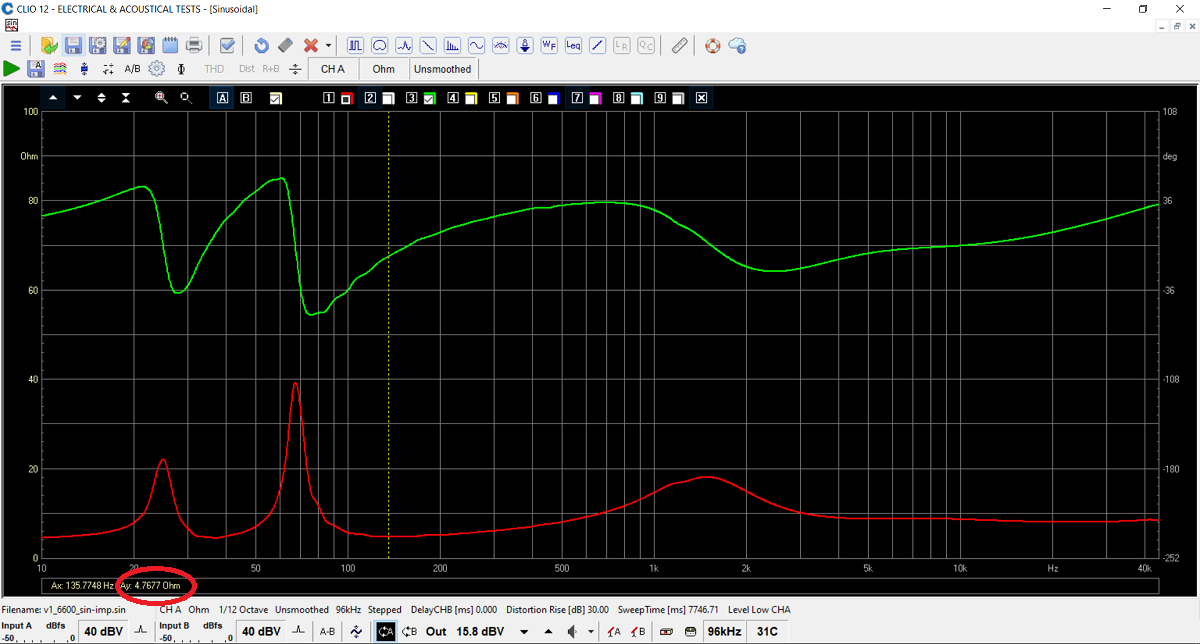
Final system impedance of 6600 version.
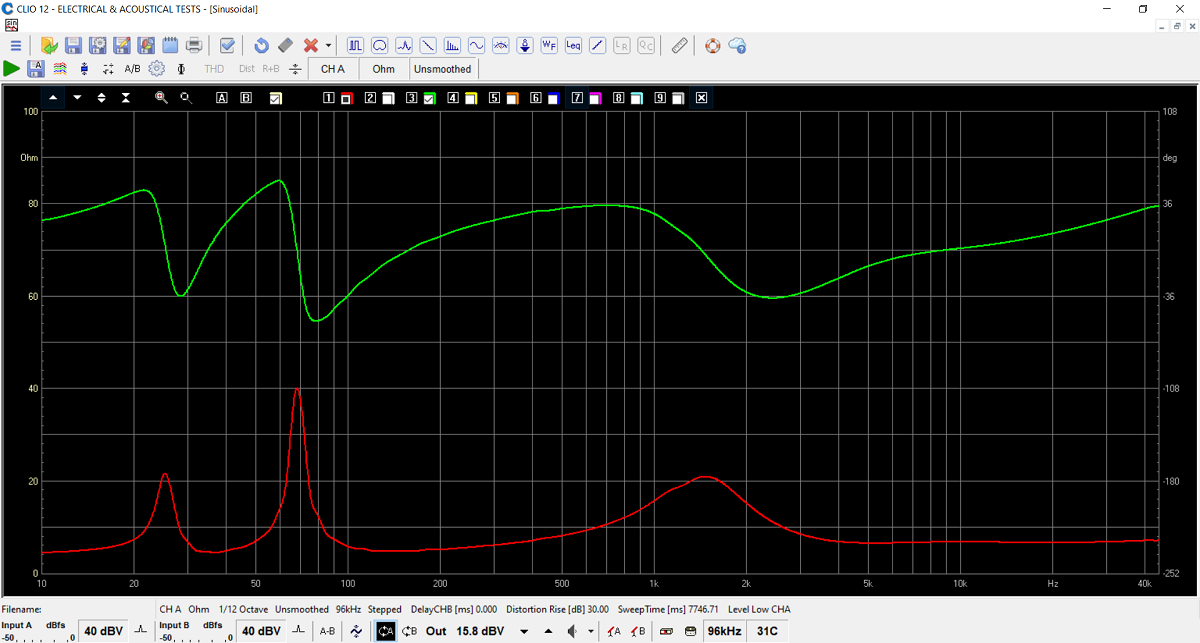
Final system impedance of 6620 version. Virtually the same as 6600
option.
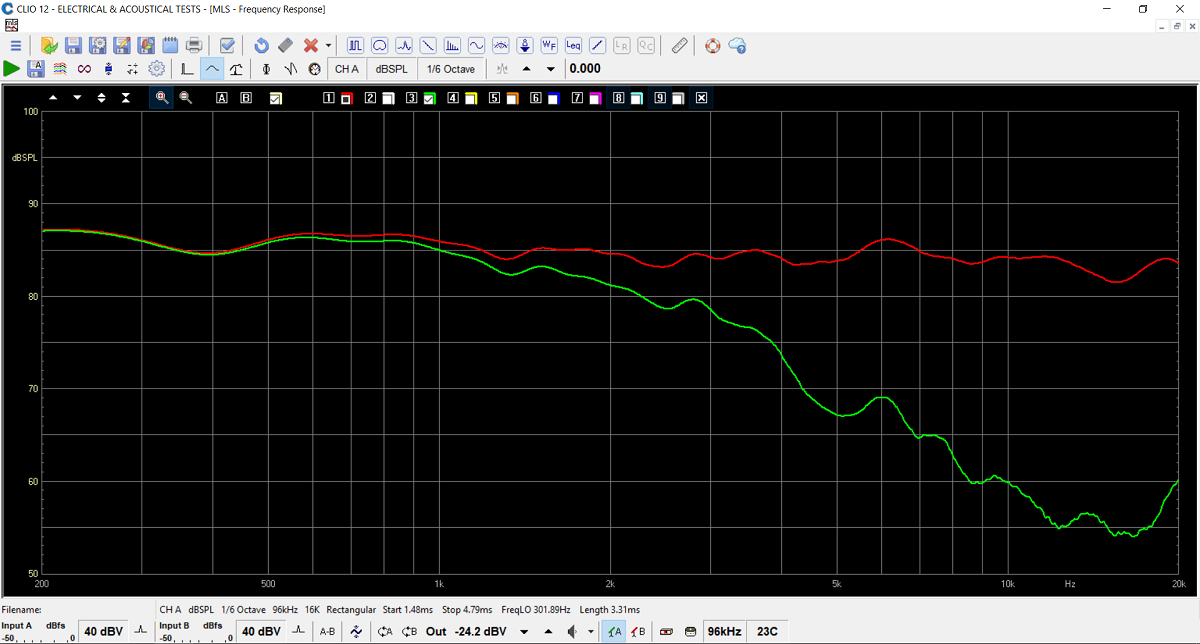
Just this to show the nice roll-off of the 18WU driver given its very
simple crossover.
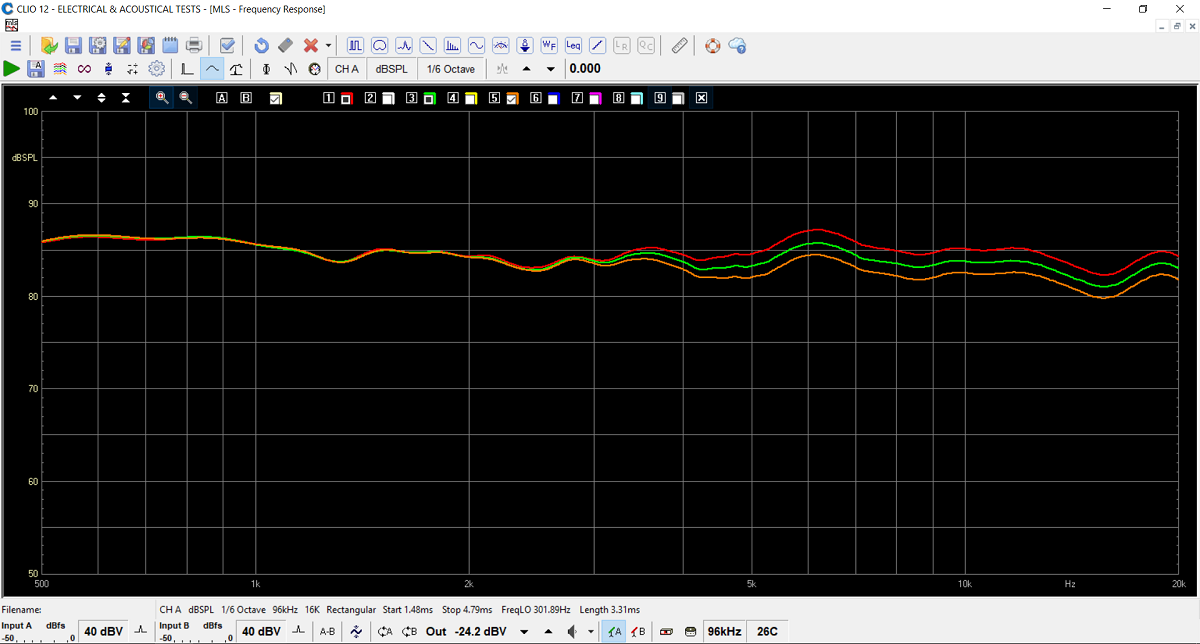
Tweeter attenuation of 6620 version with various values of R1. Values
come
with the kit.
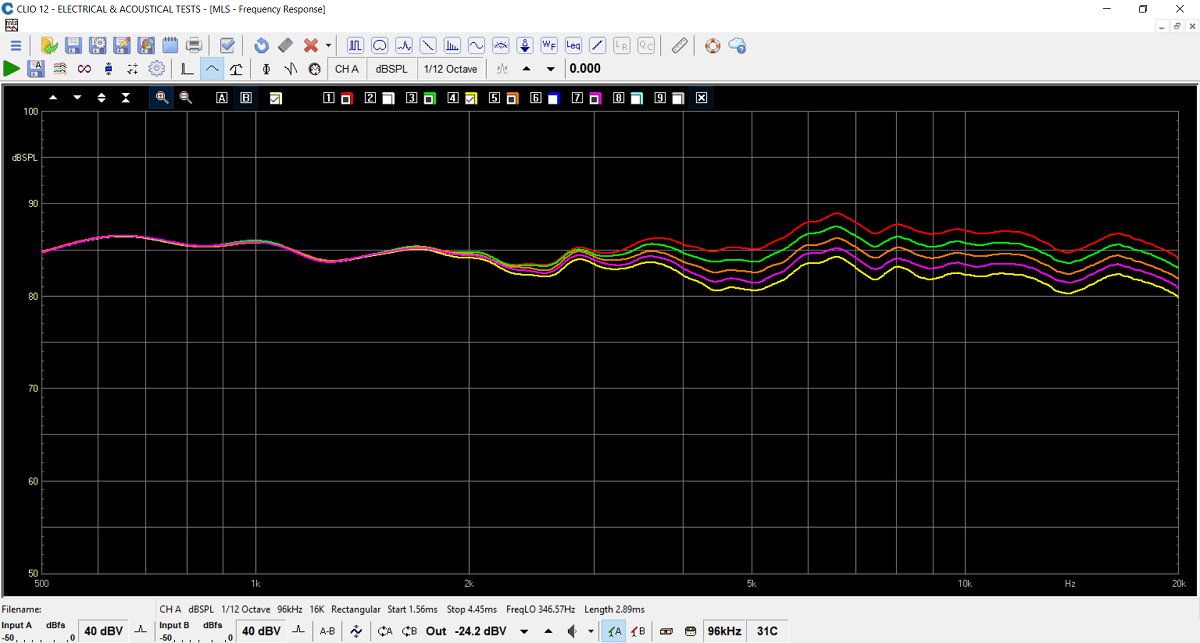
Tweeter attenuation of 6600 version with five different values of R1.
Red, green and orange are too hot for tweeter level.
Sometimes half a decibel of too much treble can turn a speaker too harsh
on certain recordings.
All kit and component prices may be subject to change and are always to be confirmed by Jantzen Audio Denmark.
Kits can always be bought with/without drivers, or some of the drivers.
Download Complete Kit Sale Presentations:
All technical questions to troels.gravesen@hotmail.com
All questions regarding purchase of kits, please mail Jantzen Audio at contact@jantzen-audio.com
CROSSOVER-LAYOUT
BACK TO INDEX
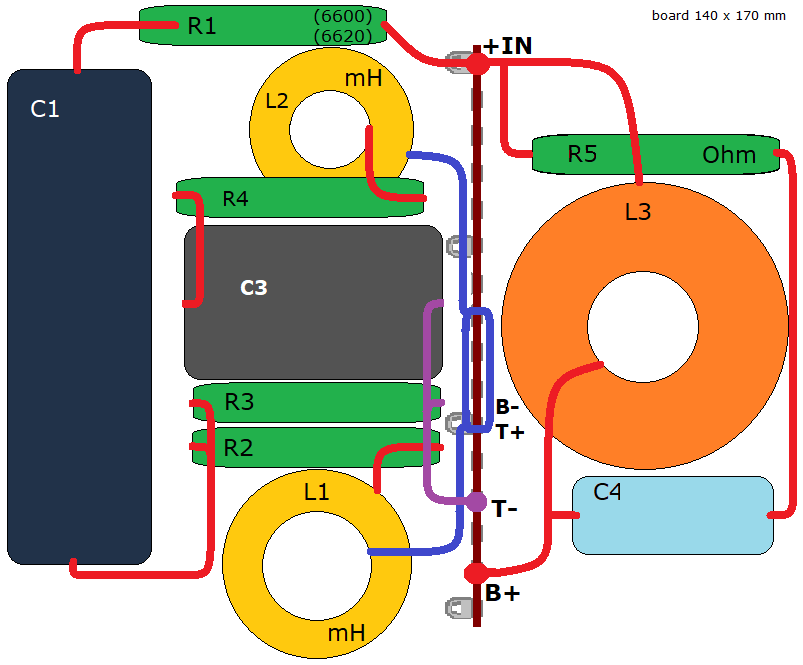
SPEAKER WIRING
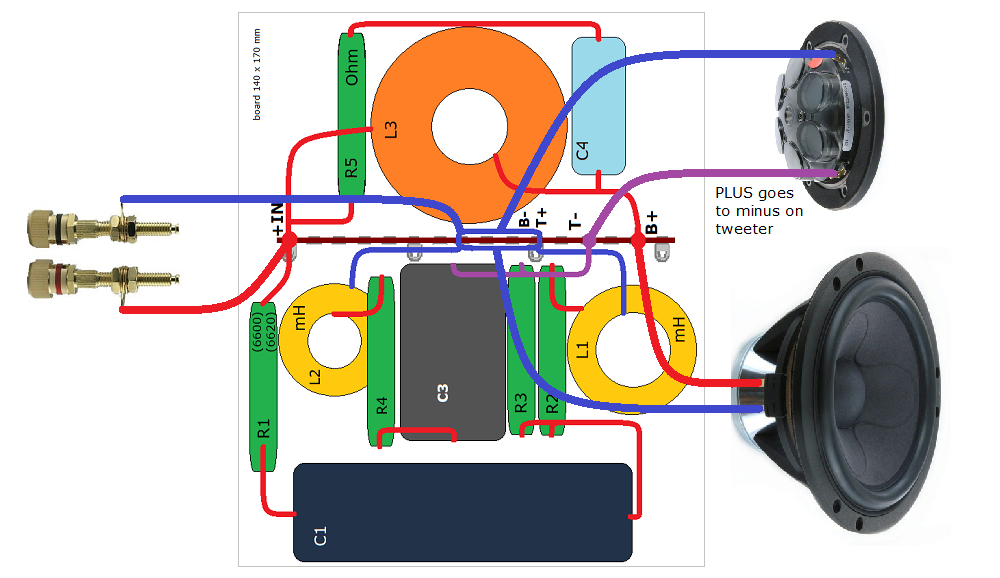
Be aware of inverted polarity of tweeter. PLUS from crossover goes to
tweeter MINUS!
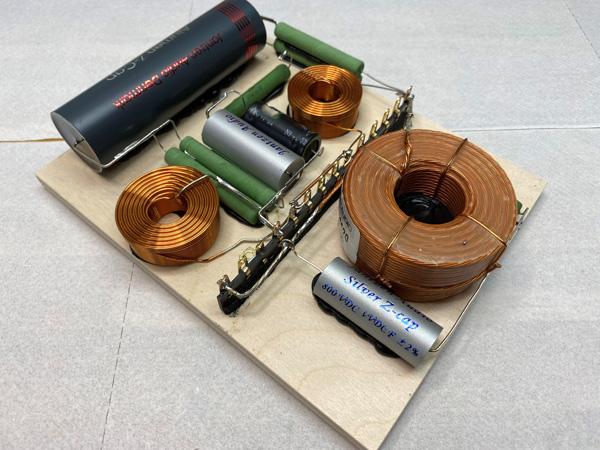
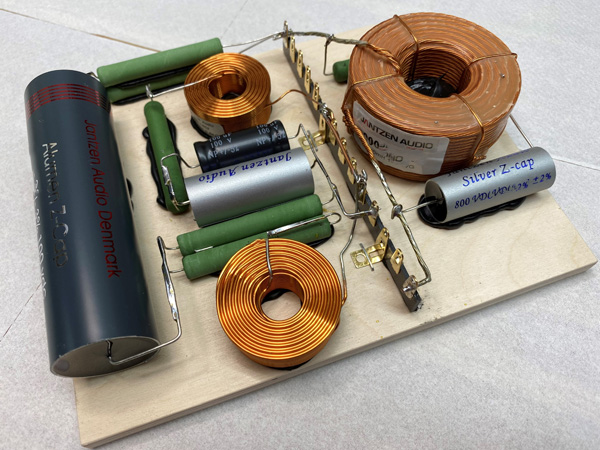
Crossover pics
Check this out:
http://www.troelsgravesen.dk/tips.htm#CONSTRUCTION_OF_CROSSOVERS
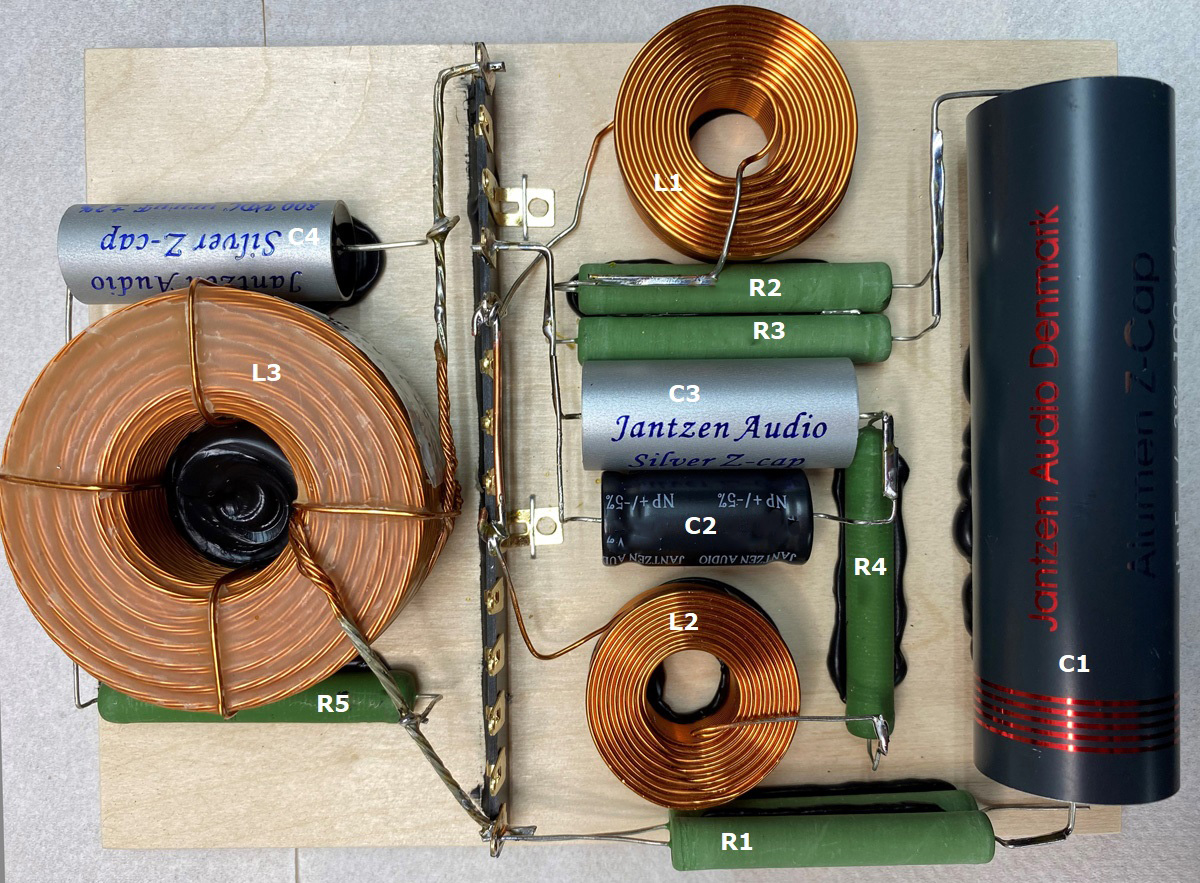
Fill up half the center hole of L3 to secure firm attachment to the
board.
C2 i gone and replaced by a single C3 MKT Z-cap.
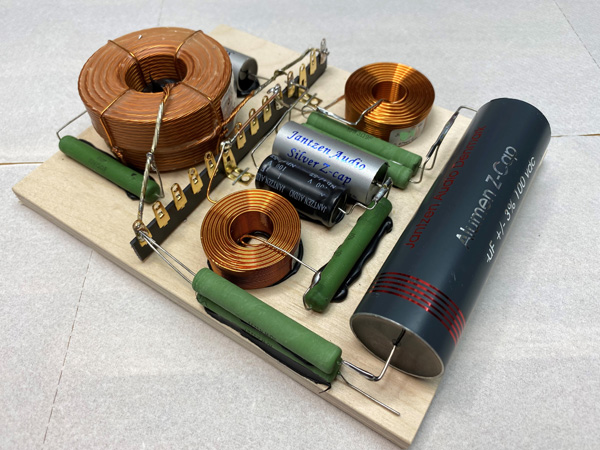
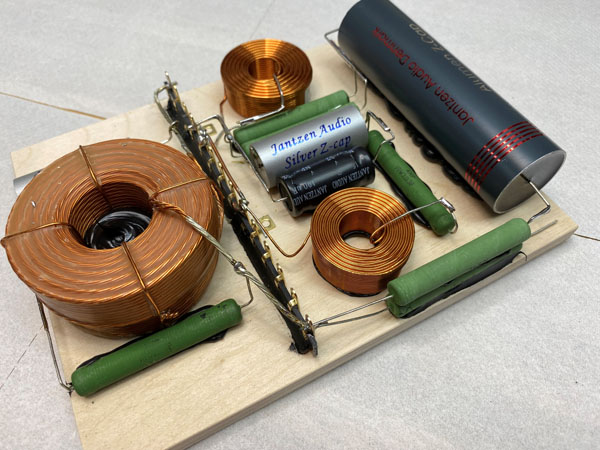
As can be seen, I have two resistors for R1, one for each tweeter. The
lower resistor here not connected to C1.
You only need one - or you may place the other resistors coming with the
kit to suit your preferred treble level.
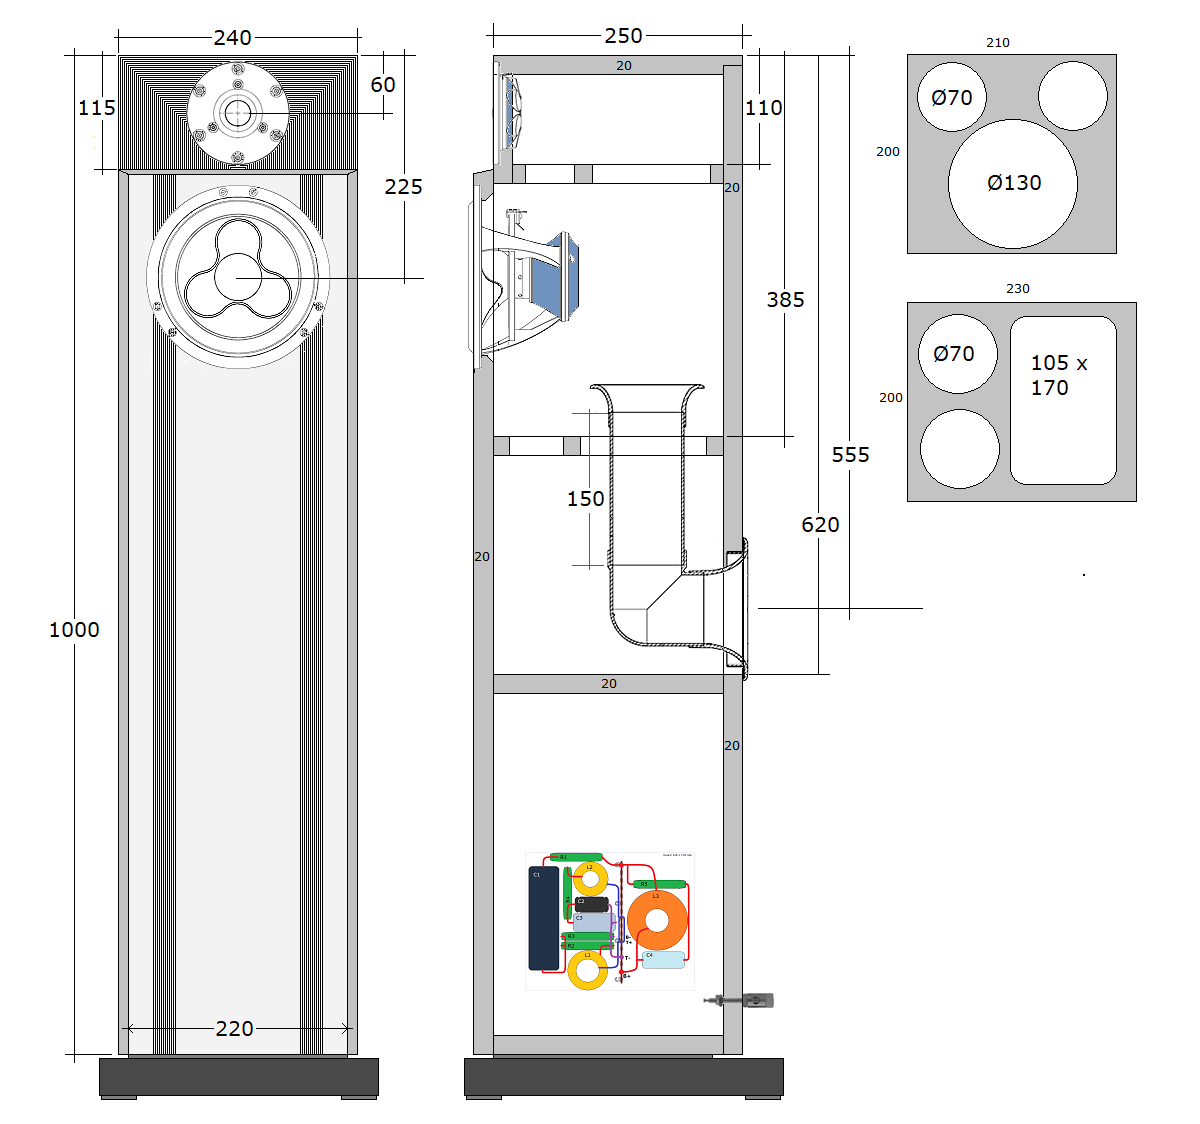
This leaves quite some room at the bottom, but plenty of space for the crossover.