Discovery-MTM
Copyright 2021 © Troels Gravesen
Go to on this page:
DRIVERS
CROSSOVER
CABINET
MEASUREMENTS
MTMs were introduced back in the 60'ies and became popular after the
concept was further developed by Joseph d'Appolito in the 80'ies (?) and
have been used by many commercial manufacturers, e.g. Dali and Living
Voice. Various crossovers have been used with MTMs, all with the aim of
reducing
crossover lobing.
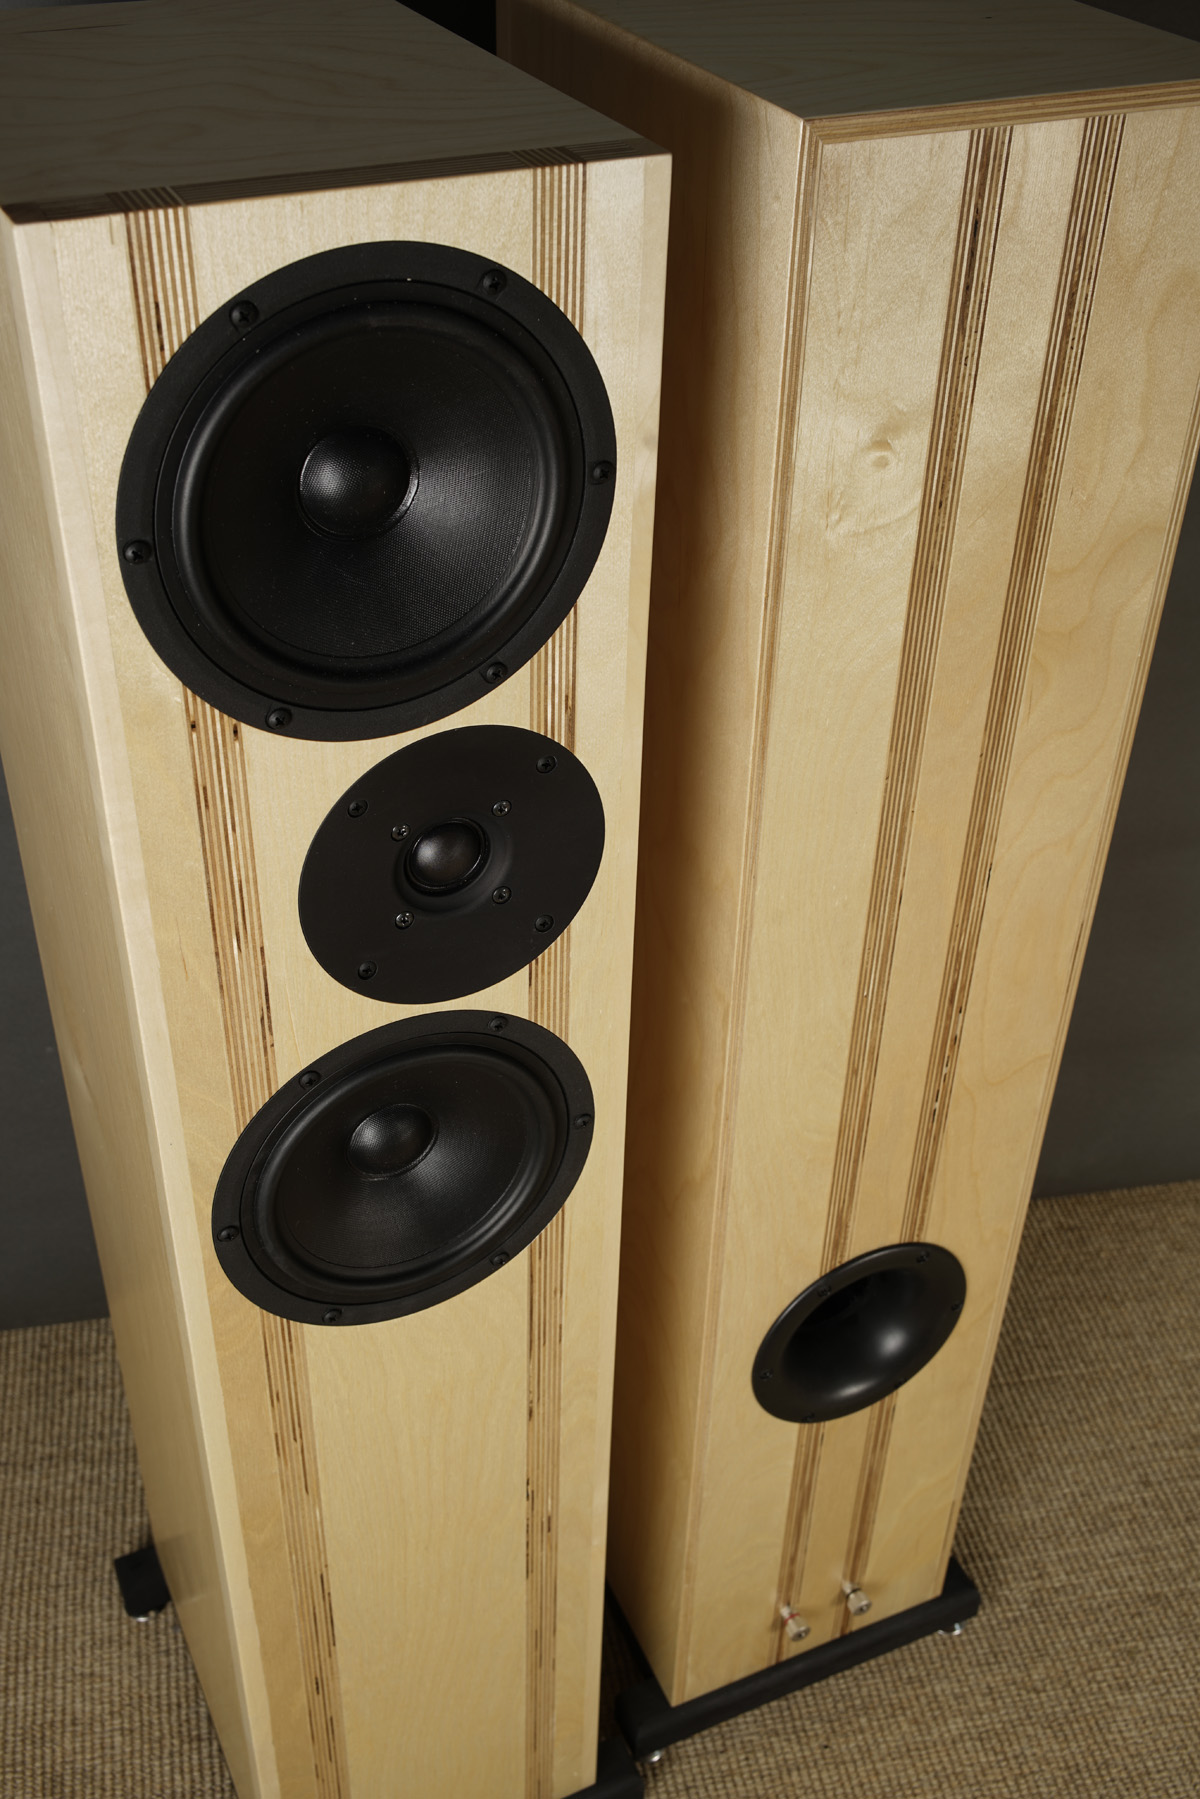
Adding a second driver obviously doubles the radiating area, in this
case to 274 cm^2, close to the size of a 10" bass driver, thus capable
of quite some sound level. Another benefit of having two drivers in
parallel is reduction in crossover complexity compared to e.g. 3-ways or
2½-ways, although the latter not so much if drivers are well behaved
like seen in the
Discovery 861.
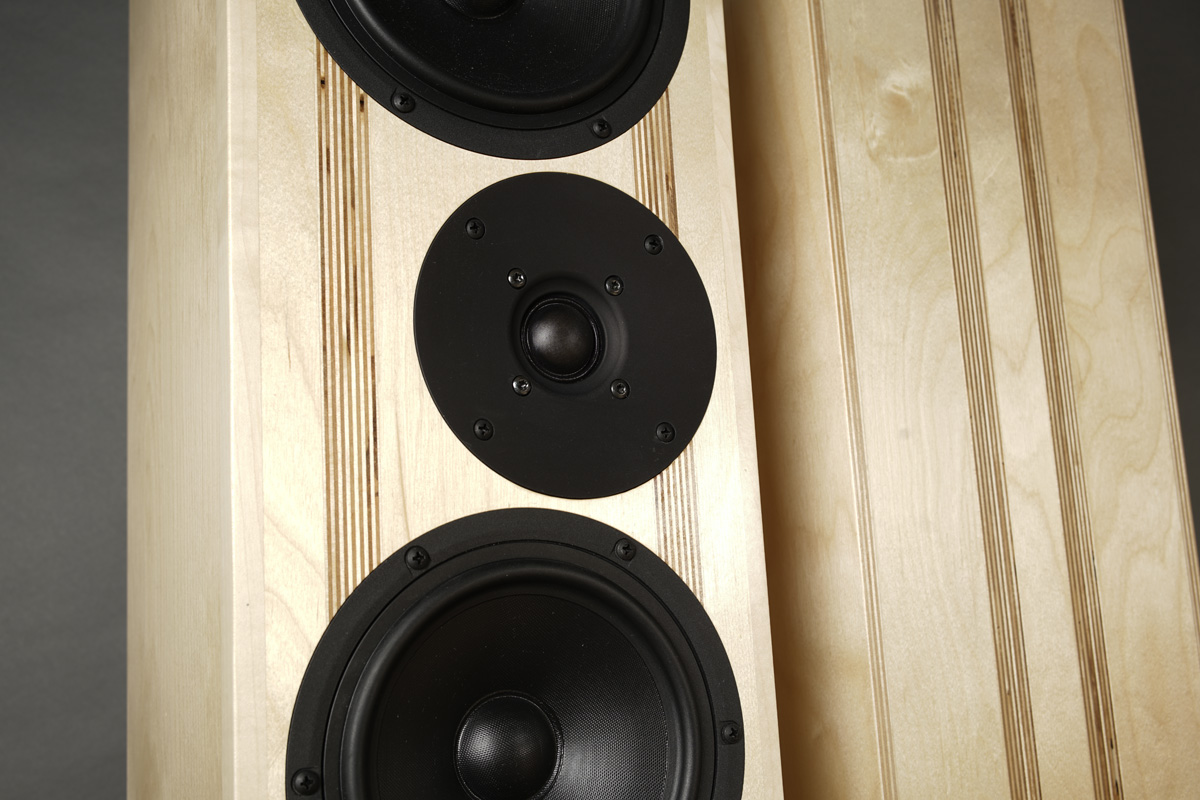
MTMs can have a strong presence character. Having 274 cm^2 membrane area
up to point of crossover, rather than a small 4" midrange driver with
some 50-60 cm^2 area, has an impact on sound and the crossover must be
fine-tuned accordingly. In this case the size of L2. In the final
voicing of the speaker L2 coils with increments of 0.1 mH were tried
until a proper upper-mid balance was found.
What this huge midrange driver area does is most noticeable on e.g.
piano and vocals delivering effortless sound pressure for the size of
the speaker. I also found it very good in terms of actual hearing the
lyrics of a song. Listening mostly to English/American music (even
Danish singers mostly sing in English in case somebody outside our
borders should listen) I'm happy for singers being articulate in order
to catch the lyrics. Not always that easy when English is not your
mother tongue.
In our living room I have the speakers pretty much free of most room
gain, yet found the bass powerful for the size. The 18W drivers are not
subwoofers, so it you want the bottom octave (20-40 Hz), add a
subwoofer.
I have a friend who is always the first visitor to evaluate my new
constructions, and the first thing he noticed was that the midrange
reminded him of the midrange of
The Loudspeaker, which I really hadn't thought about. But he was
right, having two 6" drivers in parallel doing all up almost the same
point of crossover, makes about the same membrane area as the 10"
midrange driver of The Loudspeaker. He liked what he heard - and so do
I. It's got the crisp and strong presence of Ingram Washington's voice
as I lastly enjoyed on my
The Loudspeaker-III speakers.
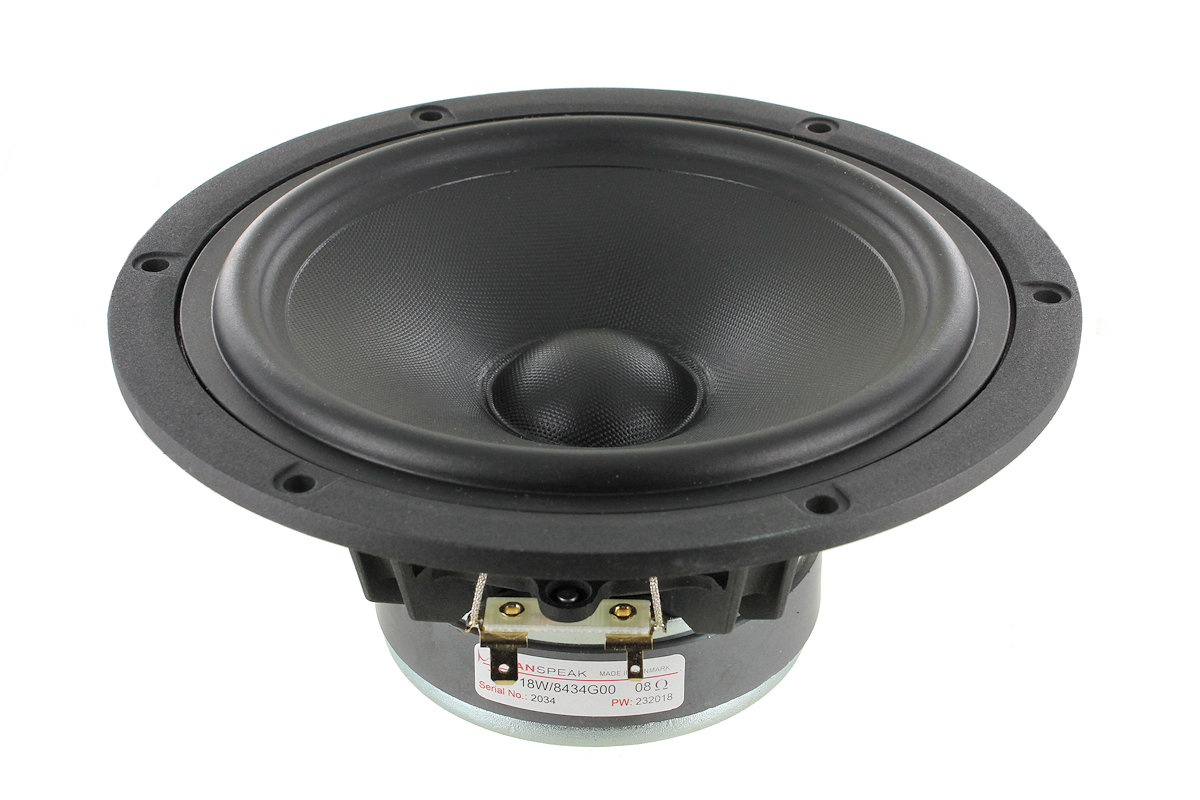
Having done a lot of work on the ScanSpeak Discovery drivers lately I have become increasingly fond of their inherent smooth response and subsequent ease of crossover construction. The 12W, 15W, 18W and even the 22W drivers have some of the smoothest midrange I have ever measured, regardless of price. See below. The 18W/8434G00 driver used here displays none of the all too familiar rubber surround resonances, a clear sign of lack of linear distortion. And let's be honest, a lucky combination of all materials going into a dynamic driver with regard to stiffness, inherent damping, elasticity and resilience is to some extent gambling. You really never know what will happen when you put together all the components, but Birger Jorgensen of ScanSpeak did a good job when he made these drivers to replace the Vifa and Peerless range of drivers after the split.
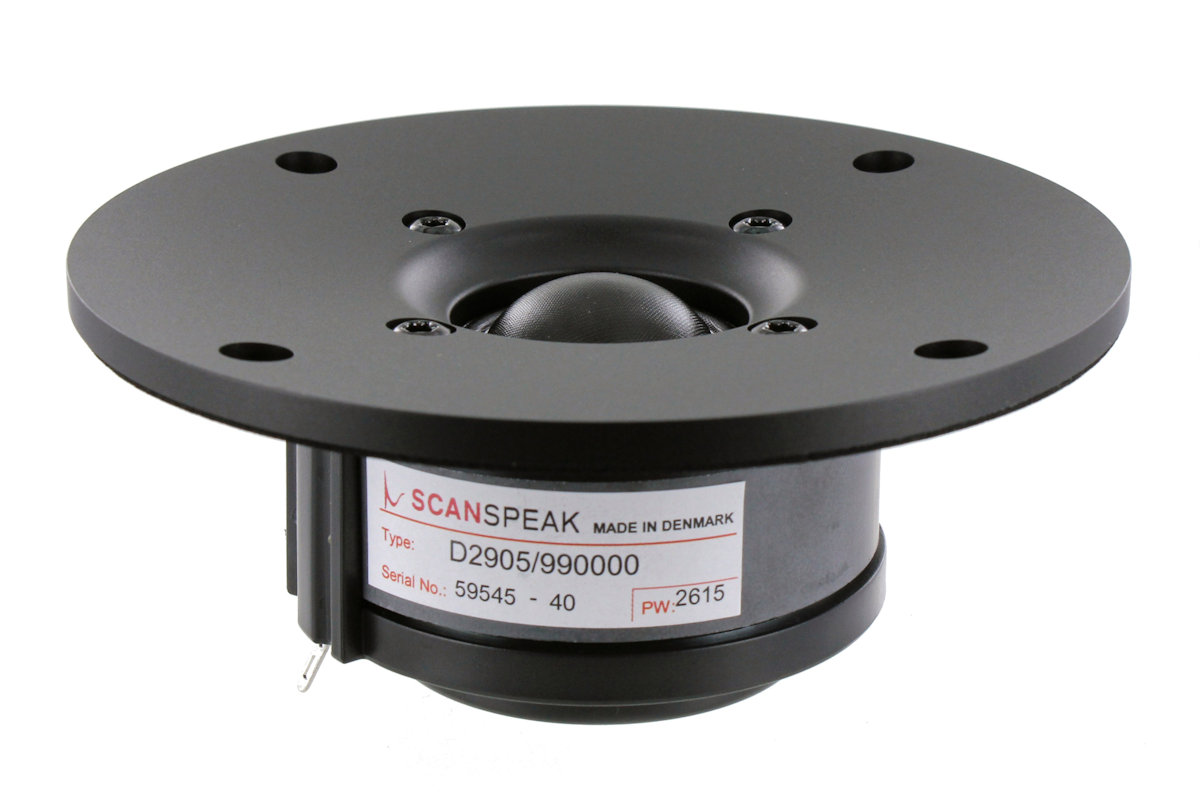
For this speaker I picked the ScanSpeak D2905/990000 tweeter having a
rather large face-plate, kind of a waveguide claimed to have "constant
directivity", a term no longer in use, thus "large waveguide front" it
is - and presumably meant to provide a more uniform coverage of treble
over a given listening angle. Whatever, I didn't pick the 9900 for that
reason, rather because I like what it does. I have used it before in my
AudioTechnology PRELUDE speaker and wanted to use it again.
On paper this 9900 tweeter makes some 90 dB sensitivity. I've always
wondered how people claiming e.g. 94 dB sensitivity for their system
could use the 9900 in such a set-up. Here we reach some true 92 dB
sensitivity and I can tell the system is not shy of treble. I guess the
slightly focused treble due to the waveguide makes up for that, despite
not being measureable. The benefit is that we don't need any
attenuation.
Click images to view large.

I have thoroughly enjoyed some recent Herbie Hancock records, in particular the "River". Being a devoted Joni Michell fan, I was anxious to hear what Hancock could make of the Joni Michell's impressive song catalogue - and I'm wasn't disappointed. Mastered by Bernie Grundman a magnificent record, which cannot be said about the Montreux live recordings. Nothing to write home about, but it does feature Michael Breaker and John Scofield. Nothing on these records put the Discovery MTM to shame.
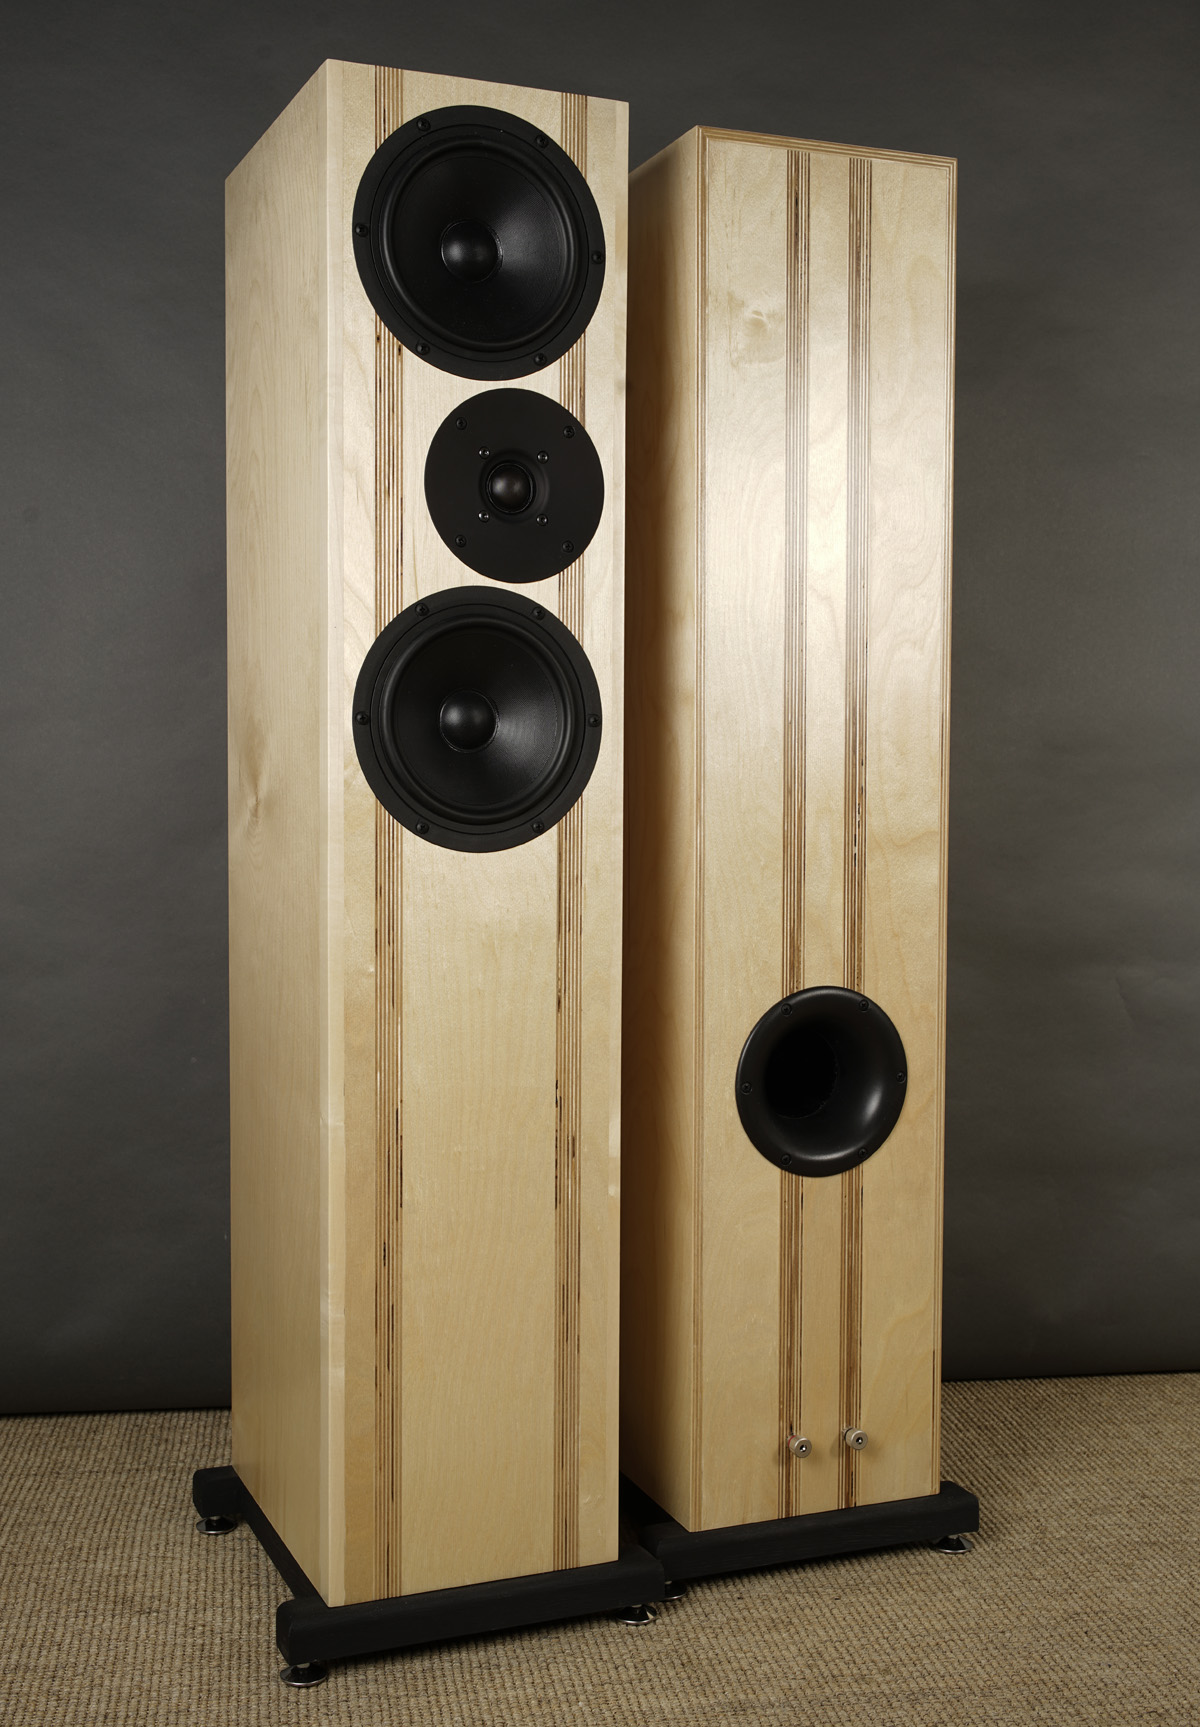
Basics:
3-driver, 2-way speaker
Dimensions: 21.5 x 29 x 102 cm (excl. feet), WxDxH.
System sensitivity: 92 dB/2.8V/1 meter.
Impedance: 4 Ohms.
Power requirement: 20+ watts/channel.
Power handling: 100 watts.
Please
also read:
http://www.troelsgravesen.dk/power-handling.htm,
and remember, any burned driver is a misused driver.
Useful links (Please
follow all links before e-mailing!):
http://www.troelsgravesen.dk/tips.htm
http://www.troelsgravesen.dk/tips.htm#CONSTRUCTION_OF_CROSSOVERS
http://www.troelsgravesen.dk/crossovers.htm
http://www.troelsgravesen.dk/LCR-RC.htm
http://www.troelsgravesen.dk/Inverted-Polarity.htm
http://www.troelsgravesen.dk/choices.htm
Click images to view large.
Download specs here: 18W/8434G00 D2905/990000
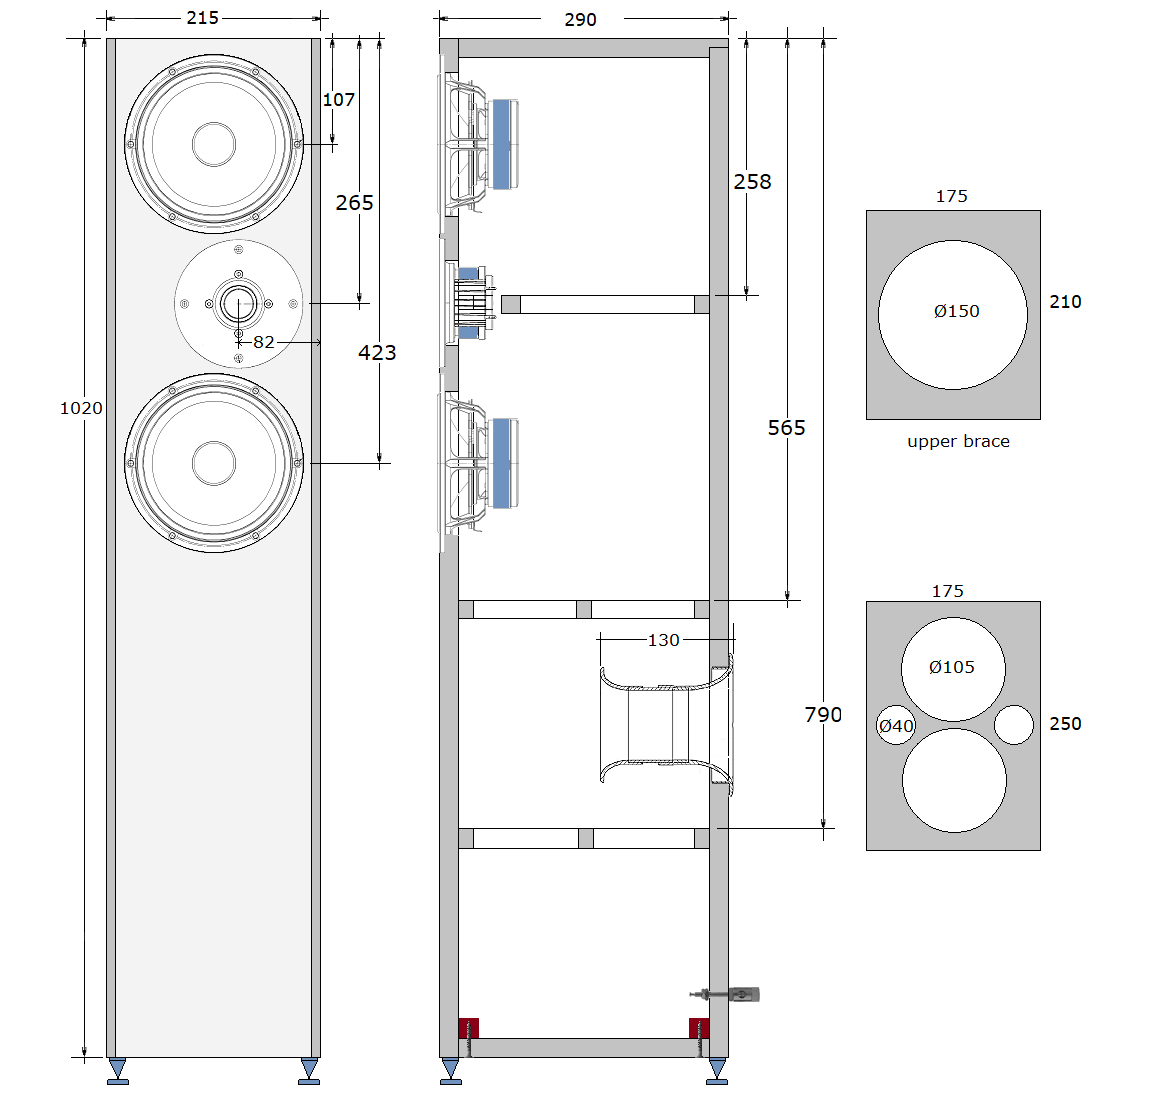
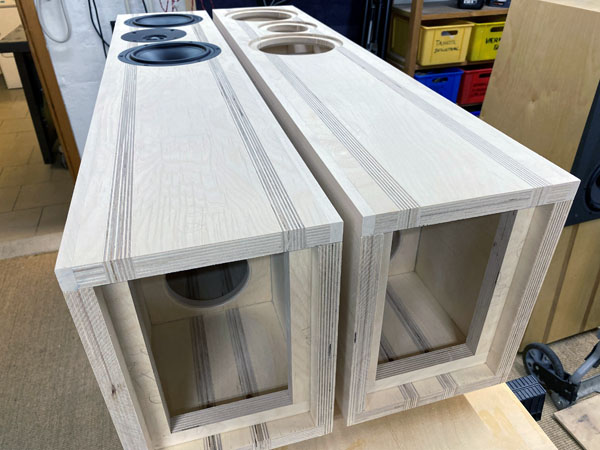
Cabinets were made throughout with 20 mm Baltic birch. The bottom panel
was made detachable as there is no way we can fasten the binding post
screws through the lower midbass driver hole and through two braces.
This also gives the opportunity to place the crossover here, although I
prefer having it on the rear panel behind the lower midbass driver.
I decided to use the more expensive 70 mm port kit. I like the extensive
flanged design. Total length is 130 mm. Cut two pieces of 65 mm tube and
glue flanges with acoustilux.
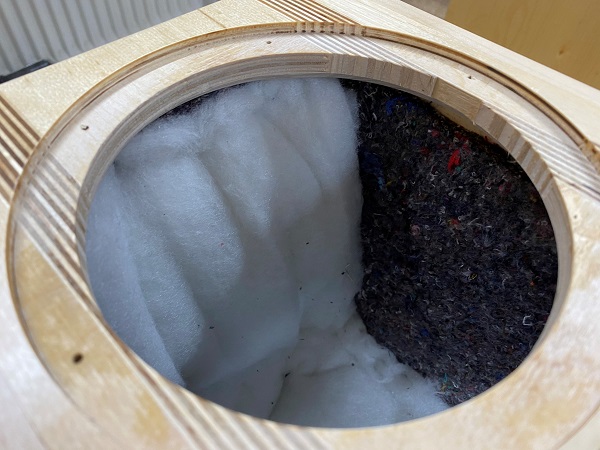
All internal panels were added felt damping sheets and at the top two layers acoustilux. Behind midbass drivers, two layers of acoustilux. At bottom 6 layers of acoustilux to eliminate any standing waves between top and bottom - the critical part of slim and tall floorstanders.
Workshop pics
There won't be a whole lot of workshop images this time, as this is as
simple as can be, a rectangular box with braces - and a flat front
panel.

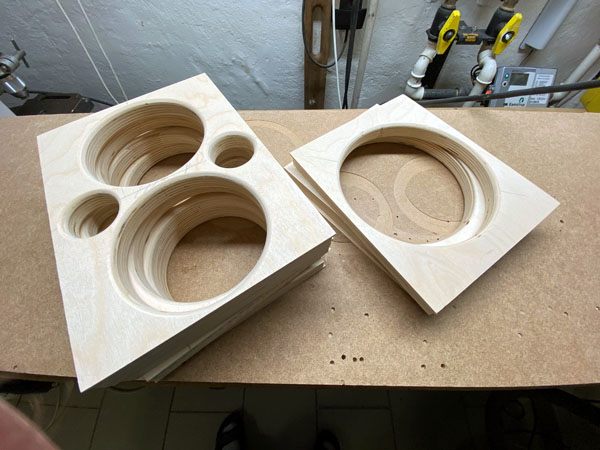
Braces shaping up.
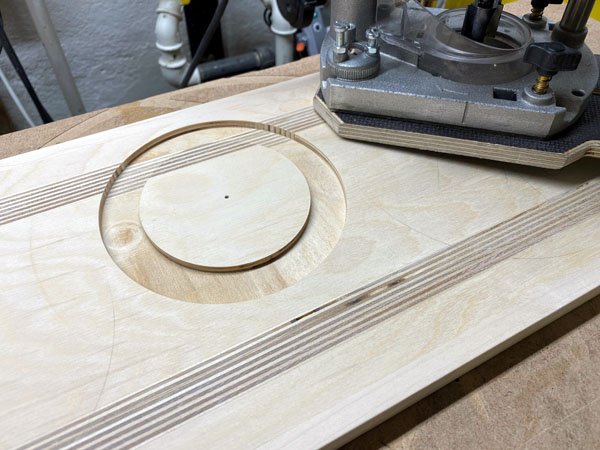
Route easy and slow with Baltic birch not to cause edge ripping. Lower
the router some 0.5 mm at a time in the beginning.
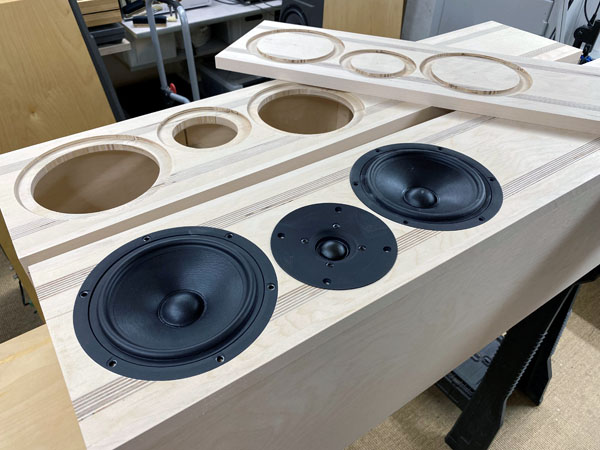
Both the 9900 tweeter and 18W midbass requires some 5.2 mm recess.
I used maple wood for side fillets. You can have the edges sharp or
rounded, r=5 mm, or slightly chamfered, 5 mm. No big deal.
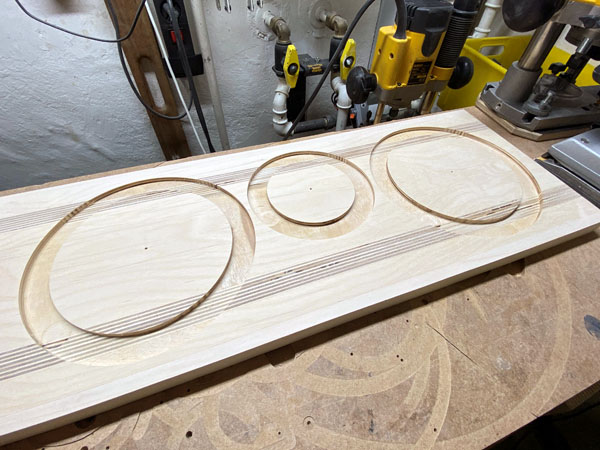
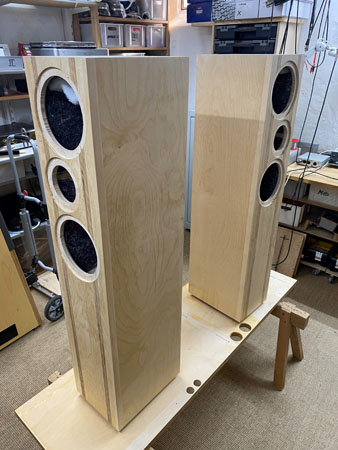
So, what's the point of three front panels? Because I'm an idiot! Forgot
to mirror the front panels!! Costs some 2 hours extra work...
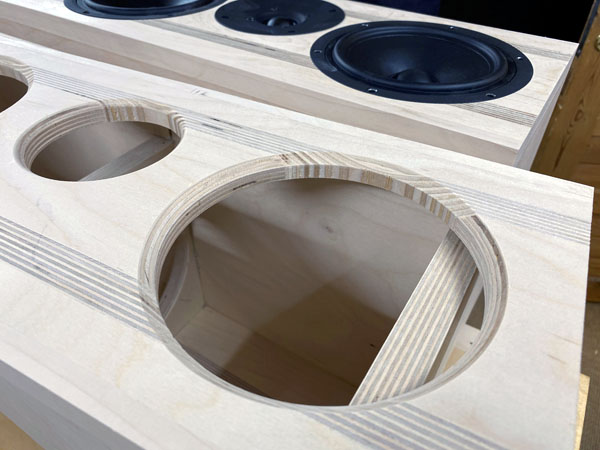
Chamfer midbass driver holes a bit, some 5-7 mm, 45 deg.
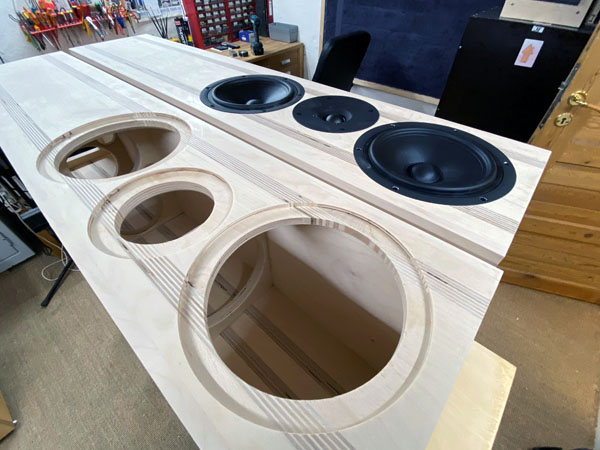
Testing driver rebates and cabs are ready for damping materials before
gluing the front panels.
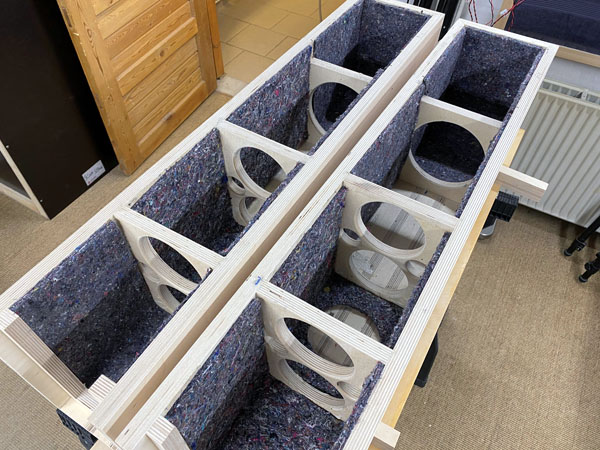
Add felt to all internal panels except rear panel behind lower midbass
driver (crossover).
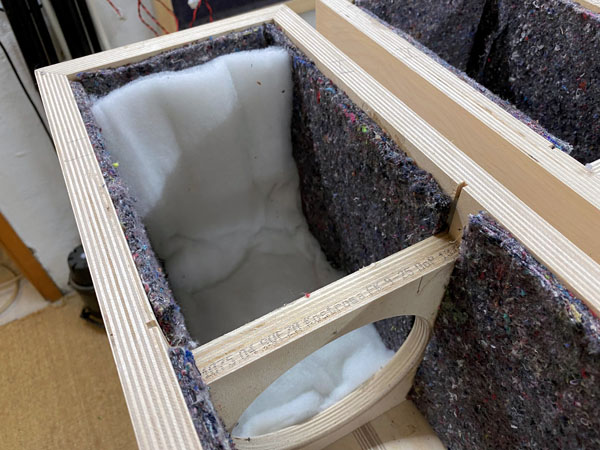
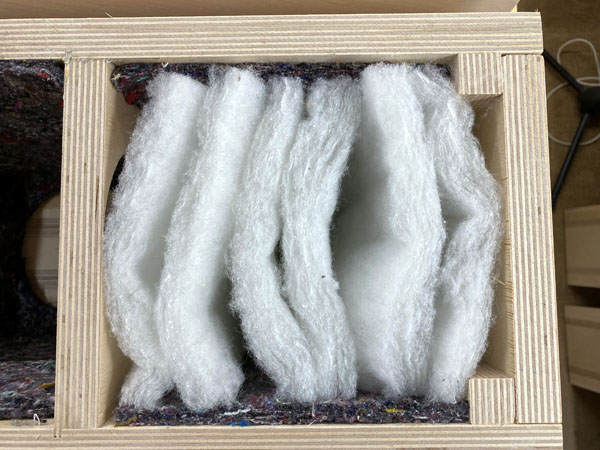
Add 2 sheets 17 x 40 cm acoustilux behind upper midbass driver covering
top and rear panel.
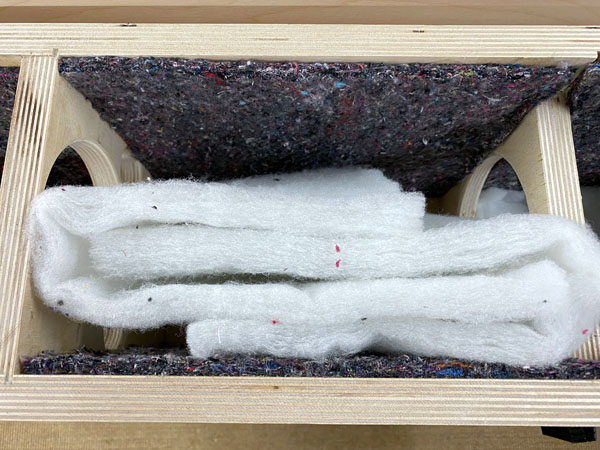
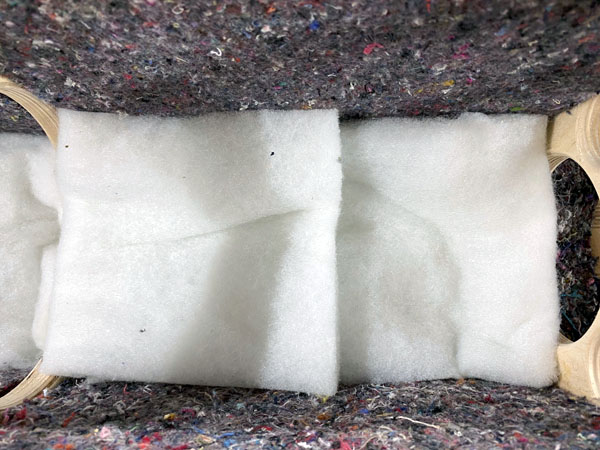
The rear panel behind lower midbass:
Fold two pieces of 17 x 50 cm like seen on photo and place above
crossover.
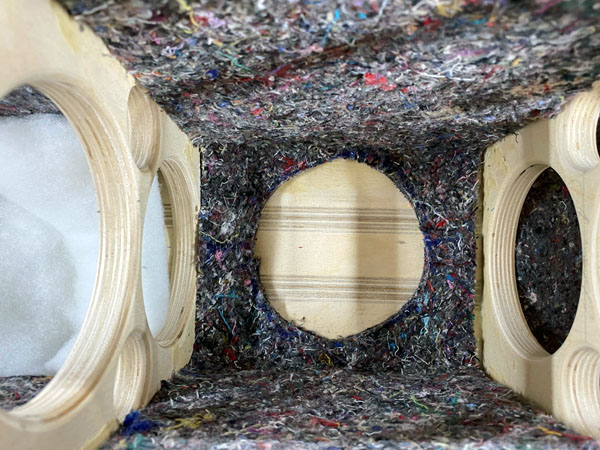
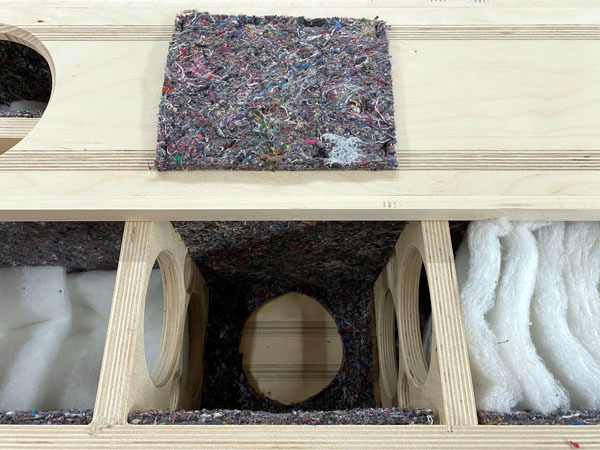
Port site. No acoustilux here. Add felt pad to front panel like seen on
photo.
I hadn't received the ports at this moment and wanted to measure the
hole diameter before routing.
Fasten the acoustilux to top panel with a pair of staples.
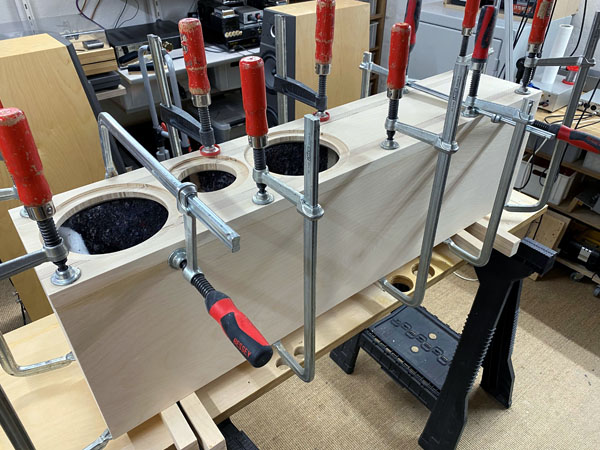
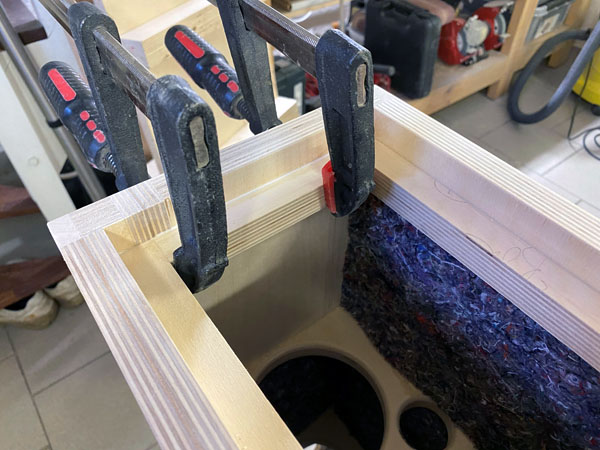
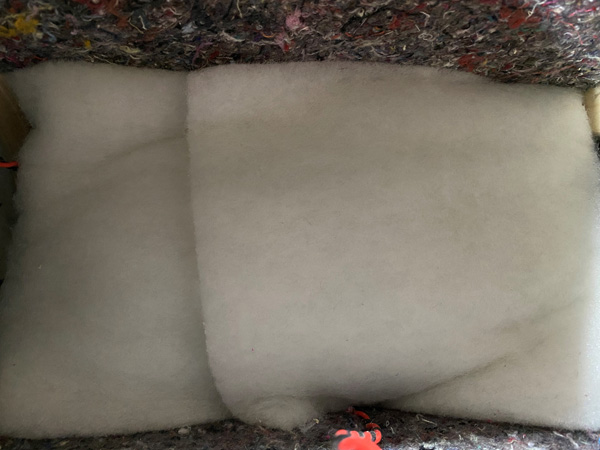
Left: Fold 3 pcs 17 x 50 cm and place at bottom. Right: Gluing front
panel.
The front panel is made about 1 mm wider and sanded after gluing to
cabinet width.

Applying the final fillet to the front panel.
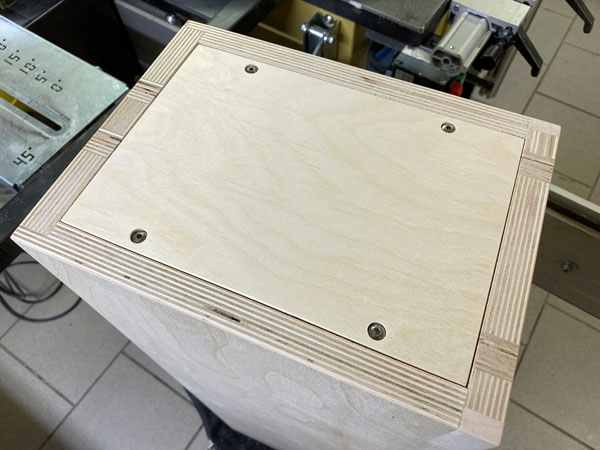
Bottom panel in place and first lacquer coat.
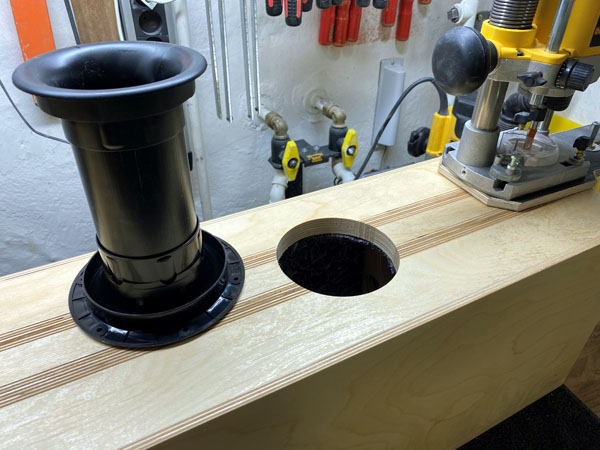

Routing for the port, Ø117 mm.
The kit is supplied with two inner flanges, two outer flanges and one
235 mm tube. Cut 2 pcs 65 mm tubes and glue the flanges with Superfix.
The port total length will be ~130 mm, 125-135 mm is fine. This will
make a port tuning of around 38Hz.
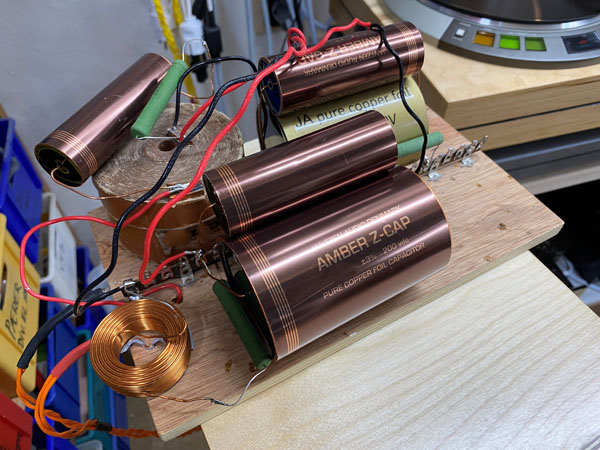
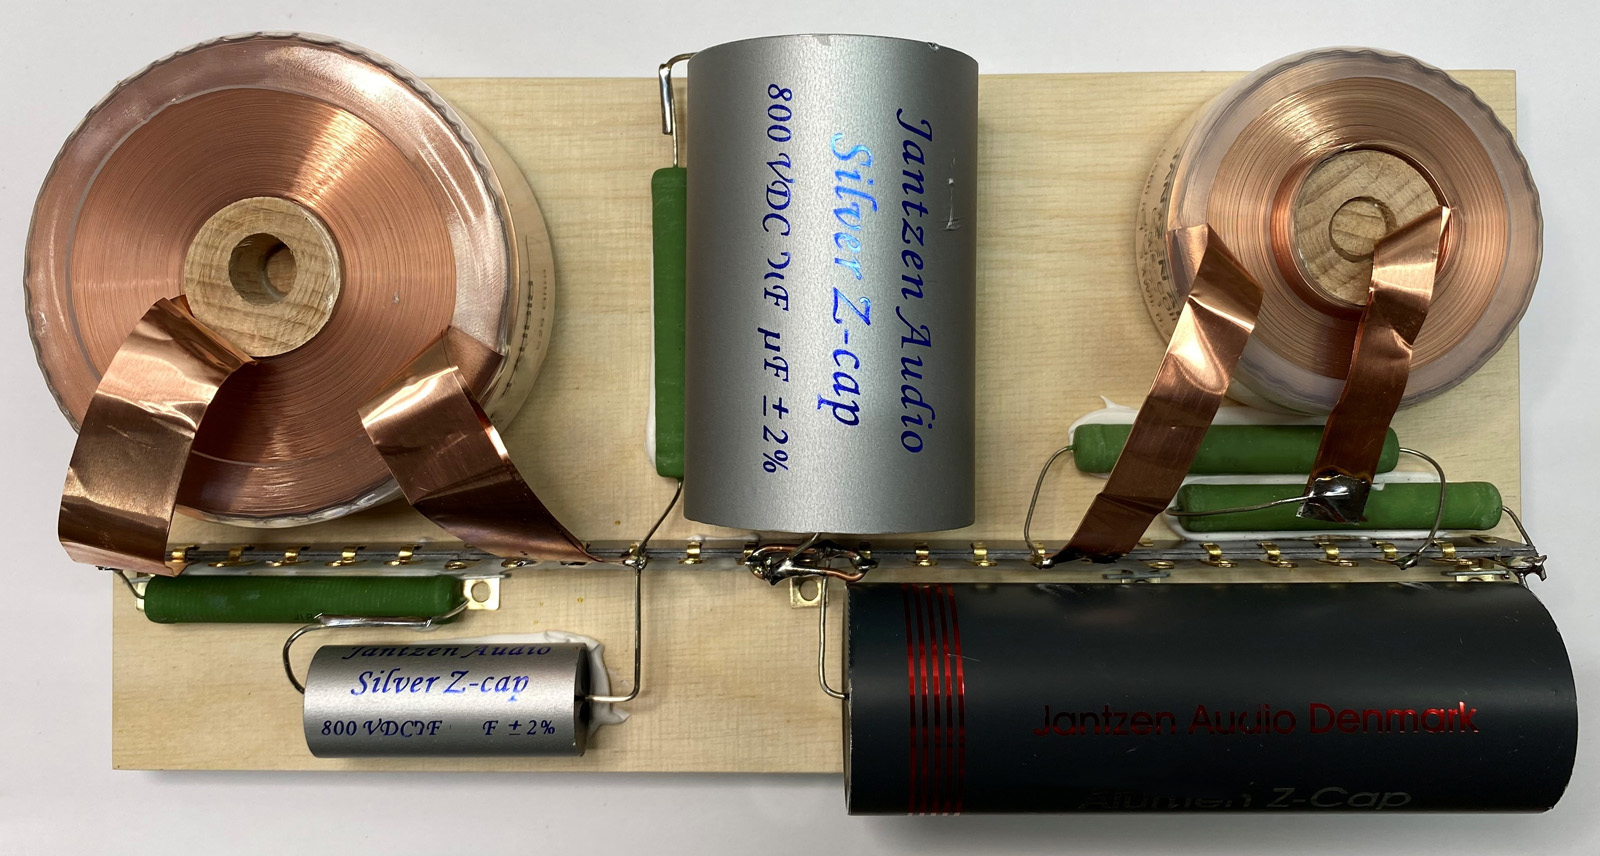
After crossover development I - just for fun and plain craziness - tried replacing all caps
with Amber-Z, which would probably cost 4 times more that all of the kit.
Does it matter? Not much compared to level 1 (left), but yes,
significantly. Dammit! Which only shows that quality components come
through even on modest priced speaker drivers. And capacitors are what
matters. Coils are of less importance as long as being well designed and
baked.
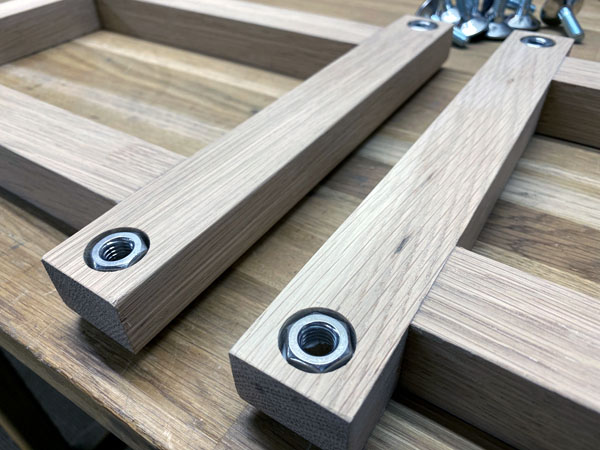
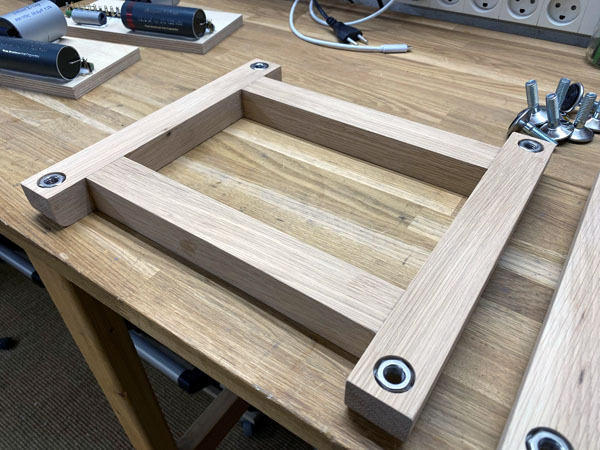
These slim floorstanders needed some feet/base-plate. I like oak and
made the above with adjustable feet. Details
here.
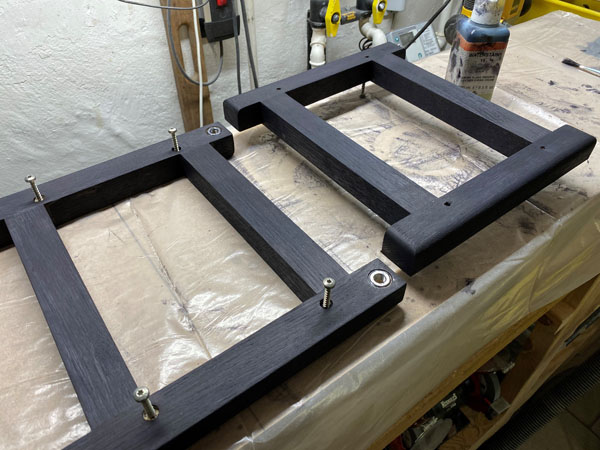
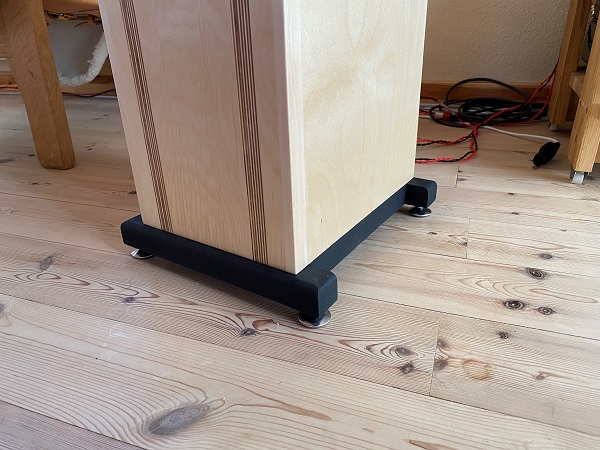
To balance the colour of the drivers the base plate was given black
water based stain and a single clear coat of laquer.
The adjustable feet do well on a wooden floor.
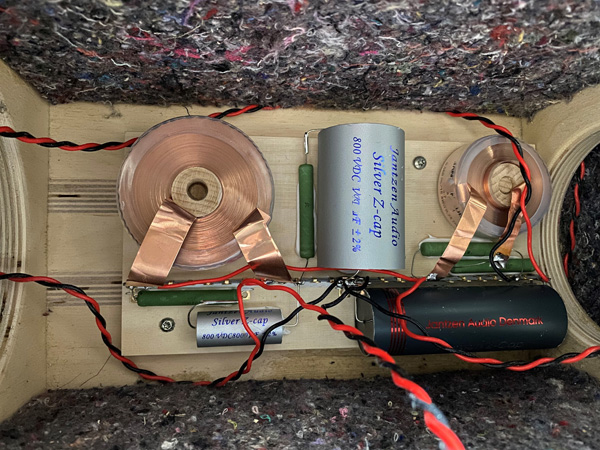
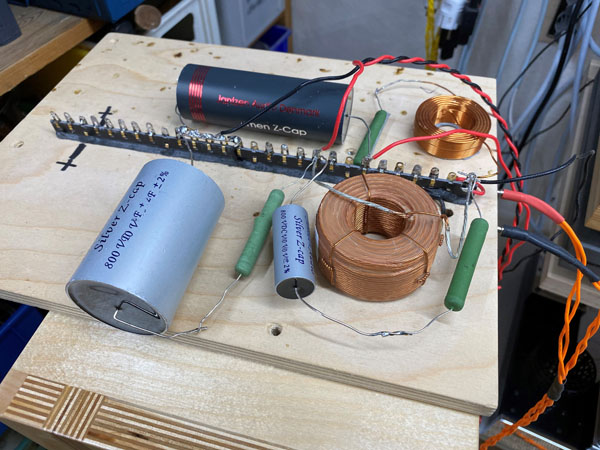
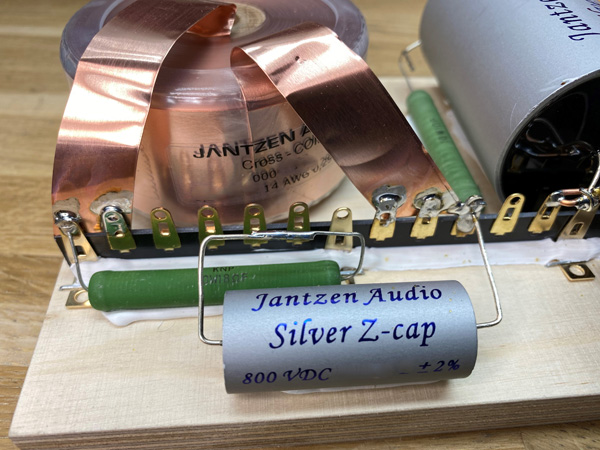
Wire up the crossover. Fasten to rear panel behind lower midbass.
Cover crossover with acoustilux.
A few comments on
MEASUREMENTS before you start interpreting the readings below.
First of all, if we think measurements will
tell us how a speaker sounds, we're wrong. The perception of sound is
way too subjective to be reflected in any measurements we can perform. A
loudspeaker system is meant to give us a satisfying idea of an acoustic
event and for some people a pair of 5 USD ear-plugs are enough, others
spend 200 kUSD on a truly full-range pair of speakers - and the latter
may not be happier than the former.
Measurements may give us an idea of tonal balance of a system, i.e. too
much or too little energy in certain areas, although dispersion
characteristics play a vital role here. A two-way 7+1 and a three-way
7+4+1 may display similar horizontal dispersion, yet sound very
different. Measurements may tell us about bass extension if far-field
measurements are merged with near-field measurements. In addition to
this, ports may contribute to bass extension. Most of we diy'ers do not
have access to an anechoic room for full-range measurements from
20-20000 Hz.
What cannot be seen is what kind of bass performance we get in a given
room. Bass performance is highly dependent on in-room placement of your
speaker and the same speaker can be boomy in one place and lean in
another. Actual SPL level at 1 meter distance and 2.8V input is useful
for en estimate of system sensitivity and combined with the impedance
profile may give an idea of how powerful an amplifier is needed to drive
the speaker to adequate levels.
What measurements do not tell is the very sound of the speaker unless
displaying serious linear distortion. The level of transparency, the
ability to resolve micro-details, the "speed" of the bass, etc., cannot
be derived from these data. Distortion measurements rarely tell much
unless seriously bad, and most modern drivers display low distortion
within their specified operating range.
Many people put way too much into these graphs and my comments here are
only meant as warning against over-interpretation. There are more to
good sound than what can be extracted from a few graphs. Every graph
needs interpretation in terms of what it means sonically and how it
impacts our choice of mating drivers, cabinet and crossover design.
What measurements certainly do not tell is the sonic signature of the
speaker, because speaker cones made from polypropylene, aluminum,
Kevlar, paper, glass fiber, carbon fiber, magnesium, ceramics or even
diamonds all have their way of adding spices to the stew. Nor do
measurements tell what impact the quality of the crossover components
add to the sound, from state of the art components to the cheapest of
coils and caps, they all measure the same if values are correct, yet
sound very different.
Above the dispersion of the D2905/990000 tweeter @ 0, 10, 20 and 30 deg.
off-axis.
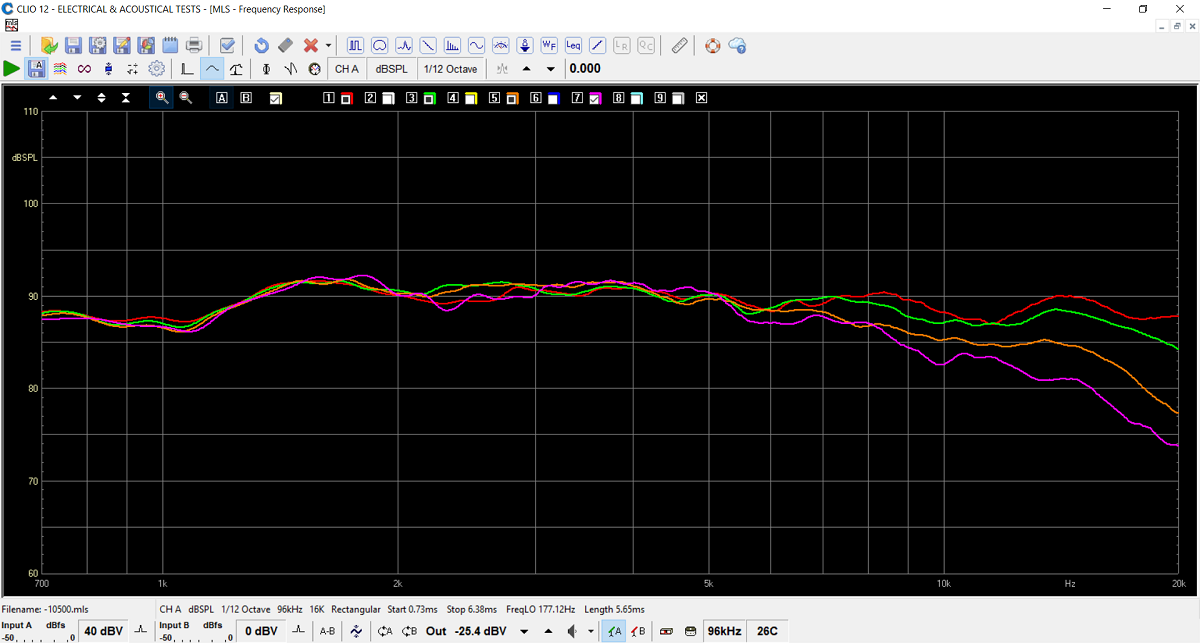
SPL of drivers on actual baffle. Green and orange, the 18W/8434G00 driver. What's not to like?
Ever soooo smooooth in all of the midrange and far beyond.
Green is upper bass and due to less baffle are around the driver a
quicker roll-off towards lower registers. See below.
Red = tweeter response.
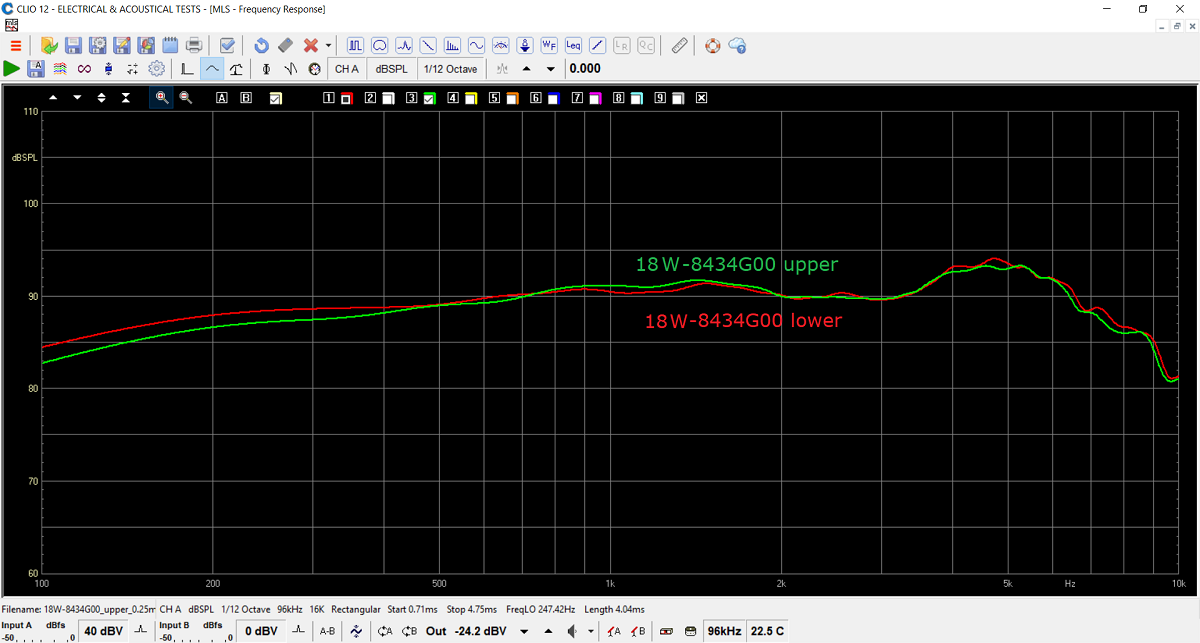
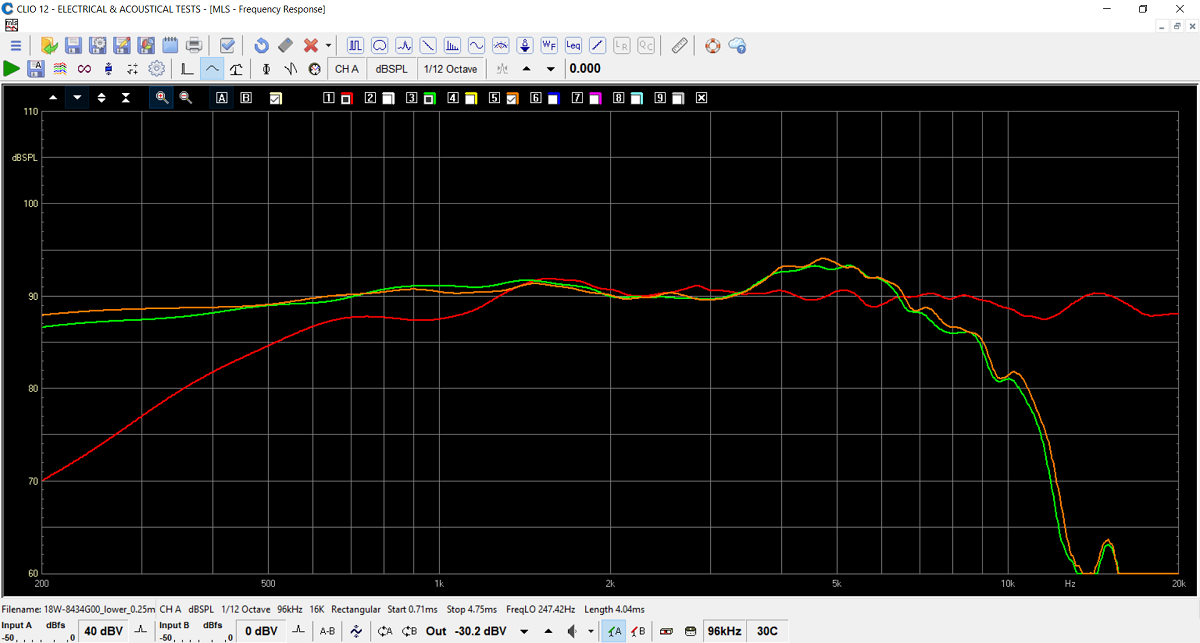
Above the 18W drivers alone.
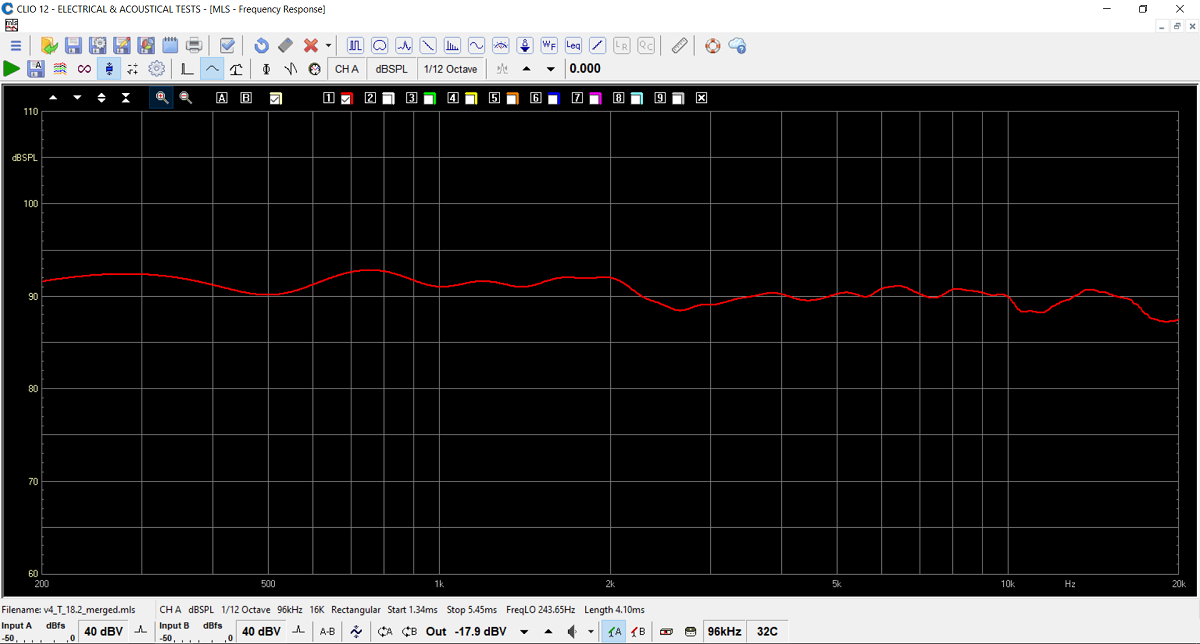
Final frequency response at 1 meter, 2.8V. Final system sensitivity ~92
dB.
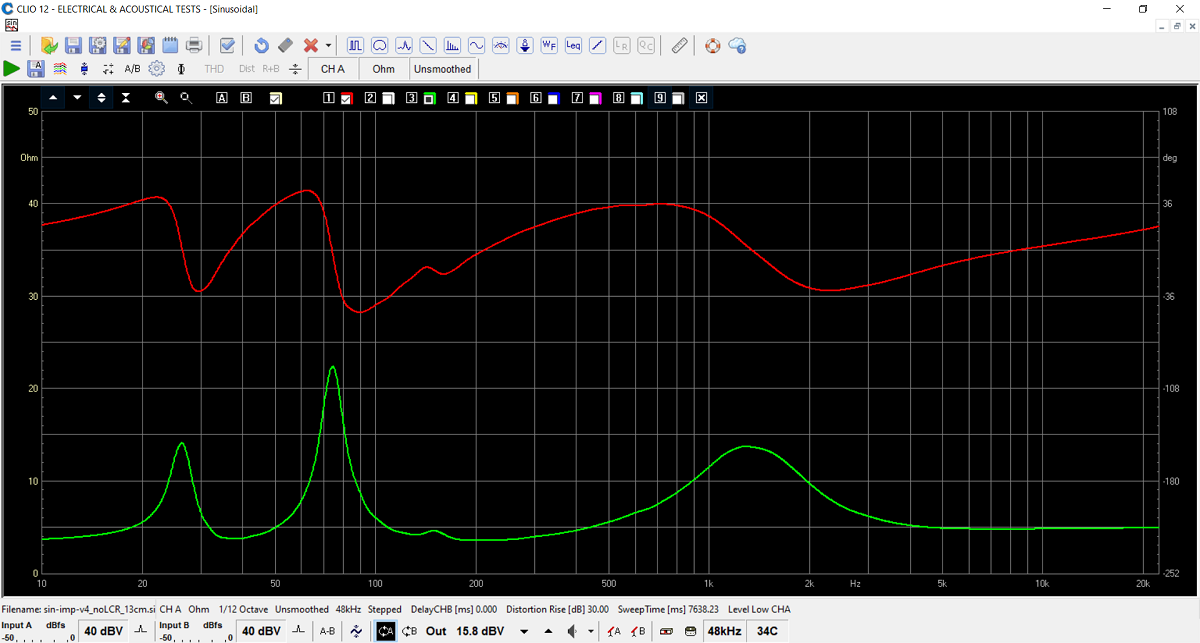
Final system impedance. Basically a 4 Ohms speaker.

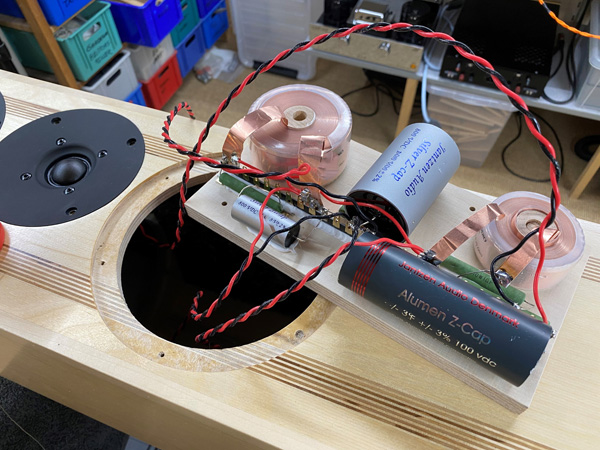
Above level 1 parts list.
You get CrossCoil and Alumen-Z for the tweeter and all Silver-Z for the
midbass drivers.
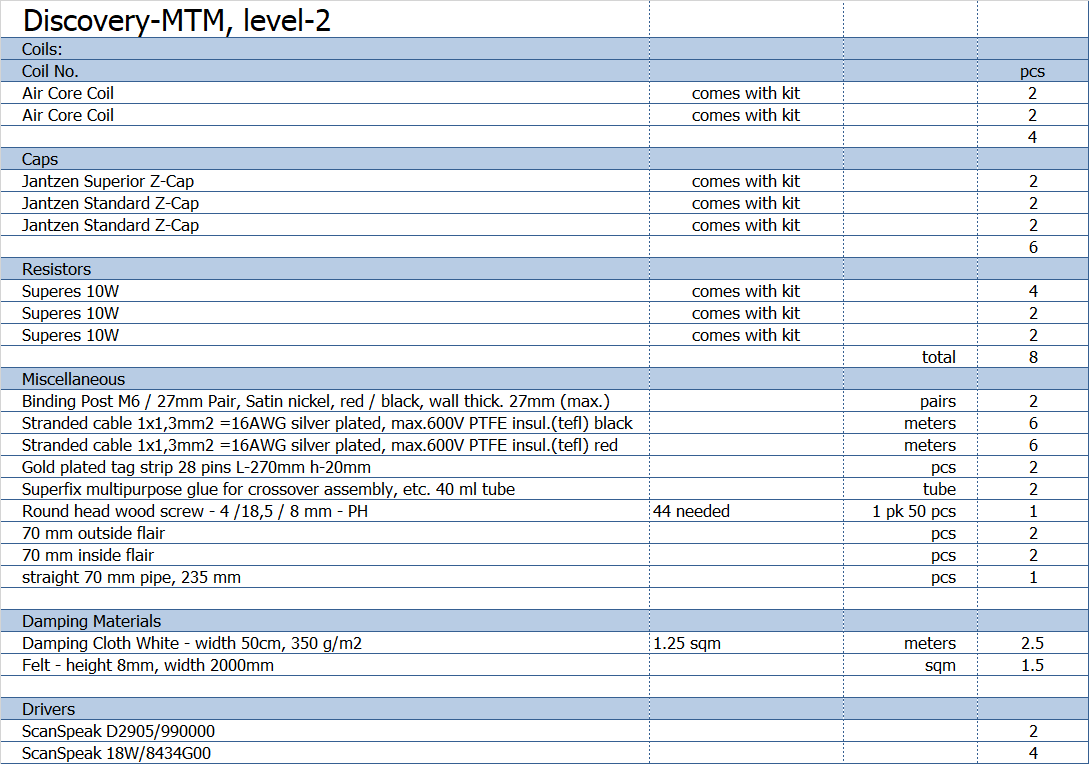
Above parts list level 2.
You get wire coils and Superior-Z for the tweeter and STANDARD-Z for the
midbass drivers.
All kit and component prices may be subject to change and are always to be confirmed by Jantzen Audio Denmark.
Kit can be bought with/without the drivers, or some of the drivers.
Download Kit Sale Presentations:
![]()
All technical questions to troels.gravesen@hotmail.com
All questions regarding purchase of kits, please mail Jantzen Audio at contact@jantzen-audio.com
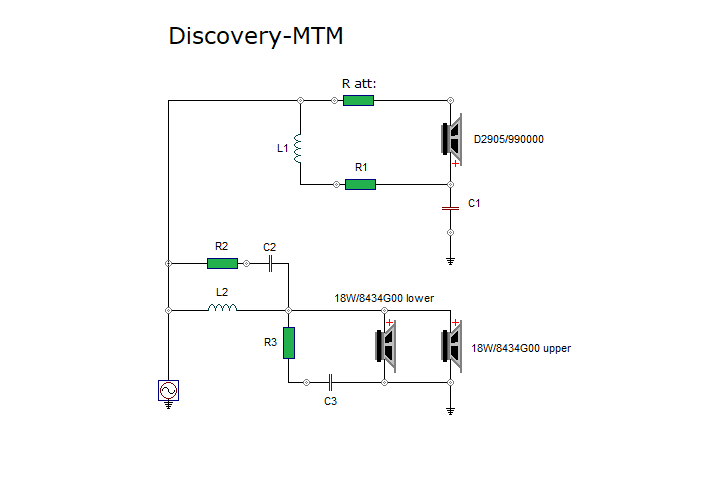
CROSSOVER-LAYOUT
BACK TO INDEX
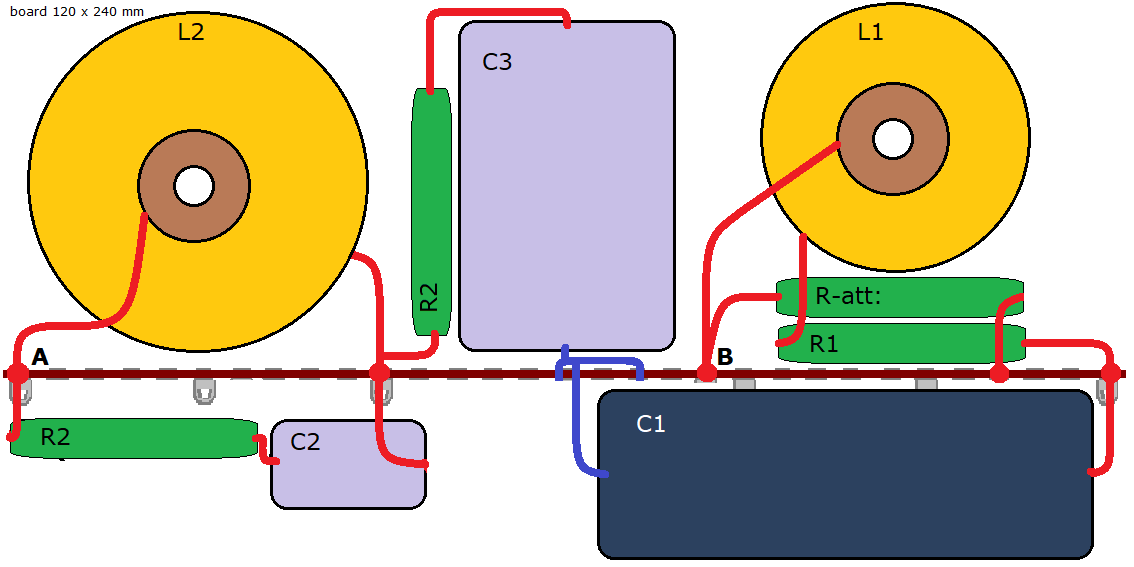
Connect A to B with wire.
Click image to view large.
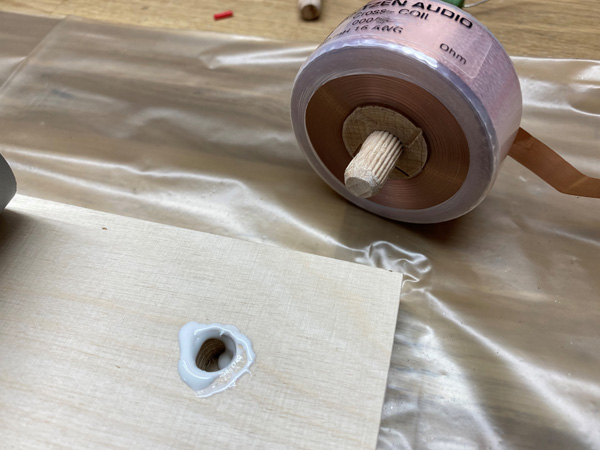
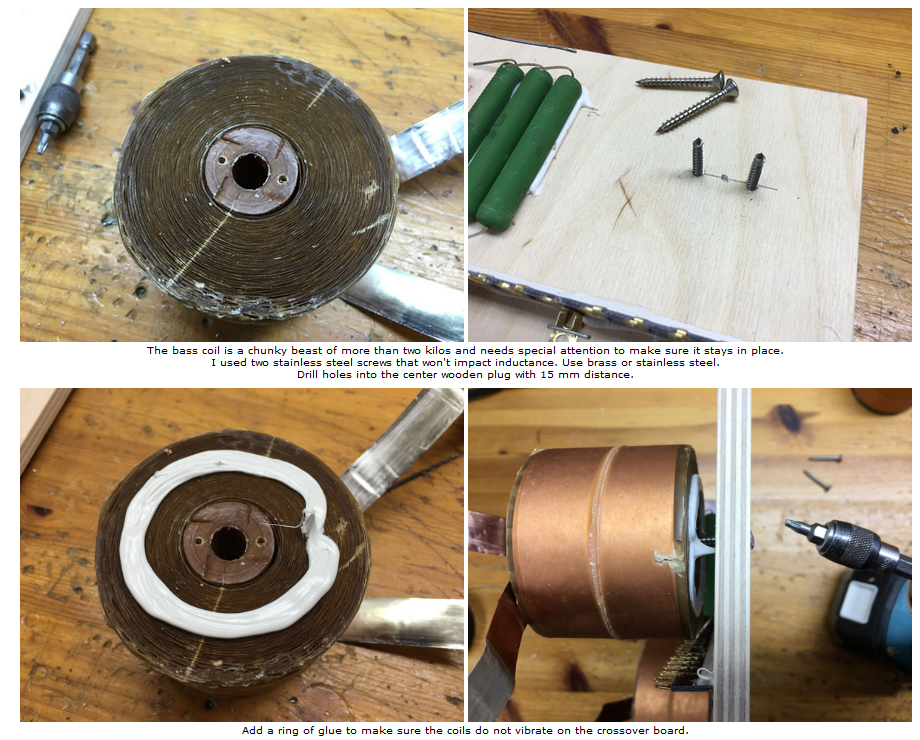
Use e.g. a 10 mm dowel to secure the foil coils.
Make sure to solder leads properly!
Add a ring of Superfix around the dowel. Check
here.
Speaker wiring:
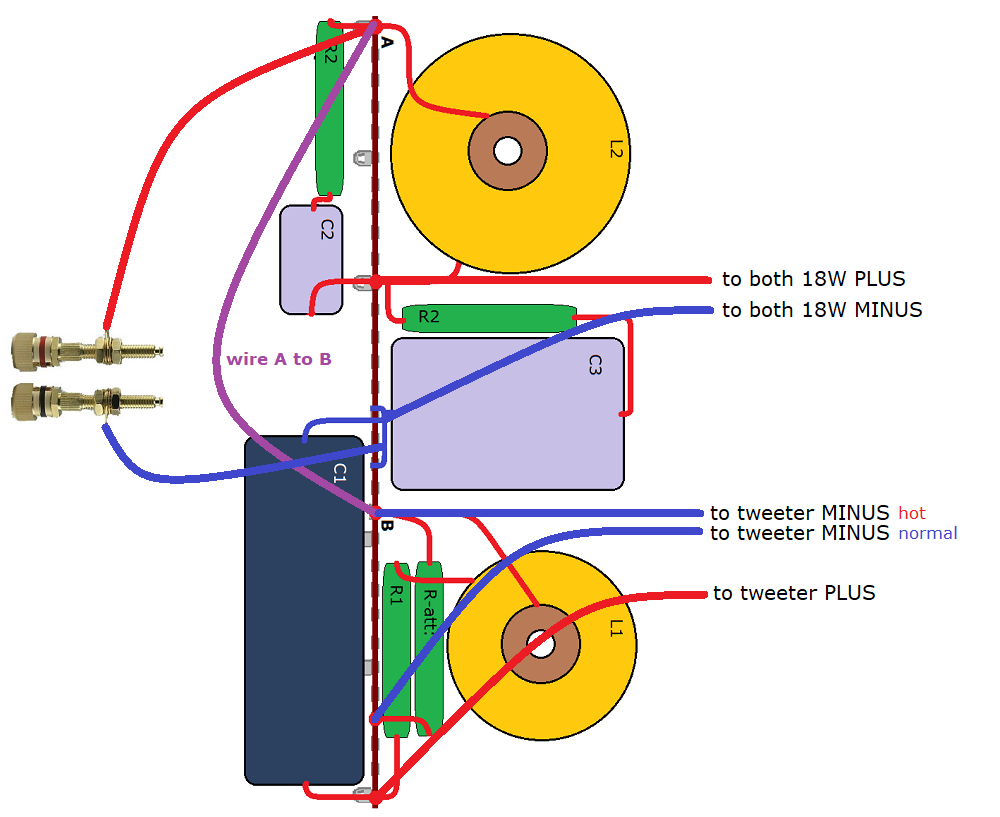
Connect A to B with piece of wire.
Note tweeter with inverted polarity.
Connect on either side of R att depending on preferred tweeter level.