ScanSpeak
Ekta-7741
Copyright 2023 © Troels Gravesen
Go to on this page:
DRIVERS CROSSOVER CABINET WORKSHOP PICS MEASUREMENTS SPEAKER-KIT CROSSOVER LAYOUT Beryllium version
Ever since making the
Ekta-mkII speaker, the extended version with two 18WU midbass
drivers have been on my mind, but building cabs take time... The
Ekta Grande,
based on Revelator drivers, has been going for many years and
still has some builders, but for years the use of the Illuminator
drivers for a similar construction was on my to-do list.
The sandwich cones and non-reflective magnet systems of the Illuminator
range of drivers have something to offer in terms of dynamic headroom,
uncoloured sound - and well, here
it is, the GRANDE's update.
The name could be the Illuminator-7741, but
I like the Ekta name, so I decided on Ekta-7741.
And please DO NOT ask about the sonic difference between the
Illuminator-7751 and Ekta-7741 as they in many ways are similar, but 4"
midrange drivers do stuff 5" drivers don't - and visa versa. Obviously
the points of crossover are quite different.
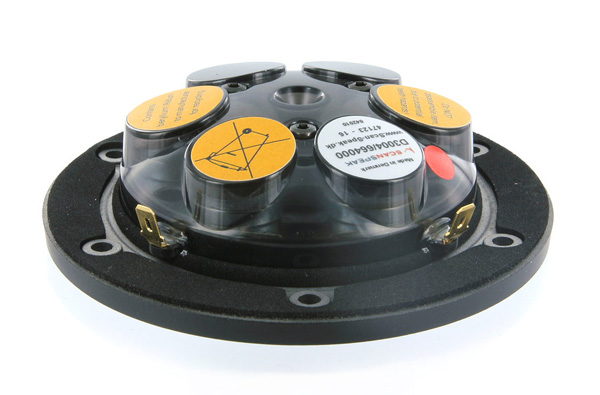
The 12MU for midrange hardly needs any introduction being used in some
of the world's most expensive speakers. I know customers have asked
ScanSpeak for customised versions - and yes, they could make such a
driver - but only worse! You better take it as-is - or leave it. And so
they took it!
Saxophone from the 12MU is something. It's got the forwardness without
the edginess, and I've spoiled it with foil
capacitors to get it all from my level 1 version, see below.
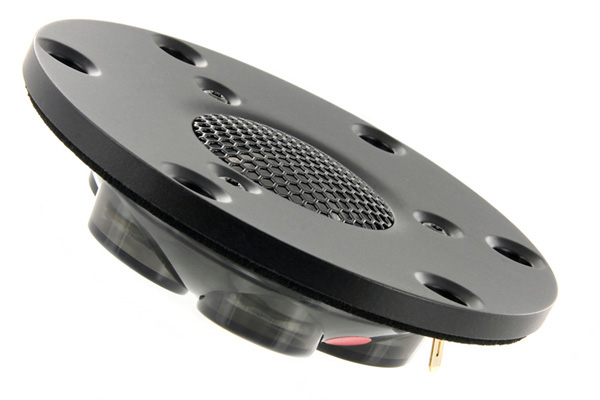
I've used the D3004/660000 so many times, and I love it. Here it really
doesn't do much due to point of crossover, but what it does, it does so
well. I have also made a crossover for the 6640 Be dome as some people
have a preference for Be
domes. To my ear a matter of taste and belief.
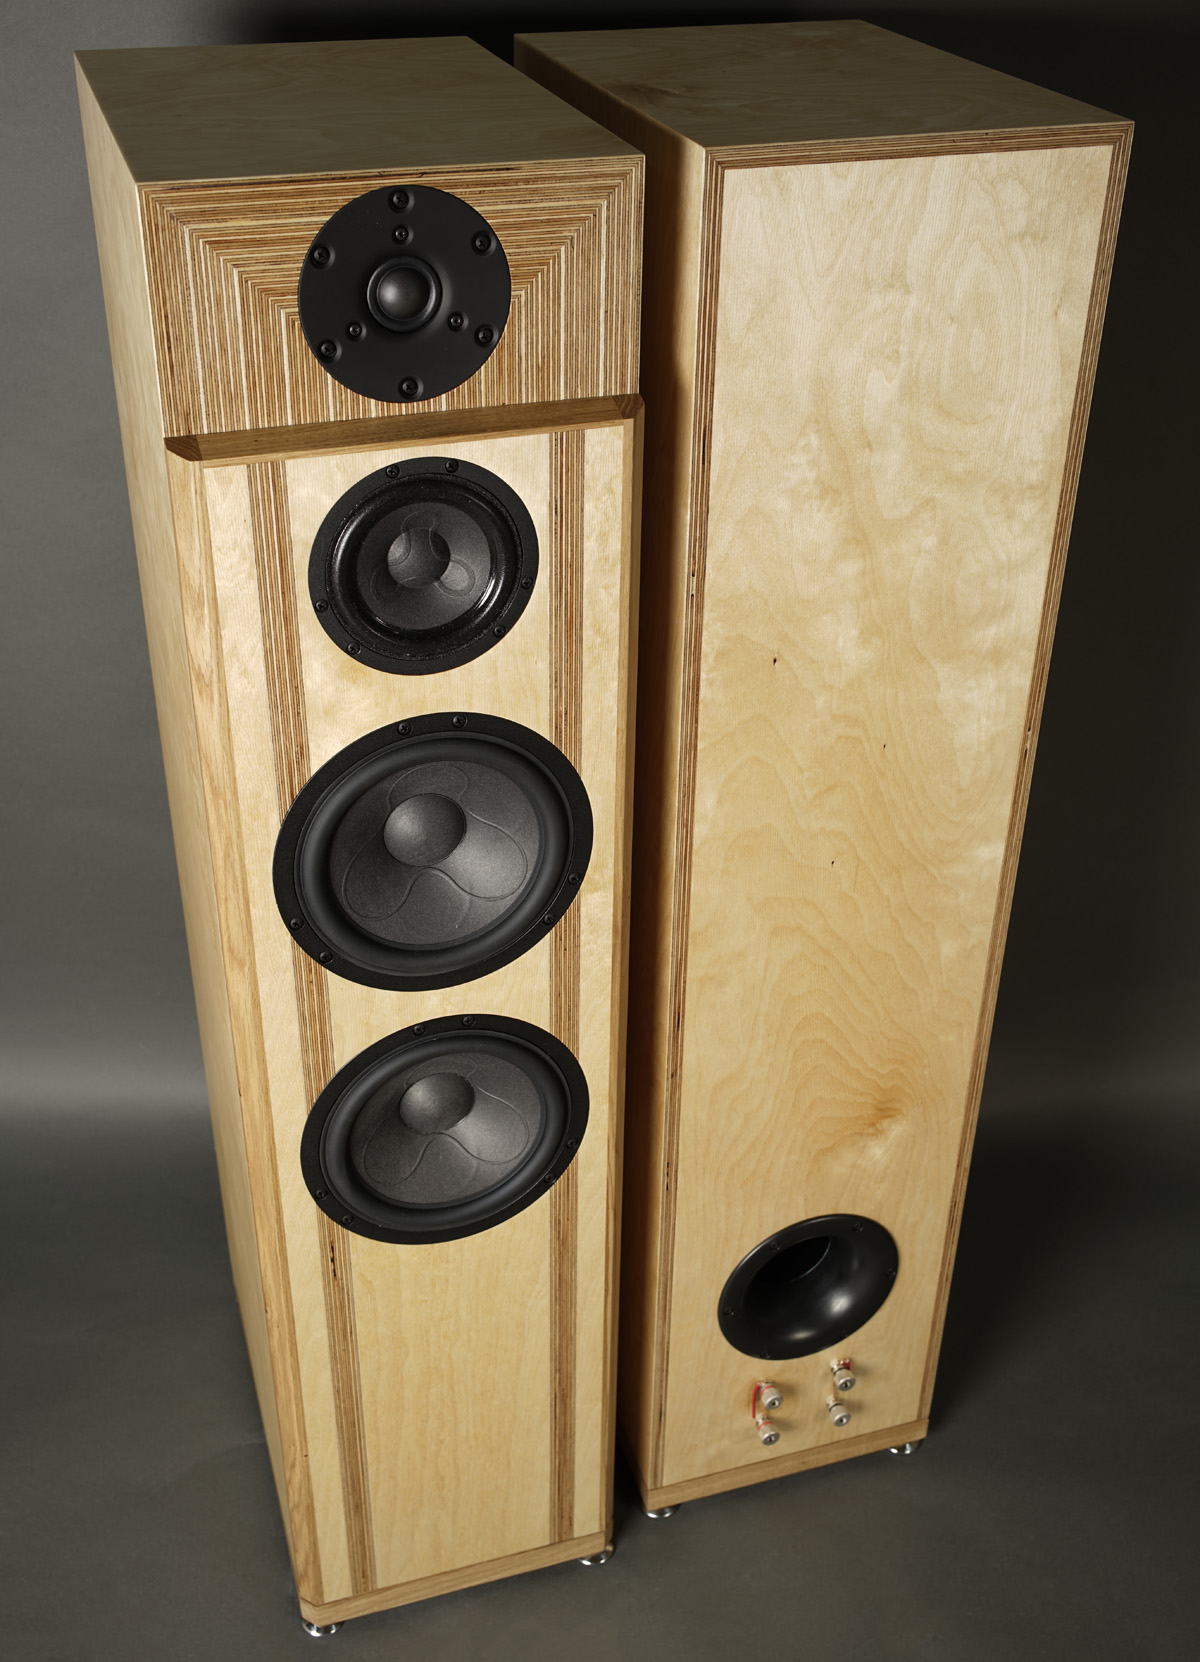
Basics:
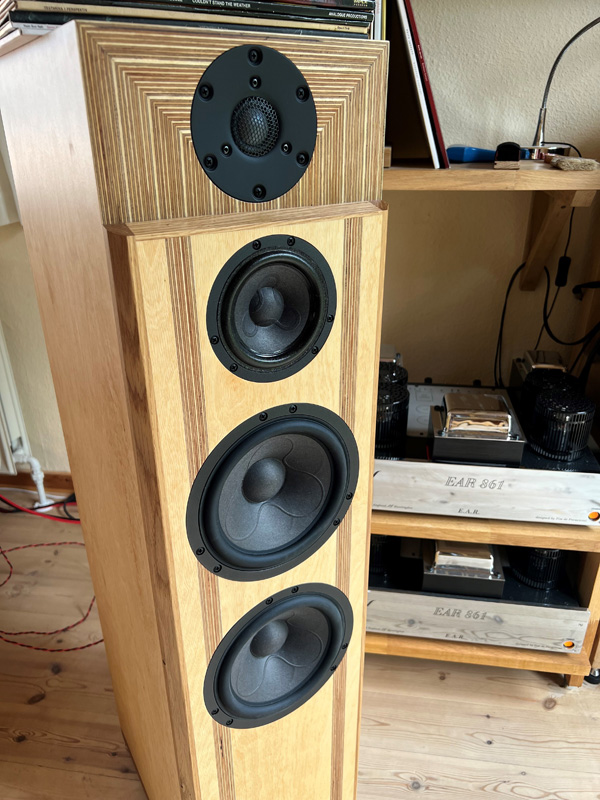
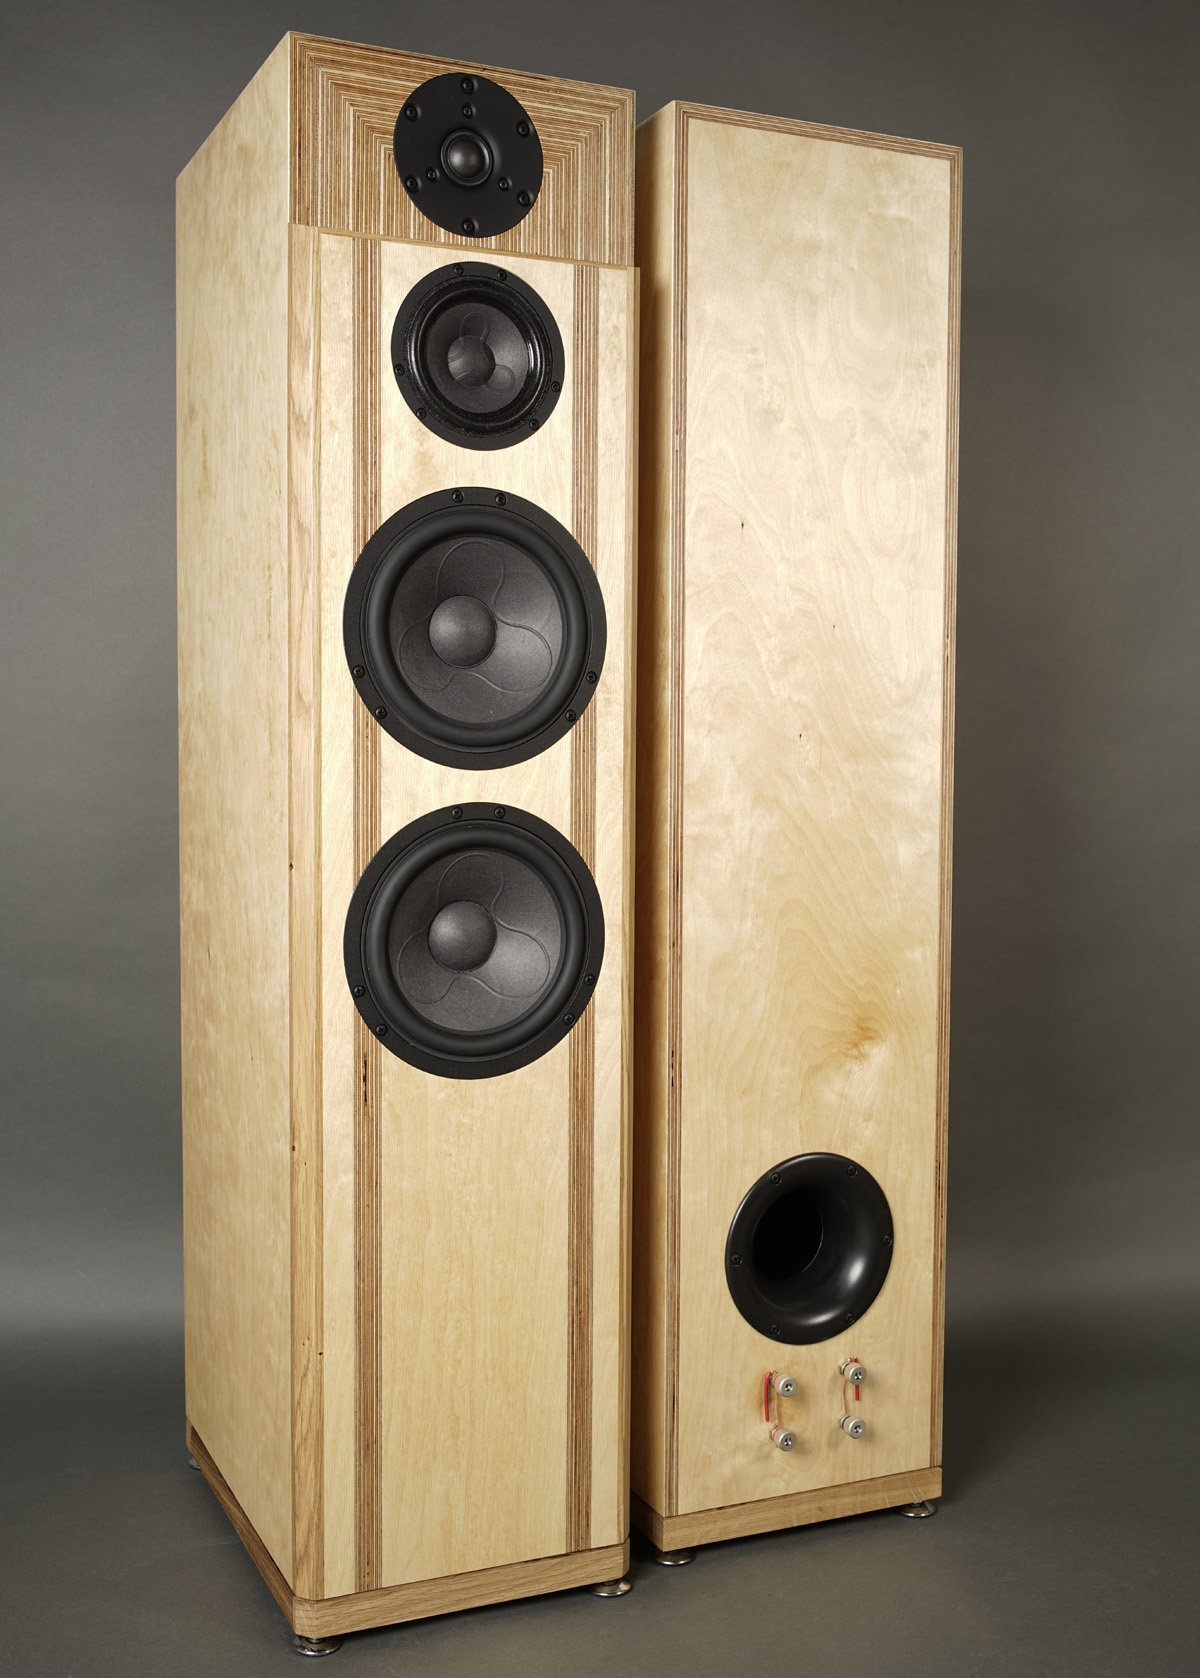
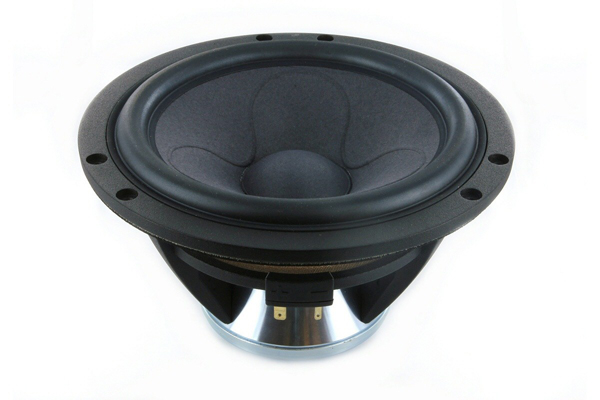
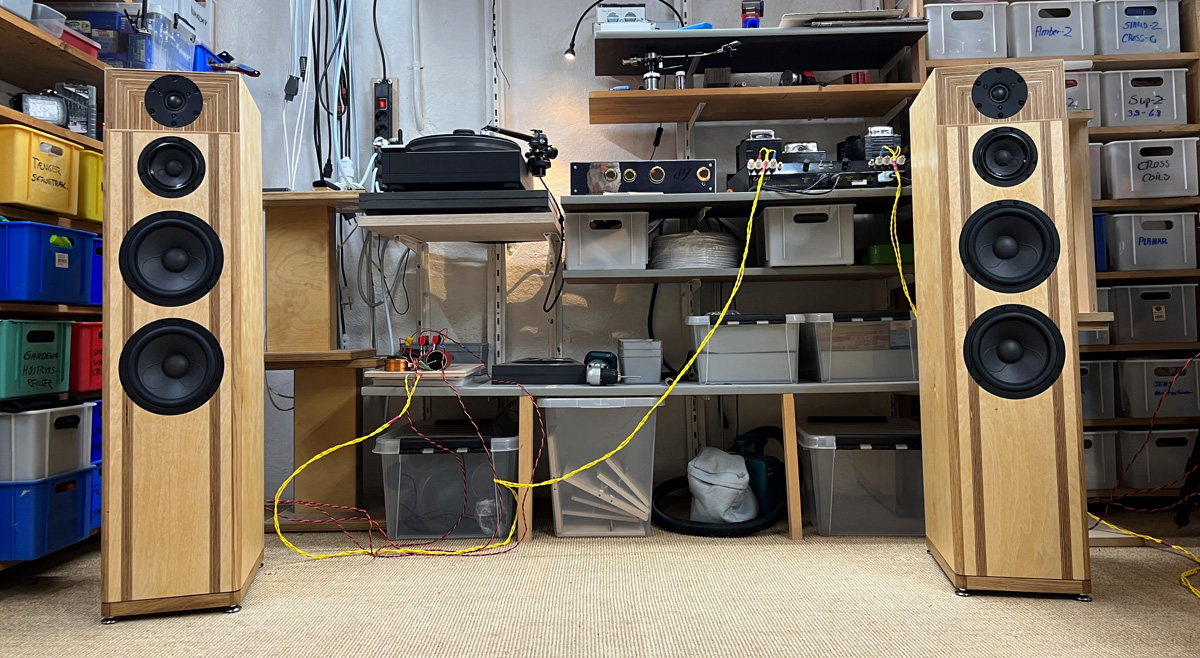
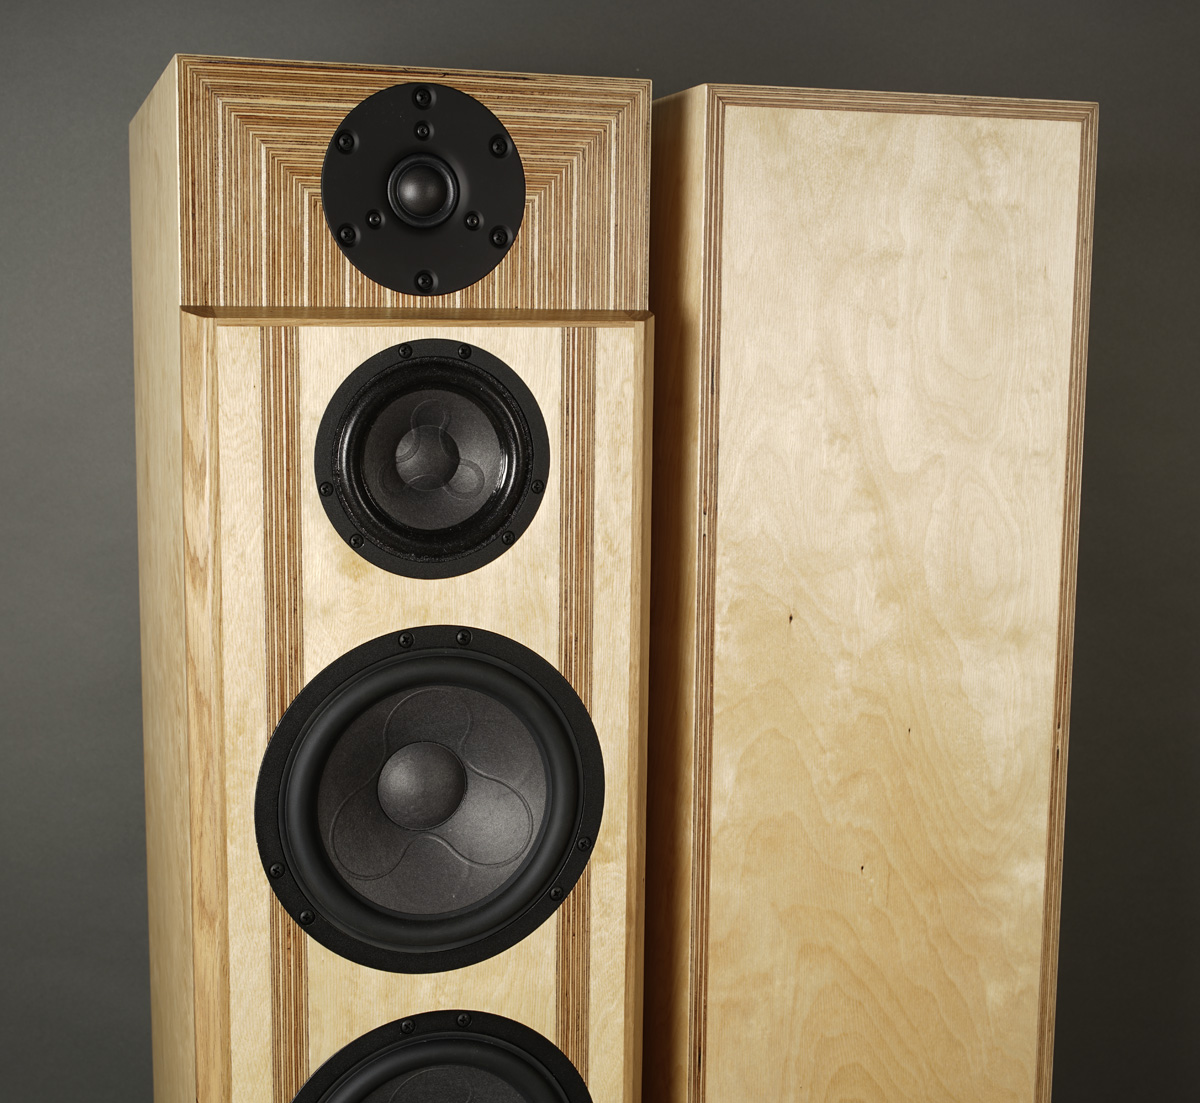
4-driver speaker.
Dimensions: 25 x 36 x 1050 cm, WxDxH.
System sensitivity: 90 dB/2.8V/1 meter.
Impedance: 4-8 Ohms. Minimum 3.0 Ohms @ 100-200 Hz.
Power requirement: 30+ watts/channel.
Useful links (Please
follow all links before e-mailing!):
http://www.troelsgravesen.dk/tips.htm
http://www.troelsgravesen.dk/tips.htm#CONSTRUCTION_OF_CROSSOVERS
http://www.troelsgravesen.dk/crossovers.htm
http://www.troelsgravesen.dk/LCR-RC.htm
http://www.troelsgravesen.dk/Inverted-Polarity.htm
http://www.troelsgravesen.dk/choices.htm
http://www.troelsgravesen.dk/power-handling.htm
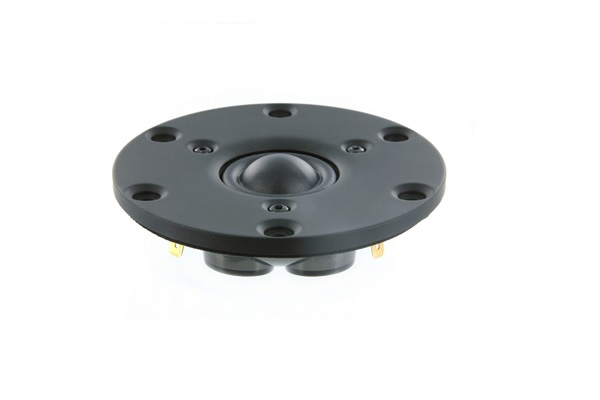
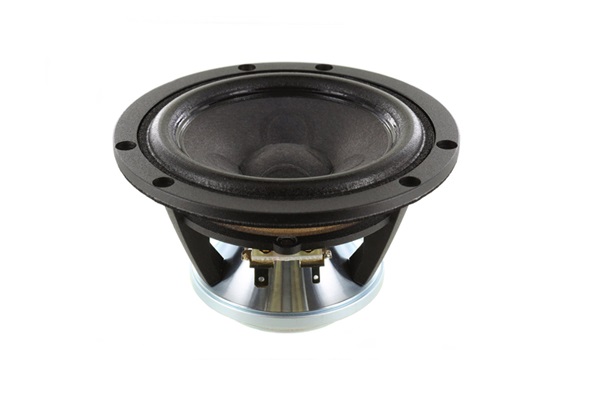
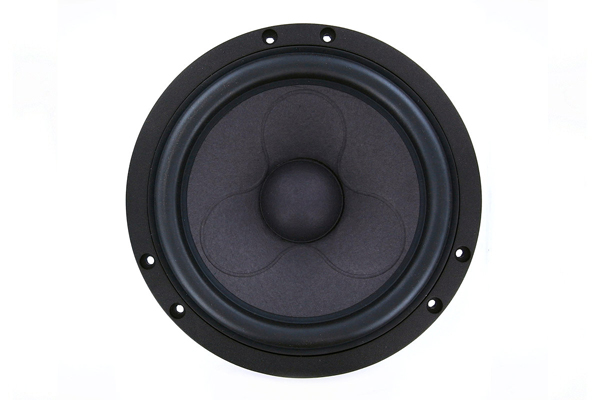
Download specs here: D3004/660000 12MU/8731T00 18WU/8741T00
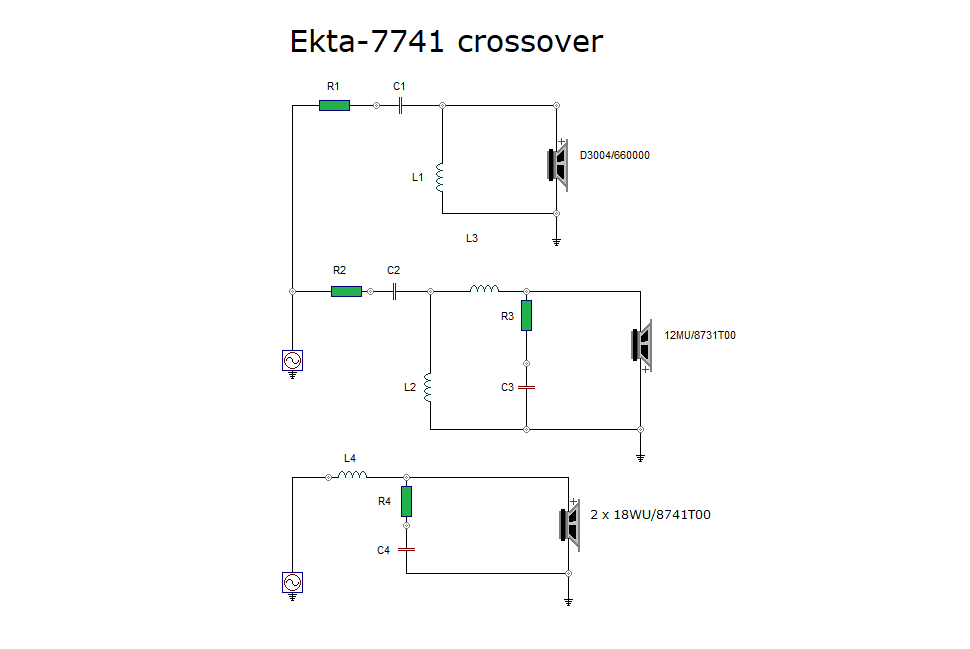
The crossover schematics for 6600 and 6640 tweeters are the same, but R1
and C1 varies, thus you have to make up your mind before ordering - or
order R1 and C1 for Be dome extra in case you want to make changes
later.
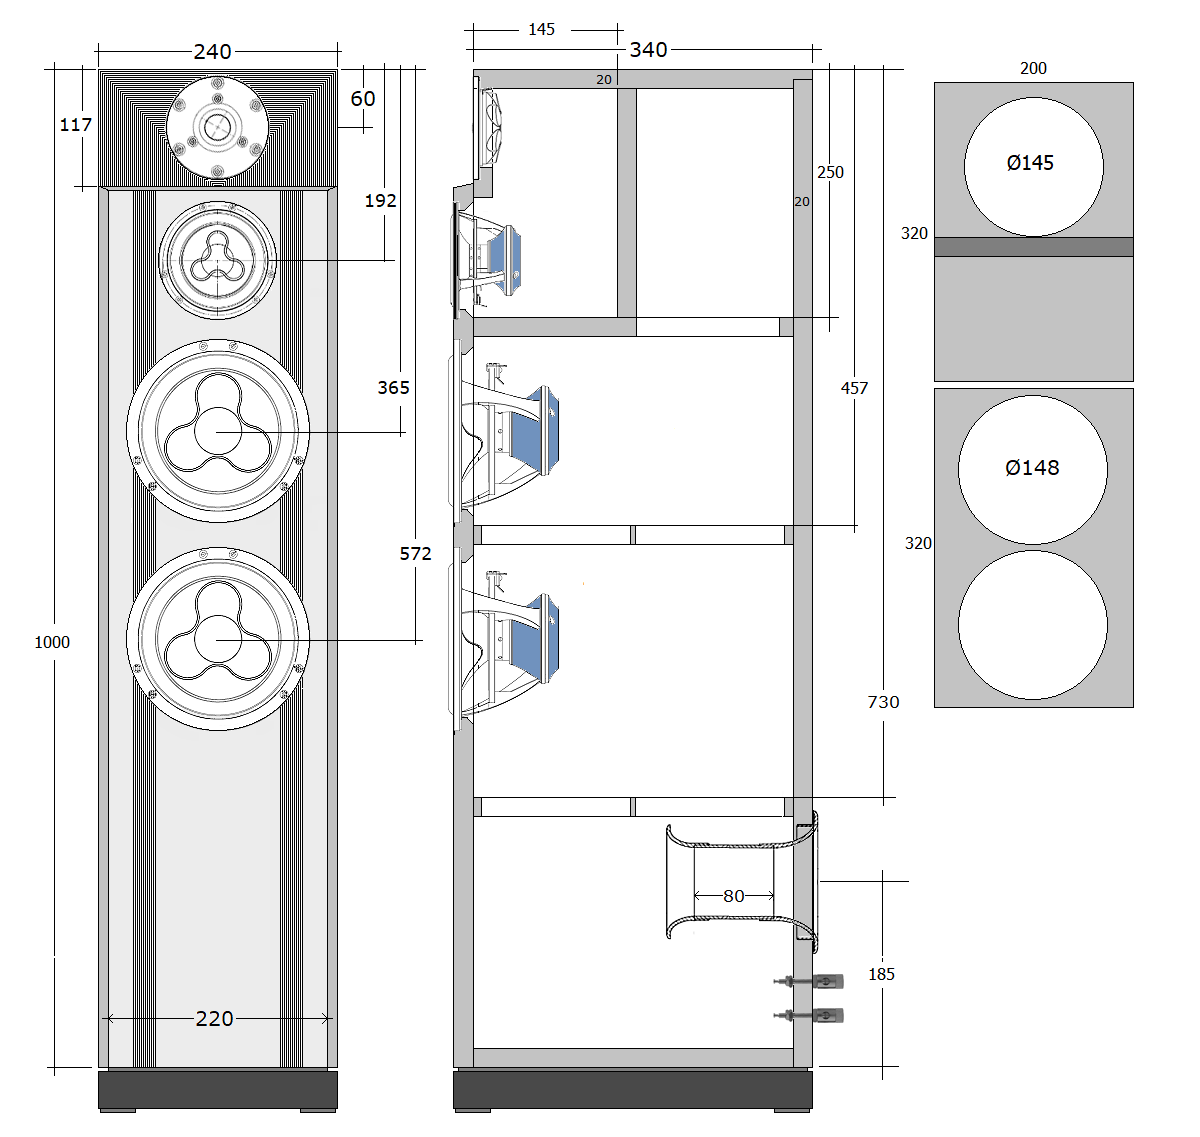
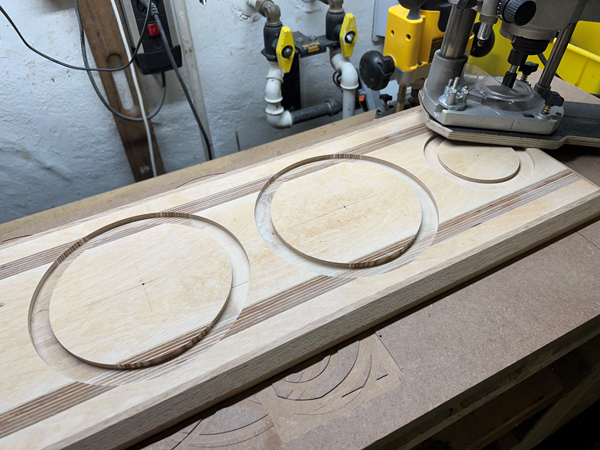
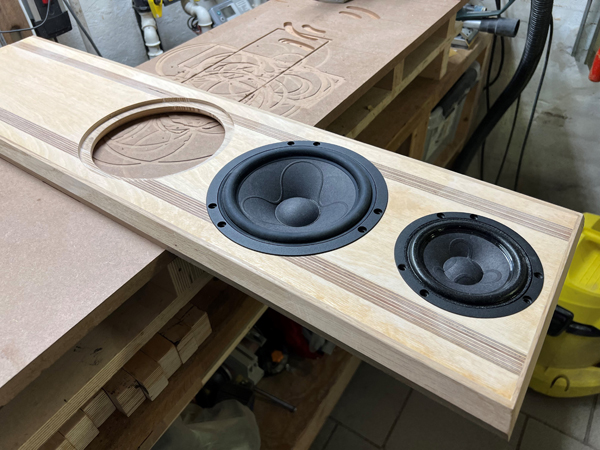
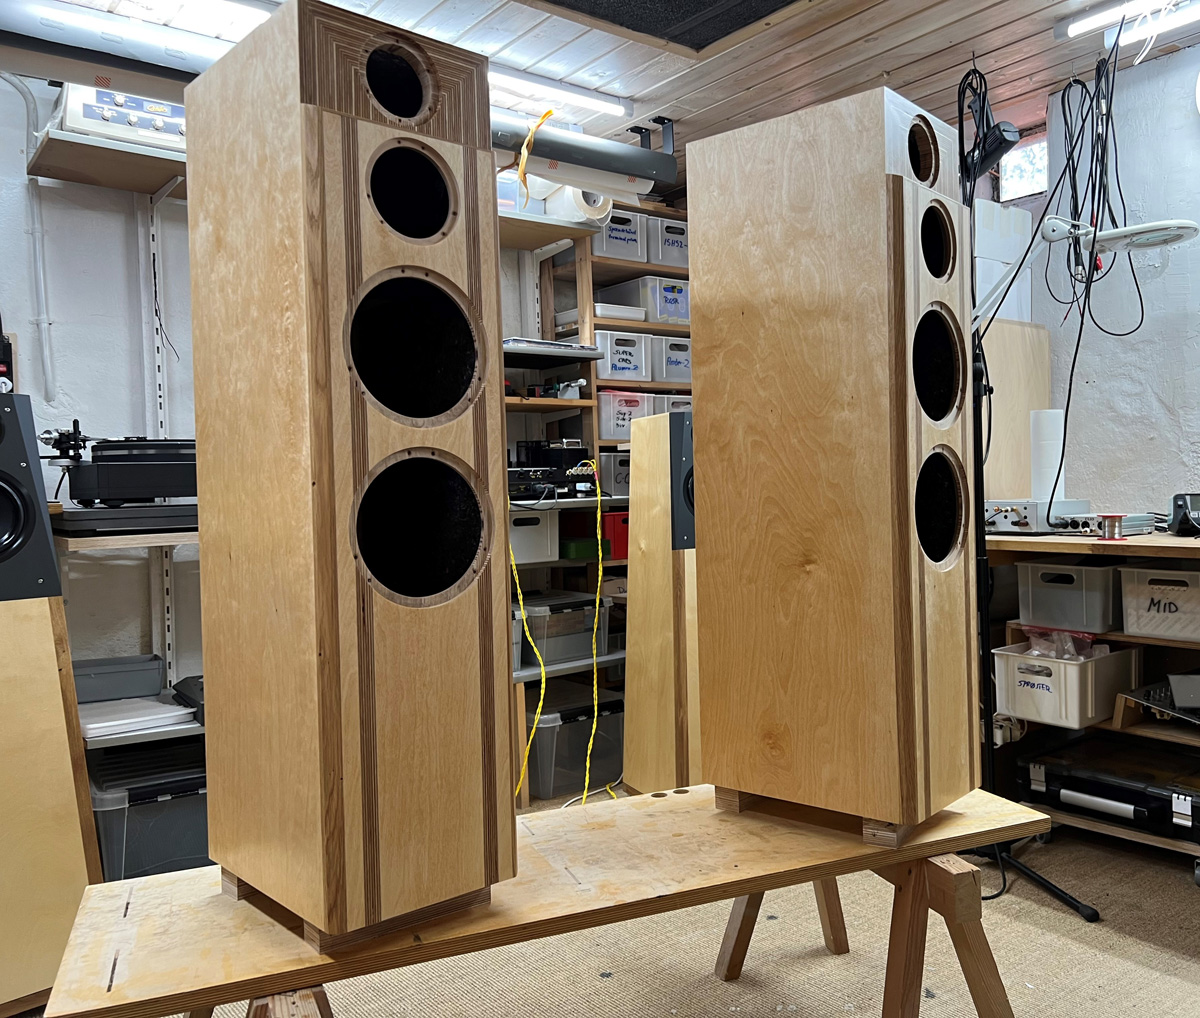
For cabinet I use 20 mm Baltic birch - and in a few places some 22 mm
MDF - because I was short of BB. For braces it doesn't matter. The
vertical strips of BB on the front panel are purely decorative. It has
no structural function, nor does the tweeter baffle, I just think it
looks nice. Go to
cabinet materials on my "tips" page, and please go through most
points - it saves me a lot of mails.
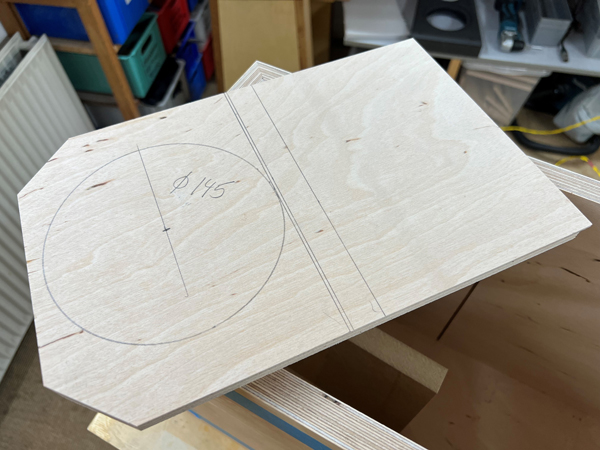
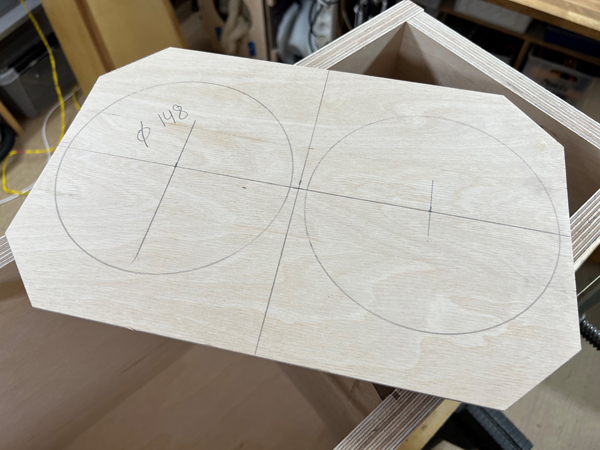
The top of the bass/mid front panel was cut 15 deg. The sides 45 deg.
The latter optional.
Make 2 pcs 80 mm port tubes from the 40 cm tube supplied and glue to
flanges with Superfix.
Port tuning around 33 Hz.
If you use e.g. 18 mm MDF, I strongly suggest adding bitumen pads to
your order.
This should just cover the side panels of the bass section:

This makes some 0.8 sqm area. 1 sqm supplied. Use the rest for midrange
rear panel.
Read here:
http://www.troelsgravesen.dk/tips.htm#Glue_for_Bitumen_Pads
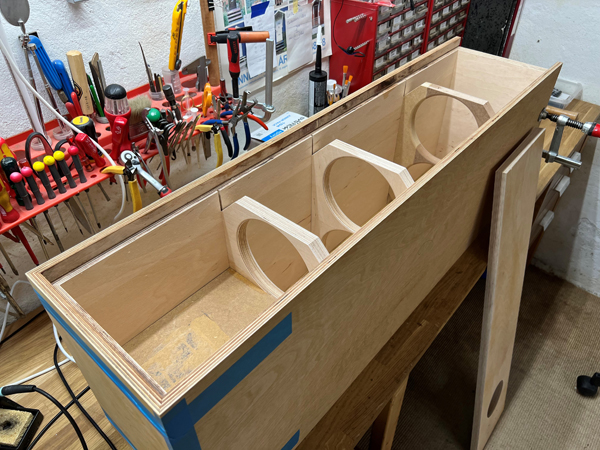
Making the braces. Cutting corners is
optional.
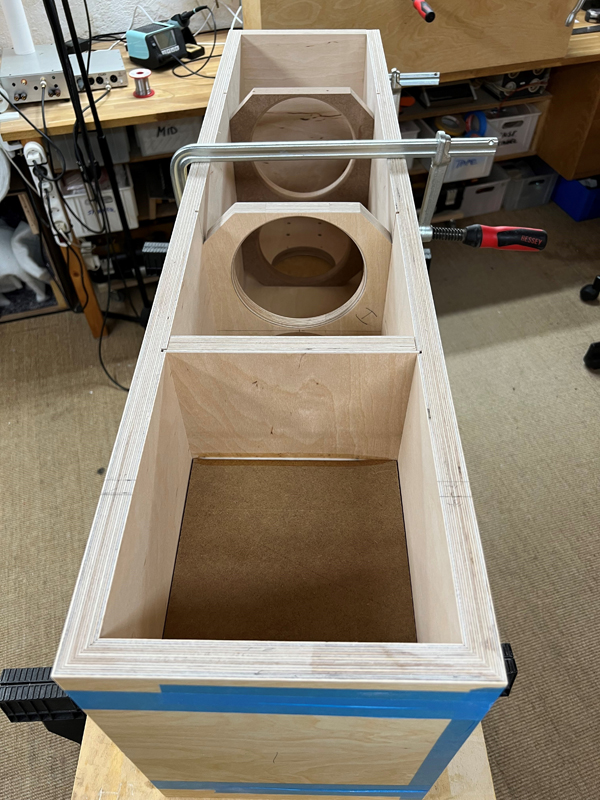
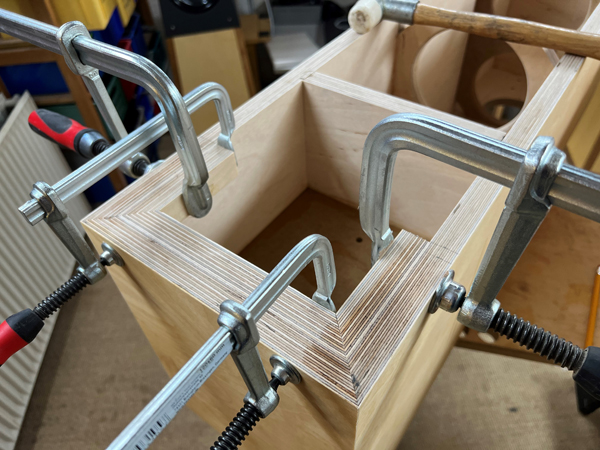
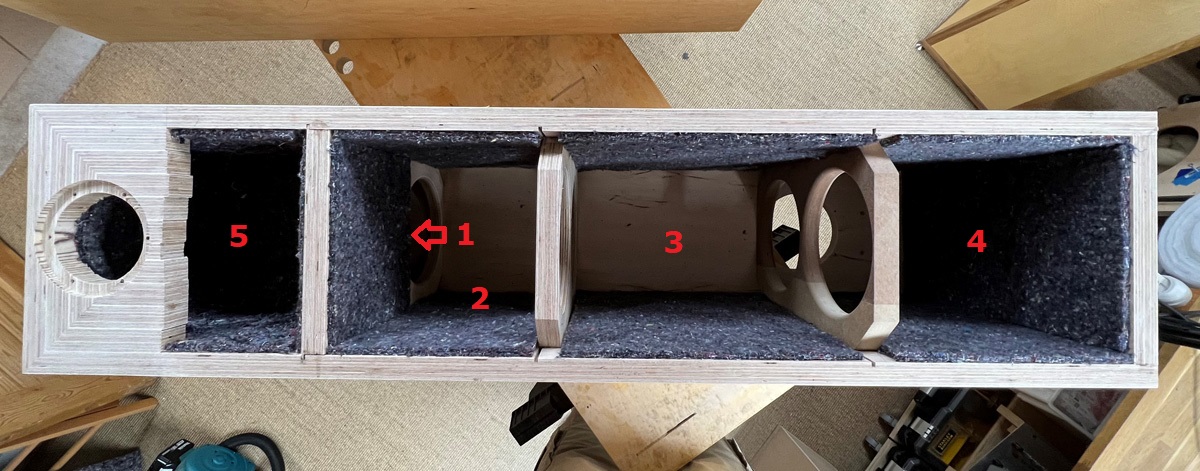
Here the ready-for-gluing cabinets seen from
bottom and top.
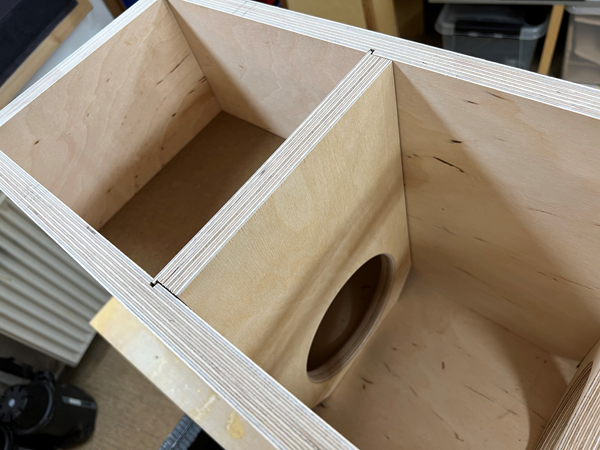
Left: Top section with compartment for mid
and tweeter. Right: Bottom view.
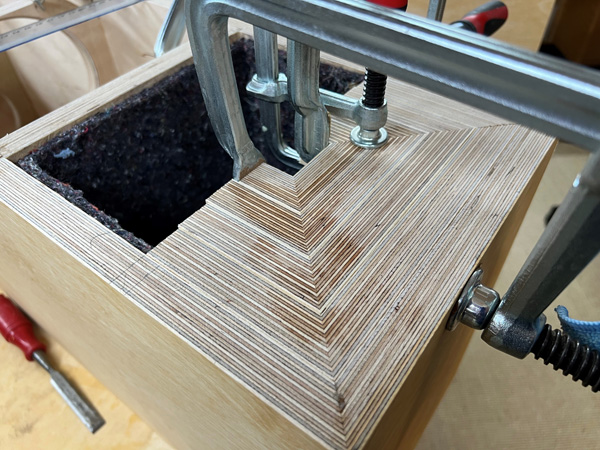
Right: Routing for the drivers.
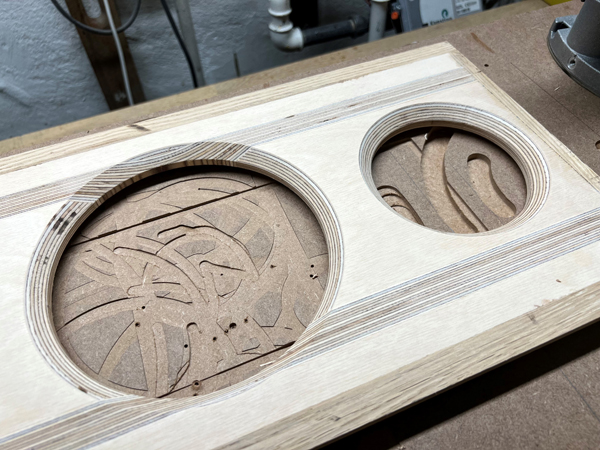
Remember
chamfering the driver holes!
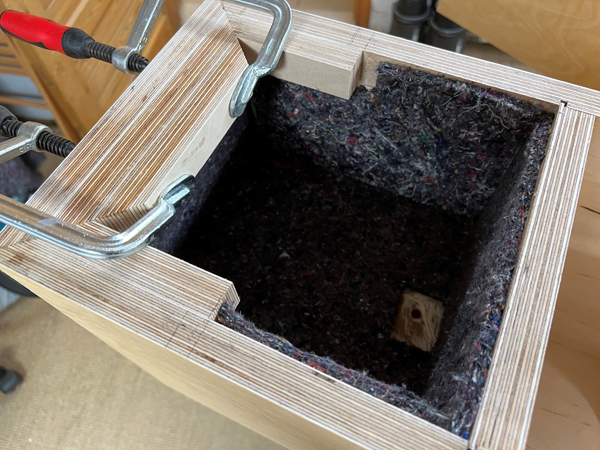
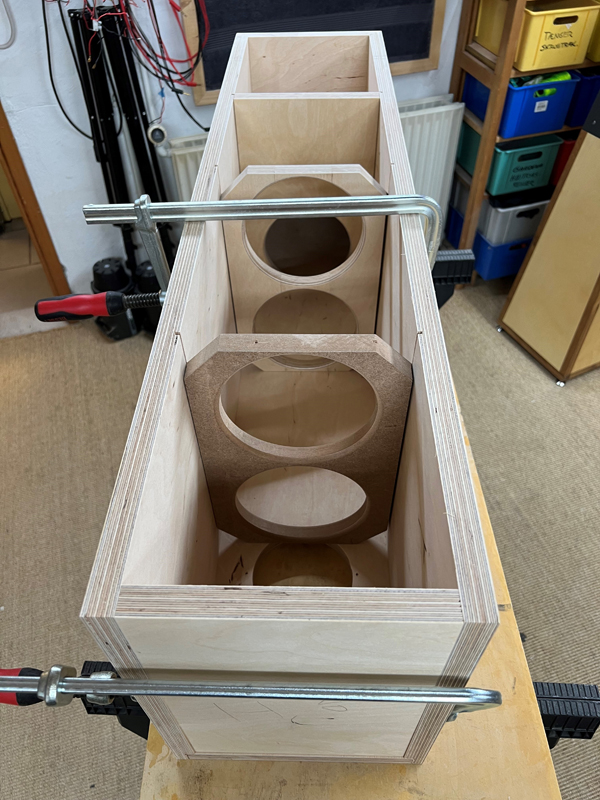
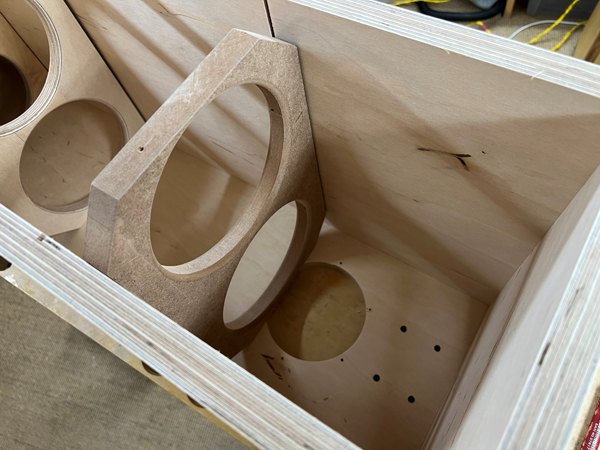
Preparing the tweeter panel. Do yourself a
favour and add damping felt to the mid-tweeter cab before closing in
with the tweeter panel.
Almost done.
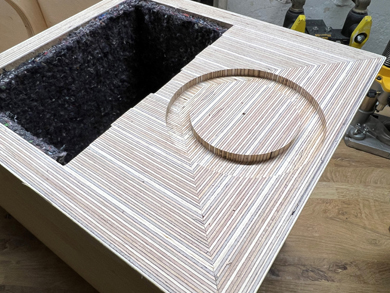
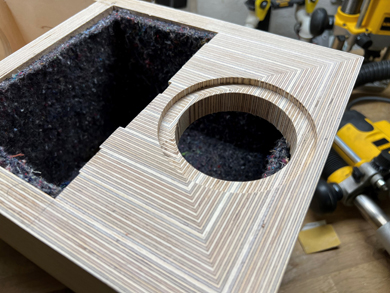
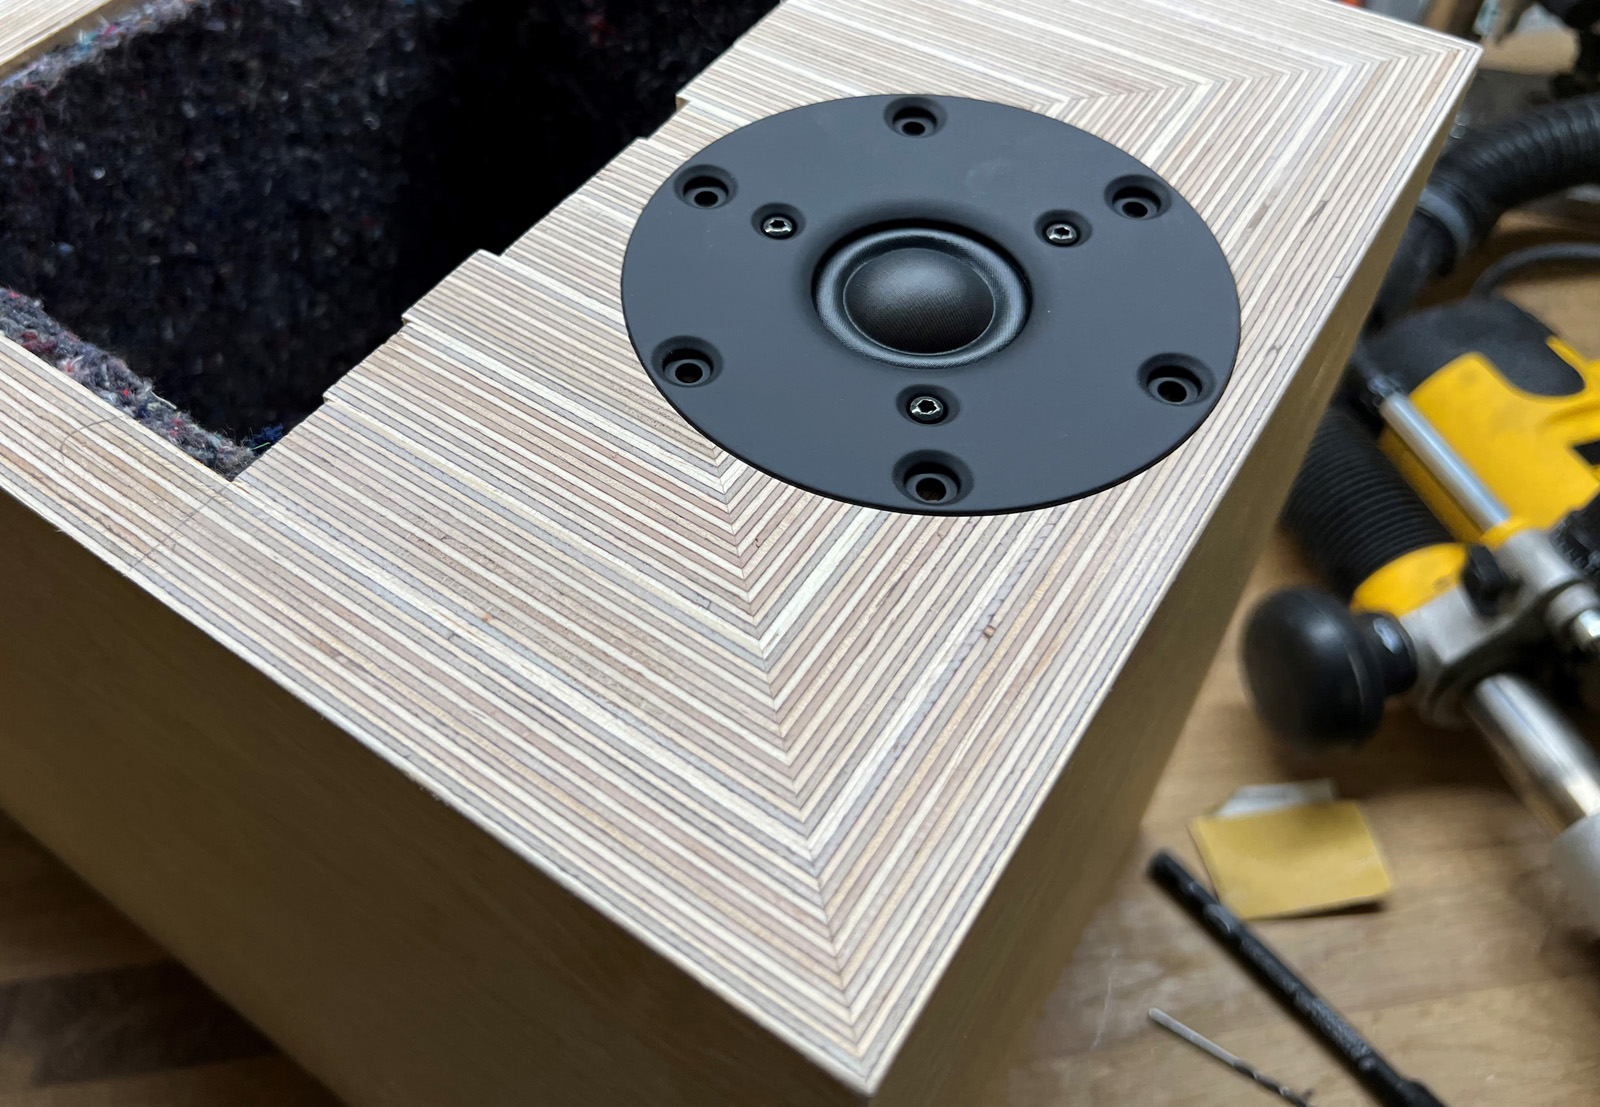
Routing for tweeter.
Picture showing all
felt damping. The mid/tweeter cab is damped on all sides. Make sure
you have made a wire hole before adding felt.
Bass cab: All sides are covered with felt. Rear panel not.
Further damping with Acoustilux:
The cavity behind the mid/tweeter (1) cab is
not added felt. The cavity is stuffed with a piece of 50 x 50 cm Acoustilux.
Section 2: Cut 2 pcs of 190 x 500 cm and place on sides and rear so that
the rear panel, where the bass crossover is placed, is covered with 2
layers. Fasten Acoustilux with staples towards front panel.
Section 3: Cut 2 pcs of 25 x 50 cm and do the same as for section 2, two
layers on rear panel.
Section 4: Cut 3 pcs 23 x 50 cm and fold like seen below and place at
bottom of cabinet.

Section 5: Split the 150 grams sheeps wool supplied in two and stuff the midrange cabinet evenly.
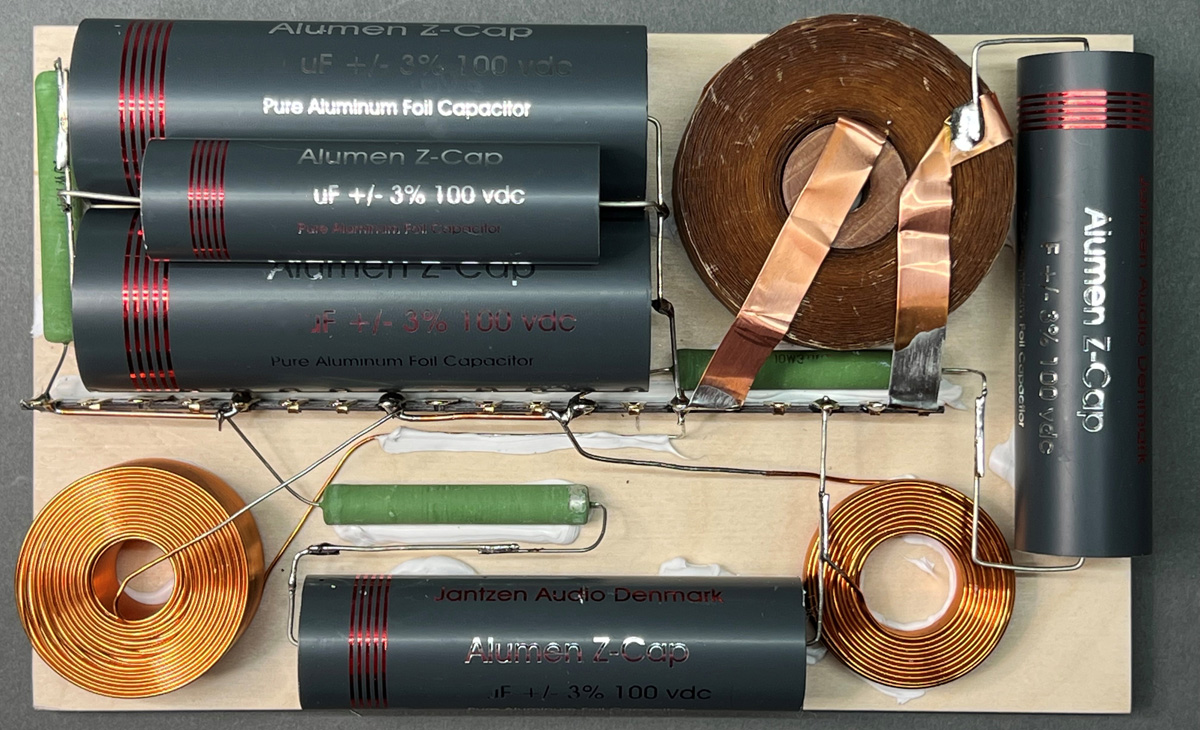
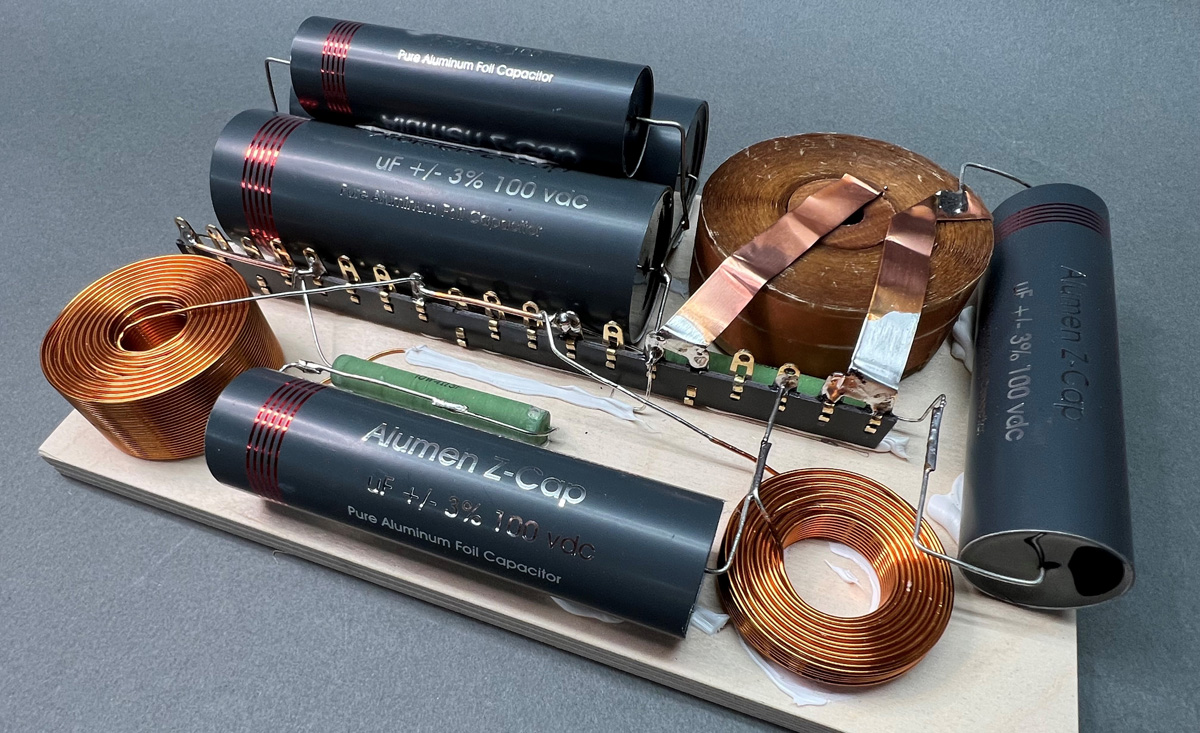
First time lacquer.
First time workshop set-up with
test-crossover.
Test crossover, fairly simple - and it sounds
great. Later the Superior-Z was replaced with Alumen-Z and the tweeter
capacitor with Amber-Z. Hmm..., this speaker seems to do better the more
we spoil it.
What helps is having my MSL cartridge mounted on the 4Point9 arm.
This speaker runs very well from my EAR-861 amp at "only" 32 wpc - and
from the 8 Ohm tabs.
Deep bass, smooth and extended midrange and lower treble from the 12MU.
No wonder this mid-driver has found its way into the most expensive
speakers on the market. What we as diy'ers can do - and very few
manufacturers can't - is using premium crossover components.
The Ekta-7741 is going to be one of my stock speakers as an example of this
configuration.
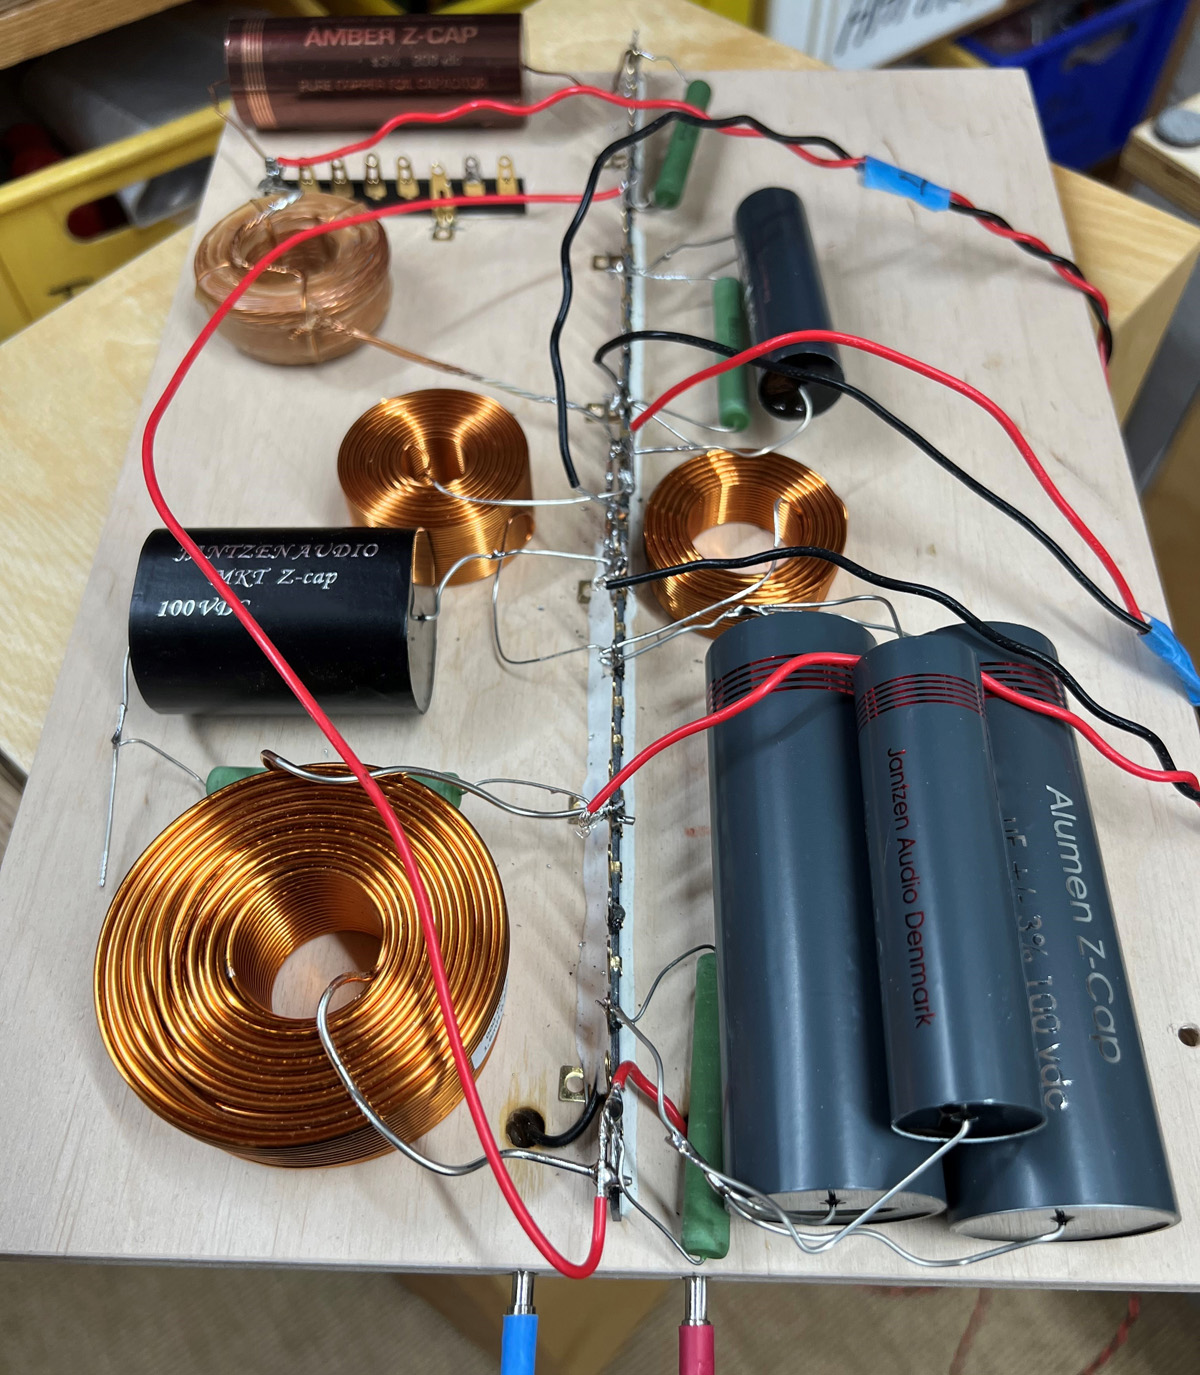
Later I changed C2 to Alumen-Z and C1 to
Amber-Z, the latter I really couldn't hear, but for C2 Alumen-Z made a
slight difference, same level of transparency, but yet a bit smoother on
the ear.
While still in my workshop I brought a range of records I'd bought
recently and my goodness, the level of transparency - not least helped
by the fact that I had replaced the Jelco tonearm with a
Kuzma 4Point9. The MSL cartridge had quite a lot more to offer than
I was aware of.
The 12MU midrange goes high in this setup, almost covering the same area
as the D8404 in my Ellipticor-A50-mkII.
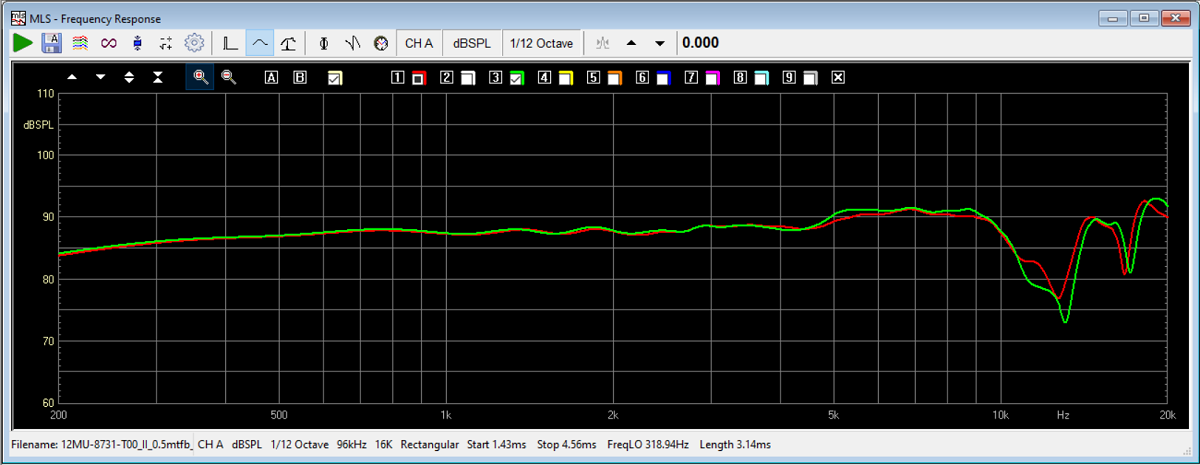
The 12MU is exceptionally linear - here the two units on actual baffle. Doing the crossover is a piece of cake! Only thing to do is choosing the proper point of crossover for the low-pass section and the 12MU leaves you all possible options.
A few comments on
MEASUREMENTS before you start interpreting the readings below.
First of all, if we think measurements will
tell us how a speaker sounds, we're wrong. The perception of sound is
way too subjective to be reflected in any measurements we can perform. A
loudspeaker system is meant to give us a satisfying idea of an acoustic
event and for some people a pair of 5 USD ear-plugs are enough, others
spend 200 kUSD on a truly full-range pair of speakers - and the latter
may not be happier than the former.
Measurements may give us an idea of tonal balance of a system, i.e. too
much or too little energy in certain areas, although dispersion
characteristics play a vital role here. A two-way 7+1 and a three-way
7+4+1 may display similar horizontal dispersion, yet sound very
different. Measurements may tell us about bass extension if far-field
measurements are merged with near-field measurements. In addition to
this, ports may contribute to bass extension. Most of we diy'ers do not
have access to an anechoic room for full-range measurements from
20-20000 Hz.
What cannot be seen is what kind of bass performance we get in a given
room. Bass performance is highly dependent on in-room placement of your
speaker and the same speaker can be boomy in one place and lean in
another. Actual SPL level at 1 meter distance and 2.8V input is useful
for en estimate of system sensitivity and combined with the impedance
profile may give an idea of how powerful an amplifier is needed to drive
the speaker to adequate levels.
What measurements do not tell is the very sound of the speaker unless
displaying serious linear distortion. The level of transparency, the
ability to resolve micro-details, the "speed" of the bass, etc., cannot
be derived from these data. Distortion measurements rarely tell much
unless seriously bad, and most modern drivers display low distortion
within their specified operating range.
Many people put way too much into these graphs and my comments here are
only meant as warning against over-interpretation. There are more to
good sound than what can be extracted from a few graphs. Every graph
needs interpretation in terms of what it means sonically and how it
impacts our choice of mating drivers, cabinet and crossover design.
What measurements certainly do not tell is the sonic signature of the
speaker, because speaker cones made from polypropylene, aluminum,
Kevlar, paper, glass fiber, carbon fiber, magnesium, ceramics or even
diamonds all have their way of adding spices to the stew. Nor do
measurements tell what impact the quality of the crossover components
add to the sound, from state of the art components to the cheapest of
coils and caps, they all measure the same if values are correct, yet
sound very different.
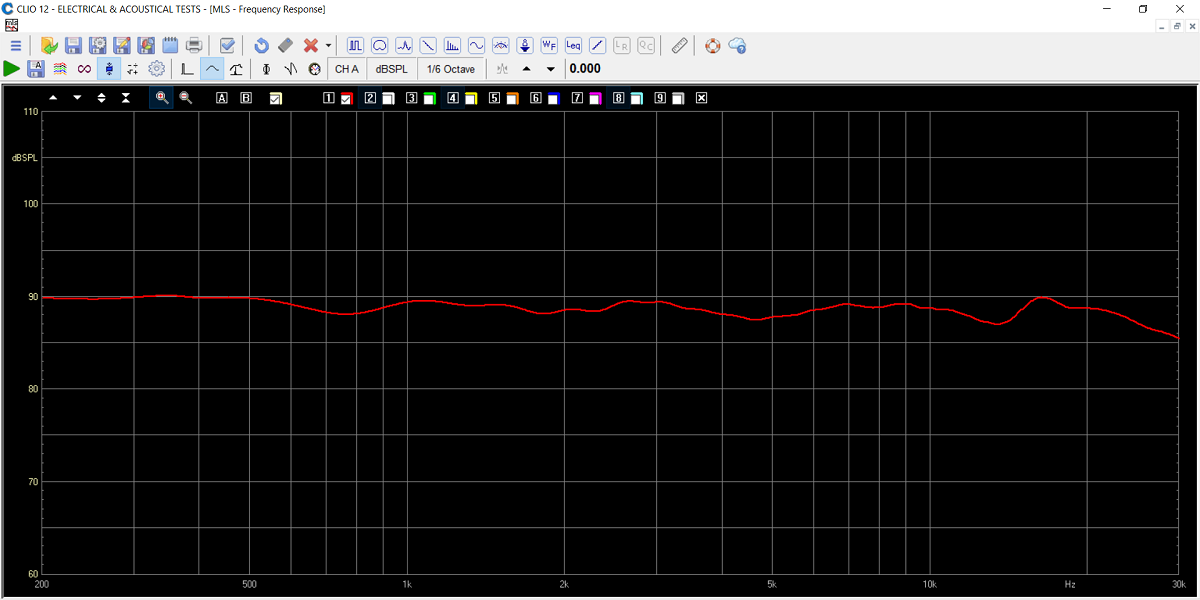
Frequency response. Fairly linear up to 30 kHz.
Given the bass cabinet volume we have -3dB @ 38 Hz.
With two 18WU bass drivers we have some 308 cm^2 membrane area, equal to
a 10" bass driver.
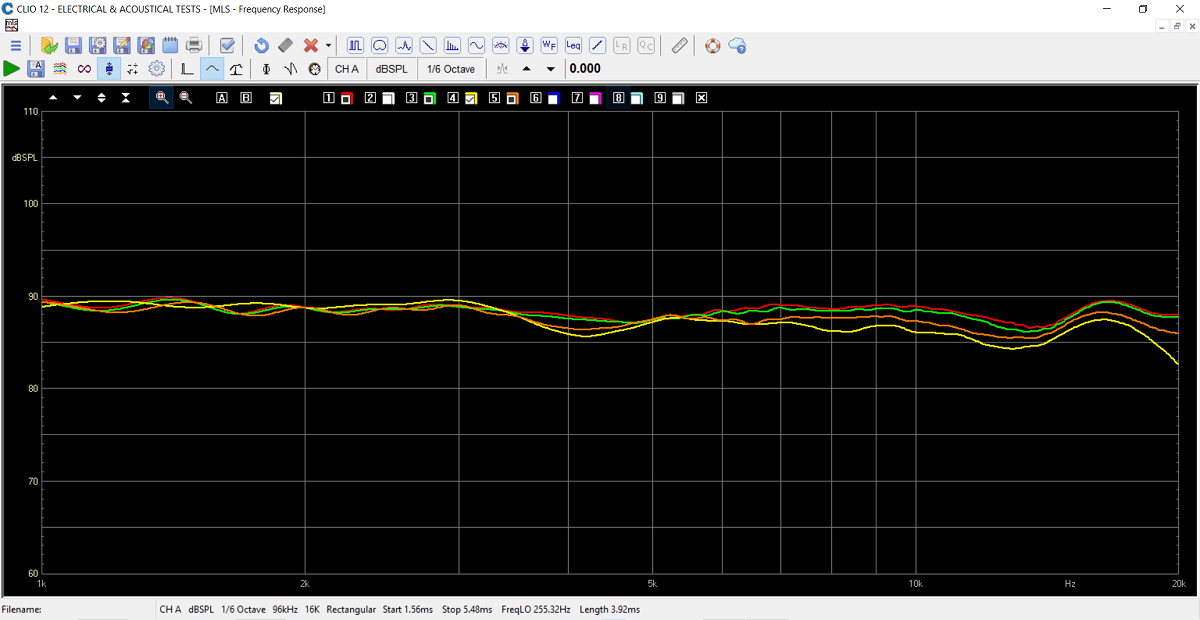
Horizontal dispersion at 0, 10, 20 and 30 deg. off-axis.
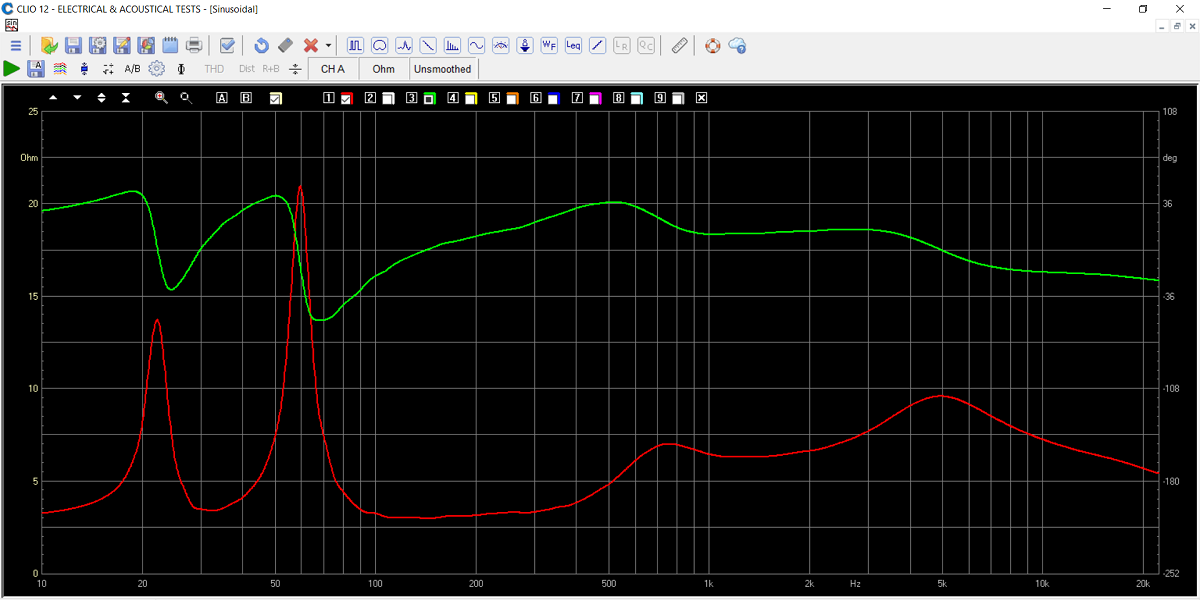
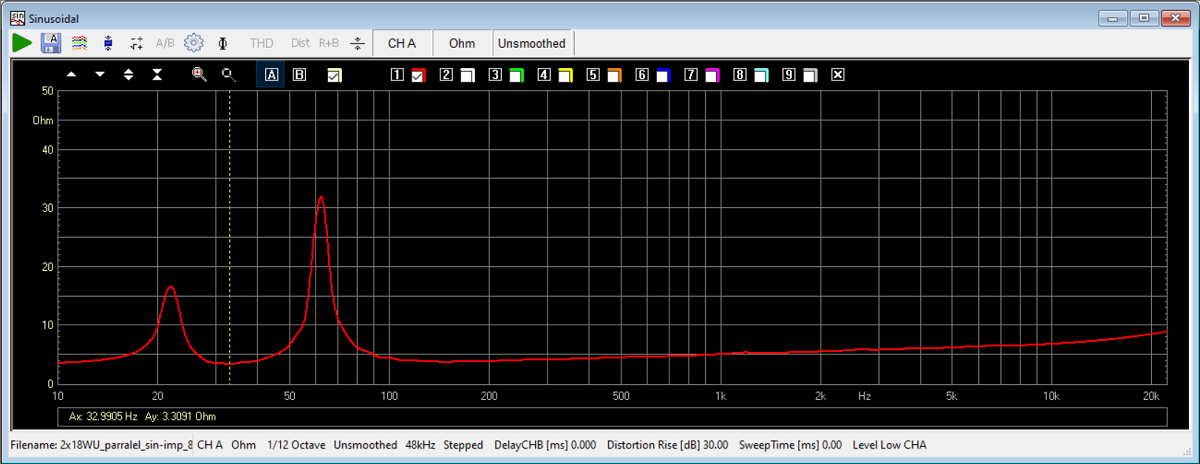
Final system impedance. Minimum 3 Ohms @ 100-200 Hz.
My 32 wpc tube amp have no trouble at all driving the speaker to
significant levels.

The kit comes in 3 versions:
Fabric dome, 6600, level 1 and level 2.
Be-dome, 6640, and only highest level crossover.
In level 2 for 6600 tweeter, C2 and C3 Alumen-Z for midrange is replaced
by Superior-Z cap.
Kits can always be bought with/without drivers, or some of the drivers.
All kit and component prices may be subject to change and are always to be confirmed by Jantzen Audio Denmark.
Download Complete Kit Sale Presentations:

All technical questions to troels.gravesen@hotmail.com
All questions regarding purchase of kits, please mail Jantzen Audio at contact@jantzen-audio.com
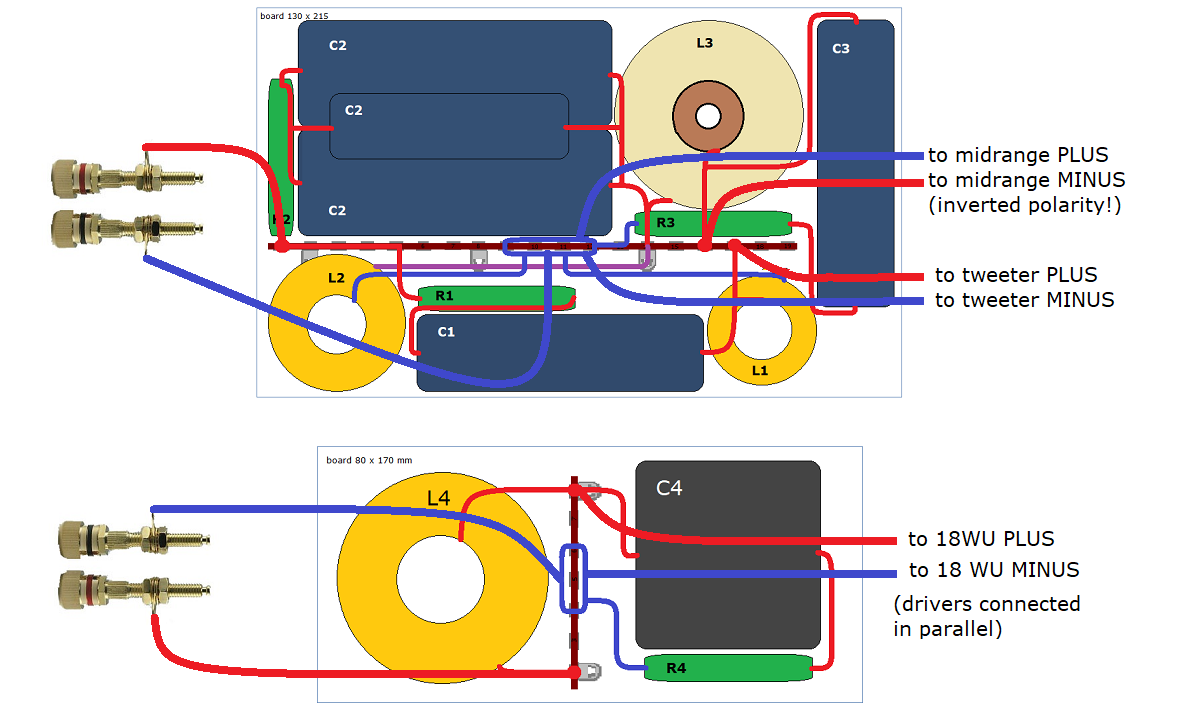
CROSSOVER-LAYOUT
BACK TO INDEX
Check this out before start making crossovers:
http://www.troelsgravesen.dk/tips.htm#CONSTRUCTION_OF_CROSSOVERS
I cannot emphasise enough the importance of this section. I have images
of crossovers from builders and they are a mess, a bird's nest that
leaves me no chance of seeing what went wrong in the layout.
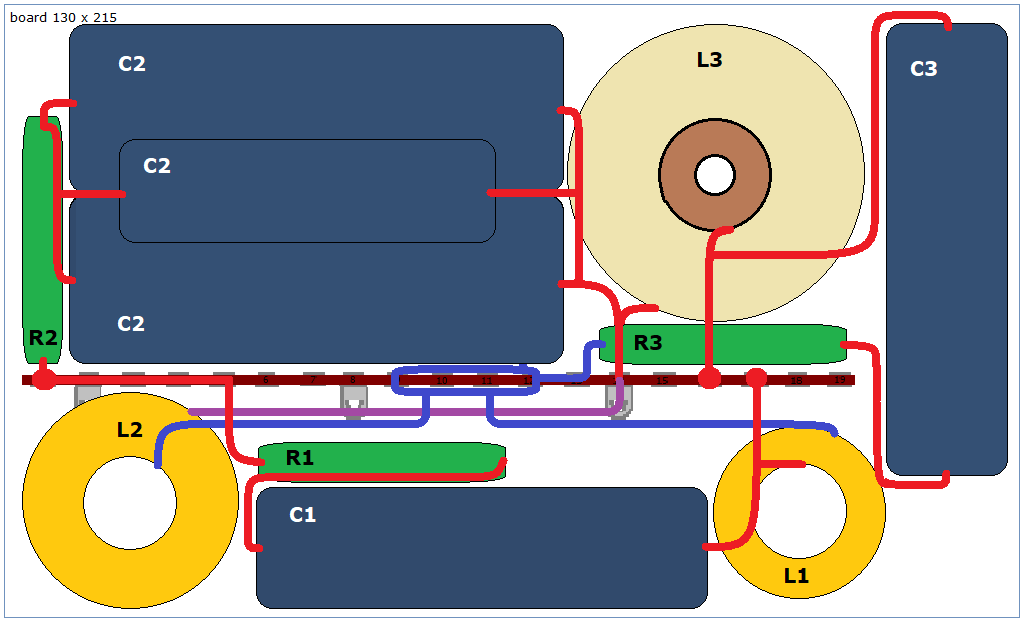
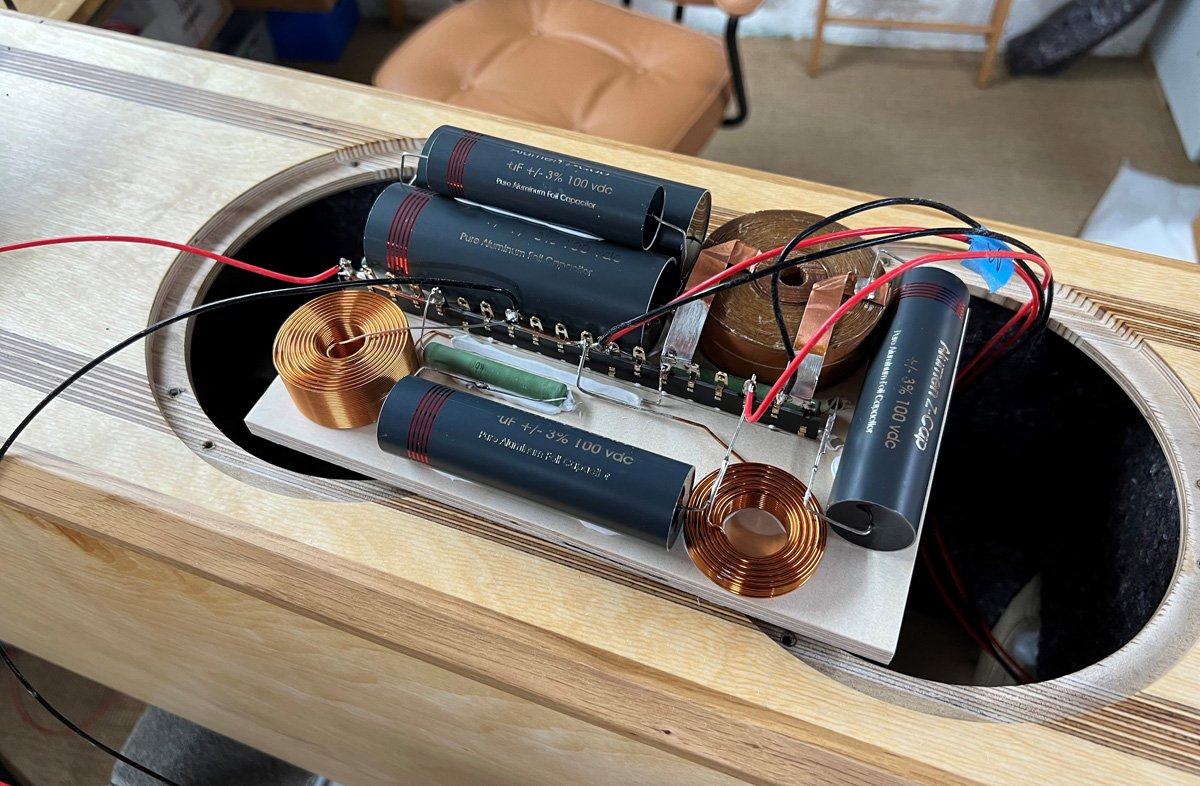
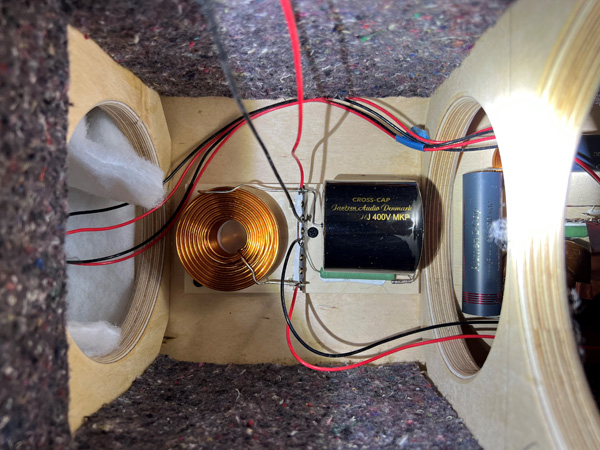
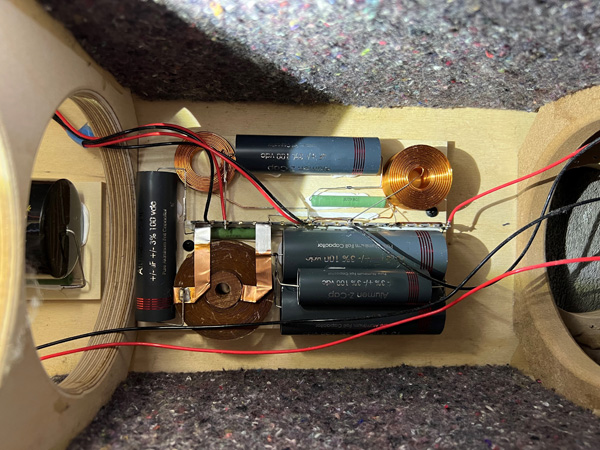
Mid-tweeter section.
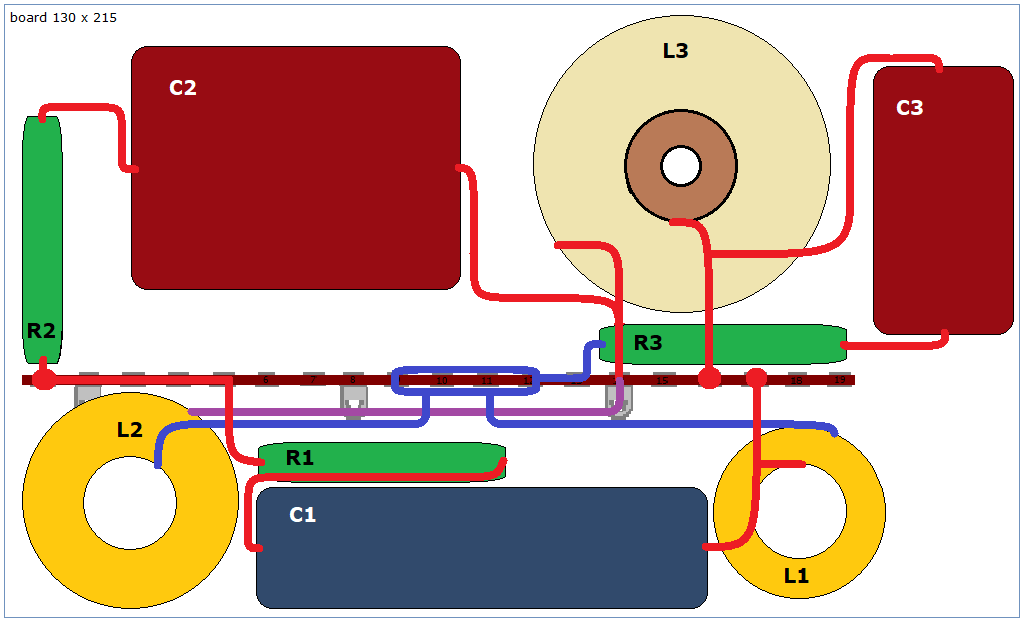
Layout for level 2, 6600 tweeter.
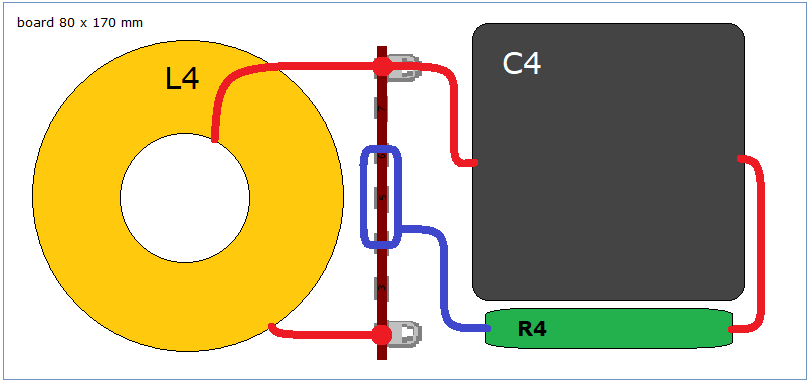
Bass section.

Speaker wiring:
Replacing the fabric dome with Beryllium is not cheap, and the sonic difference between the two tweeters may be subtle,
yet significant. And by significant, I mean audible significant, but not
significant in quality.
The difference in SPL from the two options here is
less than 0.5 dB from 3000-15000 Hz and the high-pass roll-off in the
same magnitude, thus very much the same voicing.
If I had to put a label on it, the 6600 may be tad more lush, the 6640 a
tad more clean. And by tad I mean tad! In the end a matter of taste
- and
beliefs.
R1 and C1 are different from the two versions, but both schematics are
included in the Kit Instruction, so you can make changes at a later
stage if your curiosity can't be tamed.