|
Design
Beauty
is in the eye of the beholder and sometimes we are faced with a painting, a piece of
music or architecture,
a sculpture, and immediately feel the rightness of the thing, the
shape, the sound, the colour, and we're pleased that someone finally captured
the essence of "it"; here an object in space.
The Wilson Audio
Alexia hit
me this way, that day's Moment of Zen. Whoever designed
this speaker just thought it right and the person who did it should be
credited at the WA website. It's a progressively refined evolution starting with
the MAXX speakers based on more rectangular shapes and straight lines to the
Sasha WP and finally the Alexandria, where former stealth design is
added curvatures providing more organic appearance. This is taken even further in the Alexia where the sides are chamfered
over large areas. Well done indeed!
Except
for design - and being a 3-way speaker - the Jenzen ATS is
quite different from Alexia. This is not a clone if anyone should think so,
rather a homage to Alexia's sculptor. The times
when cloning commercial speakers were hot due to speaker manufacturers
using of-the-shelf drivers is over. OEM drivers for commercial
speakers have become standard - although some may settle with a
modified basket, colour, logo imprints, etc.
The problem of trying to capture the essence of an object in a
look-alike creation is that we may end up making a pathetic wannabe. My wife and I once wandered
the streets of Rome and passed a poster stating "Genuine Copy"!
This obvious contradiction made us enter the tent where we found e.g. oil replicas of "The
Scream" by Edward Munch! That's pathetic! I hope this speaker
will hold it's own beauty and only pay tribute to whoever made such an inspirational design.

Design
for the sake of design can be bad - and often is when we're
dealing with acoustics. Too many speakers are produced to catch the
eye with little attention to acoustics. The speaker here falls into
the category of minimum baffle and a discussion on pros and cons of
wide vs. narrow baffles can be found here.
Both camps have strengths and weaknesses - as do all speakers. Narrow
baffles often produce ragged frequency response profiles and time will
tell how the drivers here will perform and what crossovers can be
realised. What this design does allow is time-alignment of all drivers
due to individual - and moveable - cabs for mid and tweeter although
only the tweeter may need adjustment, but moving the whole speaker the
separate mid cab comes handy.
The Alexia's mid cab front panel is not ideal for the 18H52 driver,
nor for some of the other Jenzen mids tried. I tried an SB
Acoustic SB17, which looks very similar to the Alexia's middriver, but
the response was awful. It took quite some experiments to get
the flattest possible response from the 18H52 and the result can be
seen below; quite different from the Alexia. My worst fear was tweeter
response from the small detached cabinet but this proved easy when I
started chamfering the cabinet. The result is a simplified crossover
with little equalisation.
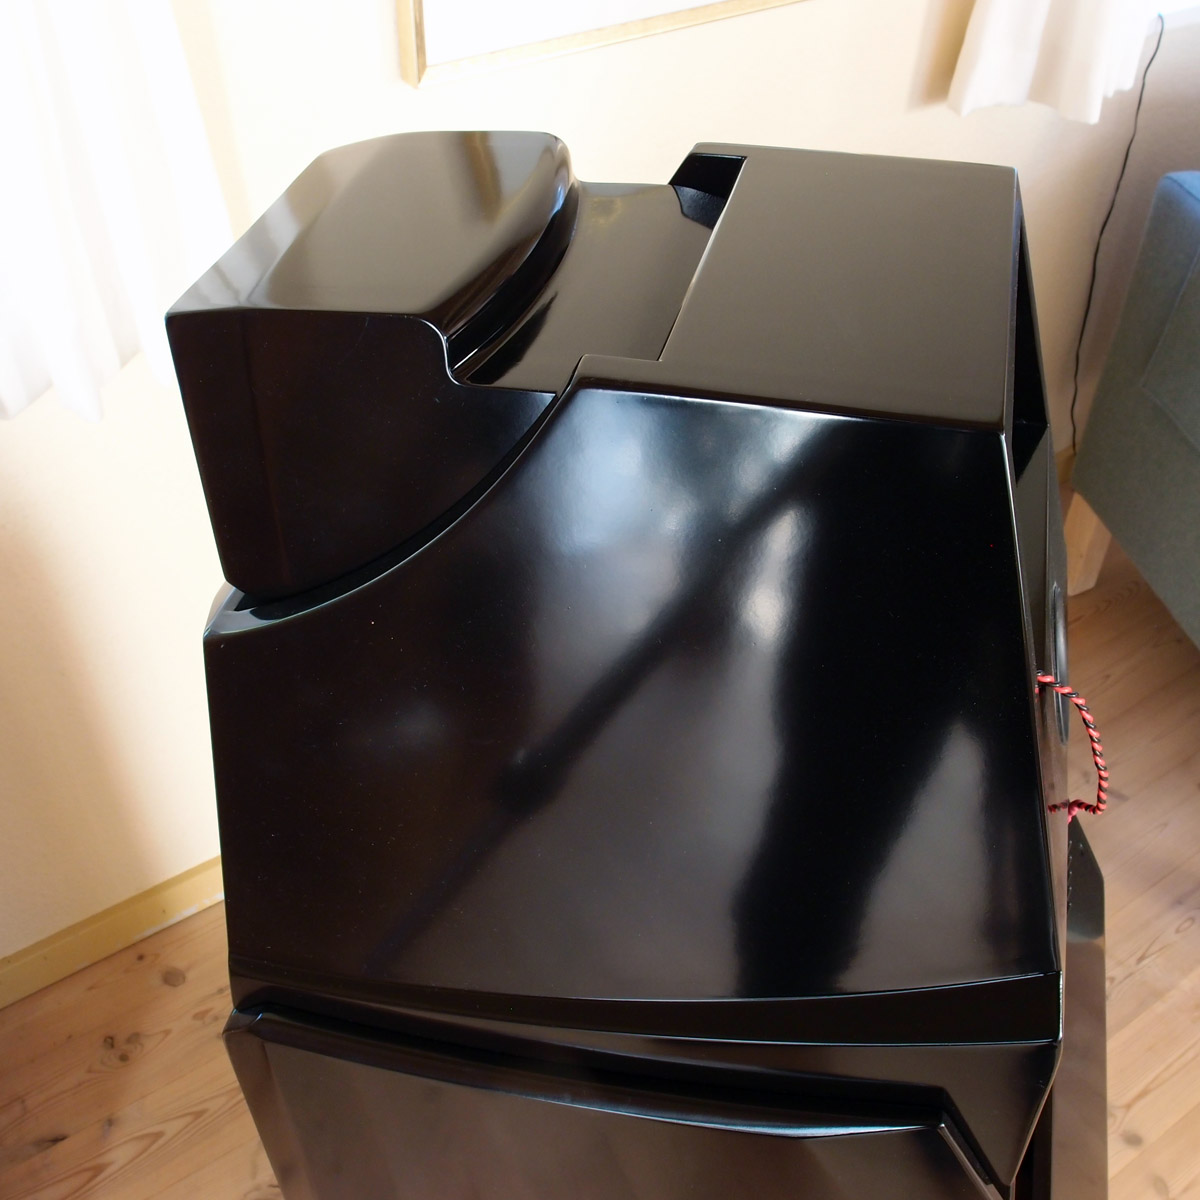
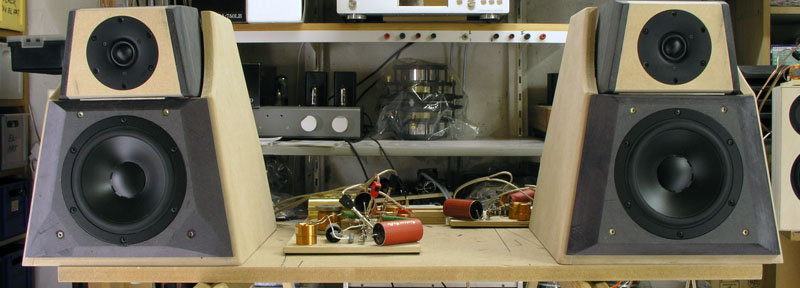
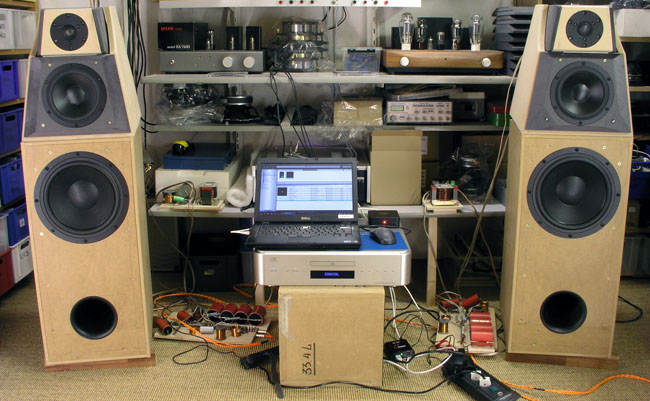
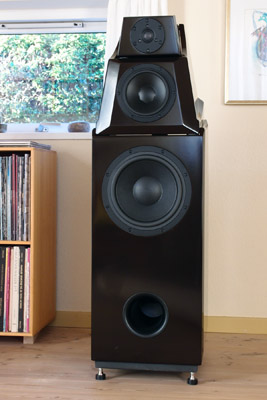
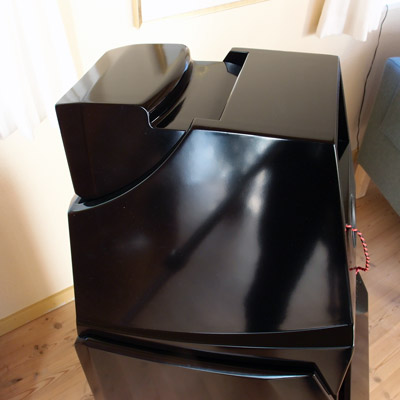
Black semi-gloss loudspeakers:
A photographer's nightmare! Hope this will give you an idea of
physical appearance.
The true colour is dark brown, colour code RAL 8022 to be exact.
The
Jenzen ATS
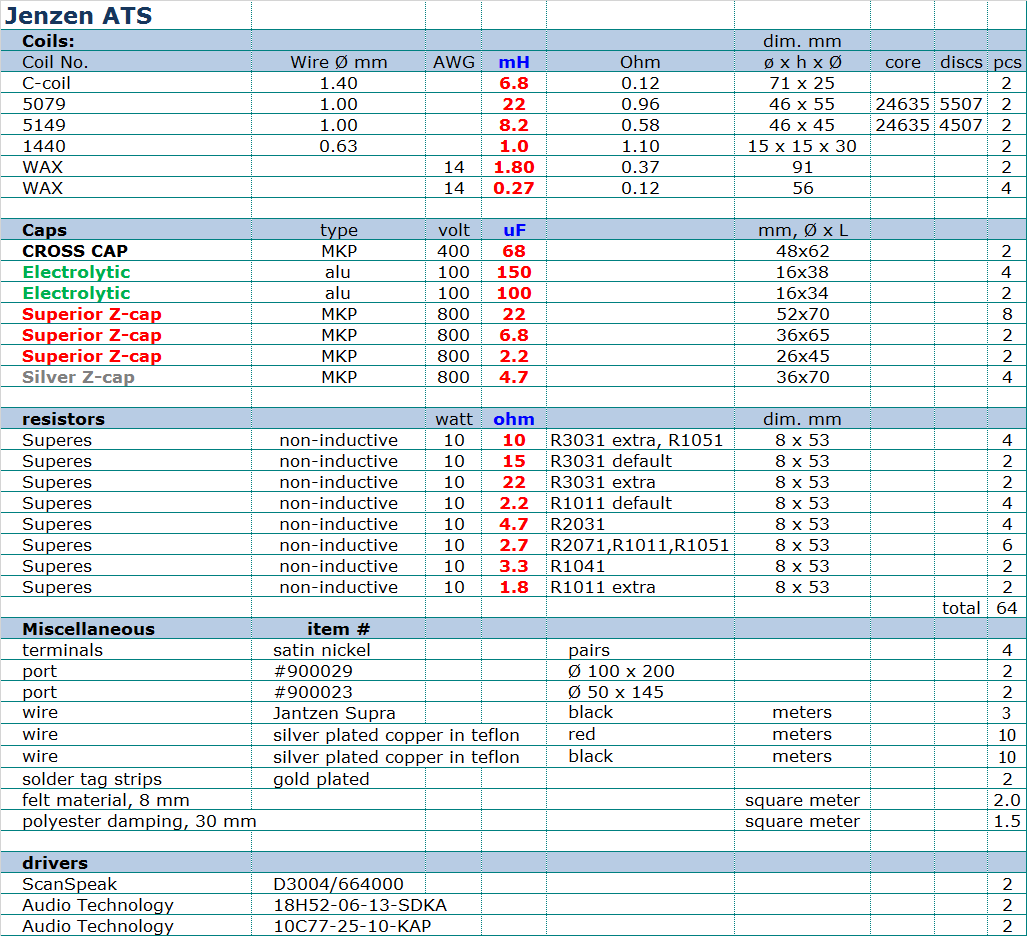
Basic
features of the Jenzen ATS include ~89 dB system sensitivity and minimum
5 Ohms impedance with no odd phase angles. Use mininmum 100 wpc amps
to drive the speakers although less can do if you never play seriously
loud. Or even better: By-amping! I currently use my
GlowMaster
KT88* for the
top and Jungson
JA88D-09 for the bass.
Drivers alone will set you back some 2,700 EUR (incl.Danish VAT).
Crossover kit is 1044 EUR (incl.DK VAT, outside EU: 836 EUR) and to this you have to add cabinet materials. The cabinet design
is hardly for first time diy'ers and you need access to a decent table saw
to make it all successful. Spray painted cabs don't come cheap and
veneering + hardwood may be more affordable.
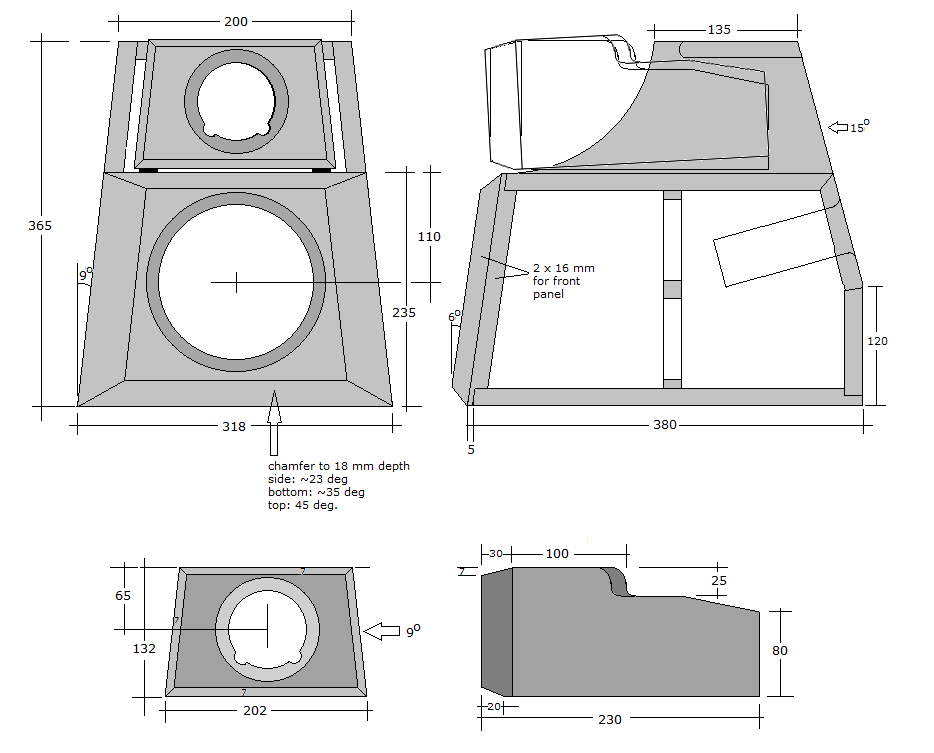
I'm not able to fully document the cabinet design in 3D, but I hope the basic
dimensions below will make it possible for you to create your own
vision of this speaker. If you follow these carefully, the speaker
will sound as good as mine - or even better. Some people go to the
extreme and use marble sheets or aluminum for cabs. Be prepared for
diminishing return of your effort and investment from such measures.
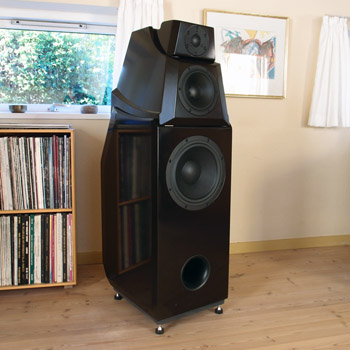
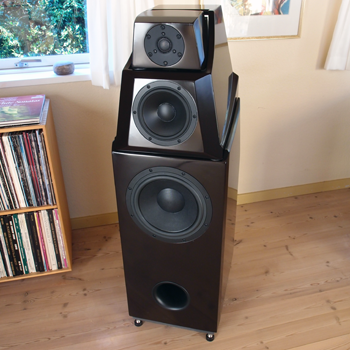
The Jenzen ATS appears quite smaller compared to the other Jenzen designs due to the smaller bass reflex enclosure and the
pyramid top. Thus, higher WAF!
It's really, really hard to pinpoint the difference in sound
of the ATS compared to Jenzen Accu and Jenzen D. The latter two
differs in treble quality as described on the
Jenzen D page.
The ATS can play louder compared to J-Accu and J-D to start somewhere.
This due to the 18H52 having exceptional dynamic headroom and partly
due to cone material being more ear-friendly in its break-up modes. At
least that's my interpretation. The 18H may not have the pitch-black
background of the C173, but yet delivers astonishing level of
transparency. This I find more surprising and I do not have any
explanation except for the use of high-quality
tweeters. Good hard dome tweeters will have a level of
transparency soft domes simply do not, and with a shallow slope
crossover around 2 kHz the dome is a vital part in any loudspeaker's
ability to deliver micro detail, i.e. transparency.
Some may prefer
the dry and forward sound of LR4 filters delivering more uniform power
response. Sometimes I do too, but it depends on what the speaker is
aimed at. Here I prefer the - to my ears - more transparent sound of
an LR2 filter delivering a better harmonic structure on instruments
and vocals. The latter really depends on the ability of the mid and
tweeter to make a good blend of sound in the overlapping area - and
these two drivers do and I was happy to finally find a partner for my ScanSpeak beryllium domes. These two drivers can play brass music
insanely loud - and vocals too!
I
rate this Jenzen ATS on par with the Jenzen Accu and Jenzen D. It
offers a different flavour and maybe something for your taste. Bon
appétit!
*Three months after having finished the Jenzen ATS I
had the
GlowMaster KT88 fully balanced amplifier, truly the best sounding
amplifier I've ever had. This amp has an unprecedented level of
transparency and low distortion as well. That is: If we don't push it
too hard. No surprise. These 65 watts can run the Jenzen ATS to
adequate low-medium listening level but really can't cope with the
heavy bass cone drawing more current than available. Then - finally -
I made another pair of XLR output terminals on my WOT line stage and
built a 200 wpc Hypex
amp to run the bass drivers. A match in heaven! Not
necessarily due to the Hypex, but having the GlowMaster relieved of
driving the bass drivers we now have the dynamic headroom needed. In
fact, I really hadn't heard what the Jenzen ATS was capable of. The
AudioTechnology 18H52-06-13-SDKA mid-drivers and ScanSpeak Be dome is truly a great match. The bi-amped Jenzen ATS is
for sure one of the three best speakers I've ever had, if not the
best.
FAQ
FAQ
having the answer NO:
Can I make any of the other Jenzen speakers with the same cabinet as
the Jenzen ATS - or the ATS in the Jenzen-D cabinet?
Do you have other tweeter options
- or can you make me a crossover for NNN tweeter?
Please
mail your questions and I will answer here.
Jenzen ATS (AudioTechnology
and ScanSpeak) drivers
Back to index

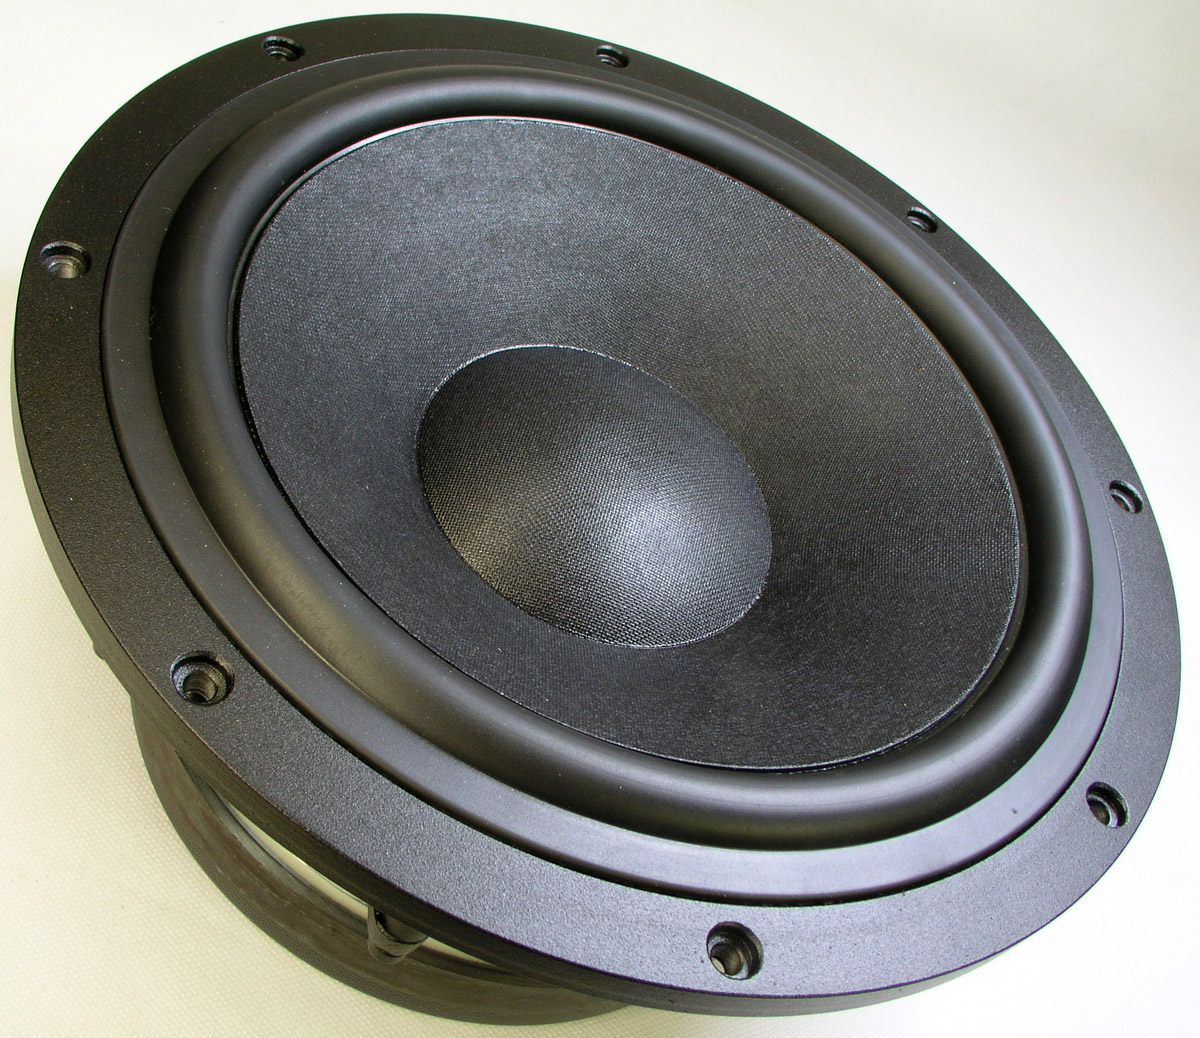
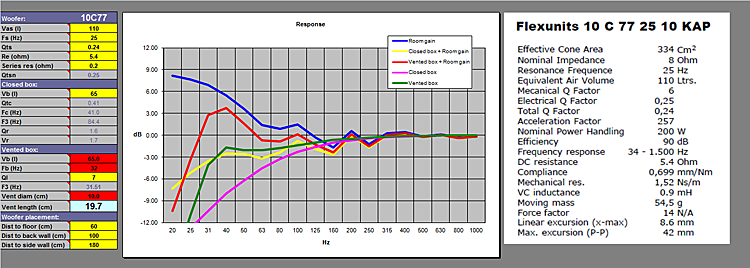
Bass:
I couldn't think of anything better for the Jenzen ATS than the
10C77-25-10-KAP.
The 10C77 was initially tested here.
This driver performs so well in PRELUDE,
Jenzen
Accu and Jenzen
D. Deep, dynamic bass with low-level
detail due to the rigid cone and high mechanical Q. It must be said that
bass quality is highly dependent on the acoustic qualities of the
listening room - and associated amplifier. "Short and dry" in
one place may be "boomy and blurred" in another set-up.
Whenever we deal with bass quality, the room dimensions, its damping and placement of speakers
must be an integral part of
that discussion - and only measurements can tell where we are. Based on
numerous response mails, too many people have to live with one speaker
in a corner and it calls for digital room correction. There's no way we
can tweak the bass response by modifying the crossover or by means of
damping the cabinet that can correct the boomy corner bass.
A few
words on "low level detail". This phrase appears to have become a
popular buzzword recently and reviewers a keen to state speakers'
ability to deliver low-level detail. What can be said about
this is that many modern over-damped bass drivers having low mechanical
Q (Qm) plus the use of over-damped cabinets can make bass
performance slow and undynamic and the bass response appears to fade
progressively when we turn down the volume. Now, the major
cause of this we shall find in our
Equal-loudness contours, the Fletcher-Munson curves, and since we do
not want tone-controls on our preamps, we have to live with the
unfortunate situation. No speakers can overcome this problem but
over-damped bass drivers certainly haven't improved the situation. The
AT 10C77 bass driver has a mechanical Q of 5 and this does make a
difference compared to a driver having Qm = 1.0-1.5 to my experience.
The rigid cone, appropriate suspensions (elasticity and resilience) and
ventilated chassis used are responsible for this.
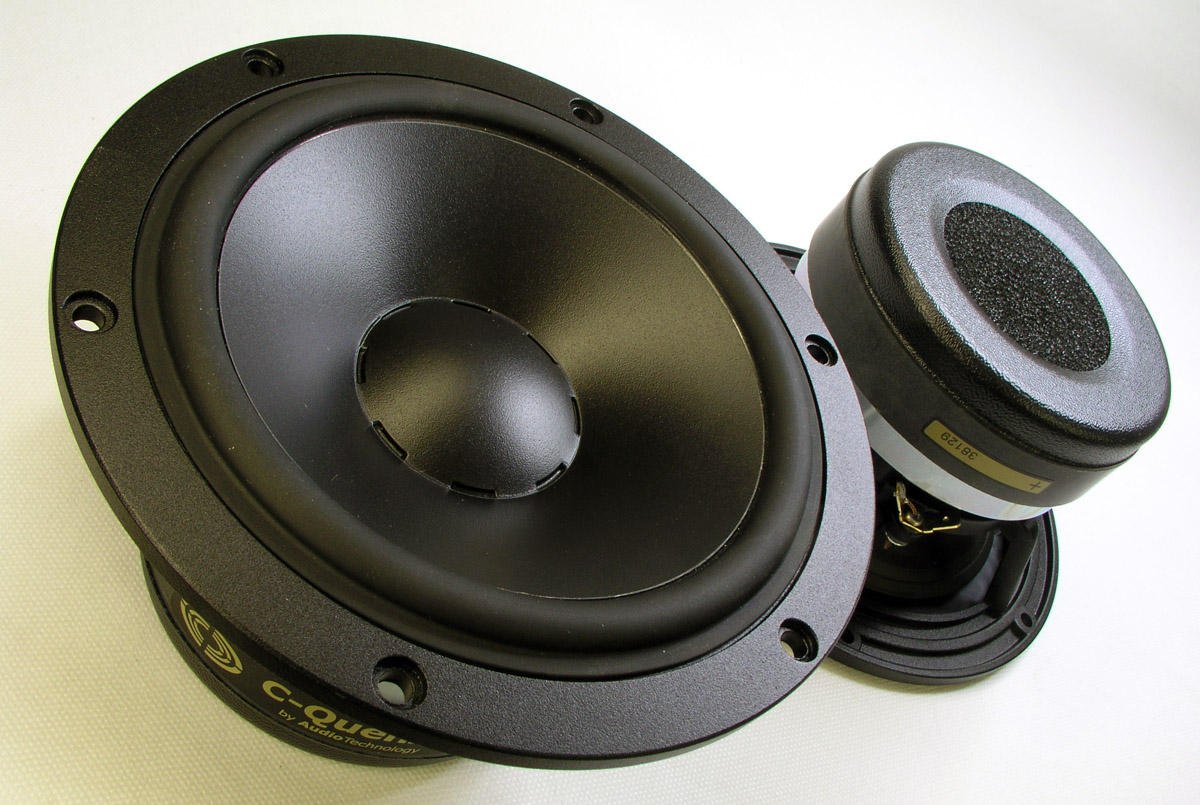
Midrange:
Working from around 200 Hz (LR2) the mid-driver really doesn't need high
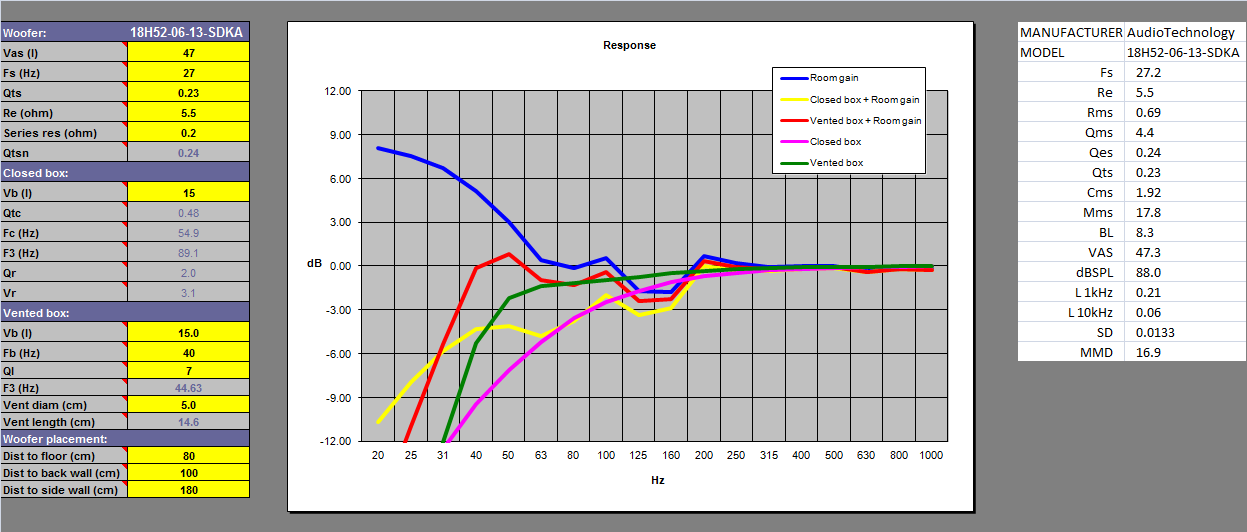
Xmax, thus Per Skaaning made me an 18H52-06-13-SDKA with underhung voice coil and +/- 3 mm excursion is more than
enough to cope with even thunderous playback levels. These mineral filled PP
cones have the ability to play seriously loud without sounding harsh,
i.e. large dynamic headroom. This dedicated midrange driver has some
unusual data, like Fs = 27 Hz, Qt = 0.23 and Qm = 4.4. High electrical damping and
very low-loss suspensions. Download main TSdata
here.
SDKA means Symmetric Drive and
Aluminum reinforced Kapton voice coil
former.
A few words on the cone material: Mineral filled poly-propylene has been
around for decades and you may ask if it isn't time for something new.
Other manufacturers may use sophisticated composite materials like
carbon fibres, either as coated woven fabric or as a sandwich with some
foam in between, e.g. Rohacell, giving strength and some degree of
internal damping. Because we need internal damping or the cone will ring
like a bell (e.g. magnesium). The Accuton used in two of the Jenzens use
some coating on the rear of the cone and cut-outs to dampen intrinsic
ringing - and it works well indeed. As discussed before, every cone
material will have a sound of its own but generally I think the last
10-15 years have increased the overall quality of drivers and we can now
have rigid or semi-rigid cones presenting a level of transparency we
simply didn't have before. On top of this speaker manufacturers have
started producing well-ventilated magnet systems, use symmetric drive
to cope with voice coil induction and not least use low-loss
suspensions. The latter a few manufacturers still have to grasp the
importance of. Yes, all of these features can be found in some vintage
drivers but it seems all the experiences of the past is finally finding
its way back into modern drivers combined with modern technology to make
more rugged and durable products.
The 18H52 here features all these advances and deliver a level of
transparency on par with more complex composite cones. I really hadn't
expected this, rather the 18H being a tiny bit on the "soft" and lush
side. It isn't, and it's dynamic headroom is above all other Jenzen mids
I've tried.
When played louder than it
should it will start sounding compressed in a more ear-friendly way hard-cone drivers may not. I'm truly impressed by this driver and it
shows how far this cone material can be taken when optimised on all
parametres.
And it must be said that when we evaluate any driver's
capability in a set-up, the associated driver, point of crossover and
crossover topology must be taken
into account. The beryllium dome certainly has a word or two to be said
in delivering sense of transparency.

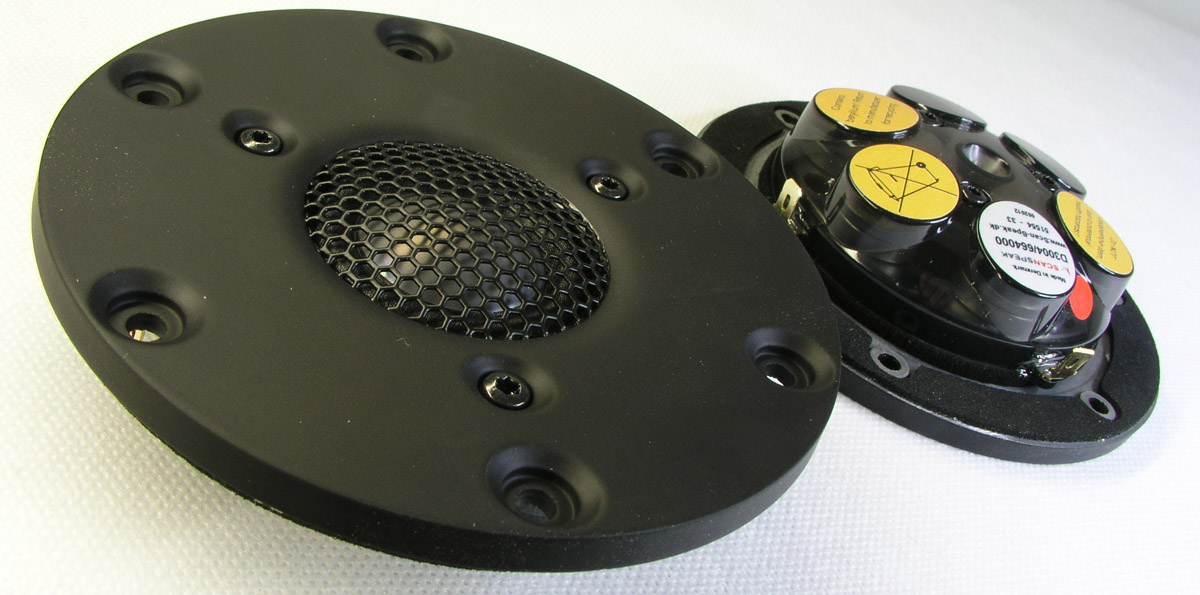
Tweeter:
Quite a range of tweeters were tested for this speaker: Accuton
C30-6-0242, Ciare MT320, ScanSpeak D3004/660000, ScanSpeak D3004/6620
(ring-radiator),
ScanSpeak D2904/710003 and finally ScanSpeak beryllium D3004/664000 to find the best partner for the 18H52
mid-driver.
This was a rewarding experience as almost all tweeters did well -
their way. The Ciare if we wanted a speaker being able to play
excessively loud, partly due to its large dome (voice coil). The Accuton for added perspective and detail. The 6620
ring-radiator will play anything without distress, very good indeed. 6600 and 7100 did equally well but the 7100
just made a seamless blend of sounds coming from
the two drivers, a more credible presentation of the harmonic structure of
instruments and vocals and stayed in for a long time. ScanSpeak beryllium D3004/664000
was tried last because it didn't perform
well in some other combinations I've tried, but here it suddenly showed
its strength in revealing detail and a harmonic structure at the same
time once mated with the
18H52.
I must emphasize that mating drivers based on specs just does not work.
I have numerous suggestions on which drivers to combine and we can have
the worlds "best" tweeter on paper - and it may sound bad together with the wrong middriver. The crossover
topology plays a vital part here and if we use fairly shallow-slope crossovers we simply cannot
predict what the blend of sound in the crossover range will be like. It
must be tried and frequency response, waterfall plots, distortion data,
etc., do not tell a thing about how two drivers will present the
harmonic structure of the flute, the oboe, the clarinet, the acoustic
piano, etc. If you have trouble with two drivers you absolutely want to
mate, try 4th-6th order filters. What may further complicate things is
that one tweeter may reveal more detail where another may produce a
better harmonic structure. At the end of the day a matter of priority if
both cannot be achieved.

Jenzen
ATS crossover
Back to index
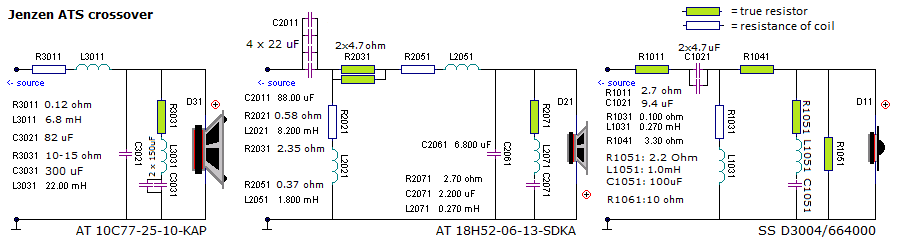
The
Jenzen ATS very much follows the topology of the other Jenzens: LR2 for
all high-pass and low-pass sections. Points of crossover are around 200 and
2200 Hz. The 18H mid is a bit too efficient for the 10C77 bass, thus
minor attenuation provided by R2031. To stay cool I use 2 x 4R7 in parallel for R2031.
For a long time I ran the 6640 tweeter without the LCR impedance
flattening circuit, R1051/L1051/C1051, as it does very little to the
tweeter's roll-off towards lower frequences, but playing in particular
classical music at loud levels, massed strings could become harsh and
aggressive. The LCR circuit solved the problem. Part of this problem
really is that the 10C77 + 18H can play so loud we're really
pushing the dome's capability to the limit with a 2nd order filter -
even with a point of crossover around 2.2 kHz.
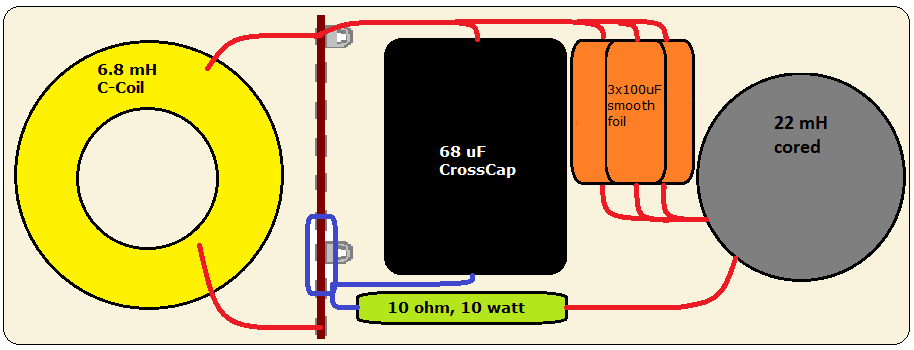
For the bass LCR filter I use
10R (R1031) but 15 and 22 Ohms resistors are included in kit for your
experimentation. Higher values will boost response around 80 Hz.
Voicing a speaker can go on
forever. Minor changes to the values of crossover components
can
make subtle changes to frequency response and prove beneficial to
particular musical choices and less favourable for others. Which is
right? In the end a matter of compromise in targeting a voicing
suitable for as wide a range of music as possible - and to as wide a
range of rooms as possible, the latter actually not possible. In
particular room conditions are a speaker designer's worst nightmare. Take a room with
concrete walls and tile floor and it could even be cubic to make
things even worse. Terrible! A lot of rooms are just not suitable for music
reproduction and designing speakers will inevitable produce feedback
telling this or that particular speaker just sounds awful. Not much we
can do about it except urge the builder to try out the speakers in
other rooms and with different equipment to get an idea of
the speaker's capability. The good thing about DIY is that we don't
have to voice the speakers for selling. We do not have any marketing
people wanting a specific voicing making metal fans drool and no
voicing bringing tears to classical fans' eyes. Because, it's easy to
seduce a specific audience.
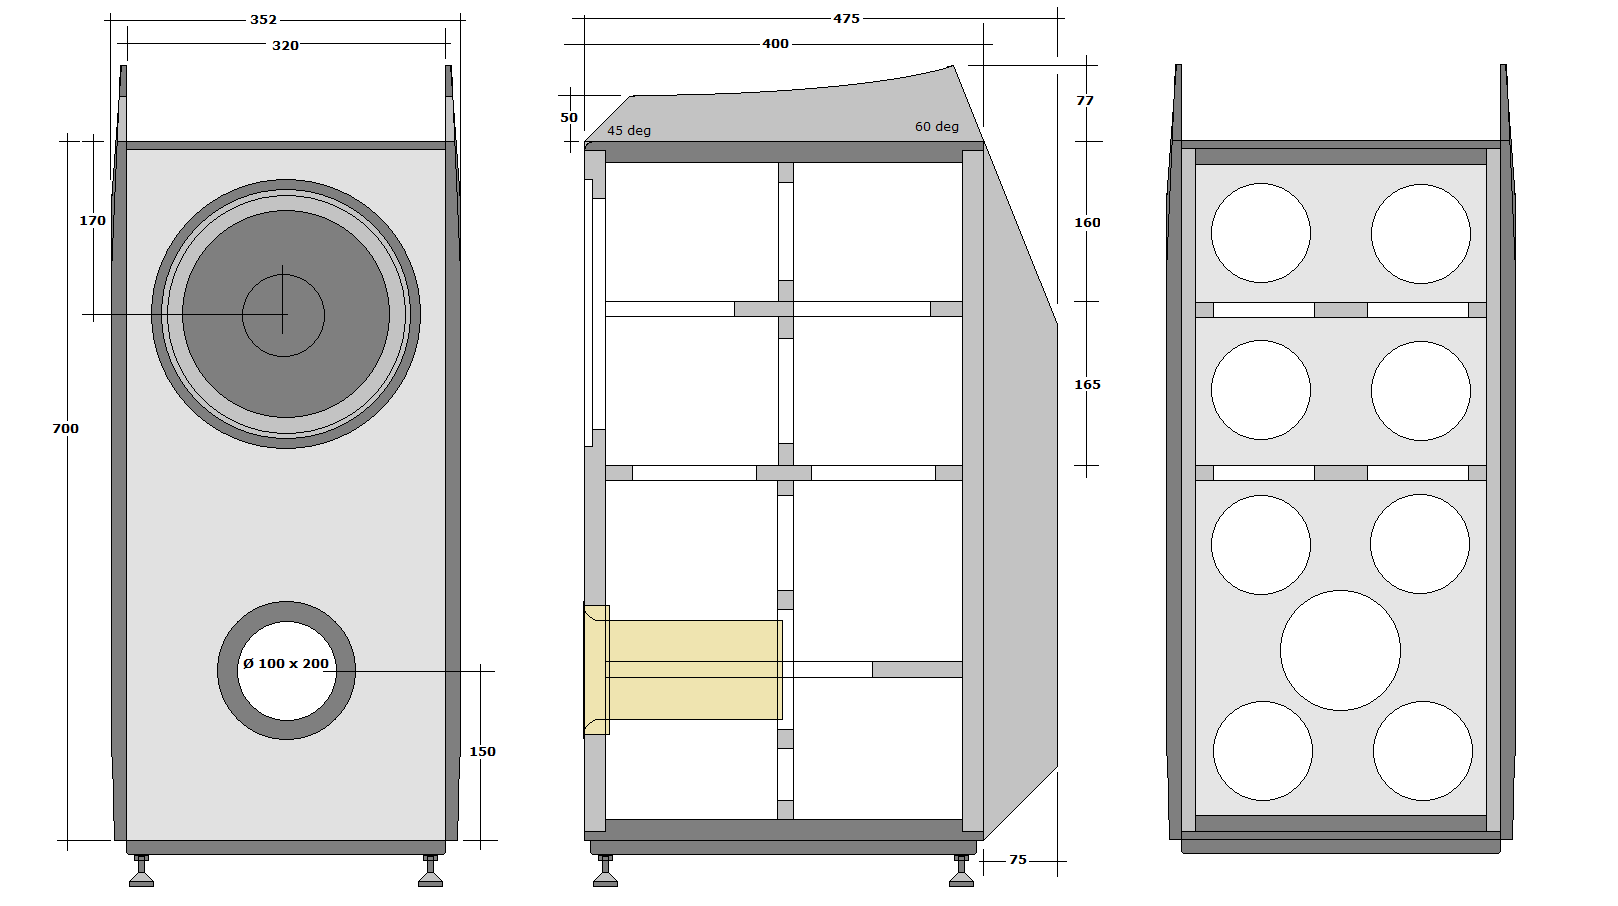
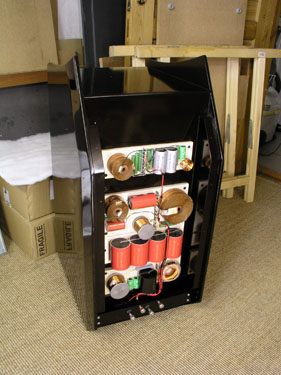
Jenzen ATS Cabinet
Back to index
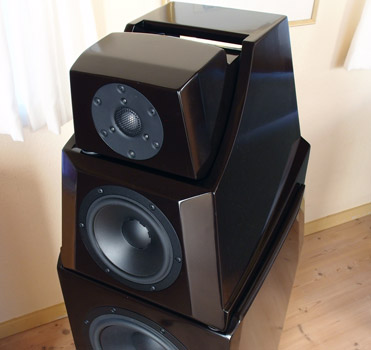
Prototype mid-cabs during fine-tuning of mid
front panel. Here with 7100 tweeters.
Prototype cabinets for bass added - and
6640 tweeters in place.
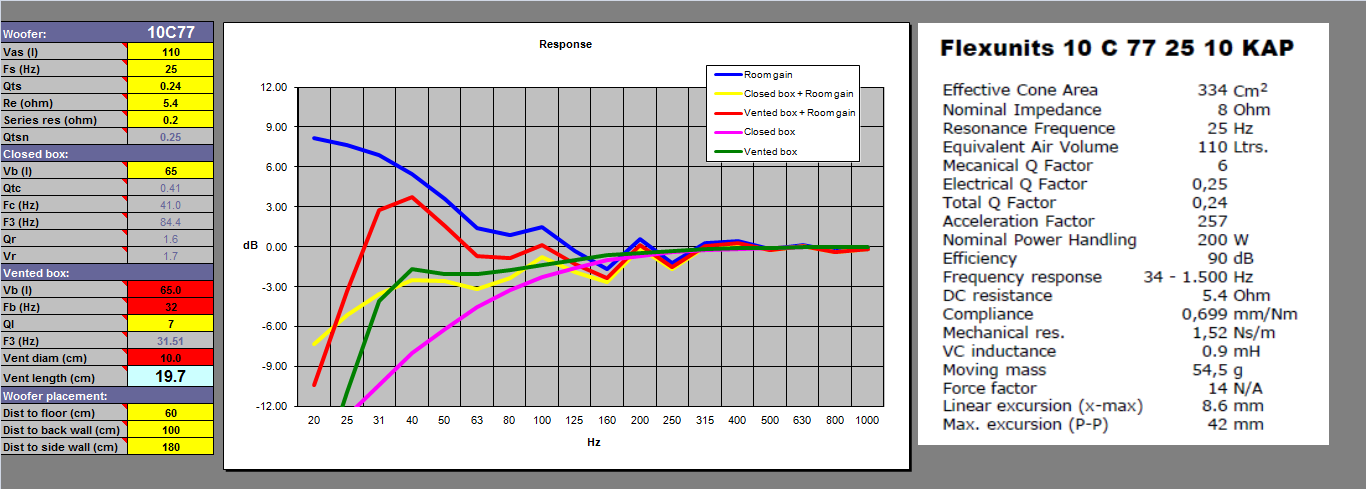
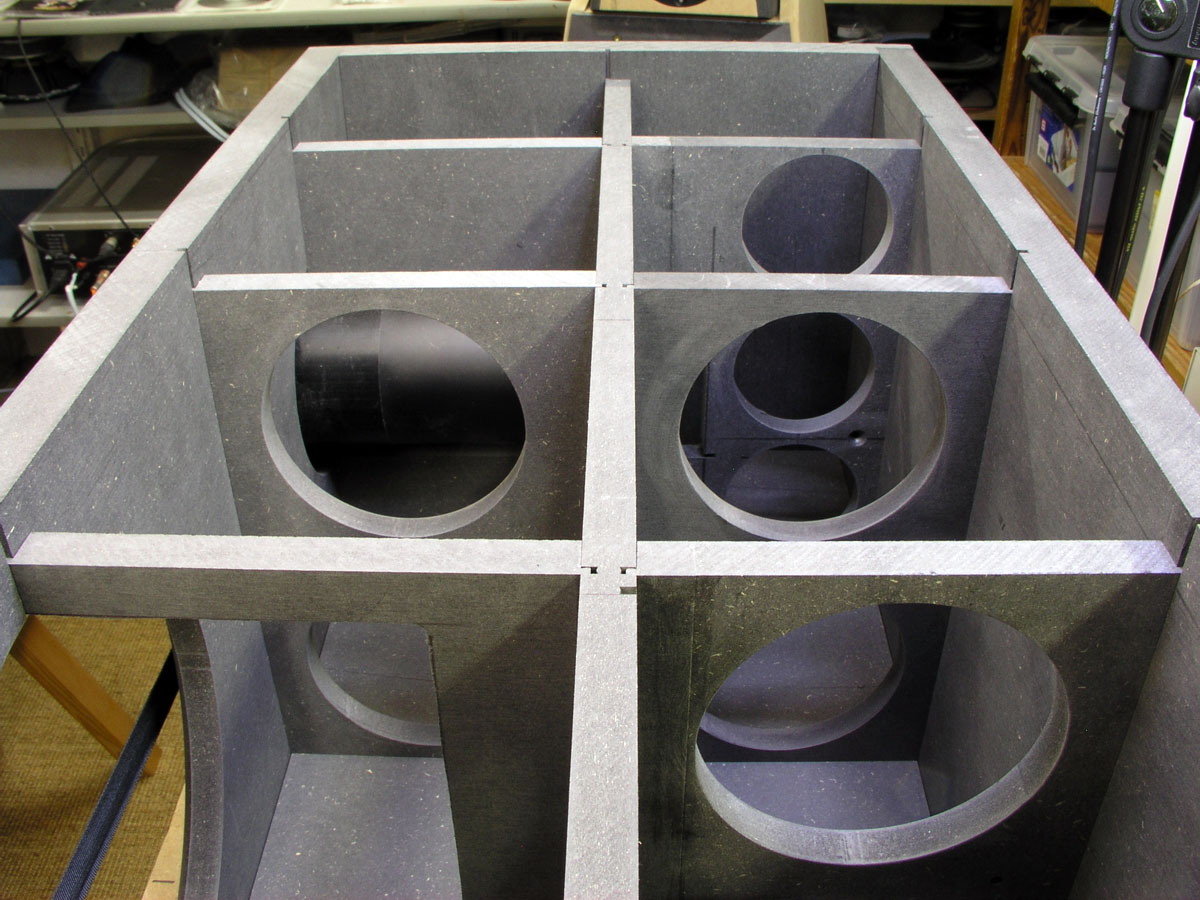
BASS CABS

Click image to view large
Wanting to keep overall volume as low as
possible, I decided on a vented bass cabinet for the ATS and being
able to compare the Jenzen-D and Jenzen-ATS the difference is less
than we might like to know. Bottom line is that this well controlled
10C77 works as well in a vented cab as a transmission line.
Bass
cab is made from 25 mm black MDF for front, top, bottom and rear
panel. Side panels are 2 x 15 mm black MDF. Bracings are made from 15
mm MDF.
Net volume is 66 litres minus volume taken by bracing,
driver and vent. As the damping material adds to the virtual volume
I've use 65 litres for box simulation. Port is Ø 100 mm and 200 mm
length. This makes a vent tuning of ~33 Hz and F3 = 32 Hz; maybe a bit
optimistic, but this driver does go deep. Due to the low Qt of the
driver it start a gently roll-off around 150 Hz and is some 1.5 dB
down at 40 Hz, something that fits the inevitable room-gain very well.
And don't forget to experiment with the LCR circuit in the bass
section, R3031, L3031 and C3031. Changing R3031 can provide further
improvement of in-room performance. You may experiment with box
simulation by downloading the excel file from
here.


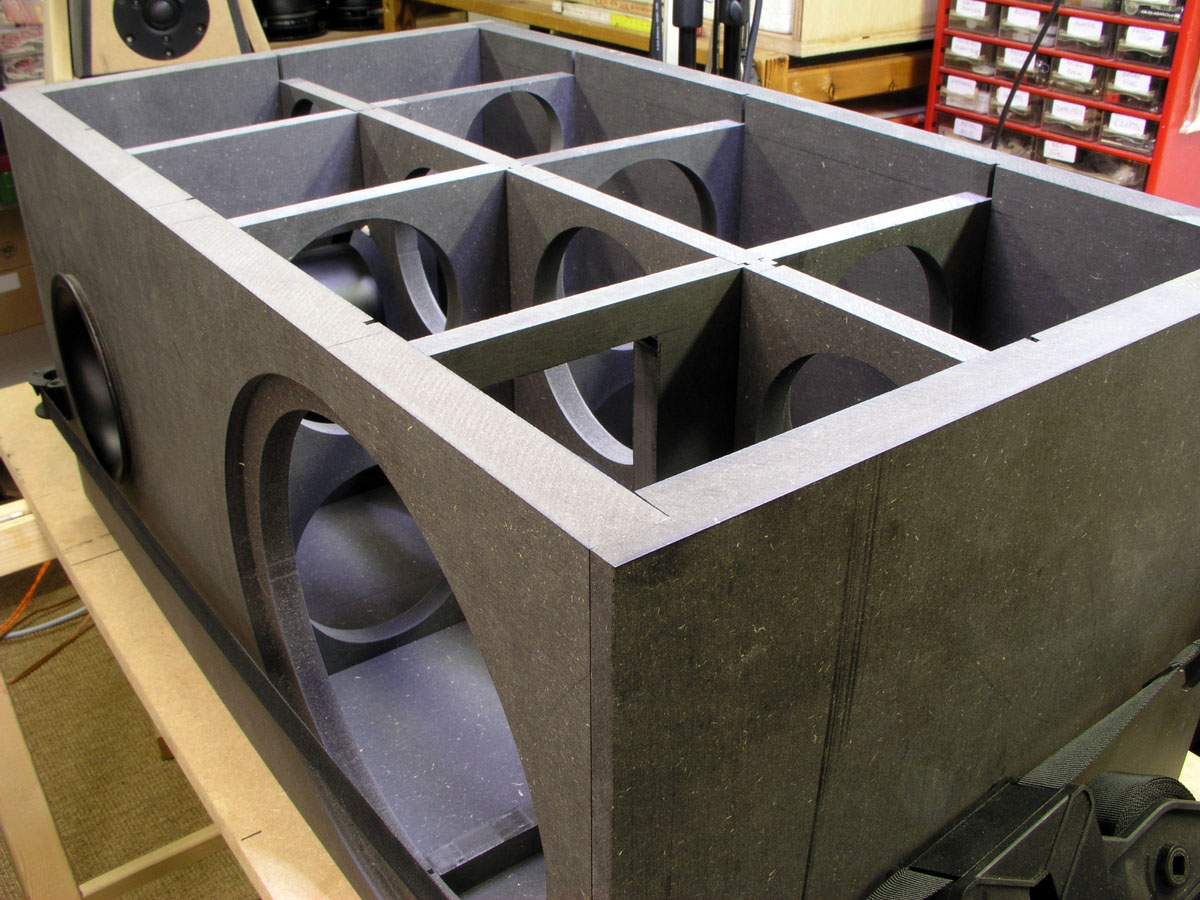
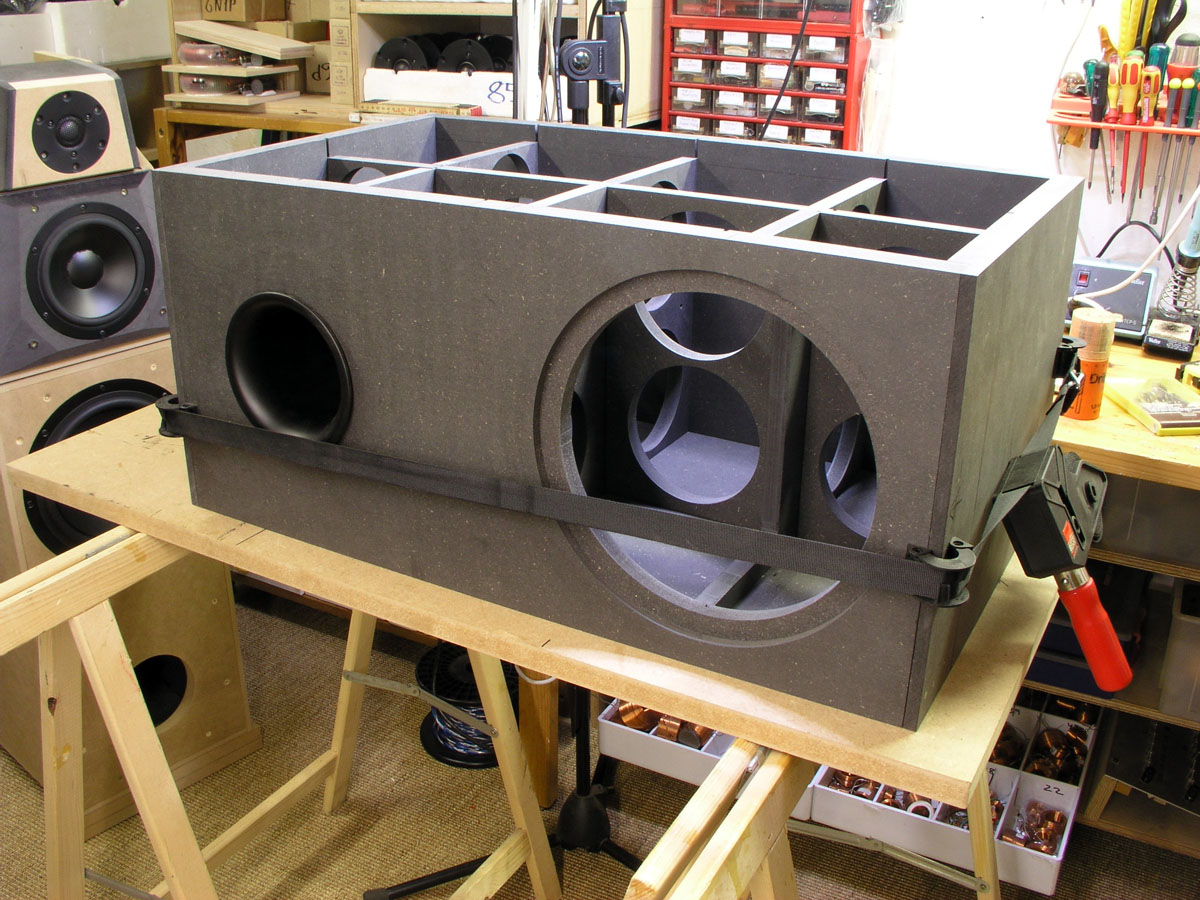
Bass cabinet construction.
MID-TWEETER CAB

Click image to view large
The mid-tweeter cabs are made from 16 mm MDF throughout. All internal
panels of the mid cab are added 4 mm bitumen pads to dampen cabinet
resonances. Net volume = 15 litres. If you hit 14-16 litres you're
safe. Chamfer driver front panel to around 17-18 mm depth as seen on
drawing. Chamfering is critical for getting target frequency response,
but all dimensions can be +/- 2 mm without impacting performance.
Leave 5 mm from edge of tweeter faceplate to edge of upper chamfering.
At 3 meter listening distance I have the tweeter tilted a bit forward,
10-12 mm block with Sorbothane under rear of tweeter cabinet.
No dimension on the rear part of tweeter cab is given as this can be
made to your liking as it has no impact on performance. Only make sure
the tweeter cab has some mass to reduce any vibration from
mid and bass cab. Both mid and tweeter cabs are placed on 3 pads of
3.2 mm (1/8") x Ø 30 mm Sorbothane pads (Duro 50) bought
here. This is a wonderful material. During development I had the
mid cabs placed directly on the bass cabs, but adding the Sorbothane
pads certainly had an impact on midrange clarity when played loud. Has
to said the prototype bass cabs are not as well braced as the final
cabs.
18H52 box simulation

Click image to view large
The mid cabs hold an
aperiodic tuning from
having stuffed vents on the rear panel, thus more likely to follow
closed box simulation as the vent is lightly stuffed with acoustilux. Follow link to read what an
acoustic vent is. Mid cab volume is approx. 15 litres and it doesn't
matter if it's 14 or 16 litres. The port is 50 Ø x 145 mm length and
lightly stuffed with a roll of acoustilux, 14 x 14 x 3 cm.
As
always:
Maintain
front panel dimensions, driver layout and front panel chamfering and
tilt. This is of vital
importance for the crossover to work as intended and in particular this
speaker's mid and tweeter cabs should follow the dimensions
carefully.
Go to
cabinet pics on construction page
CABINET DAMPING
Click image to view large |
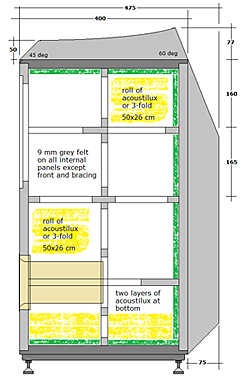
CABINET DAMPING
Following the kit is 2 sqm of ~8
mm grey felt and 1.5 sqm 30 mm acoustilux.
Bass cabs:
Bass cabs are added felt on all
internal panels except front and bracings. At bottom 2 layers
of 30 mm acoustilux.
Two rolls of 30 mm acoustilux is
placed as seen on drawing.
Mid cabs:
All internal panels are added 4 mm bitumen pads glued with
elastic vinyl glue. Be generous with the glue.
All internal
panels further added ~8 mm grey felt.
A roll of acoustilux
is placed below port, dimension 25 x 30 cm.
Bitumen pads can be ordered at Jantzen Audio too. Use 2 layers
of 2 mm bitumen pads, "panel STANDARD". Be prepared for some
additional shipping weight. Order 1 sqm for two mid cabs.
Bitumen pads are
not needed for the bass cab due to extensive bracing.
|
Measurements
Back to index
Measurements may give us
an idea of tonal balance of a system, i.e. too much or too little
energy in certain areas. Measurements may tell us about bass extension
if far-field measurements are merged with near-field measurements. In
addition to this ports may contribute to bass extension. Most of us
diy'ers do not have access to an anechoic room for full-range
measurements from 20-20000 Hz. What cannot be seen is what
kind of bass performance we get in a given room. Bass performance is
highly dependent on in-room placement of your speaker and the same
speaker can be boomy in one place and lean in another. Actual SPL
level at 1 meter distance and 2.8V input is useful for en estimate of
system sensitivity and combined with the impedance profile may give an
idea of how powerful an amplifier is needed to drive the speaker to
adequate levels. What measurements do not tell is the very sound of
the speaker unless displaying serious linear distortion. The level of
transparency, the ability to resolve micro-details, the
"speed" of the bass, etc., cannot be derived from these
data. Distortion measurements rarely tell anything unless seriously
bad and most modern drivers display low distortion within their
specified operating range. Many people put way too much into
these graphs and my comments here are only meant as warning against
over-interpretation. There are way more to good sound than what can be
extracted from a few graphs. Every graph needs interpretation in terms
of what it means sonically and how it impacts our choice of mating
drivers, cabinet and crossover design.
Left: 18H52 response from various
baffles: Green = flat baffle as a true copy of the Alexia front
panel.
This less than ideal response was persistent from a range of
middrivers suggesting less than ideal geometry.
By adding a 25 mm chamfered front panel the red curve could be
produced making crossover work much easier.
Right: Middriver impedance in cabinet from un-stuffed port (red) and
stuffed port (green), 130 x 170 x 30 mm Acoustilux roll added.
Left: Bass system impedance without crossover. Port tuning around 34
Hz. Right: Final system impedance. An easy load not going below 5
ohms.
Left: 6640 tweeter response (no xover)
from 1) flush with mid cab (orange), 2) + 9 mm (green) and 3) + 18 mm
(red).
The 6640 does really well on this panel and maintain response within
+/- 1 dB regardless of retraction.
Right: Basic tweeter response and response driven from crossover.
Readings not normalised for 2.8V/1 meter.
The
Jenzen ATS Crossover Kit
Back to index
All technical
questions at:
troels.gravesen@hotmail.com
Buy Audio
Technology bass and mids directly from factory: mail@audiotechnology.dk
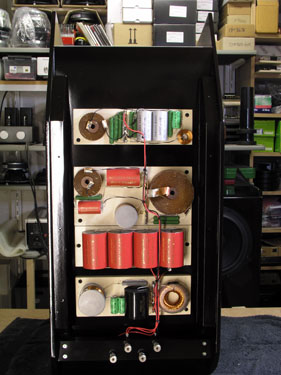
Crossover
Modular Layout
Back to index
The crossover for the ATS is
placed on the rear panel between side panel "wings", making tweaking
as easy as ever.
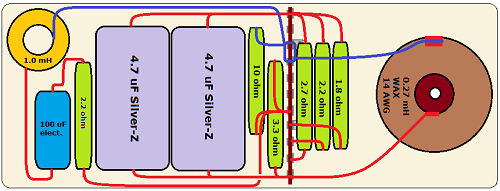
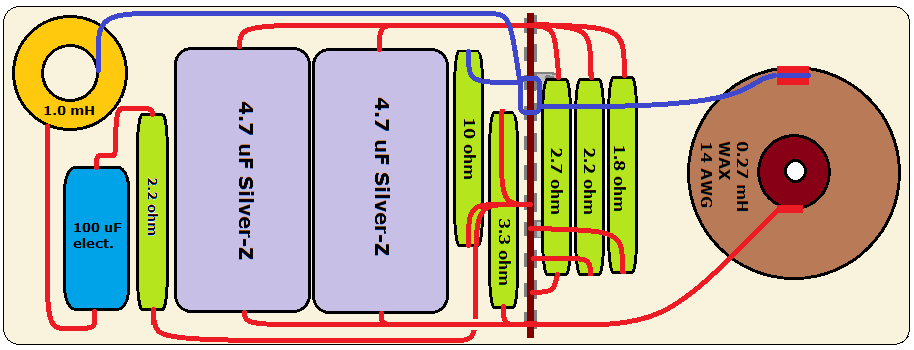
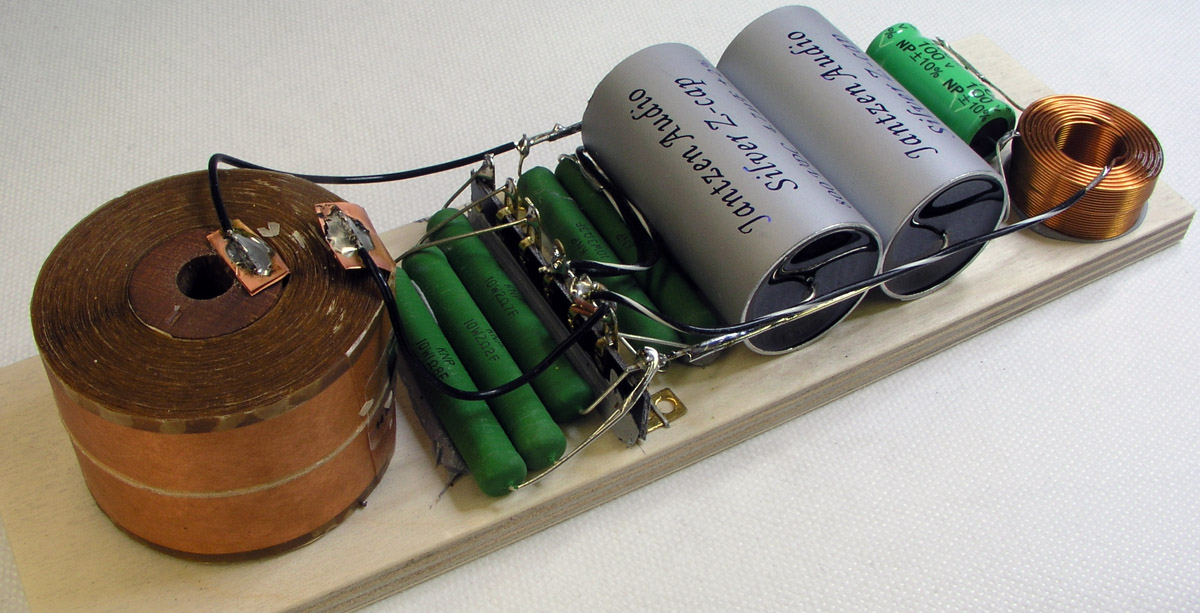
Tweeter section. Click image to view large.
Midrange section. Click image to view large.
Actually I made the M section into two
sections as the 88 uF are sometimes used in other
experiments.
On the images below you can see I turned the mid
section upside-down to increase distance between coils.
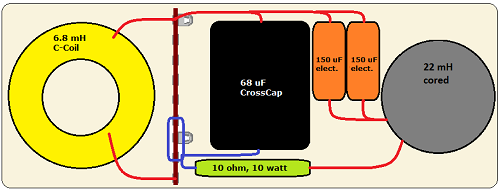
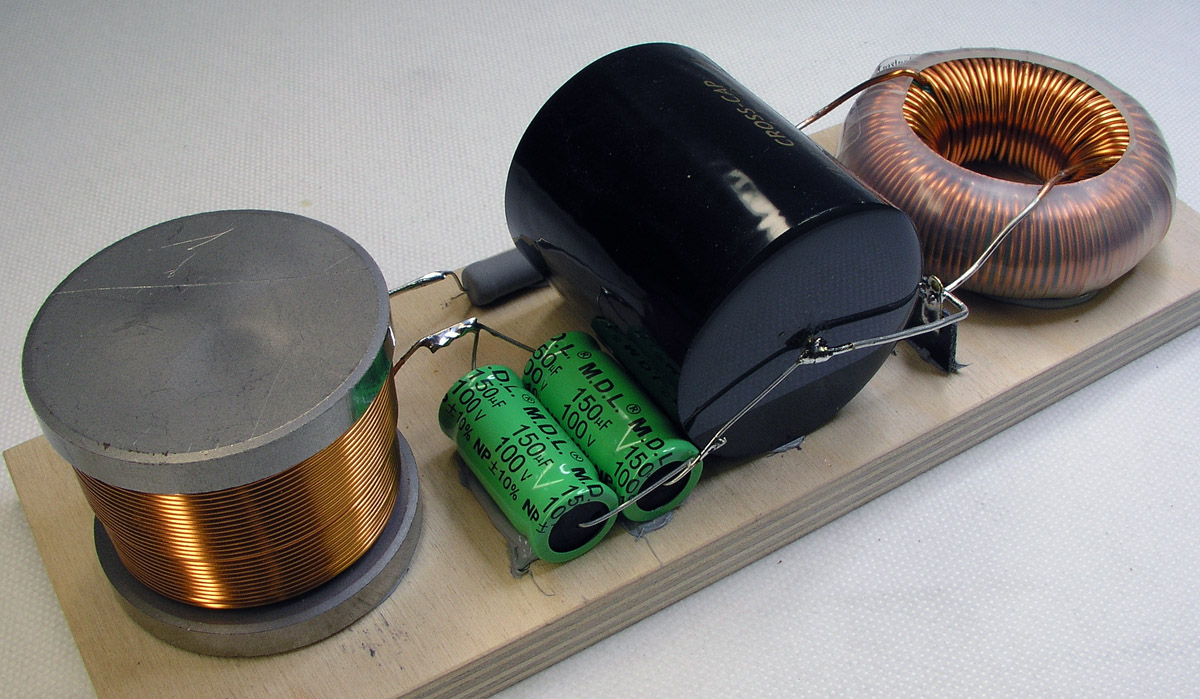
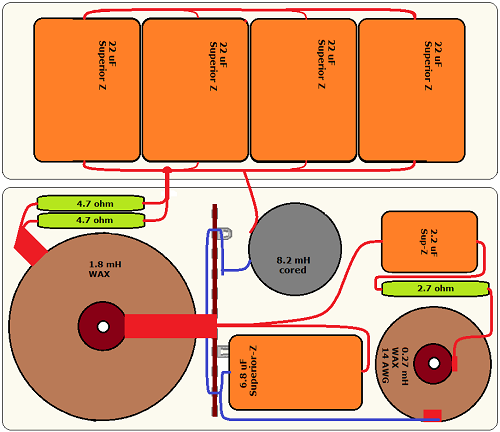
Bass section. Click image to view large.
The two 150 uF electrolytics have now been replaced by 3 x 100 uF
Premium Elko 5%, smooth foil caos.
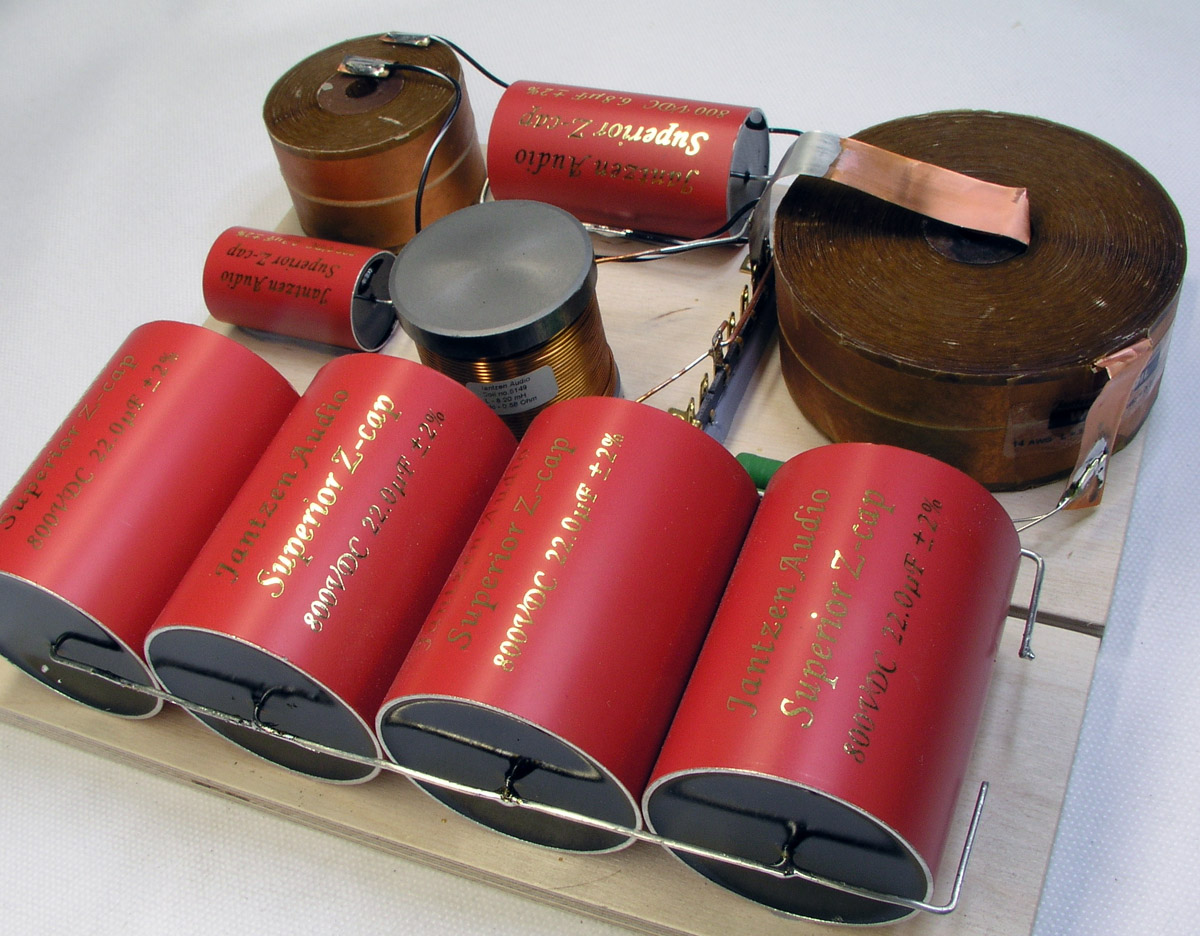
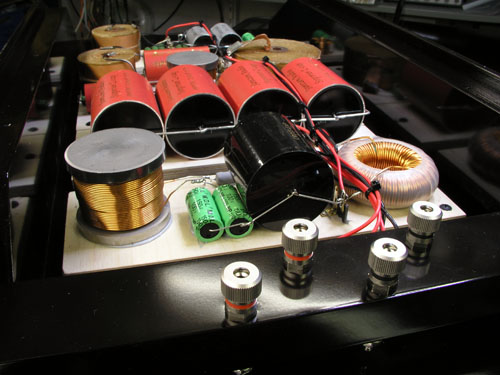
Wiring
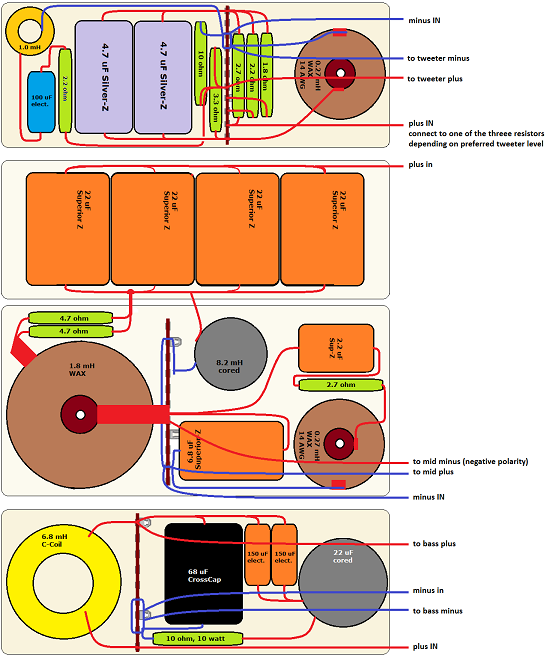
Wiring, click image to view large
Crossover Pics

Left: Tweeter section. Right: Bass section.
Click images to view
large 
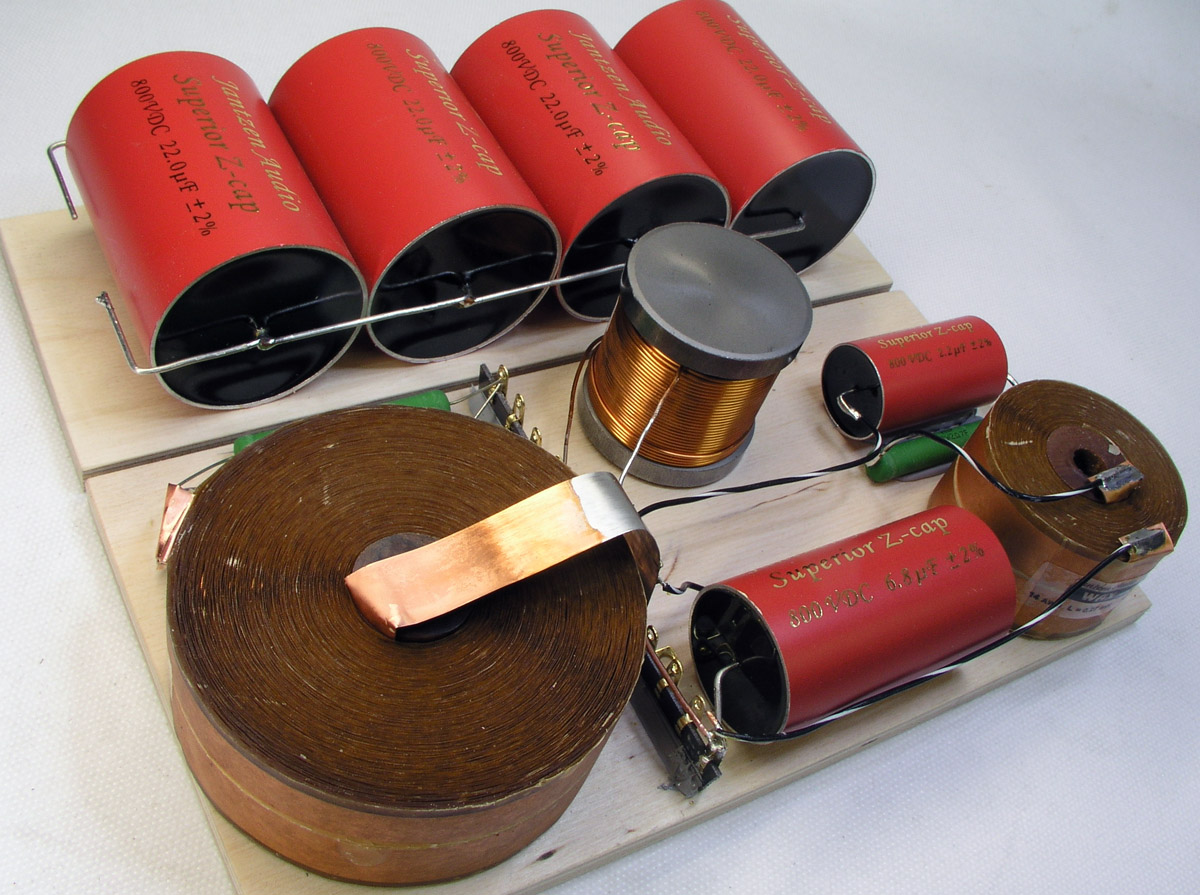
Mid section seen from two angles. Pay notice
the wiring of the 8.2 mH coil is wrong here. Should be connected to
ground and the 88 uF series caps. Follow drawings.
Mounting of the crossover

The great thing about having the crossover on the rear panels is
space. Lots of space! Coils can be wide apart and crossover tweaking
is as easy as ever.
For wiring I use silver plated copper in teflon
throughout. Some may thing we need humongous 5 mm^2 wire for the bass
driver - and mid. We don't. Wires should be as thick as needed - no
more. The wires here will carry the current to a 2000 watts boiling
kettle without trouble and even for a speaker like this it's overkill.
Back to
index
|