Purifi Be
or go to -
Purifi-Fa
Copyright 2023 © Troels Gravesen
Go to on this page:
DRIVERS CROSSOVER CABINET WORKSHOP PICS MEASUREMENTS SPEAKER-KIT CROSSOVER LAYOUT
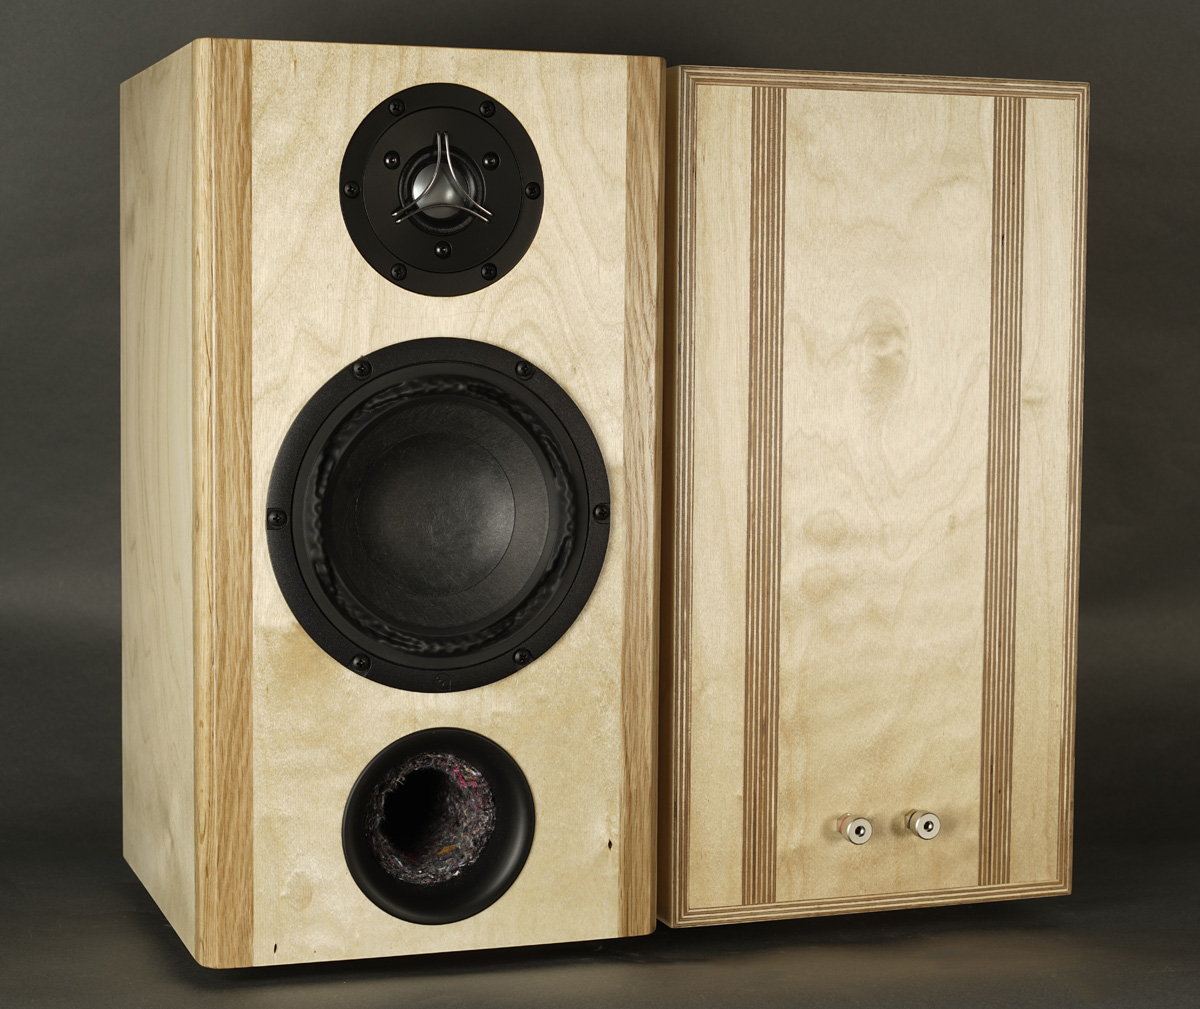
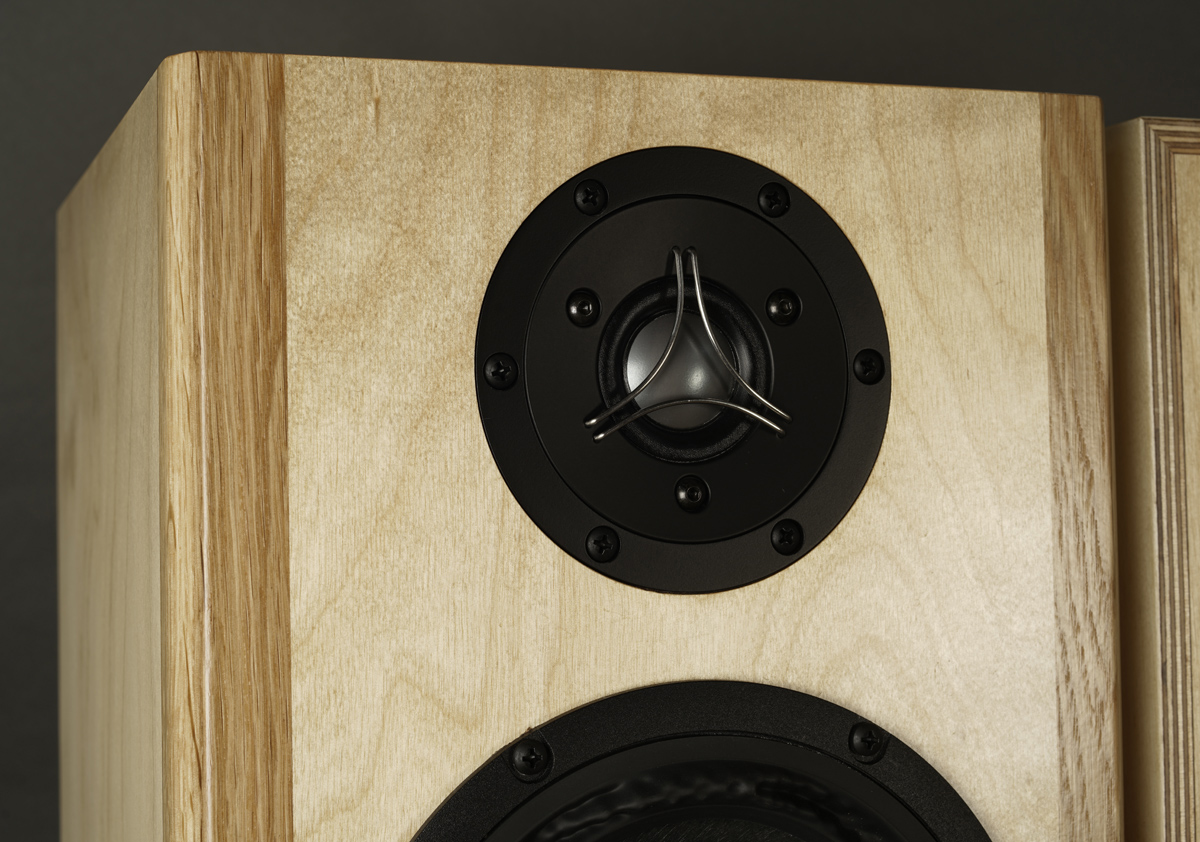
The small Purifi-6R two-way has proven successful, but due to the unavailability of the Viawave tweeters (manufactured in
Russia) an alternative is now introduced. Here I chose the
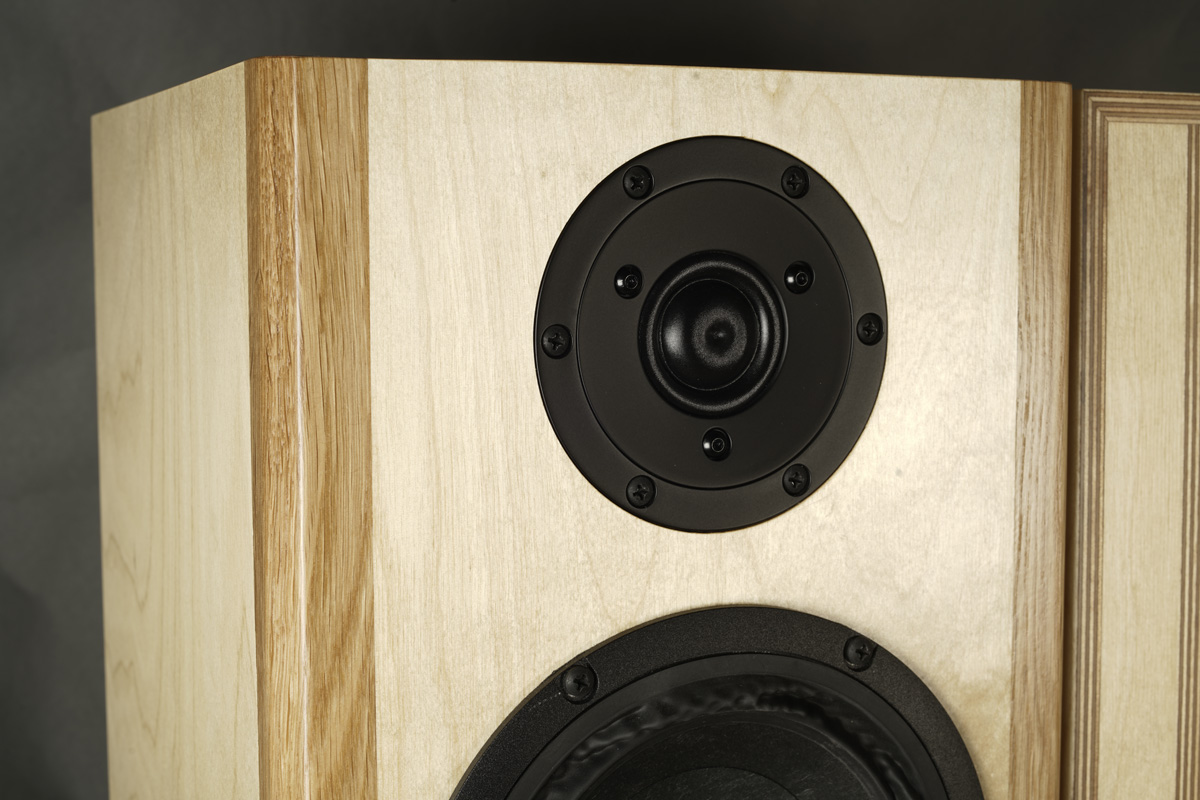
magnificent SBAcoustics TW29BN-B-4 tweeter.
After finishing the speakers I had the chance of comparing the two I
would say the choice between these two is a matter of taste and beliefs.
Ribbon
tweeters have had a steady crowd of followers for decades - and for good
reasons as earlier soft-domes quite often left quite a lot to be
desired, not to forget horrific examples of hard-domes from aluminum and
titanium, but with state of the art domes we have come a loooong way.
I've had the question many times if a Be dome would not give more
"sparkle" to the sound - and the answer is NO. On the contrary. If we
want more sparkle and tizz, decrease tweeter attenuation or use a poor
capacitor, then we're back to the Eighties.


Coming directly from the newly released
FUSION-22, I used the same records for reference. The bass from the
Purifi midbass appears as deep as the FUSION-22, albeit not with the
same power and fullness at loud levels. Size matters, but a lot of
people have to live with much less than 105 litre gross volume of the
FUSION-22.
As always, the Purifi drivers never fails to deliver an astonishing
level of midrange clarity without having any specific tonal colour, not
dry, not hard, not clean, not lush, but utterly ear-friendly, which
tells that well executed wood pulp is still the most versatile material
for speaker cones.
Needless to say the Be dome delivers crystal clear treble without ever
being hard or tizzy, unless source material is poorly recorded and
processed.
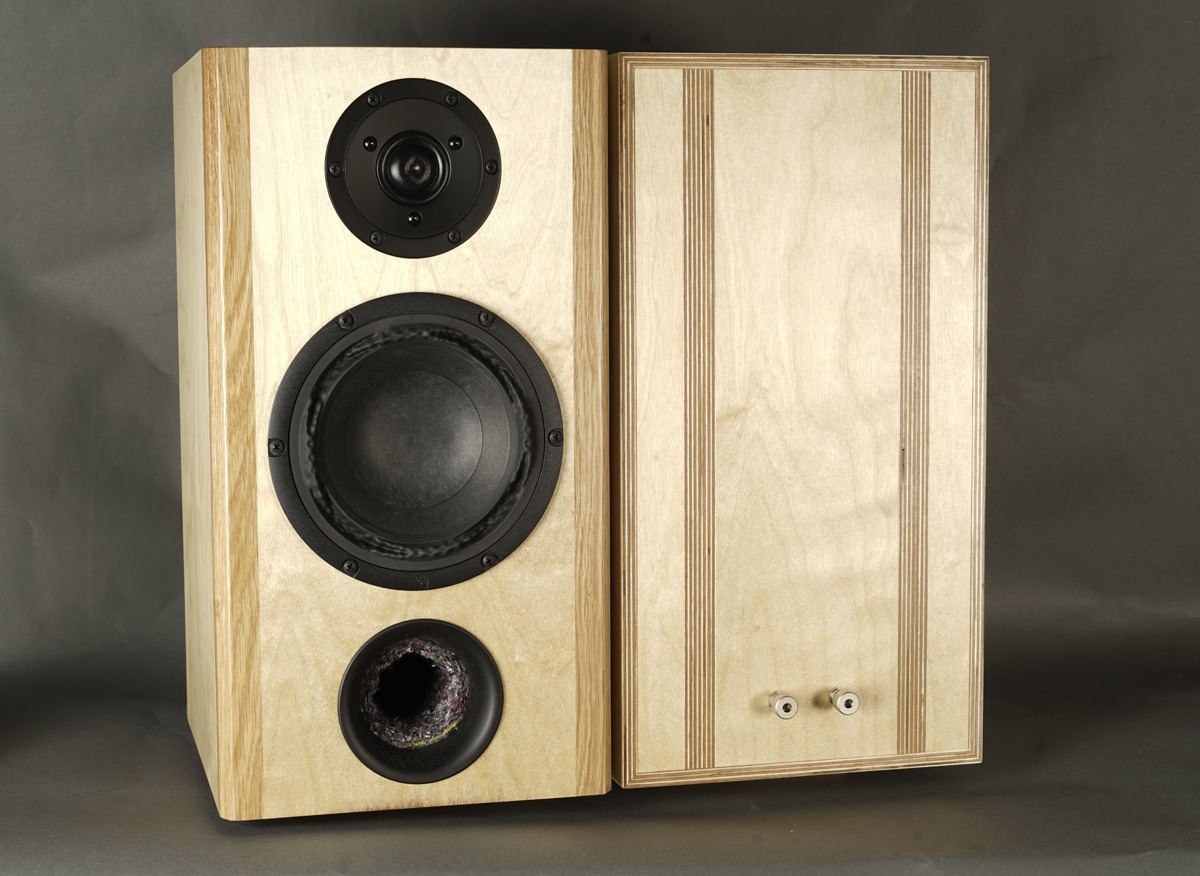
Basics:
2-driver speaker.
Dimensions: 24 x 26 x 45 cm, WxDxH.
System sensitivity: ~86-87 dB/2.8V/1 meter.
Impedance: 4-8 Ohms.
Power requirement: 20+ watts/channel.
Power handling: 100 watts.
Useful links (Please
follow all links before e-mailing!):
http://www.troelsgravesen.dk/tips.htm
http://www.troelsgravesen.dk/tips.htm#CONSTRUCTION_OF_CROSSOVERS
http://www.troelsgravesen.dk/crossovers.htm
http://www.troelsgravesen.dk/LCR-RC.htm
http://www.troelsgravesen.dk/Inverted-Polarity.htm
http://www.troelsgravesen.dk/choices.htm
http://www.troelsgravesen.dk/power-handling.htm
Download specs here:
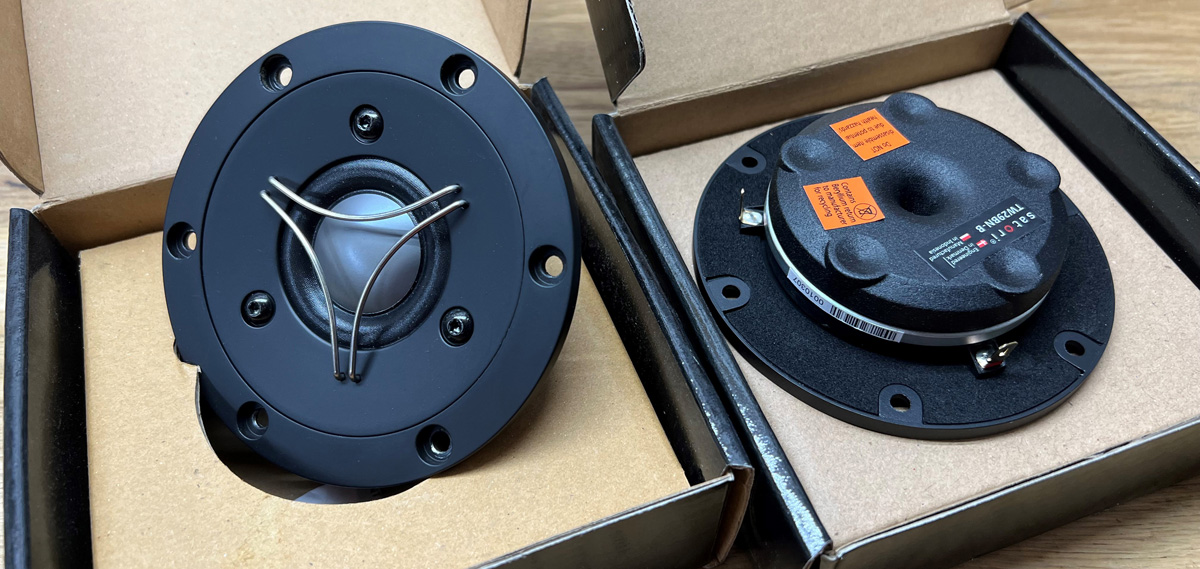
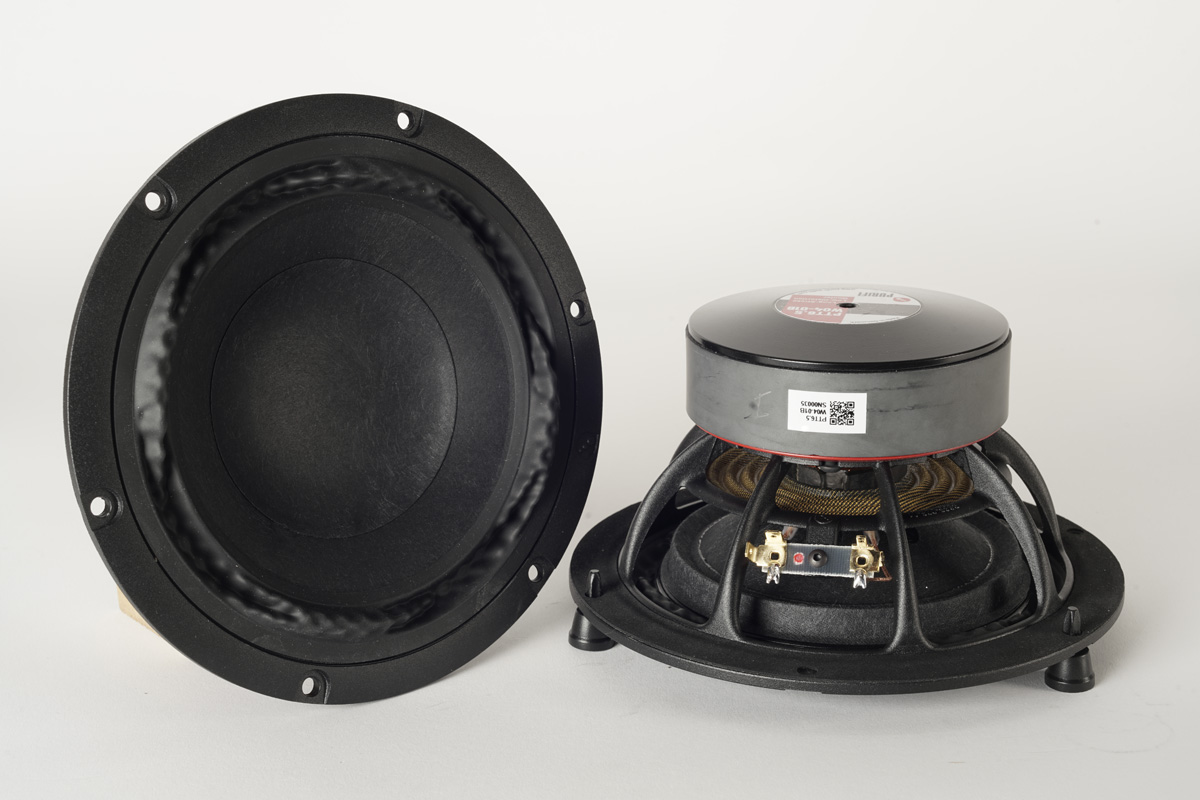
PTT6.5X04-NFA-01
TW29BN-B-4
The TW29BN-B-8 canNOT be used here!
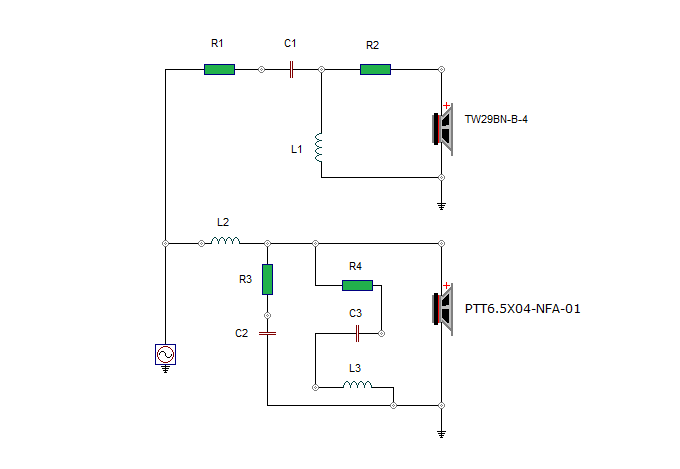
On paper a 2nd order crossover, on the acoustical side a 4th order
(LR4), thus positive polarity for both drivers.
Initially I chose a larger value for L2 to tame the 800-1200 Hz range,
which - as often is the case - produce a slightly recessed middle-mid
(320-640 Hz). A smaller value followed by a mild LCR circuit produced a
nothing less than perfect linear response - and the sound was just
right. Exceptional midrange clarity and tranparency. And by a mild LCR
circuit I mean mild. The value of R4 is really high only attenuating the
response around 800 Hz by 1-1.5 dB. And it matters, in particular on
female vocals.
Cabinet is a little deeper than Purifi-6R but otherwise the same, so
go to page.
Placement of drivers is the same.
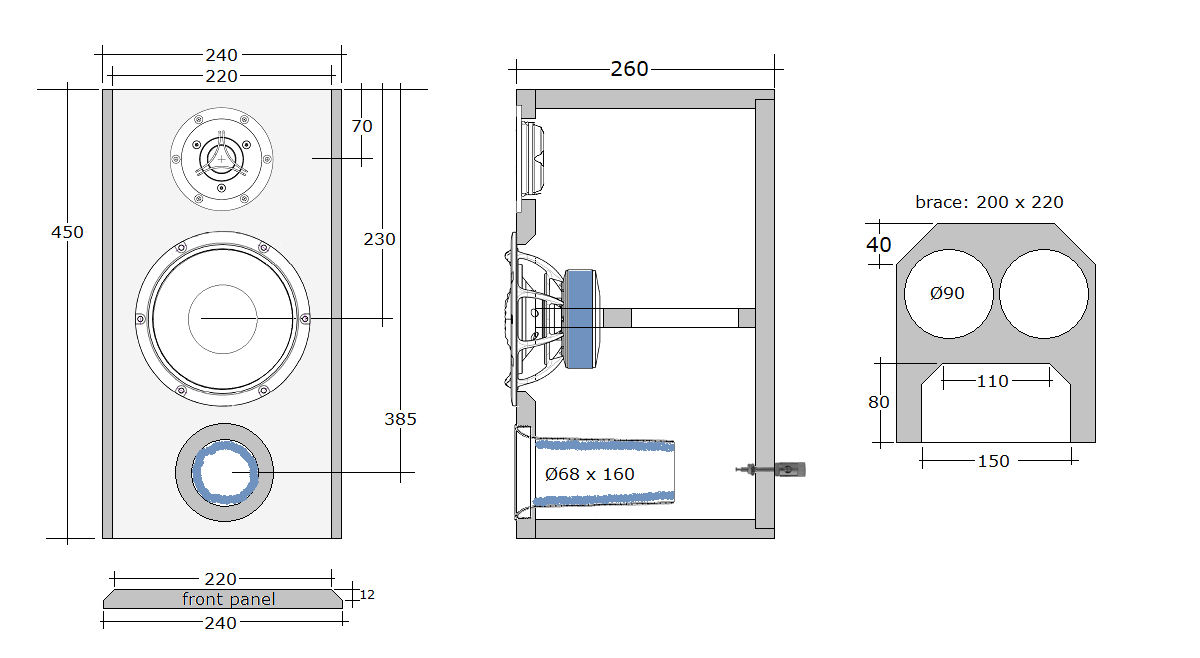
Crossover placement on rear panel.
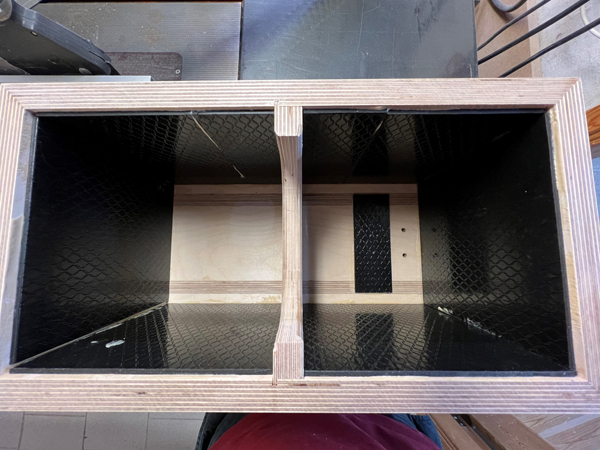
Workshop pics (a few)
BACK TO INDEX
Look for cabinet construction on Purifi-6R page.
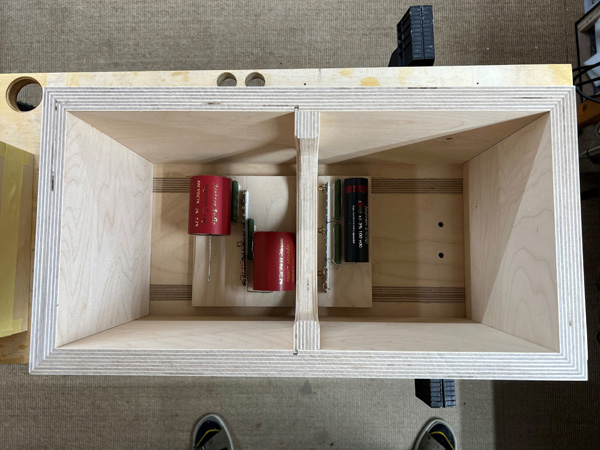
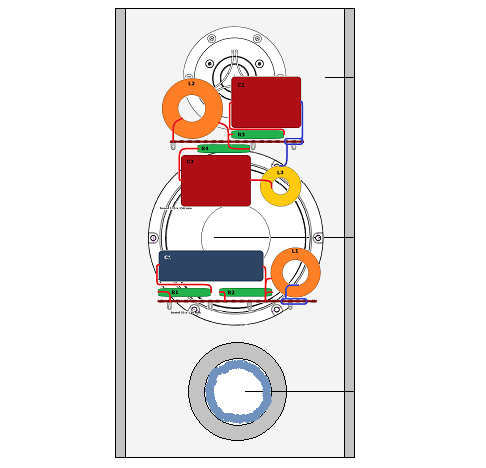
Checking out the crossover placement.
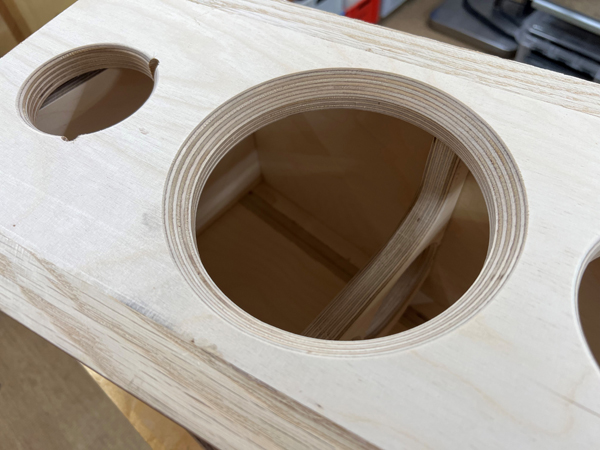
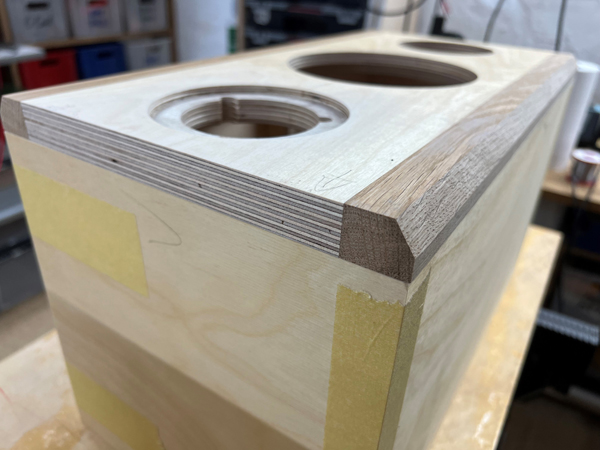
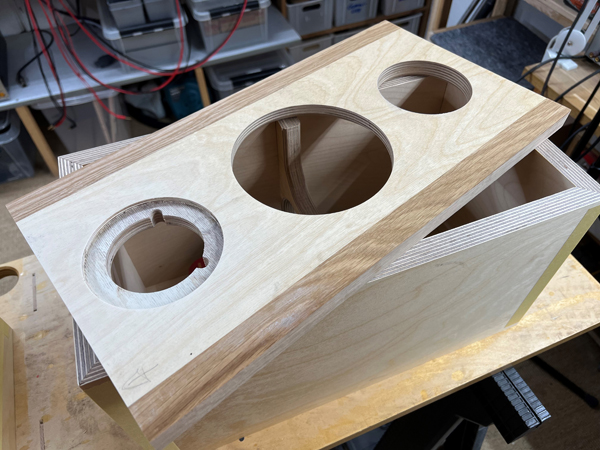
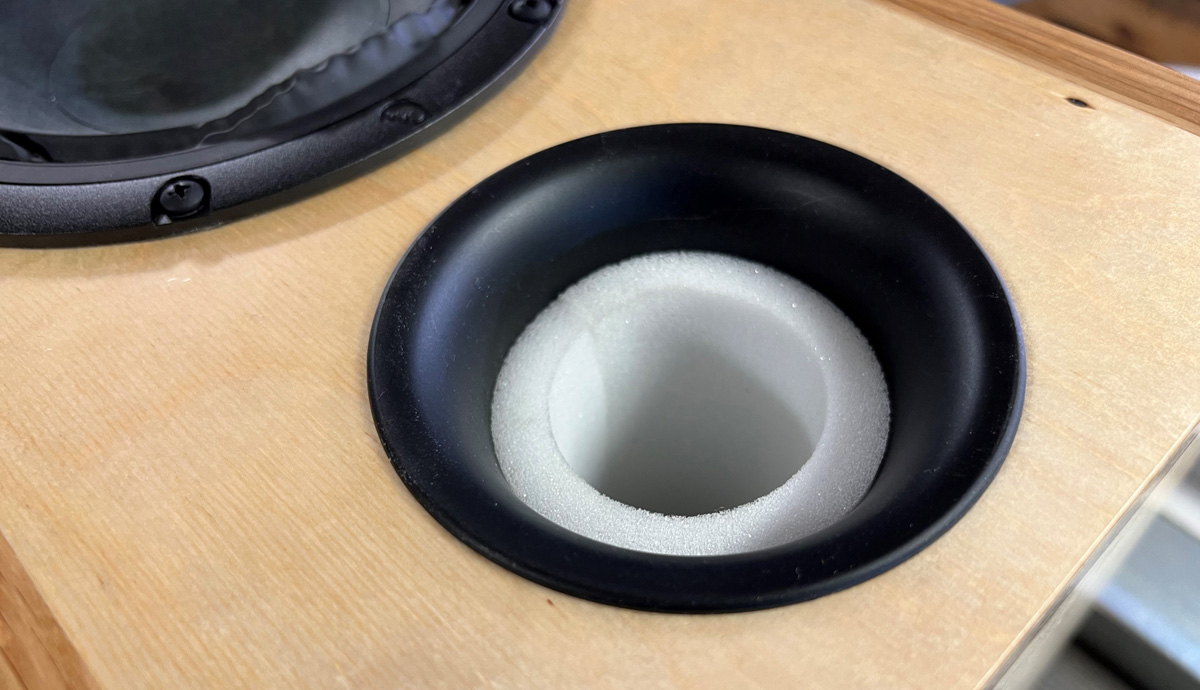
Remember to chamfer the Purifi driver holes, 45 deg. to some 10-12 mm
depth.
Chamfering the front panel is not critical, here 40 deg. table saw
setting to a depth of ~12 mm.
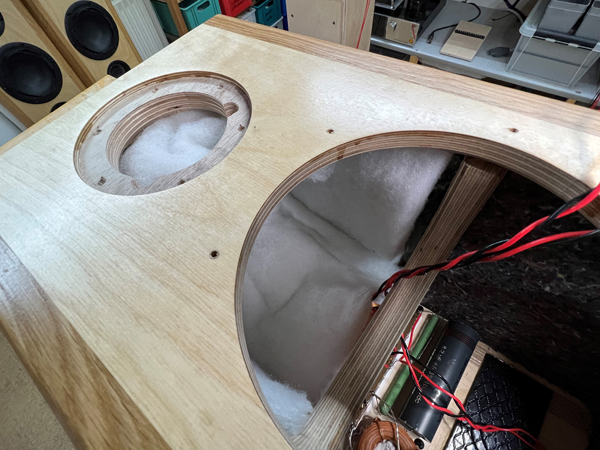
I strongly suggest bitumen pads.
Make 12 pcs 19 x 21 cm from 2 sheets of 50x50 cm. Use
vinyl glue.
The strip on the rear panel was what was left.
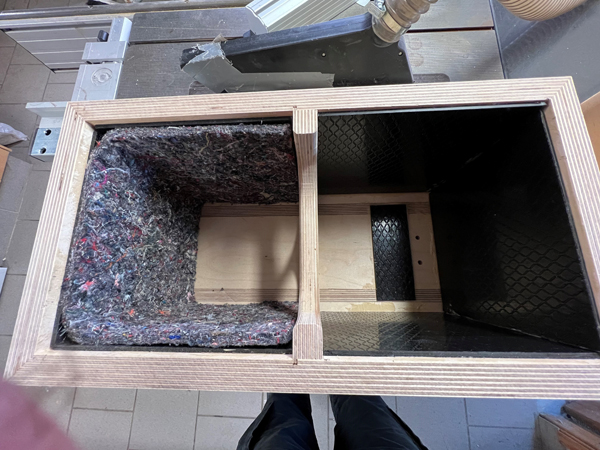
Cut 4 pcs 21 x 55 cm felt material and add to cabinets as seen on
images. Use vinyl glue again.
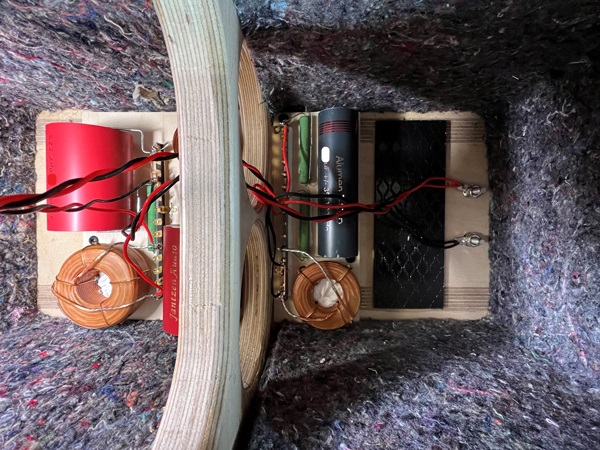

Left: Place crossovers on rear panel.
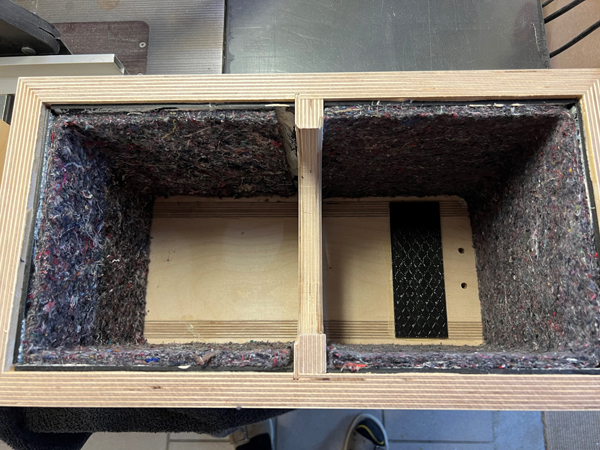
Acoustilux:
Cut 7 pieces of 18 x 50 cm acoustilux. Cut one of these in half.
Add 1 piece as seen on photo above covering upper half sides and rear
(cover xover).
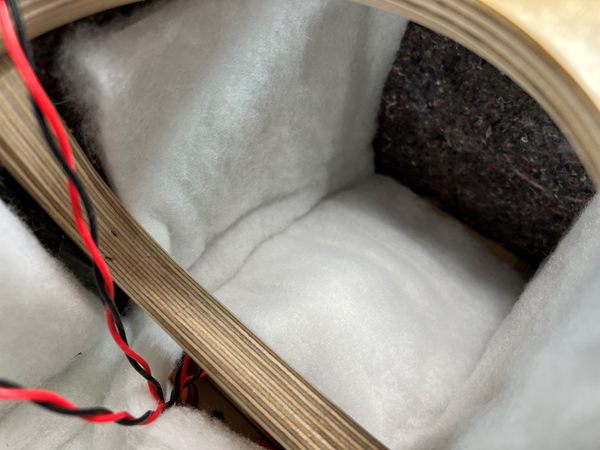
Left: Add 1 piece 18x50 on top covering x-over, top and up under
tweeter.
Right: Add 1 piece 18x50 to bottom section covering sides and rear
panel.
Add 1 piece 18 x 25 to cover bottom below port.
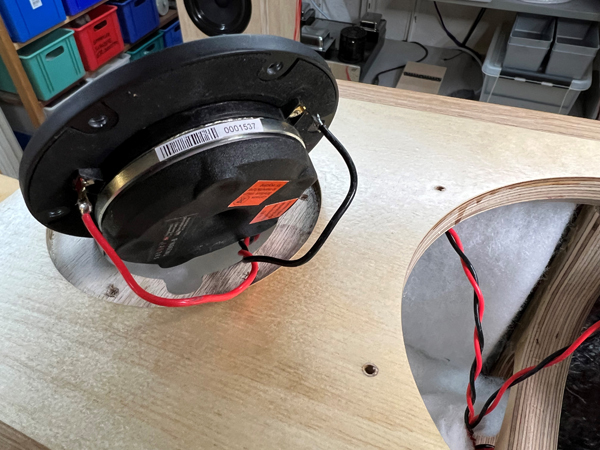
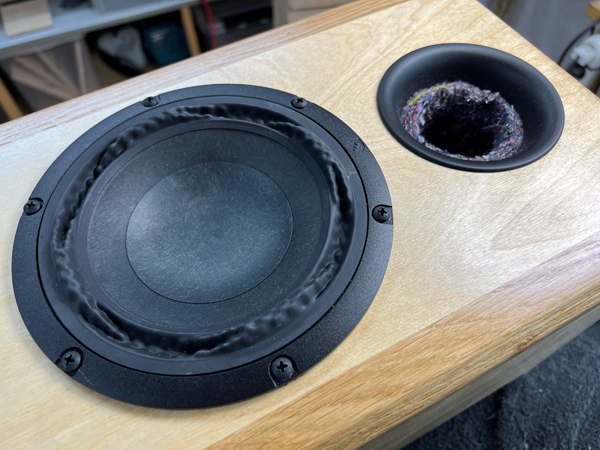
Insert port and connect drivers and add felt to the port.

People have complained about the look of the felt in the port tube. If this troubles your sense of aesthetics, use 10 mm polyester foam. Unfortunately I couldn't get it in black...
A few comments on
MEASUREMENTS before you start interpreting the readings below.
First of all, if we think measurements will
tell us how a speaker sounds, we're wrong. The perception of sound is
way too subjective to be reflected in any measurements we can perform. A
loudspeaker system is meant to give us a satisfying idea of an acoustic
event and for some people a pair of 5 USD ear-plugs are enough, others
spend 200 kUSD on a truly full-range pair of speakers - and the latter
may not be happier than the former.
Measurements may give us an idea of tonal balance of a system, i.e. too
much or too little energy in certain areas, although dispersion
characteristics play a vital role here. A two-way 7+1 and a three-way
7+4+1 may display similar horizontal dispersion, yet sound very
different. Measurements may tell us about bass extension if far-field
measurements are merged with near-field measurements. In addition to
this, ports may contribute to bass extension. Most of we diy'ers do not
have access to an anechoic room for full-range measurements from
20-20000 Hz.
What cannot be seen is what kind of bass performance we get in a given
room. Bass performance is highly dependent on in-room placement of your
speaker and the same speaker can be boomy in one place and lean in
another. Actual SPL level at 1 meter distance and 2.8V input is useful
for en estimate of system sensitivity and combined with the impedance
profile may give an idea of how powerful an amplifier is needed to drive
the speaker to adequate levels.
What measurements do not tell is the very sound of the speaker unless
displaying serious linear distortion. The level of transparency, the
ability to resolve micro-details, the "speed" of the bass, etc., cannot
be derived from these data. Distortion measurements rarely tell much
unless seriously bad, and most modern drivers display low distortion
within their specified operating range.
Many people put way too much into these graphs and my comments here are
only meant as warning against over-interpretation. There are more to
good sound than what can be extracted from a few graphs. Every graph
needs interpretation in terms of what it means sonically and how it
impacts our choice of mating drivers, cabinet and crossover design.
What measurements certainly do not tell is the sonic signature of the
speaker, because speaker cones made from polypropylene, aluminum,
Kevlar, paper, glass fiber, carbon fiber, magnesium, ceramics or even
diamonds all have their way of adding spices to the stew. Nor do
measurements tell what impact the quality of the crossover components
add to the sound, from state of the art components to the cheapest of
coils and caps, they all measure the same if values are correct, yet
sound very different.
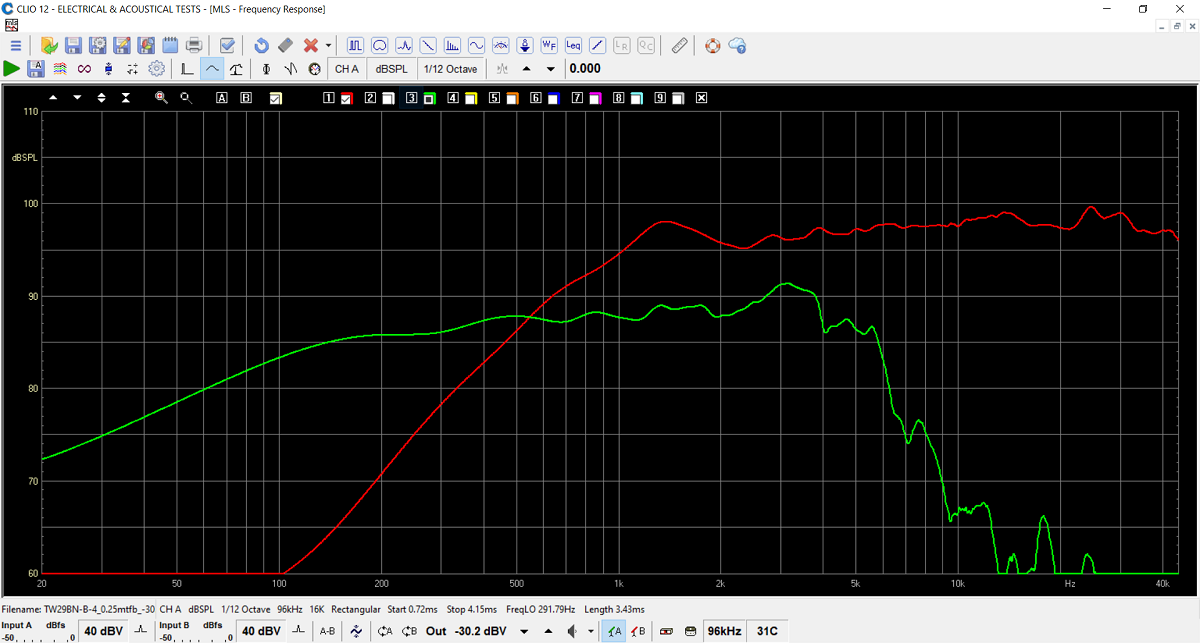
For those interested, the initial response of
driver on actual baffle.
As can be seen this Be dome really does more than 40kHz.
SPL measured at 0.5 m distance between
drivers.
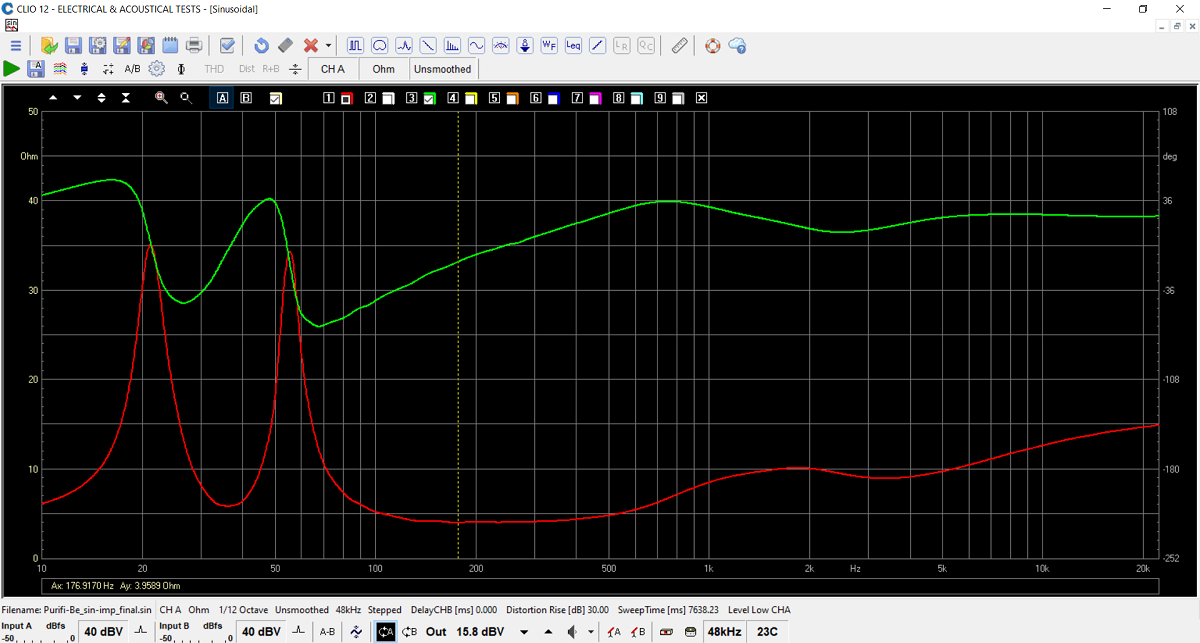
Final system impedance. Minimum 4 Ohms at 175 Hz.

Horizontal dispersion at 0, 10, 20 and 30
deg. off-axis.
-BT(green)-T(or)_1200.png)
Something you rarely see: Vertical dispersion measured at
only 0.5 meter
distance at bass height ( red), between drivers (green) and tweeter
height (orange).
All kit and component prices may be subject to
change and are always to be confirmed by Jantzen Audio Denmark.
I strongly suggest adding the bitumen pads (anti-drum-panel). It adds
weight and reduce panel vibration - and these magnificent drivers
deserves the very best.
Kits can always be bought with/without drivers, or some of the drivers.
Download Complete Kit Sale Presentations:
![]()
All technical questions to troels.gravesen@hotmail.com
All questions regarding purchase of kits, please mail Jantzen Audio at contact@jantzen-audio.com
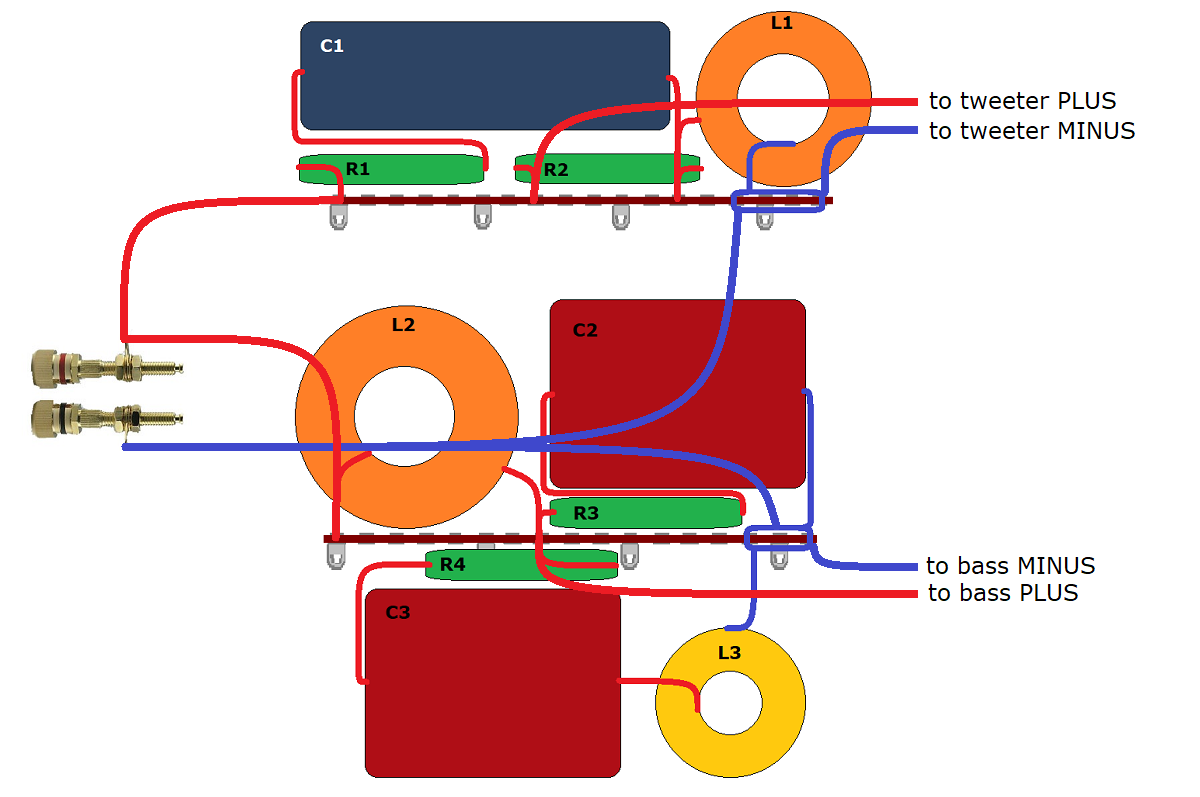
CROSSOVER-LAYOUT
BACK TO INDEX
Check this out before start making crossovers:
http://www.troelsgravesen.dk/tips.htm#CONSTRUCTION_OF_CROSSOVERS
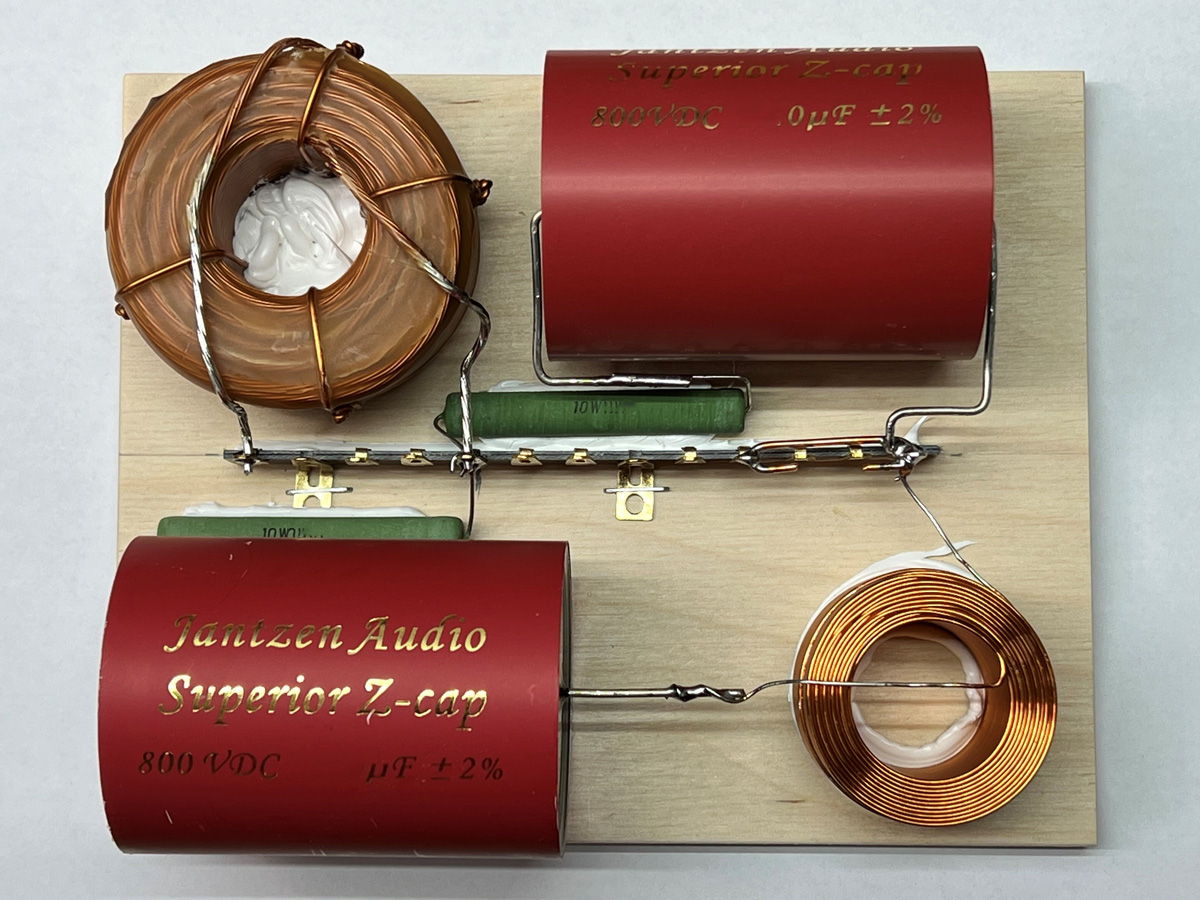
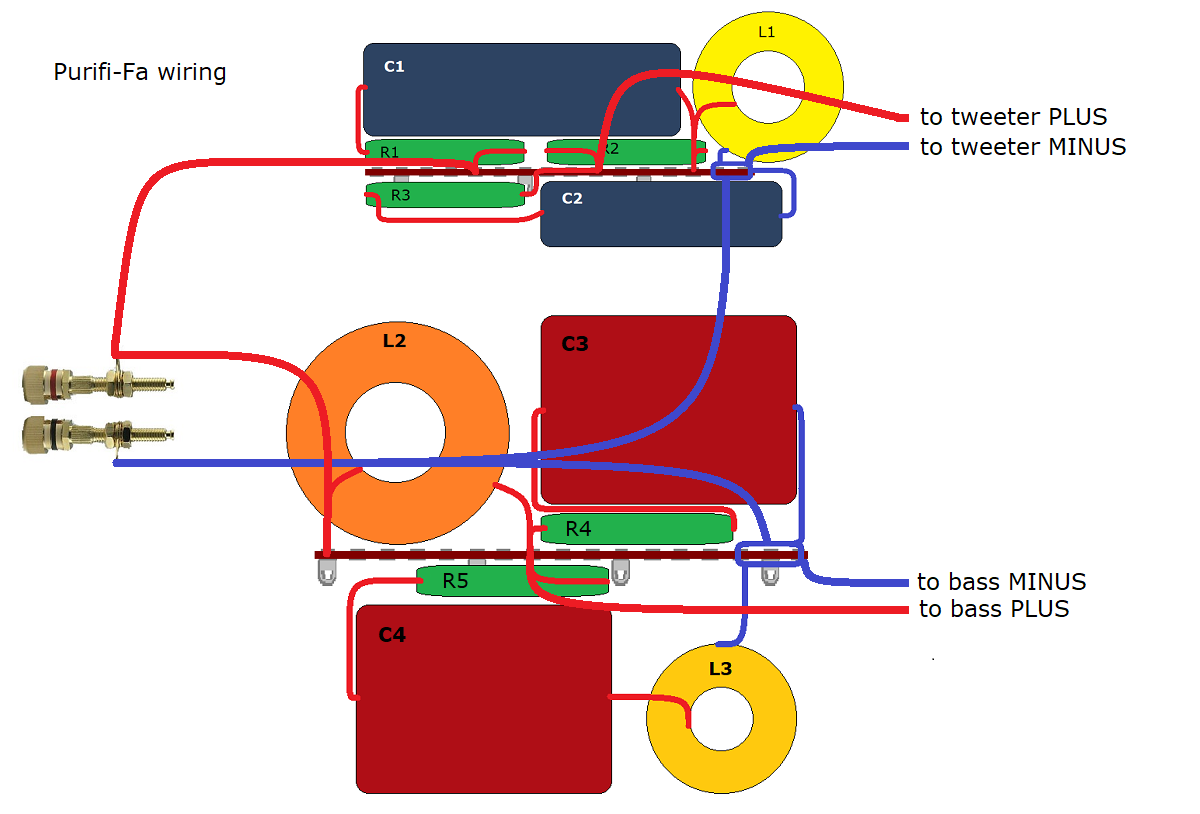
Tweeter layout.
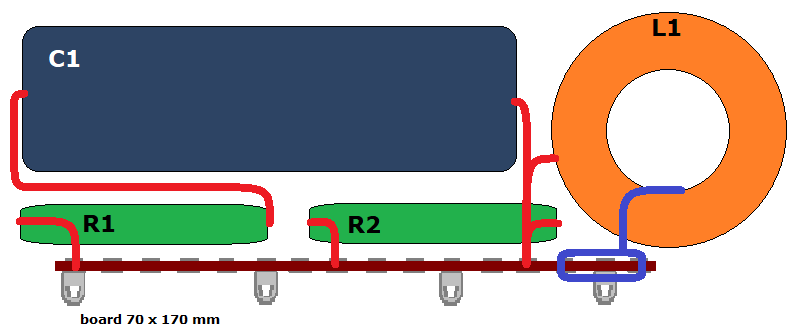
Cut the solder tag strips in two, 125 mm and 138 mm. The longest for the
tweeter xover.
The tag strip is 263 mm long.
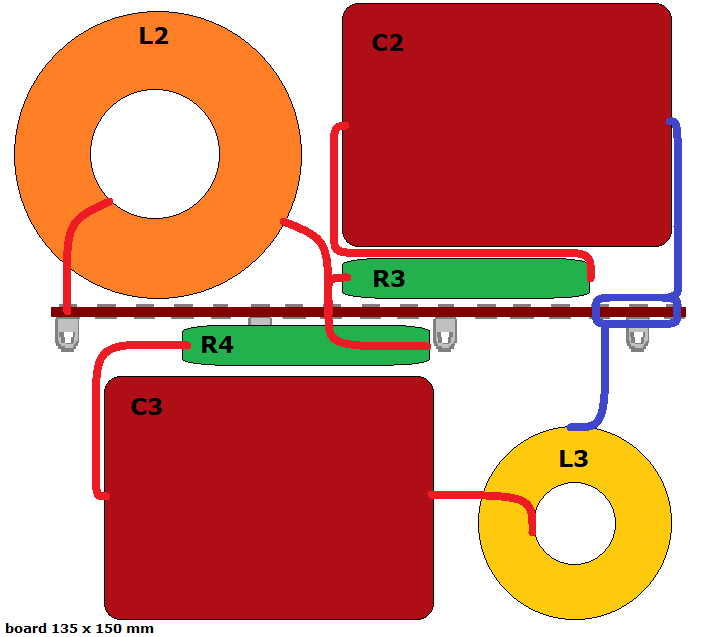
Bass layout
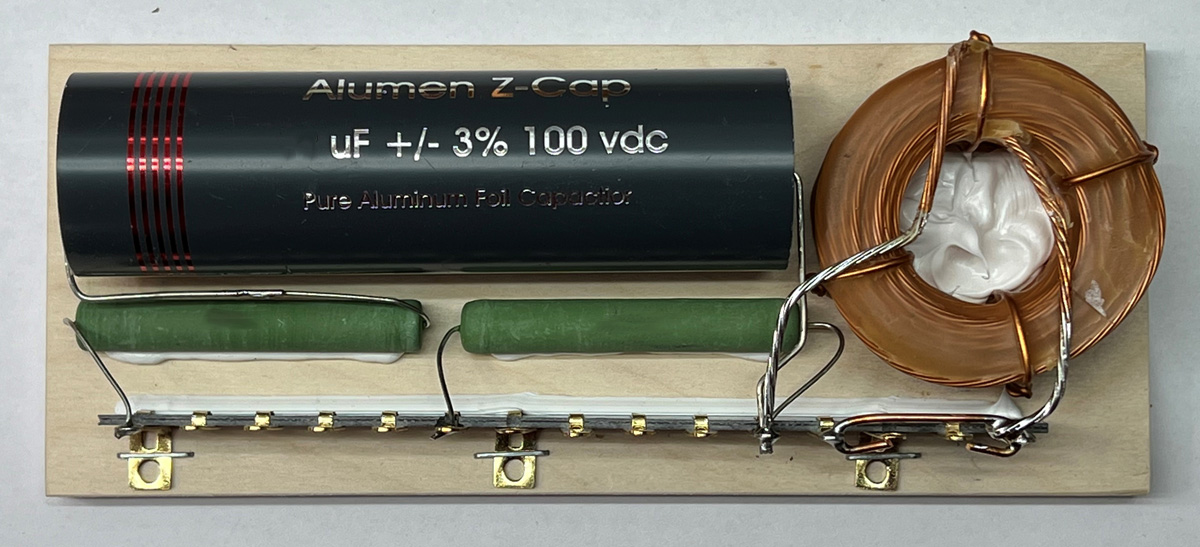
Tweeter circuit.
Midbass circuit.
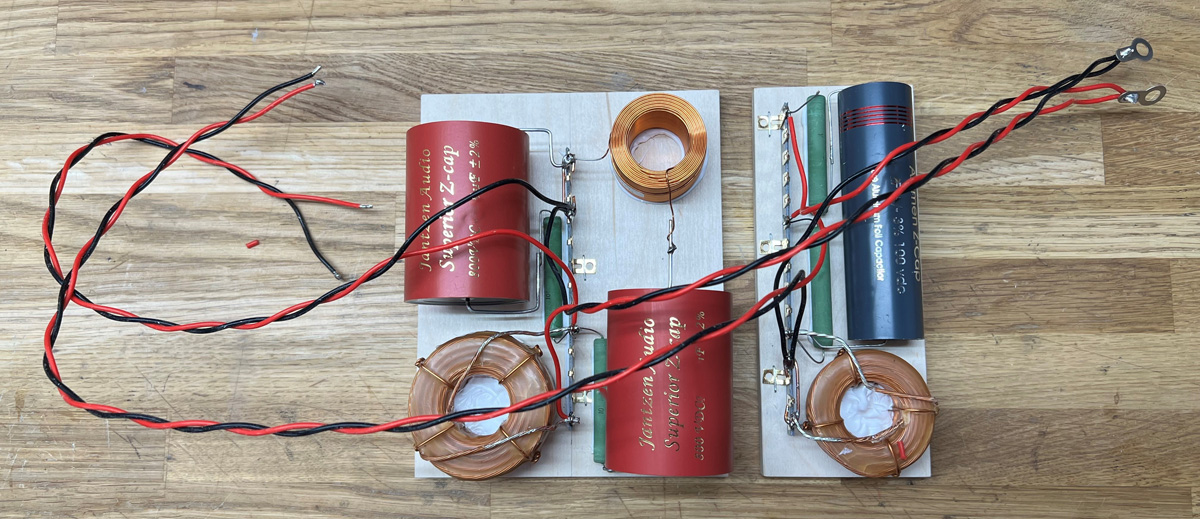
Wiring complete.
Speaker Wiring
The Be dome is not exactly cheap, hence a more affordable version with the no less magnificent TW29RN-B-8 tweeter. I used this tweeter in numerous other speakers and it's my favourite high-performance tweeter costing only some 160€ compared to 399€ for the Be dome. Some ~480€ saved for two tweeters.
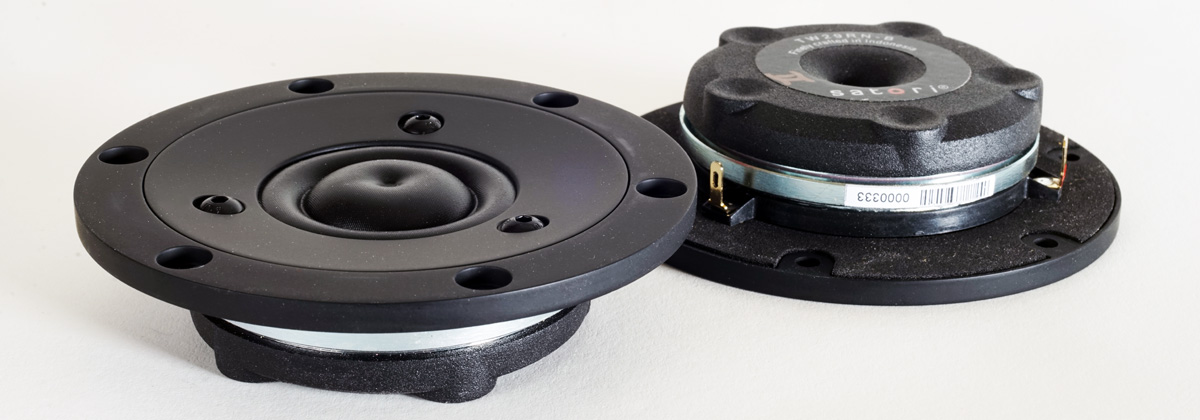
download specs:
TW29RN-B-8
Crossover
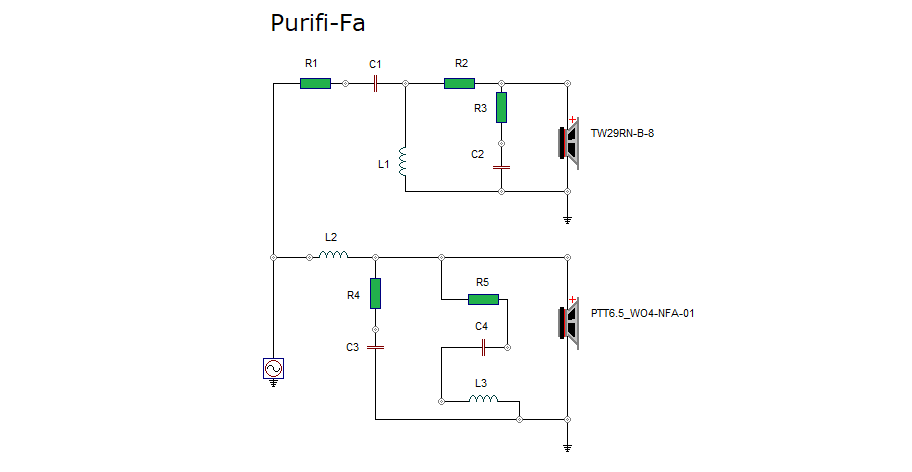
Crossover is similar to the Be dome, only a rising response in the 10-20 kHz range calls for some equalisation, hence R3 and C2.

Tweeter crossover layout.
Bass layout is the same as for the Be dome.
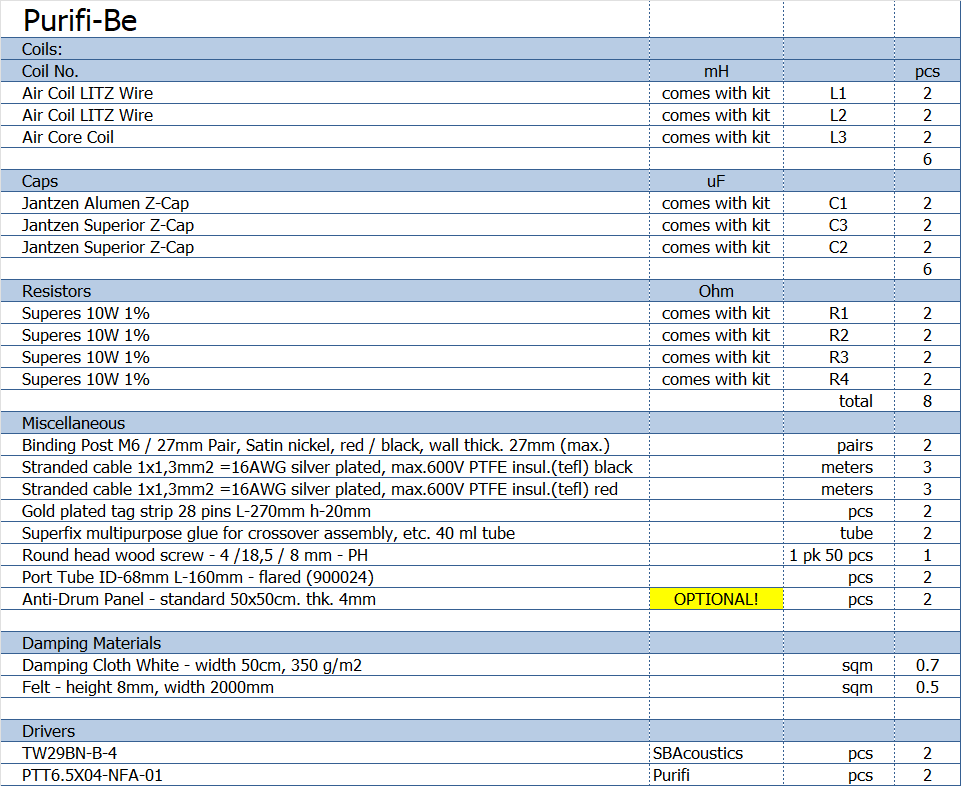
Parts list:

Parts list for the Purifi-Fa.
Download Complete Kit Sale Presentations:
![]()
All technical questions to troels.gravesen@hotmail.com
All questions regarding purchase of kits, please mail Jantzen Audio at contact@jantzen-audio.com
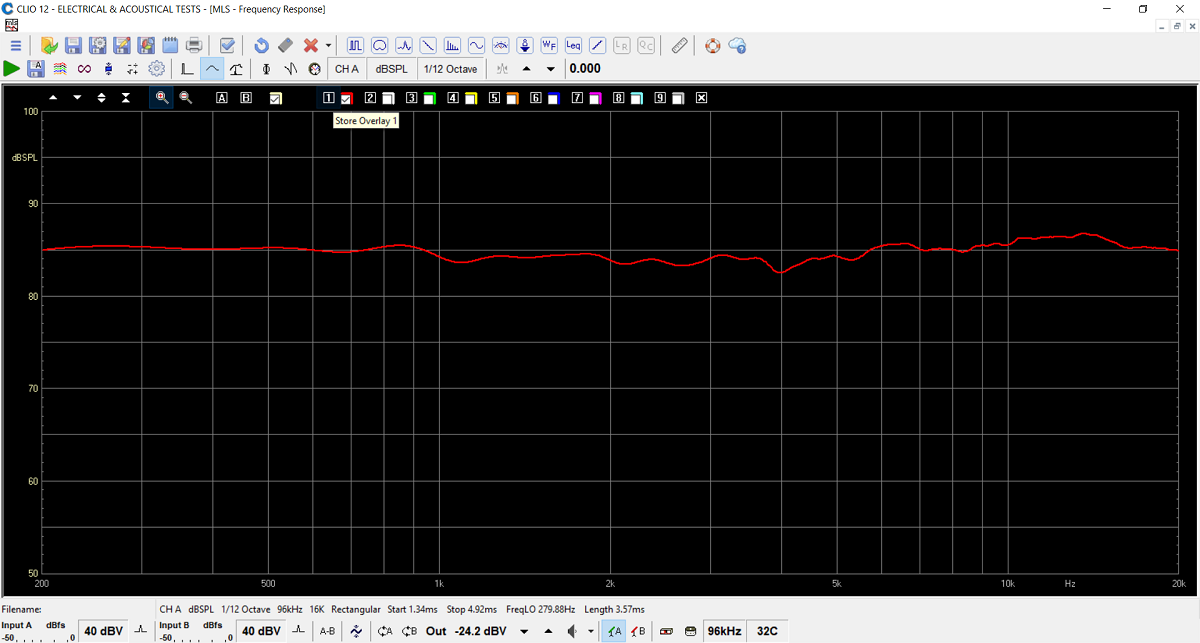
Measurements
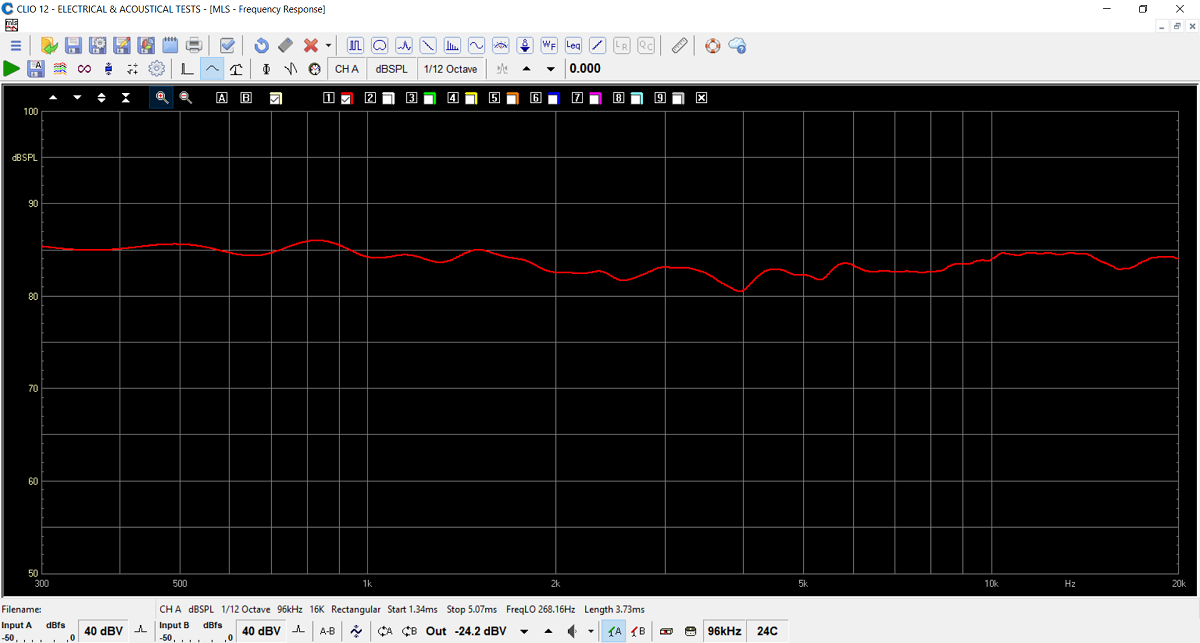
Frequency response of Purifi-Fa measured at ½ meter distance at a height
between the two drivers.
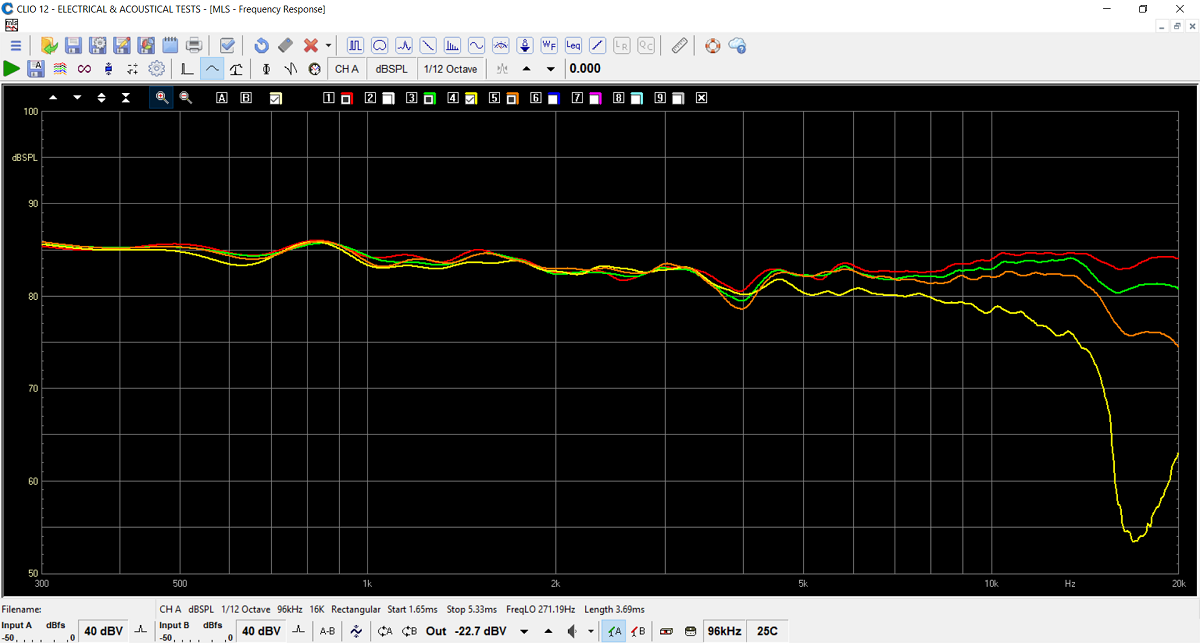
Horizontal dispersion at 0, 10, 20 and 30 deg. off-axis.
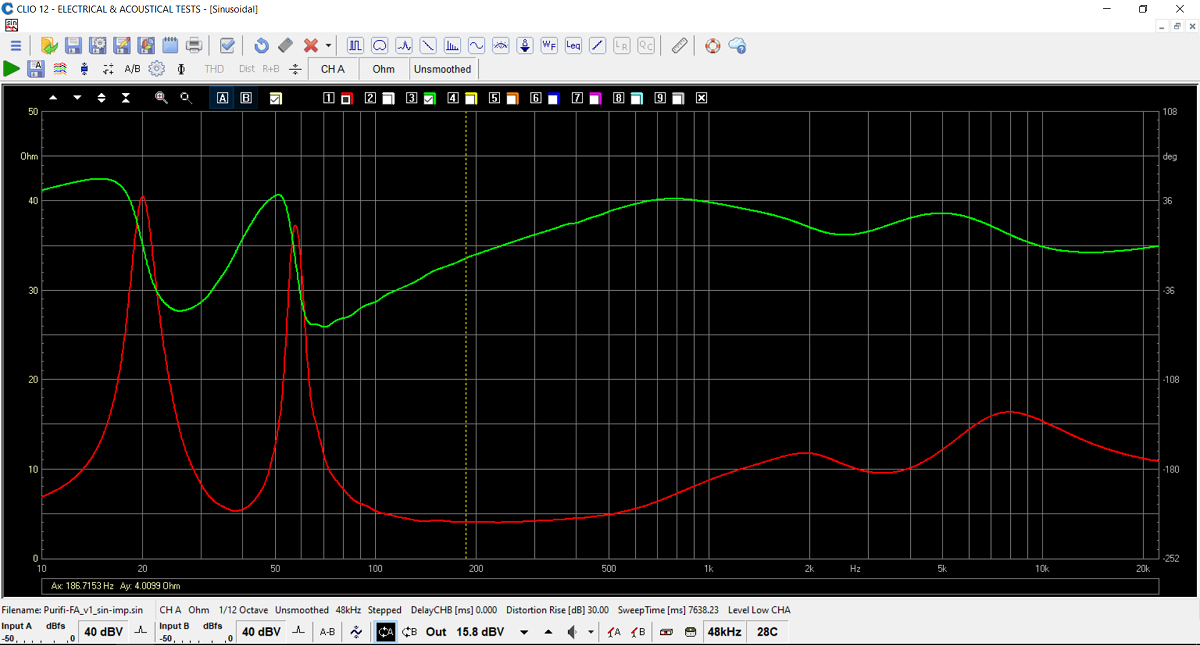
Final system impedance. Basically a 4-8 Ohm speaker. Minimum impedance
is 4 Ohms.