ScanSpeak
Revelator-3WC
Copyright 2023 © Troels Gravesen
Go to on this page:
DRIVERS CROSSOVER CABINET WORKSHOP PICS MEASUREMENTS SPEAKER-KIT CROSSOVER LAYOUT
The intro to this construction could be a copy-paste of the
Revelator-851, as it features exactly the same drivers, but quite a
few have found the Rev-851 cabinet a bit too complicated and asked for a
standard 3-way classic in a simple rectangular box, so here it is.
Cabinet is made as simple as possible - and with a slotted port - and
we save money. Having a different cabinet shape calls for a new
crossover, hence not the same as Rev-851.
I have made a lot of these 3-way classics - and for good reason. Easy to construct is an important issue as a lot of people do not have sophisticated workshops, rather hand tools and basic workshop facilities. Does this mean we can only build lesser quality speakers? Not at all! A classic 3-way may prove just as good as any fancy looking speaker with high-gloss lacquer, etc. In fact, what we can do that commercial manufacturers mostly cannot, is using premium drivers and premium crossover components. The latter something totally absent in commercial speakers, unless we're taking 10-20+ k€/pair. We see seriously expensive speakers in e.g. 5k€ range with el-cheapo Bennic capacitors. Remember, most commercial speakers are ~10 times the production cost. And so it must be to make a viable business. As DIY'ers we can skip marketing, packing, transport, distributor profit, dealer profit, etc.
With the Revelator drivers used here we're into high-end and with high-quality baked coils, Superior-Z and Alumen-Z capacitors we're into super-high-end. A speaker is never going to sound better than what crossover components allow to pass to the drivers and especially capacitors are a key ingredient in high-quality sound reproduction.
Also in mind here is costs, thus the slot port and simpler crossover topology without compromising sound compared to the Revelator-851.

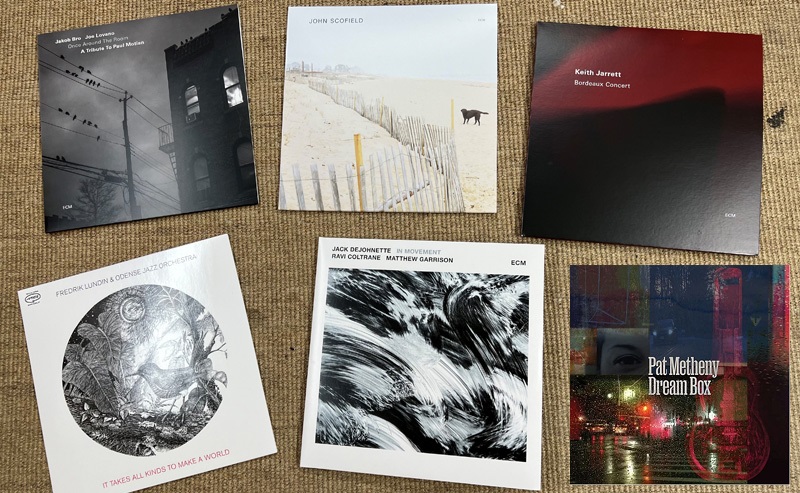
Going through my current selection of records I found a seriously potent
bass, stellar clear midrange and seamless integration of midrange and
treble. No sibilance unless recording is sibilant. This is in no way
inferior to the Revelator-851. Had I been able to make this classic
3-way some 30 years ago, this website might not have existed at all.
My 32 wpc EAR-861 can play this speaker to alarmingly loud levels from
its 8 Ohm tabs.
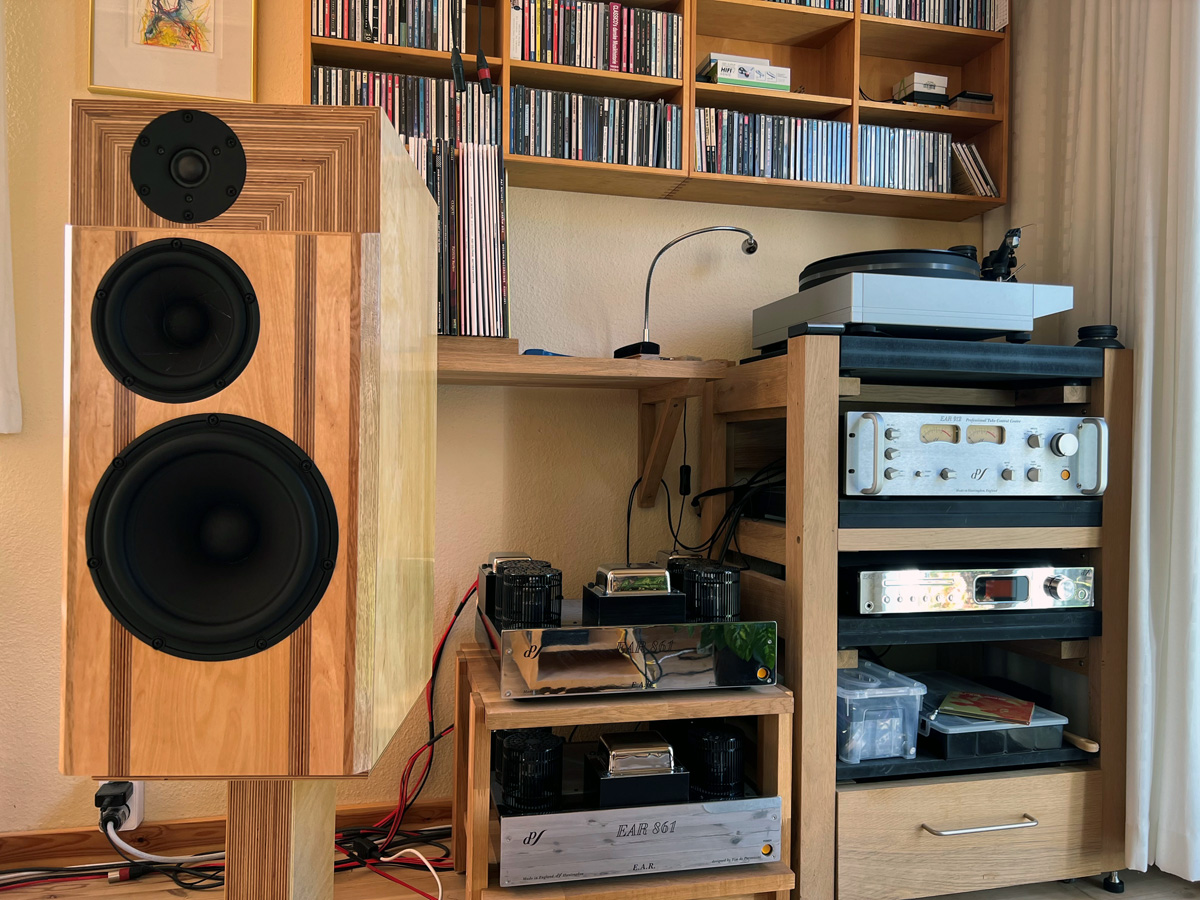
Basics:
3-driver speaker.
Dimensions: 28 x 36 x 61 cm, WxDxH.
System sensitivity: 89 dB/2.8V/1 meter.
Impedance: 4-8 Ohms.
Power requirement: 30+ watts/channel.
Useful links (Please
follow all links before e-mailing!):
http://www.troelsgravesen.dk/tips.htm
http://www.troelsgravesen.dk/tips.htm#CONSTRUCTION_OF_CROSSOVERS
http://www.troelsgravesen.dk/crossovers.htm
http://www.troelsgravesen.dk/LCR-RC.htm
http://www.troelsgravesen.dk/Inverted-Polarity.htm
http://www.troelsgravesen.dk/choices.htm
http://www.troelsgravesen.dk/power-handling.htm
Click images to view large.
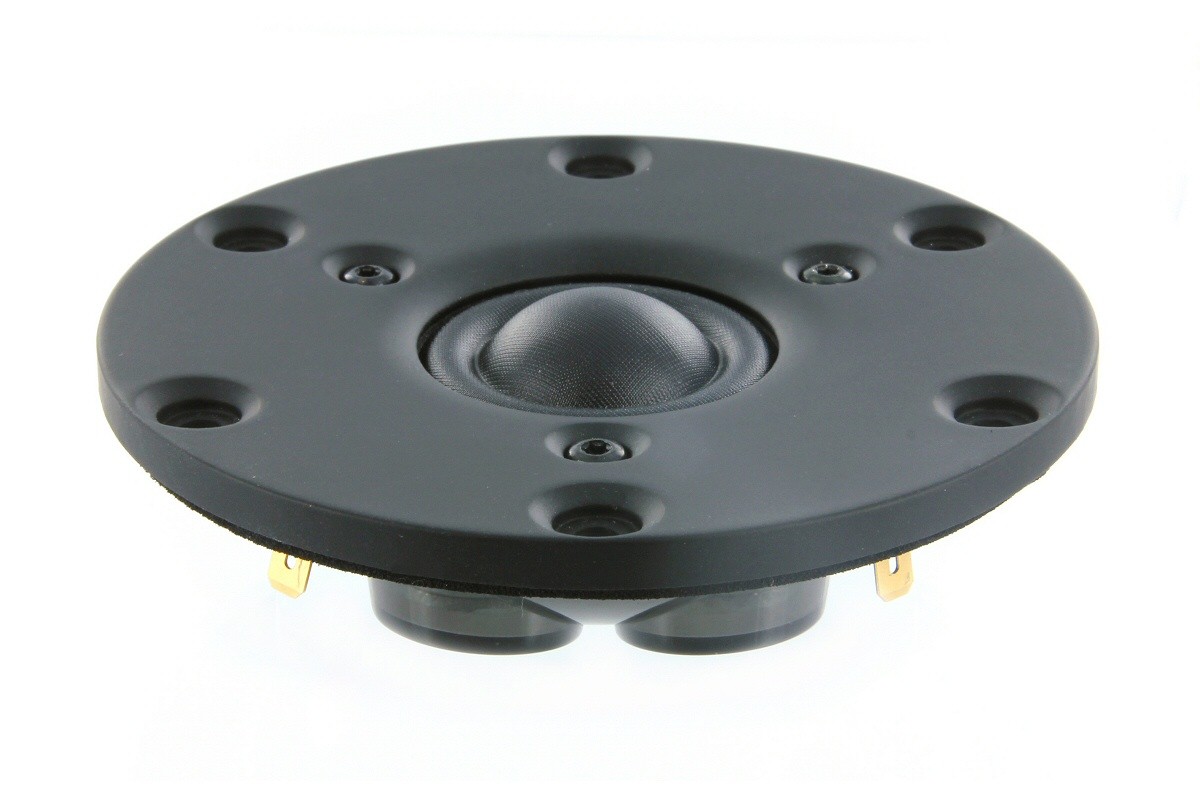
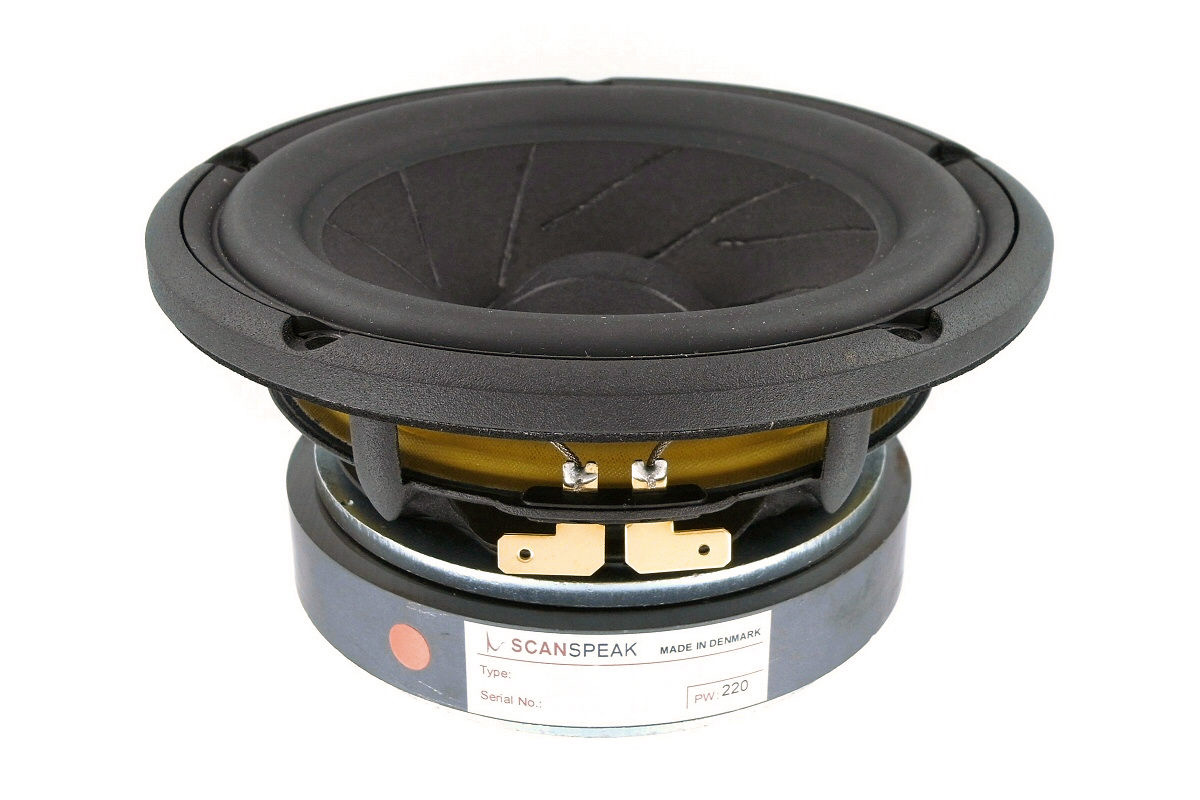
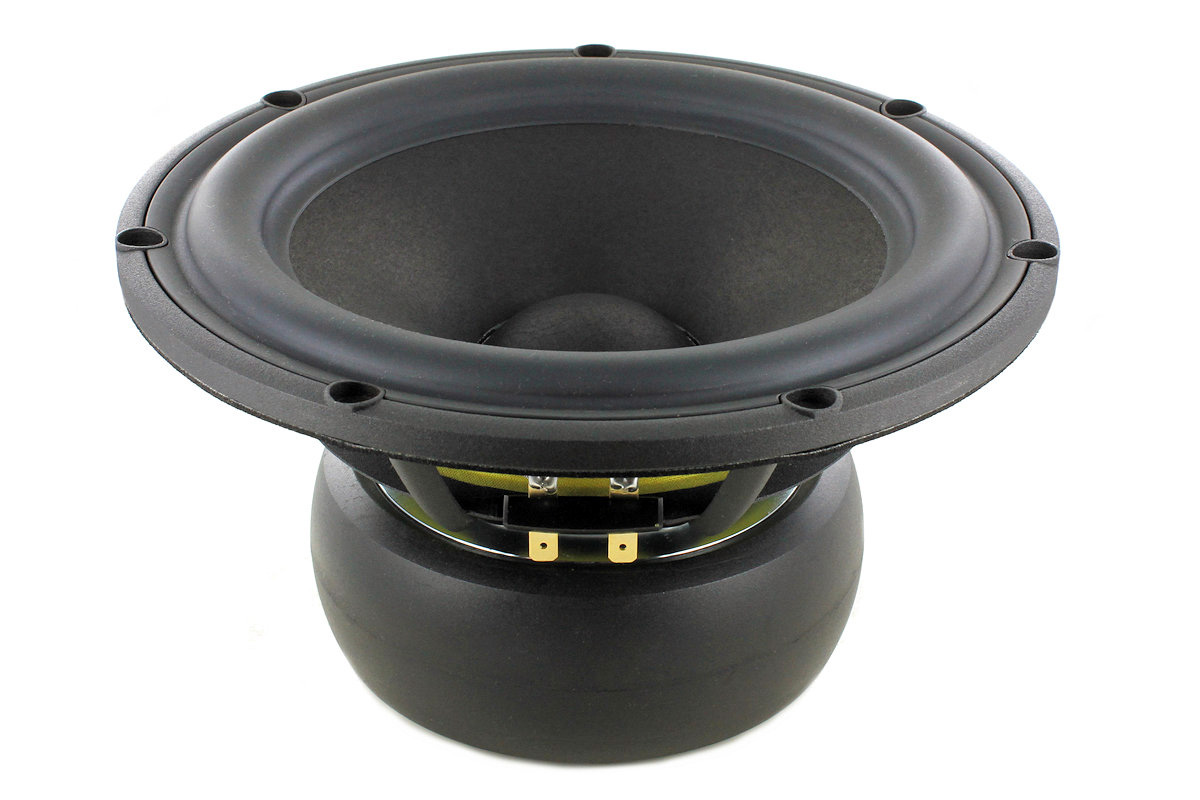
Download specs here: D3004/660000 15M/8631G00 22W/4851T00
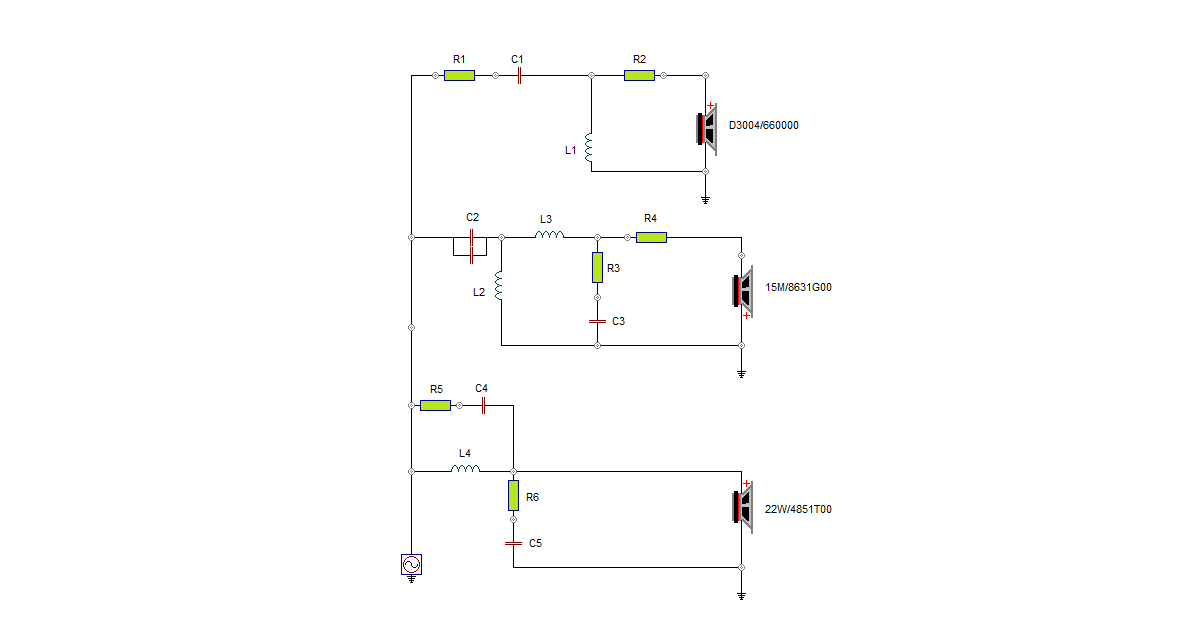
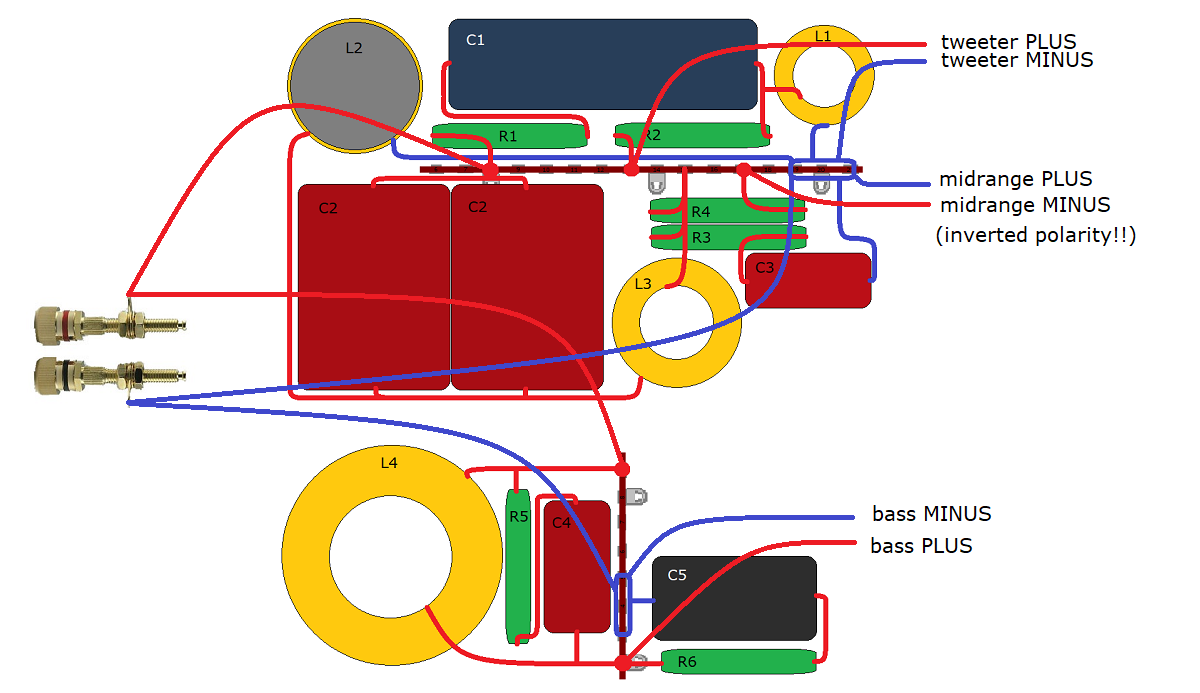
Crossover is a simple LR2 filter with inverted polarity of midrange
driver.
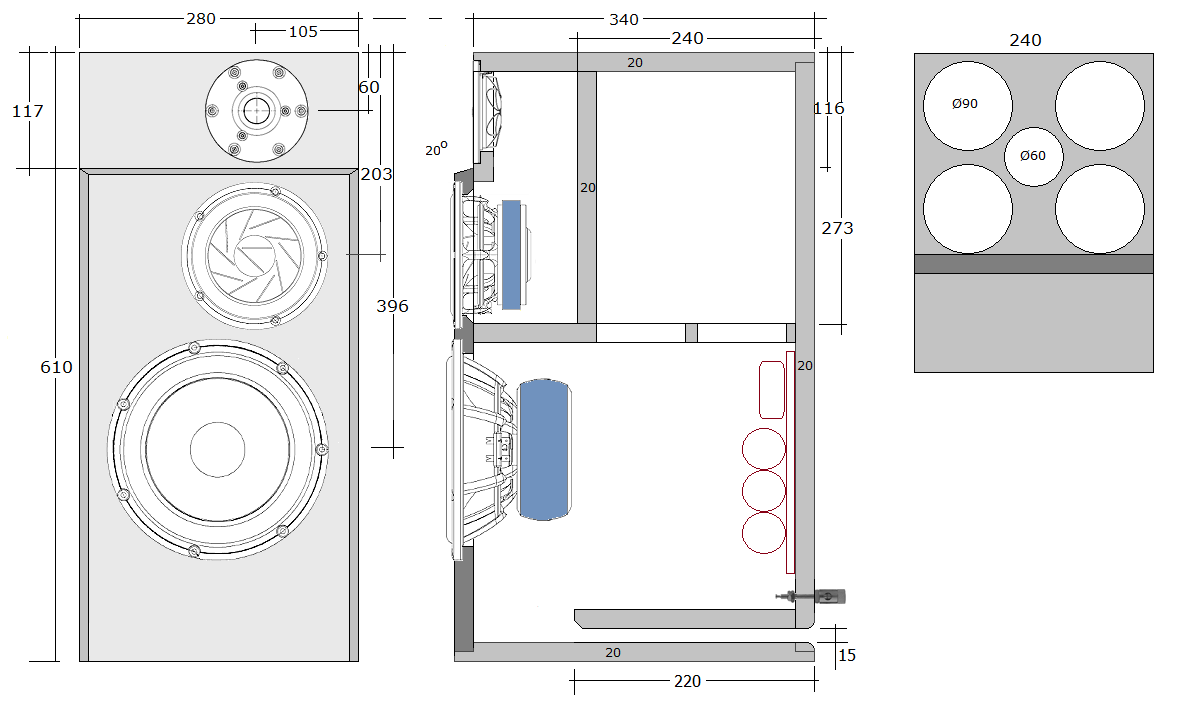
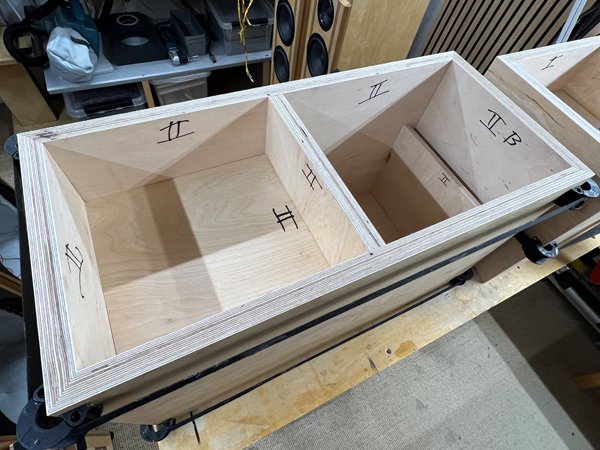
Cabinets were made from 20 mm Baltic birch. You can use 19-22 mm MDF -
or 18 mm as seems available in some places, but add bitumen pads to your
order if 18 mm is used.
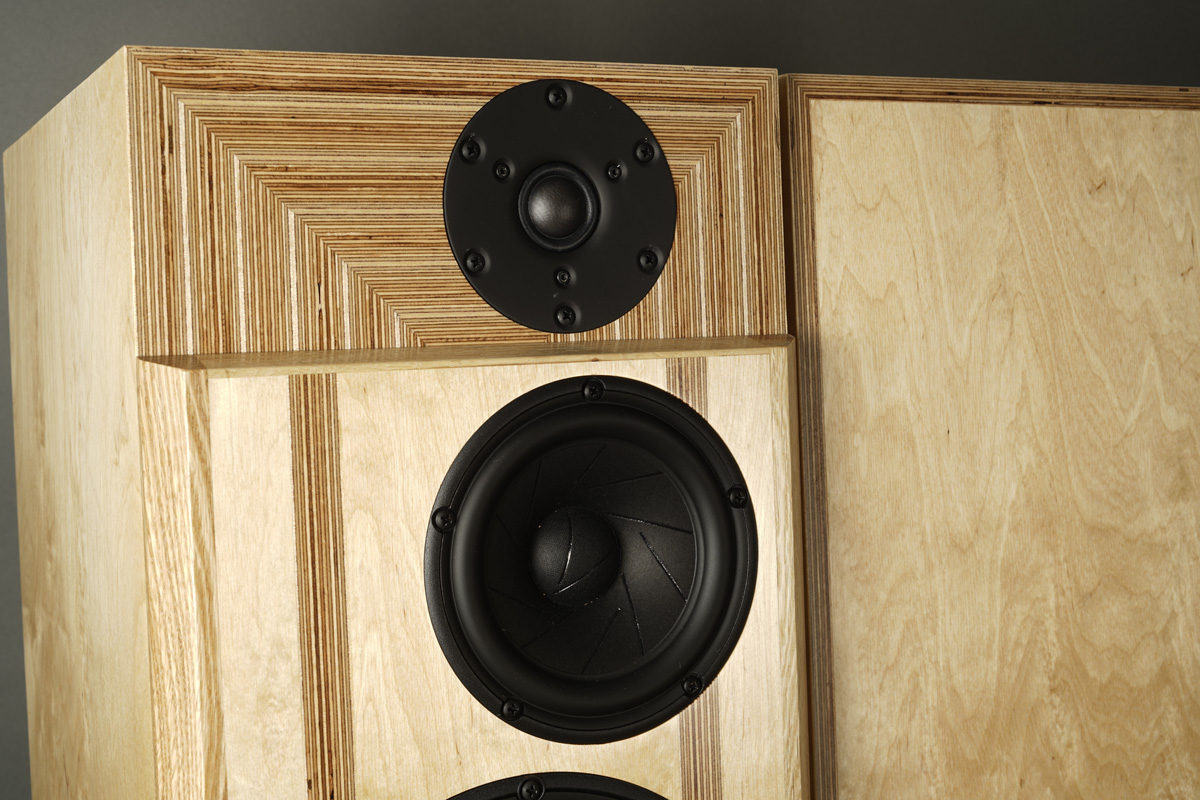
In any circumstance, keep front panel dimensions and drivers' placement.
And yes, yes, YES! You can place the port to the front. Who on
earth made the claim that rear ports are bad?? Ports usually leak some
midrange - and not the good part!

The speakers should be placed on stands to have the tweeter at ear
height.
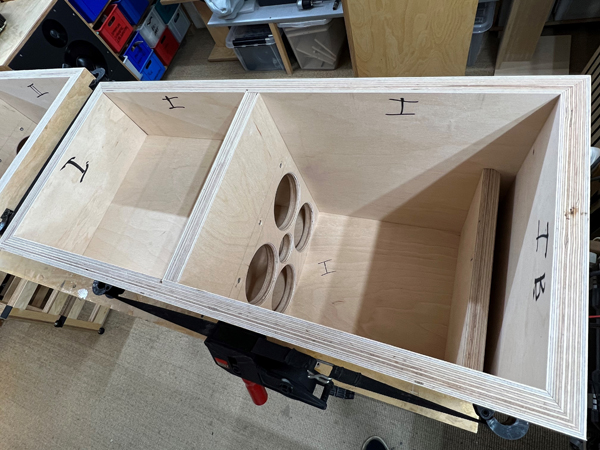
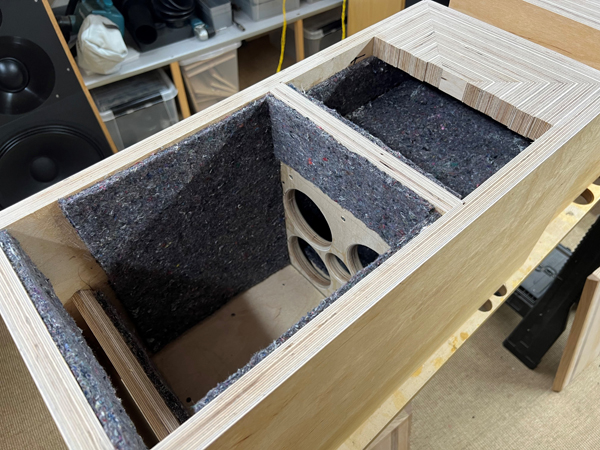

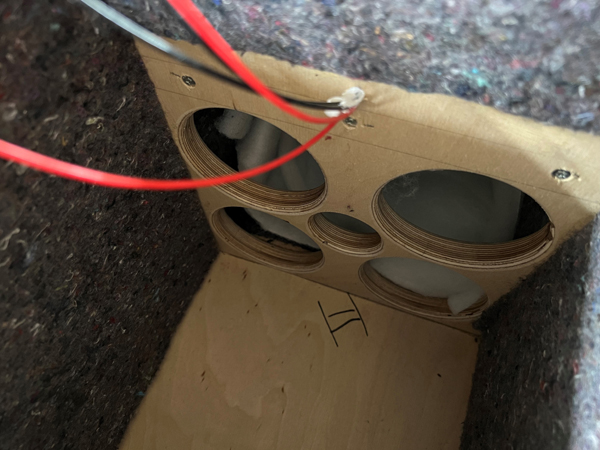
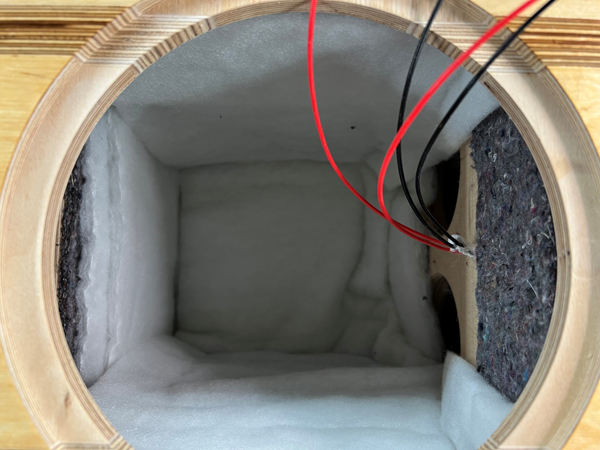
The cavity behind the midrange cabinet is
added felt on all sides.
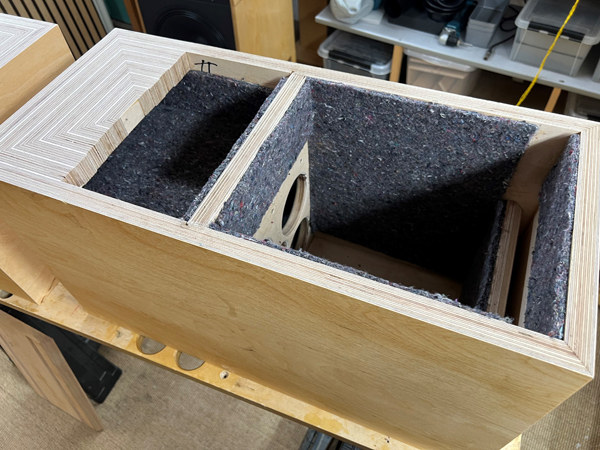
The pictures should tell the story of felt
damping.
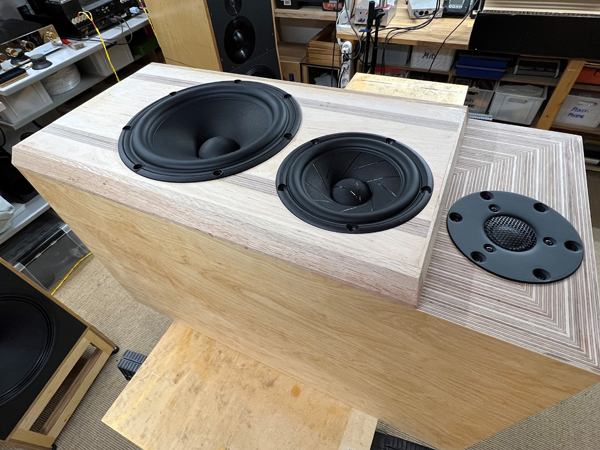
Making the tweeter panel.
I add lacquer to the tweeter panel and upper edge of front panel before
gluing.
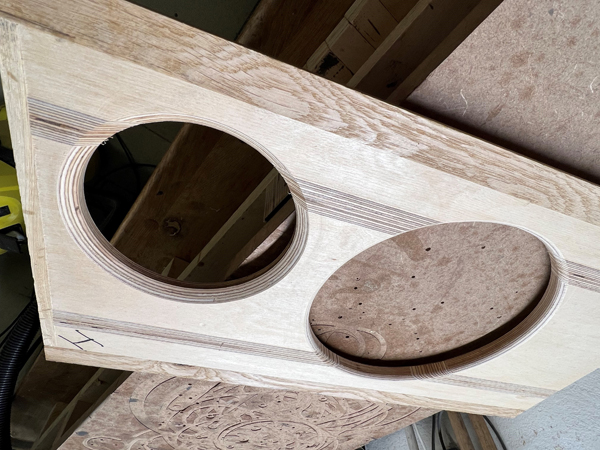
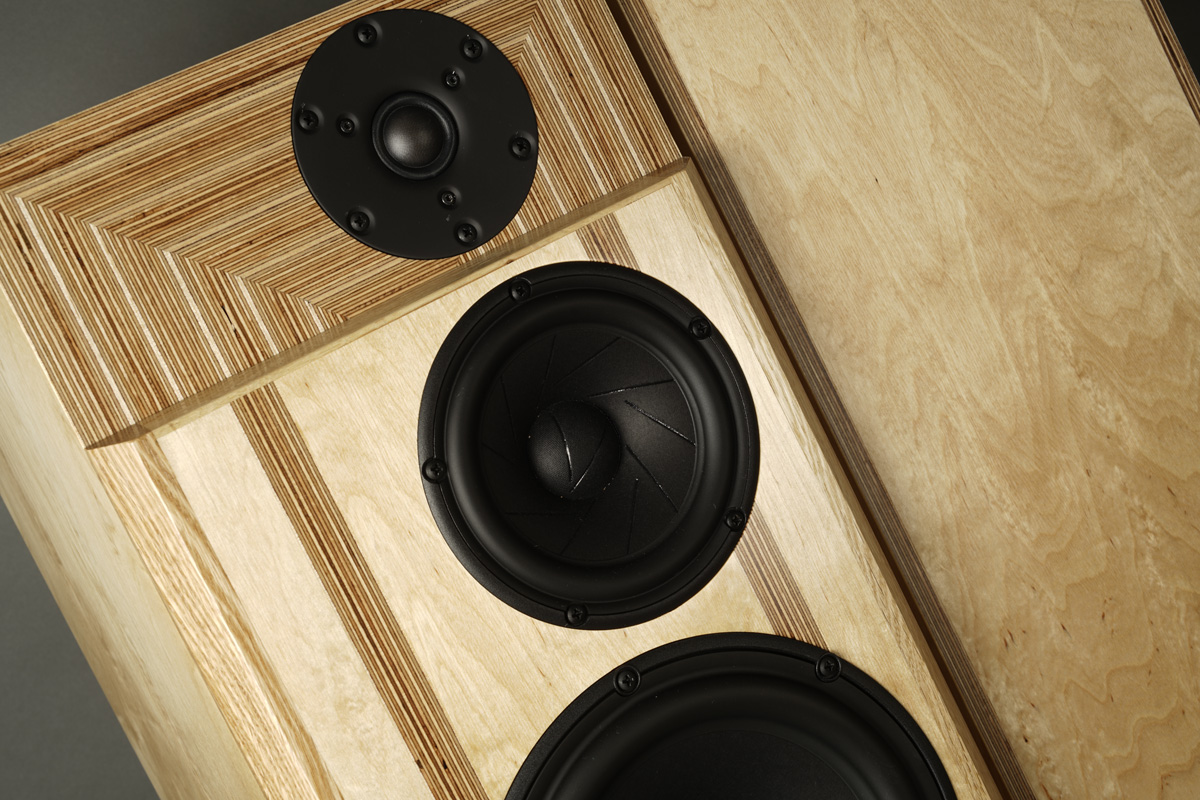
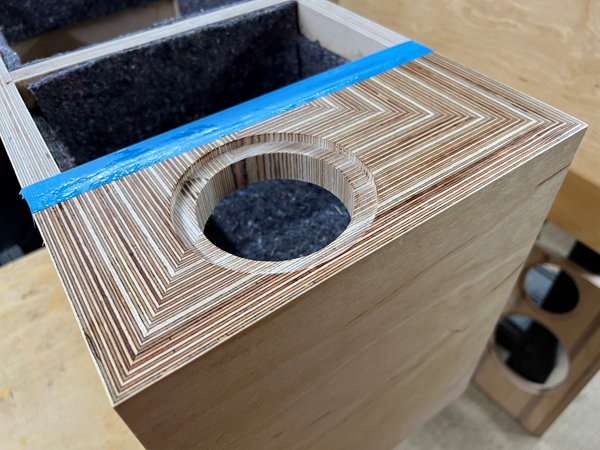
Making the front panel. Remember chamfering
the midrange driver hole.
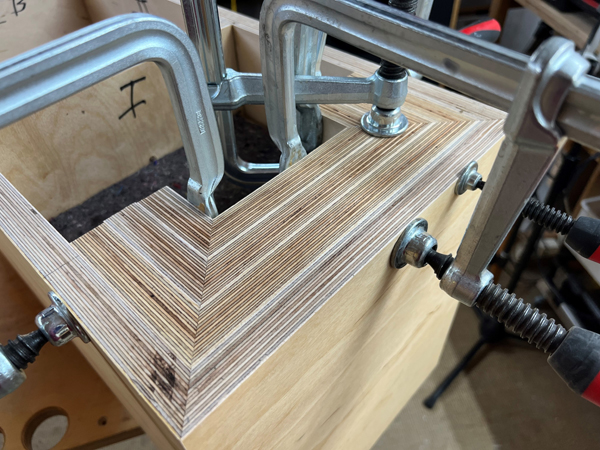
The vertical strips have no structural function, just decor. Same for
tweeter panel, can be made from just inserting piece of BB and adding
veneer or filler/paint.
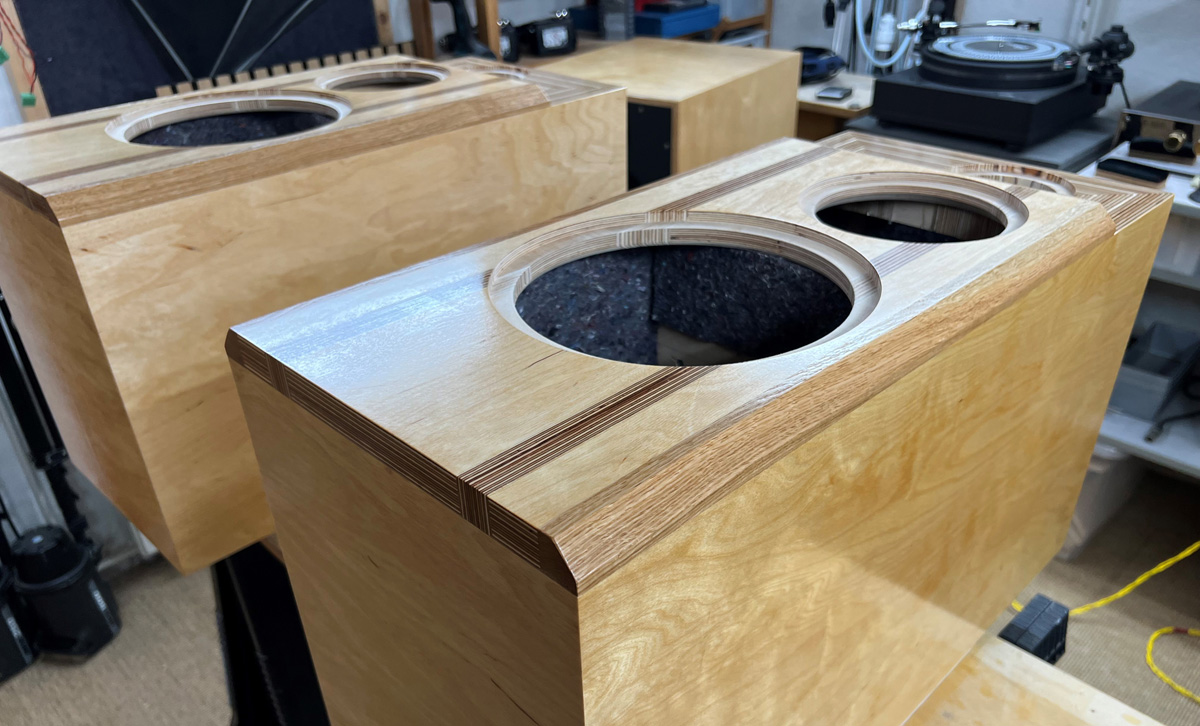
Lacquer work finished.
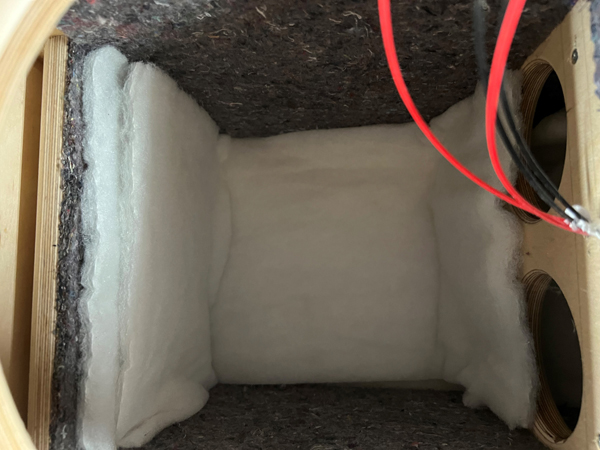
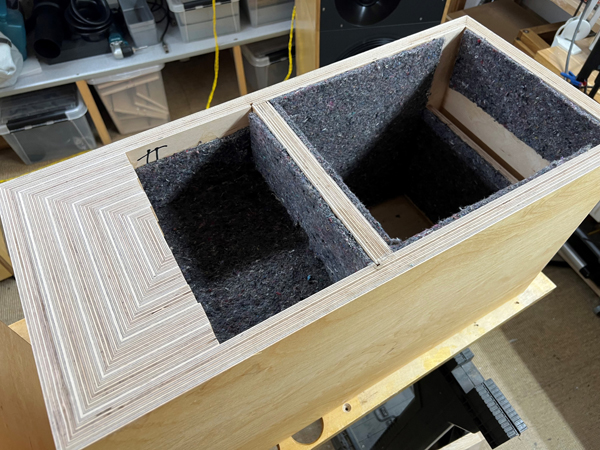
Left: Fold two pieces of 25 x 50 cm
acoustilux and place in cavity behind mid cabinet.
Right: Cut 2 pcs of 25 x 50 cm acoustilux and place on rear panel and
port panel.
Cut one piece of 25 x 75 cm acoustilux and
place on rear panel and side panels around bass section.
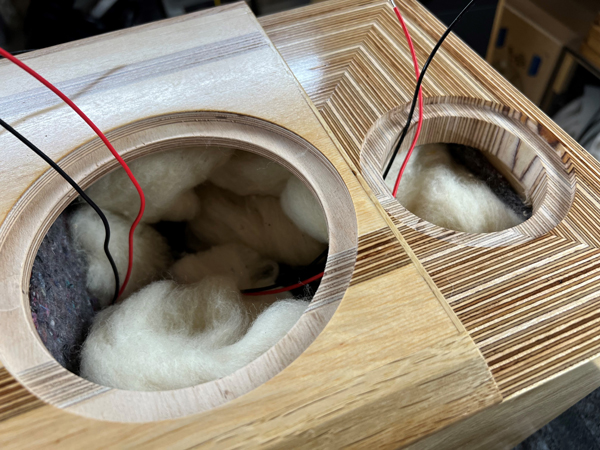
Place 60 grams of wool in mid-tweeter cabinet.
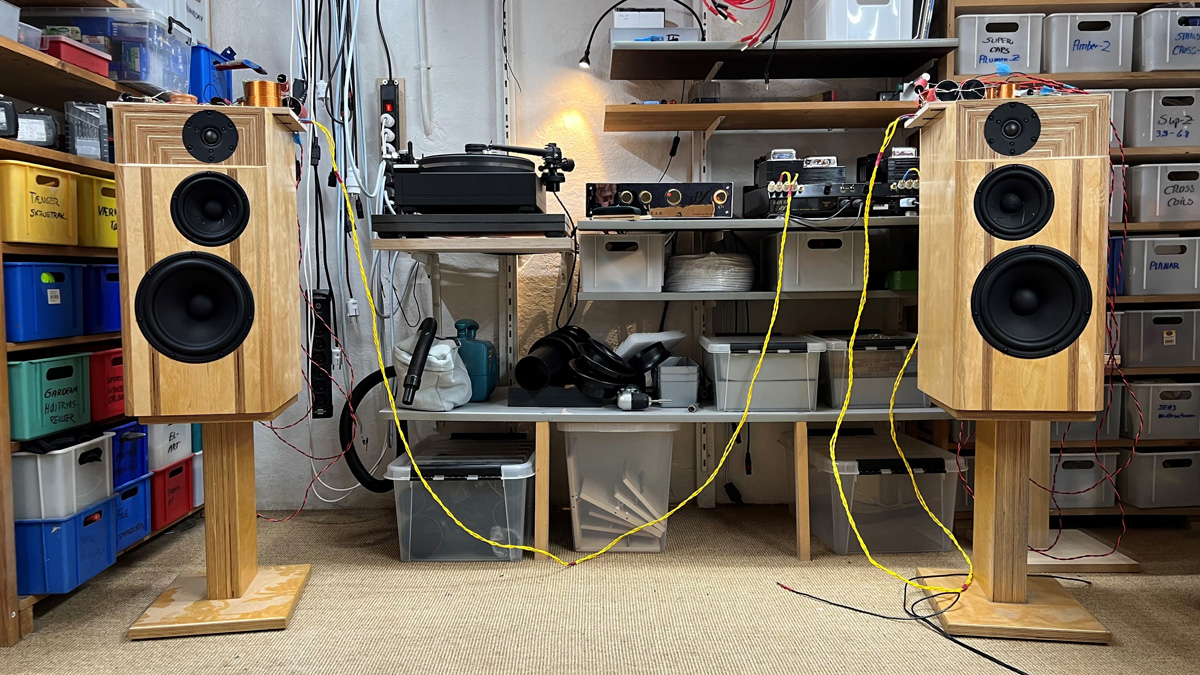
Workshop setup during crossover fine-tuning.
I prefer the mid/tweeter towards the center.
I don't fancy this artificial wide soundstage from placing speakers wide
apart with mid-tweeter in outer position.
Crossover placed on rear panel.
Fasten with screws - never glue!

A few comments on
MEASUREMENTS before you start interpreting the readings below.
First of all, if we think measurements will
tell us how a speaker sounds, we're wrong. The perception of sound is
way too subjective to be reflected in any measurements we can perform. A
loudspeaker system is meant to give us a satisfying idea of an acoustic
event and for some people a pair of 5 USD ear-plugs are enough, others
spend 200 kUSD on a truly full-range pair of speakers - and the latter
may not be happier than the former.
Measurements may give us an idea of tonal balance of a system, i.e. too
much or too little energy in certain areas, although dispersion
characteristics play a vital role here. A two-way 7+1 and a three-way
7+4+1 may display similar horizontal dispersion, yet sound very
different. Measurements may tell us about bass extension if far-field
measurements are merged with near-field measurements. In addition to
this, ports may contribute to bass extension. Most of we diy'ers do not
have access to an anechoic room for full-range measurements from
20-20000 Hz.
What cannot be seen is what kind of bass performance we get in a given
room. Bass performance is highly dependent on in-room placement of your
speaker and the same speaker can be boomy in one place and lean in
another. Actual SPL level at 1 meter distance and 2.8V input is useful
for en estimate of system sensitivity and combined with the impedance
profile may give an idea of how powerful an amplifier is needed to drive
the speaker to adequate levels.
What measurements do not tell is the very sound of the speaker unless
displaying serious linear distortion. The level of transparency, the
ability to resolve micro-details, the "speed" of the bass, etc., cannot
be derived from these data. Distortion measurements rarely tell much
unless seriously bad, and most modern drivers display low distortion
within their specified operating range.
Many people put way too much into these graphs and my comments here are
only meant as warning against over-interpretation. There are more to
good sound than what can be extracted from a few graphs. Every graph
needs interpretation in terms of what it means sonically and how it
impacts our choice of mating drivers, cabinet and crossover design.
What measurements certainly do not tell is the sonic signature of the
speaker, because speaker cones made from polypropylene, aluminum,
Kevlar, paper, glass fiber, carbon fiber, magnesium, ceramics or even
diamonds all have their way of adding spices to the stew. Nor do
measurements tell what impact the quality of the crossover components
add to the sound, from state of the art components to the cheapest of
coils and caps, they all measure the same if values are correct, yet
sound very different.
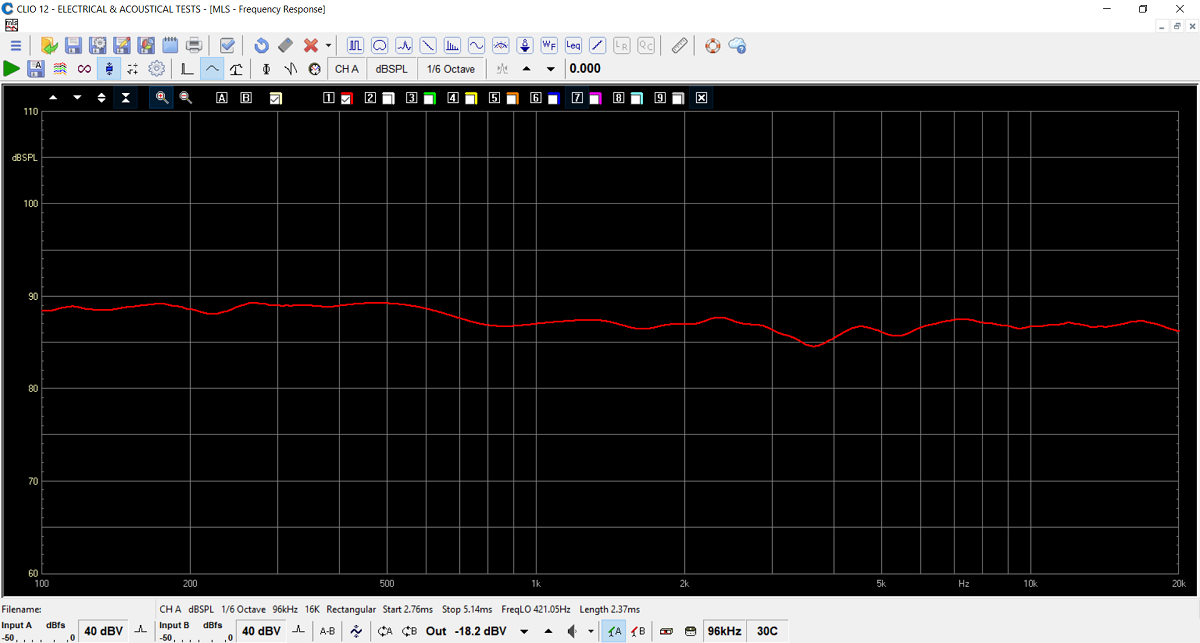
SPL measured at 1 meter distance.
System sensitivity around 88-89 dB/2.8V/1m.
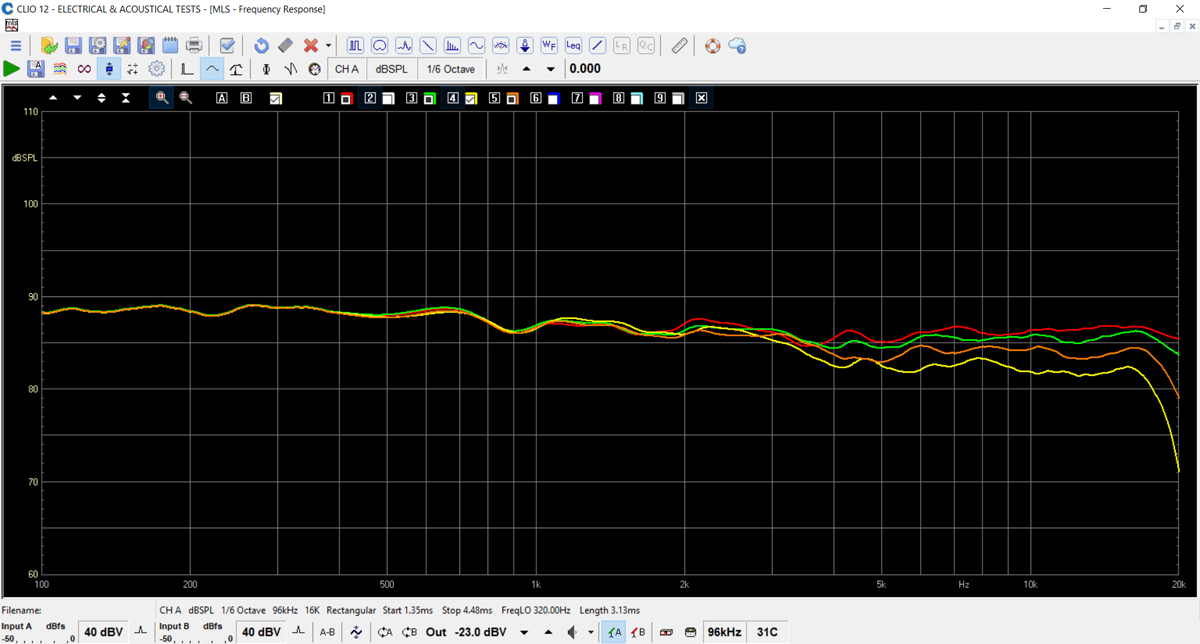
Horizontal dispersion at 0, 10, 20 and 30
deg. off-axis.
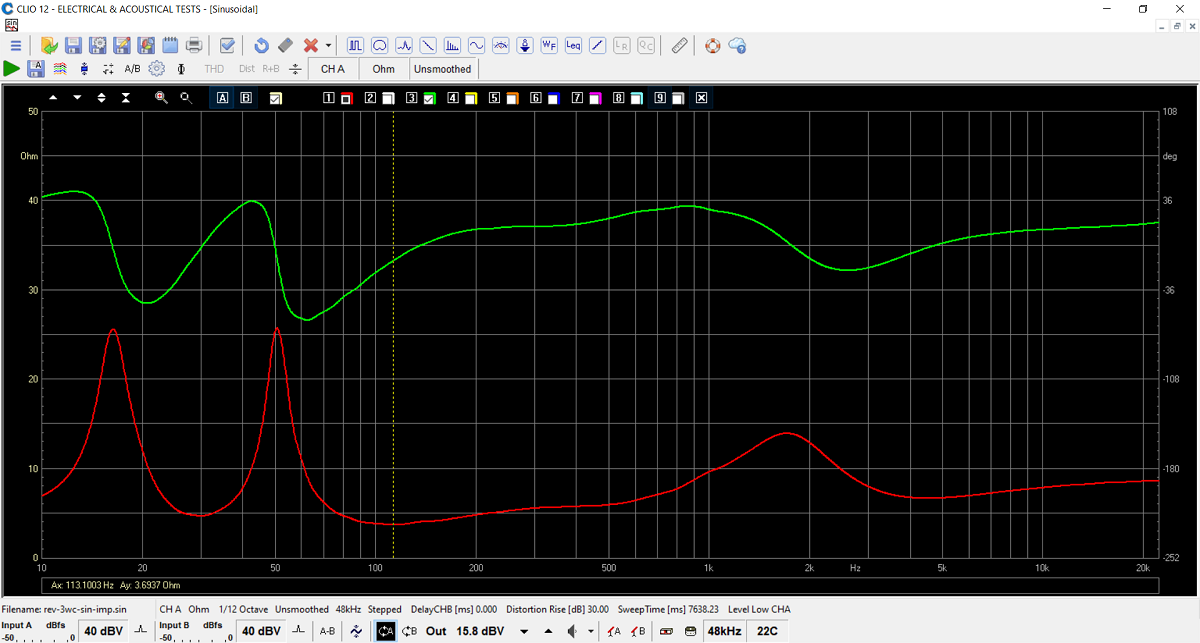
Final system impedance, minimum 3.7 Ohm @ 113
Hz.
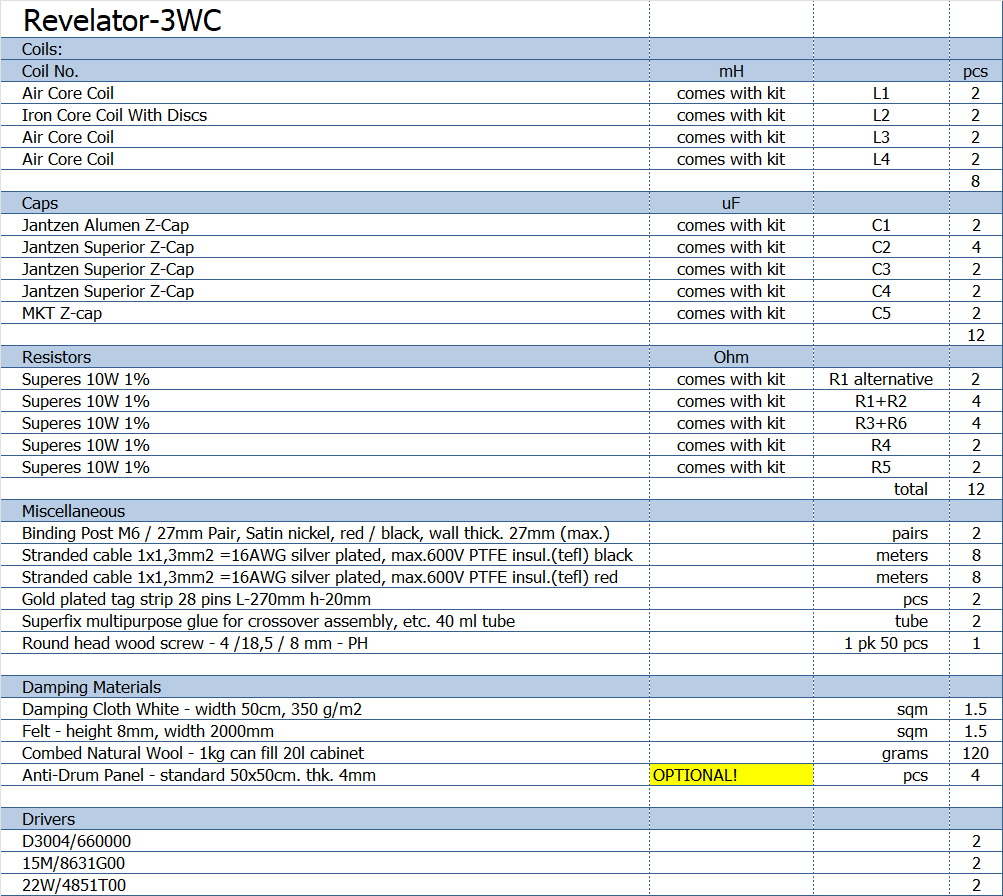
All kit and component prices may be subject to change and are always to be confirmed by Jantzen Audio Denmark.
Kits can always be bought with/without drivers, or some of the drivers.
Download Complete Kit Sale Presentations:
![]()
All technical questions to troels.gravesen@hotmail.com
All questions regarding purchase of kits, please mail Jantzen Audio at contact@jantzen-audio.com
CROSSOVER-LAYOUT
BACK TO INDEX
Check this out before start making crossovers:
http://www.troelsgravesen.dk/tips.htm#CONSTRUCTION_OF_CROSSOVERS
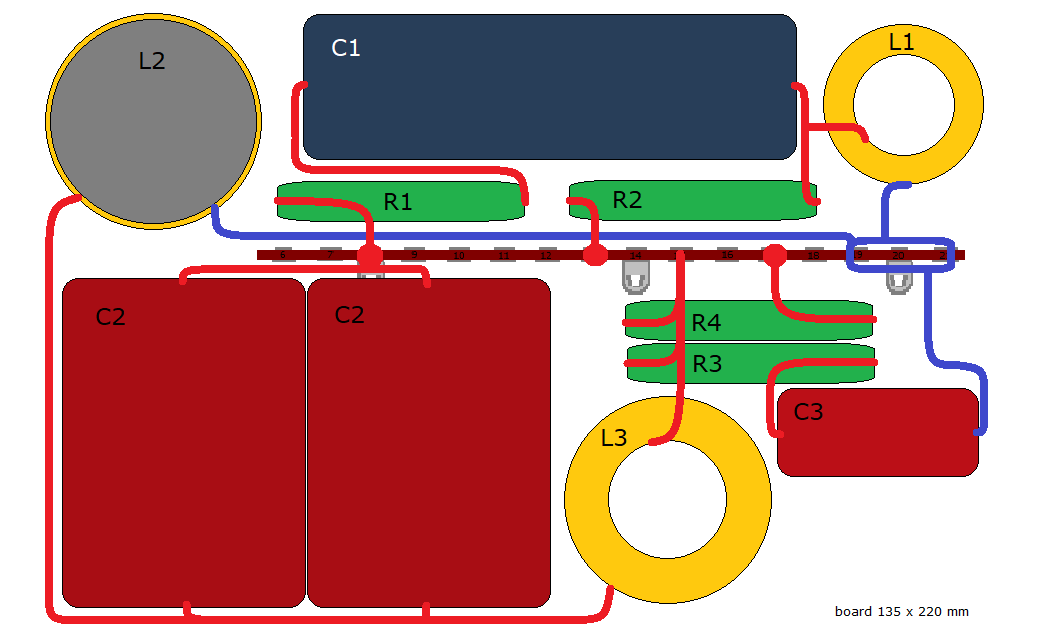
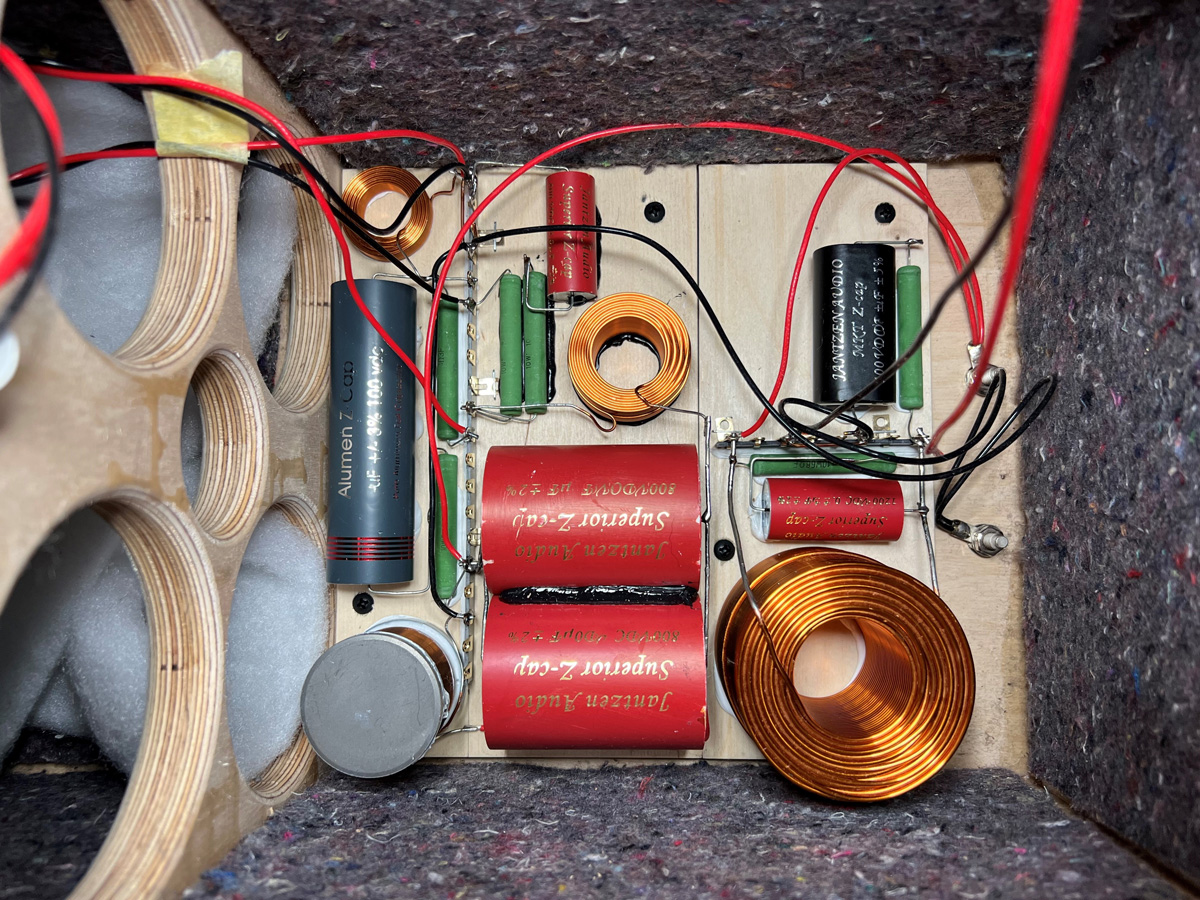
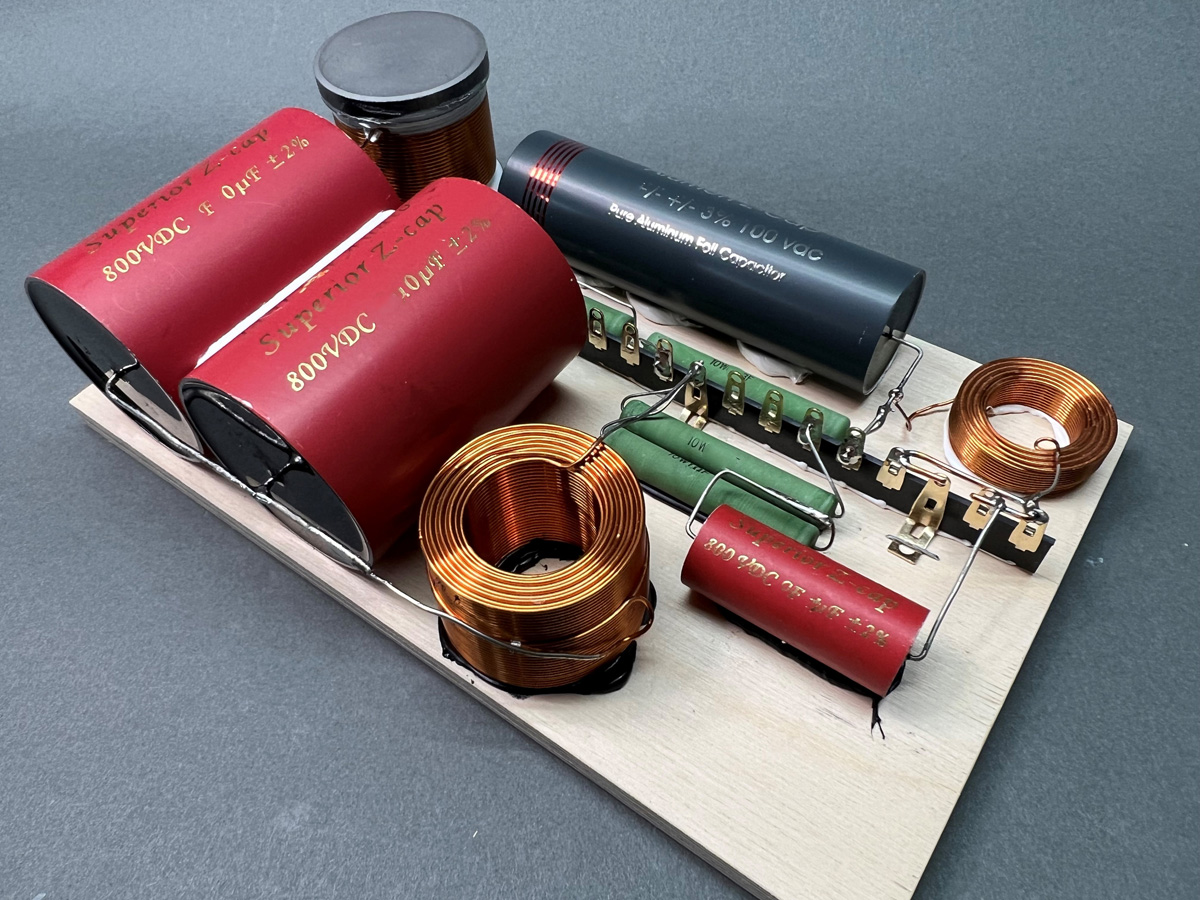
Mid-tweeter layout.

The money has been spent where it matters the most: Capacitors.
Superior-Z for the midrange and Alumen-Z pure foil capacitor for the
tweeter. This is higher high-end!
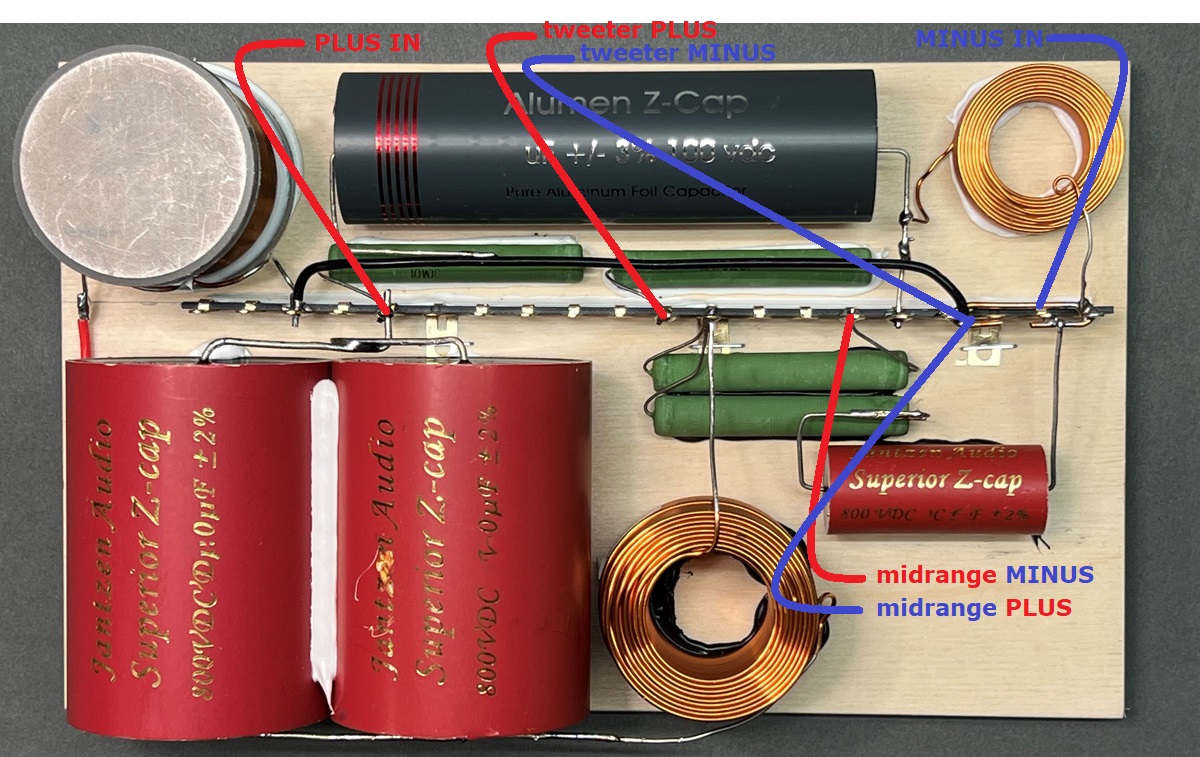
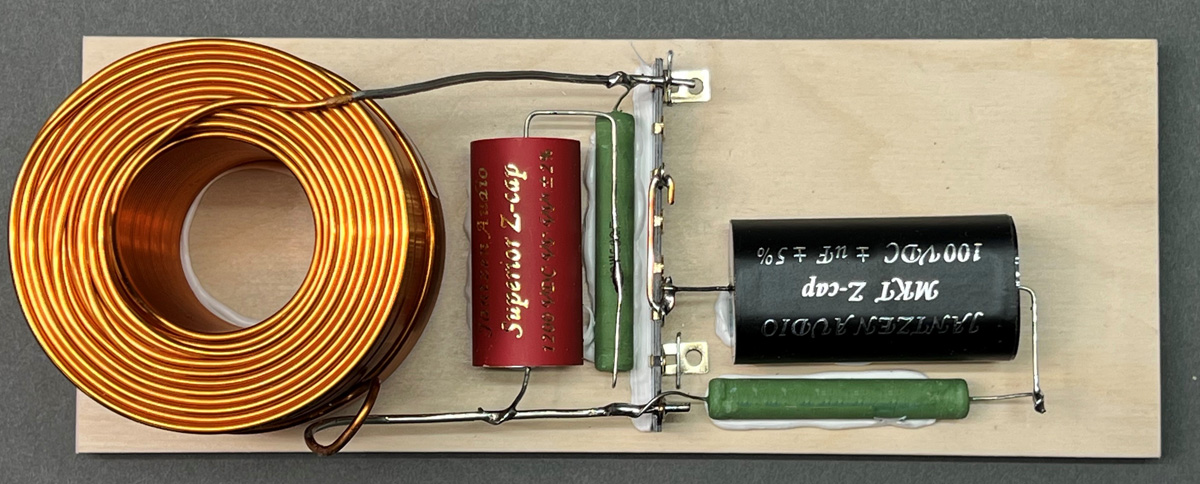
Wiring of tweeter and midrange.
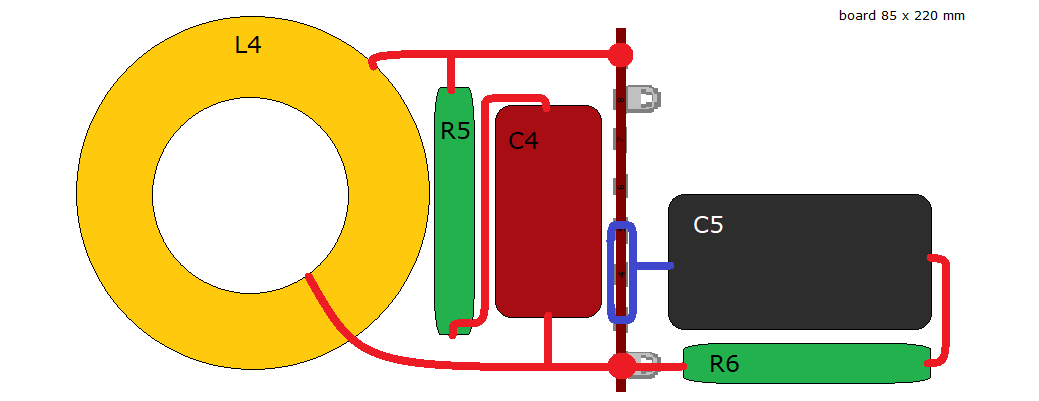
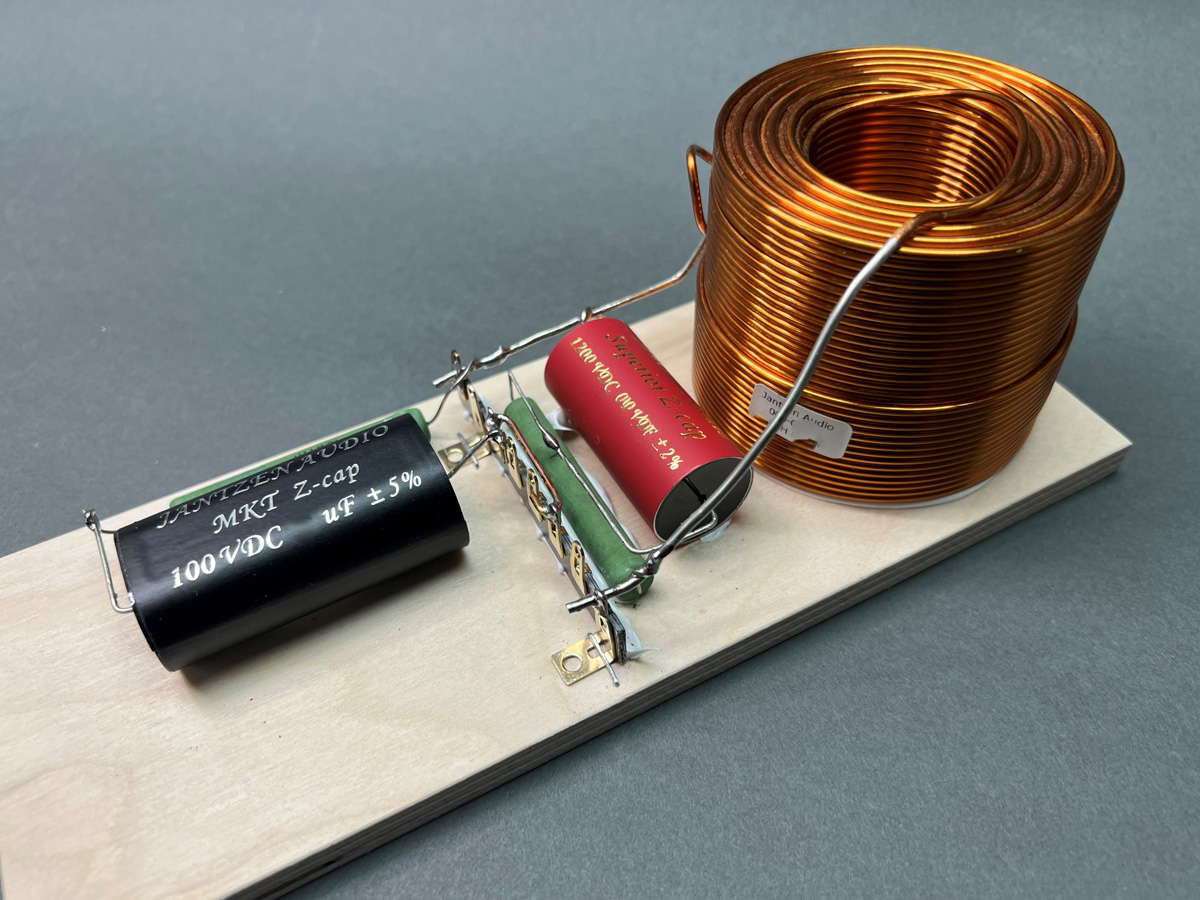
Bass layout.
Speaker wiring.
Notice midrange is connected with inverted polarity!