DIY Loudspeakers: HOME INDEX UPDATES RESPONSE WHAT'S NEW
SBAcoustics SBA-10
TW29BN Beryllium dome optional
Copyright 2016 © Troels Gravesen
Go to on this page:
DRIVERS
CROSSOVER
CABINET
MEASUREMENTS
SPEAKER-KIT
CROSSOVER LAYOUT
SOUND
Spending 100+ hours in the workshop, cutting sheets, adjusting panels,
making fillets, gluing, routing, test assembly, etc., creates excitement and expectations! What are we getting from
all the hours and money invested? Working with well-know drivers we may
have a good idea of the outcome, but working with completely new drivers
is gamble. Cabinet design, drivers' placement, points of crossover,
crossover components, crossover topology, voicing of the drivers, etc.,
all plays a significant role in what finally hits our ears.
Having done four constructions with the SBA drivers I already felt at
home and
I already knew the sound of the domed dome from SBA 3WC
and I didn't expect the Satori here to be that much different (tested
here).
The 10" bass driver features a hard-pressed paper cone - almost as hard
as aluminum - and it's not that different from the ScanSpeak
26W Revelator except for suited for smaller enclosures having lower Vas
and a heavier cone and - to my thinking - better suspensions. The 26W
Rev features really high Vas and requires a good power house keeping
things in control.
Hard-pressed paper cones for midrange has been tried in the
Jenzen SEAS ER
and SBA
61-NRXC and both drivers need either notch filters or 4th order
crossover to deal with cone break-up. The Satori MW16P is an unusual
driver in having a frequency response all the way to 15 kHz, like a
full-range driver. Waterfall plot suggests modest cone break-up and and
a driver suitable for low-order filters. Doing 15 kHz doesn't suggest
using it as a full-range driver although I admit it has been heard with
good results from a two-way having a point of crossover around 10 kHz.
Quite remarkable. (Please don't ask which and how!).
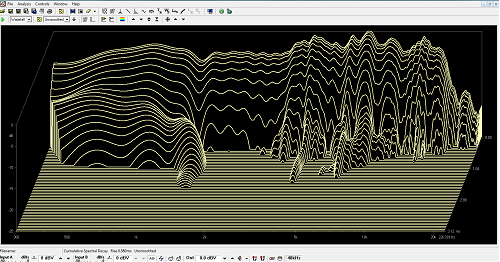
MW16P waterfall plot with 25 dB scaling.
The MW16P is a rather small 6" driver, having a membrane area of 119 cm^2. Initially I set up a two-way small pyramid from MW16P and tweeter and was surprised by a robust bass performance, even from a 14 liter closed box, suggesting the possibility of a point of crossover something similar my other larger constructions, i.e. 150-200 Hz. The prototype two-way also suggests very good driver integration with excellent transparency, but also a speaker that requires careful voicing. But adding a bass driver changes everything, so let's see.
---o--O--o----
This speaker construction is to mark the 10th Anniversary of SBAcoustics.
It's been 10 years since a group of engineers left the ScanSpeak company,
following the Tymphany take-over, to form their
own company, Scandinavian Audio Research and later
Danesian AudioTM,
to produce speaker drivers sold under the name SBAcoustics. Link to SBA
here: http://www.sbacoustics.com/
Certainly these guys left with an abundance of know-how and experience
and have incorporated this knowledge into their now substantial product
range, produced in Indonesia by
Sinar Baja
Company. Having all Satori drivers at hand (5-6-7") certainly
displays high quality assembly and product finish.
Google any SBA driver and you'll find a remarkable presence in the DIY community.
It's more trouble spotting SBA in commercial products as baskets and
cones may be proprietary to the customer. If you google the combination of Sinar Baja and Wilson
Audio you will find export statistics indicating supply to one of the
top speaker manufacturers. Quite a remarkable achievement over such a
short period of time.
A lot of constructions have been considered for this Anniversary
project. Stand-mount 2-way, slim 2½-way floor-stander, 4-way with active
sub, etc. Lots of options. I finally decided on something in between
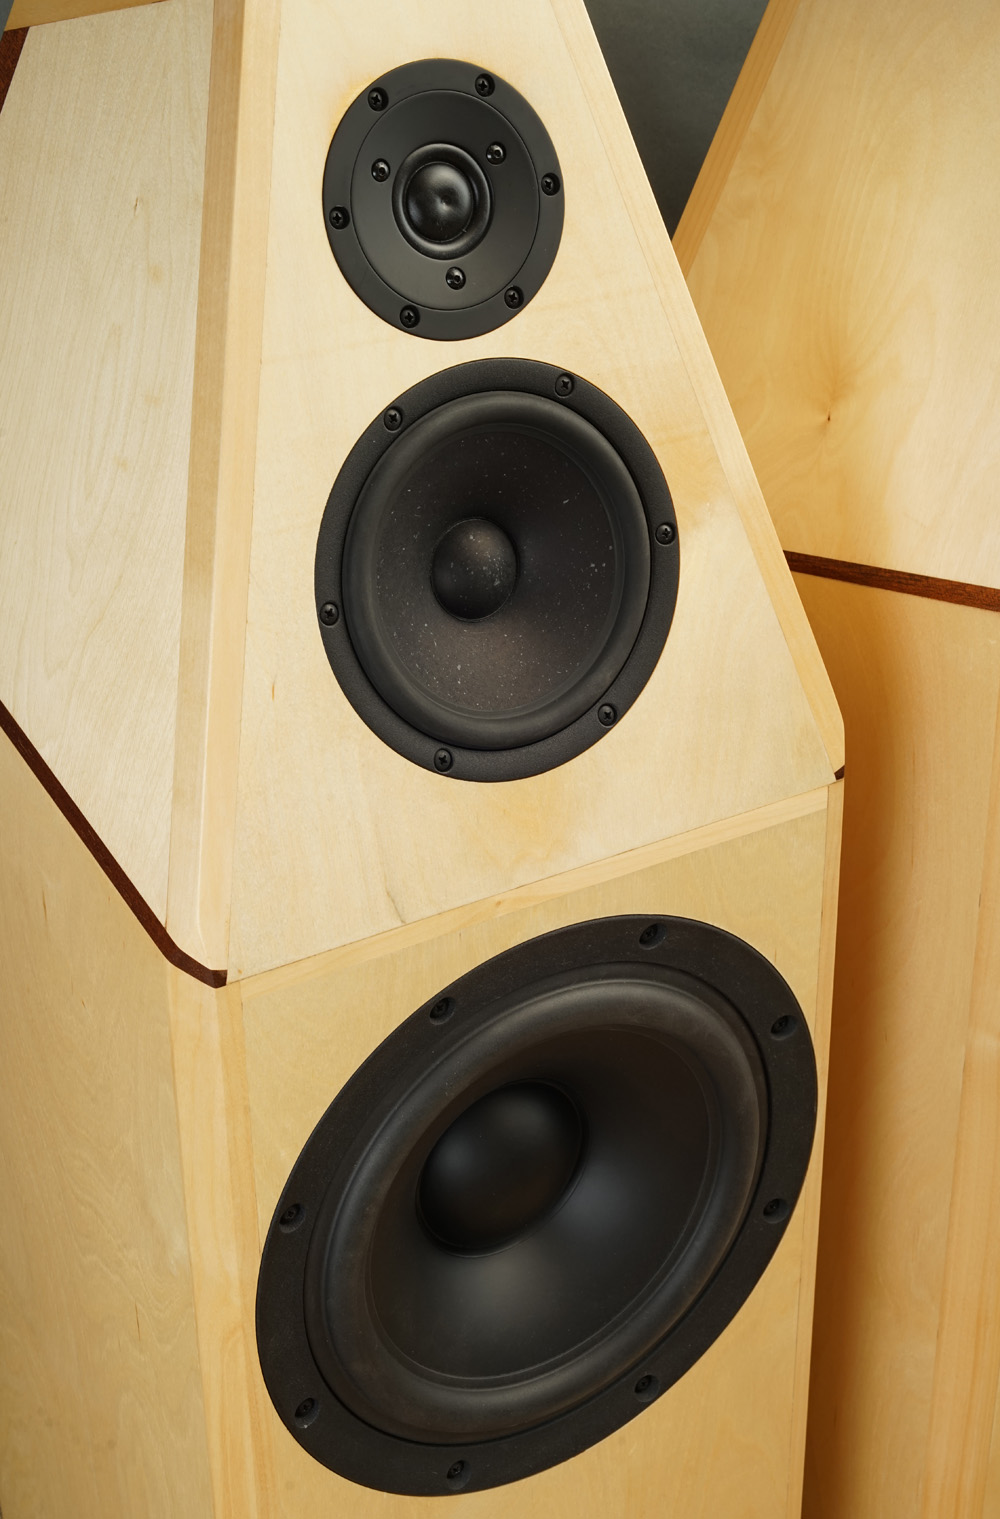
with a hopefully broader DIY appeal, a significant 3-way from a 10" bass driver
supplemented by a 6+1 pyramid on top. It's classic and the concept has
been around for decades because it can provide a substantial soundstage
from a relatively small footprint.
Cabinet work had to be fairly
simple, appealing to a wider audience compared to my more elaborate
4-ways. It's not that cabinet construction is for first-timers because
we have to do a little extra to get the best out of the Satori drivers
we're using, hence a pyramid top holding the middriver and tweeter - and
a tilted front panel for acoustic alignment. The front design
should allow the addition of a front grille - increasing WAF - I hope.
WAF is an unpredictable parametre, but I've tried my best to make this
speaker room-friendly and hopefully suitable for modern interiors. I
know my standard wooden finish is a no-go for younger people (women). If so, I suggest
making the cabs from MDF suitable for spray painting to render your
desired Mercedes finish. I guess they would be really cool in
Ferrari red..
Basics:
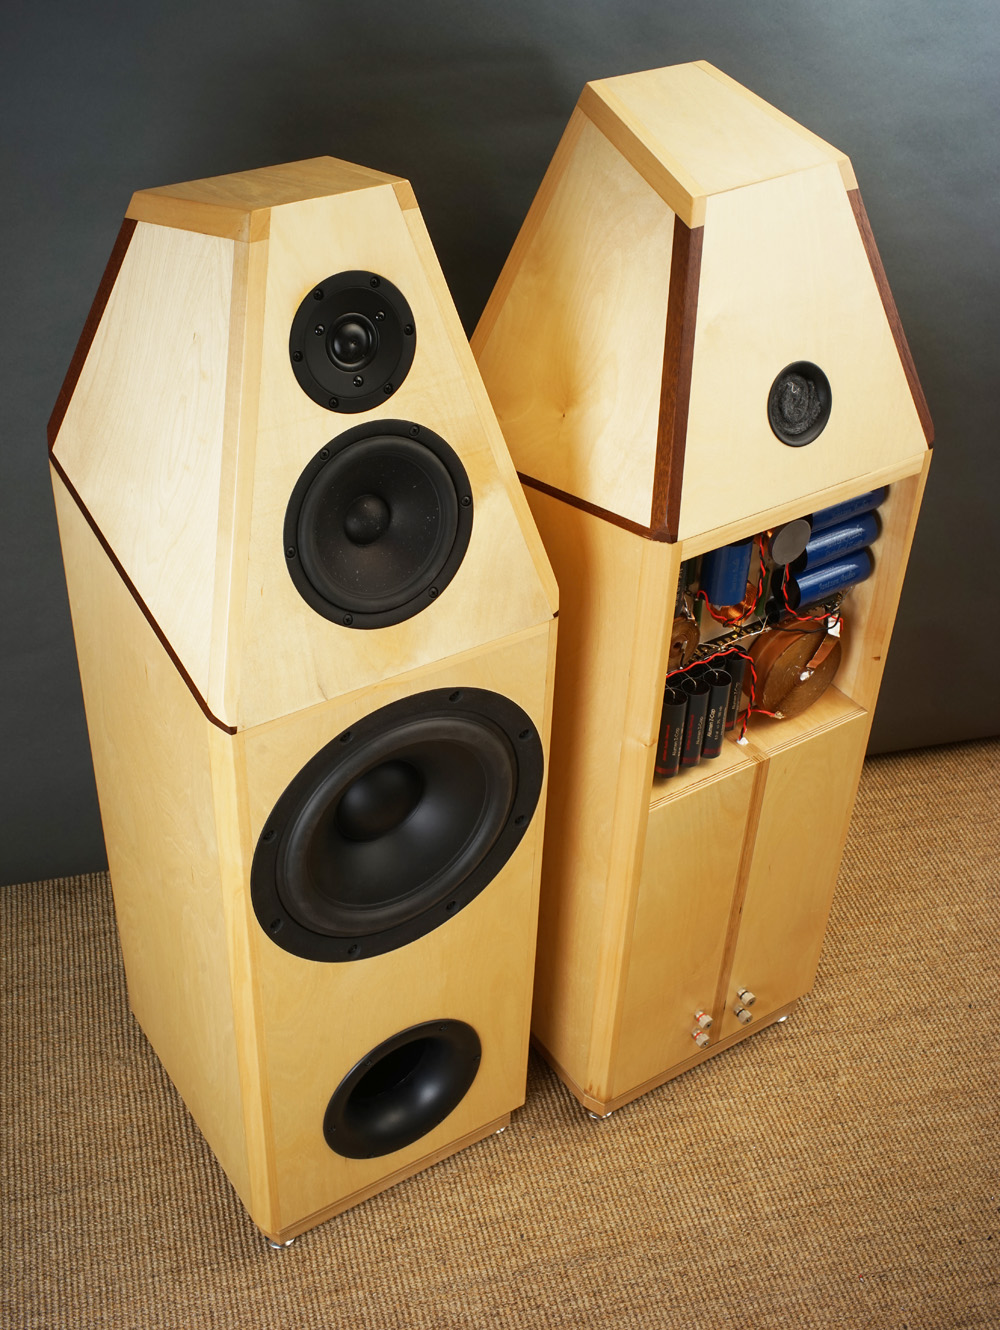
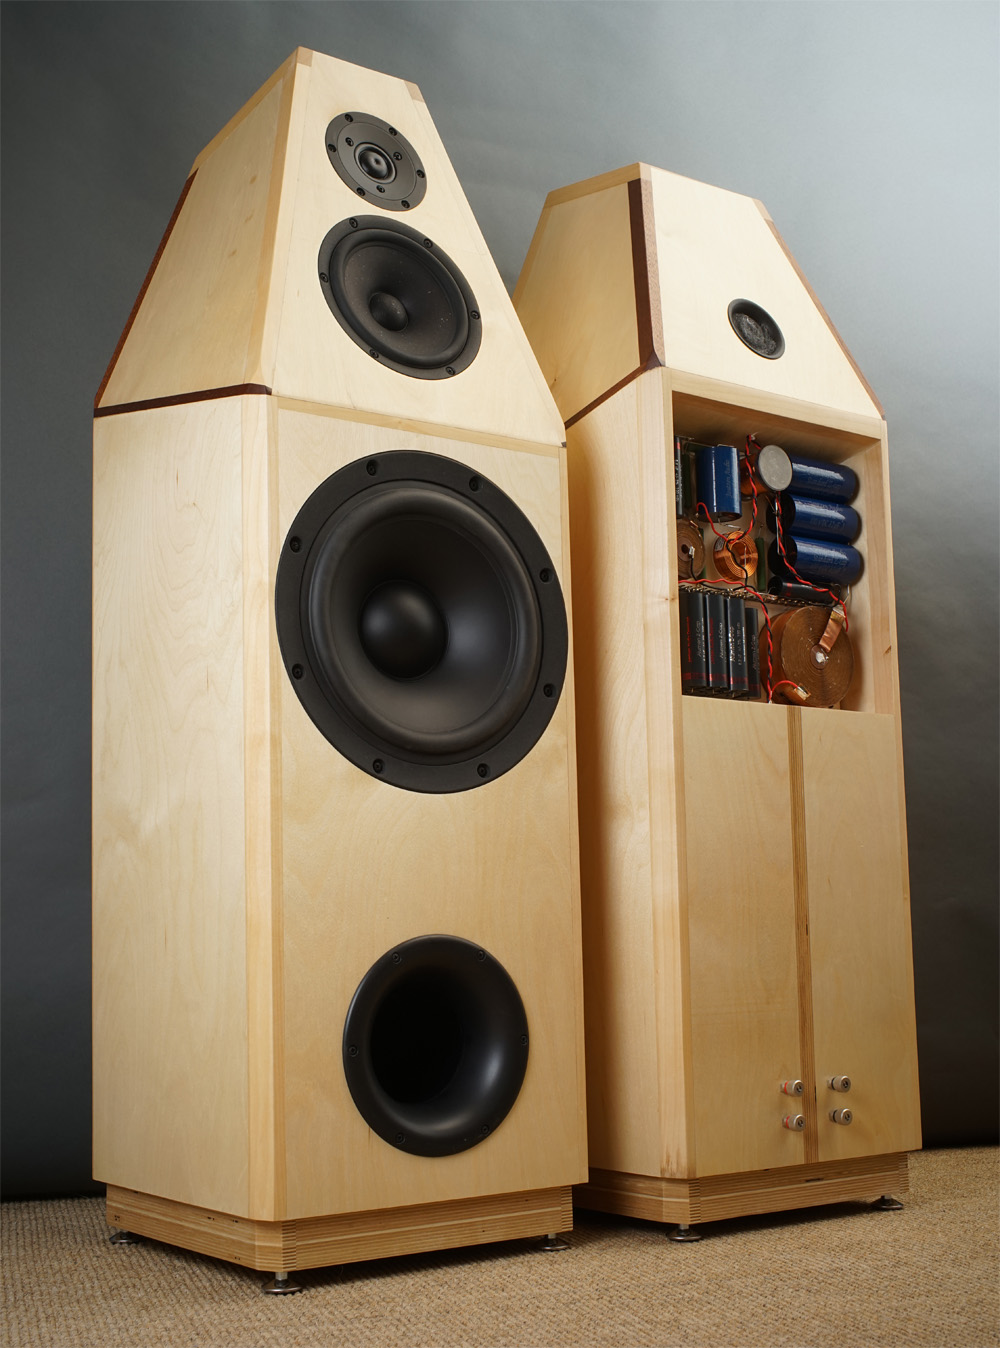
3-way vented/aperiodic system from 1", 6" and 10" drivers.
Cabinet dimensions: 32 cm (W) x 36 cm (D) x 101 cm (H, feet not
included).
Points of crossover: 200 Hz and 1600 Hz, low-order LR2 filter topology.
System sensitivity: ~87 dB.
Impedance: 4-8 Ohms, minimum 3.6 Ohms @ 70 Hz.
Power requirement: 50 wpc minimum, but depends on required playback
level, room size and amplifier power supply.
Power handling: 200 watts, please also read this:
http://www.troelsgravesen.dk/power-handling.htm.
Any burned driver is a misused driver!
Useful links (Please
follow all links before e-mailing!):
http://www.troelsgravesen.dk/tips.htm
http://www.troelsgravesen.dk/tips.htm#CONSTRUCTION_OF_CROSSOVERS
http://www.troelsgravesen.dk/crossovers.htm
http://www.troelsgravesen.dk/LCR-RC.htm
http://www.troelsgravesen.dk/Inverted-Polarity.htm
http://www.troelsgravesen.dk/choices.htm
http://www.troelsgravesen.dk/power-handling.htm


Click images to view large
Download spec here: TW29RN-B-4 MW16P-8 SB29NRX75-6
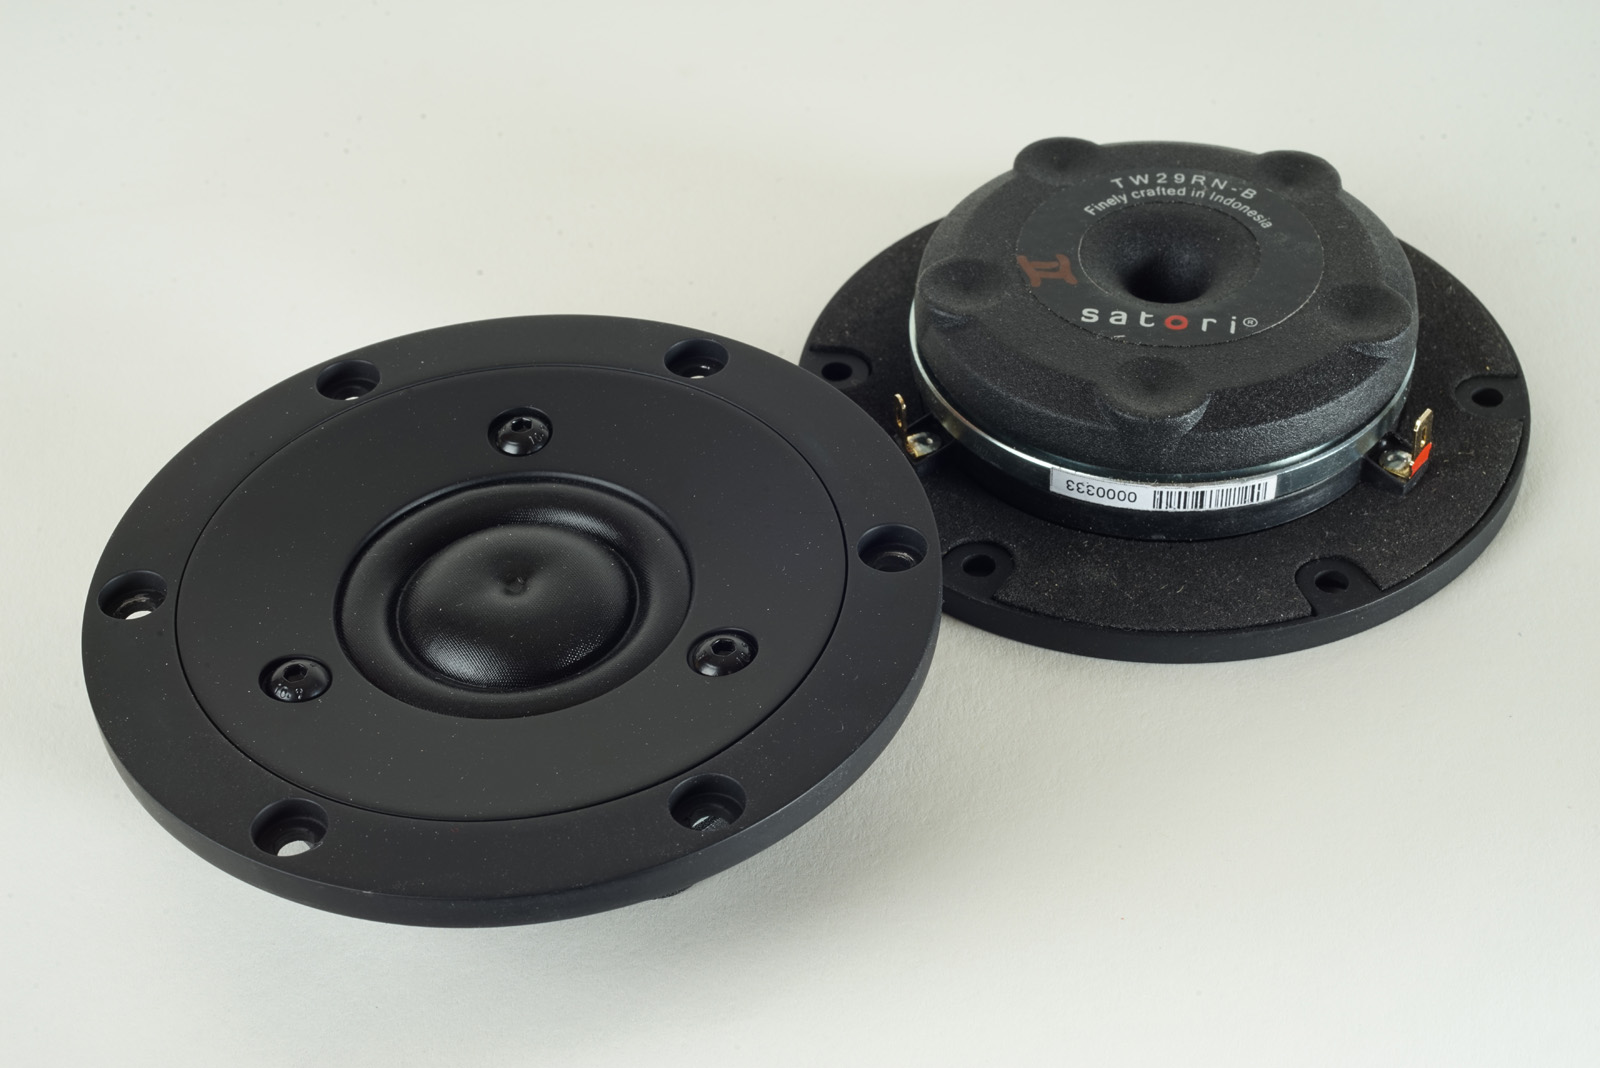
The tweeter used here is the "B" for an all black face plate. Otherwise
same as TW29RN, and they are both 4 Ohms.
The bass driver features a massive basket frame, some 290 mm diameter! A
bit tasteless to my eye. I
think 270 mm could have done, but well, doesn't hurt.
By the way: Make threads in two opposite mounting holes of the bass and mid driver before mounting. Highly recommended!

TW29BN Beryllium dome tweeters. Download data sheet
here.
Actual crossover component values come with
purchase of kit.
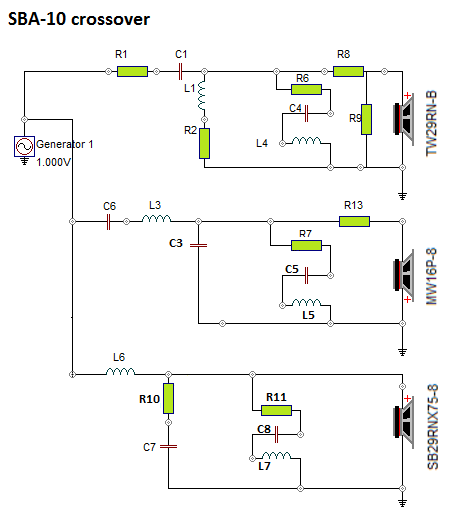
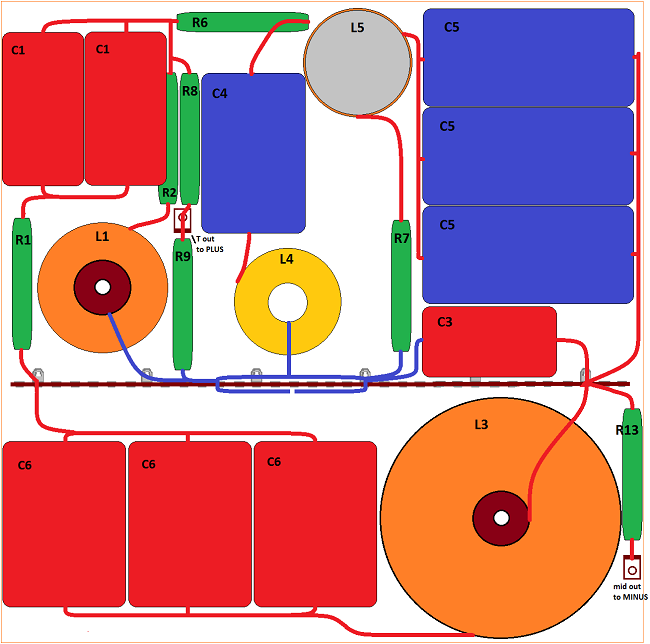
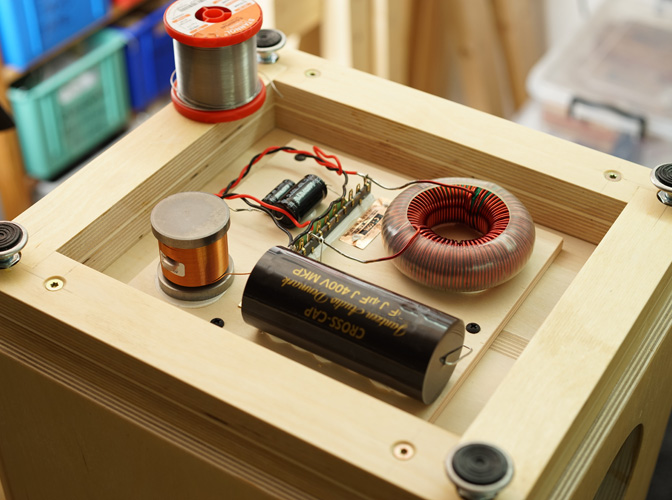
The crossover is a simple LR2 filter with points of crossover at 200 Hz and 1.6 kHz. The Satori tweeter has no trouble handling such a low point of crossover and subsequently we get an excellent even power response in all upper-mid/lower treble. See measurements below. To manage the impedance bump at 80 Hz for the midrange we have the LCR circuit consisting of R7-C5-L5. The upper impedance peak of the bass driver at 80 Hz needs the same treatment, hence R11-C8-L7.
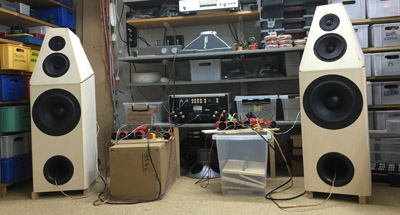
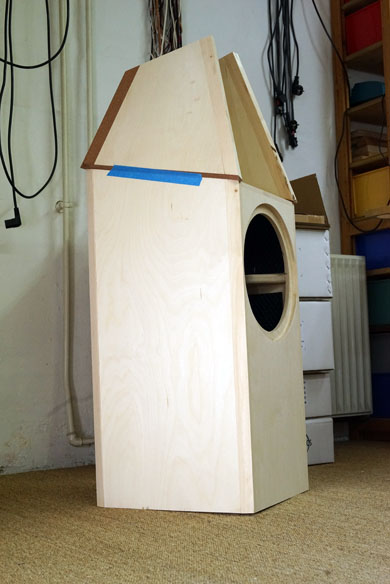
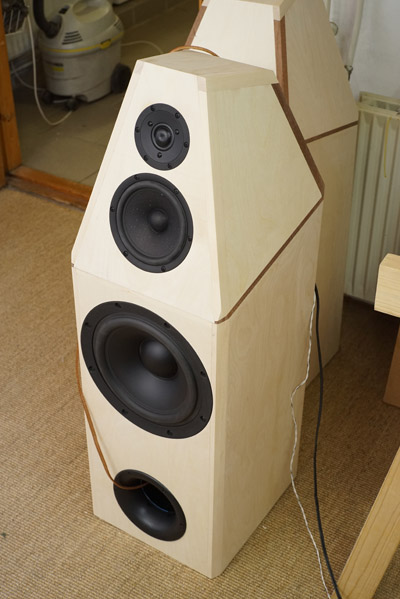
Initial crossover fine-tuning, cabs still needing sanding and lacquer - but hard to wait.
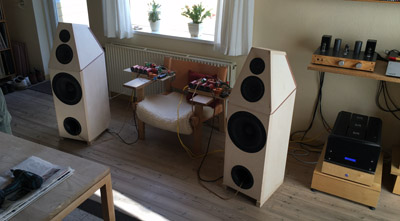
Further fine-tuning in living room with my reference gear in front.
Treble and midrange levels always need a little further correction once
speakers are placed in an actual living space.
The 29NRX75-8 is going to be mounted in a ~55 litres vented cabinet.
Period! Now, we know endless discussions in forums on vented vs
ported and we all now vented are poorer in transient response compared
to closed, and we know we don't get much low-end bass from a closed box
unless we sacrifice efficiency and find another high-Qt driver with a
heavy cone and smaller magnet. ALL compromises! Here we compromise and
use a vented box and get fairly deep response from a modest size
cabinet. The 29NRX even does well down to 45 litres, F3 = 30 Hz (!), and
from 55 litres we have F3 = 27.5 Hz. Not much we get for extra 10 litres
but given the target design we kind of have a few litres to spare.
Using a 100 mm port takes quite some length to make port tuning around
28-30
Hz. Some 40 cm is required, hence an angled port. Make sure the lower
brace allows the bend.
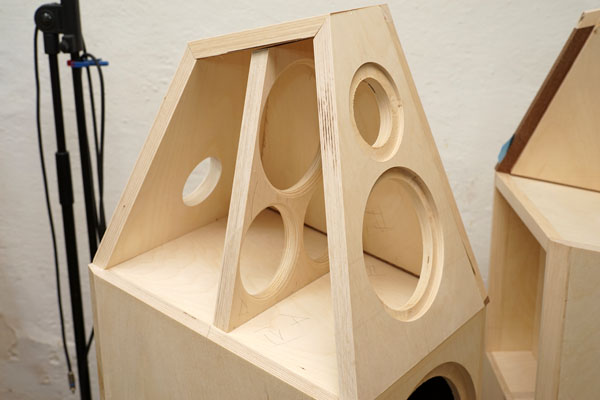
The bass section is pretty straight forward, but the upper pyramid - as
I made it - is
quite a challenge I can tell! All parts have to be cut at specific
angles - not easy! But don't despair! Below you can see how simple it
can be done - and with the same sonic results I guarantee.
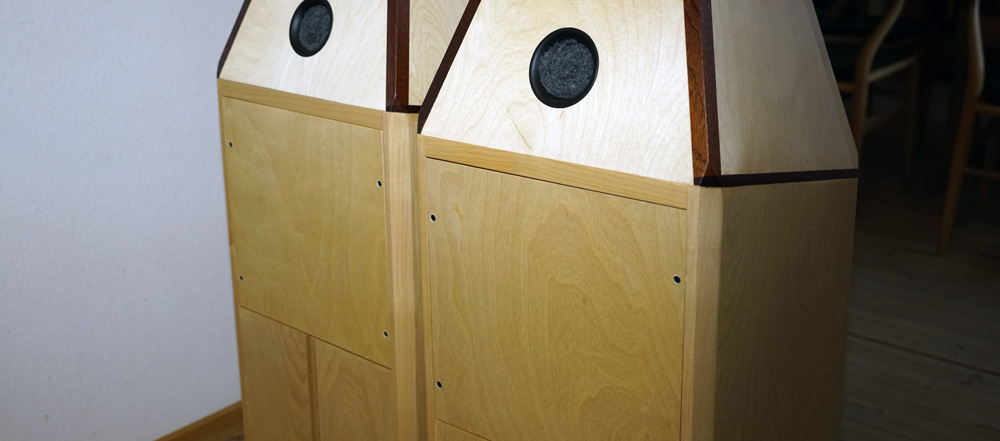
I love the shape of this cabinet. It's compact, it's potent and
something that can make a nice appearance in any living room - if
wife-acceptance is present at all.... Taste can't be argued.
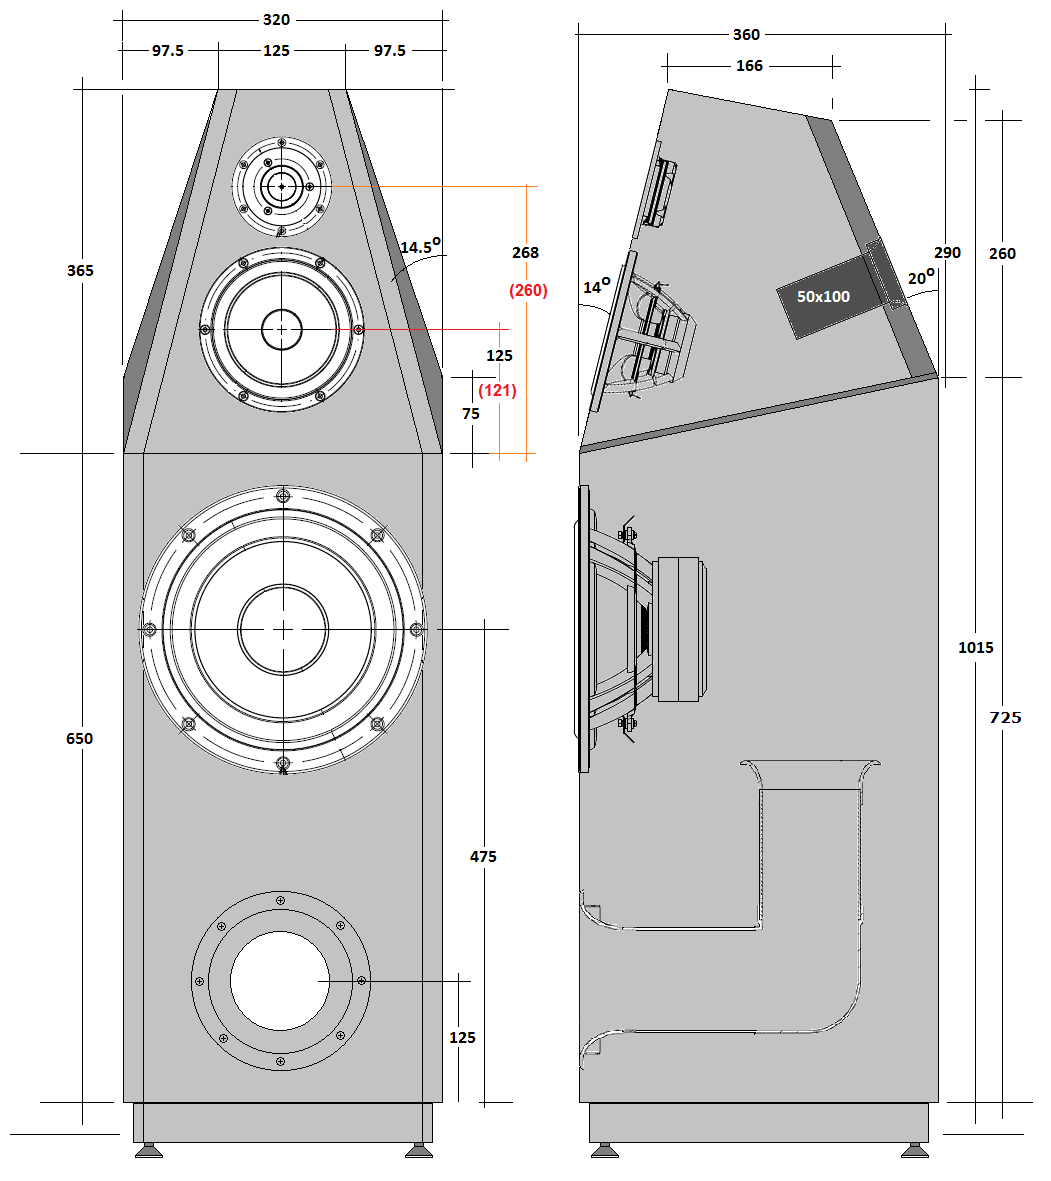
Cabinets, option 1
Click image to view large
The bass cabinet is fairly straight forward, the pyramid quite a pain,
but looks nice to my eyes. Keep outer dimensions and cut mid cabinet
panels one by one by adjusting cutting angles.
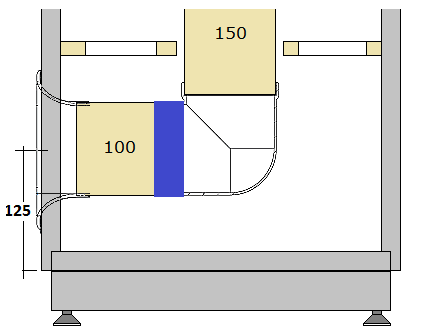
The red numbers in the drawings are the visual height of the mid-driver
and tweeter when seen from the front with the MT panel tilted 14 deg.
When you have the MT panel flat you place the drivers 125 mm and 268 mm
from the bottom line.
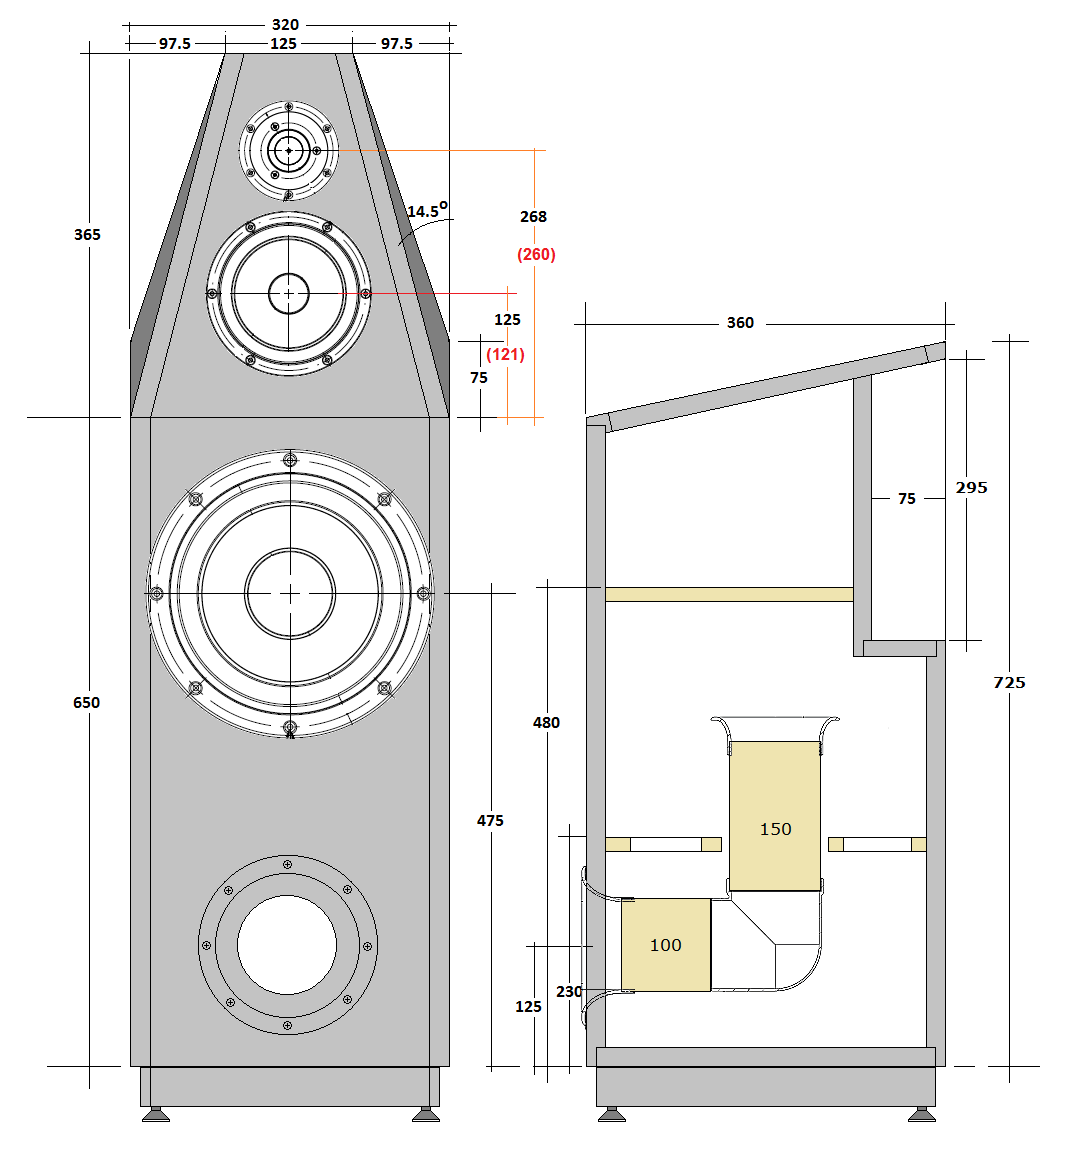
Further bass cabinet details, click image to view large.
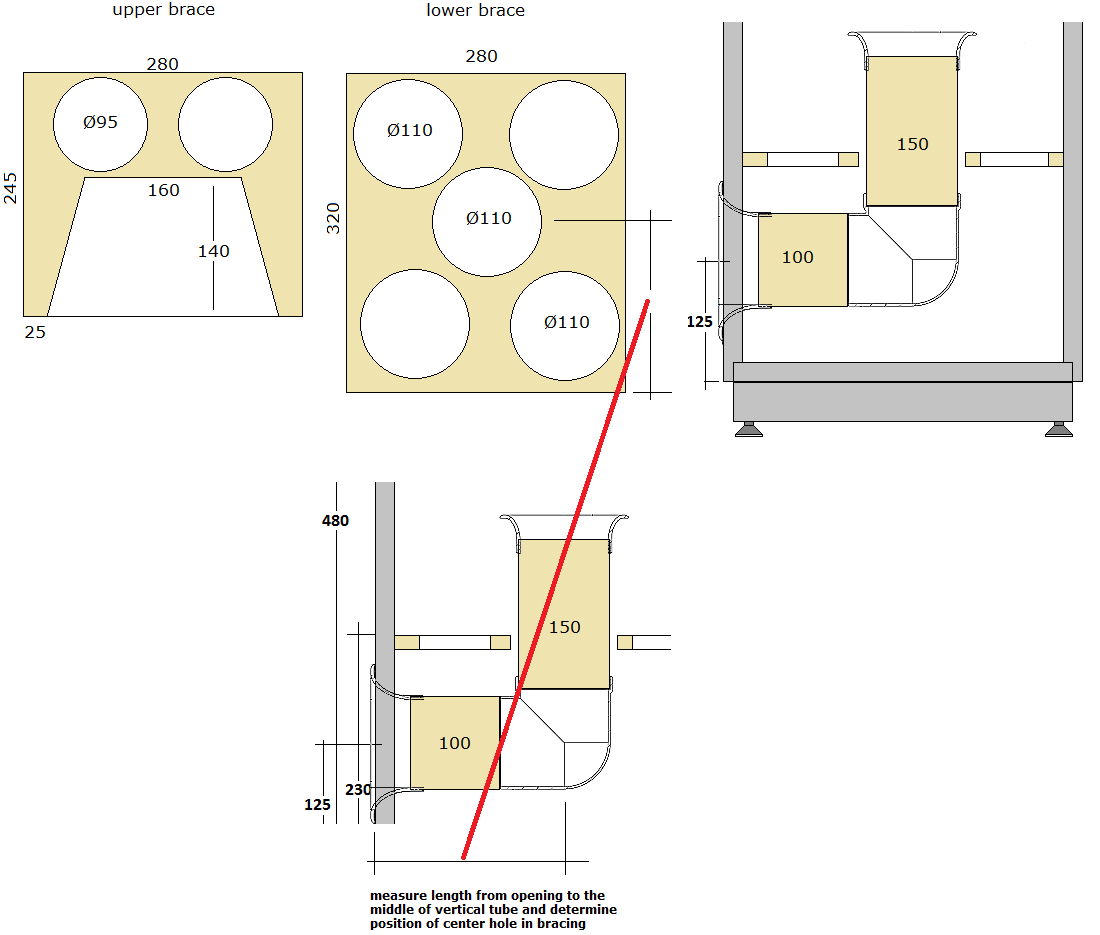
Click image to view large.
Some details on braces. These are based on 20 mm panel thickness.
Make your own cutting/routing planes based on actual dimensions.
Check out this file regarding construction tips: http://www.troelsgravesen.dk/tips.htm
Cabinets, option 2

Click image to view large

Click image to view large
The simple way:
1. Make the bass cabinets from 20 mm Baltic birch or 19 mm MDF. In case
you use 22 mm MDF, increase cabinet depth to make ~55 litre net volume.
+/- 2 litres is OK. Make bracing like option 1.
2. Cut the mid-tweeter front panel exact to dimensions and tilt it back
14 deg. Make a symmetrical pyramid for middriver to make ~12 liter net
volume. +/- 1 litre is OK. The tweeter doesn't need a cabinet as we have
no rear radiation. Use mid brace like option 1.
3. Place bass crossover in the bass cabinet or at the bottom in base
cavity. Crossover for mid-tweeter section in cut-out on the rear.
4. Damp cabinets as to instructions below - and you're safe.
All technical questions to troels.gravesen@hotmail.com
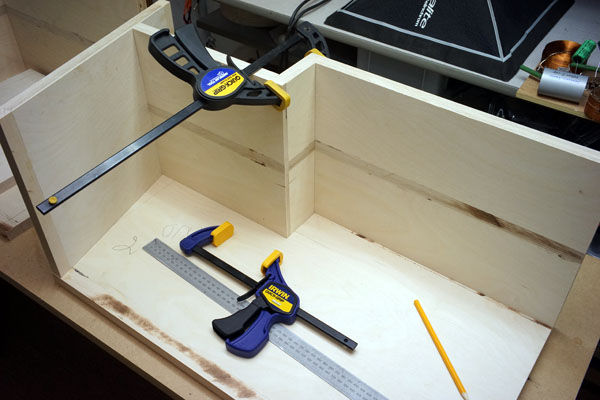
Place side panel on table and start making rear and top panels.
Cutting bass cabinet top panel requires a little help for making the 12
deg tilt.
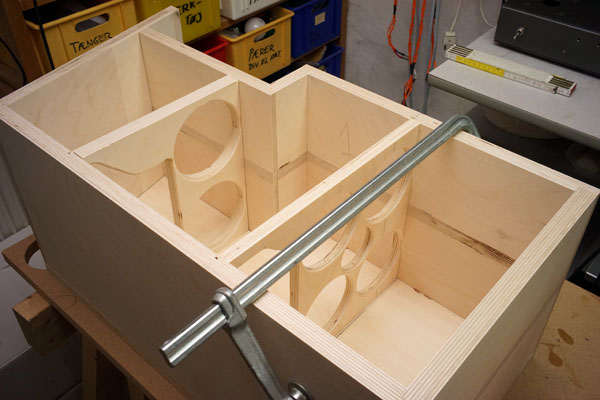
The lower brace was initially made for a passive radiator and later
modified to allow also an angled 100 mm port.
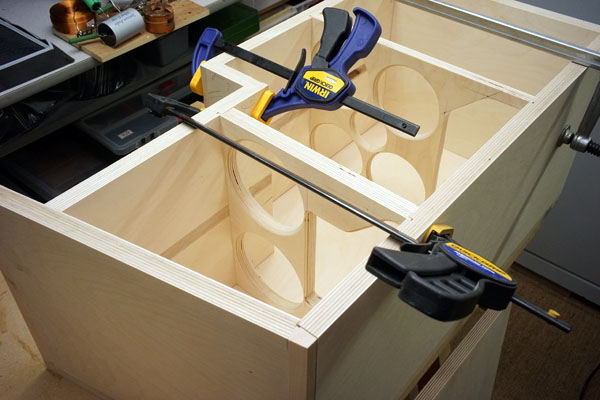
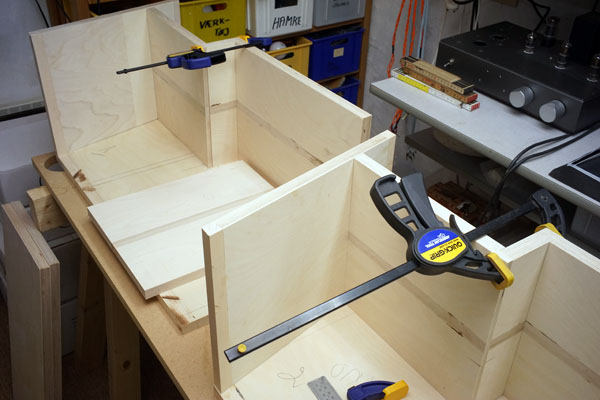
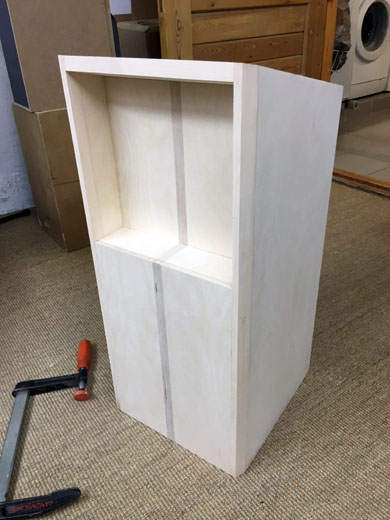
Left: All panels ready for gluing. Start gluing rear and bottom panels
and make sure the the sure they are 90 deg to the side panels!

Right: Glue front and top panel and check other side panel before doing
so.
I suggest making the final side panel a little larger than the other
allowing final adjustments!
Doing cabs from MDF makes this all much easier. Baltic birch and fillets
requires a lot more precision.
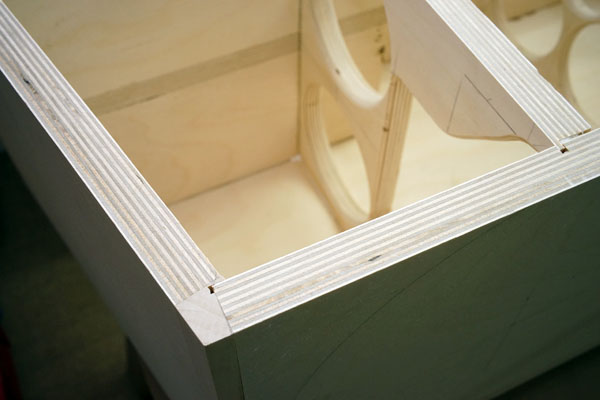
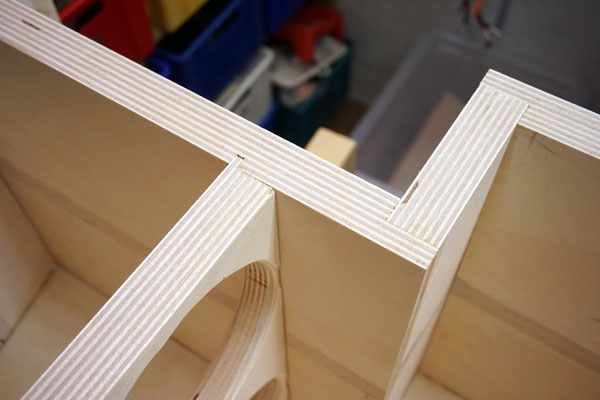
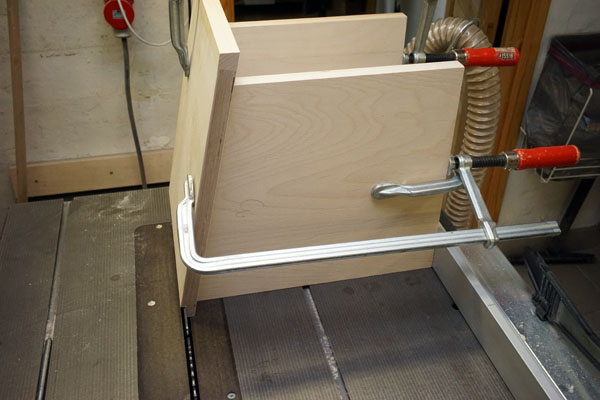
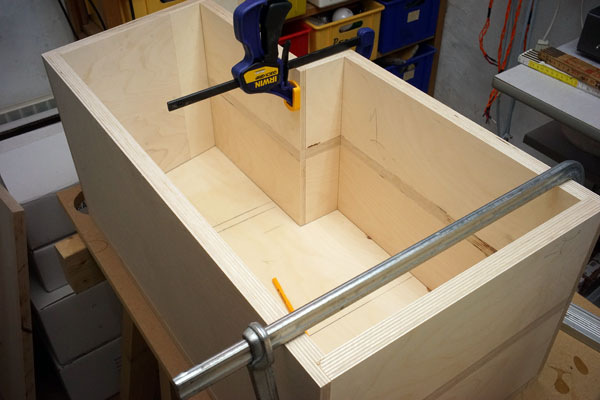
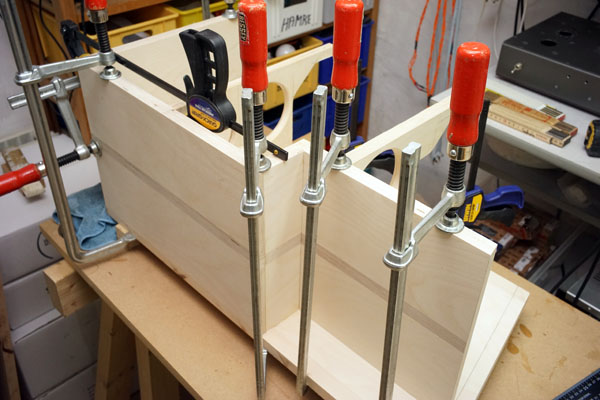
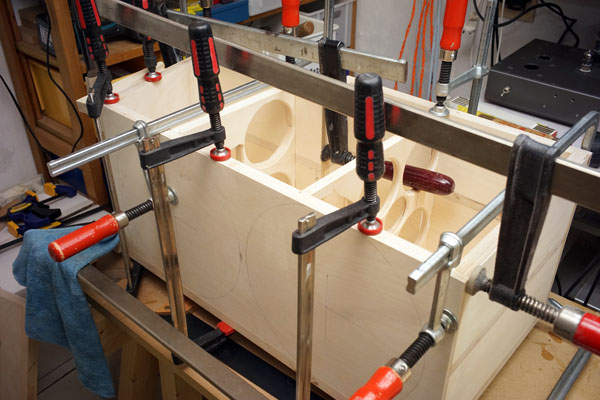
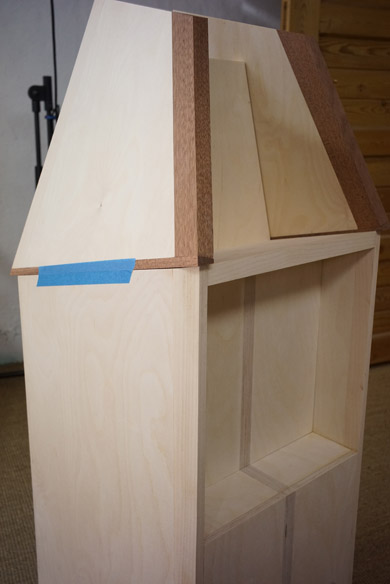
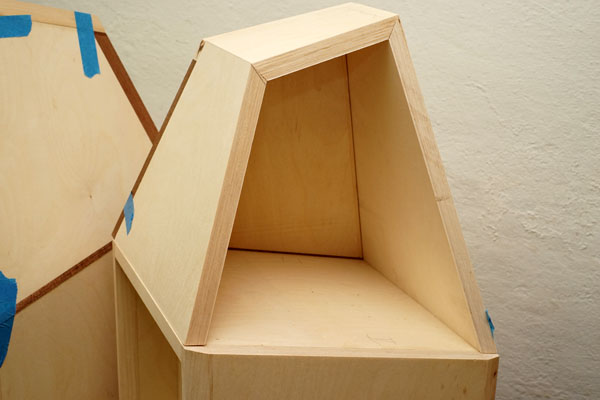
Details after gluing.
Bass sections assembled and vertical fillets chamfered.
You don't have to chamfer the bass cabinets as seen here, but it looks a
lot better.
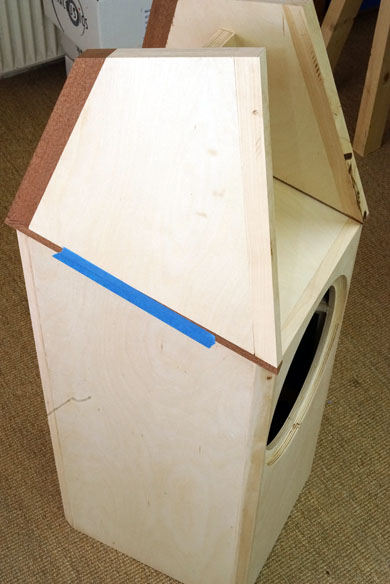
Now, placing a truncated pyramid like this on a sloped support is
calling for trouble as there are no 90o angles any more.
Everything has to be cut into angles - and not only that, it also has to
be mirrored.
One solution is to make the alternative cabinets as shown above. And you
won't get a lesser performing loudspeaker from doing so.
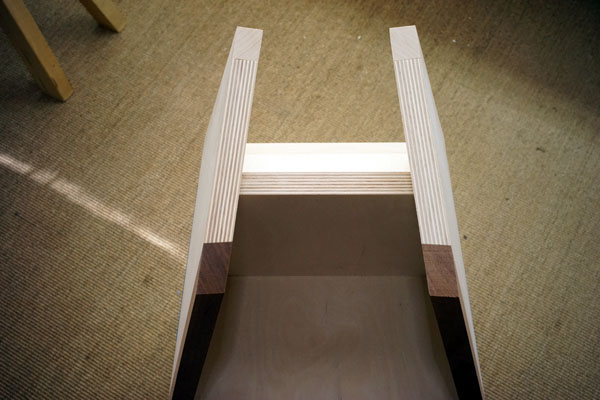
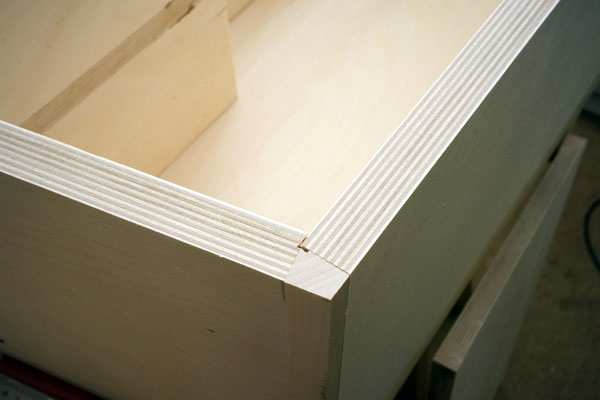
As can be seen above, the front fillets have to be cut at a 5o
angle to match the front of the bass cabinet.

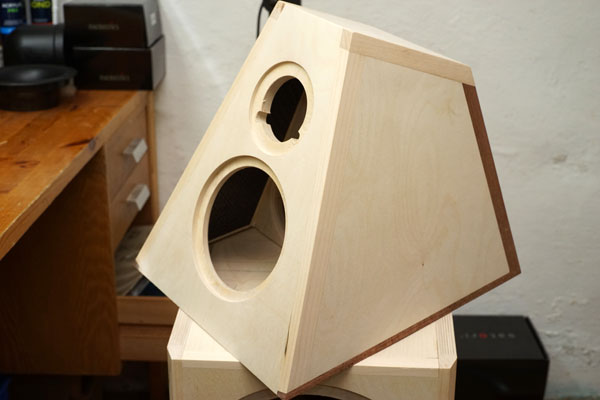
First time fully assembly of mid-tweeter cabinet.
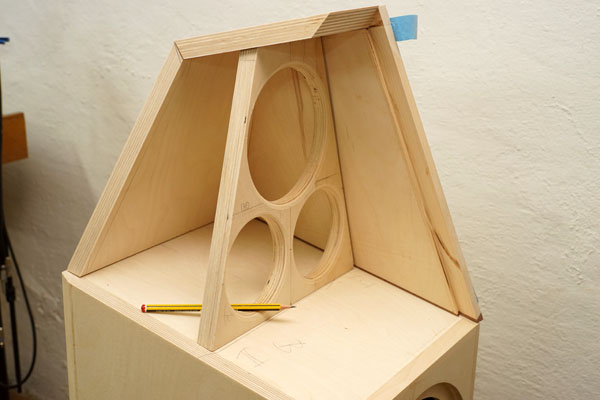
Preparing brace for mid-tweeter section.
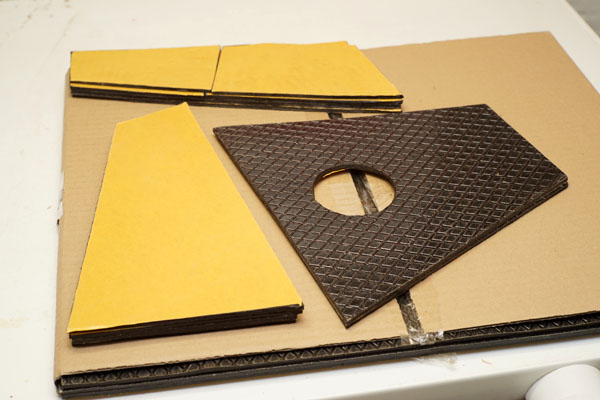
Cutting 4 mm bitumen pads for mid-tweeter section.
Bitumen pads in place and mid-tweeter section ready for gluing to bass
cabinet.
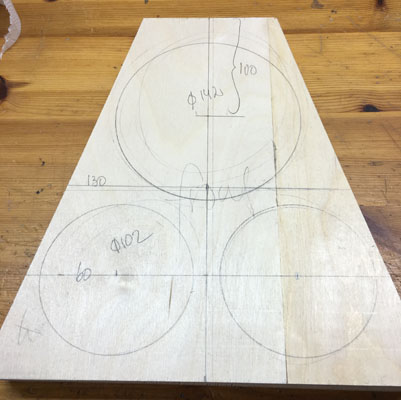
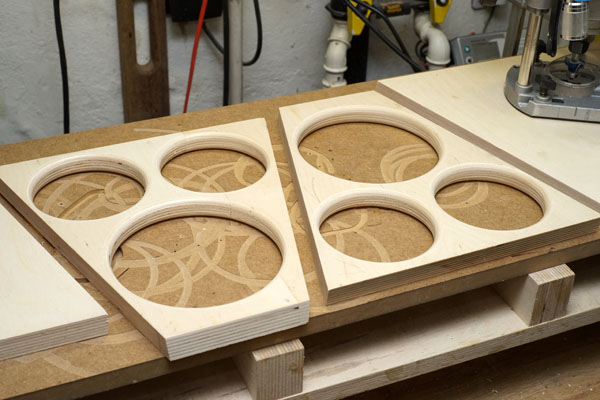
Mid-cabinet bracing. Ø 102 mm and 142 mm.
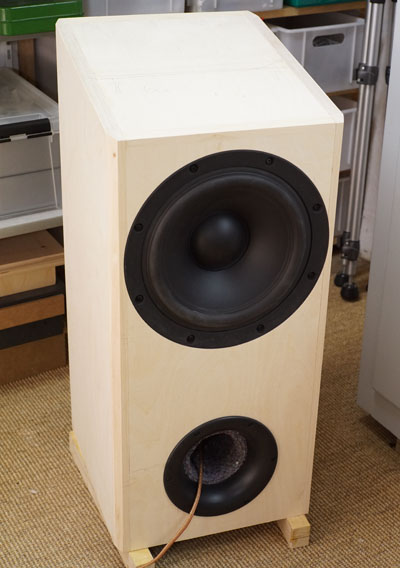
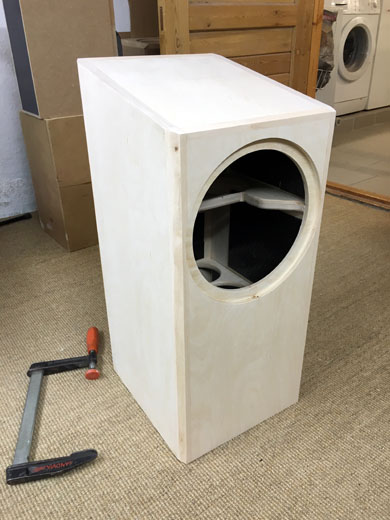
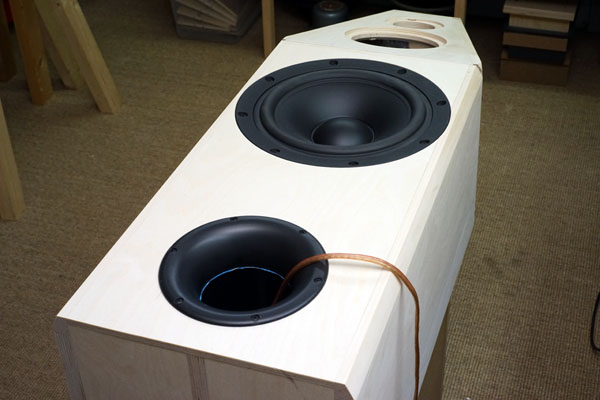
Testing bass driver and port tuning. This driver goes really deep
and has a surprisingly smooth midrange presentation with a nice,
non-aggressive midrange, probably due to the early inherent roll-off. Very suitable for low-order crossover like the
intended LR2 filter.
I tried lining the lower part of the port with felt to get a lower
tuning, works fine if you want to experiment.
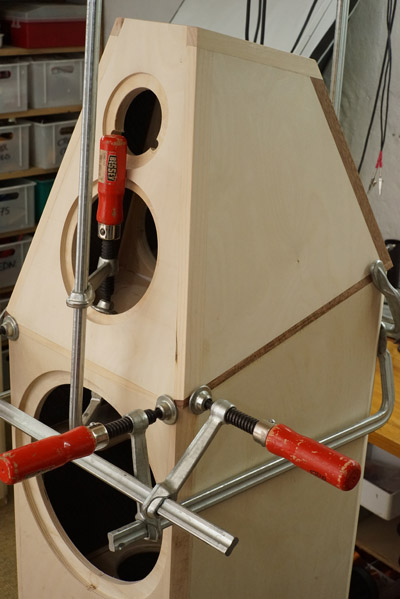
Gluing mid-tweeter section to the bass cabinet.

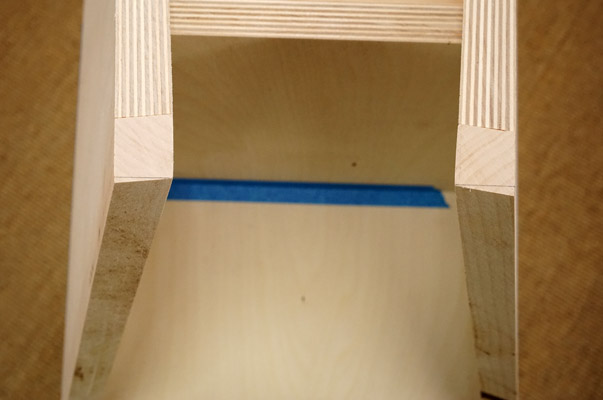
Left: Felt cuts for cabinets. Right: Port fully assembled with tape for
testing. Use glue for final assembly.
This 100 mm port is not made to be used this way,
so you have to assemble the lower horizontal tube to the bend either by
glue or tape.
Port in place.
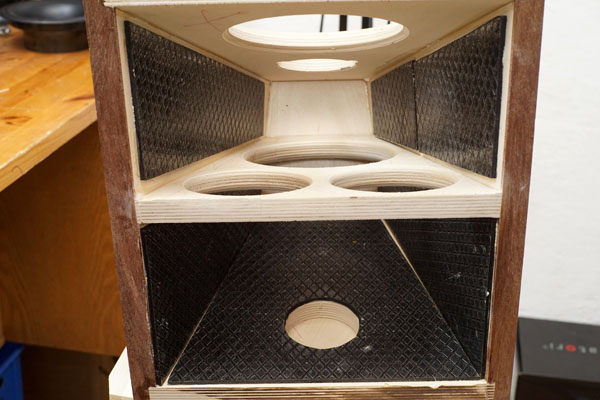
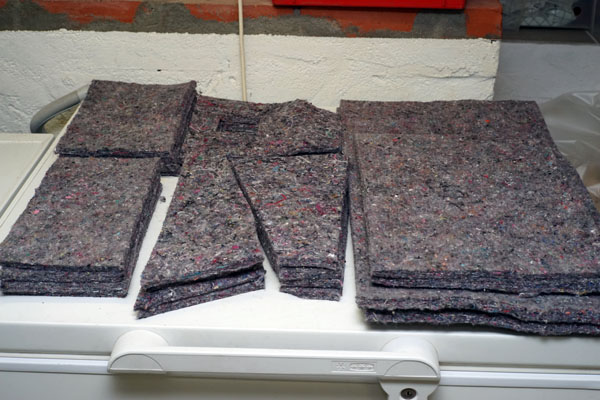
Cabinet Damping
Bass section: Add 8 mm felt to all internal panels, except front. Place
one sheet of acoustilux at bottom and up on sides of lower section,
approx. 32 x 60 cm. That's all for bass section.
Mid-tweeter cabinet: Add 8 mm felt to all internal panels except front
panel. Add acoustilux to rear panel and bottom of rear section. Add
acoustilux til bottom and side panels of front section. That's all.
Mid-cabinet port: Roll a piece of acoustilux, 10 x 20 cm and stuff the
vent, i.e. aperiodic tuning.
Bass data and simulation
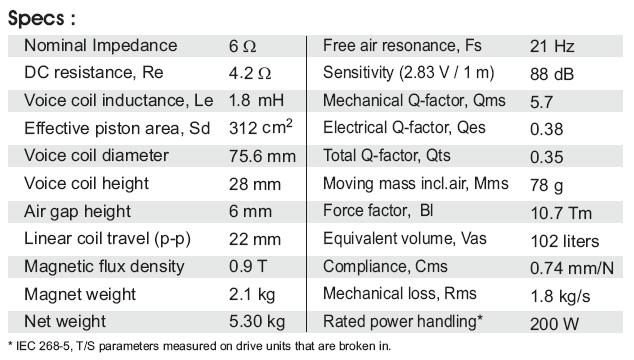
Qt = 0.35, perfect for a close match from
simulation. Read
here.
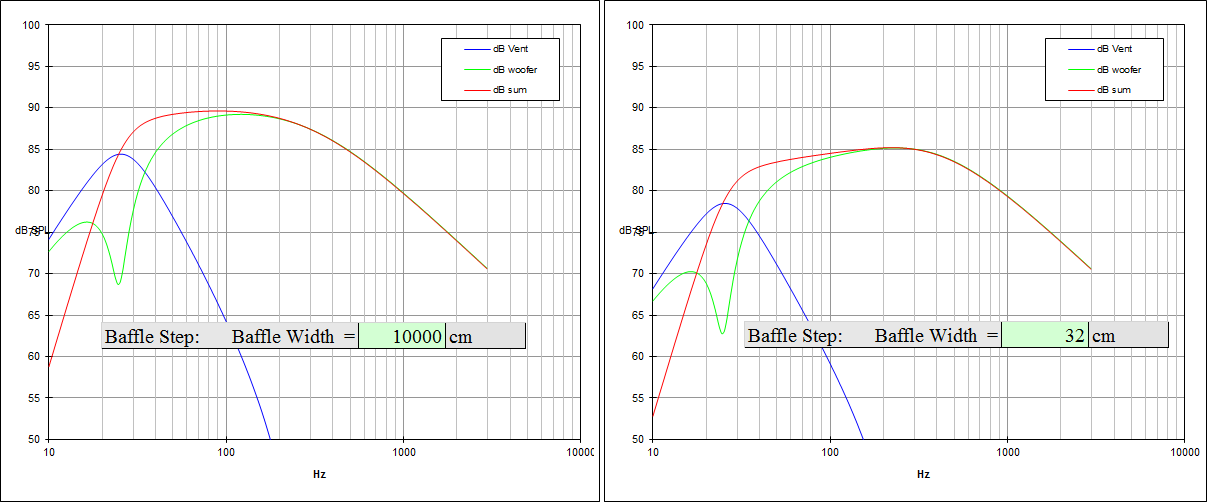
The SS sheet calculates effective response from a given baffle width. Excellent! From target baffle width we can count on some 85 dB sensitivity. From an "infinite" baffle we're close to 89 dB. Now, what the SS sheet doesn't do is adding the room-gain depending on speaker position and room dimensions. No wonder, these calculations depends on a lot of things, but from my other EXCEL sheet I get some 3-4 dB room gain from 55 cm above floor, 80 cm to front wall and 180 cm to side wall. Based on experience we can expect a system sensitivity i the area of 88-89 dB. Not bad from such small enclosure - and bass extension. There's a price to pay for everything - size, efficiency or bass extension. If we want high efficiency and small cabs, we sacrifice bass extension. If we sacrifice efficiency we can get deep bass from small cabs and deep bass plus high efficiency requires large cabinets and efficient drivers. Some manufacturers claim it all from 40 litre - and it's phantasy.
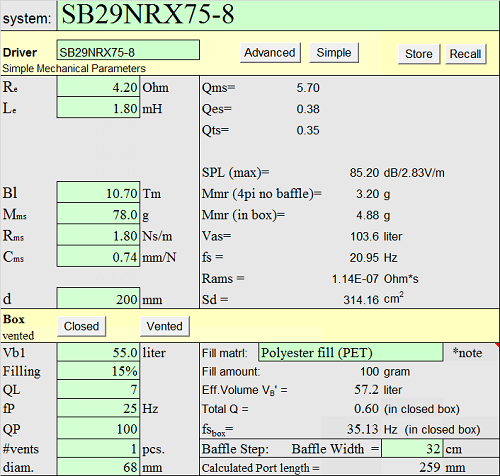
Above the ScanSpeak
simulation EXCEL sheet.
Adding Re, Le, Bl, Mms, Rms and Cms to the sheet obviously provides the SBA TS data.
SPL based on 32 cm baffle.
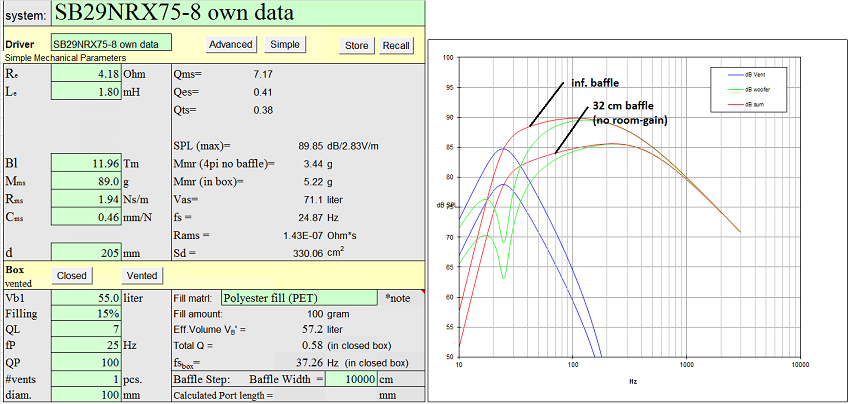
Above my own data after recommended break-in procedure.
Slightly higher Qt and lower Vas. Added mass method used (50 grams).
This doesn't change my choice of cabinet volume and port tuning.
Mid-tweeter panel tilt
A few words on mid-tweeter front panel tilt. 14 degrees seems an awful
lot and more than needed for making an acoustically alignment of the
midrange and tweeter.
The acoustic offset of the tweeter can be measured with the method
described here:
http://www.troelsgravesen.dk/Time-Alignment.htm
Acoustic alignment can be achieved by making a stepped baffle as I have
done many times over the past few years. Another way is to tilt the
front panel and listening to the drivers slightly off-axis, which is not
always a disadvantage and most drivers display a fairly decent
dispersion at least 15-30 deg. off-axis. We're here dealing with a
relatively small 6" displaying good dispersion up to 3 kHz even at 30
deg. off-axis:
Actually we have a flatter response 30 deg. off-axis compared to on-axis
(blue). Green is 30 deg. and red is 60 deg.
The other thing we get from tilting front panel is a reduction in floor
bounce - early reflections from the floor, and it's not trivial. Floor
reflections may smear midrange detail and sense of depth in the acoustic
scenario. Always have a thick rug in front of your speakers.
Everything that can be counted does not necessarily count; everything that counts cannot necessarily be counted". Albert Einstein.
A few comments on MEASUREMENTS before you start
interpreting all the readings below.
First of all, if we think measurements will tell us how a speaker
sounds, we're wrong. The perception of sound is way too subjective to be
reflected in any measurements we can perform. A loudspeaker system is
meant to give us a satisfying idea of an acoustic event and for some
people a pair of 5 USD ear-plugs are enough, others spend 200 kUSD on a
truly full-range pair of speakers - and the latter may not be happier
than the former.
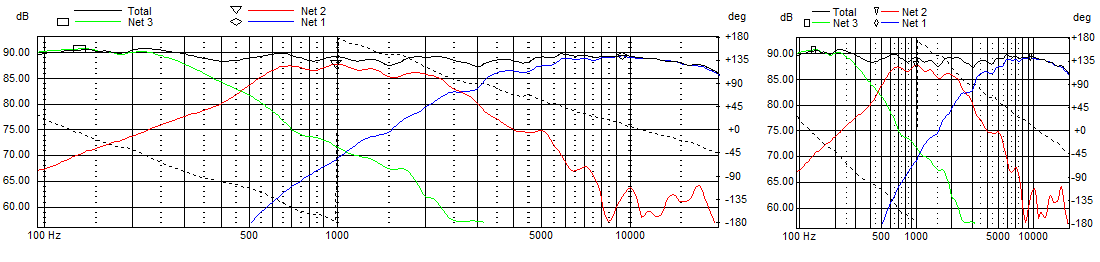
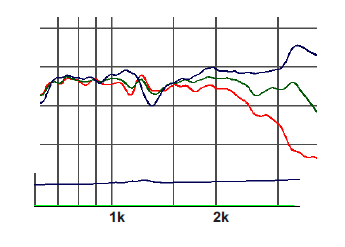
Above you see the same graph presented with the
same 50 dB scaling, but at
different width and height. Now, we may think the graph to the right looks rather
rugged, but if we stretch out the presentation (left) it suddenly looks
rather smooth. The left presentation is often used by driver manufacturers to make their frequency response graphs look better. If we
apply e.g. 1/6 or 1/3 octave smoothing things look even better. Just
this to display how easily measurements can be manipulated to look nice.
Measurements may give us an idea of tonal balance of a system, i.e. too
much or too little energy in certain areas. Measurements may tell us
about bass extension if far-field measurements are merged with
near-field measurements. In addition to this, ports may contribute to
bass extension. Most of us diy'ers do not have access to an anechoic
room for full-range measurements from 20-20000 Hz, nor do manufacturers
for that matter.
Some further info here on commercial speakers:
http://www.troelsgravesen.dk/Stereophile.htm. If I ever made a
speaker displaying such un-linear response, no one would probably ever
build it.
What cannot be seen is what kind of bass performance we get in a given
room. Bass performance is highly dependent on in-room placement of your
speaker and the same speaker can be boomy in one place and lean in
another.
Actual SPL level at 1 meter distance and 2.8V input is useful for en
estimate of system sensitivity and combined with the impedance profile
may give an idea of how powerful an amplifier is needed to drive the
speaker to adequate levels.
What measurements do not tell is the very sound of the speaker unless
displaying serious linear distortion. The level of transparency, the
ability to resolve micro-details, the "speed" of the bass, etc., cannot
be derived from these data. Distortion measurements rarely tell much
unless seriously bad, and most modern drivers display low distortion
within their specified operating range.
Many people put way too much into these graphs and my comments here are
only meant as warning against over-interpretation. There are more to
good sound than what can be extracted from a few graphs. Every graph
needs interpretation in terms of what it means sonically and how it
impacts our choice of mating drivers, cabinet and crossover design.
What measurements certainly do not tell is the sonic signature of the
drivers, because cones made from polyprop, alu, Kevlar, paper, glass
fiber, carbon fiber, magnesium, ceramics or even diamonds all have their
way of colouring the sound.
The choice of crossover topology has a huge impact on the sound
we get. We may produce the same frequency response from 1st, 2nd or 4th
order filters and they may be Butterworth, Linkwitz-Riley, Bessel and
others and they all sound different, very different indeed, so take
care!
Let's start looking at bass cabinet at port tuning. Above to the left
the impedance +/- felt lining of horizotal part of the port. This reduce
Fp to around 28 Hz. I'll leave it there.
Above to the right the significance of the mid LCR circuit flattening
the basic resonance of the driver in cabinet with port stuffed as
described.
Without the LCR circuit we have the orange graph, with the LCR we have
the green graph, smooth roll-off - as should be. This is a near-field
response, hence does not reflect true performance above ~200 Hz.
Left: The basic response of the bass driver compared to AT 10C77 under
the same conditions. As can be seen not as efficient as the AT driver,
but nice low-end response. Both measurement merged with near-field
response @ 250 Hz. Now, what you see below 250 Hz is not the
true response of the driver in cabinet, but it gives us a good idea of
low-end extension. What comes from the port is not included here, hence
overall extension is better than seen here.
To the right we have the response of all driver in actual cabinet. What
can be read from this is an estimated system sensitivity of 87 dB/2.8V
(response in the middle midrange of mid and tweeter).This is not high
efficiency territory, but we have deep bass from a small footprint in
return. All a matter of choices.
The tweeter on this baffle is a dream! Plus/minus 1 dB from 1200 Hz to
above 15 kHz. Couldn't ask for more. This makes crossover work very easy
and we can pick almost any point of crossover we want. Not often that
happens. What could be wanted is an 8 Ohm version of this great tweeter,
which would save quite some money on the series capacitors. 95 dB
sensitivity is way above what is needed for any SBA construction. 95 dB
is excellent if we could persuade people to start with a 15" bass driver
in a 180 liter cabinet!
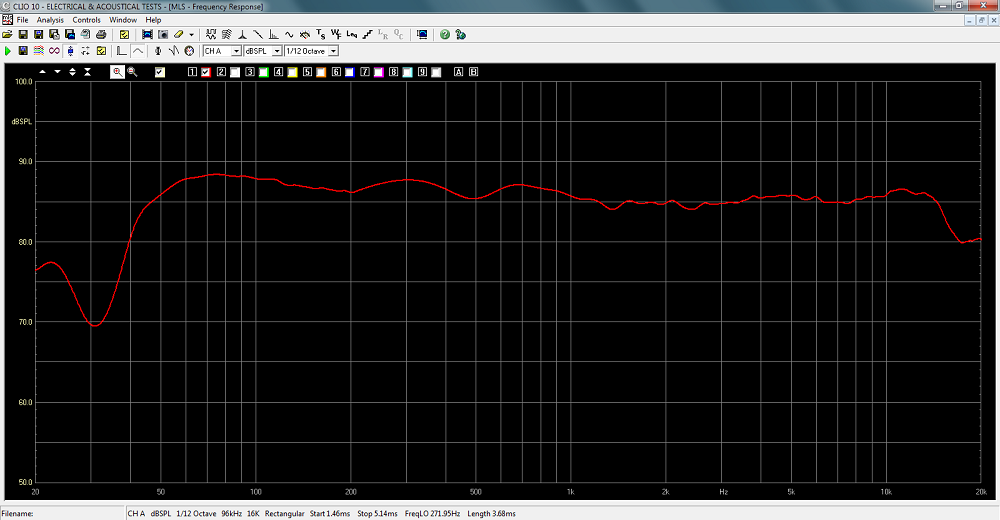
Above a screenshot from the CLIO of the frequency response, merged at
200 Hz with bass nearfield response.
Port contribution is not included. System sensitivity: 87 dB/2.8V/1
meter (average of midrange level).
Left: Individual and summed response from mid and tweeter. Purple is
with same polarity of mid and tweeter. Point of crossover = 1.6 kHz.
Right: Different tweeter levels depending on value of R1. Default value
for R1 = 5R6 and this is really what I want the speaker to sound like,
so no extra resistors included in kit.
Left: Horizontal dispersion at 0, 10, 20, 30 and 40 deg. off-axis.
Right: Final system impedance. Minimum 3.6 Ohm at 70 Hz.
Left:
Right: MT CSD display @ 25 dB scaling.
Right: Green is response at tweeter height, so don't think this doped
dome doesn't do 20 kHz.
Be dome:
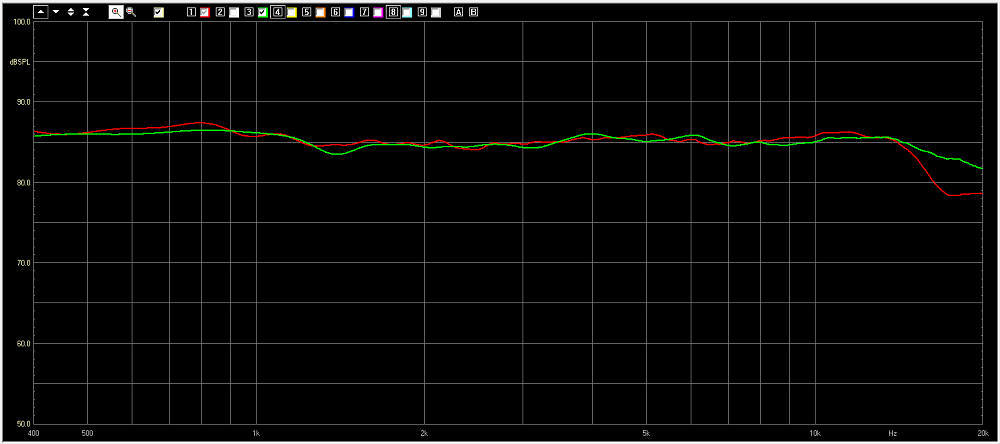
TW29BN Be dome and MW16P-8 were set up in my prototype front panels and fed the
same signal as the TW29RN-B and above you can see the result.
Red = TW29RN-B and green = TW29BN.
No changes to the crossover - and highly recommended.
All technical questions to troels.gravesen@hotmail.com
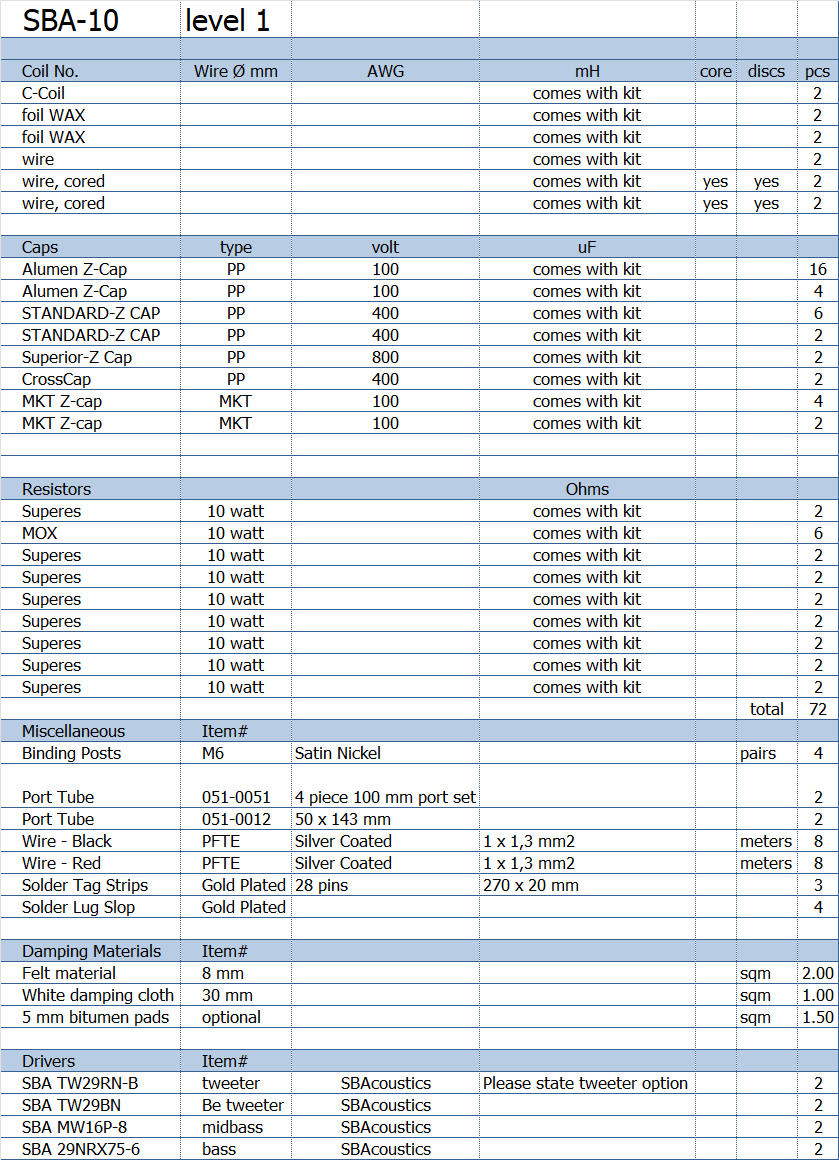
Above level 1 kit. Crossover components' values to come with the kit.
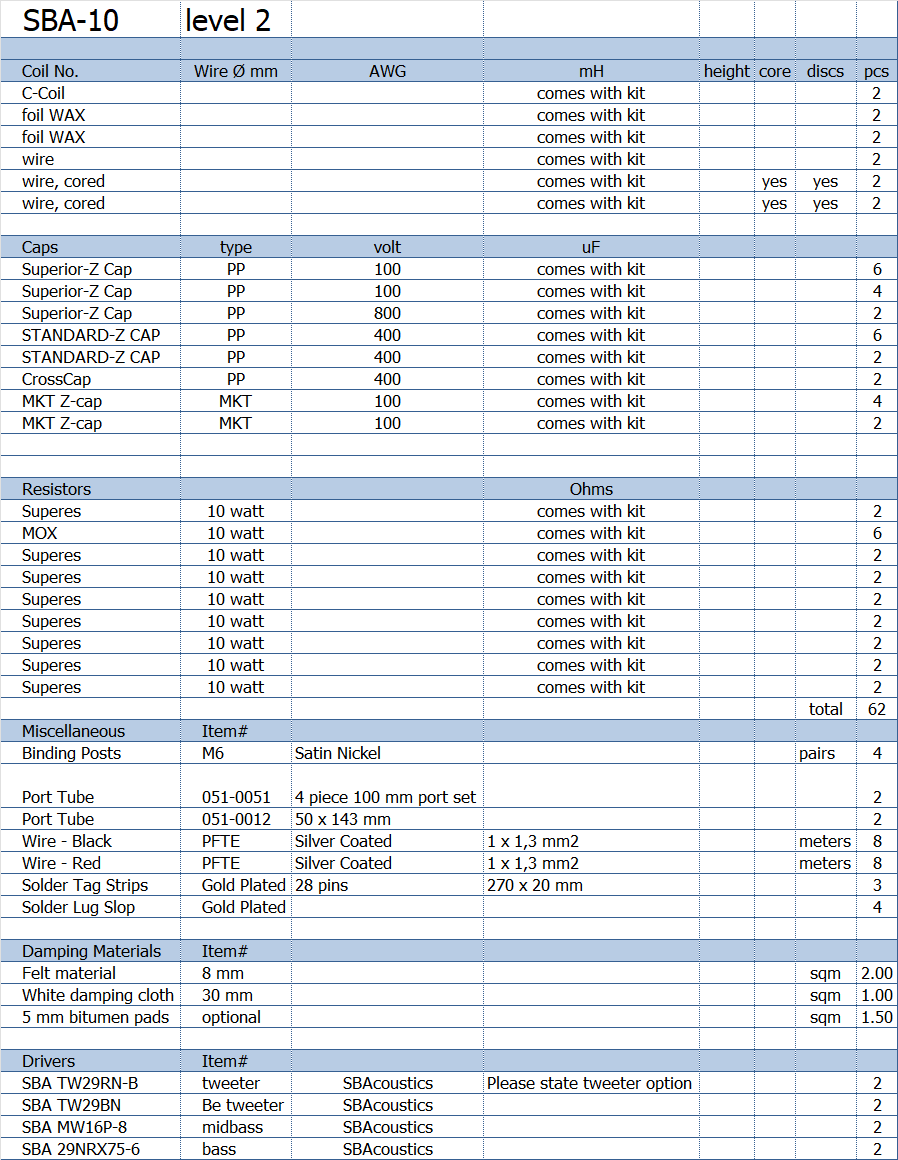
Above level 2
kit. Crossover
components' values to come with the kit.
Series capacitors for mid and tweeter replaced by
Superior-Z caps
There was a level 3 kit once, but these drivers
with STANDARD-Z just didn't sell - and really didn't make sense.
All builders wanted better than this, thus level 3 discontinued.
You can buy the kit with or without the drivers - or some of the drivers
if you already have some.
Please ask Jantzen Audio
for options.
All kit and component prices may be subject to change and are always to be confirmed by Jantzen Audio Denmark.
Download Kit
Sale Presentations:

All technical questions to troels.gravesen@hotmail.com
All questions regarding purchase of kits, please mail Jantzen Audio at contact@jantzen-audio.com
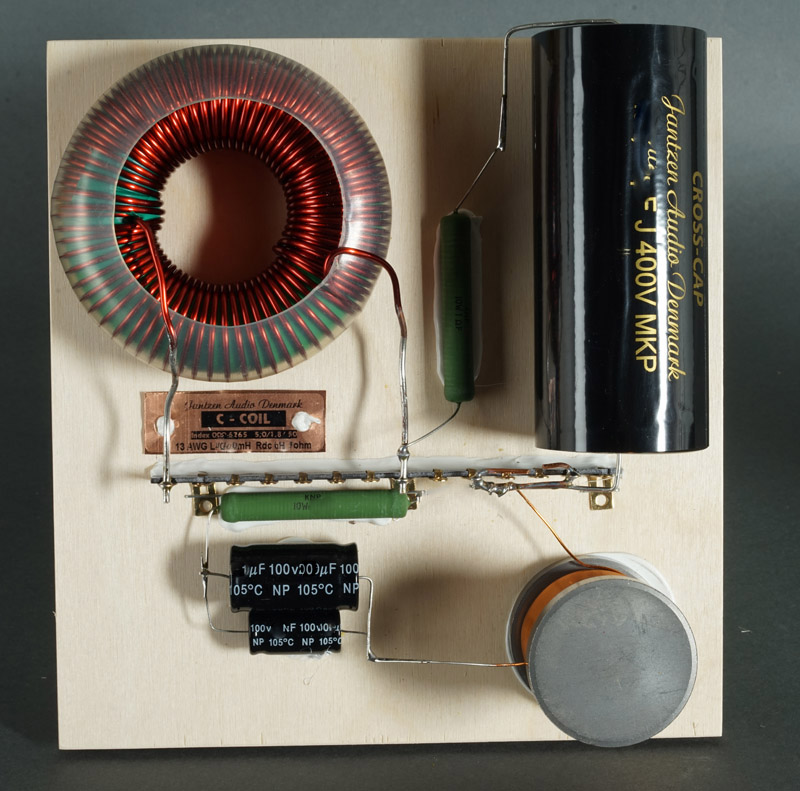
CROSSOVER-LAYOUT
BACK TO INDEX
Mid-tweeter section. C6 consists of 8 capacitors in parallel to make
target value.
Board = 270 (height) x 270 (width) mm.
Components' values come with kit.
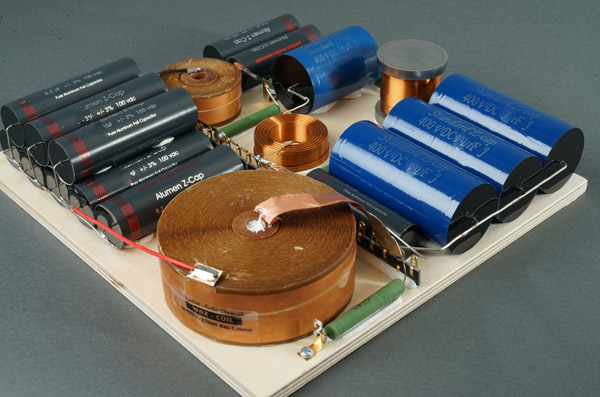
Above the Superior-Z version.
You may also want to try Sup-Z for midrange and Alumen-Z for tweeter.
Ask Jantzen Audio.
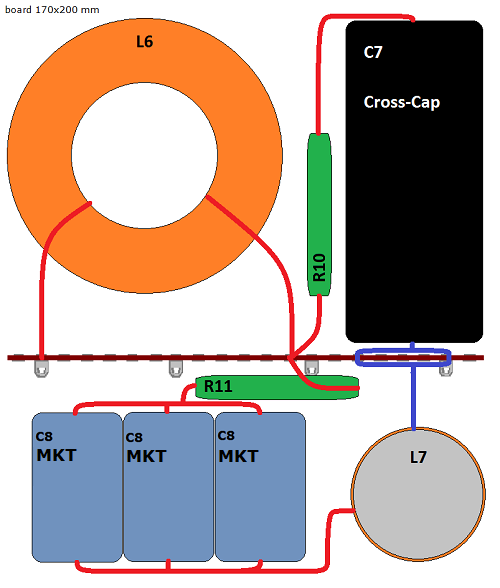
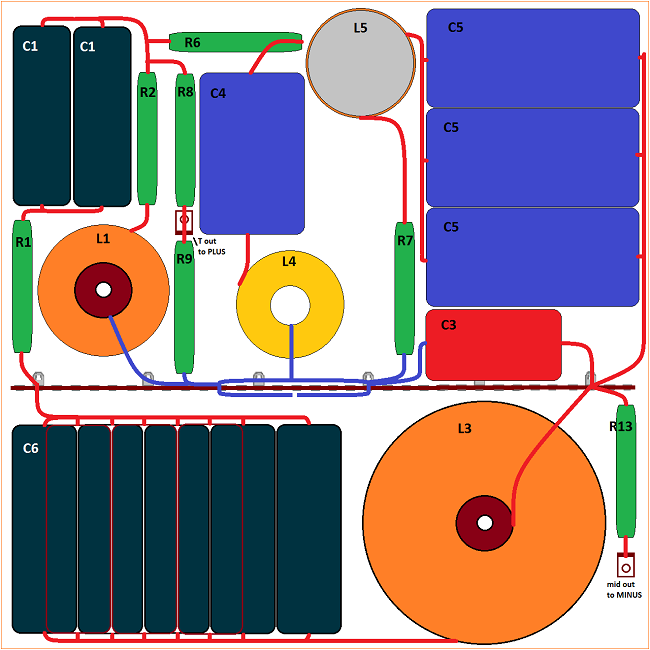
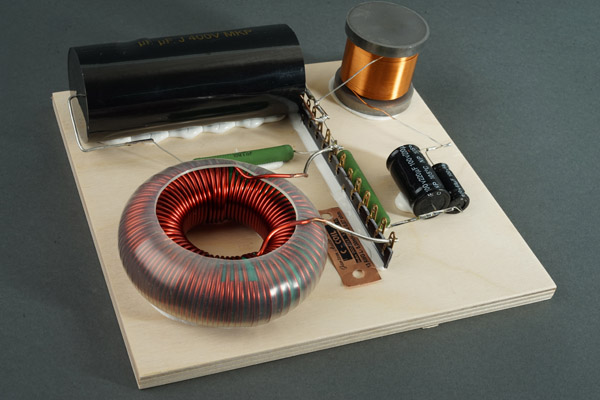
Bass section crossover layout. Values come with kit.
Speaker wiring
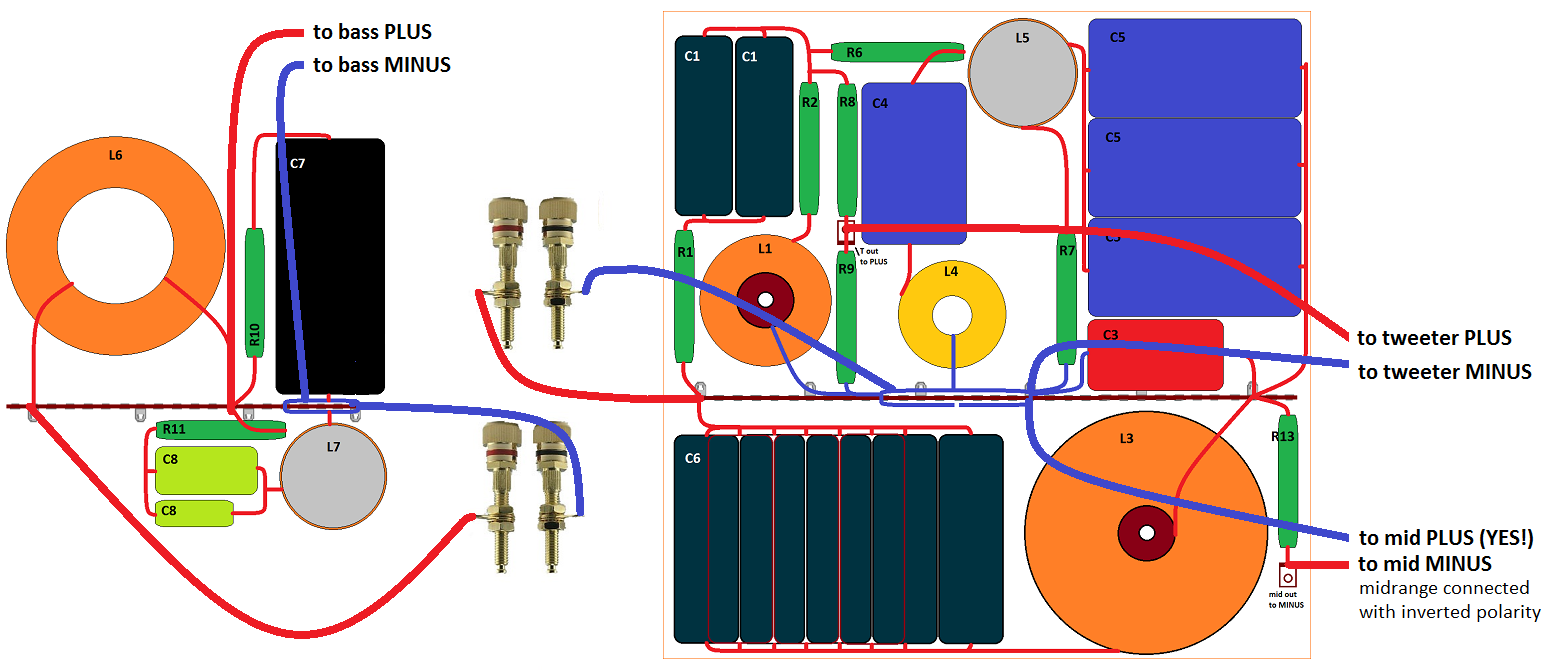
Click image to view large
C3 here Alumen-Z, later replaced by
Superior-Z.
Notice C8 replaced by MKT caps.
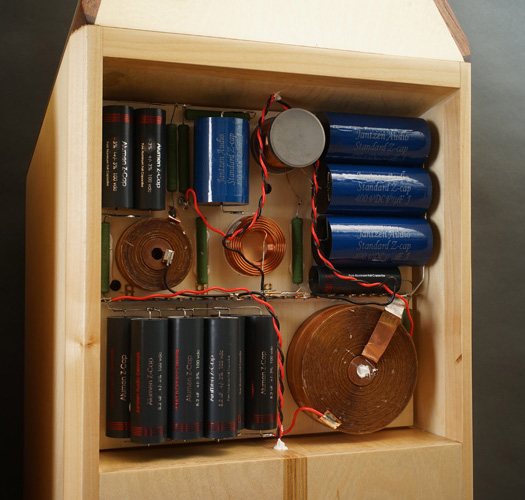
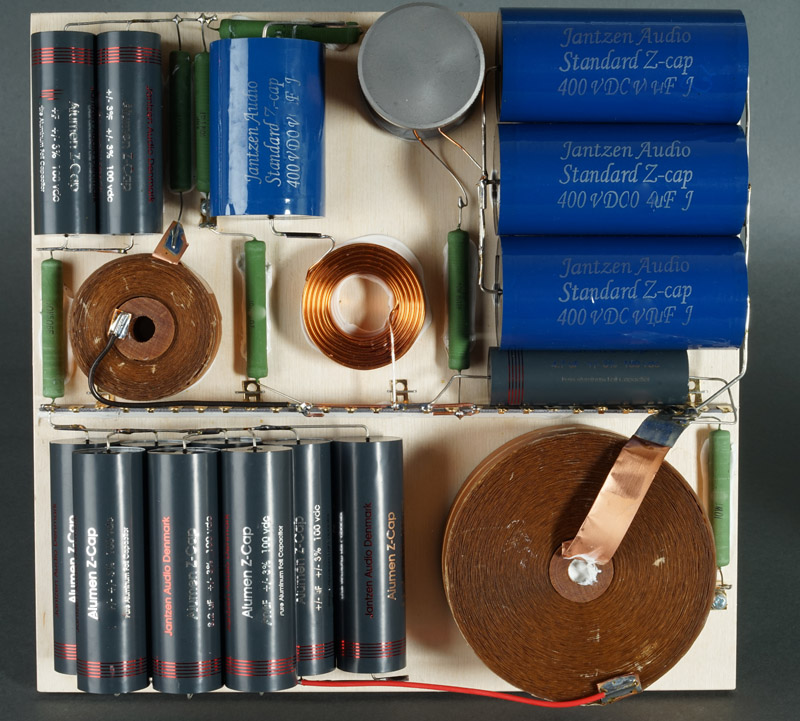
Crossover covered by 9 mm BB panel.
After fine-tuning of the crossover it was time for a thorough listen and
I'm amazed we can get this much - for so little. All drivers alone are
around 800 EUR! The most basic kit starts around 1700, but I only
recommend level 3 if you're on a real tight budget. These drivers need the best of crossover components, and the
better front gear you can afford, feel sure the SBA-10 will make up to
it.
With the low point of crossover between mid and tweeter we have an
unusual even power response in all of the upper mid. These two drivers
really leaves out any thoughts on a 3-way upper section.
Bass is deep, potent and dynamic. Need I say more? I won't. Middriver
and tweeter deliver an astonishing level of transparency. The
hard-pressed paper cone of the Satori MW16 does its thing and appear to
have a dynamic headroom on par with my beloved AT 18H driver from the
ATS-4. It sounds different, because paper sounds different than polyprop.
And there's no point in describing it, because you won't know what it
means until you've heard it yourself from two well-tuned speaker
systems. It's a matter of taste.
Transient response is phenomenal! These drivers show what low-loss
means, what proper symmetric drive means and they have the dynamic
headroom that allows them to be played really hard - but don't forget
any burned driver is a misused driver!
The tweeter...Hmm.. This Satori tweeter appear to cope with whatever you
feed it. It's super linear on the sloped pyramid baffle. Treat it well
and it delivers. Use different capacitors and it will display the
differences, not least here where we have a 1.6 kHz point of crossover
between mid and tweeter. I started out using Superior-Z caps for C1 in
the crossover, being the crucial components in the tweeter high-pass
section. Tonnes of details and see-through, shimmering cymbals, etc.
Swapping to the new Alumen Z-Caps made more change than expected.
The thing is that whatever type of metallised polyprop
super-cap
we use, they deliver details no standard-PP ever comes close, but also
sometimes with a hint - and I say just a hint - of glair to the overtone structure of instruments,
something we may mostly cherish as pleasant colouration to the overall
sound picture. The benefits of super-caps is indisputable, but every cap
adds its character to the sound and is a vital part of the equation. I'd
say the alu-foil Alumen Z-Caps are even better than the Silver-Golds
when cost-no-object rules - and they are cheaper than the Silver-Golds,
actually here one-third of SG, believe it or not.
Initially I used Superior-Z for C6, the capacitors in series with the
midrange, and it works as good as they do for any other 3-4-way I've
made. As the value is smaller than for e.g. ATS-4 and Ill-5, I persuaded
Jantzen Audio to sponsor the full Monty for the midrange, hence all foil
caps for the high-pass section. I don't think this has been seen before.
Actually the price is not bigger than the high-pass section for the
Illuminator-5. I just badly wanted to hear what foil caps can do for
midrange. The change was less radical than for the tweeter, but there
was a difference for the better. Same level of transparency but
a slightly smoother presentation. There will be several options for
crossover quality depending on your budget, but I suggest sticking to
the board size to allow later up-grade.
I wide selection of recordings were tested, from massed strings, male
and female vocals to transient piano recordings (Keith Jarrett) and it
all came through as wanted - even better than anticipated. These
speakers will better a wide selection of speakers recently heard at the
Munich High-Eng show - and for a fraction of the cost. Only thing you
have to add is some - hopefully - enjoyable workshop hours. Have fun!
All technical questions to troels.gravesen@hotmail.com