DIY Loudspeakers: HOME INDEX UPDATES RESPONSE WHAT'S NEW
Illuminator 5
Copyright 2015-22 © Troels Gravesen
Go to on this page:
DRIVERS CROSSOVER CABINET CABINET-DAMPING MEASUREMENTS SPEAKER-KIT CROSSOVER-LAYOUT SOUND Be-DOME D3004/604010


click images to view large
This will be my attempt to make the very best we can get from ScanSpeak
drivers*.
Who knows what the future will bring, but until then, these Revelator
and Illuminator drivers can make recorded music alive in our living rooms.
Why 5-way? The thing is that a 18WU driver has a cone area of 154 cm^2
and a dome like the D3004/602010 some 7 cm^2. Any driver will start
beaming at a frequency having a wavelength equal to the diameter of the
cone, thus for the 18WU it will start beaming around 34.400/14 = 2.457
Hz. On paper this all goes well as long as we stick to a point of
crossover somewhere around that frequency. And this has indeed been the
prescription for countless speakers over the years, the classic "6+1"
set-up. It's a compromise as any speaker is and it's OK! They're doing
well, but they also have a sound that is characterised by this sudden
change in dispersion pattern going from 150 to 7 square centimetres. The
Ekta and SP44 and Classic 3-ways sound very differently because they all
have this small 2-4" middriver with a much different dispersion in upper
mid/lower treble, creating a presence the standard 6+1 doesn't. This
"presence" reveals detail and to some it may be too much detail because
source material may not be too good - or the overall front-end, amps,
CD-player, etc., is not up to the task. In this construction we're talking as few
compromises as possible.
In reality, this is just the classic 3-way like ScanSpeak SP44, Ekta and
SP38, added a bass module. For some reason this is rarely seen in
commercial speakers, rather a 2-way with added sub module and I think
the simple reason is cost.
As mentioned in
my recent
Discovery 12W file, there at a lot of good 4" drivers around. A good 4"
driver is much better handling the upper midrange and lower treble
compared to any
6-7" driver. That is the ~800-1300 Hz range. Treble starts
at 1280 Hz and to some it comes as a surprise that our 6" drivers very
often handles treble. The most cost-efficient way of dealing with this
is the Classic 3W, where a 3-4" driver bridges the two main drivers like
my
SEAS Classic 3W and
Discovery Classic 3W. If we do this we can also increase the size of
the bass driver to an 8" and get an even bigger soundstage.
Initially I made one speaker with the 12MU midrange driver and compared
to the Illuminator-4 (4-way with 7100 tweeter, not published) speaker and the result was more surprising that I
had expected. The 5-way could play even louder - and the Illuminator-4 can play
loud. The 5-way would play a saxophone until it was painful, not because it
sounded bad, but just because it was loud. Really loud.
Another thing I've noticed is that with a high-quality upper mid-driver,
we start worrying less about the tweeter. Not that we can use an
inferior el-cheapo tweeter, only that swapping tweeters really doesn't
seem to pay off that much, where in a classic "6+1" we're more dependent
on a really good match to the mid-bass, and this doesn't always come
from using the most expensive tweeter, rather one that makes a good
blend with the midbass. Tweeters may show us all the things we think
is good, but make a poor partner to whatever midbass we aim at. Synergy
is the keyword, not some intrinsic "on-paper" quality. I've often had
the question why I don't use ribbons more and I generally find ribbons
hard to integrate well with a 6 inch mid-bass.
Now, two 12MU mids certainly don't come for nothing, but here we're not
talking cost-efficiency, rather what we can do if we want the best from
the Illuminator drivers and the more even change in distribution pattern
of drivers is paying off in the smoothest midrange I've so far hear from
a ScanSpeak set-up.
* That is, within a given footprint! We might do even bigger/better(?) from a tower with multiple 10" bass drivers and d'Appolito arrangement of 22W/18WU/12MU/dome(s), but this speaker will fit in a normal living space without totally dominating the picture.
Speaker basics:
5-way speaker system or you could argue the 22W not having a high-pass
filter makes it a 4½-way due to the use of two bass drivers having
different low-pass functions.
Bass reflex, closed box and aperiodic
tuning is used for lower bass, upper bass and middriver respectively.
Points of crossover; 80, 180, 900 and 2800 Hz, 2nd order LR, mids and tweeter
time-aligned.
Impedance: 4 Ohms, minimum 3 Ohms.
Sensitivity: 88 dB/2.8 volts, 1 meter.
Amplifier requirement: Minimum 50 watts.
Power handling: A lot! Read
here.
You cannot use any other driver than those specified, or you need a new crossover - and I can't help. Any change to front panel design and drivers' placement and alignment - and you need a new crossover. Sorry, can't help.
Useful links (Please follow all links before e-mailing!):http://www.troelsgravesen.dk/tips.htm
http://www.troelsgravesen.dk/tips.htm#CONSTRUCTION_OF_CROSSOVERS
http://www.troelsgravesen.dk/crossovers.htm
http://www.troelsgravesen.dk/LCR-RC.htm
http://www.troelsgravesen.dk/Inverted-Polarity.htm
http://www.troelsgravesen.dk/choices.htm
http://www.troelsgravesen.dk/power-handling.htm

Click images to view large
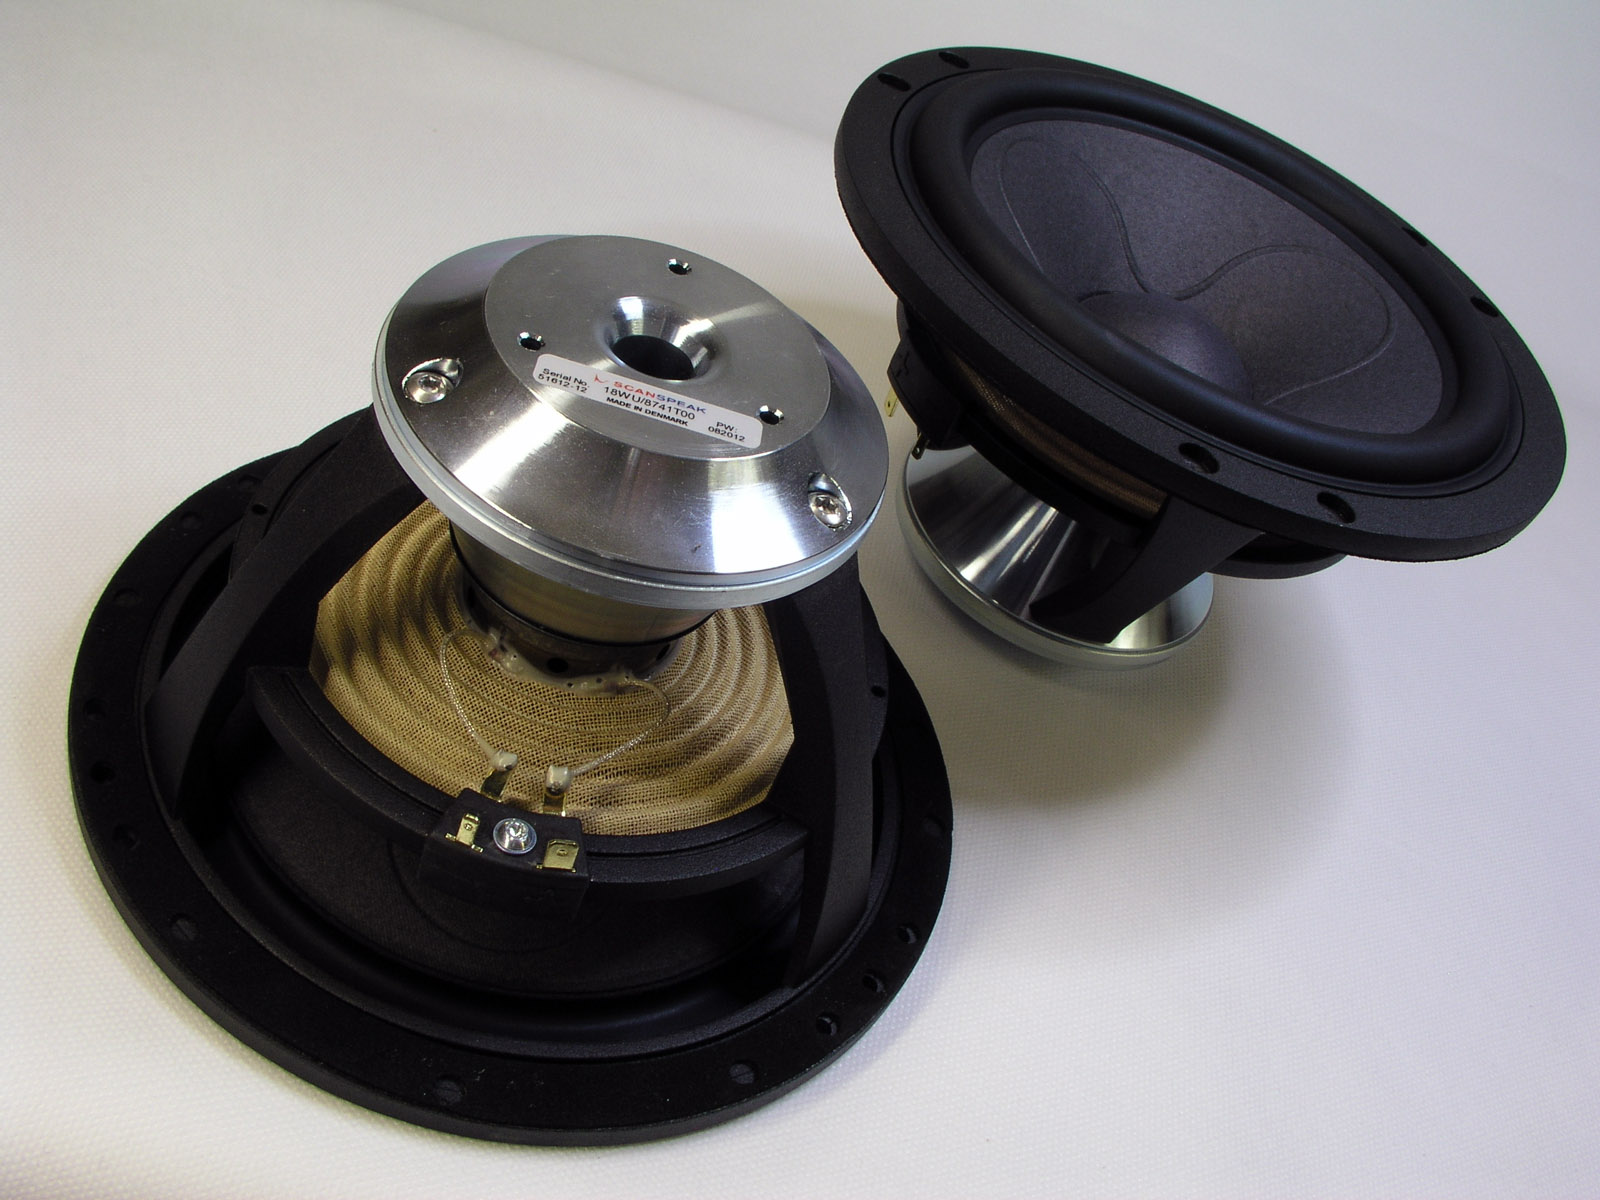
Download specs:
26W/8861T00
22W/8851T00
18WU/8741T00 12MU/8731T00
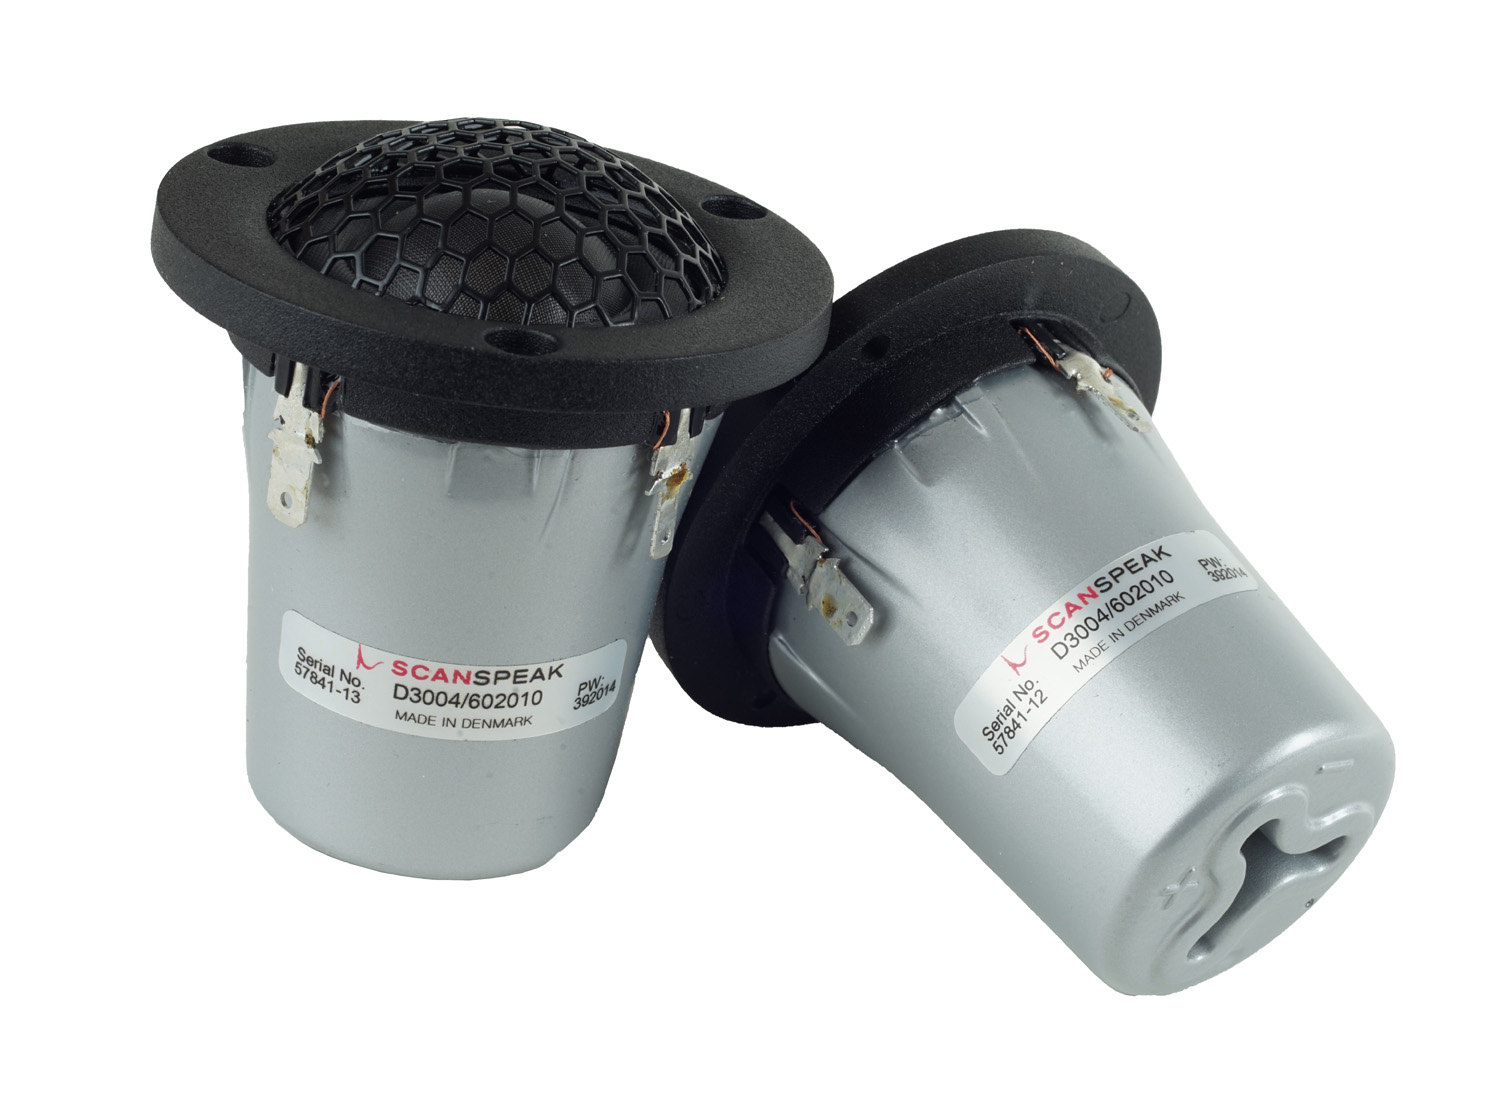
D3004/604010
(D3004/602010 replaced by D3004/604010, Be dome)
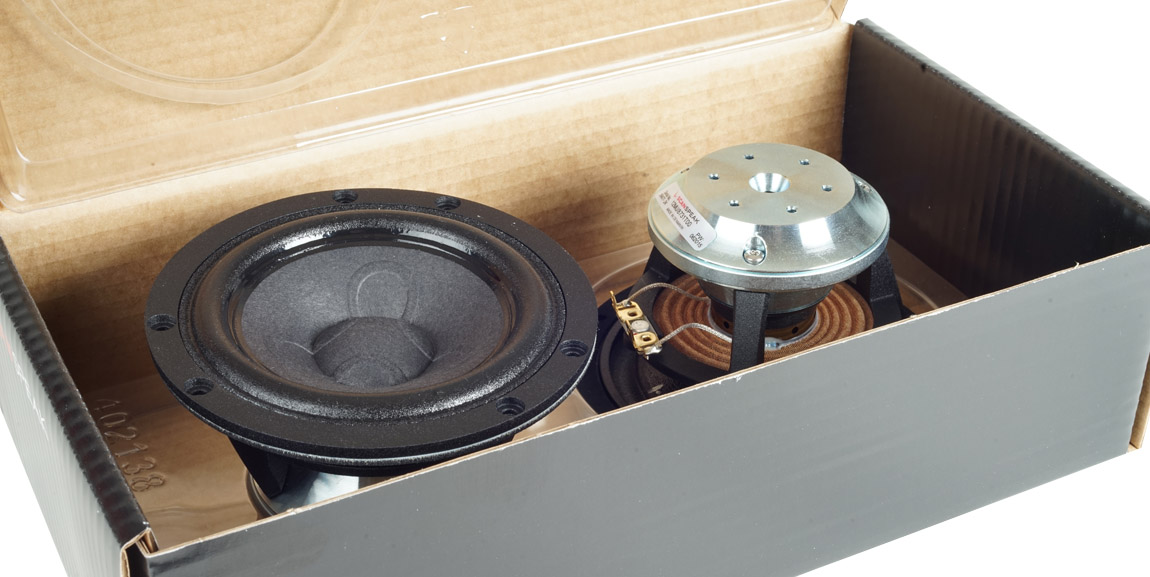
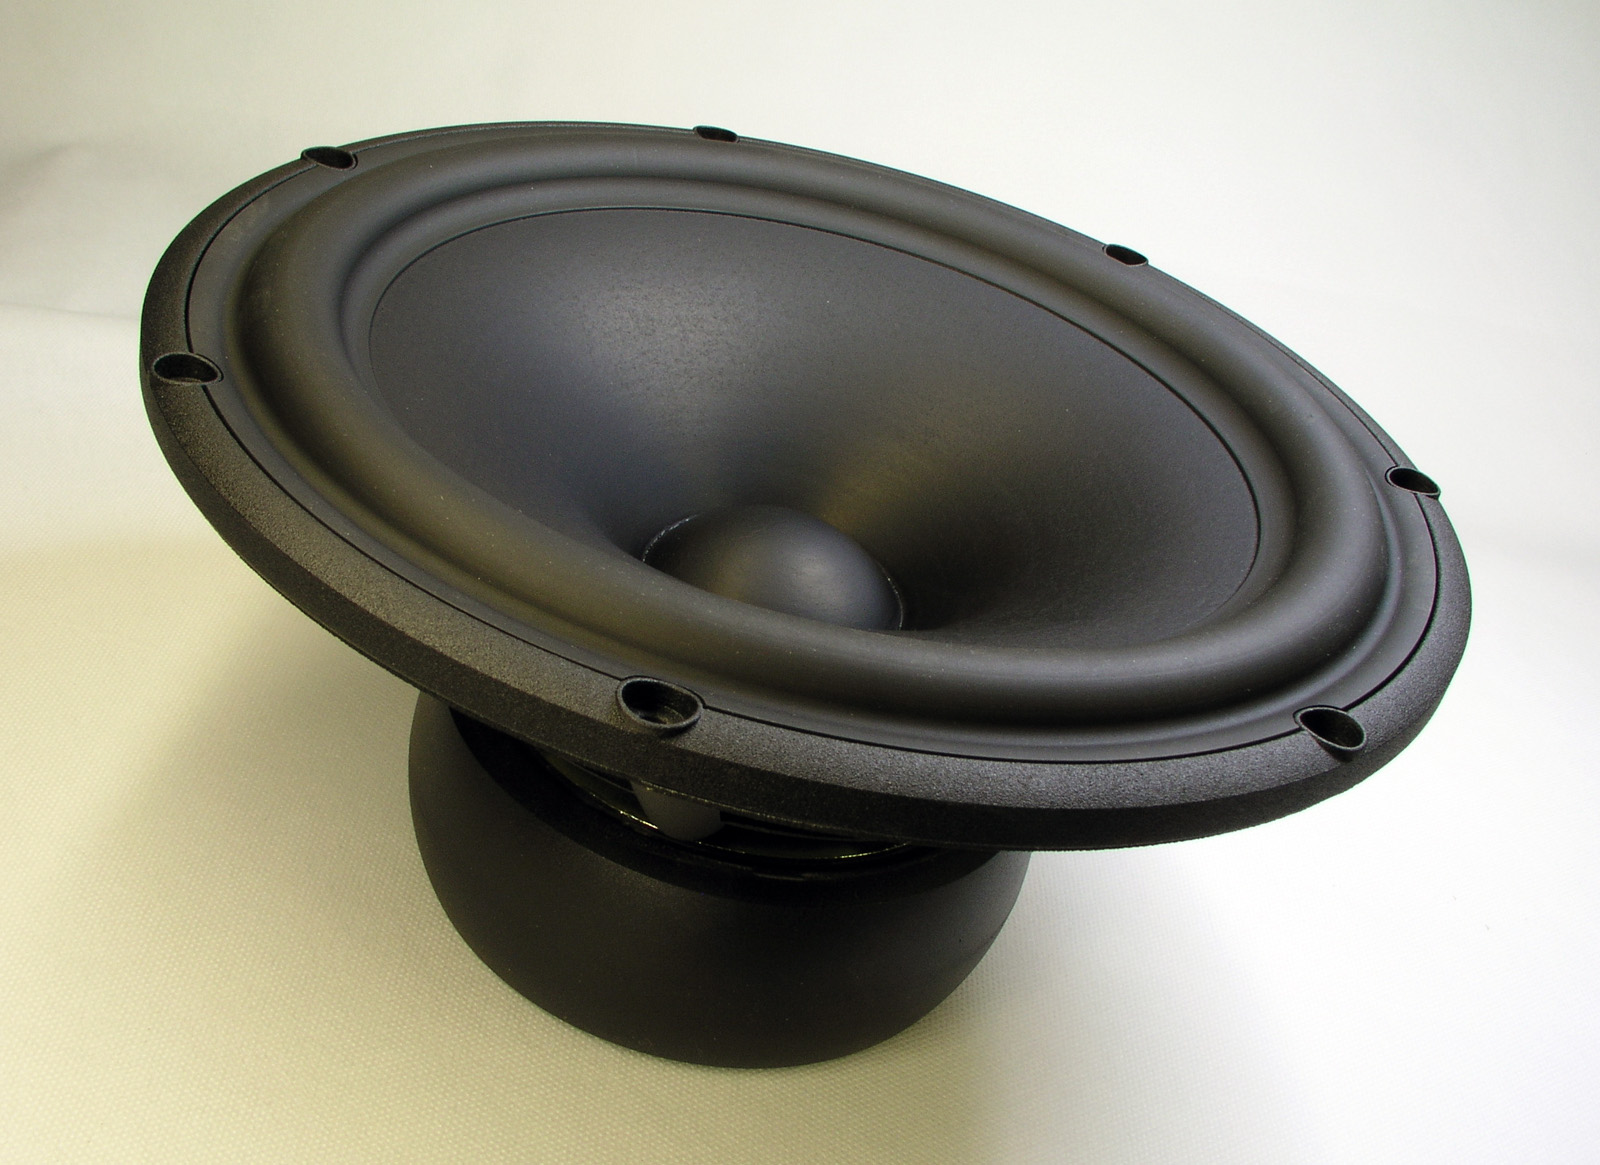
Let's take a break here! The 12MU midrange driver. It's a marvel of engineering! Everything we've learned about speaker
drivers over the last century seems built into this Illuminator
midrange driver.
Long-fibre, one-piece molded paper cone, low-loss suspensions, symmetric
drive, low-reflection magnet system, ventilated voice coil, highly open frame structure, etc.
All seen before, but rarely in one single unit.
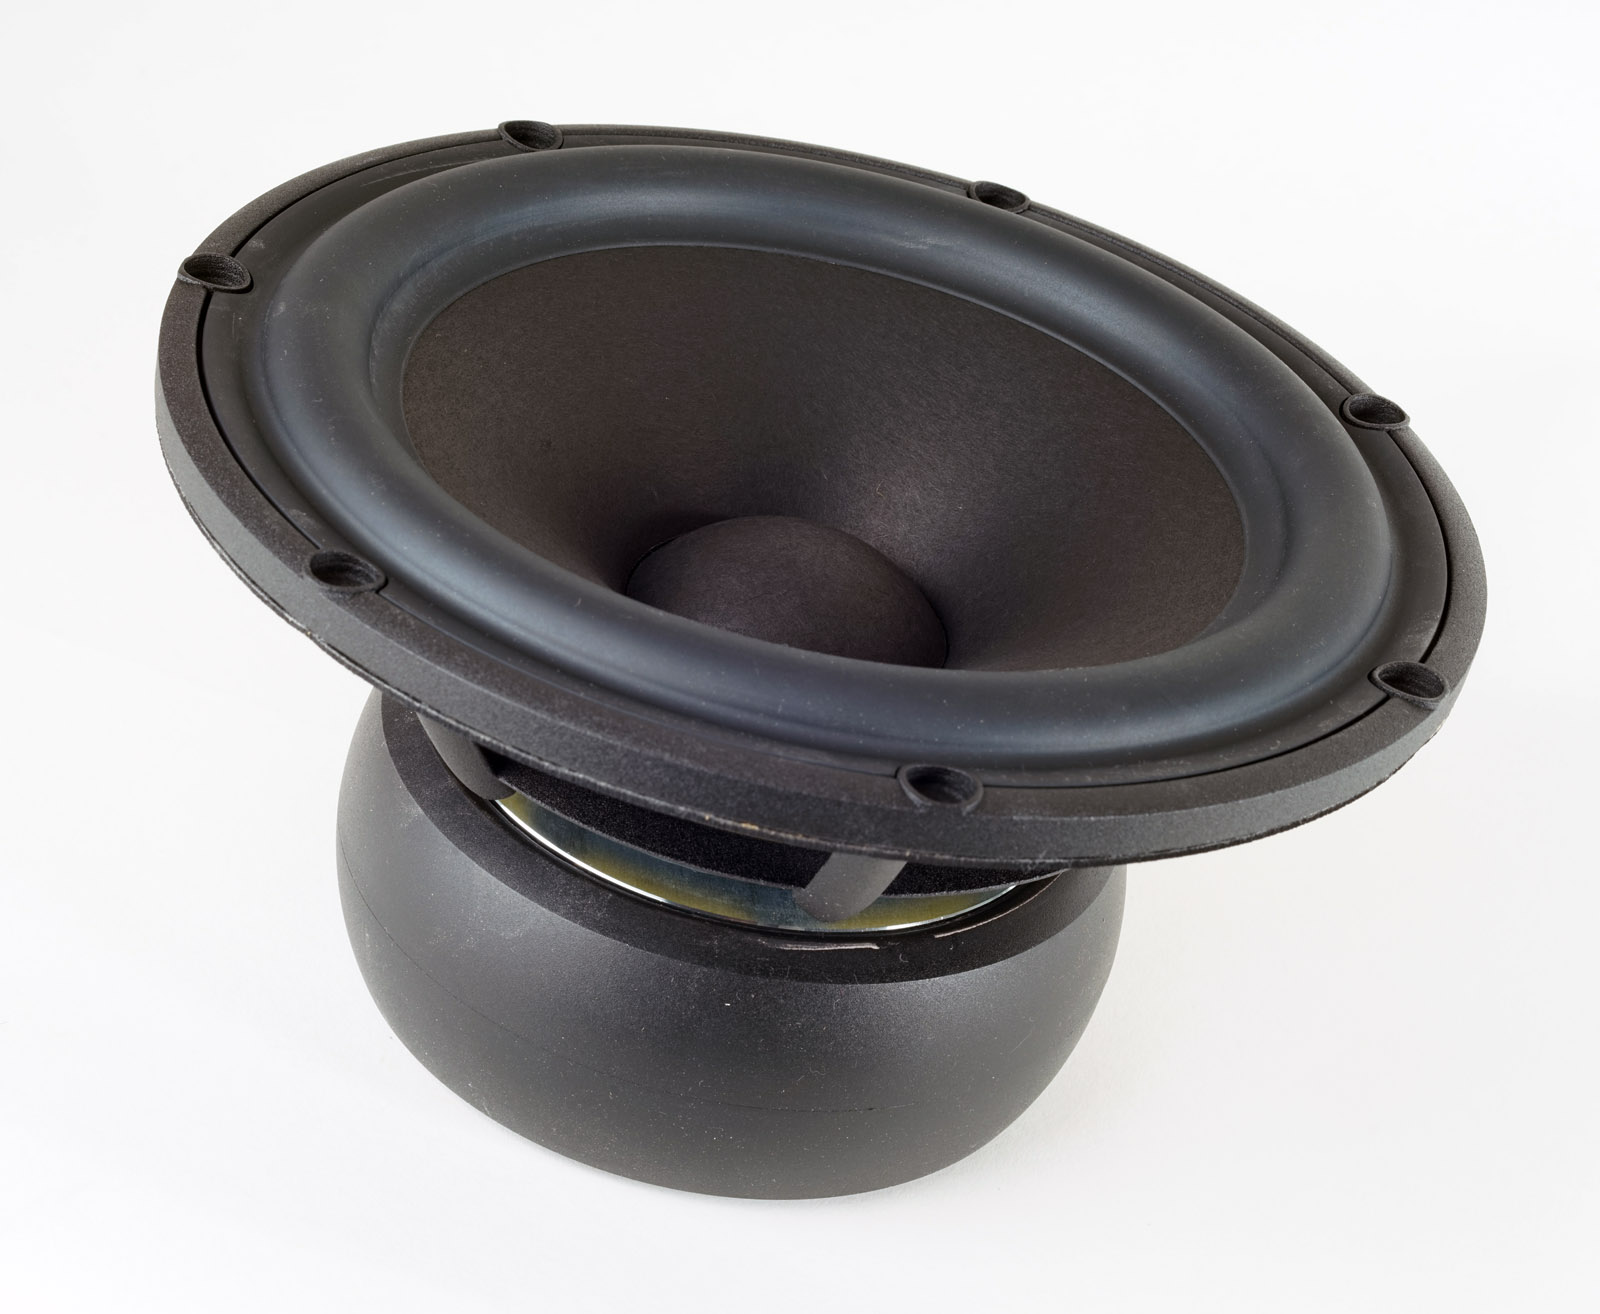
And it doesn't stop here: The under-hung voice coil and titanium voice
coil former with virtues of paper bobbins*,
but with much better power handling. On top of this, selective rear coating
of the cone and around the rim of the outer cone a carefully applied
ring of damping glue to handle upper-mid resonances, something many 6"
drivers could benefit from, but it takes time to do it right - and time
is added production cost. Last, but not least, the low-loss,
light-weight coated foam surround. The coating will ensure many years of
service, don't worry.
* - and not the
common aluminium voice coil formers that reduce transient attack acting
as a brake and reducing Qm (one of the many reasons for
modern dull hifi).
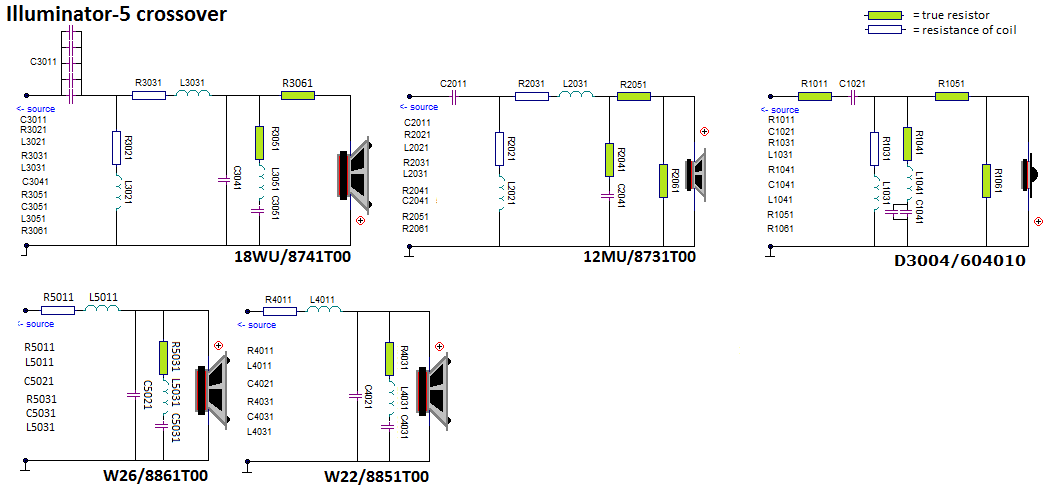
Crossover components' values come with the kit.
Please notice you cannot use any other drivers than those
specified. Please read:
crossovers
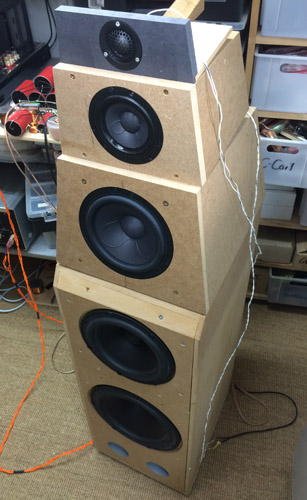
All things start with test set-up for fine-tuning cabinet design and a
birds nest crossover to make it as simple as possible.
In particular tweeter and midrange front panels can make huge
differences and jeopardize drivers' frequency response and require
equalising in the crossover, something that can mostly be avoided by
proper design.
I can't tell you
what this Illuminator-5 sounds like. Like food and wine, you'll
experience something different from me. Auditive perception is just
as subjective as taste and smells.
I've already told this speaker can play seriously loud and deliver a
punchy bass, but what surprised me the most was how low it can play.
Thanks to the dispersion of the small midrange and the presence it
creates, we don't loose grip of the music when listening at low
levels. We maintain the ability to catch subtle nuances and tonal
colour even when turning down the volume to quite low levels.
I'm sure I'll have the question on a smooth midrange and silky
treble. These phrases really mean nothing, but YES! It's got a
non-aggressive midrange, all of the midrange. Even with the
tweeter tuned to a fairly flat response, you'll listen to treble,
not tweeter. We really shouldn't be able to hear the tweeter as
such. If we do, it plays too loud. And yes, it does vocals really
well too. I've tried all my troublesome vocal recordings and this
speaker just doesn't care. One thing that can turn vocals aggressive
is beaming of the midrange driver, for full-range drivers this is
often heard as the "midrange shout". This phenomenon is effectively
eliminated by the small 12MU driver. The 12MU also creates a better
placement of vocals and instruments in space than the usual 6+1
set-up. It simply creates a better 3-dimensionality.
I run these speakers from my
bi-amping set-up: GlowMaster KT88 for the MmT section and a
Hypex digital for the bass module. The Illuminator-5 likes a little
more power than my
ATS4 speakers, I guess we're talking 1-1½ dB reduced sensitivity
compared to ATS4, but it's only one click more on my attenuator.
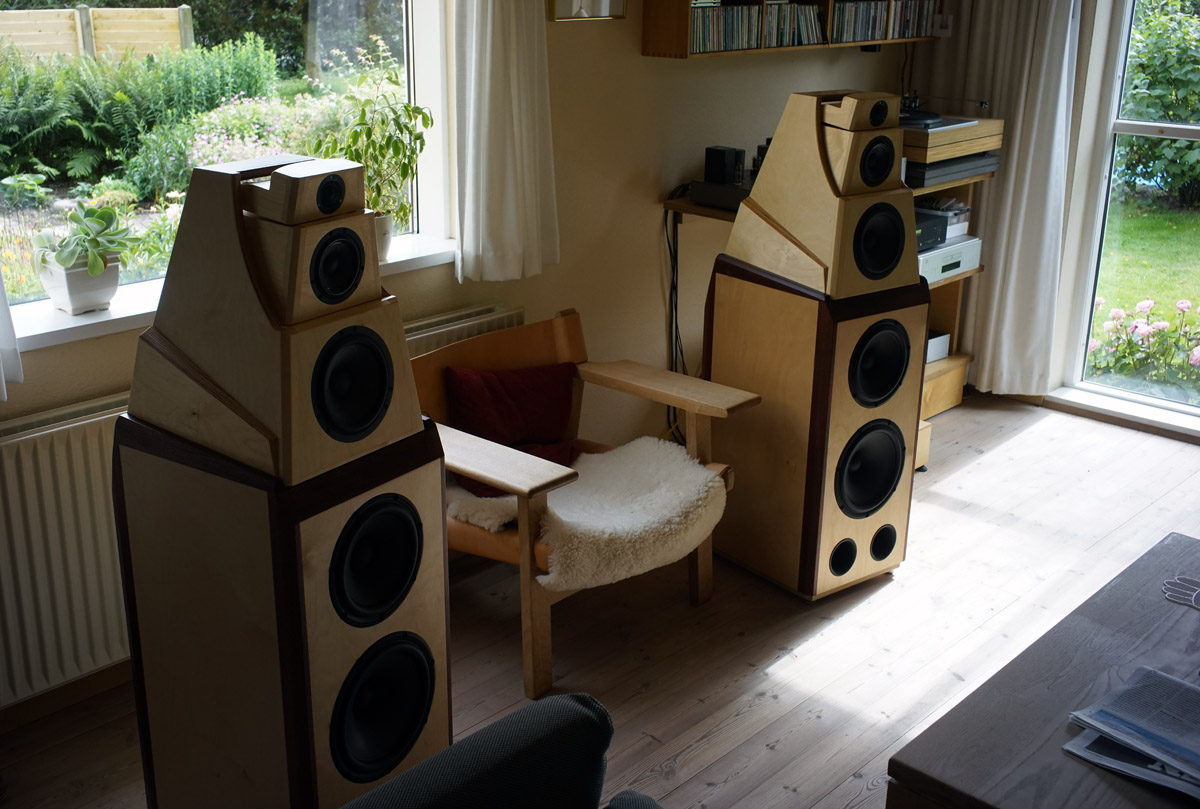
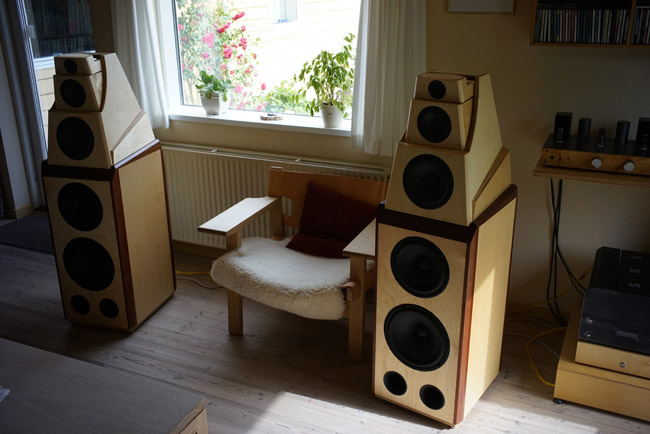
Setting up the speakers in our living room was unproblematic. Same
place as ATS4 and a little experimentation on toing-in made it.

What the speakers will do in your listening room is impossible for me to tell. Only thing I can advice not to do is place them up against the front wall and not in corners. The former will reduce sense of depth and transparency and the latter make bass too boomy. In that respect the Ill-5 is no different from any other speaker.
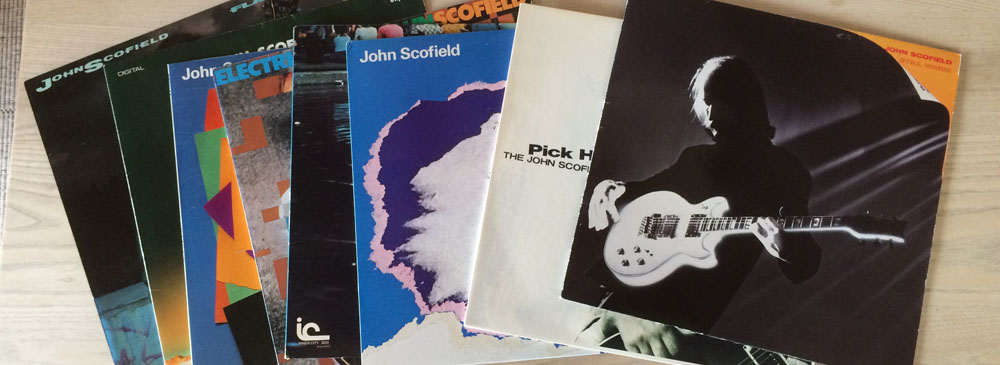
I didn't only listen to John Scofield during fine-tuning the Illuminator-5 speaker. Sometimes I just dig out all my LPs of a particular artist. These LPs are mostly music of the Eighties and I fancy challenging my past to hear what music last and what doesn't. Well, some of these records are very much of the Eighties, very electric. Apart from Scofield we also went to hear Chick Corea's Electric Band at Montmartre in Copenhagen and I've never seen so much electronics on a stage. John Scofield visited Montmartre not too long after the release of my favourite LP, Still Warm. Some of the music does stand the test of time, some doesn't. What the Illuminator-5 does is recreating the dry and fat low-end bass that followed this musical period.

Click image to view large.
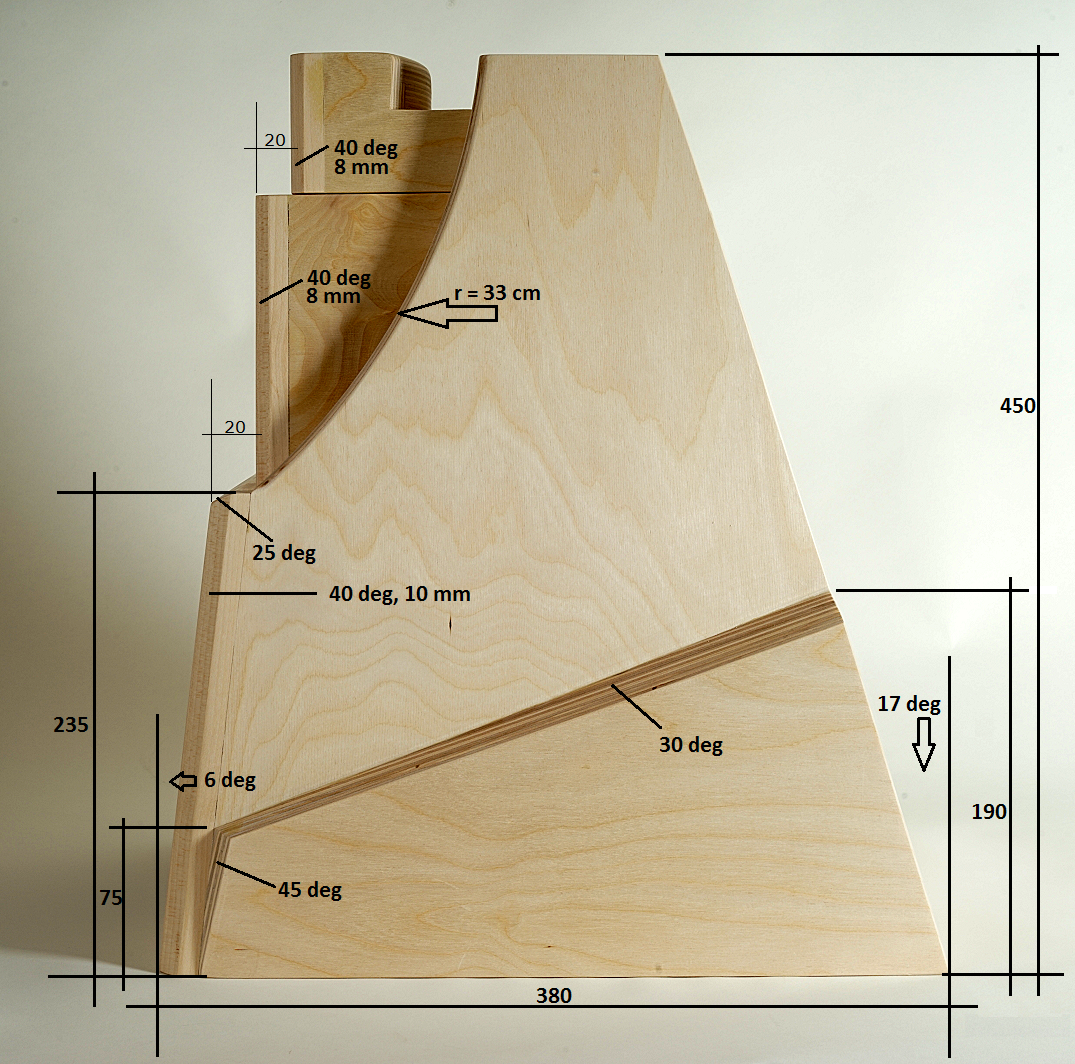
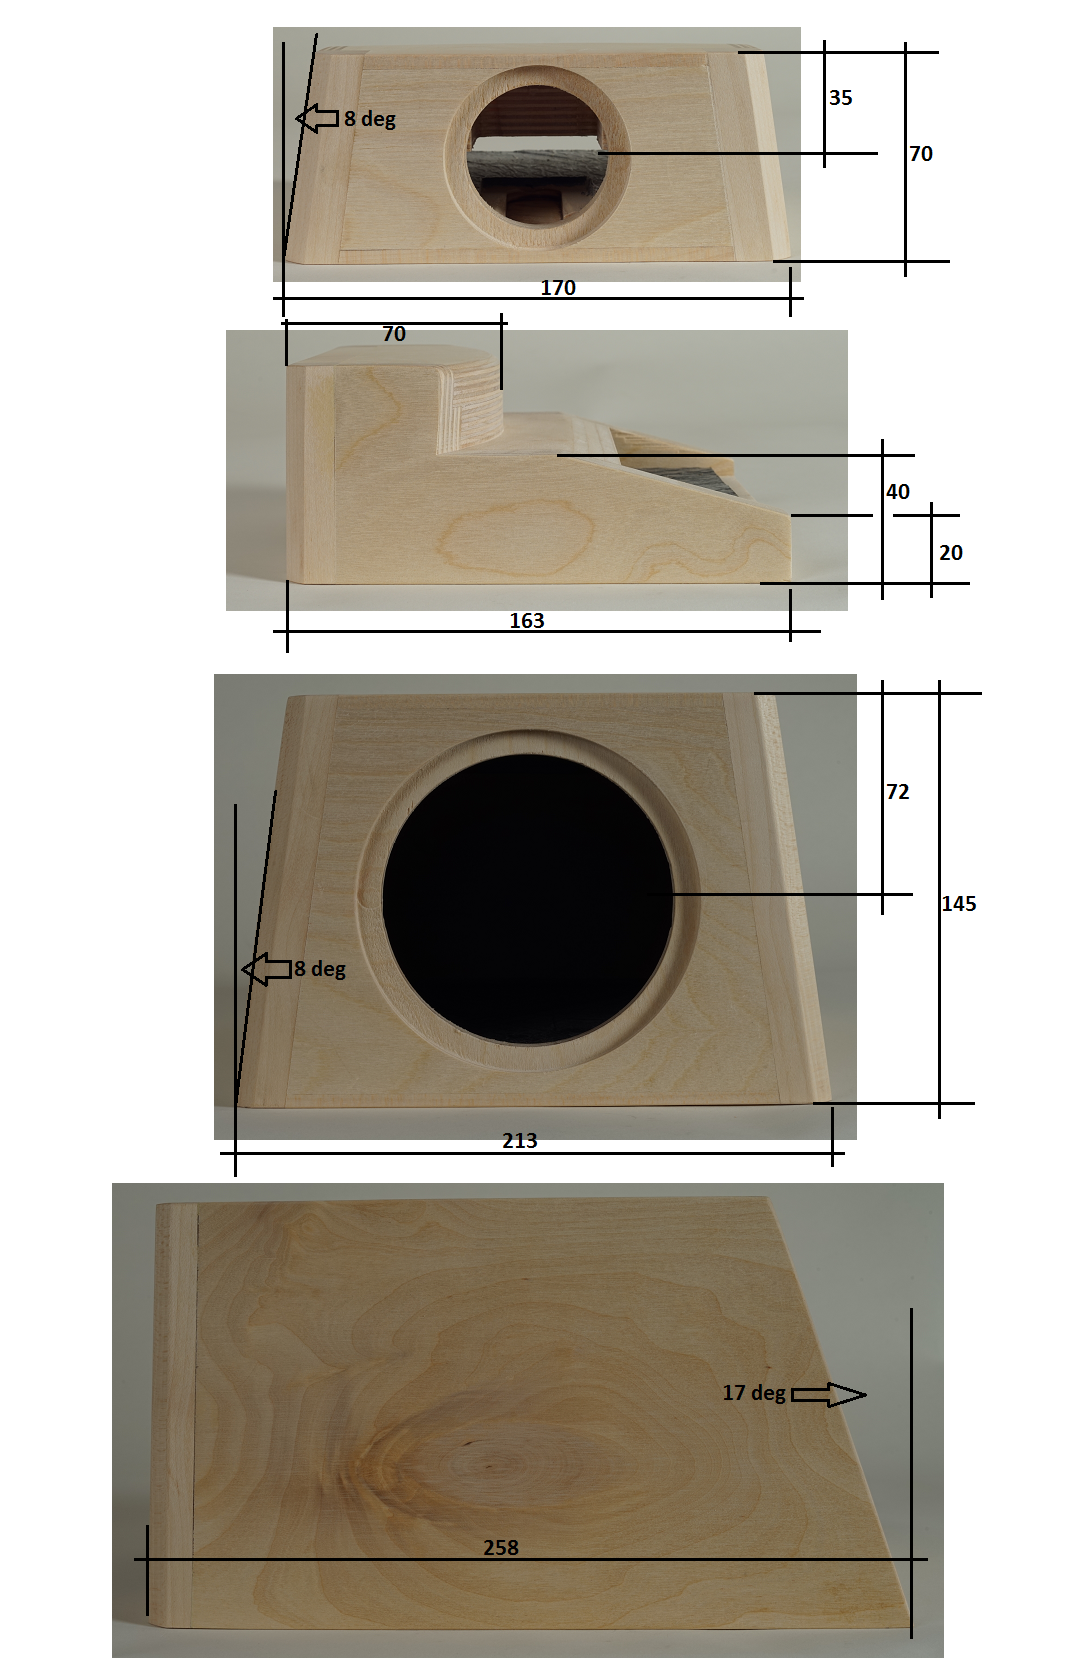
Making drawings from the Illuminator-5 would take ages, thus some images
with added dimensions. This really provides all the basic info needed to
making the cabinets. Click images to download files.
Now, making the cabs above takes time! Many, many hours of work. The
thing is that you get the same sound from making cabs much simpler like
the DISC-4
speakers.
AS ALWAYS: Stick to front panel dimensions* and
drivers' placement. Keep internal volumes +/- 5%
and you're safe. Whatever fancy dress you come up with for your speakers
is fully up to you.
*: The front panel reflects sound and depending on
size, shape and the drivers position, you'll get a frequency response
different from any other panel or placement. Thus, the crossover is
designed in such a way it takes into account the response of the driver
on that particular front panel. Any change to this - and you need a new
crossover. Any other driver than those specified will produce a
different response and need its own new crossover. And here I cannot
help without having your speaker in my workshop. Any change to
these few basic things, and you're on your own.
Ports:
With the kit you have 4 ports @ 68 x 220 mm, 2 ports @ 50 x 145 mm and 2
ports @ 35 x 68 mm.
Please read here about port dimensions:
http://www.troelsgravesen.dk/tips.htm#PORT_DIMENSIONS_
You may find other tips useful from the same page.
Two 68 mm ports are used for the bass cabinet, use full length.
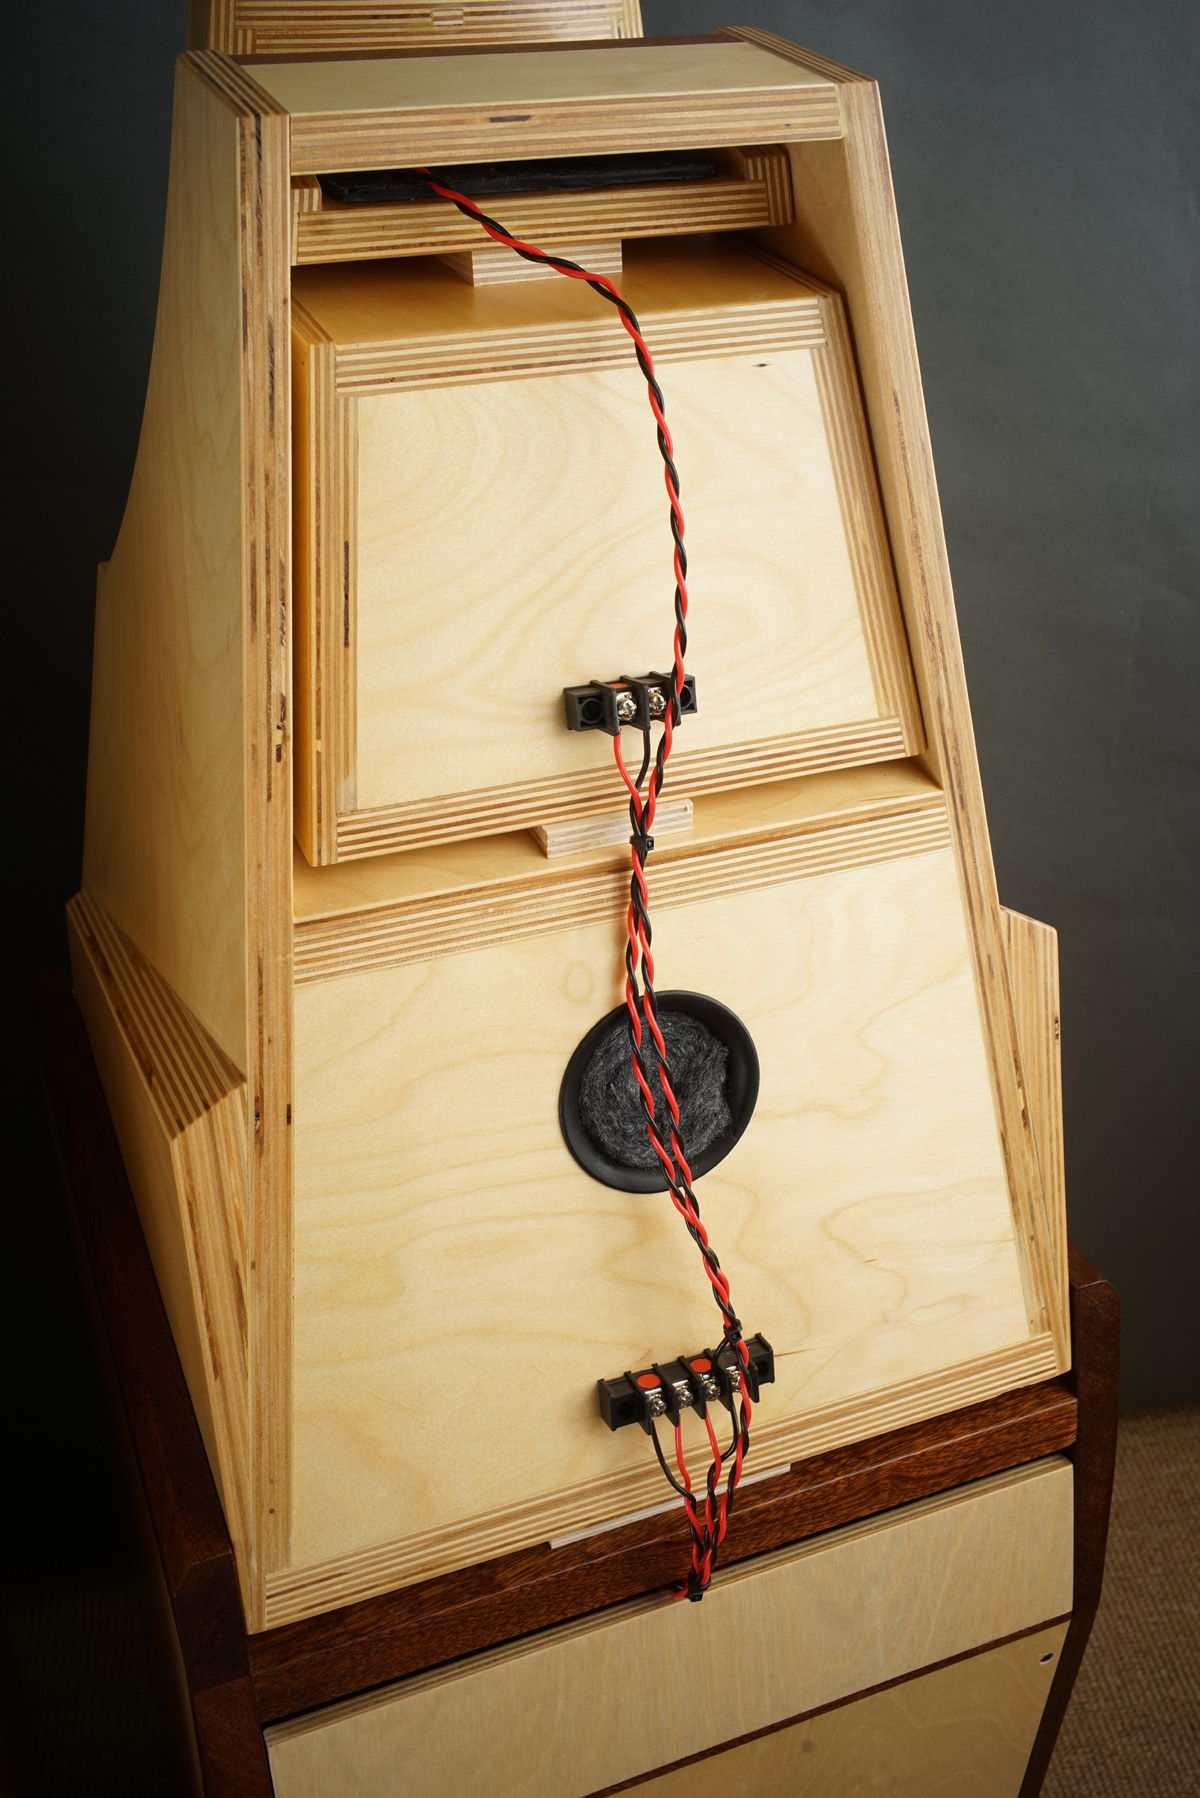
One 50 mm port is placed in middle of mis cab rear panel, cut to 10 cm
length and stuffed with a roll of 10 x 20 cm acoustilux.
One 35 mm port is placed on rear panel of 12MU cabinet and stuffed with
a roll of 60 x 80 mm acoustilux.
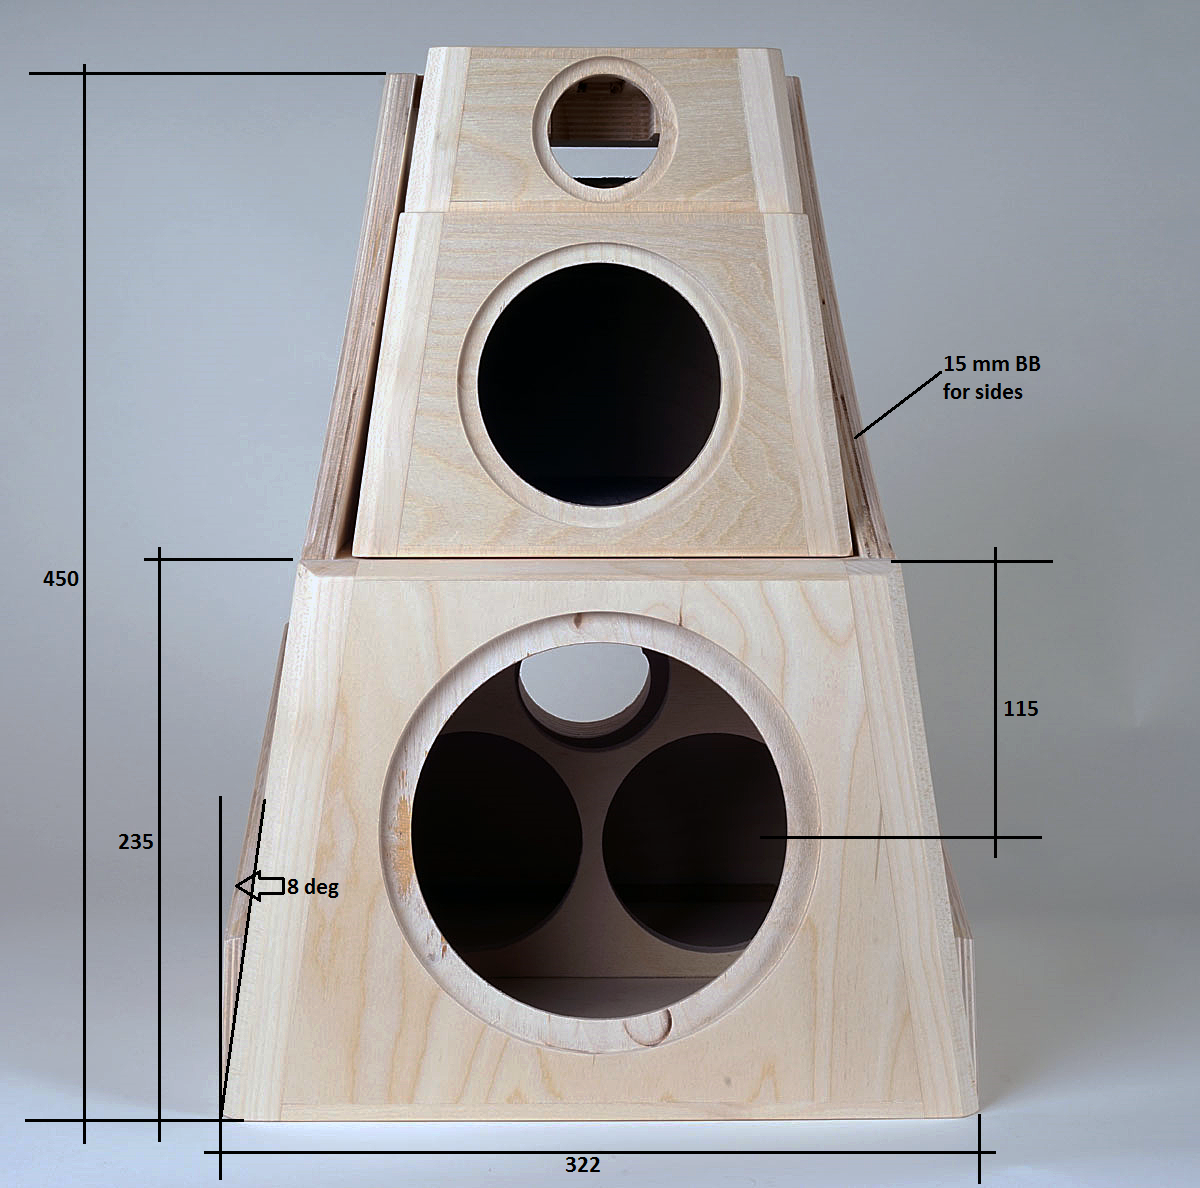
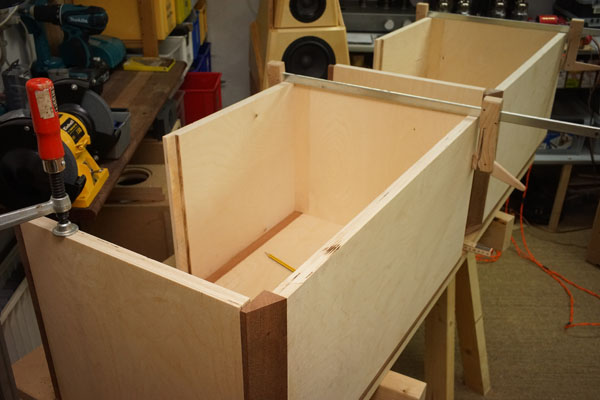
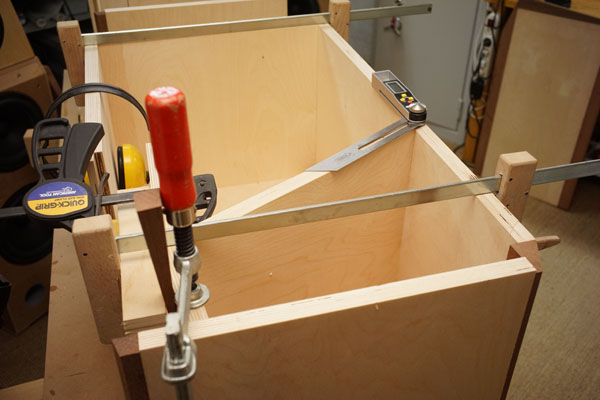
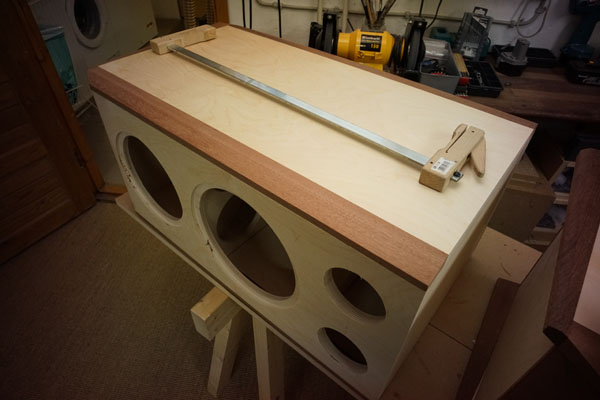
For the lower-mid cabs I used 15 mm BB for sides and 20 mm for the rest.
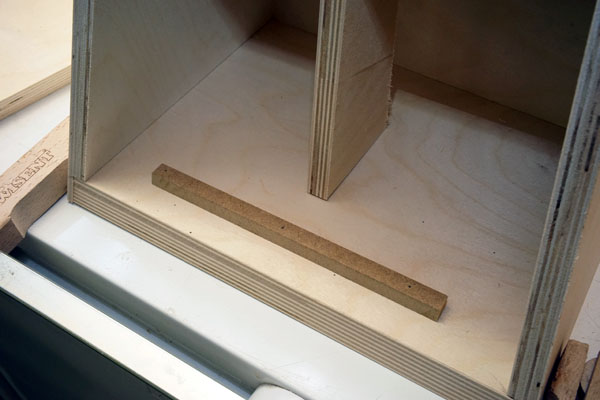
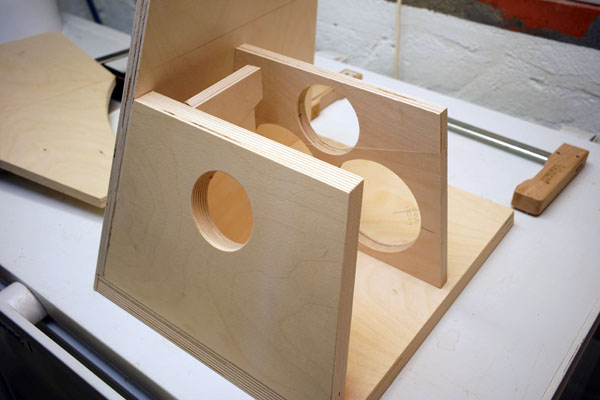
Make a single bracing like seen on photo. The holes are Ø 107 and 75 mm.
Place the bracing in the middle of the cabinet.
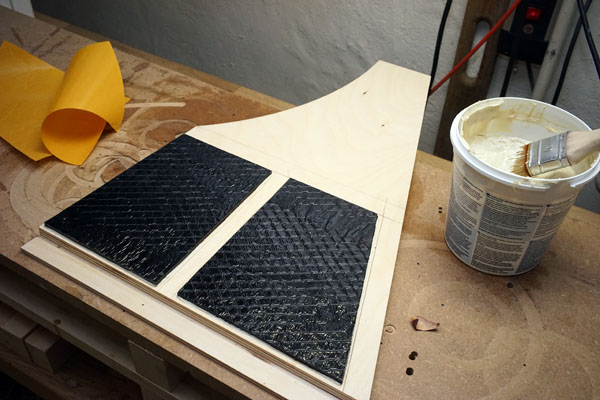
For the sides I added 4 mm bitumen pads.
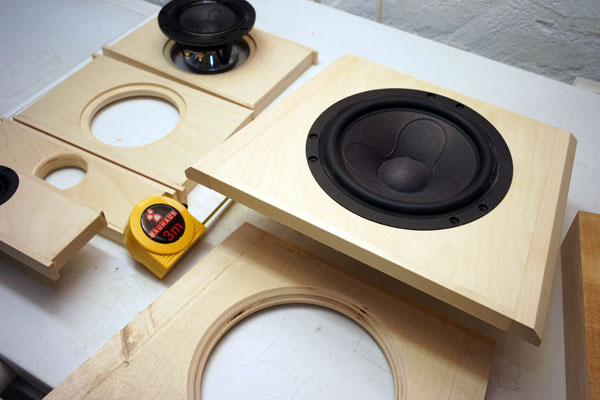
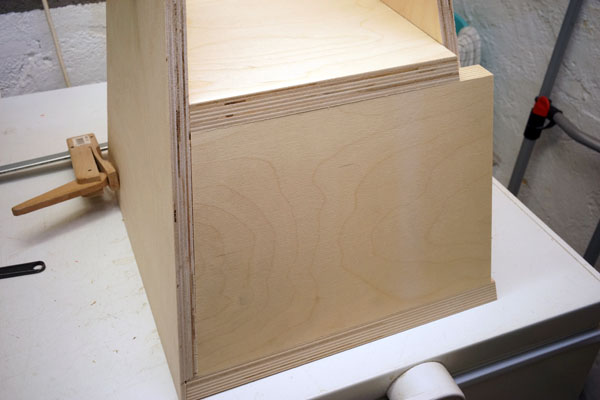
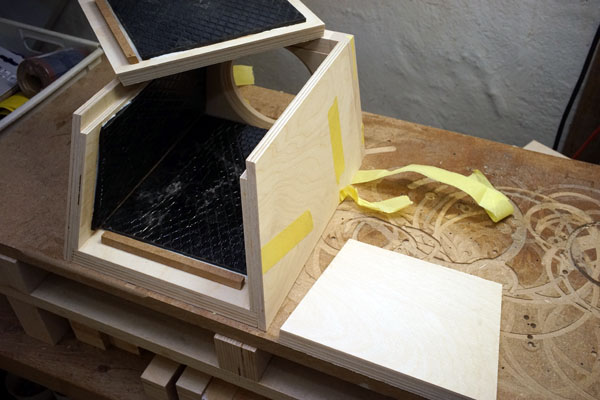
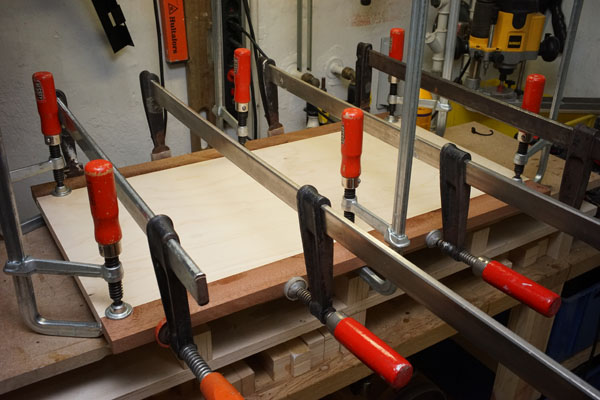
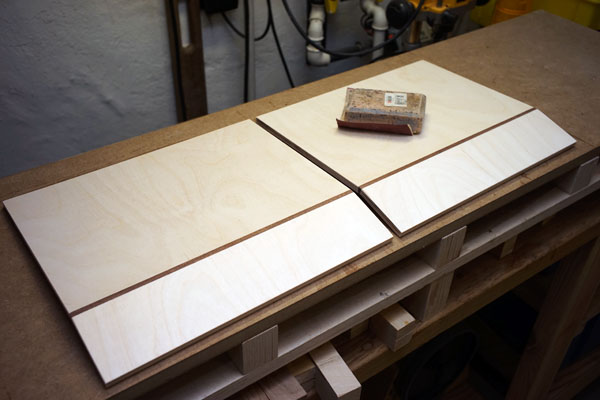
Front panels shaping up.
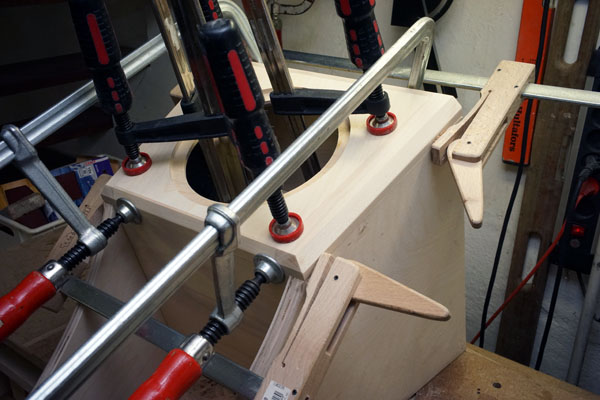
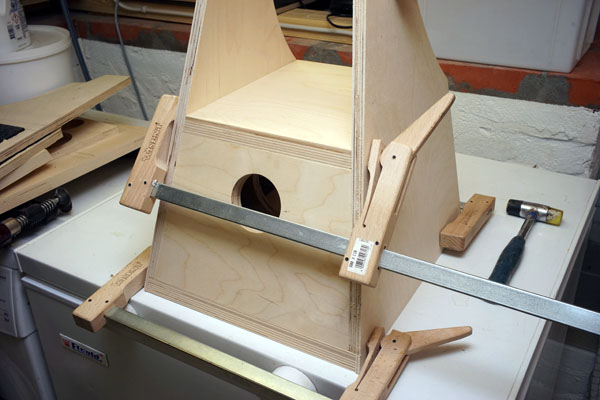
Gluing the front panel was easy as we have the bracing to hold the four
clamps. Otherwise, gluing pyramids are a pain!
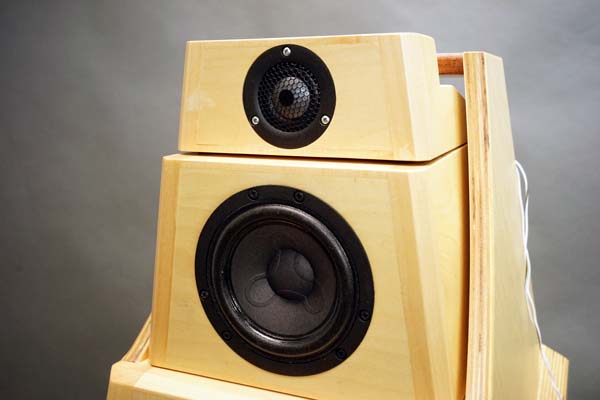
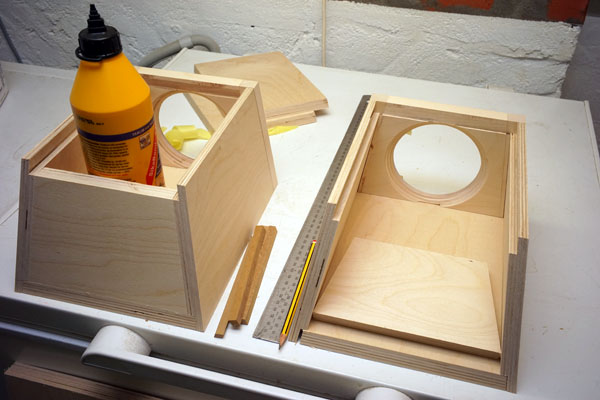
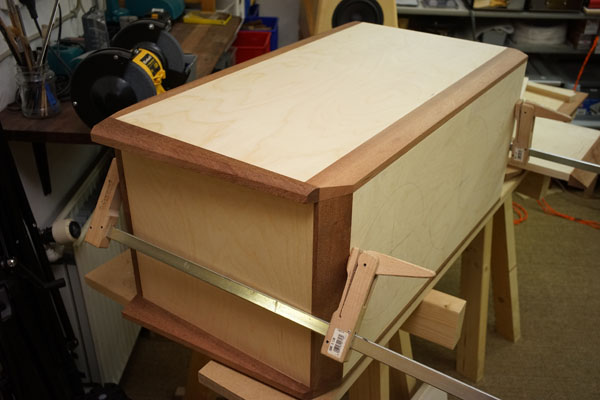
Right image: The easiest part, the upper-mid cab. All made from 15 mm BB
except for front and rear panels where I used 20 mm. Same goes for the
tweeter cabs.
Upper-mid cab damped with bitumen pads.
The kit includes a small 35 mm port for the 12MU cabinet. At the time of
the photo shoot this wasn't mounted yet.
Stuff the port with a roll of 60 x 100 mm sheet of acoustilux.
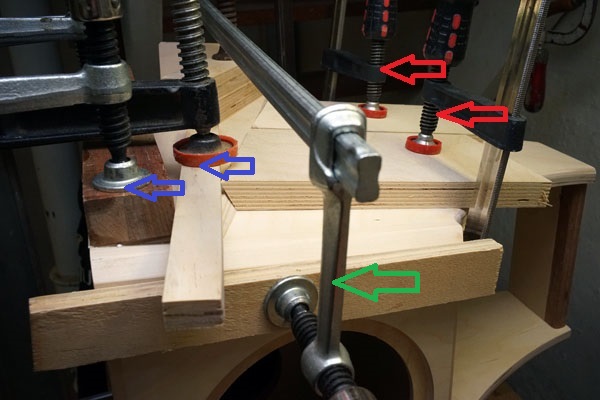
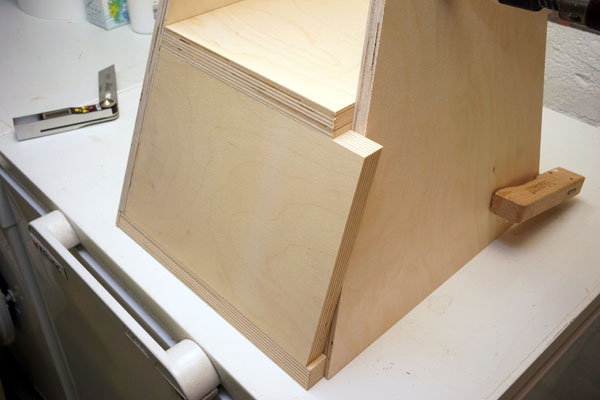
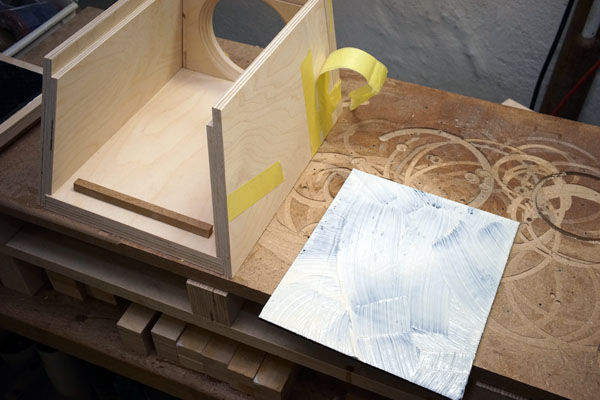
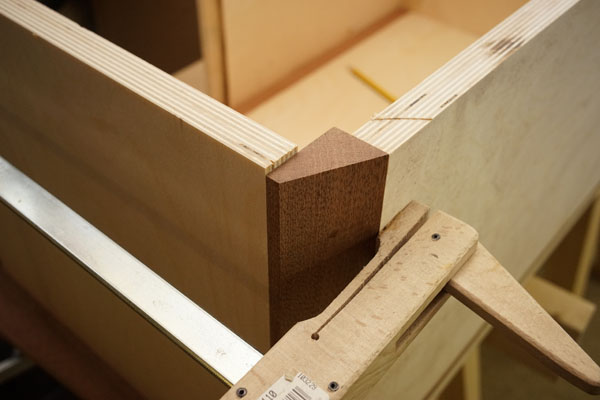
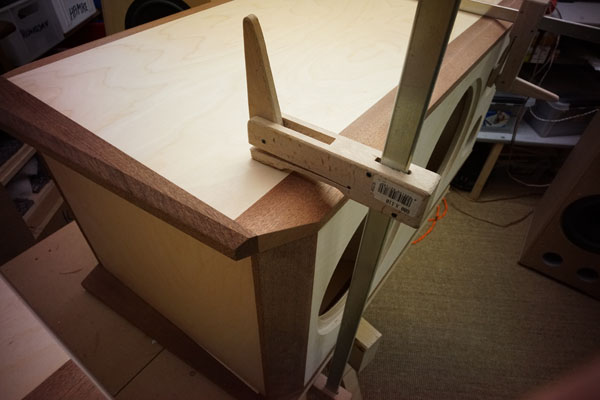
Gluing the side reinforcement panels is a pain! Make a sheet with a 30
deg cut and fix with clamps to the upper (red arrows on image) panel to avoid it sliding
upwards. Add a clamp to prevent the panel from sliding sidewards (green
arrow). Then
finally we can apply pressure to the panel (blue arrows), but make it slow and keep
checking edges. I made the side panels slightly bigger than needed.
Easier to sand off than to add...
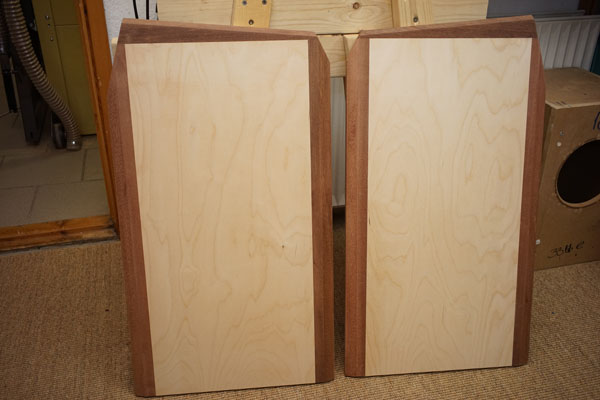
The side panels were made from laminating 20+10 mm BB (30 x 200 x 800 mm
block) and cutting it 8 deg from both sides and sawing the rest by hand
as my table saw only does 75 mm height. Quite tedious. The cuts were
smoothed by using the router sliding on an 8 deg. rig.
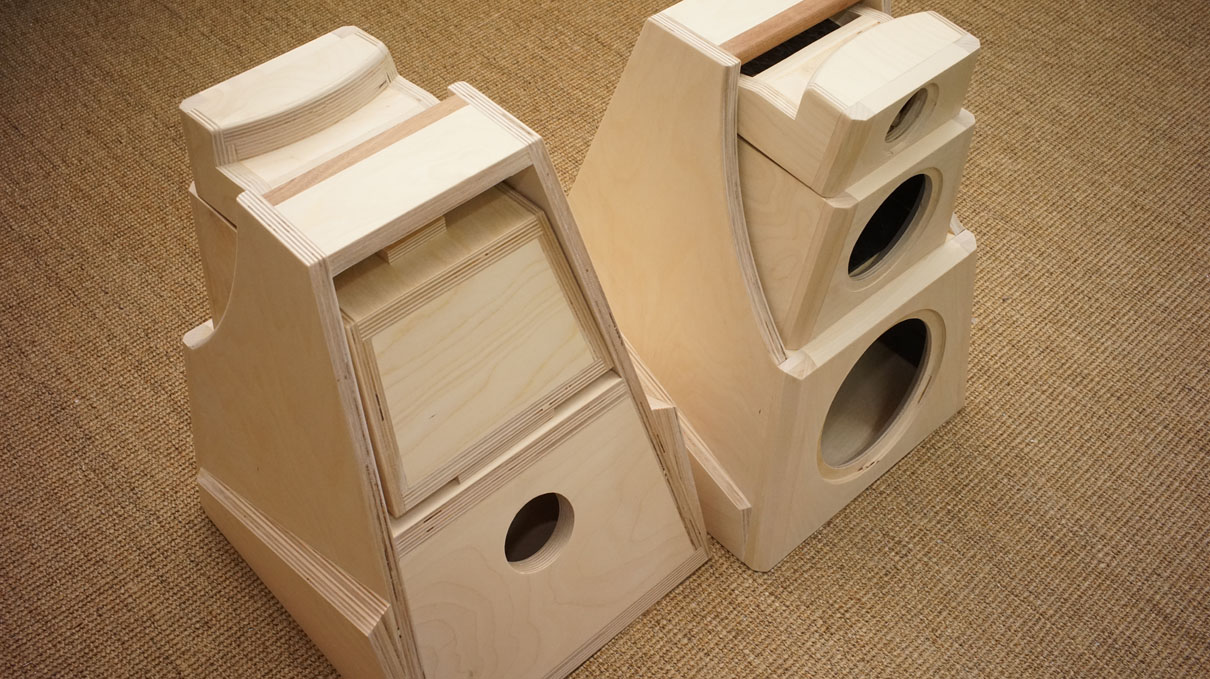
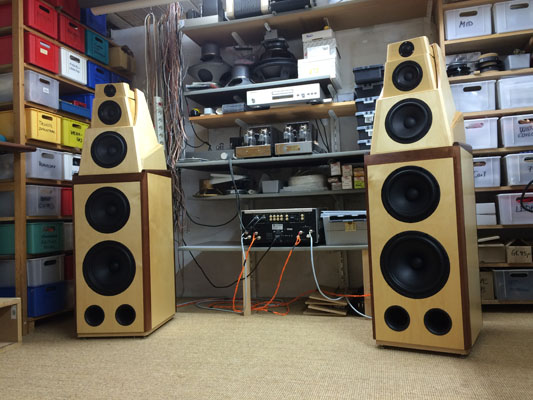
Eventually, after many hours of work; ready for lacquer.
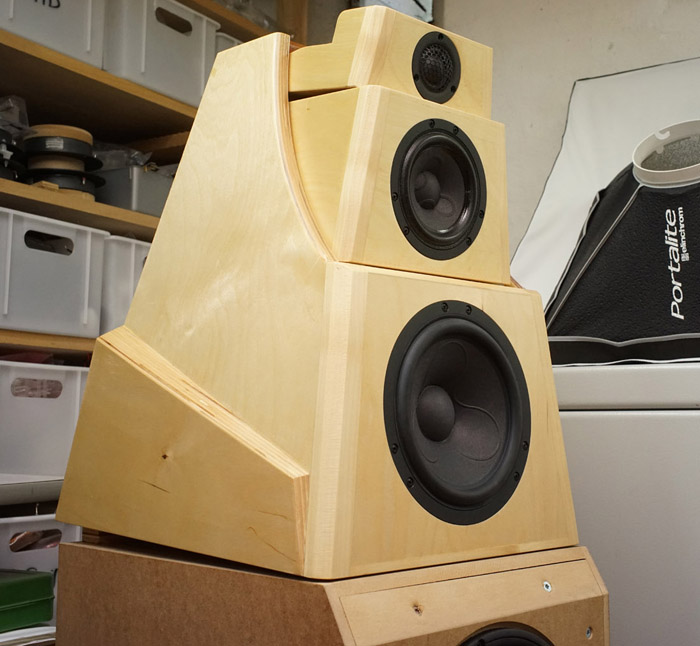
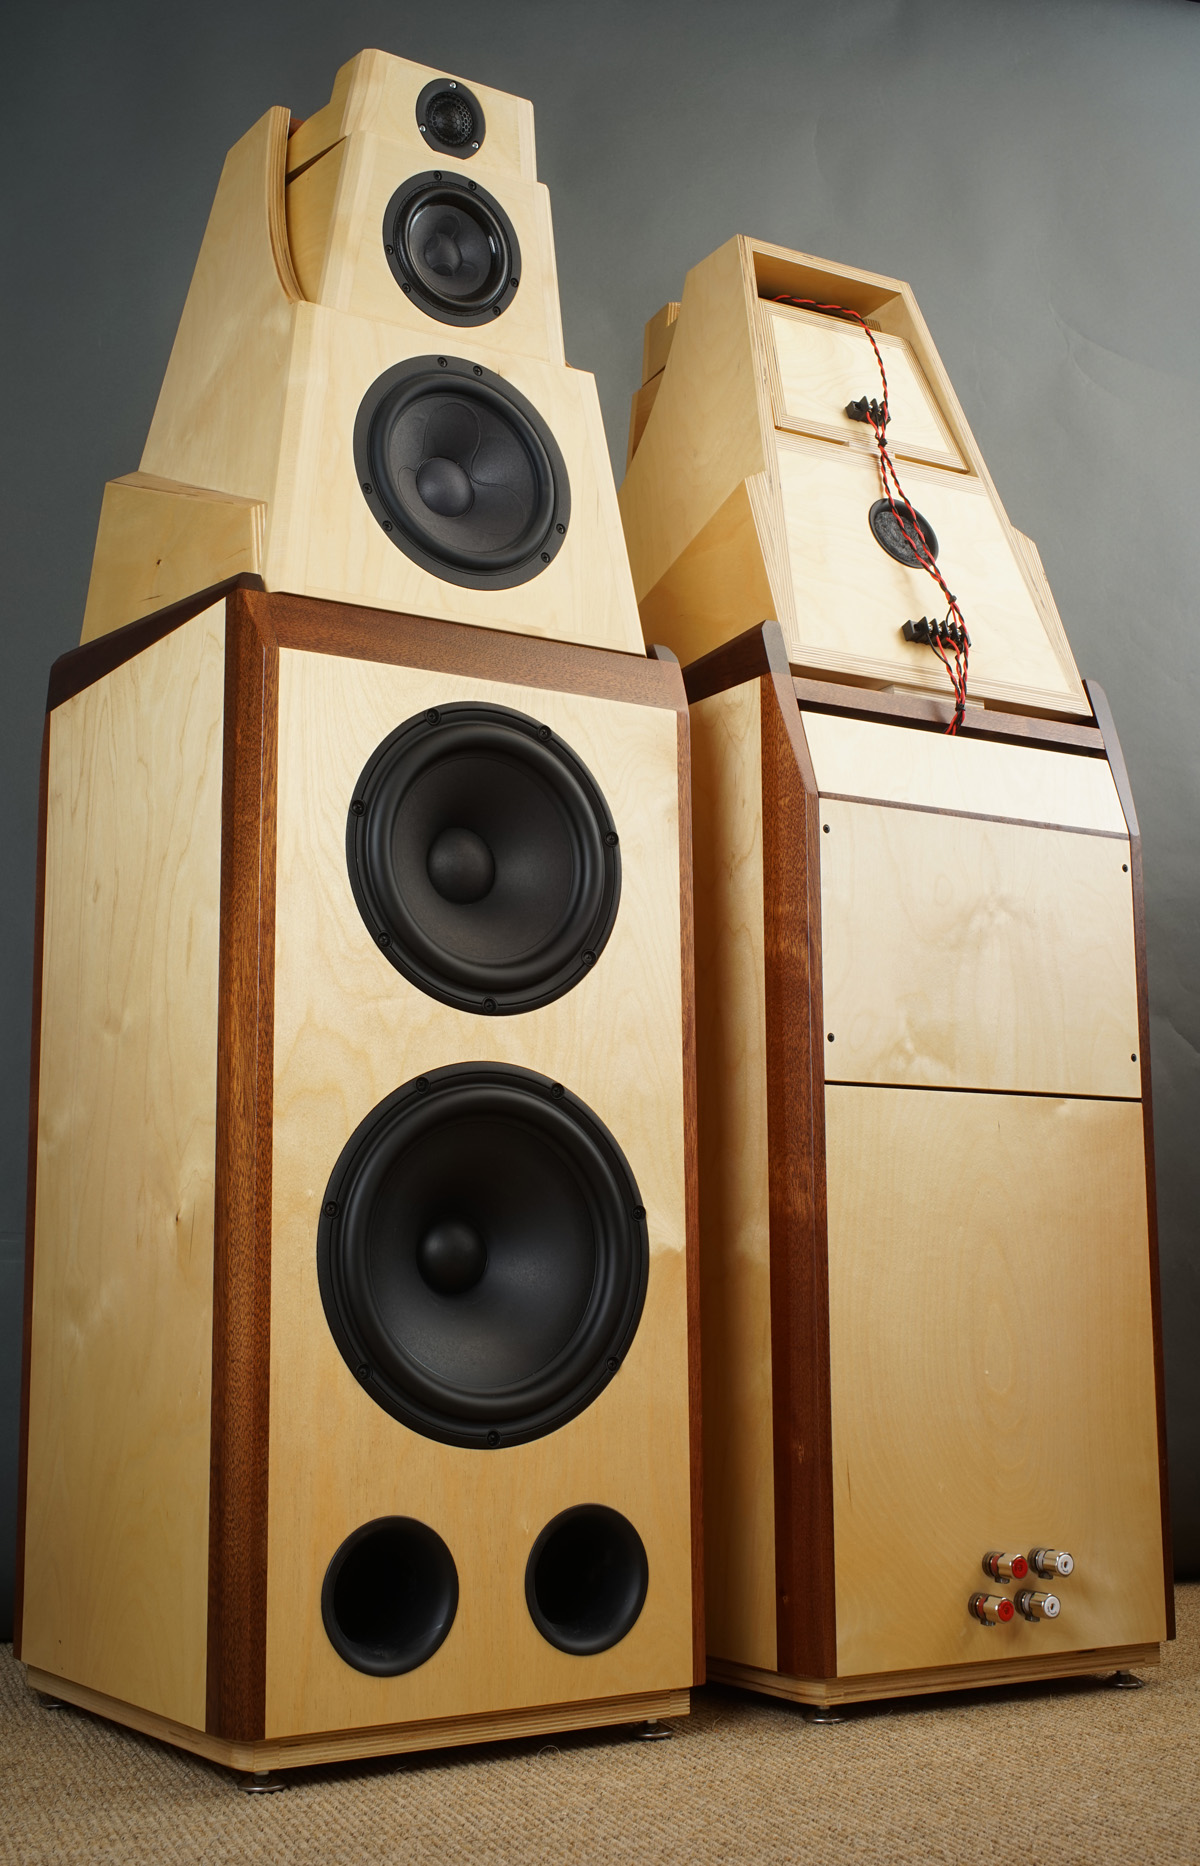
Added lacquer and fully mounted playing on top of test bass modules.
Getting the stuffed port for the 18WU in place helped considerably
compared to the closed box test cabinet. Better dynamics and more sense
of depth to the bottom end though this may sound strange. The 12MU cab
is closed at this point in time, but a small will be added here too to
hear what happens.
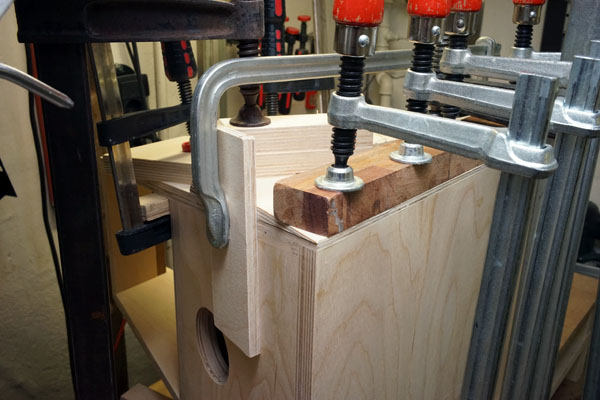
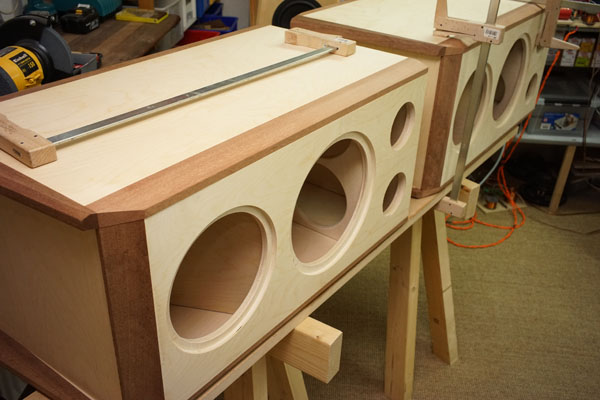
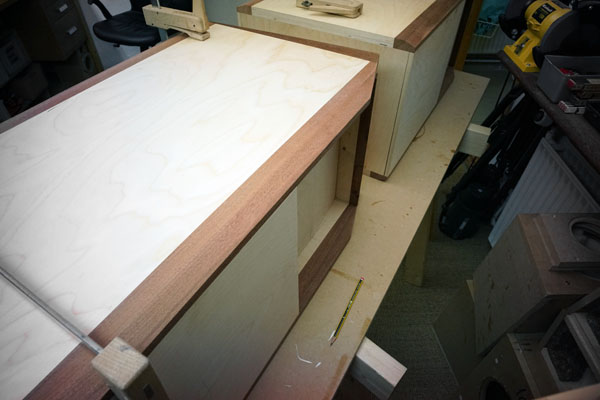
Side panels for bass modules shaping up.
At this point I had to start thinking of the MmT crossover layout to know the exact dimensions in order to design the rear part of the bass modules. To keep overall height the same as the ATS-4 I decided to omit the 50 mm base support and place the bass crossovers inside the bass module. Changes to the bass section crossover is unlikely once in place and no need for quick access.
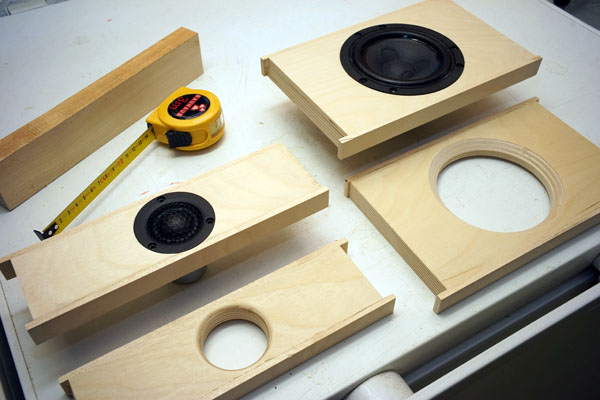
Cutting parts for the bass modules. Last thing to do is cutting final
width.
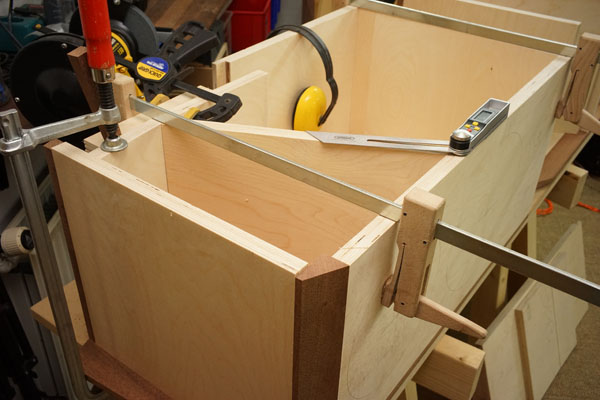
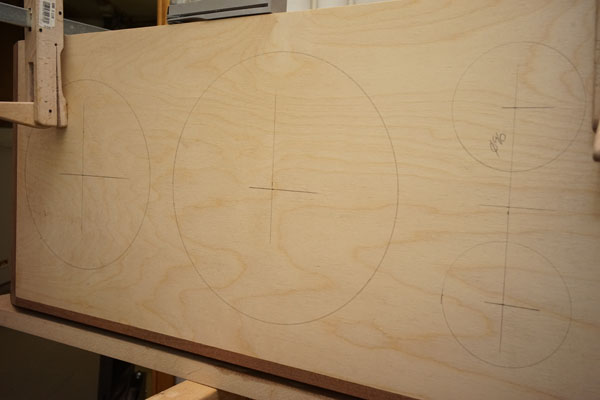
Doing internal panels for upper bass enclosure and marking drivers'
placement on front panel.
Right: Testing both side panels.
All panels between the two side panels were cut to 325 mm width at the
same time to make sure of a tight fit.
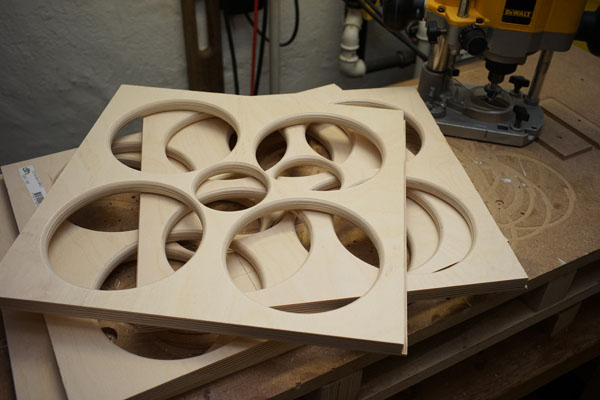
All bracings ready.
Above and below: First time all panel assembly.
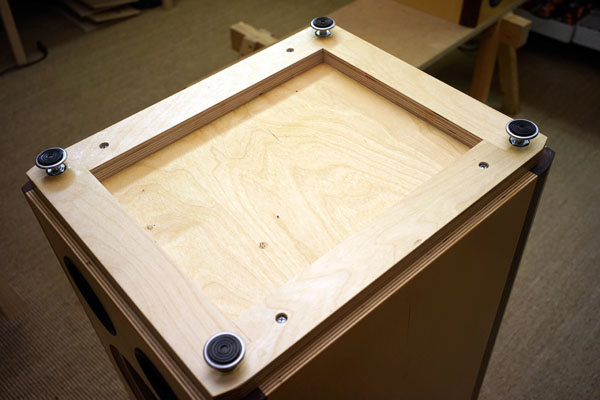
Adding the base frame for the adjustable feet.

Bass drivers and MmT crossover in place.
Rear cover panels and first time final set-up and - as always - sounding
better than the prototypes.
All internal panels are damped with 8 mm felt material supplied with the
kit. Exception is panel behind 26W driver where the crossover is placed
and the 26W upper panel towards 22W bass driver. In the compartment
above 26W, place a roll of 30 x 100 cm acoustilux.
On top of the bass crossover on rear panel behind 26W driver, place two
sheets of 25 x 30 cm acoustilux.
18WU cabinet: Rear compartment: Cover the floor, sides and rear
panel with acoustilux. Front compartment: Cover floor
and sides with acoustilux.
12MU cabinet: Cover sides, rear and
half bottom and top panels with
acoustilux. Bottom and top only half due to limited space around 12MU
driver.
FINAL SET-UP
The Illuminator-5 has a potent bass and don't place the speakers too
close to the corners. Tilt the MmT cabs according to your listening
height. I have some 10 mm blocks under all sections to suit my 3 meter
listening distance. The 18WU on-axis may be a little above listening
height, where 12MU and D3004 should point at your listening height. My
speakers a slightly toed in so that I can just see the inner side
panels.
Take you time finding the best placement and tilting of upper-mid and
tweeter cabs! If you have too much or too little bass, there's nothing I
can do about it. Your room is an amplifier and a vital part of your
system.
A few comments on MEASUREMENTS before you start
interpreting all the readings below.
First of all, if we think measurements will tell us how a speaker
sounds, we're wrong. The perception of sound is way too subjective to be
reflected in any measurements we can perform. A loudspeaker system is
meant to give us a satisfying idea of an acoustic event and for some
people a pair of 5 USD ear-plugs are enough, others spend 200 kUSD on a
truly full-range pair of speakers - and the latter may not be happier
than the former.
Measurements may give us an idea of tonal balance of a system, i.e. too
much or too little energy in certain areas. Measurements may tell us
about bass extension if far-field measurements are merged with
near-field measurements. In addition to this, ports may contribute to
bass extension. Most of us diy'ers do not have access to an anechoic
room for full-range measurements from 20-20000 Hz.
What cannot be seen is what kind of bass performance we get in a given
room. Bass performance is highly dependent on in-room placement of your
speaker and the same speaker can be boomy in one place and lean in
another. Actual SPL level at 1 meter distance and 2.8V input is useful
for en estimate of system sensitivity and combined with the impedance
profile may give an idea of how powerful an amplifier is needed to drive
the speaker to adequate levels.
What measurements do not tell is the very sound of the speaker unless
displaying serious linear distortion. The level of transparency, the
ability to resolve micro-details, the "speed" of the bass, etc., cannot
be derived from these data. Distortion measurements rarely tell much
unless seriously bad, and most modern drivers display low distortion
within their specified operating range.
Many people put way too much into these graphs and my comments here are
only meant as warning against over-interpretation. There are more to
good sound than what can be extracted from a few graphs. Every graph
needs interpretation in terms of what it means sonically and how it
impacts our choice of mating drivers, cabinet and crossover design.
What measurements certainly do not tell is the sonic signature of the
drivers, because cones made from polyprop, alu, Kevlar, paper, glass
fiber, carbon fiber, magnesium, ceramics or even diamonds all have their
way of colouring the sound.
Above response graphs from some of the initial stages of crossover
fine-tuning from prototype baffles. To the left the smooth roll-off profiles of the 18WU and 12
MU drivers. To the right the response graphs of individual drivers.
Points of crossover around 900 and 3100 Hz. The 12MU really handles an
important part of the lower treble response - and it does it well.
Overall a very smooth combined response.
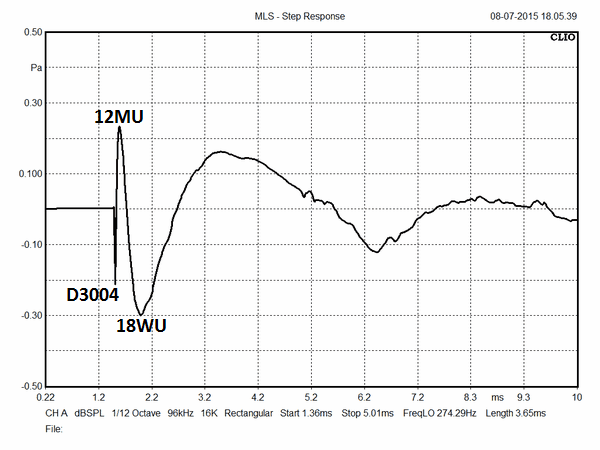
To the right we see what happens when we invert 12MU polarity. Deep
suck-outs are produced around points of crossover telling overall phase
integration performs well. Initially I had the 18WU and 12MU in the same
plane, but pulling back the 12MU some 20 mm gave the above result. To
the right the MmT step response showing negative polarity of tweeter and
18WU and positive polarity of 12MU.
Left: Un-smoothed response of final system including port contribution.
Don't put too much into what's below 200 Hz as this is made merging
far-field and near-field response and it can look quite different
depending on data manipulation. What cannot be seen is the overall
powerful bass response from this speaker and the bass punch due to the
22W being in a closed cabinet.
What can also not be seen is the low-level detail this speaker is
capable of due to the small 12MU midrange driver. Getting good
dispersion in upper-mid/lower treble is one element in low-level detail
along with low-loss drivers.
Right: Final system impedance (red) and electrical phase (black). My 80
wpc Jungson has no trouble running this speaker to thunderous levels.
Two graphs on horizontal dispersion. Left @ 0, 10, 20 and 30 deg. Right:
Here 40 and 50 deg included.
This ensures a very consistent power response regardless of listening
angle.
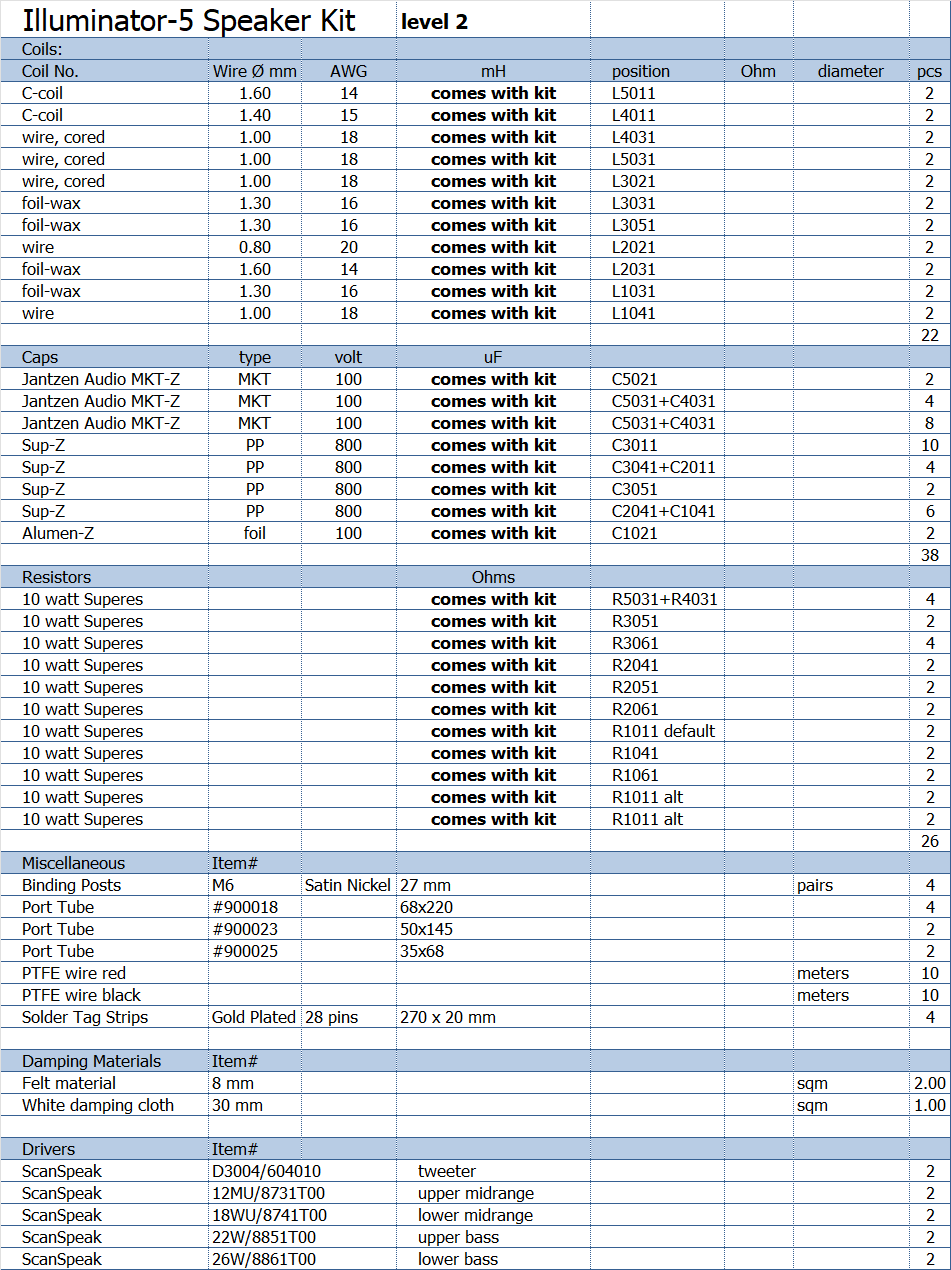
Complete kit only available from Jantzen Audio, contact@jantzen-audio.com
Crossover schematics only available with purchase of kit.
Kit can be bought with/without drivers -
or some of the drivers.
Above the level 2 kit. Level 1 has Amber-Z caps for tweeter.
Please state where you live for full quotation incl. shipping.
All kit and component prices may be subject to change and are always to be confirmed by Jantzen Audio Denmark.
Download Kit Sales presentations

All technical questions to me at troels.gravesen@hotmail.com
Complete kit only available from Jantzen Audio, contact@jantzen-audio.com
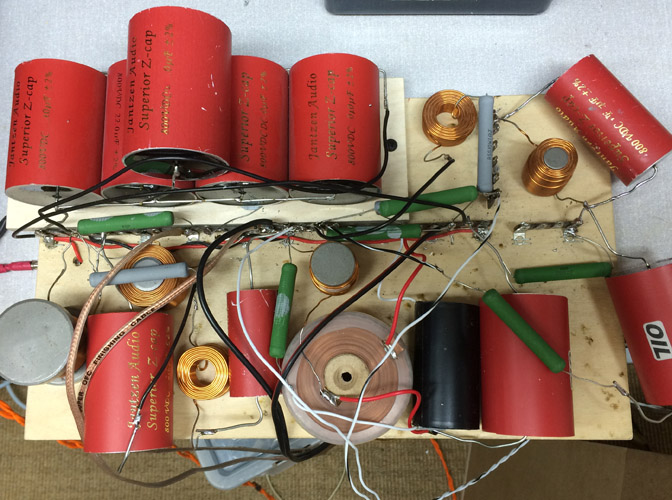
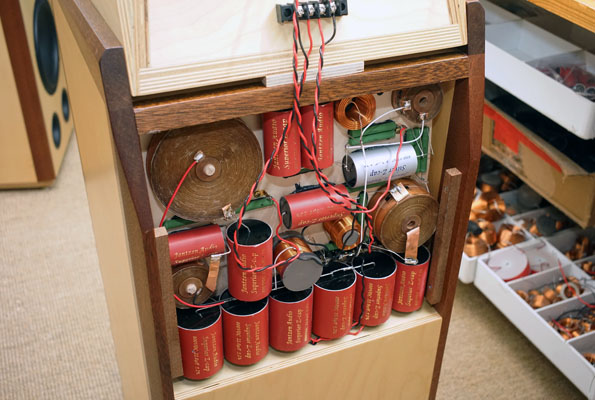
CROSSOVER-LAYOUT
BACK TO INDEX
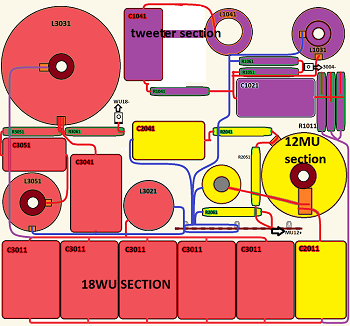
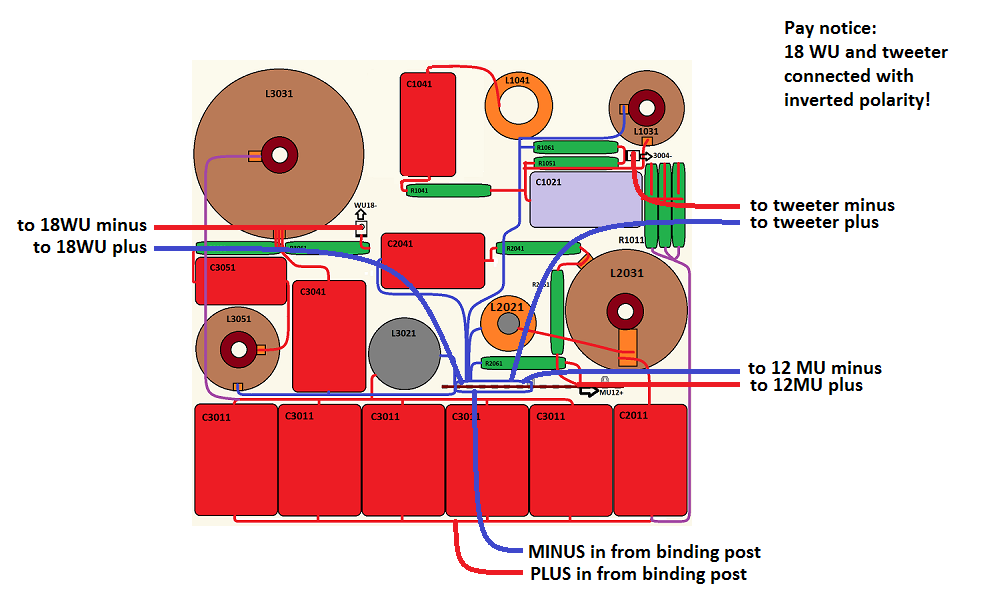
MmT SECTION
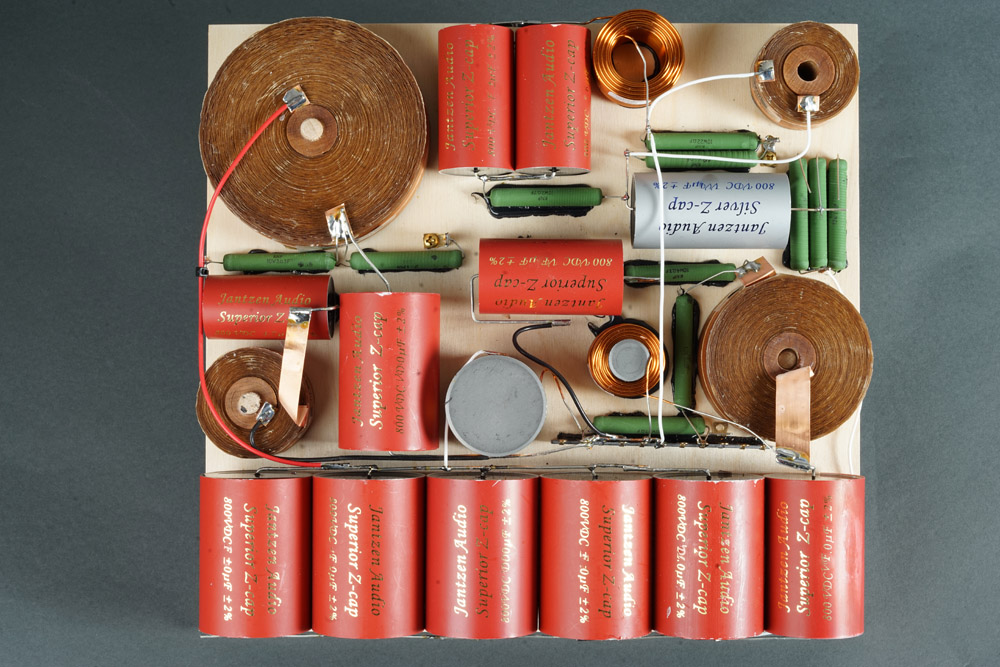
Crossover layout for 18WU/12MU/3004 section.
C1041 has been replaced by a single capacitor.
The board here is approx. 308 x 290 mm (width x height as seen above).
The exact width of all the caps at bottom is 306 mm.
Make sure your board can fit into the crossover compartment before doing
the layout.

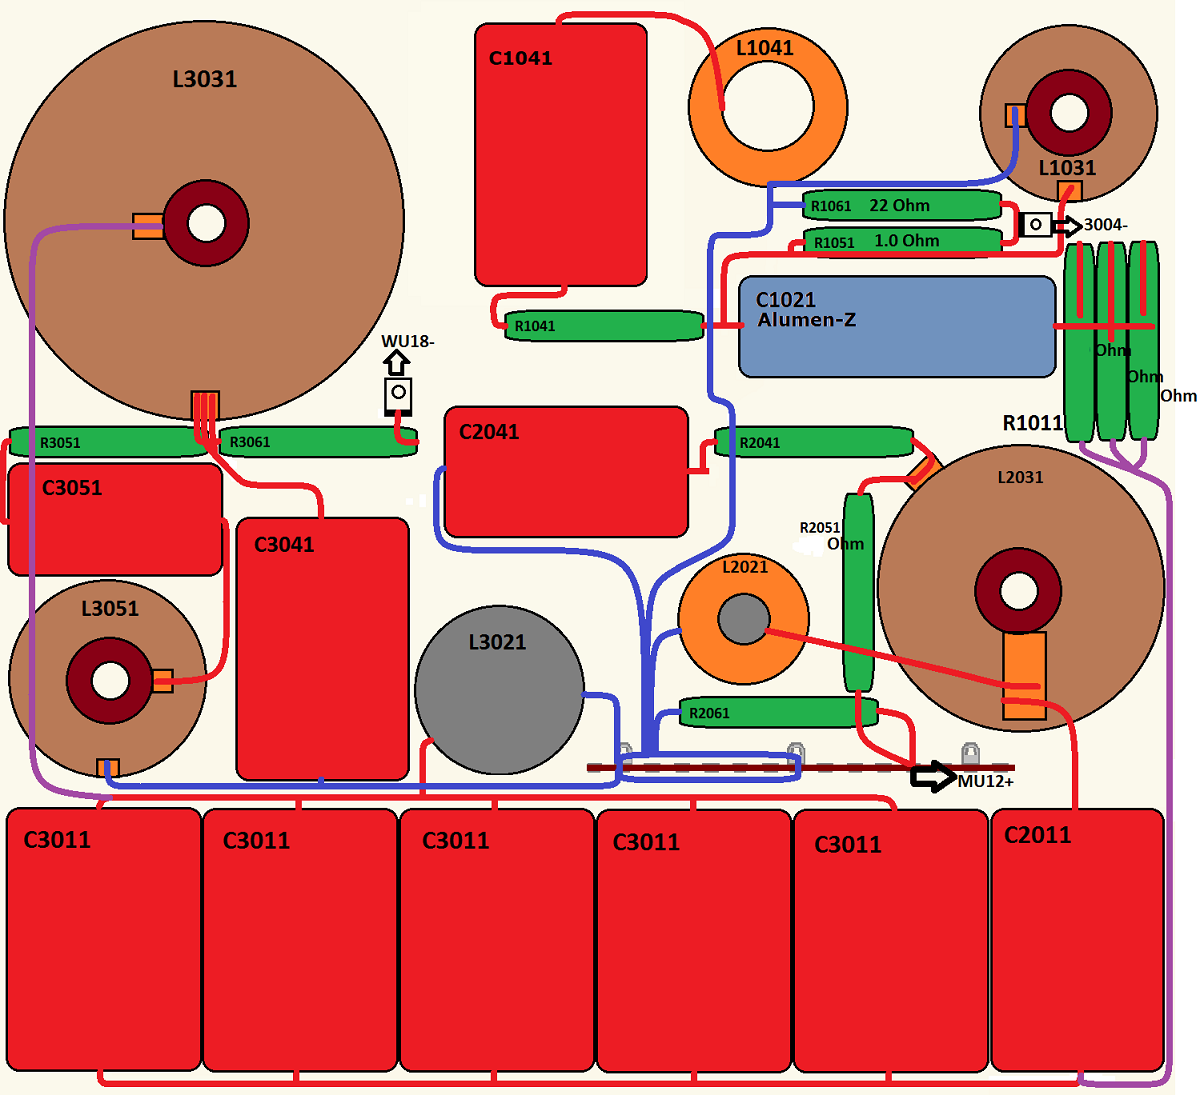
Layout.
BASS SECTION
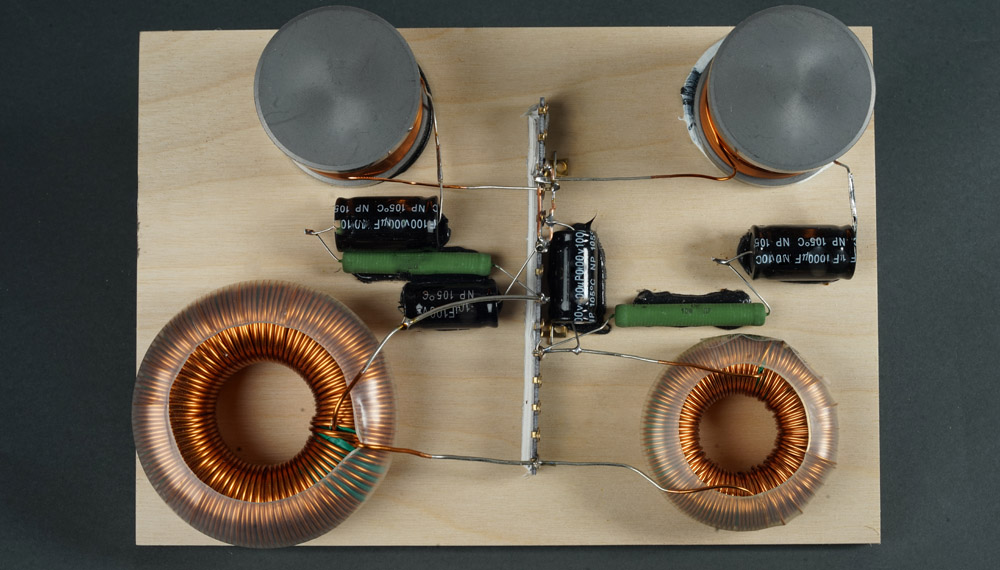
Crossover layout for 26W/22W section.
This section will be placed behind 26W driver on rear panel.
I cut off some of the length to the left before mounting.
All electrolytics are now replaced by Jantzen Audio MKT-Z caps.
These
are bigger than the electrolytics, but there is plenty of space on the
board, so keep the layout seen below.
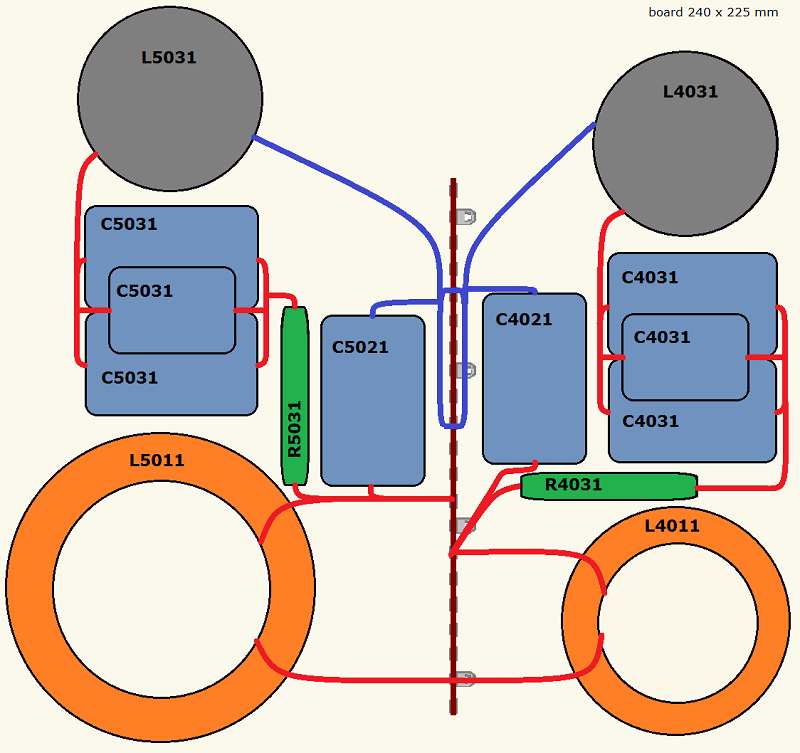
Bass section layout, W26 to the left, W22 to
the right.
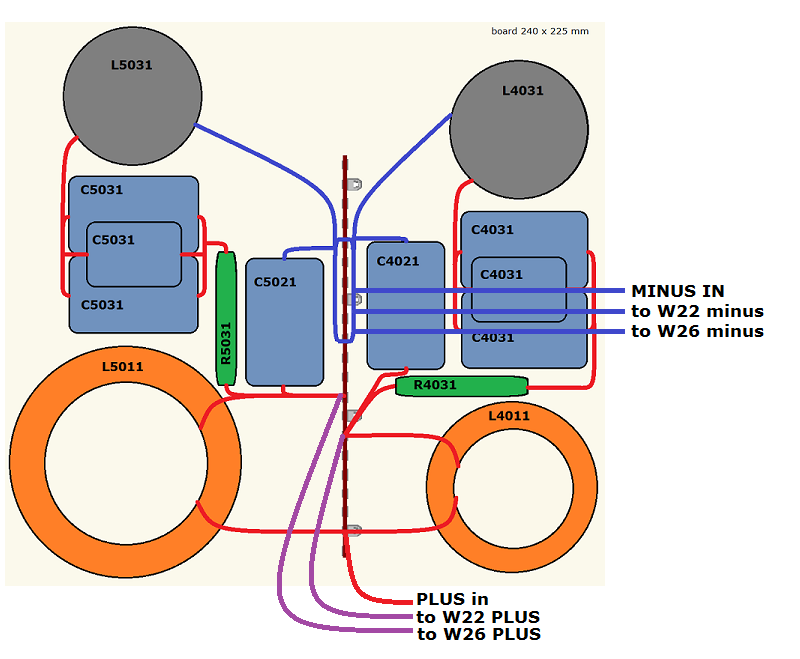
Wiring of bass section